Pulsar Axion Key Operating Instructions Manual

Категория
Удобное освещение
Тип
Operating Instructions Manual
AXION
KEY
Thermal Imaging Monoculars
Operating Instructions
English / Français / Deutsch / Español / Italiano / Русский
Thermal Imaging Monoculars AXION KEY 1-7 English
Operating Instructions
Imageurs Thermiques AXION KEY 8-14 Français
Mode d'emploi
Wärmebildkameras AXION KEY 15-21 Deutsch
Bedienungsanleitung
Generador de imágenes térmico AXION KEY 22-28 Español
Instrucciones de uso
Termovisori AXION KEY 29-35 Italiano
Istruzioni per l'uso
Тепловизор AXION KEY 36-42 Русский
Инструкция по эксплуатации
v.0719
SPECIFICATIONS
SKU#
AXION KEY Model
Microbolometer
Type
Resolution (pixels)
Frame refresh rate (Hz)
Pixel size (microns)
Optical specifications
Optical magnification (x)
Smooth digital zoom (x)
Digital zoom (x)
Relative aperture (D/f)
Minimum focusing distance (m/y)
Exit pupil diameter (mm/inch)
Angle of field of view (HxV), degrees
Angle of field of view, metres at 100m
Focusing range of eyepiece (dioptres)
Detection distance (deer type object), m (y)
Display
Type
Resolution (pixels)
Operational specifications
External power voltage
Battery type
Capacity
Rated output voltage
External power supply
Battery charge life in hours (at 22°C)
IP code (IEC60529) degree of protection
Operating temperature range
Dimensions (mm/inch)
Weight without batteries (kg/oz)
77424
KEY XМ22
uncooled
320x240
50
12
2
2-8
2/4
1.2
11 (12)
3
10
17.5
-4/+5
950
LCOS
960х720
3 – 4.2 V
Li-Ion Battery Pack АPS3
3200 mAh
DC 3.7 V
5 V (USB)
4
IPХ7
-10°С ... +40°С/+14F ... +104F
143x41x69/5.63х1.61х2.71
0.25/8.82
77425
KEY XМ30
uncooled
320x240
50
12
2,5
2.5-10
2/4
1.2
3 (3.28)
3
7,3
12.8
-4/+5
1300
LCOS
960х720
3 – 4.2 V
Li-Ion Battery Pack АPS3
3200 mAh
DC 3.7 V
5 V (USB)
4
IPХ7
-10°С ... +40°С/+14F ... +104F
149x49x70/5.87х1.93х2.75
0.27/9.52
Improvements may be made to the design and software of this product to enhance its user features.
The current version of the User manual may be found on the website www.pulsar-vision.com
AXION KEY monoculars can be used for night-time hunting, observation and terrain orientation, and carrying out
rescue operations.
AXION KEY IR-matrix (microbolometer) based thermal imaging monoculars are represented by a number of
models that differ in magnification and lens diameter. These devices are designed for use both at night-time and
during the day in difficult weather conditions (fog, smog, rain), as well as where obstacles are present that
impede the detection of a target (branches, tall grass, dense shrubs etc.). Unlike night-vision devices that are
based on electron-optical converters, thermal vision monoculars do not require an external light source and are
resistant to the effects of bright light.
DELIVERY PACKAGE
џ AXION KEY Thermal Imager
џ APS3 rechargeable battery
џ Power adapter
џ Warranty card
џ Case
џ USB cable
џ Hand strap
џ Quick start guide
џ Cloth for cleaning optics
DESCRIPTION
џ High magnification
џ Long detection distance
џ High-contrast HD Display.
џ Microbolometer pixel size of 12 microns
џ Functional and ergonomic design
џ Picture in picture (PiP) function
џ Short power-up time (quick start)
џ Three calibration modes (manual, semi-automatic and automatic)
Battery Pack
џ Various colour palettes
џ Lightweight and compact
џ USB charging option
џ IPX7 completely waterproof
џ Strengthened metal body
џ Convenient user interface
џ Quick-change APS3 Li-ion battery pack
џ Three observation modes (forest, rocks and identification)
џ Stadiametric rangefinder
DISTINGUISHING FEATURES
ENGLISH
1
1. Eyepiece dioptre adjustment ring
3. Menu button
2. Down button 
4. Up/Zoom button 
Device is powered on
5. On/Calibration ON button 
7. Lens cap
that glass wearers fold back the edge of the
6. Lens focus ring
9. Battery release button
8. MicroUSB connector
LED indicator displaying current status of the device
Device on / battery charge <10%
For a better viewing experience, we recommend
LED Indicator Operating Mode
elastic eyeshade.
USING THE RECHARGEABLE BATTERY
џ Attach the second plug of the microUSB cable to the
socket (12) of the mains charger (11).
џ Attach the USB plug on the USB cable (15) to the USB
connector on the mains device (16). Plug the
deviceinto a 100–240 V power outlet (17).
џ Two batteries can be charged at the same time – a
second slot is provided for this.
џ The LED indicator (13) will light up battery charge
status (see table).
Note: The PB8I Power Bank may be used as a charger
(see Item 7).
Option 2 (Fig.3) :
џ Insert the rechargeable battery (10) supplied with
your device, or purchased separately, fully along the
guide rail into the APS charger slot (аvailable
separately) (11).
џ Point A on the battery and Point B on the charger
should be aligned.
џ Install the battery (10) into its slot on the instrument
case (14) by aligning the icons to form a 'dot' on the
device and the battery. (see Fig. 4).
Charging the battery
AXION KEY thermal imagers are supplied with a
rechargeable APS3 Lithium-ion Battery Pack. The
battery should be charged before first use.
џ Connect the other end of the USB cable (15) to the
mains charger (16) or to a USB socket connected to
another power source with rated output of 5V or less.
џ Connect the mains charger (16) to the mains power
supply.
Option 1 (Fig.2) :
џ Attach a USB cable (15) to the microUSB connector
(8) on the device.
COMPONENTS AND CONTROLS
BUTTON OPERATION
123456
7 9 8
LED indicator
Fig.
1
2
Control
mechanism
Condition / Operating
Mode
1 short press Next short press Long press
ON button Device is powered off Power on the device Device calibration Power on the device
Display off Turn on display Device calibration Power off the device
Device turned on, quick
menu, main menu
Device calibration Display off / device
powered off
Up/Zoom
button
Device is powered on
Change magnification (Zoom)
PiP on/off
Quick menu Increase parameter Increase parameter
Main menu Navigation up, right Navigation up, right
Menu button Device is powered on Open quick menu Open main menu
Quick menu Navigation up Exit quick menu
Main menu Confirm value, enter menu options Exit menu options, exit
main menu
Down button Device is powered on Operating modes Color palettes
Quick menu Reduce parameter Reduce parameter
Main menu Navigation down, left Navigation down, left
џ Store the battery out of the reach of children.
џ When charging, always use the
charger supplied with your optical
device. The use of a different
charger may cause irreparable
damage to the battery or the charger and may cause the battery to ignite.
џ After being stored for a long time, the battery should be partially charged – it should not be fully charged or
completely discharged.
Battery charge from 20% to 60%.
џ Insert the battery (10) into the
assigned slot on the device casing
(14), aligning the images on the
instrument and the battery.
LED Indicator * Battery charge status
Installation:
Battery charge from 60% to 95%.
Battery charge from 0% to 10%; Charger connected to the mains power supply.
Battery defective. Battery should not be used.
Battery charge from 10% to 20%.
џ The battery should be charged at a temperature of between C and +45° C, otherwise the battery life will be
significantly reduced.
* The LED indicator displays the current level of charge of the battery for 30 seconds when the APS charger is not
plugged in. When the power is connected, the display shows the current status of the battery constantly, the LEDs
additionally flickering to indicate the battery charging process.
џ Do not subject the battery to shocks or falls.
џ Do not use the battery in temperatures that exceed those shown in the table this may shorten battery life.
Battery charge status (see table).
џ Do not leave the battery unattended during charging.
џ Do not charge the battery immediately after bringing it from the cold into a warm atmosphere. Wait 30–40
minutes for the battery to warm up.
џ Do not expose the battery to high temperatures or naked flame.
џ Do not use the charger if it has been modified or damaged.
Battery charge from 0% to 10%; Charger not connected to the mains power supply.
џ The connecting of third-party devices with an energy consumption greater than permissible is not
recommended.
џ When properly installed, the
battery is locked into the slot with
a special clip.
џ To remove the battery, press the
Battery Release button (9).
џ The battery is equipped with a short circuit protection system. However, situations that may lead to short
circuiting should be avoided.
џ Do not dismantle or deform the battery.
џ The battery is not intended to be immersed in water.
џ Where the battery is used in below-zero temperatures, capacity will decrease. This is normal and does not
indicate a defect.
Safety measures:
Battery completely charged. Can be disconnected from the charger.
џ Do not leave a charger with a battery connected to the mains for more than 24 hours after full charge.
EXTERNAL POWER SUPPLY
џ The device will switch to operation from the external power source, while the APS3 battery will be gradually
recharged.
External power is supplied from an external source, such as a 5V Power Bank.
џ When the external power supply is disconnected, the device switches to the internal power supply without the
device powering off.
џ An icon of a battery will appear on the display showing its charge as a percentage.
џ Attach the external power source to the device's USB connector (8) (Fig. 1)
џ If the device is operated from an external power source and the APS3 battery is not connected, an icon is
displayed .
OPERATION
ATTENTION! The lens of the device must not be pointed at any sources of intense energy, such as laser-emitting
devices or the sun. This may damage the electronic components in the device. Damage caused by failure to
comply with the operating guidelines is not covered under warranty.
џ Adjust the resolution of the icons on the display by rotating the dioptre adjustment ring on the eyepiece (1). In
future, it will not be necessary to rotate the eyepiece dioptre adjustment ring, regardless of distance and other
conditions.
џ Turn the device off after use with a long press of the ON button (5).
џ Adjustment of brightness and contract in the display, as well as turning on the smooth digital zoom, are
described in the FAST ACCESS MENU FUNCTIONS section.
џ To focus on the object being observed, rotate the lens focus ring (6). Axion XM22 does not require lens focusing.
џ Remove the lens cover (7). Secure the cover to the strap using the magnet built into the cover.
Switching on and adjusting the image
џ Power up the device by pressing the ON button (5).
CALIBRATING THE SENSOR
џ M mode (manual). Secure the lens cap and briefly press the ON button (5). After completing the calibration
process, remove the lens cap.
Calibration enables the microbolometer temperature background to be equalised and defects in the image
(such as vertical lines, phantom images etc.) to be eliminated.
Select the required mode in the CALIBRATION section of the menu .
There are three calibration modes: manual (M), semi-automatic (SA) and automatic (A).
џ SA mode (semi-automatic). Calibration is engaged by a brief press of the ON button (5). The lens cap need not
be secured (the sensor is closed by an internal shutter).
џ A mode (automatic). The device is calibrated autonomously, in accordance with the software algorithm. The
lens cap need not be secured (the sensor is closed by an internal shutter). In this mode, the device may be
calibrated by the user using the ON button (5) (in semi-automatic mode).
DISCRETE DIGITAL ZOOM
The device's functionality offers the possibility of quickly increasing its base multiplicity (see the table of
technical properties in the Digital Zoom line) by a factor of 2 or 4. Adjust the digital zoom accordingly by pressing
the DOWN button (2).
THE QUICK ACCESS MENU FUNCTIONS
џ A short press of the Menu button (3) enables you to switch between functions.
џ Enter the menu with a short press of the Menu button (3).
The basic settings (brightness and contrast adjustment, use of the smooth digital zoom function and the
stadiametric rangefinder) are changed via the Quick Access Menu.
3
Tab 1 Tab 2
General view of the menu
Menu General SettingMenu Mode
PIP
Off
Hot White
Automatic
10
Calibration
Mode
Selection of calibration mode There are three calibration modes: manual, semi-automatic
and automatic.
џ Press and hold the Menu button (3) to enter the menu.
џ Select the 'Calibration Mode' option.
Automatic
Calibration requirements in the automatic mode are determined programmatically, with the
calibration process being started automatically.
Manual
Semi-automatic
џ A short press of the Menu button (3) confirms the selection.
џ A short press of the Menu button (3) opens the submenu.
џ Select one of the calibration modes described below with the UP (4) / DOWN (2) buttons.
Manual calibration. Close the lens cap before beginning calibration.
The user independently sets the calibration requirements (according to the image being
observed).
MAIN MENU FUNCTIONS
џ Automatic exit from the menu occurs after 10 seconds of inactivity.
џ To exit the menu, press and hold down the Menu button (3).
џ When exiting the menu, the cursor location ( ) is remembered only for the duration of the one working session
(i.e. until the device is powered off). The next time the device is powered on and the menu is accessed, the cursor
will be at the first item on the menu.
џ Press the UP (4) / DOWN (2) buttons to move through the menu functions.
џ One short press of the Menu button (3) opens a menu item.
џ Enter the menu with a long press of the Menu button (3).
џ Menu navigation is be means of scrolling. When the last item on the first tab is reached, navigation moves to
the first item of the second tab.
Brightness by pressing the UP (4) / DOWN (2) buttons and changing the display brightness value from 00 to
20.
Contrast by pressing the UP (4) / DOWN (2) buttons and changing the display contrast value from 00 to 20.
Stadiametric rangefinder press the UP (4) / DOWN (2) buttons to change the position of the markings for
determining the distance of the object being observed (see Section 16 for further information on the
rangefinder).
To exit the menu, press and hold down the Menu button (3), or wait 10 seconds for automatic selection.
The initial smooth digital zoom factor displayed is equal to x1.0 if the discrete zoom is inactive, x2.0 if is 2x, and
x4.0 if 4x.
Smooth digital zoom by pressing the UP (4) / DOWN (2) buttons and changing the digital zoom value from 1.0
to 4.0. The increment size of the digital zoom is 0.1.
Note. Current magnification is calculated as the product of the base magnification and the smooth digital zoom
ratio. Example: where the basic device magnification is 3.0x and the smooth digital zoom ratio is x1.7, the actual
magnification is 5,(3,0*1,7). The next time the device is turned on, the image is projected onto the display with
the brightness and contrast settings saved from the previous power off.
Mode
The devices have three operating modes: FOREST (observation mode of objects within low
thermal contrast conditions), IDENTIFICATION (high zoom mode), ROCKS (observation mode
of objects within high thermal contrast conditions). Each mode has been created to provide
the best image quality of a wild nature object being observed within various observation
conditions.
џ Select the ‘Mode’ option.
џ A short press of the Menu button (3) opens the menu.
џ Press and hold the Menu button (3) to enter the menu.
џ Select one of the settings described below with the UP (4) / DOWN (2) buttons.
FOREST MODE This is the best mode when searching and observing within field
conditions, against the background of leaves, bushes and grass. The mode is highly
informative about an object being observed as well as landscape details.
џ Short press of the DOWN button (2) activates the switching of the operating modes.
џ A short press of the Menu button (3) confirms the selection.
ROCKS MODE This is the best mode when observing objects after a sunny day or within
urban conditions.
IDENTIFICATION MODE This is the best mode when observing objects within adverse
weather conditions (fog, mist, rain and snow). It allows you to recognize the characteristics of
an object being observed more clearly. Zoom increase may be accompanied by insignificant
image graininess.
џ Quick activation of the operating modes is possible by using the DOWN button (2).
Icon
brightness
џ A short press of the Menu button (3) opens the submenu.
џ Select the 'Icon Brightness' option.
Adjusting icon brightness.
џ Press and hold the Menu button (3) to enter the menu.
џ Select the brightness level of the pictograms with the UP (4) / DOWN (2) buttons.
џ A short press of the Menu button (3) confirms the selection.
General
Settings
This menu item allows you to program the following settings
Choose Language
џ To save your choice and exit the submenu, press and hold down the Menu button (3).
џ Confirm your selection with a short press of the Menu button (3).
џ Select one of the available interface languages (English, French, German, Spanish or
Russian) with the UP (4) / DOWN (2) buttons.
џ Enter the 'Language' submenu with a short press of the Menu button (3).
Language
Composition and description of the menu
4
Date
џ Set the required year, month and day with the UP (4) / DOWN (2) buttons. Press the Menu
button (3) to move through the digits.
Setting the Date
џ To save your chosen date and exit the submenu, press and hold down the Menu button (3).
џ Enter the 'Date' submenu with a short press of the Menu button (3). The date appears in
dd/mm/yyyy format.
Time
џ Enter the 'Time' submenu with a short press of the Menu button (3).
џ To save your chosen time and exit the submenu, press and hold down the Menu button (3).
џ Set the hour by pressing the UP (4) / DOWN (2) buttons.
џ Press the Menu button (3) to move to the minute setting.
Setting the Time
џ Press the Menu button (3) to move to the hour setting.
џ Select the time format (24-hour clock or AM/PM) by pressing the UP (4) / DOWN (2) buttons.
џ Set the minute by pressing the UP (4) / DOWN (2) buttons.
Units of
Measurement
M
Y
џ Enter the 'M/Y' submenu with a short press of the Menu button (3).
Selecting a unit of measurement
џ Return to the submenu occurs automatically.
џ Set the unit of measurement (metres or yards) by pressing the UP (4) / DOWN (2) buttons;
then press the Мenu button (3) .
M
Y
Default
Settings
Restore Factory Settings
џ Enter the 'Default Settings' submenu with a short press of the Menu button (3).
џ Select the 'YES' option to reset to factory settings or 'NO' to cancel with the UP (4) / DOWN (2)
buttons.
џ Confirm your selection with a short press of the Menu button (3).
Note: When resetting to factory settings the date/time settings and the user pixel map are
saved.
џ If the NO option has been selected, formatting will be cancelled and the submenu will
reappear.
Calibration mode automatic
The following settings will be restored to their factory state before being set by the user:
џ If the YES option has been selected, the message 'Do you want to return to default settings?'
will appear together with options YES and NO. Select YES to format the memory card.
Language English
Magnification original value
Operating mode video
Mode forest
Colour palette Hot White
Unit of measurement metres
Removal of
Defective Pixels
When using the device, defective (broken) pixels may appear on the sensor: i.e. bright or dark
points of constant brightness that are visible on the image. AXION KEY thermal imagers offer
the possibility of removing any defective pixels on the sensor programmatically, as well as to
cancel any deletion.
џ Open the submenu by pressing the Menu button (3).
џ A marker will appear on the left side of the display.
џ A magnifying glass will appear on the right side of the display – an enlarged image with a
џ Select the icon with a short press of the Menu button (3).
џ To exit the ‘Delete defective pixels’ function, press and hold down the Menu button (3).
џ Select the icon and press the Menu button (3).
џ Confirm your selection with a short press of the Menu button (3).
fixed cross  that is required to facilitate a search for the defective pixel and to align the
marker with it. There are horizontal and vertical directional arrows to move the marker
џ Use the UP (4)/DOWN (2) buttons to move the marker to align its centre with the defective pixel.
џ A short press of the Menu button (3) switches the marker direction from the horizontal to the
vertical and vice versa.
џ Where a pixel has been successfully deleted, the word ‘OK’ will appear briefly on the screen.
џ Then, by moving the marker across the display, you can delete the next defective tile.
џ Using the UP (4) and DOWN (2) buttons, align the defective pixel with the fixed cross in the
frame the pixel should disappear.
џ Delete the defective pixel with a short press of the On/Calibration ON button (5).
Return all defective pixels previously disabled by the user to their original state:
with the coordinates along the X and Y axes.
џ Open the submenu by pressing the Menu button (3).
џ Select 'YES' if you want to return to the factory pixel map and 'NO' if you do not.
Attention! One or two pixels on the imager display in the form of black, bright white or
coloured (blue or red) dots may appear. These are not a defect.
Return to
factory
'pixel map'
џ USB connection (if the device is connected)
џ Calibration mode (when in automatic calibration mode with 3 seconds remaining until automatic calibration, a
countdown timer will appear in place of the calibration icon).
The status bar is located at the bottom of the display and displays information relating to the operational status
of the device, including:
џ Colour palette (displayed only when the Hot Black palette is installed)
џ Observation mode
џ Current full magnification
џ Current time
џ External power supply indicator (when the device is powered from an external supply)
џ Battery discharge level (when the device is powered by the rechargeable battery)
Note: when calibration is in progress, the display image freezes for the duration of the calibration
SA
11.0x 08:13PM
STATUS BAR
STADIAMETRIC RANGEFINDER
Thermal imagers are fitted with a stadiametric rangefinder that enables the distance to an object to be defined
where its size is known.
џ Bars will appear on the display to determine the distance, icons of three objects and digits of the estimated
distance of these three objects.
џ The stadiametric rangefinder function is accessed by a short press of the Menu button (3) and selecting the
icon .
џ Place the lower fixed cursor beneath the object and, with the UP (4) / DOWN (2)
navigation buttons, move the upper horizontal cursor relative to the lower
Deer height 1.7 m
Boar height 0.7 m
Hare height 0.3 m
There are three pre-set values for objects:
160m
66m
28m
5
PiP FUNCTION
џ To alter the zoom ratio in the PiP window, briefly press the UP button (4).
џ The remaining image is displayed with the optical zoom value which corresponds to the value of the x1.0
coefficient.
џ A short press of the Menu button (3) switches the mode on/off.
PiP (Picture in Picture) enables you to view a magnified digital zoom image
in a separate 'window' simultaneously with the main image.
Enabling/disabling the PiP function:
џ Press and hold the Menu button (3) to enter the main menu.
џ Select the 'PiP Mode' option
џ Press and hold the Menu button (3) to exit the main menu.
џ The enlarged image is displayed in a separate window using the full optical zoom value.
џ When PiP is turned off, the image is displayed with the optical zoom value set for the PiP mode.
џ When the PiP is turned on, you can control the discrete and smooth zooms. In this instance, the full optical
magnification value will appear only in the separate window.
PIP
6.9x
3.1x
TECHNICAL INSPECTION
A technical inspection of the device is recommended before each use. Check:
џ The external appearance of the device (there should be no cracks in the casing).
џ The condition of the lens and eyepiece (there should be no cracks, greasy spots, dirt or other deposits).
џ The condition of the rechargeable battery (this should be charged) and the electrical contracts (there should
be no presence of salts or oxidation).
џ The controls should be in working order.
MAINTENANCE
џ Maintenance should be carried out at least twice a year and consist of the following actions.
џ Clean the electrical contacts of the battery and battery slot on the unit using a non-greasy organic solvent.
џ Check the glass surfaces of the eyepiece and the lens. If necessary, remove dust and sand from the lenses
(preferably using a non-contact method). Cleaning of the external surfaces of the optics should be done with
substances designed specially for this purpose.
џ Wipe the external surfaces of metal and plastic parts free of dust and dirt with a cotton cloth Silicone grease
may be used for this.
This function disables the transfer of images to the display, reducing the intensity of its illumination to a
minimum. This helps prevent inadvertent unmasking. The device will continue to function.
џ When this function is in use, the device switches to standby mode, which allows it to be quickly turned off, if
necessary.
џ When the device is switched on, press and hold the ON button (5). The display will disappear and the message
'Display off.' will appear.
Then the device will turn off.
џ To switch on the display, press the ON button (5) briefly.
џ When the ON button (5) is held, the display will show 'Display off.' and a countdown.
DISPLAY OFF FUNCTION
џ If the distance is not determined within 10 seconds, the information disappears from the display.
horizontal fixed cursor so that the object is positioned between the cursors. An automatic recalculation of the
distance to the target occurs simultaneously with this movement.
џ Go to the relevant item on the menu to select a unit of measurement (metres or yards).
џ To exit the rangefinder mode, press the Menu button (3) briefly, or wait 10 seconds for automatic exit.
џ A distance value is rounded up or down before appearing on the display to 5 metres for longer distance
readings and 1 metre for shorter distance readings.
Connecting the device to a computer used as an external power source.
џ Switch the device on by pressing the ON button (5) (the computer will not
detect the device if it is turned off).
џ Connect one end of the USB cable to the device’s microUSB connector (8) and
the other end to the port on your computer.
џ When this option is selected, the computer is used by the device as an external power source. An icon will
appear in the status bar . The device will continue to function and all functions are available.
џ The battery installed in the device will not be charged.
џ If a video was being recorded at the time of connection, the recording will cease and be saved.
џ The device is detected automatically by the computer and no installation of drivers is required.
џ When disconnecting the USB from the device when connected in Power Mode, the device will continue to
function on battery power, if present and sufficiently charged.
USB CONNECTION
COLOR PALETTES
Hot Red
Ultramarine
Hot White
џ To enable the alternative palettes described below and to toggle between them, press the DOWN button (2)
long.
Hot Black
The principal display mode for an observed image is 'Hot White'.
A black and white palette (cold temperature corresponds to white, and hot temperature to black).
Sepia
A black and white palette (cold temperature corresponds to black, and hot temperature to white).
Colour palettes:
Rainbow
TROUBLESHOOTING
This table lists all the problems that may arise when operating the device. Carry out the recommended checks
and repairs in the order shown in the table. If a defect should occur that is not listed in the table, or if it is
impossible to repair the defect yourself, the device should be returned for repair.
USB connection
Use as power
6
In positive temperature conditions, objects being observed (surroundings and
background) heat up differently because of thermal conductivity, thereby generating
a high temperature contrast. Accordingly, image quality produced by the device will
be higher.
In low-temperature conditions, objects being observed (background) do, as a rule,
cool down to roughly the same temperature, because of which temperature contrast
is substantially reduced and image quality (detail) is poorer. This is a feature of
thermal imaging devices.
By following the link below you can find answers to the most frequently asked
questions about thermal imaging https://www.pulsar-nv.com/glo/support/faq/79
Environment protection first!
Your appliance contains valuable material which can be recovered or recycled.
Leave it at a local civic waste collection point.
Attention! AXION KEY thermal imagers require a licence when exported outside your country.
Electromagnetic compatibility.
This product complies with the requirements of European standard EN 55032: 2015, Class A.
Caution: Operating this product in a residential area may cause radio interference.
The term of possible repair of the device is five years.
Coloured lines
appeared on display
or image has
disappeared.
Image is too dark.
Thermal imager does
not power up.
Malfunction
Image is unclear, with
vertical lines and
uneven background.
Does not operate
from external power
source.
When used in low
temperature
conditions, image
quality of the
surroundings is
worse than in
positive temperature
conditions.
Poor image quality /
reduced detection
distances.
The device was exposed to static
electricity during operation.
USB cable damaged.
Low brightness or contrast level set.
Possible reason
Battery completely discharged.
External power source discharged.
Calibration required.
Perform image calibration according to
Section 'Operation' of the Instructions.
Correction
Charge the battery.
Replace USB cable.
Charge external power source (if
necessary).
Adjust brightness or contrast.
After exposure to static electricity, the
device may either reboot automatically,
or require turning off and on again.
These problems may occur during observation in difficult weather conditions (snow,
rain, fog etc.).
7
SPECIFICATIONS
SKU#
Modèle AXION KEY
Microbolomètre
Type
Résolution (pixels)
Fréquence de rafraîchissement d'image (Hz)
Taille pixels (microns)
Spécifications optiques
Grossissement optique (x)
Zoom numérique continu (x)
Zoom numérique (x)
Ouverture relative (D/f)
Distance minimum de mise au point (m)
Diamètre pupille de sortie (mm)
Angle du champ de vision (horizontal), degrés
Angle du champ de vision, mètres à 100 m
Distance de mise au point de l'oculaire (dioptries)
Distance de detection (m)*
Affichage
Type
Résolution (pixels)
Spécifications opérationnelles
Tension d'alimentation extérieure
Type de batterie
Capacité
Tension de sortie nominale
Alimentation extérieure
La durée de charge de la batterie en heures (à 22°C)
Code IP (IEC60529) degré de protection
Plage de températures d'utilisation
Dimensions (mm)
Poids sans batteries (kg)
77424
KEY XМ22
Non refroidi
320x240
50
12
2
2-8
2/4
1,2
11
3
10
17,5
-4/+5
950
LCOS
960х720
3 – 4,2 V
Bloc batterie Li-Ion АPS3
3200 mAh
DC 3.7 V
5 V (USB)
4
IPХ7
-10°С ... +40°С
143x41x69
0,25
77425
KEY XМ30
Non refroidi
320x240
50
12
2,5
2,5-10
2/4
1,2
3
3
7,3
12,8
-4/+5
1300
LCOS
960х720
3 – 4,2 V
Bloc batterie Li-Ion АPS3
3200 mAh
DC 3.7 V
5 V (USB)
4
IPХ7
-10°С ... +40°С
149x49x70
0,27
* pour un animal, comme un chevreuil
Des améliorations peuvent être apportées à la conception et au logiciel de ce produit pour améliorer ses
fonctionnalités pour l'utilisateur.
Une version mise à jour du mode d'emploi peut être obtenue sur le site web www.pulsar-vision.com
Les monoculaires AXION KEY peuvent être utilisés pour la chasse de nuit, l'observation et l'orientation sur le
terrain, et également pour effectuer des opérations de sauvetage.
Les monoculaires d'imagerie thermique à matrice IR (microbolomètre) AXION KEY sont représentés par plusieurs
modèles qui diffèrent par le grossissement et le diamètre de lentille. Ces appareils sont conçus pour être utilisés
à la fois de nuit et de jour dans des conditions météo difficiles (brouillard, smog, pluie), ainsi qu'aux endroits
avec présence d'obstacles empêchant la détection d'une cible (branches, herbes hautes, arbustes denses, etc.).
A la différence des dispositifs de vision de nuit utilisant des convertisseurs électro-optiques, les monoculaires
de vision thermique n'ont pas besoin d'une source de lumière externe et résistent aux effets d'une lumière
brillante.
EMBALLAGE DE LIVRAISON
џ Chargeur secteur
џ Carte de garantie
џ Dragonne
џ Batterie rechargeable APS3
џ Imageur thermique AXION KEY
џ Câble USB
џ Caisse
џ Guide de démarrage rapide
џ Chiffon pour nettoyer l'optique
DESCRIPTION
џ Grossissement important
џ Écran HD à contraste élevé.
Bloc batterie
џ Conception fonctionnelle et ergonomique
џ Palettes de couleurs différentes
џ Boîtier en métal renfor
џ Mise sous tension rapide (démarrage rapide)
џ Trois modes d'observation (forêt, montagnes et identification)
џ Fonction Picture in Picture (PiP) (image dans image)
џ Option de chargement USB
џ Taille de pixel du microbolomètre de 12 microns
џ Léger et compact
џ Trois modes de calibration (manuel, semi-automatique et automatique)
џ Étanchéité parfaite à l'eau IPX7
џ Détection à grande distance
џ Télémètre stadiamétrique
џ Interface utilisateur conviviale
џ Bloc batterie Li-ion APS3 à remplacement rapide
CARACTERISTIQUES PARTICULIERES
FRANÇAIS
8
5. Bouton allumage/étalonnage 
4. Bouton flèche vers le haut/zoom
L'appareil est allumé.
Témoin LED Mode opératoire
lunettes de correction ou des lunettes de
7. Couvercle de lentille
2. Bouton flèche vers le bas 
6. Bague de mise au point de l'objectif
3. Bouton Menu
8. Connecteur MicroUSB
Pour la meilleur visibilité lors de l'utilisation des
protection, il est recommandé de replier
9. Bouton de déverrouillage de batterie
Témoin LED affichant l'état actuel de l'appareil :
1. Bague de réglage de dioptre d'oculaire
Appareil allumé/charge batterie <10%
le bord extérieur de l'œilleton élastique.
UTILISATION DE LA BATTERIE RECHARGEABLE
џ Connectez un câble USB (15) au connecteur microUSB (8)
sur l'appareil.
Note: Le PB8I Power Bank peut servir ce chargeur.
Option 2 (Fig.3.) :
Recharge de la batterie
џ Installez la batterie (10) dans son logement sur le boîtier
de l'instrument (14) en alignant les icônes pour former un
"point" sur l'appareil et la batterie. (voir Fig. 4).
џ Connectez le chargeur secteur (16) à l'alimentation
électrique du secteur.
Option 1 (Fig.2.) :
Les imageurs thermiques AXION KEY sont livrés avec un
bloc batterie ion-lithium APS3 rechargeable.
La batterie doit être chargée avant la première utilisation.
џ Connectez l'autre extrémi du câble USB (15) au
chargeur par alimentation secteur (16) ou à une prise
femelle USB connectée à une autre source d'alimentation
avec une tension nominale de sortie de 5V ou moins.
џ Raccordez la fiche microUSB sur le câble USB (15) au
connecteur microUSB sur le chargeur (16). Branchez
l'appareil dans une prise électrique 100–240 V (17).
џ Raccordez la seconde fiche mâle du câble microUSB à la
prise femelle (12) du chargeur secteur (11).
џ Le témoin LED (13) s'allumera.
џ Le point A sur la batterie et le point B sur le chargeur
doivent être alignés.
џ Insérez la batterie rechargeable (10) fournie avec votre
appareil, ou achetée séparément, le long du rail de
guidage dans l'emplacement du chargeur APS (disponible
séparément) (11) (voir Fig. 3).
џ Deux batteries peuvent être chargées simultanément –
un second emplacement est prévu pour cela.
COMPOSANTS ET COMMANDES
FONCTIONNEMENT DES BOUTONS
9
Mécanisme de
commande
Mode de fonctionnement
/état
1 appui court Appui court suivant Appui long
ON bouton L'appareil est éteint. Allumez l'appareil Calibration de la
lunette
Marche l'appareil
Extinction de l'affichage Allumez l'écran Calibration de la
lunette
Eteignez l'appareil
Appareil allumé, menu
rapide, menu principal
Calibration de la lunette Ecran éteint/appareil
éteint
Up/Zoom
bouton
L'appareil est allumé. Changez le grossissement (zoom) Marche/arrêt PiP
Menu rapide Augmenter le paramètre Augmenter le
paramètre
Menu principal Navigation vers le haut, à droite Navigation vers le
haut, à droite
Menu bouton L'appareil est allumé. Lancez le menu rapide Lancez le menu
principal
Menu rapide Navigation vers le haut Quittez le menu
rapide.
Menu principal Confirmez la valeur, entrez les options
de menu
Quittez les options de
menu, quittez le menu
principal
Down bouton L'appareil est allumé. Modes opératoires Palettes de couleur
Menu rapide Diminuer le paramètre Diminuer le paramètre
Menu principal Navigation vers le bas, à gauche Navigation vers le bas,
à gauche
Mesures de sécurité
Charge de la batterie de 0 à 10%; Chargeur raccorà l'alimentation secteur.
џ Ne laissez pas une batterie sans surveillance pendant sa charge.
Charge de la batterie entre 60% et 95%
Batterie complètement chargée. Peut être débranchée du chargeur.
џ Insérez la batterie (10) dans l'emplace-
ment attribué sur le boîtier de l'appareil
(14) (voir Fig. 4), en alignant les images sur
l'instrument et la batterie.
État de charge de la batterie (voir tableau).
Charge de la batterie entre 10% et 20%
* Le témoin LED affiche le niveau actuel de charge de la batterie pendant 30 secondes lorsque le chargeur APS
n'est pas branché. Lorsque l'alimentation est connectée, l'écran affiche l'état actuel de la batterie en
permanence, de plus les témoins LED clignotent pour indiquer que la batterie est en cours de charge.
џ Lorsqu'elle est bien installée, la batterie
se verrouille dans l'emplacement à l'aide
d'un clip spécial.
Charge de la batterie de 0 à 10%; Chargeur non raccorà l'alimentation secteur.
Témoin LED* État de charge de la batterie
Charge de la batterie entre 20% et 60%
Installation
Batterie défectueuse. La batterie ne doit pas être utilisée.
џ Pour retirer la batterie, appuyez sur le
bouton de déverrouillage de la batterie (9).
џ Pour recharger, utilisez toujours le
chargeur fourni avec votre appareil
optique. L'utilisation d'un chargeur
différent peut causer des dommages irréparables à la batterie ou au chargeur et peut provoquer l'inflammation
de la batterie.
џ Après un stockage de longue durée, la batterie doit être partiellement chargée elle ne doit pas être chargée
au maximum ou complètement déchargée.
џ Ne chargez pas la batterie immédiatement après l'avoir transférée d'une atmosphère froide à une atmosphère
chaude. Attendez 30-40 minutes pour que la batterie se réchauffe.
џ N'utilisez pas le chargeur s'il a été modifié ou endommagé.
џ N'exposez pas la batterie à des températures élevées ou à une flamme nue.
џ La batterie doit être chargée à une température comprise entre 0°C et +45°C, sinon sa durée de vie sera
considérablement réduite.
џ La batterie ne doit pas être utilisée en immersion dans l'eau.
џ La connexion d'appareils tiers avec une consommation électrique supérieure à celle autorisée n'est pas
recommandée.
џ La batterie est équipée d'un système de protection contre les courts-circuits. Cependant, il faut éviter les
situations pouvant provoquer un court-circuit.
џ Ne laissez pas un chargeur avec une batterie connectée à l'alimentation secteur pendant plus de 24 heures
après une recharge complète.
џ Ne pas démonter ni déformer la batterie.
џ Ne soumettez pas la batterie à des chocs ou à des chutes.
џ Lorsque la batterie est utilisée à une température en dessous de zéro, sa capacité diminuera. Ceci est normal et
n'indique pas un défaut.
џ N'utilisez pas la batterie à des températures supérieures à celles indiquées dans le tableau – ceci pourrait
diminuer la durée de vie de la batterie.
џ Rangez les batteries hors de portée des enfants.
ALIMENTATION EXTÉRIEURE
џ Une icône de batterie apparaîtra sur l'écran en indiquant sa charge en pourcentage.
џ Lorsque l'alimentation externe est déconnectée, l'appareil passe sur l'alimentation interne sans s'éteindre.
џ Raccordez l'alimentation externe au port USB (8) de l'appareil (Fig. 1).
џ L'appareil basculera sur l'alimentation externe pendant la recharge progressive de la batterie APS3.
L'alimentation doit provenir d'une source externe, comme un chargeur 5V.
џ Si l'appareil fonctionne sur une alimentation externe et si la batterie APS3 n'est pas connectée, une icône est
affichée .
FONCTIONNEMENT
ATTENTION ! L'objectif de l'appareil ne doit pas être dirigé sur une source d'énergie intense, telle que des
appareils émettant un rayon laser et telle que le soleil. Ceci peut endommager les composants électroniques
dans l'appareil. Les dommages causés par le non-respect des directives d'utilisation ne sont pas couverts par la
garantie.
џ Réglez la résolution des icônes sur l'écran en faisant tourner la bague de réglage dioptrique sur l'oculaire (1). A
l'avenir, il ne sera pas nécessaire de faire tourner la bague de réglage dioptrique de l'oculaire, quelles que soient
la distance et les autres conditions.
џ Pour mettre au point sur l'objet observé, faites tourner la bague de mise au point (6). Axion XM22 ne nécessite
pas de mise au point.
Allumage de l'appareil et réglage de l'image
џ Retirez le couvercle de lentille (7). Fixez le couvercle sur la sangle à l'aide de l'aimant intégré dans le couvercle.
џ Allumez l'appareil en appuyant sur le bouton ON (5).
џ Le réglage de la luminosité et du contraste sur l'écran, ainsi que le réglage du zoom numérique continu sont
décrits dans la section FONCTIONS DU MENU D'ACCES RAPIDE.
џ Éteignez l'appareil après utilisation en appuyant longuement sur le bouton ON (5).
CALIBRATION DU CAPTEUR
La calibration permet d'égaliser la température de fond du microbolomètre et de supprimer les défauts dans
l'image (tels que les lignes verticales, les images fantômes, etc.).
Il y a trois modes de calibration : manuel (M), semi-automatique (SA) et automatique (A).
Sélectionnez le mode requis dans la section CALIBRATION du menu .
џ Mode M (manuel). Fixez le couvercle de lentille et appuyez brièvement sur le bouton ON (5). À la fin de la
calibration, enlevez le couvercle de l'objectif.
џ Mode SA (semi-automatique). La calibration est activée en appuyant rapidement sur le bouton ON (5). Il n'est
pas nécessaire de fixer le couvercle de l'objectif (le capteur est fermé par un obturateur interne).
џ Mode A (automatique). L'appareil est calibré de manière autonome, selon l'algorithme logiciel. Il n'est pas
nécessaire de fixer le couvercle de l'objectif (le capteur est fermé par un obturateur interne). Dans ce mode,
l'appareil peut être calibré par l'utilisateur à l'aide du bouton ON (5) (en mode semi-automatique).
ZOOM NUMÉRIQUE DISCRET
La fonctionnalité de l'appareil permet d'augmenter rapidement son grossissement de base (voir le tableau des
propriétés techniques dans la ligne Zoom numérique) par un facteur de 2 ou 4. Réglez le zoom numérique en
appuyant sur le bouton flèche vers le bas (2).
FONCTIONS DU MENU D'ACCES RAPIDE
Luminosité – en appuyant sur les boutons flèche vers le haut (4) et flèche vers le bas (2) et en modifiant la
luminosité de l'écran entre 00 et 20.
џ Un appui court sur le bouton Menu (3) permet de basculer entre les fonctions.
Les paramètres de base (réglage de la luminosité et du contraste, utilisation du zoom numérique continu et
télémètre stadiamétrique) sont modifiés via le menu Quick Access (accès rapide).
џ Lancez le menu en appuyant rapidement sur le bouton Мenu (3).
10
Onglet 1 Onglet 2
Vue générale du menu :
Menu General SettingMenu Mode
PIP
Off
Hot White
Automatic
10
Mode
calibration
Sélection du mode de calibration Il y a trois modes de calibration : manuel, semi-automatique
et automatique.
џ Sélectionnez l'un des modes de calibration décrits ci-dessous à l'aide des boutons flèche
vers le haut (4) / flèche vers le bas (2).
Automatique. Les exigences de calibration en mode automatique sont déterminées par
programme, la calibration étant démarrée automatiquement.
џ Appuyez et maintenez enfoncé le bouton Menu (3) pour lancer le menu.
џ Sélectionnez l'option "Mode de calibration".
џ Un appui court sur le bouton Menu (3) ouvre le sous-menu.
џ Un appui court sur le bouton Menu (3) confirme la sélection.
Semi-automatique. L'utilisateur définit les exigences de calibration de façon indépendante
(en fonction de l'image observée).
Manuel. Calibration manuelle. Fermez le couvercle de lentille avant de commencer la
calibration.
FONCTIONS DU MENU PRINCIPAL
џ Lancez le menu en appuyant rapidement sur le bouton Мenu (3).
џ La navigation dans le menu utilise le défilement. Lorsque la dernière option sur le premier onglet est atteinte,
la navigation se déplace sur la première option du second onglet.
џ Un appui court sur le bouton Menu (3) ouvre une option du menu.
џ Pour quitter le menu, appuyez et maintenez enfoncé le bouton Menu (3),
џ Appuyez sur les boutons flèche vers le haut (4) et flèche vers le bas (2) pour parcourir les fonctions du menu.
џ La sortie automatique du menu se produit après 10 secondes d'inactivité.
џ À la sortie du menu, l'emplacement du curseur ( ) n'est mémorisé que pendant la durée de la séance de travail
(c'est-dire jusqu'à ce que l'appareil soit éteint). La fois suivante, lorsque l'appareil est allumé et que l'on
accède au menu, le curseur se placera sur la première option du menu.
Contraste – en appuyant sur les boutons flèche vers le haut (4) et flèche vers le bas (2) et en changeant le
contraste de l'écran entre 00 et 20.
Zoom numérique continu – en appuyant sur les boutons flèche vers le haut (4) et flèche vers le bas (2) et en
modifiant la valeur du zoom numérique entre 1,0 et 4,0. L'incrément du zoom numérique est 0.1.
Note. le grossissement est calculé comme le produit du grossissement de base et du rapport de zoom numérique
continu. Exemple : lorsque le grossissement de base est 3.0x et lorsque le rapport du zoom numérique continu
est x1.7, le grossissement réel est 5,(3,0*1,7). lorsque l'appareil est allumé la fois suivante, l'image est projetée
sur l'écran avec les réglages de luminosité et de contraste sauvegardés lors de l'extinction précédente.
Télémètre stadiamétrique Appuyez sur les boutons flèche vers le haut (4) et flèche vers le bas (2) pour
modifier la position des repères permettant de déterminer la distance de l'objet observé (voir la Section 16 pour
plus d'informations sur le télémètre).
Le facteur de zoom numérique continu initial affiché est égal à x1.0 si le zoom discret est inactif, x2.0 s'il est 2x, et
x4.0 s'il est 4x.
Pour quitter le menu, appuyez et maintenez enfoncé le bouton Menu (3), ou attendez 10 secondes pour la
sélection automatique.
Mode
MODE «MONTAGNES» Optimal lors de l'observation d'objets après une journée
ensoleillée ou en milieu urbain.
џ Un appui court sur le bouton Menu (3) ouvre le menu.
џ L'activation rapide des modes de fonctionnement est possible à l'aide du bouton DOWN (2).
џ Sélectionnez l'un des réglages décrits ci-dessous à l'aide des boutons flèche vers le haut (4)
et flèche vers le bas (2).
џ Sélectionnez l'option "Mode".
џ Un appui court sur le bouton Menu (3) confirme la sélection.
џ Appuyez et maintenez enfoncé le bouton Menu (3) pour lancer le menu.
MODE «IDENTIFICATION» Optimal pour la reconnaissance d'objets d'observation dans
des conditions météorologiques défavorables (brouillard, brume, pluie, neige). Permet de
reconnaître plus clairement les caractéristiques distinctives de l'objet observé. Une
augmentation de nombre de détails peut s'accompagner d'une légère granulation de l'image.
џ Une brève pression sur la touche DOWN (2) active la commutation des modes de
fonctionnement de l'imageur.
Les appareils disposent de trois modes de fonctionnement du caméra thermique: «FORET»
(mode d'observation d'objets dans des conditions de contraste de température basse),
«IDENTIFICATION» (mode haute niveau de détail) et «MONTAGNES» (mode d'observation
d'objets dans des conditions de contraste de température haute). Chacun des modes est
conçu pour fournir la meilleure qualité d'image de l'objet de la nature observé sous diverses
conditions d'observation.
MODE «FORÊT» Optimal pour la recherche et observation sur le terrain, sur fond de
feuillage, d'arbustes et d'herbe. Le mode fournit un haut niveau d'information tant sur l'objet
observé que sur les détails de paysage.
џ Confirmez votre sélection en appuyant rapidement sur le bouton Menu(3).
џ Sélectionnez l'une des langues d'interface disponibles (anglais, français, allemand,
espagnol ou russe) à l'aide des boutons flèche vers le haut (4) / flèche vers le bas (2).
џ Lancez le sous-menu "Langue" en appuyant rapidement sur le bouton Мenu (3).
џ Pour enregistrer votre choix et quitter le sous-menu, appuyez et maintenez enfoncé le
bouton Menu (3).
Choisir la langue
Luminosité
de l'icône
џ Sélectionnez l'option "Luminosité icône".
Réglage de la luminosité de l'icône.
џ Un appui court sur le bouton Menu (3) ouvre le sous-menu.
џ Appuyez et maintenez enfoncé le bouton Menu (3) pour lancer le menu.
џ Sélectionnez la luminosité des pictogrammes à l'aide des boutons flèche vers le haut (4) /
flèche vers le bas (2).
џ Un appui court sur le bouton Menu (3) confirme la sélection.
Paramètres
généraux
Cette option du menu vous permet de programmer les paramètres suivants
Langue
Composition et description du menu
11
Heure
џ Appuyez sur le bouton Menu (3) pour passer au réglage de l'heure.
џ Sélectionnez le format de l'heure (sur 24 heures ou AM/PM) à l'aide des boutons flèche vers
le haut (4) / flèche vers le bas (2).
џ Pour sauvegarder l'heure choisie et pour quitter le sous-menu, appuyez et maintenez
enfoncé le bouton Menu (3).
џ Lancez le sous-menu "Heure" en appuyant rapidement sur le bouton Мenu (3).
џ Réglez les minutes en appuyant sur les boutons flèche vers le haut (4) / flèche vers le bas (2).
џ Réglez l'heure en appuyant sur les boutons flèche vers le haut (4) / flèche vers le bas (2).
Réglage de l'heure
џ Appuyez sur le bouton Menu (3) pour passer au réglage des minutes.
Unités
de mesure
M
Y
Sélection d'une unité de mesure
џ Lancez le sous-menu "M/Y" en appuyant rapidement sur le bouton Мenu (3).
џ Réglez l'unité de mesure (mètres ou yards) en appuyant sur les boutons flèche vers le haut
(4) / flèche vers le bas (2) ; puis appuyez sur le bouton Мenu (3) .
џ Le retour au sous-menu s'effectue automatiquement.
M
Y
Paramètres
par défaut
џ Lancez le sous-menu "Default Settings" (paramètres par défaut) en appuyant rapidement
sur le bouton Мenu (3).
Rétablissement des paramètres usine
џ Sélectionnez l'option "YES" pour rétablir les paramètres usine ou sur "NO" pour les annuler
à l'aide des boutons flèche vers le haut (4) / flèche vers le bas (2).
џ Confirmez votre sélection en appuyant rapidement sur le bouton Menu(3).
Les paramètres suivants seront rétablis sur leur valeur fixée en usine avant d'être initialisés
par l'utilisateur :
Grossissement valeur d'origine
Mode forêt
Palette de couleurs chaud blanc
џ Si l'option NO a été sélectionnée, le formatage sera annulé et le sous-menu s'affichera à
nouveau.
Langue Anglais
Note : Lors du rétablissement des paramètres usine, les réglages de date/heure et la carte des
pixels de l'utilisateur sont sauvegardés.
Mode calibration automatique
џ Si l'option YES a été sélectionnée, le message "Do you want to return to default settings?"
(voulez-vous revenir aux paramètres par défaut ?) apparaîtra avec les options YES et NO.
Sélectionnez YES pour formater la carte mémoire.
Unité de mesure mètres
Réglage de la date
џ Pour sauvegarder la date choisie et pour quitter le sous-menu, appuyez et maintenez
enfoncé le bouton Menu (3).
џ Lancez le sous-menu "Date" en appuyant rapidement sur le bouton Мenu (3). La date
apparaît sous le format jj/mm/aaaa.
џ Réglez l'année, le mois et le jour souhaités à l'aide des boutons flèche vers le haut (4) /
flèche vers le bas (2). Appuyez sur le bouton Menu (3) pour parcourir les chiffres.
Suppression
des pixels
défectueux
џ Un marqueur apparaîtra à gauche de l'écran.
џ Sélectionnez l'icône en appuyant rapidement sur le bouton Мenu (3).
џ Lancez le sous-menu en appuyant sur le bouton Menu (3).
Lors de l'utilisation de l'appareil, les pixels défectueux (cassés) peuvent apparaître sur le
capteur par des points brillants ou sombres de luminosité constante qui sont visibles sur
l'image. Les imageurs thermiques AXION KEY permettent de supprimer les pixels défectueux
sur le capteur par programme et permettent aussi d'annuler une suppression.
џ Lancez le sous-menu en appuyant sur le bouton Menu (3).
џ Sélectionnez "YES" si vous voulez rétablir la carte de pixels créée en usine et sur "NO" si
vous ne voulez pas.
џ Lorsqu'un pixel a été supprimé avec succès, le mot "OK" s'affiche brièvement sur l'écran.
џ Utilisez les boutons flèche vers le haut (4) / flèche vers le bas (2) pour déplacer le marqueur
afin d'aligner son centre avec le pixel défectueux.
џ A l'aide des boutons flèche vers le haut (4) / flèche vers le bas (2), alignez le pixel défectueux
avec la croix fixe dans le cadre le pixel doit disparaître.
Attention ! Un ou deux pixels sur l'écran de l'imageur, sous la forme de points noirs, brillants
blancs ou colorés (bleu ou rouge) peuvent apparaître. Ce ne sont pas des défauts.
џ Une loupe apparaîtra à droite de l'écran une image agrandie avec une croix fixe qui est
nécessaire pour faciliter une recherche des pixels défectueux et pour aligner le marqueur
avec. Il y a des flèches de direction horizontale et verticale pour déplacer le marqueur avec
les coordonnées le long des axes X et Y.
џ Un appui court du bouton Menu (3) commute la direction du marqueur de l'horizontale à la
verticale et vice-versa.
џ Supprimez le pixel défectueux en appuyant rapidement sur le bouton ON On/Calibration.
џ Ensuite, en déplaçant le marqueur sur l'écran, vous pouvez supprimer le prochain pixel
défectueux.
џ Pour quitter la fonction "Suppression des pixels défectueux", appuyez et maintenez enfoncé
le bouton Menu (3).
Ramenez tous les pixels défectueux précédemment supprimés par l'utilisateur à leur état
d'origine :
џ Sélectionnez l'icône et appuyez sur le bouton Мenu (3).
џ Confirmez votre sélection en appuyant rapidement sur le bouton Menu(3).
Rétablissement
de la "carte de
pixels" créée
en usine
BARRE D'ÉTAT
џ Grossissement maximum actuel
џ Niveau de décharge de la batterie (lorsque la lunette est alimentée par le bloc batterie rechargeable)
La barre d'état se trouve en bas de l'écran et elle affiche des informations concernant l'état opératoire de la
lunette, incluant :
џ Mode d'observation
џ Heure actuelle
џ Mode calibration (en mode calibration automatique, 3 secondes avant la calibration automatique, un
temporisateur à rebours apparaîtra à la place de l'icône calibration).
џ Palette de couleurs (affichée uniquement lorsque la palette Hot Black ("chaud noir") est installée).
џ Connexion USB (si la lunette est connectée)
Note : Lorsque la calibration est en cours, l'image sur l'écran se fige pendant la durée de la calibration
џ Témoin d'alimentation extérieure (lorsque la lunette est alimentée par une alimentation extérieure)
SA
11.0x 08:13PM
TÉLÉMÈTRE STADIAMÉTRIQUE
Les imageurs thermiques sont équipés d'un télémètre stadiamétrique permettant de déterminer la distance à
un objet lorsque sa taille est connue.
Il y a trois valeurs prédéterminées pour les objets :
џ La fonction du télémètre stadiamétrique est accessible en appuyant rapidement sur le bouton Menu (3) et en
sélectionnant l'icône .
џ Des barres s'afficheront sur l'écran pour déterminer la distance, les icônes des trois objets et les chiffres de la
distance estimée de ces trois objets.
Date
12
Cette fonction désactive le transfert d'images sur l'écran, ce qui minimise l'intensité de son éclairage. Cela
permet d'éviter un démasquage intempestif. L'appareil continuera à fonctionner.
џ Lorsque l'appareil est allumé, appuyez et maintenez enfoncé le bouton ON (5). L'affichage disparaîtra et le
message "Display off" (affichage éteint) apparaîtra.
џ Pour allumer l'écran, appuyez rapidement sur le bouton ON (5).
џ Lorsque le bouton ON (5) est maintenu enfoncé, l'écran affichera "Display off »
џ (affichage éteint) et un compte à rebours débutera. Ensuite l'appareil s'éteindra.
Lorsque cette fonction est utilisée, l'appareil passe en mode veille, ce qui permet de l'éteindre rapidement, si
nécessaire.
160m
66m
28m
FONCTION DISPLAY OFF (EXTINCTION DE L'ECRAN)
џ L'appareil est tec automatiquement par l'ordinateur et aucune
installation de pilote n'est nécessaire.
џ La batterie installée dans l'appareil ne sera pas chargée.
Connexion de l'appareil à un ordinateur utilisé comme une source
d'alimentation externe.
џ Raccordez une extrémité du câble USB au connecteur microUSB (8) de
l'appareil et l'autre extrémité au port sur votre ordinateur.
џ Allumez l'appareil en appuyant sur le bouton ON (5) (l'ordinateur ne
détectera pas l'appareil s'il est éteint).
џ Lorsque cette option est sélectionnée, l'ordinateur est utilisé par l'appareil comme une source d'alimentation
externe. Une icône apparaîtra dans la barre d'état . L'appareil continuera à fonctionner et toutes les
fonctions seront disponibles.
џ Lors du débranchement de la clé USB de l'appareil lorsqu'il est connecté en mode Power (alimentation),
l'appareil continuera à fonctionner sur la batterie, si elle est présente et si elle est suffisamment chargée.
CONNEXION USB
FONCTION PiP
La fonction PiP (image dans image) vous permet de visualiser une image
zoomée numérique agrandie dans une "fenêtre" séparée simultanément
avec l'image principale.
џ Sélectionnez l'option "Mode PiP".
џ L'image agrandie est affichée dans une fenêtre séparée en utilisant la valeur de zoom optique maximum.
џ Lorsque la fonction PiP est activée, vous pouvez effectuer des zooms discrets et des zooms continus. Dans ce
cas, la valeur maximum de grossissement optique apparaîtra uniquement dans la fenêtre séparée.
џ Pour modifier le rapport de zoom dans la fenêtre PiP, appuyez rapidement sur le bouton flèche vers le haut (4).
џ Appuyez et maintenez enfoncé le bouton Menu (3) pour lancer le menu
principal.
Activation/désactivation de la fonction PiP :
џ Un appui court sur le bouton Menu (3) active/désactive le mode (on/off).
џ Appuyez et maintenez enfoncé le bouton Menu (3) pour quitter le menu principal.
џ L'image restante est affichée avec la valeur de zoom optique correspondant à la valeur du grossissement x1.0.
џ Lorsque la fonction PiP est désactivée, l'image est affichée avec la valeur de zoom optique fixée pour le mode
PiP.
PIP
6.9x
3.1x
SÉLECTION DE PALETTE DE COULEURS
Blanc chaud. Une palette de noir et blanc (température froide correspondant au noir et température chaude au
blanc).
Palettes de couleurs
Le principal mode d'affichage pour une image observée est le "Hot White" (blanc chaud).
џ Pour activer les autres palettes décrites ci-dessous et pour basculer entre elles, appuyez durable sur le bouton
flèche vers le bas (2).
џ Placez le curseur fixe inférieur sous l'objet et, à l'aide des boutons de
navigation flèche vers le haut (4) / flèche vers le bas (2), déplacez le curseur
horizontal supérieur par rapport au curseur fixe horizontal inférieur afin de
placer l'objet entre les curseurs. La distance à la cible est recalculée
automatiquement et simultanément avec ce mouvement.
Sanglier sauvage hauteur 0,7 m
џ Pour quitter le mode télémètre, appuyez rapidement sur le bouton Menu (3), ou attendez 10 secondes pour une
sortie automatique.
Lièvre hauteur 0,3 m
Cerf hauteur 1,7 m
џ Si la distance n'est pas déterminée dans un délai de 10 secondes, l'information disparaît de l'écran.
џ Allez à l'option correspondante sur le menu pour sélectionner une unité de mesure (mètres ou yards).
џ La valeur de distance est arrondie vers le haut ou vers le bas avant d'être affichée sur l'écran, elle est arrondie à
5 mètres pour les grandes distances et à 1 mètre pour les distances plus courtes.
Chaud noir. Une palette de noir et blanc (température froide correspondant au blanc et température chaude au
noir).
Sépia
Chaud rouge
Arc-en-ciel
Ultramarin
Une inspection technique de l'appareil est recommandée avant chaque utilisation. Vérification :
џ Les commandes doivent être en bon état de fonctionnement.
џ L'état de la lentille et de l'oculaire (il ne doit pas y avoir de fissures, de points graisseux, de poussières ou
d'autres dépôts).
џ L'aspect extérieur de l'appareil (il ne doit pas y avoir de fissures dans le boîtier).
џ L'état de la batterie rechargeable (elle doit être chargée) et des contacts électriques (il ne doit pas y avoir de
présence de sels ou d'oxydation).
INSPECTION TECHNIQUE
USB connection
Use as power
DÉPANNAGE
Ce tableau répertorie tous les problèmes pouvant survenir lors de l'utilisation de l'appareil. Exécutez les
vérifications et les réparations recommandées dans l'ordre indiqué sur le tableau. Si un défaut se produit qui
n'est pas indiqué dans le tableau, ou si vous ne pouvez pas réparer vous-même le défaut, l'appareil doit être
retourné pour réparation.
ENTRETIEN
џ Vérifiez les surfaces en verre de l'oculaire et de la lentille. Si nécessaire, enlevez la poussière et le sable sur les
lentilles (en utilisant de préférence une méthode sans contact). Le nettoyage des surfaces extérieures de
l'optique doit être effectué avec des produits conçus spécialement dans ce but.
џ La maintenance doit être effectuée au moins deux fois par an et doit comprendre les mesures suivantes :
џ Essuyez les surfaces extérieures des pièces en métal et en plastique, et dépoussiérez avec un chiffon en coton ;
de la graisse au silicone peut être utilisée pour cela.
џ Nettoyez les contacts électriques de la batterie et l'emplacement de la batterie sur l'appareil à l'aide d'un
solvant organique non graisseux.
13
En suivant le lien ci-dessous, vous pourrez trouver des réponses aux
questions les plus fréquemment posées à propos de l'imagerie thermique
https://www.pulsar-nv.com/glo/support/faq/79
Attention ! Les imageurs thermiques AXION KEY exigent une licence lorsqu'ils sont exportés
à l'extérieur de votre pays.
Compatibilité électromagnétique.
Ce produit est conforme aux exigences de la norme européenne EN 55032: 2015, Classe A.
Attention : L'utilisation de ce produit dans une zone résidentielle peut provoquer des
interférences radio.
La durée de réparation possible de l'appareil est de cinq ans.
L'appareil ne fonctionne
pas à partir d'une source
d'alimentation externe.
Des rayures colorées
apparaissent sur l'écran
ou l'image a disparu.
L'image est trop sombre.
En cas d'utilisation par
basses températures, la
qualité de l'image de
l'environnement est
moins bonne que dans
des conditions de
température positives.
Mauvais fonctionnement
Mauvaise qualité de
l'image/distances
réduites de détection.
L'imageur thermique ne
s'allume pas.
L'image est floue, avec
des rayures verticales et
un fond inégal.
L'appareil a été exposé à de
l'électricité statique pendant son
fonctionnement.
Câble USB endommagé.
Batterie complètement déchargée.
La calibration est nécessaire.
Faible niveau de luminosité ou de
contraste.
Raison possible
Source d'alimentation externe
déchargée.
Correction
Rechargez la batterie.
Remplacez le câble USB.
Après exposition à de l'électricité
statique, l'appareil peut redémarrer
automatiquement, ou il doit être
éteint et allumé à nouveau.
Rechargez la source d'alimentation
externe (si nécessaire).
Réglez la luminosité ou le contraste.
Exécutez la calibration d'image
conformément à la Section
"Fonctionnement" des Instructions.
Ces problèmes peuvent survenir pendant l'observation dans des conditions
météo difficiles (neige, pluie, brouillard, etc.).
Dans des conditions à basse température, les objets observés (arrière-plan) se
refroidissent en général à peu près à la même température, et de ce fait le
contraste de température est considérablement réduit et la qualité de l'image
(détail) est plus médiocre. Ceci est normal pour un imageur thermique.
Dans des conditions de température positives, les objets observés
(environnement et arrière-plan) se réchauffent de manière différente en raison
de la conductivité thermique et de ce fait générant un contraste élevé de
température. En conséquence, la qualité de l'image produite par l'appareil sera
meilleure.
14
TECHNISCHE DATEN
Lagereinheit-Nr. (Stock Keeping Unit; SKU)
AXION KEY-Modell
Mikrobolometer
Typ
Auflösung (Pixel)
Bildwiederholfrequenz (Hz)
Pixelgröße (Mikron)
Optische Daten
Optische Vergrößerung (x)
Stufenloses digitales Zoom (x)
Digitales Zoom (x)
Relatives Öffnungsverhältnis (D/f)
Minimaler Fokussierabstand (m)
Durchmesser Austrittspupille (mm)
Blickwinkel des Sichtfeldes (horizontal), Grad
Blickwinkel des Sichtfeldes, Meter bei 100 m
Fokussierbereich des Okulars (Dioptrien)
Entdeckungsdistanz (m) *
Display
Typ
Auflösung (Pixel)
Betriebstechnische Daten
Externe Versorgungsspannung
Akkutyp
Kapazität
Nennausgangsspannung
Externe Stromversorgung
Akkulaufzeit in Stunden * (bei 22 °C)
IP-Code (IEC60529) Schutzart
Betriebstemperatur- Bereich
Abmessungen (mm)
Gewicht ohne Akku (kg)
77424
KEY XМ22
ungekühlt
320x240
50
12
2
2-8
2/4
1.2
11
3
10
17,5
-4/+5
950
LCOS
960х720
3 – 4.3V
Li-Ion Akkupack АPS3
3200 mAh
DC 3.7V
5V (USB)
4
IpХ7
-10°С ... +40°С
143x41x69
0.25/8.82
77425
KEY XМ30
ungekühlt
320x240
50
12
2,5
2,5-10
2/4
1.2
3
3
7,3
12,8
-4/+5
1300
LCOS
960х720
3 – 4.3V
Bloc batterie Li-Ion АPS3
3200 mAh
DC 3.7V
5V (USB)
4
IpХ7
-10°С ... +40°С
149x49x70
0.27
* für ein Tierobjekt, wie z. B. ein Hirsch.
Es können Optimierungen am Design und an der Software dieses Produkts vorgenommen werden, um die
Benutzerfunktionen zu verbessern.
Eine aktualisierte Version des Benutzerhandbuchs finden Sie auf der Website www.pulsar-vision.com
Auf AXION KEY IR-Matrix (Mikrobolometer) basierende Monokulare der Wärmebildtechnik werden durch eine
Reihe von Modellen dargestellt, die sich in der Vergrößerung und dem Durchmesser der Objektive
unterscheiden. Diese Geräte sind sowohl für den Einsatz in der Nacht als auch am Tage bei schwierigen
Wetterverhältnissen (Nebel, Smog, Regen) entwickelt, sowie in Umgebungen mit Hindernissen, welche die
Erkennung eines Ziels erschweren (Äste/Zweige, hohes Gras, dichte Sträucher, usw.). Im Gegensatz zu
Nachtsichtgeräten, die auf elektronenoptischen Wandlern basieren, benötigen Wärmebildmonokulare keine
externe Lichtquelle und sind gegen die Einwirkung von hellem Licht resistent.
AXION KEY Monokulare können zur Nachtjagd, Beobachtung und Geländeorientierung und zur Durchführung von
Rettungsaktionen verwendet werden.
LIEFERUMFANG
џ Handschlaufe
џ Garantiekarte
џ AXION KEY Wärmebildkamera
џ Netzladeadapter
џ Wiederaufladbarer APS3-Akku
џ USB-Kabel
џ Aufbewahrungstasche
џ Kurzanleitung
џ Optikreinigungstuch
BESCHREIBUNG
џ Hohe Erkennungsreichweite
џ Verstärkter Metallkörper
џ Starke Vergrößerung
џ Mikrobolometer-Pixelgröße von 12 Mikron
џ HD-Display mit hohem Kontrast.
џ Komfortable Benutzeroberfläche
џ Funktionales und ergonomisches Design
џ Komplett wasserdicht nach IPX7
џ Kurze Einschaltzeit (Schnellstart)
џ Stadiametrischer Entfernungsmesser
џ Drei Kalibrierungsmodi (manuell, halbautomatisch und automatisch)
џ Verschiedene Farbtonpaletten
џ Bild-im-Bild-Funktion (PiP Picture in Picture)
Akkupack
џ APS3 Li-Ion Schnellwechsel-Akkupack
џ Leicht und kompakt
џ Drei Beobachtungsmodi (Wald, Felsen und Identifizierung)
џ USB-Ladeoption
UNTERSCHEIDENDE MERKMALE
DEUTSCH
15
Option 1 (Abb. 2):
џ Verbinden Sie das andere Ende des USB-Kabels
(15) mit dem Netzladeadapter (16) oder mit einer
USB-Buchse, die an eine andere Stromquelle mit
einer Ausgangsspannung von 5 V oder weniger
angeschlossen ist.
Aufladen des Akkus
AXION KEY Wärmebildkameras werden mit einem
wiederaufladbaren APS3 Lithium-Ionen-
Akkupack geliefert, mit dem die Wärmebild-
kamera bis zu 4 Stunden verwendet werden kann.
Der Akku sollte vor dem ersten Gebrauch
aufgeladen werden.
џ Setzen Sie den Akku (10) in seinen Schacht im
Gerätegehäuse (14) ein, indem Sie die Symbole so
ausrichten, dass sie auf dem Gerät und dem Akku
einen „Punktbilden. (siehe Abb. 4).
џ Schließen Sie an dem microUSB-Anschluss (8)
des Geräts ein USB-Kabel (15) an.
Hinweis: Die PB8I Power Bank kann als Ladegerät
verwendet werden.
џ Schieben Sie den mit dem Gerät gelieferten
oder separat erworbenen wiederaufladbaren
Akku (10) entlang der Führungsschiene vollstän-
dig in den APS-Ladeschacht (separat erhältlich)
(11) (siehe Abb. 3).
џ Verbinden Sie den zweiten Stecker des
microUSB-Kabels mit der Buchse (12) des
Netzladeadapters (11).
џ Die LED-Anzeige (13) leuchtet auf.
џ Es können zwei Akkus gleichzeitig geladen
werden – hierzu ist ein zweiter Schacht vorgese-
hen.
џ Stecken Sie den Netzladeadapter (16) in die
Netzsteckdose.
Option 2 (Abb. 3):
џ Verbinden Sie den microUSB-Stecker des USB-
Kabels (15) mit dem microUSB-Anschluss des
Netzsteckers (16). Stecken Sie das Gerät in eine
Steckdose mit 100 240 V (17).
џ Punkt A auf dem Akku und Punkt B auf dem
Ladegerät müssen zueinander ausgerichtet sein.
der Brillen wird empfohlen, den äußeren Rand
5. Taste „On/Calibration ON“ 
2. Taste „Down“ 
8. microUSB-Anschluss
Gerät ist eingeschaltet
4. Taste „Up/Zoom“ 
1. Okular-Dioptrieneinstellring
3. Taste „Menu“
6. Fokussierring
7. Objektivkappe
9. Taste „Akkuentriegelung“
LED-Anzeige Betriebsmodus
LED-Anzeige, die den aktuellen Zustand des Geräts anzeigt:
Gerät eingeschaltet / Akkustand < 10 %
Für eine bequeme Beobachtung beim Tragen
der Augenmuschel zur Seite zu biegen.
KOMPONENTEN UND BEDIENELEMENTE VERWENDEN DES WIEDERAUFLADBAREN AKKUS
16
BEDIENUNG DER TASTEN
Steuermechanis-
mus
Zustand/Betriebsmodus 1 kurzer Druck Nächstes
kurzes Drücken
Langes Drücken
Taste
On“
Gerät ist ausgeschaltet Einschalten des
Geräts
Gerätekalibrierung Gerät Einschalten
Display aus Display einschalten Gerätekalibrierung Gerät ausschalten
Gerät eingeschaltet,
Schnellstartmenü, Haupt-
menü
Gerätekalibrierung Display ausgeschaltet /
Gerät ausgeschaltet
Taste
„Up/Zoom“
Gerät ist eingeschaltet Vergrößerung ändern (Zoom) PiP ein/aus
Schnellstartmenü Parameter erhöhen Parameter erhöhen
Hauptmenü Navigation nach oben, rechts Navigation nach oben,
rechts
Taste
„Menu“
Gerät ist eingeschaltet Schnellstartmenü aufrufen Hauptmenü aufrufen
Schnellstartmenü Navigation nach oben Schnellstartmenü ver-
lassen
Hauptmenü Wert bestätigen, Menüoptionen auf-
rufen
Menüoptionen ver-
lassen, Hauptmenü
verlassen
Taste
„Down“
Gerät ist eingeschaltet Betriebsmodi Farbtonpaletten
Schnellstartmenü Parameter verringern Parameter verringern
Hauptmenü Navigation nach unten, links Navigation nach unten,
links
Akkuladezustand (siehe Tabelle).
LED-Anzeige* Akkuladezustand
*Die LED-Anzeige zeigt den aktuellen Ladezustand des Akkus 30 Sekunden lang an, wenn das APS-Ladegerät
nicht angeschlossen ist. Wenn die Stromversorgung angeschlossen wird, zeigt das Display den aktuellen
Zustand des Akkus ständig an und die LEDs flackern zusätzlich, um den Ladevorgang des Akkus anzuzeigen.
џ Der Anschluss von Fremdgeräten mit einem höheren Energieverbrauch als zulässig wird nicht empfohlen.
џ Verwenden Sie zum Laden immer das
mit Ihrem optischen Gerät gelieferte Ladegerät. Die Verwendung eines anderen Ladegeräts kann zu irreparablen
Schäden am Akku oder am Ladegerät führen und der Akku kann sich entzünden.
џ Laden Sie den Akku nicht sofort, nachdem Sie ihn aus der Kälte in eine wärmere Umgebung gebracht haben.
Warten Sie 30 40 Minuten, damit sich der Akku aufwärmen kann.
џ Verwenden Sie das Ladegerät nicht, falls es modifiziert oder beschädigt wurde.
џ Der Akku sollte bei einer Temperatur zwischen 0 °C und +45 °C geladen werden, andernfalls wird die Lebenszeit
des Akkus erheblich reduziert.
Akkuladung beträgt 10% bis 20%.
џ Setzen Sie den Akku keinen hohen Temperaturen oder offenen Flammen aus.
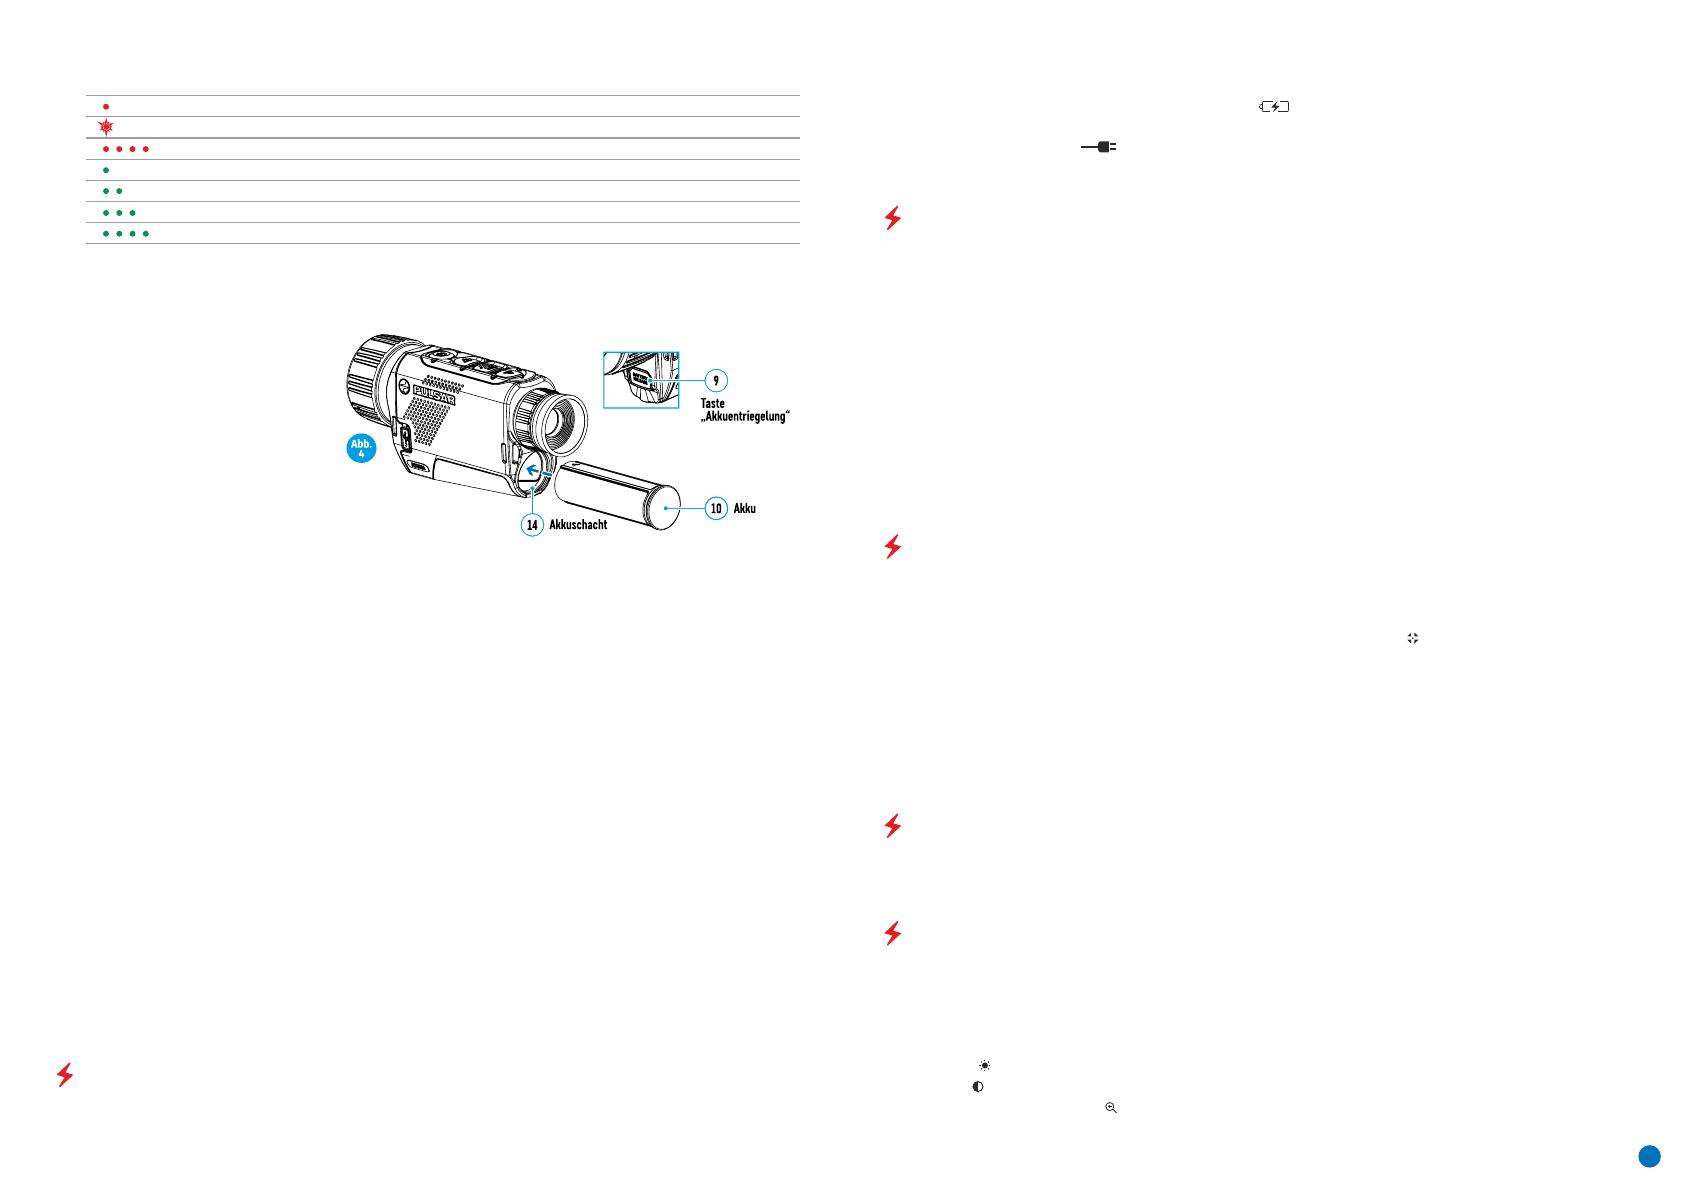
џ Bei ordnungsgemäßer Installation
wird der Akku mit einem speziellen Clip
im Akkufach verriegelt.
Einsetzen:
џ Lassen Sie ein Ladegerät mit angeschlossenem Akku nicht länger als 24 Stunden nach dem vollständigen
Laden am Netz.
Akkuladung beträgt 60% bis 95%.
џ Wurde der Akku eine lange Zeit gelagert, sollte er teilweise geladen werden er sollte nicht vollständig geladen
oder entladen werden.
Akku ist defekt. Akku sollte nicht verwendet werden.
џ Zerlegen oder verformen Sie den Akku nicht.
џ Um den Akku zu entnehmen, drücken
Sie auf die Taste Akkuentriegelung (9).
џ Der Akku darf nicht in Wasser getaucht werden.
Akkuladung beträgt 0 % bis 10 %. Ladegerät ist nicht am Stromnetz angeschlossen.
Akkuladung beträgt 0 % bis 10 %. Ladegerät ist am Stromnetz angeschlossen.
Sicherheitsmaßnahmen:
џ Lassen Sie den Akku während des Ladevorgangs nicht unbeaufsichtigt.
џ Wenn der Akku bei Temperaturen unter Null verwendet wird, nimmt die Kapazität ab. Dies ist normal und
deutet nicht auf einen Defekt hin.
џ Verwenden Sie den Akku nicht bei höheren als in der Tabelle angegebenen Temperaturen dies kann die
Lebensdauer des Akkus verringern.
џ Bewahren Sie den Akku außerhalb der Reichweite von Kindern auf.
џ Setzen Sie den Akku (10) in seinen
vorgesehenen Schacht im Gerätege-
häuse (14) ein (siehe Abb. 4), indem Sie
die Bilder auf dem Gerät und dem Akku
ausrichten.
Akku vollständig geladen. Kann vom Ladegerät getrennt werden.
џ Der Akku ist mit einem Verpolungsschutz ausgestattet. Situationen, die zu einem Kurzschluss führen können,
sollten jedoch vermieden werden.
џ Setzen Sie den Akku keinen Stößen oder Stürzen aus.
Akkuladung beträgt 20 % bis 60 %.
BETRIEB
џ Schalten Sie das Gerät nach Gebrauch durch langes Drücken auf die Taste ON (5) aus.
ACHTUNG! Das Objektiv des Geräts darf nicht auf starke Energiequellen, wie z. B. Laser-emittierende Geräte oder
die Sonne, gerichtet werden. Dies kann die elektronischen Komponenten im Gerät beschädigen. Schäden, die
durch Nichtbeachtung der Betriebsanleitung entstehen, fallen nicht unter die Garantie.
џ Schalten Sie das Gerät ein, indem Sie Taste ON (5) drücken.
џ Stellen Sie die Auflösung der Symbole im Display durch Drehen des Dioptrieneinstellrings am Okular (1) ein. In
Zukunft ist es nicht mehr notwendig, den Dioptrieneinstellring zu drehen, unabhängig von der Entfernung und
anderen Bedingungen.
џ Entfernen Sie den Objektivschutz (7). Befestigen Sie den Schutz mit dem im Schutz eingebauten Magneten an
der Schlaufe.
Einschalten und Einstellen des Bilds
џ Um das zu beobachtende Objekt zu fokussieren, drehen Sie den Fokussierring (6).
џ Die Einstellung der Helligkeit und des Kontrasts im Display sowie das einschalten des stufenlosen digitalen
Zooms werden im Abschnitt SCHNELLZUGRIFFSMENÜ-FUNKTIONEN beschrieben.
KALIBRIERUNG DES SENSORS
џ Modus „A“ (automatisch). Das Gerät wird selbstständig, in Übereinstimmung mit einem Softwarealgorithmus,
kalibriert. Die Objektivkappe muss nicht angebracht werden (der Sensor ist durch einen internen Verschluss
geschlossen). In diesem Modus kann das Gerät vom Benutzer kalibriert werden, indem er die Taste ON (5) (im
halbautomatischen Modus) verwendet.
Wählen Sie im Abschnitt KALIBRIERUNG des Menüs den benötigten Modus aus .
Durch die Kalibrierung kann der Temperaturhintergrund des Mikrobolometers ausgeglichen und Defekte im Bild
(wie vertikale Linien, Phantombilder, usw.) eliminiert werden.
Es gibt drei Kalibrierungsmodi: manuell (M), halbautomatisch (SA) und automatisch (A).
џ Modus „M“ (manuell). Bringen Sie die Objektivkappe an und drücken Sie kurz die Taste ON (5). Entfernen Sie die
Objektivkappe, nachdem der Kalibrierungsvorgang abgeschlossen ist.
џ Modus „SA(halbautomatisch). Die Kalibrierung wird durch kurzes Drücken auf die Taste ON (5) aktiviert. Die
Objektivkappe muss nicht angebracht werden (der Sensor ist durch einen internen Verschluss geschlossen).
DISKRETES DIGITALZOOM
Die Funktionalität des Geräts bietet die Möglichkeit, die Basismultiplizität um den Faktor 2 oder 4 schnell zu
erhöhen (siehe Tabelle der technischen Eigenschaften in der Zeile „Digitales Zoom“). Stellen Sie das digitale
Zoom entsprechend ein, indem Sie die Taste DOWN (2) drücken.
џ Das Gerät schaltet zum Betrieb über die externe Stromversorgung um, während der APS3-Akku allmählich
geladen wird.
џ Auf dem Display erscheint das Symbol einer Batterie , das den Ladezustand in Prozent anzeigt.
џ Wenn das Gerät an einer externen Stromversorgung betrieben wird und der APS3-Akku nicht eingesetzt ist,
wird ein Symbol angezeigt .
џ Wenn die externe Stromversorgung unterbrochen wird, schaltet das Gerät auf die interne Stromversorgung
um, ohne das Gerät abzuschalten.
SCHNELLSTARTMENÜ-FUNKTIONEN
Die grundlegenden Einstellungen (Anpassung der Helligkeit und des Kontrasts, Verwendung der stufenlosen
digitalen Zoom-Funktion und des stadiametrischen Entfernungsmessers) werden über das Schnellzugriffsmenü
geändert.
џ Rufen Sie das Menü durch kurzes Drücken der Taste Menu (3) auf.
џ Durch kurzes Drücken der Taste Menu (3) können Sie zwischen den Funktionen wechseln.
Helligkeit Durch Drücken der Tasten UP (4) / DOWN (2) und Ändern der Displayhelligkeit von 00 bis 20.
Kontrast Durch Drücken der Tasten UP (4) / DOWN (2) und Ändern des Displaykontrastes von 00 bis 20.
Stufenloses digitales Zoom – Durch Drücken der Tasten UP (4) / DOWN (2) und Ändern des digitalen
Zoomwerts von 1,0 bis 4,0. Die Schrittweite des digitalen Zooms beträgt 0,1.
EXTERNE STROMVERSORGUNG
Die externe Stromversorgung wird von einer externen Quelle, wie z. B. einer 5 V Power Bank, bereitgestellt.
џ Schließen Sie die externe Stromversorgung an den USB-Anschluss (8) des Geräts an (Abb. 1)
17
Registerkarte 1 Registerkarte 2
Allgemeine Ansicht des Menüs:
Zusammensetzung und Beschreibung des Menüs
Menu General SettingMenu Mode
PIP
Off
Hot White
Automatic
10
Kalibrierungs-
modus
Manuell. Manuelle Kalibrierung. Schließen Sie die Objektivkappe, bevor Sie mit der
Kalibrierung beginnen.
Halbautomatisch. Der Benutzer legt die Kalibrierungsvoraussetzungen unabhängig fest
(entsprechend dem zu beobachtenden Bild).
џ Kurzes Drücken auf die Taste Menu (3) öffnet das Untermenü.
џ Kurzes Drücken auf die Taste Menu (3) bestätigt die Auswahl.
Automatisch. Die Kalibrierungsvoraussetzungen im automatischen Modus werden
programmgesteuert ermittelt, wobei der Kalibrierprozess automatisch gestartet wird.
Auswahl des Kalibrierungsmodus Es gibt drei Kalibrierungsmodi: manuell, halbautomatisch
und automatisch.
џ Drücken und halten Sie die Taste Menu (3), um das Menü aufzurufen.
џ hlen Sie mit den Tasten UP (4) / DOWN (2) einen der unten beschriebenen
Kalibrierungsmodi aus.
џ Wählen Sie die Option „Kalibrierungsmodus“ .
HAUPTMENÜFUNKTIONEN
џ Beim Verlassen des Menüs wird die Cursor-Position ( ) nur für die Dauer der einen Arbeitssitzung gespeichert
(d. h. bis das Gerät abgeschaltet wird). Wenn beim nächsten Einschalten des Geräts das Menü aufgerufen wird,
befindet sich der Cursor auf dem ersten Eintrag des Menüs.
џ Die Menünavigation ist eine Möglichkeit zu blättern. Wenn der letzte Eintrag auf der ersten Registerkarte
erreicht ist, springt die Navigation auf den ersten Eintrag der zweiten Registerkarte.
џ Rufen Sie das Menü durch langes Drücken der Taste Menu (3) auf.
џ Das automatische Verlassen des Menüs erfolgt nach 10 Sekunden Inaktivität.
џ Ein kurzes Drücken auf die Taste Menu (3) öffnet eine Menüoption.
џ Drücken Sie die Tasten UP (4) / DOWN (2), um sich durch die Menüfunktionen zu bewegen.
џ Zum Verlassen des Menüs halten Sie die Taste Menu (3) gedrückt.
Zum Verlassen des Menüs halten Sie die Taste Menu (3) gedrückt oder
warten Sie 10 Sekunden auf die automatische Auswahl.
Hinweis. Die aktuelle Vergrößerung wird als das Produkt der Basisvergrößerung und dem Verhältnis des
stufenlosen digitalen Zooms berechnet. Beispiel: wenn die Basisvergrößerung des Geräts 3,0x und das
Verhältnis des stufenlosen digitalen Zooms x1,7 ist, dann beträgt die tatsächliche Vergrößerung 5,1x (3,0 * 1,7).
Beim nächsten Einschalten des Geräts, wird das Bild mit den Helligkeits- und Kontrasteinstellungen auf das
Display projiziert, die beim vorherigen Abschalten gespeichert wurden.
Der anfänglich angezeigte stufenlose digitale Zoomfaktor ist x1,0, wenn das diskrete Zoom nicht aktiv ist, x2,0,
wenn er 2x und x4,0, wenn er 4x ist.
Stadiametrischer Entfernungsmesser Drücken Sie die Tasten UP (4) / DOWN (2), um die Position der
Markierungen zur Bestimmung der Entfernung des zu beobachtenden Objekts zu ändern. (weitere
Informationen zum Entfernungsmesser finden Sie im Abschnitt 16).
Modus
џ Drücken und halten Sie die Taste Menu (3), um das Menü aufzurufen.
Die Geräte haben drei Betriebsmodi des Wärmebildgerätes: WALD“ (Modus für Beobachtung
der Objekte bei geringem Temperaturgegensatz), „IDENTIFIZIERUNG“ (hochdetaillierter
Modus), „FELSEN“ (Modus für Beobachtung der Objekte bei großem Temperaturgegensatz).
Jeder der Modi wurde für die Gewährleistung der besten Abbildungsqualität der Tierwelt
unter verschiedenen Beobachtungsbedingungen entwickelt.
џ Wählen Sie die Option „Modus“ .
џ Kurzes Drücken auf die Taste Menu (3) bestätigt die Auswahl.
MODUS «FELSEN» – Optimal bei der Beobachtung der Objekte nach einem sonnigen Tag
oder unter Stadtbedingungen.
MODUS «WALD» Optimal beim Suchen und bei der Beobachtung im Felde, in Belaubung,
Gebüsch und Gras. Der Modus gewährleistet einen hohen Detaillierungsgrad der Abbildung
eines Beobachtungsobjektes als auch der Landschaft.
MODUS «ERKENNUNG» Optimal für Erkennung der Beobachtungsobjekte bei
ungünstigen Bedingungen (Nebel, Dunst, Regen, Schnee). Er lässt typische Merkmale des zu
beobachtenden Objekts genauer erkennen. Die Vergrößerung der Detaillierung kann zu
leichtem Bildrauschen führen.
џ Die Betriebsmodi können mittels Taste DOWN (2) aktiviert werden.
џ Wählen Sie mit den Tasten UP (4)/DOWN (2) eine der unten beschriebenen Einstellungen aus.
џ Ein kurzes Drücken aktiviert das Umschalten der Betriebsmodi.
џ Kurzes Drücken auf die Taste Menu (3) öffnet das Menü.
Datum
џ Rufen Sie das Untermenü „Datum“ durch kurzes Drücken der Taste Menu (3) auf. Das
Datum erscheint im Format tt.mm.yyyy.
Einstellen des Datums
џ Stellen Sie mit den Tasten UP (4) / DOWN (2) das gewünschte Jahr, den Monat und den Tag
ein. Drücken Sie die Taste Menu (3), um sich durch die Ziffern zu bewegen.
џ Zum Speichern Ihres ausgewählten Datums und zum Verlassen des Untermenüs halten Sie
die Taste Menu (3) gedrückt.
Sprachauswahl
џ Rufen Sie das Untermenü „Sprache“ durch kurzes Drücken der Taste Menu (3) auf.
џ Wählen Sie mit den Tasten UP (4) / DOWN (2) eine der verfügbaren Sprachen (Englisch,
Französisch, Deutsch, Spanisch oder Russisch) aus.
џ Zum Speichern Ihrer Auswahl und zum Verlassen des Menüs halten Sie die Taste Menu (3)
gedrückt.
џ Bestätigen Sie die Auswahl mit einem kurzen Drücken der Taste Menu (3).
Symbolhelligkeit
џ Wählen Sie die Option „Symbolhelligkeit“ .
џ Drücken und halten Sie die Taste Menu (3), um das Menü aufzurufen.
џ Kurzes Drücken auf die Taste Menu (3) bestätigt die Auswahl.
џ Wählen Sie mit den Tasten UP (4) / DOWN (2) die Helligkeitsstufe der Piktogramme aus.
Einstellen der Symbolhelligkeit.
џ Kurzes Drücken auf die Taste Menu (3) öffnet das Untermenü.
Allgemeine
Einstellungen
Mit dieser Menüoption können Sie folgende Einstellungen vornehmen:
Sprache
18
1 / 1

Задайте вопрос, и я найду ответ в документе

Поиск информации в документе стал проще с помощью ИИ

Спросите документ

на других языках