Brayer BR2031 Инструкция по эксплуатации

Категория
Печи
Тип
Инструкция по эксплуатации
Instruction manual
Инструкция по эксплуатации
Electric AIR GRILL BR2031
Электрический аэрогриль BR2031
brayer.ru
СОДЕРЖАНИЕ
EN ......................................................................................................................................3
DE ....................................................................................................................................15
RU ...................................................................................................................................29
KZ ....................................................................................................................................42
3EN
ELECTRIC AIR GRILL BR2031
The operation principle of the air grill is to circulate
hot air ow inside the work basket, so the food is
cooked evenly on all sides, it is tender inside and
crispy outside. This cooking principle allows to
cook with minimal amount of oil or without it.
DESCRIPTION
1. Body
2. Display
3. Control panel
4. Protective cover of the basket release button
5. Basket release button
6. Basket handle
7. Basket
8. Tray
9. Hot air outlet grid
10. Power cord storage
Display and control panel
11. Digital symbols of the set temperature
12. Heating element on symbol « »
13. Electric motor operation symbol « »
14. Operation time digital symbols
15. «Temperature/operation time» setting buttons « »
16. On/O button « »
EN
ATTENTION!
For additional protection it is reasonable to install a
residual current device (RCD) with nominal operation
current not exceeding 30 mA into the mains. To install
RCD, contact a specialist.
17. «Start/Pause» button « »
18. «Temperature/operation time» setting selection
button « »
19. «Temperature/operation time» setting buttons « »
4EN
pic. 3
pic. 2pic. 1
5EN
SAFETY MEASURES AND OPERATION
RECOMMENDATIONS
Read the operation manual carefully before using
the air fryer; after reading, keep it for future
reference.
Use the air fryer for its intended purpose only, as
specied in this manual.
Mishandling the air fryer can lead to its breakage
and cause harm to the user or damage to the user’s
property, which is not covered by warranty.
Make sure that the operating voltage of the unit
indicated on the label corresponds to your home
mains voltage.
Connect the power plug to the socket with reliable
grounding contact.
Do not connect the unit to external timers or remote
control mains sockets.
To avoid re, do not use adapters for plugging the air
fryer in.
Install and use the air fryer on a at, dry, steady and
heat-resistant surface with free access to the mains
socket.
To prevent stains on the surface where the air fryer
is installed, it is recommended to install it on an
additional stand placed between the air fryer and the
counter top.
The gap between the wall and the back of the air
fryer body should be at least 20-30 cm, the distance
from the sides of the air fryer body should be at least
10-20 cm.
Always check the condition of the hot air inlet and
outlet grids, otherwise the hot air circulation will be
impaired, which can aect the coo¬king process or
damage the unit.
Do not use the unit outdoors.
It is recommended not to use the unit during lightning
storms.
Protect the air fryer from impacts, falling, vibrations
and other mechanical stress.
Never leave the unit connected to the mains
unattended.
Do not use the unit near heating appliances, heat
sources or open ame.
Do not use the air fryer in places where aerosols are
used or sprayed, and in proximity to inammable
liquids.
Do not use the air fryer in proximity to the kitchen
sink, in bathrooms, near swimming pools or other
containers lled with water.
If the air fryer is dropped into water, unplug it
immediately, and only then you can take the unit out
of water. Apply to the service center for testing or
repairing the unit.
Do not let the power cord touch hot surfaces and
sharp edges of furniture.
The air fryer body heats up strongly during operation,
do not touch hot surfaces marked with « » to avoid
6EN
burns.
Do not move the air fryer when it is hot; wait until it
cools down completely.
Use the unit in places with proper ventilation.
Use only the air fryer parts supplied with the unit.
Do not switch the air fryer on without products.
Take the products out of the air fryer right after
cooking; keeping products in the operating air fryer
for a long time can cause their ignition.
Never use metal objects to take the cooked food
out, as they can damage the non-stick coating of the
basket; use the kitchen tools intended for non-stick
surfaces.
Unplug the unit after usage or before cleaning. When
unplugging the air fryer, hold the power plug and
carefully remove it from the mains socket, do not pull
the power cord, as this can lead to its damage and
cause a short circuit.
Do not touch the unit body, the power cord and the
power plug with wet hands.
For child safety reasons do not leave polyethylene
bags used as packaging unattended.
ATTENTION!
Do not allow children to play with polyethylene bags
or packaging lm. Danger of suocation!
Do not allow children to touch the unit body, the
power cord or the power plug during operation of the
unit.
Be especially careful if children or disabled persons
are near the operating unit.
During the unit operation and breaks between
operation cycles, place the unit out of reach of
children.
The unit is not intended for usage by sensory,
physically or mentally disabled persons (including
children) or by persons lacking experience or
knowledge if they are not under supervision of a
person who is responsible for their safety or if they
are not instructed by this person on the usage of the
unit.
From time to time check the power cord integrity.
If the power cord is damaged, it should be replaced
by the manufacturer, a maintenance service or
similar qualied personnel to avoid danger.
Do not repair the unit by yourself. Do not
disassemble the unit by yourself, if any malfunction
is detected, and after the unit was dropped, unplug it
and apply to the authorized service center.
To avoid damages, transport the unit in the original
package.
Keep the unit in a dry cool place out of reach of
children and disabled persons.
The unit is not intended for usage by children.
Do not leave children unattended to prevent using
the unit as a toy.
7EN
THE UNIT IS INTENDED FOR HOUSEHOLD USE
ONLY, DO NOT USE THE UNIT FOR COMMERCIAL OR
LABORATORY PURPOSES
BEFORE THE FIRST USE
After unit transportation or storage at negative
temperature, unpack it and wait for 3 hours before
using.
Unpack the unit and remove all the packaging
materials.
Keep the original package.
Read the safety measures and operating
recommendations.
Check the delivery set.
Examine the unit for damages, in case of damage do
not plug it into the mains.
Make sure that the indicated specications of the
power supply voltage of the unit correspond to the
specications of your mains. When using the unit in
the mains with 60 Hz frequency, the unit does not need
any additional measures.
Wipe the air fryer surface with a slightly damp cloth
and then wipe it dry.
Take the handle (6) and remove the tray (8) with the
basket (7) (рис.1).
Lift the protective cover (4), press the release button
(5) and remove the basket (7) from the tray (8) (pic. 2).
Wash the basket (7) with warm water and neutral
detergent, rinse them and wipe dry.
Install the basket (7) into the tray (8) until the lock
clicking (pic. 3).
Install the tray (8) with the basket (7) into the air fryer.
Note: - If the drip tray is not xed in the air fryer body,
the air fryer will not switch on, always make sure that
the tray (8) is installed properly.
Switching the air fryer on for the rst time
To remove any foreign odors, switch the air fryer on
with empty basket (7).
Pull the power cord out from the cord storage (10)
without excessive eort.
Insert the power plug into the mains socket, the
display (2) will light up.
Press the «on/o» button « » (16), at the same
time, you will hear a sound signal and the display will
show the temperature «180°C» in digital symbols
(11), the temperature is set by default, the digital
symbols (14) will display the time «15: 00» set by
default.
Press the «start/pause» button « » (17), the air
fryer will switch on and the symbols « , » (12,
13) will light up, the heating element operation
symbol « » (12) will periodically light up and go out,
which means that the set temperature is maintained
in during the air fryer operation.
After 10 minutes you can press the «start/pause»
8EN
button « » (17) and switch the air fryer o by
pressing the «on/o» button « » (16), unplug the
unit and wait for the air fryer to cool completely,
remove the drip tray (8), remove the basket (7) and
rinse it again.
Note:
- the control buttons (15, 16, 17, 18, 19) are
sensory, and you just need to touch a button, each
touch is accompanied by a sound signal.
- when using the unit for the rst time, a foreign
smell or some smoke from the heating element
can appear - this is normal and it is not covered
by warranty.
USING THE AIR FRYER
ATTENTION!
- The air fryer is not intended for water boiling.
- During the operation of the air fryer, heat is
released and hot steam can escape from the
grid (9). Use appropriate precautions to prevent
the risk of burns, res or other personal injury or
property damage.
- The air fryer heats up during operation and retains
heat for some time after it is switched o. Always
use potholders when working on hot surfaces and
let the metal parts cool down before cleaning the
air fryer.
- Be careful when removing cooked food from the
basket, always use cooking accessories designed
for non-stick surfaces when removing food.
Install and use the air fryer on a at, dry, steady and
heat-resistant surface with free access to the mains
socket.
The gap between the wall and the back of the air fryer
body should be at least 20-30 cm, the distance from
the sides of the air fryer body should be at least 10-20
cm.
Always check the condition of the hot air inlet and
outlet grids, otherwise the hot air circulation will be
interrupted, which can aect the cooking process or
damage the appliance.
Take the handle (6) and remove the tray (8) with the
basket (7) (pic.1).
Put the food products in the basket (7), do not
overload the basket (7) with products. Hot air
circulation is necessary for proper cooking, so it is not
recommended to ll the basket (7) more than 2/3 full.
When you fry fresh vegetables, do not put into the
basket (7) more than 3 cups of the products.
Insert the tray (8) into the air fryer body, make sure that
the tray (8) is installed properly otherwise the air fryer
will not switch on.
Pull the power cord out from the cord storage (10)
without excessive eort.
Insert the power plug into the mains socket.
9EN
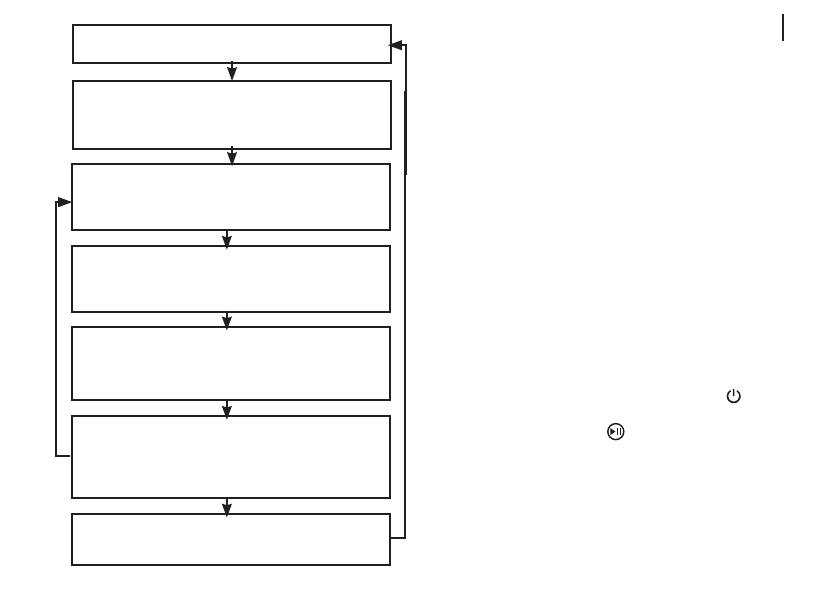
AIR FRYER OPERATION DIAGRAM
Notes:
- if the drip tray (8) is not xed in the air fryer body,
the air fryer will not switch on, always make sure
that the tray (8) is installed properly.
- during the air fryer operation you can change the
cooking temperature and the operation time of
the air fryer (see the operation diagram of the air
fryer).
For even cooking of foods, it is recommended to take
out the tray (8) several times and put it on a heat-
resistant surface, take the basket (7) out of the tray
(8), stir the foods in it or shake the basket (7) several
times. Install the basket (7) in the tray (8), install the
tray (8) in the air fryer body. If necessary, you can
adjust the cooking temperature (see the operation
diagram of the air fryer).
Notes:
- if necessary, you can switch the air fryer o at any
time, to do this, press the «on/o» button « » (16)
or pause the air fryer operation by pressing the
«start/pause» button « » (17).
After you nish cooking, wait 10-20 seconds and
then remove the tray (8), place it on a heat resistant
surface, remove the basket (7) from the tray (8) and
remove the food from it, do not remove cooked food
with metal objects that can damage the non-stick
coating of the basket (7), use kitchen accessories
By pressing the «temperature/operation time» setting
selection button (18) select the temperature setting, the
temperature or the operating time symbols (11) will light
up, the symbols (14) will light up.
Set the operation time of the air fryer within the range
«00:00 -60:00» pressing the buttons «-» (15) or «+» (19)
with a setting step 1 minute. By pressing and holding the
buttons (15, 19) you can quickly set the operating time.
By pressing the «-» (15) or «+» (19) buttons, set the
cooking temperature in the range «80-200°C» with a
setting step «5°C». By pressing and holding the buttons
(15, 19) you can quickly set the cooking temperature.
Press the «start/pause» button (17), the symbols (12,
13) will light up. The heating element operation symbol
(12) goes out when heated and lights up when the set
temperature is reached. Press the «start/pause» button
(17) again to temporarily stop the air fryer operation.
After the cooking time is over, you will hear 5 sound
signals. The cooking time symbols (14) will display the
time «00:00», the air fryer will switch o.
Install the food basket back to its place and plug the unit
in, the display (2) will light up.
Press the on/o button (16), you will hear a sound signal,
the symbols (11) will display the default temperature
«180°C», the symbols (14) will display the default time
«15:00». The unit is in the default operation mode.
10 EN
designed for non-stick surfaces.
Unplug the unit after the operation.
RECOMMENDATIONS
When you fry food in the air fryer, it is recommended
to add a small amount of rened olive or vegetable
oil, the oil can be applied to the food with a brush or
sprayed on it. This option is more economical and the
oil will be applied to the food more evenly.
Do not ll more than 2/3 of the basket (7) capacity.
When you fry fresh vegetables in the air fryer, it is
recommended to add no more than 3 cups of the
food in the basket.
For best results, some foods may need to be shaken
or turned vigorously while air-frying (see the cooking
table).
To avoid excess smoke from the grid (9), when
cooking foods with a naturally high fat content
such as chicken wings or sausages, it may be
necessary to drain the fat from the tray (8), and it is
recommended to cook such foods in small batches.
Before loading the food in the basket (7), make sure
that it is dry, if necessary, remove excess moisture,
this will help to get a crust on the food and reduce the
amount of steam and smoke escaping.
When frying breaded foods, make sure that the
breading does not peel o the food and position the
food pieces so that they do not touch, this will ensure
good circulation of hot air between the products.
You can reheat the food in the air fryer. It is
recommended to set the temperature not higher
that 140°C and the operation time no more than 10
minutes.
To kill various harmful bacteria, it is recommended
to cook such meat as beef, lamb, etc. at an internal
temperature of 63°C. Pork should be cooked at an
internal temperature of 71°C and poultry products
should be cooked at an internal temperature of 77°C
- 82°C.
When reheating meat/poultry products, they should
also be cooked to an internal temperature of 74°C.
Use a cooking thermometer to measure the
temperature.
FOOD COOKING TABLE
Products Tempe-
rature
Time Action
Vegetable mix (baked) 200°C 15-20
min.
встряхнуть
корзину
Broccoli (roasted) 200°C 15-20
min.
встряхнуть
корзину
Onion rings (frozen) 200°C 12-18
min.
встряхнуть
корзину
Cheese Sticks (frozen) 180°C 8-12 min. -
Sweet potato fried chips (fresh, hand-cut, about 2-4 mm
thick)
11EN
Parboil (step 1) 160°C 15 min. shake the
basket
Fry in the air fryer
(Step 2)
180°C 10-15
min.
shake the
basket
French fries (fresh, hand-cut, about 5-6 mm thick)
Parboil (step 1) 160°C 15 min. shake the
basket
Fry in the air fryer
(Step 2)
180°C 10-15
min.
shake the
basket
French fries, thin
(frozen), 3 cups
200°C 12-16
min.
shake the
basket
Meat loaf, 0.5 kg 180°C 35-40
min.
-
Hamburgers, up to
4 pcs.
180°C 10-14
min.
-
Hot dogs/sausages 180°C 10-15
min.
stir in the
basket
Chicken wings (fresh/
defrosted) Parboil
(step 1)
160°C 15 min. shake the
basket
Fry in the air fryer
(Step 2)
180°C 10 min. shake the
basket
Chicken wings Parboil
(step 1)
180°C 13 min. stir in the
basket
Fry in the air fryer
(Step 2)
200°C 5 min. shake the
basket
Notes:
- parboiling is a term that refers to the pre-cooking of
foods at a lower temperature before nal frying in an
air fryer;
- the cooking time and temperature are given for
reference, the result of cooking depends on the size and
shape of the food;
- it is recommended to add 5 minutes to the cooking
time if the air fryer is cold;
- If you nd the cooking result unsatisfactory, you
can increase or decrease the cooking time/cooking
temperature or the weight of the food.
TROUBLES AND TROUBLESHOOTING
Malfunction Cause Solution
The air fryer is
not operating
The unit is not
connected to the
mains.
Insert the power plug
into the grounded mains
socket.
12 EN
Airfried food
is not cooked
through.
Too much food in the
basket.
Put small batches
of ingredients in the
basket. Smaller batches
are fried more evenly.
The set temperature is
too low.
Set the required
temperature (see the
cooking table).
Cooking time is too
short.
Set the required
operation time for the
timer (see the food
cooking table).
The ingredients
are not fried
evenly in the air
fryer.
You need to shake
some types of food
halfway through
cooking.
Ingredients lying on top
of each other (such as
french fries) must be
shaken halfway through
cooking (see the
cooking table).
Fried snacks
are not crispy
when you take
them out of the
deep fryer.
You have used a type
of snack that is meant
to be cooked in a
traditional deep fryer.
Use oven-baked snack
recipes or brush them
lightly with oil to make
them crispier.
I cannot install
the tray in
the air fryer
correctly.
The basket is
overlled with
ingredients.
Do not exceed the MAX
mark of the basket.
The basket is not
installed correctly in
the tray.
Install the basket in
the tray until the lock
clicking.
White smoke
escapes from
the grid.
You cook food with
high fat content.
When you fry fatty
ingredients in the air
fryer, a large amount
of fat ows onto the
drip tray. The fat makes
white smoke. This does
not aect the operation
of the unit or the nal
result of cooking.
There is remaining fat
on the tray from the
previous use.
Clean the tray after
each use of the air fryer.
Fresh french
fries are
unevenly fried
in the air fryer.
You used the wrong
kind of potato.
Use fresh potato of
appropriate kind.
You haven’t washed
the potato sticks
properly before frying.
Rinse the potato sticks
well to remove the
starch from the outside
of the sticks.
Fresh french
fries are not
crispy after
cooking.
It is possible when
using a small amount
of oil, as well as the
presence of moisture
on the surface of the
potato.
Make sure that you
dried the potato sticks
properly before adding
oil.
Cut the potato into
smaller sticks so they
become crispier.
Add a little more oil for
crunchier results.
13EN
CLEANING AND CARE
Clean the air fryer after every use.
Switch the air fryer o and unplug the power cord
plug from the mains socket, wait until the air fryer
cools down.
Wipe the air fryer surface with a slightly damp cloth
and then wipe it dry.
Take the handle (6) and remove the tray (8) from the
air fryer (pic. 1).
Lift the protective cover (4), press the release button
(5) and remove the basket (7) from the tray (8) (pic.
2).
Wash the basket (7) and the tray (8) with warm water
and neutral detergent, rinse them and wipe dry.
Install the basket (7) into the tray (8) until the lock
clicking (pic. 3).
Install the tray (8) with the basket (7) into the air fryer.
Do not use metal brushes, abrasives and solvents to
clean the air fryer body and the removable parts.
Do not immerse the air fryer, the power cord or the
power plug into water or any other liquids.
STORAGE
Clean the air fryer before taking it away for storage.
Put the power cord in the cord storage compartment
(10).
Keep the unit in a dry cool place out of reach of
children and handicapped persons.
DELIVERY SET
1. Air grill – 1 pc.
2. Instruction manual – 1 pc.
SPECIFICATIONS
Power supply 220-240 V ~ 50-60 Hz
Rated input power: 1400 W
Cooking basket capacity - 3 l
RECYCLING
To prevent possible damage to the
environment or harm to the health of people
by uncontrolled waste disposal, after service
life expiration of the unit or the batteries (if
included), do not discard them with usual
household waste, deliver the unit and the batteries to
specialized centers for further recycling.
The waste generated during the disposal of the unit
is subject to mandatory collection and consequent
disposal in the prescribed manner.
For further information about recycling of this product
apply to a local municipal administration, a disposal
service or to the shop where you purchased this
product.
14 EN
The unit operating life is 3 years
The manufacturing date is specied in the serial
number.
In case of any malfunctions promptly apply to the
authorized service center.
The manufacturer reserves the right to change the
appearance, design and specications not aecting
general operation principles of the unit, without prior
notice.
15DE
ELEKTRISCHER
HEISSLUFTOFEN BR2031
Das Funktionsprinzip eines Heißluftofens besteht
darin, einen heißen Luftstrom im Arbeitskorb zu
zirkulieren, wobei die Produkte gleichmäßig von
allen Seiten zubereitet werden, sie innen zart und
außen mit einer knusprigen Kruste ausfallen.
Dieses Prinzip des Kochens ermöglicht es Ihnen,
die meisten Produkte ohne Zugabe von Öl oder mit
seiner minimalen Menge zuzubereiten.
BESCHREIBUNG
1. Gehäuse
2. Bildschirm
3. Bedienungsplatte
4. Schutzabdeckung der Entriegelungstaste des
Korbs
5. Entriegelungstaste für den Korb
6. Korbgri
7. Korb
8. Tropfschale
9. Heißluftauslassgitter
10. Netzkabelaufbewahrung
Bildschirm und Bedienungsplatte
11. Digitale Symbole der eingestellten Temperatur
DE
ACHTUNG!
Als zusätzlicher Schutz ist es zweckmäßig,
den FI-Schalter mit Nennstrom bis 30 mA im
Stromversorgungskreis aufzustellen; wenden Sie sich
dafür an einen Spezialisten.
12. Symbol zum Einschalten des Heizelements « »
13. Das Symbol für den Betrieb des Elektromotors
« »
14. Digitale Symbole für die Betriebszeit
15. Einstelltasten «Temperatur/Betriebszeit» « »
16. Ein-/Ausschalttaste « »
17. «Start/Pause»-Taste « »
18. Taste zur Auswahl der Einstellung «Temperatur/
Betriebszeit» « »
19. Einstelltasten «Temperatur/Betriebszeit» « »
16 DE
abb. 3
abb. 2abb. 1
17DE
SICHERHEITSHINWEISE UND
GEBRAUCHSANLEITUNG
Bevor Sie den Heißluftofen benutzen, lesen Sie
zuerst die Bedienungsanleitung aufmerksam durch
und bewahren Sie sie zum späteren Gebrauch auf.
Benutzen Sie den Heißluftofen nur
bestimmungsmäßig und laut dieser
Bedienungsanleitung.
Missbrauch des Heißluftofens kann zu seiner
Störung führen, den Benutzer oder sein Eigentum
beschädigen und bildet keinen Garantiefall.
Vergewissern Sie sich, dass die auf dem
Bezeichnungszettel angegebene Betriebsspannung
und die Netzspannung übereinstimmen.
Stecken Sie den Netzstecker in eine Steckdose mit
einem zuverlässigen Erdungskontakt.
Schließen Sie das Gerät an keine externen
Schaltuhren oder elektrischen Steckdosen mit
Fernbedienung an.
Um Brandgefahr zu vermeiden, verwenden Sie keine
«Adapterstecker», wenn Sie den Heißluftofen an eine
Steckdose anschließen.
Installieren und verwenden Sie den Heißluftofen auf
einer ebenen, trockenen, stabilen, hitzebeständigen
Oberäche, so dass der Zugang zur Steckdose
immer frei ist.
Um Flecken auf der Oberäche zu vermeiden,
auf der der Heißluftofen aufgestellt wird, wird es
empfohlen, ihn auf einem zusätzlichen Ständer zu
installieren, indem er zwischen dem Heißluftofen und
der Arbeitsplatte platziert wird.
Der Abstand von der Wand zur Rückseite des
Heißluftofen-Gehäuses sollte mindestens 20-30 cm
betragen, der Abstand von der seitlichen Teile des
Heißluftofen-Gehäuses sollte mindestens 10-20 cm
betragen.
Achten Sie immer auf den Zustand der Heißluftein-
und -austrittsgitter, da sonst die Heißluftzirkulation
gestört wird, dies kann den Koch¬vorgang
beeinträchtigen oder das Gerät beschädigen.
Es ist nicht gestattet, das Gerät draußen zu
benutzen.
Es ist nicht empfohlen, das Gerät bei Gewitter zu
benutzen.
Schützen Sie den Heißluftofen vor Stößen, Stürzen,
Vibrationen und anderen mechanischen Einüssen.
Lassen Sie das ans Stromnetz angeschlossene
Gerät nie unbeaufsichtigt.
Benutzen Sie das Gerät in direkter Nähe von
Heizgeräten, Wärmequellen oder oenem Feuer
nicht.
Es ist verboten, den Heißluftofen an den Orten, wo
Aerosole verwendet werden, sowie in der Nähe von
leicht-entzündbaren Flüssigkeiten, zu benutzen.
Benutzen Sie den Heißluftofen in der Nähe von
Spülbecken, in Badezimmern, neben Wasserbecken
oder anderen mit Wasser gefüllten Behältern nicht.
18 DE
Wenn der Heißluftofen ins Wasser gefallen ist,
ziehen Sie sofort den Netzstecker aus der Steckdose
und ziehen Sie das Gerät erst dann aus dem
Wasser. Wenden Sie sich an einen autorisierten
Kundendienst, um das Gerät prüfen oder reparieren
zu lassen.
Achten Sie darauf, dass das Netzkabel heiße
Oberächen und scharfe Möbelkanten nicht berührt.
Während des Betriebs wird das Gehäuse des
Heißluftofens sehr heiß, um Verbrennungen
zu vermeiden, berühren Sie nicht die heißen
Oberächen, die mit dem Zeichen « »
gekennzeichnet sind.
Bewegen Sie den heiße Heißluftofen nicht, warten
Sie, bis er vollständig abgekühlt ist.
Benutzen Sie das Gerät in gut belüfteten Räumen.
Verwenden Sie nur die Teile des Heißluftofens, die im
Lieferumfang enthalten sind.
Schalten Sie das Gerät nicht ein, wenn sich keine
Produkte im Heißluftofen benden.
Entfernen Sie die Produkte aus dem Heißluftofen
sofort nach dem Kochen, wenn Sie sich längere Zeit
im eingeschalteten Heißluftofen benden, kann es zu
einem Brand kommen.
Entfernen Sie gekochte Speisen nicht mit
Metallgegenständen, die die Antihaftbeschichtung
des Korbs beschädigen können, verwenden Sie
Küchenwerkzeuge, die für Antihaftoberächen
ausgelegt sind.
Trennen Sie das Gerät nach dem Gebrauch oder
vor der Reinigung vom Stromnetz ab. Wenn Sie
den Heißluftofen vom Stromnetz trennen, halten Sie
den Stecker des Netzkabels fest und ziehen Sie ihn
vorsichtig aus der Steckdose. Ziehen Sie nicht am
Netzkabel – dies kann es beschädigen und einen
Kurzschluss verursachen.
Berühren Sie das Gerätegehäuse, das Netzkabel
und den Netzstecker mit nassen Händen nicht.
Aus Kindersicherheitsgründen lassen Sie
Plastiktüten, die als Verpackung verwendet werden,
nie ohne Aufsicht.
ACHTUNG!
Lassen Sie Kinder mit Plastiktüten oder
Verpackungsfolien nicht spielen. Erstickungsgefahr!
Das Gerät ist nicht für Kinder bestimmt.
Beaufsichtigen Sie Kinder, damit sie das Gerät als
Spielzeug nicht benutzen.
Lassen Sie Kinder die Arbeitsäche, das
Gerätegehäuse, das Netzkabel oder den Netzstecker
während des Gerätebetriebs nicht berühren.
Besondere Vorsichtsmaßnahmen sind in den
Fällen angesagt, wenn sich Kinder oder behinderte
Personen während des Gerätebetriebs in der Nähe
aufhalten.
Während des Betriebs und der Pausen zwischen
den Betriebszyklen stellen Sie das Gerät an einen für
Kinder unzugänglichen Ort auf.
19DE
Das Gerät ist für Personen (darunter Kinder) mit
eingeschränkten sensorischen, körperlichen,
geistigen oder mentalen Fähigkeiten oder Personen
ohne ausreichende Erfahrung und Kenntnisse nicht
geeignet, wenn sie sich unter Aufsicht der Person,
die für ihre Sicherheit verantwortlich ist, nicht
benden oder entsprechende Anweisungen über die
Gerätenutzung nicht bekommen haben.
Prüfen Sie die Unversehrtheit des Netzkabels von
Zeit zu Zeit.
Wenn das Netzkabel beschädigt ist, soll es vom
Hersteller, vom Kundendienst oder von ähnlich
qualiziertem Personal ersetzt werden, um Gefahren
zu vermeiden.
Es ist nicht gestattet, das Gerät selbständig
zu reparieren. Es ist nicht gestattet, das Gerät
selbständig auseinanderzunehmen; bei der
Feststellung jeglicher Beschädigungen, sowie im
Sturzfall, trennen Sie es vom Stromnetz ab und
wenden Sie sich an einen Kundendienst.
Um Beschädigungen zu vermeiden, transportieren
Sie das Gerät nur in der Fabrikverpackung.
Bewahren Sie das Gerät an einem trockenen,
kühlen und für Kinder und behinderte Personen
unzugänglichen Ort auf.
DAS GERÄT IST NUR FÜR DEN GEBRAUCH IM
HAUSHALT GEEIGNET, ES IST VERBOTEN, DAS
GERÄT ZU HANDELS- ODER LABORZWECKEN ZU
BENUTZEN.
VOR DER ERSTEN NUTZUNG
Packen Sie das Gerät aus und warten Sie 3 Stunden,
bevor Sie es bei einer negativen Temperatur
transportieren oder bewahren.
Packen Sie das Gerät aus und entfernen Sie alle
Verpackungsmaterialien.
Bewahren Sie die Originalverpackung auf.
Lesen Sie die Sicherheitsmaßnahmen und
Bedienungsempfehlungen durch.
Prüfen Sie die Komplettheit.
Prüfen Sie das Gerät auf Beschädigungen; wenn
es beschädigt ist, schließen Sie es ans Stromnetz
nicht an.
Vergewissern Sie sich, dass die angegebenen
Parameter der Geräteversorgungsspannung und die
Stromnetzparameter übereinstimmen. Beim Einsatz
des Geräts in einem 60-Hz-Stromnetz sind keine
weiteren Schritte erforderlich.
Wischen Sie die Oberäche des Heißluftofen-
Gehäuses mit einem leicht feuchten Tuch ab und
wischen Sie sie anschließend trocken.
Greifen Sie den Gri (6) und nehmen Sie den
Tropfschale (8) mit dem Korb (7) heraus (Abb.1).
Heben Sie die Schutzabdeckung (4) an, drücken Sie
die Entriegelungstaste (5) und nehmen Sie den Korb
(7) aus der Tropfschale (8) (Abb. 2).
Waschen Sie den Korb (7) mit warmem Wasser und
einem neutralen Reinigungsmittel, spülen Sie ihn ab
und wischen Sie ihn dann trocken.
20 DE
Setzen Sie den Korb (7) in die Tropfschale (8) ein,
bis die Verriegelung ausgelöst wird (Abb. 3).
Setzen Sie die Tropfschale (8) mit dem Korb (7) in
den Heißluftofen ein.
Anmerkungen:
- wenn die Tropfschale nicht in das Heißluftofen-
Gehäuse einrastet, lässt sich der Heißluftofen
nicht einschalten, überprüfen Sie immer, ob die
Tropfschale (8) richtig installiert ist.
Erste Einschaltung des Heißluftofens
Um Fremdgerüche zu entfernen, wird es empfohlen,
den Heißluftofen einzuschalten, ohne Lebensmittel in
den Korb (7) zu legen.
Ziehen Sie das Netzkabel ohne großen Aufwand aus
der Netzkabelaufbewahrung (10) heraus.
Stecken Sie den Netzstecker in eine Steckdose, und
der Bildschirm (2) leuchtet auf.
Drücken Sie die Ein-/Ausschalttaste « » (16), es
ertönt ein Tonsignal und die Temperatur wird mit
den digitalen Symbolen (11) auf «180°C» angezeigt,
die Temperatur ist auf die Standardtemperatur
eingestellt, die digitalen Symbole (14) zeigen die
Zeit «15:00» an, die Zeit ist auf die Standardzeit
eingestellt.
Drücken Sie die «Start/Pause»-Taste « » (17), der
Heißluftofen wird eingeschaltet und die Symbole «
, » (12, 13) leuchten, das Funktionssymbol
des Heizelements « » (12) leuchtet regelmäßig
auf und erlischt, was bedeutet, dass die eingestellte
Temperatur während des Heißluftofen-Betriebs
beibehalten wird.
Nach 10 Minuten können Sie die «Start/Pause»-
Taste « » (17) drücken und den Heißluftofen
durch Drücken der Ein-/Ausschalttaste « »
(16) ausschalten, Ziehen Sie das Netzkabel aus
der Steckdose und warten, bis der Heißluftofen
vollständig abgekühlt ist, entfernen Sie die
Tropfschale (8), den Korb (7) und spülen Sie ihn
erneut aus.
Anmerkungen:
- Steuerungstasten (15, 16, 17, 18, 19) sind
berührungsempndlich, und es genügt, die Taste
zu berühren, jede Berührung wird von einem
Tonsignal begleitet.
- wenn Sie das Gerät zum ersten Mal einschalten,
kann es zu einem Fremdgeruch oder einer
geringen Menge Rauch durch das Heizelement
kommen - dies ist zulässig und stellt keinen
Garantiefall dar.
VERWENDUNG DES HEISSLUFTOFENS
ACHTUNG!
- Der Heißluftofen ist nicht zum Abkochen von
Wasser bestimmt.
- Während des Betriebs des Heißluftofens wird
Wärme freigesetzt und heißer Dampf kann
  • Page 1 1
  • Page 2 2
  • Page 3 3
  • Page 4 4
  • Page 5 5
  • Page 6 6
  • Page 7 7
  • Page 8 8
  • Page 9 9
  • Page 10 10
  • Page 11 11
  • Page 12 12
  • Page 13 13
  • Page 14 14
  • Page 15 15
  • Page 16 16
  • Page 17 17
  • Page 18 18
  • Page 19 19
  • Page 20 20
  • Page 21 21
  • Page 22 22
  • Page 23 23
  • Page 24 24
  • Page 25 25
  • Page 26 26
  • Page 27 27
  • Page 28 28
  • Page 29 29
  • Page 30 30
  • Page 31 31
  • Page 32 32
  • Page 33 33
  • Page 34 34
  • Page 35 35
  • Page 36 36
  • Page 37 37
  • Page 38 38
  • Page 39 39
  • Page 40 40
  • Page 41 41
  • Page 42 42
  • Page 43 43
  • Page 44 44
  • Page 45 45
  • Page 46 46
  • Page 47 47
  • Page 48 48
  • Page 49 49
  • Page 50 50
  • Page 51 51
  • Page 52 52
  • Page 53 53
  • Page 54 54
  • Page 55 55
  • Page 56 56

Brayer BR2031 Инструкция по эксплуатации

Категория
Печи
Тип
Инструкция по эксплуатации

Задайте вопрос, и я найду ответ в документе

Поиск информации в документе стал проще с помощью ИИ

на других языках