Hendi 299869 Руководство пользователя

Тип
Руководство пользователя

Это руководство также подходит для

You should read this user manual carefully before
using the appliance.
Bevor Sie das Gerät in Betrieb nehmen, sollten
Sie diese Gebrauchsanweisung aufmerksam lesen.
Alvorens de apparatuur in gebruik te nemen dient
u deze gebruiksaanwijzing aandachtig te lezen.
Przed uruchomieniem urządzenia należy koniecznie
dokładnie przeczytać niniejszą instrukcję obsługi.
Lisez attentivement ce mode d’emploi avant d’utiliser
l’appareil .
Prima di utilizzare l’apparecchio in funzione leggere
attentamente le istruzioni per l’uso.
Citiţi cu atenţie prezentul manual de utilizare înainte de
folosirea aparatului.
Внимательно прочитайте руководство пользователя
перед использованием прибора.
Πρέπει να διαβάσετε αυτές τις οδηγίες χρήσης
προσεκτικά πριν χρησιμοποιήσετε τη συσκευή.
HOT CHOCOLATE DISPENSER
274125, 274149
2
Keep these instructions with the appliance.
Diese Gebrauchsanweisung bitte beim Gerät aufbewahren.
Bewaar deze handleiding bij het apparaat.
Zachowaj instrukcję urządzenia
Gardez ces instructions avec cet appareil.
Conservate le istruzioni insieme all’apparecchio.
Păstraţi maualul de utilizare alături de aparat.
Хранить руководство вместе с устройством.
Φυλάξτε αυτές τις οδηγίες μαζί με τη συσκευή.
For indoor use only.
Nur zur Verwendung im Innenbereich.
Alleen voor gebruik binnenshuis.
Do użytku wewnątrz pomieszczeń.
Pour l’usage à l’intérieur seulement.
Destinato solo all’uso domestico.
Doar pentru uz la interior.
Использовать только в помещениях.
Για χρήση μόνο σε εσωτερικό χώρο.
3
EN
Dear Customer,
Thank you for purchasing this Hendi appliance. Read this manual carefully, paying particular attention to
the safety regulations outlined below, before installing and using this appliance for the first time.
Safety regulations
This appliance is intended for buffet and household use.
Only use the appliance for the intended purpose it was designed for as described in this
manual.
The manufacturer is not liable for any damage caused by incorrect operation and
improper use.
Keep the appliance and electrical plug away from water and other liquids. In the event
the appliance falls into water, immediately remove the power plug from the socket. Do
not use the appliance until it has been checked by a certified technician. Failure to follow
these instructions will cause life threatening risks.
• Never attempt to open the housing of the appliance by yourself.
• Do not insert objects into the housing of the appliance.
• Do not touch the plug with wet or damp hands.
Danger of electric shock! Do not attempt to repair the appliance by yourself, repairs
are only to be conducted by qualified personnel.
Never use a damaged appliance! When it’s damaged, disconnect the appliance from the
socket and contact the retailer.
Warning! Do not immerse the electrical parts of the appliance in water or other liquids.
• Never hold the appliance under running water.
Regularly check the power plug and cord for any damage. When damaged it must be
replaced by a service agent or similarly qualified person in order to avoid danger or injury.
Make sure the cord does not come in contact with sharp or hot objects and keep it away
from open fire. Never pull the power cord to unplug it from the socket, always pull the
plug instead.
• Make sure that the power cord and/or extension cord do not cause a trip hazard.
• Never leave the appliance unattended during use.
Warning!
As long as the plug is in the socket the appliance is connected to the power
source.
• Turn off the appliance before unplugging it from the socket.
Connect the power plug to an easily accessible electrical socket so that in case of emergency
the appliance can be unplugged immediately.
• Never carry the appliance by the cord.
• Do not use any extra devices that are not supplied together with the appliance.
Only connect the appliance to an electrical outlet with the voltage and frequency mentioned
on the appliance label.
Never use accessories other than those recommended by the manufacturer. Failure to do
so could pose a safety risk to the user and could damage the appliance. Only use original
parts and accessories.
4
EN
This appliance should not be operated by persons with reduced physical, sensory or mental
capabilities, or persons that have a lack of experience and knowledge.
• This appliance should, under any circumstances, not be used by children.
• Keep the appliance and its power cord out of reach of children.
WARNING: ALWAYS switch off the appliance and unplug from power socket before
cleaning, maintenance or storage.
Special Safety Regulations
This appliance is only intended for heating chocolate and producing hot chocolate drinks
in buffet and household use. NOT SUITABLE for other liquids or boiling water.
• This appliance is intended to be used by trained personnel such as kitchen or bar staff.
Use the appliance only as described in manual.
Leave at least 25cm spacings from surrounding for ventilation purposes.
Use fresh and cold water to fill the boiler tank (12). Pour the water slowly until it reaches
the maximum level that marked “MAX” on the boiler tank.
Warning! Never operate the appliance without water in the boiler tank (12) as this would
damage the heating element if there is no water inside.
Warning! Never exceed the maximum level which is marked “- MAX LEVEL -” on the bowl
(2) itself.
Warning! Do not open the bowl lid (1) while it is operating and heating. Hot steam will
come out. Risk of scalding.
Danger of burns!. Do not touch the bowl during operating & heating.
Keep the appliance away from hot surfaces and open flames. Always operate the
appliance on a level, stable, clean, heat-resistant and dry surface.
Dry and clean the appliance and all accessories before connecting to the electrical power
supply and usage.
Let the appliance cool down completely in a location out of reach of children before
cleaning and storage.
Do not move the appliance while it contains hot chocolate or while it is operating.
Attention! Grip the bottom of the appliance when lifting the appliance and moving the
appliance in order to avoid damage.
5
EN
Intended use
This appliance is intended for buffet and house-
hold use.
The appliance is designed only for heating choc-
olate and producing hot chocolate drinks. Not
suitable for other food. Any other use may lead to
damage to the appliance or personal injury.
Operating the appliance for any other purpose
shall be deemed a misuse of the device. The user
shall be solely liable for improper use of the de-
vice.
Grounding installation
This appliance is classified as protection class
I and must be connected to a protective ground.
Grounding reduces the risk of electric shock by
providing an escape wire for the electric current.
This appliance is fitted with a power cord that has a
grounding wire and grounded plug. The plug must
be plugged into an outlet that is properly installed
and grounded.
Machine description
Use of the machine
The machine for professional use you have purchased is intended to produce hot chocolate drinks,
Main components
The main components making up the machine are:
1. Bowl lid
2. Bowl (5L for item 274125, 10L for item 274149)
3. Mixing auger
4. Bowl hook-on handles x2
5. Machine body
6. Main switch
7. Temperature regulator (°C)
8. Feet
9. Mixing paddle
10. Bottom pan
11. Lid for water boiler tank
12. Boiler tank
13. Product dispenser unit (tap)
14. Drip tray maximum level indicator
15. Drip tray grid
16. Drip tray
17. Boiler tank drainage cap
6
EN
Operation
Starting up
To start up the machine carry out the following
steps:
Make sure that the main switch (6) is set to off;
Take off the bowl lid (1)
Fill the boiler tank (12) with water using the boiler
tank level indicator tray, until it reaches the max-
imum value indicated on the tray itself, which is
marked –MAX-.
Warning: fill the boiler tank by pouring in water
slowly and check for a few seconds to make sure
that the water level has reached the –MAX-level
and that it is stable.
When filling an empty boiler tank for the first
time, the amount of water needed to completely
fill the tank is approximately 3.5 litres.
Open the bowl lid (1) and pour the chocolate into the
bowl (2).
Never exceed the maximum level, which is
marked –MAX LEVEL - on the bowl (2) on the tray
itself.
After pouring the chocolate into the bowl, fit the
lid back in place.
Then, connect the power plug to a suitable elec-
trical power supply.
Press the main switch (6) to start the machine;
the product inside the bowl will start to be mixed:
Green indicator light up: Machine switch ON
Green indicator off: Machine switch OFF
Set the temperature regulator (7) to the desired
temperature in order to heat the chocolate inside
the bowl (2).
Note: There is a RESET button for the temperature
sensor inside. The temperature sensor will shut
down the machine. Then you need to press the re-
set button to restart the machine (See para. 1.14).
7
EN
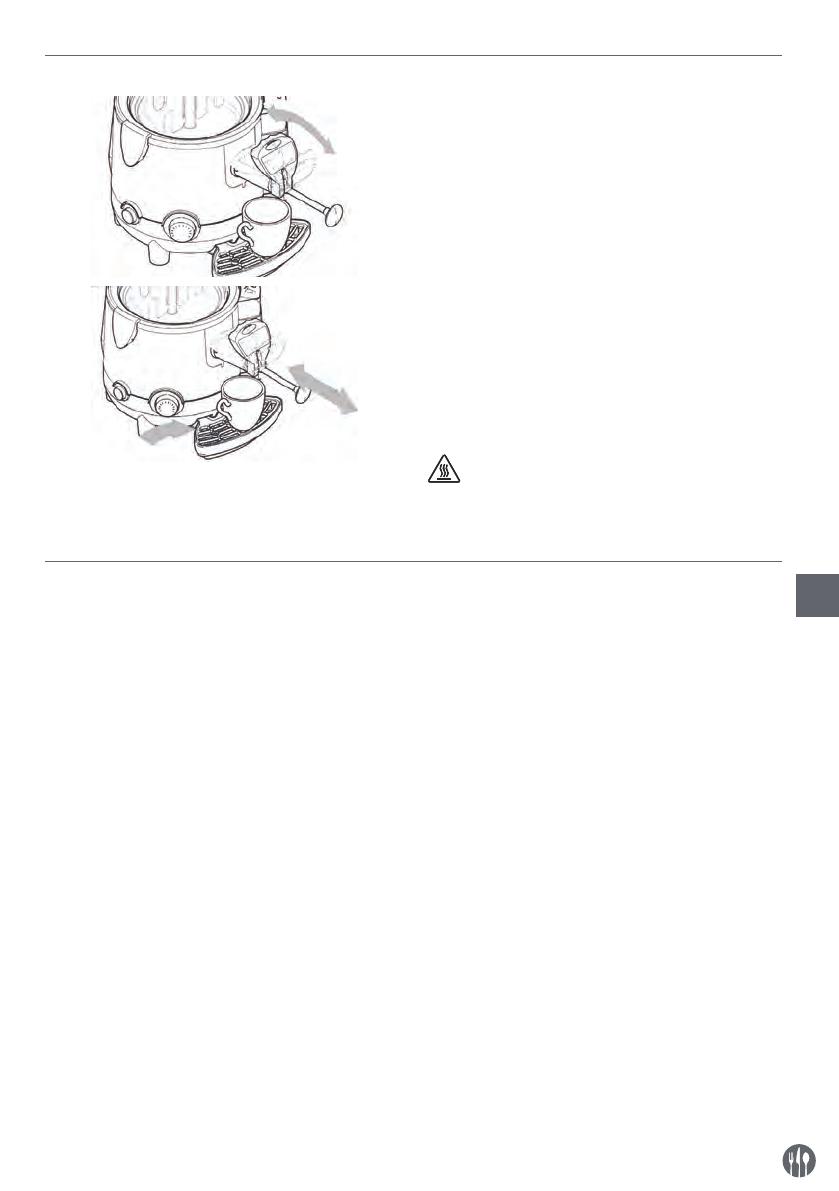
Dispensing the product
Fig. 1
Warning: The products dispensed from the ma-
chine has a very high temperature; risk of scalding.
To dispense hot chocolate proceed as follows,
It is advisable to keep the rod in the maximum dis-
pensing position to help the product to flow at the
required rate.
Place a cup beneath the tap:
Use the lever on the tap (the product is dispensed
when the level is pressed or pulled) until the required
amount of product has been poured inside the cup:
Gradually release the tap level so that it returns
to the standby position (tap off).
If the hot chocolate is passing too low, it is ad-
visable to keep the rod pulled out at the maxi-
mum position; any clogging in the dispensino line
may be removed by sliding the rod back and forth
while keeping the machine, as shown in the Fig.1
Caution! Danger of burns! Do not touch the
bowl lid (1) and the bowl (2) while the machine is
operating since they are very hot. Always use the
top knob of the bowl lid (2) for picking up.
Cleaning and maintenance
Machine cleaning and maintenance must be per-
formed with the main switch set to OFF and the
machine unplugged from the mains electricity.
Warning: each time that the bowl is filled with any
type of product (food or sanitizing product), make
sure that the mixing rod is present.
Warning: before carrying out any cleaning job wait
until the machine has cooled down sufficiently.
Warning: the use of abrasive and/or metal sponges
to clean the machine or its components is com-
pletely prohibited; only use ad amp cloth and/or
non-abrasive sponge for cleaning.
Warning: only use the cleaning brush provided to
clean the channel connecting between the tank
and the tap (see section 1.5); never use this brush
to clean other parts.
Before performing any cleaning and maintenance
operation on the machine, wear the personal
protections (gloves, glasses,etc.), which are rec-
ommended by the safety standards in force in the
country where the machine is used.
When performing the Cleaning and Maintenance
operations, follow these instructions:
• wear protection accident-proof gloves;
• do not use solvents or in flammable materials;
do not use abrasive and/or metal sponges to
clean the machine and its components;
do not wash machine components in a dishwasher;
do not dry parts of the machine in a conventional
and/or microwave oven,
• do not immerse the machine in water;
do not expose the machine to direct sprays of water;
clean only with warm water and a sanitizing
product made from sodium hypochlorite diluted
in water to obtain an active chloride concentra-
tion of
on completing work, make sure that all protec-
tive covers and guards that have been removed or
opened are set back in place and properly secured.
Cleaning and sanitization are operations that must
be performed with utmost care and on a regular ba-
sis
to guarantee the quality of the beverages dis-
pensed and compliance with mandatory hygiene
standards.
8
EN
Each bowl must be cleaned and sanitized for a
product change at least every 2 days and in any
case in compliance with the current hygiene reg-
ulations in the user’s country. These operations
must be made more frequently if demanded by
the char acteristics of the product used; for fur-
ther details, contact the product supplier.
The metal, plastic and rubber materials used to
make these parts, combined with their specific
shapes make cleaning easier but do not prevent
the formation of bacteria and mould in the event
of insufficient cleaning.
1.1. Cleaning and sanitation procedures
When performing cleaning and sanitation opera-
tions, proceed as described here below:
empty the product from the bowl, (see paragraph
1.2);
remove the bowl from the machine, (see paragraph
1 3);
remove the tap from the machine, (see paragraph
1.4);
clean the pan, (see paragraph 1.5);
disassemble the tap previously removed from the
machine, (see paragraph 1.6);
wash and sanitize the machine’s component
parts, (see paragraph 1.7);
refit the bowl on the machine, (see paragraph 1. 8.1);
use a damp cloth and/or non-abrasive sponge
soaked in sanitizing product to clean the tap cou-
pling;
re-assemble the tap, (see paragraph 1.8.2);
fit the tap onto the machine, (see paragraph 1.8
3);
perform the sanitizing procedure for the inside of
the machine, (see paragraph 1.9);
clean the drip tray, (see paragraph 1.10
clean the bowl using a damp cloth and/or a
non-abrasive sponge, (see paragraph 1.11).
empty out the boiler tank, (see paragraph 1.12);
clean and de-scale the boiler tank, (see para-
graph 1.13);
1.2. Emptying the bowl
Before cleaning out the bowl, it is first necessary to
empty out any production inside it.
With the machine switched on, empty out all of the
product still inside the bowl, using the level on the tap.
Fill the bowl with water and set temperature regu-
lator (7) to 50°C (122°F),Operate the appliance for
at least 15-20 minutes; increasing this amount of
time will release any product residues that may be
stuck to the sides of the bowl.
Empty out the entire contents of the bowl, using the
lever on the tap.
Warning: the product dispensed from the machine
has a very high temperature; risk of scalding.
9
EN
1.3. Removing the bowl
Warning: before removing the bowl, make sure that
the main switch is off and that the machine is un-
plugged from the mains electricity and sufficiently
cooled down.
Removing the bowl is prohibited if it contains the
product or any other liquid.
It Is fundamentally important to remove the howl
and its component parts if the machines to be cor-
rectly cleaned and sainted.
To remove the bowl correctly proceed as follows:
• Take off the lid;
Slide the mixer upwards to remove it, keeping it
in line with the central rod until the bottom slot of
the mixer itself is level with the rotation pin.
Tilt the mixer and slide it upwards, as illustrated
in the figure, to remove it completely.
Unlock the bowl hook-on handles, as illustrated
in the figure, to free the bowl from the machine
body;
Release the bowl from the machine body, using
two fingers to prise it away from the fixed steel
part of the mixer auger(A) and the others to grip
the outlet edge of the bowl(B): Gradually pull the
bowl harder until it comes away from its seating;
Slide the bowl upwards using both hands;
10
EN
Slide the mixing auger upwards with one hand,
taking care to grip it by the rotation pin;
Place the bowl on a flat surface and using both
hands, remove the gasket by sliding it upwards in
the direction shown by the arrow.
1.4. Removing the tap
Removing the tap is prohibited if the bowl contains the product or any other liquid.
To remove the tap, proceed as follows:
move the rod to the maximum dispensing posi-
tion;
Press with some force to push the shaft (A) and
then remove the tap (B) with both hands, as illus-
trated in the figures;
1.5. Cleaning the pan
It is necessary to remove all parts fitted to the pan.
Remove any product left in the bowl, see para-
graph 1.2;
Remove the bowl from the machine, see para-
graph 1.3;
Remove the tap from the machine, see paragraph
1.4;
Clean the entire surface of the pan using a damp
cloth and/or a non-abrasive sponge;
Clean the channel connecting the bowl and the
tap, using a cleaning brush (not supplied), as il-
lustrated in the figure;
11
EN
• Refit the tap;
• Pour a little water inside the pan;
Use the tap to drain out all water from the pan so
as to eliminate any small product residues inside
the dispensing channel.
1.6. Disassembling the tap
To clean the inside of the tap more thoroughly, dis-
assemble it as follows:
Remove the tap, follow the steps listed in para-
graph 1.4;
Place the tap on a clean, flat surface, then loosen
and remove the screw (A) fastening the button to
the machine, then slide out the pin (B) and rele-
vant spring (C) from the seating.
Pull the (D) all the way out from the knob (E) then
push the lever (F) upwards from the bottom until
it comes out from the pin guide, as illustrated in
the figure;
Unscrew the knob (E) by turning it anticlockwise
while holding the rod in place;
Pull out the rod (G) and spring (H) from the tap
body (the pin/gasket assembly (I) will slide out
together with the rod)
Detach the rod (G) from the pin/gasket assembly
(I);
12
EN
Disassemble (by pulling) the pin (L) from the gas-
ket (M).
1.7. Washing and sanitizing the components
All of the component parts previously disassem-
bled (tap, mixer, mixing auger, gasket and bowl)
must be carefully washed and sanitized.
To carry out this procedure correctly proceed as follows:
Fill a container with detergent and hot water with
a temperature of 50~60°C (122~140°F);
Wash the disassembled components with the de-
tergent solution;
Rinse with hot water;
Clean only with warm water and a sanitizing product
made from sodium hypochlorite diluted in water to
obtain an active chloride concentration of 0.02%;
Immerse the disassembled component parts in
the sanitizing solution for about 30 minutes;
Rinse with clean water;
Clean the bowl lid,(see paragraph 1.11)
Place the components on a clean surface and dry them.
1.8. Assembling the washed components
All washed and sanitized component parts must be re-assembled with care and then subsequently refitted
to the machine, following the relevant steps.
1.8.1. Assembling the bowl
Warning: make sure that the gasket is correctly
assembled.
A seal correctly assembled; here the seal per-
fectly adheres to the bowl edge.
A seal which is not correctly assembled; here the
seal does not perfectly adhere to the bowl edge.
Fit the bowl back into place firmly downward,
after moistening the seal with water
DO NOT USE GREASE OR VASELINE.
Warning: make sure that the bowl is correctly fit-
ted to the machine; an incorrectly fitted bowl will
cause the product to leak out; risk of scalding!
13
EN
A bowl correctly assembled; here the bowl per-
fectly adhere to the machine edge.
A bowl which is not correctly assembled; here the
bowl does not perfectly adhere to the machine
edge.
Fix the bowl to the machine body using the rele-
vant hook-on handles, as illustrated in the figure;
Insert the mixer auger into its seating;
Insert the mixer into its seating following the
steps described in paragraph 1.3 in inverse or-
der.
1.8.2. Assembling the tap
To assemble the tap, carry out in reverse all of the
disassembly steps illustrated previously.
To fit the level (F) push the rod (D) from the inside
until
the guides protrude; the insert the level (F) and
slowly
release the rod (D).
14
EN
1.8.3. Fitting the tap
To fit the lap correctly back in place proceed as fol-
lows;
hold down the button, making sure that the road
is completely extracted;
introduce the tap into the seat provide and push
until the pushbutton returns to its initial position.
1.9. Internal sanitization
Warning the temperature regulator (7) must be set
to -OFF-
Carry out the following steps:
prepare the sanitizing solution (see paragraph 1.7)
fill the bowl with the sanitizing solution;
leave the solution to act for about 30 mins;
empty out the sanitizing solution from the bowl;
Then rinse out the bowl and inside surfaces thor-
oughly to eliminate all residues of sanitizing solution.
1.10. Cleaning the drip tray
The drip tray should be emptied and cleaned daily.
Note: the tray needs to be emptied out and cleaned
every time that the red float fitted to the grid rises,
this is to stop liquid from leaking out.
Lift the tray with grid and pull it outwards to re-
move it from its seating.
wash the tray and grid separately with lukewarm,
water;
dry all of the component
reposition the grid on top of the tray;
fit the tray back in place and press down to se-
cure it to the machine.
1.11. Cleaning the bowl lid
• Remove the bowl lid from the machine;
Clean the surface using a damp cloth and / or a
non-abrasive sponge soaked in sanitizing prod-
uct.
• Rinse thoroughly using clean water.
15
EN
1.12. Emptying the water boiler tank
Warning: while the water boiler tank (12) is being
emptied, the machine must be unplugged.
11
X
X
Warning: The boiler may be emptied only when
the bowl is empty and the machine has cooled
down sufficiently.
The use of water from the boiler tank for food pur-
poses is empty prohibited.
To empty the boiler proceed as follows:
• Unplug the machine;
Remove the drip tray, as described in the relevant
paragraph 1.8:
• Remove the lid for water boiler (11).
Place the machine on a flat surface and with the
boiler tank (12) tumed towards to the outer edge
of the support surface.
Place a container (B) with a capacity of more than
3 litres undemeath the bleeder cap (X);
Use a coin or Allen wrench to unscrew the bleed-
er cap (X). Alternatively, you can use water boil-
er’s lid (11) to unscrew it.
Pull out the bleeder cap (X) with a firm movement
and wait for all the water to empty out from the
boiler tank.
1.13. Cleaning and de-scaling the boiler tank
The boiler tank needs to be de-scaled on a regular
basis; this operation is recommended at least once
every 3 months.
Follow the steps for draining out the boiler tank,
see paragraph 1.12;
Insert and secure the boiler tank bleeder cap;
Insert water plus scale remover for coffee ma-
chines into the tank (follow the instructions on
the scale remover package);
Leave the solution tact for the time indicated in
the instruction of the solution itself.
Empty out the solution from inside the boiler
tank, see paragraph 1.12.
Rinse out the tank with plenty of water, by filling
and emptying it ,see paragraphs starting up and
1.12.
16
EN
1.14. Resetting the temperature sensor
Note: There is a RESET button for the temperature
sensor inside.
Warning: after the temperature sensor has inter-
vened to shut down the machine, it is indispensable
to drain out any product contained inside the bowl
and to clean all components before restoring the
machine function.
Warning: before resetting the temperature sensor,
switch off the machine using the relevant switch
and unplug it from the electriclty mains, then wait
for the machine to cool down.
Use a suitable tool (not included) to unscrew and
loosen and remove the protective screw:
Use hand to press the button inside to restore nor-
mal machine operation.
1.15. Periodic maintenance
The machine must be periodically checked (at least
once a year) by a specialized technician, this pe-
riodic check serves to ensure that all the compo-
nents installed and the machine itself are main-
tained at a high level of safety.
Any wom components must be replaced by an orig-
inal spare part.
It is forbidden to use the machine when even only
one of its components is faulty or wom. Users are
forbidden to perform periodic maintenance.
17
EN
Troubleshooting
Problem Cause Remedy
Does not heat No power Make sure that the machine is plugged in properly
Main switch (6) set to OFF Set the switch to -ON-
Temperature sensor activated Reset the temperature sensor as directed in section
6.1.
Temperature regulator (7) set to
0°C
Adjust the temperature regulator (7)
Mixing paddle
does not turn
No power Make sure that the machine is plugged in properly
The driving shaft is not properly in
place
Remove the shaft and then insert it correctly as
directed in section 1.8.
Motor fault Contact service personnel
Main switch (6) set to OFF Press the switch on
Tap leaks It has not been fit correctly Empty the machine and fit the tap as directed in
section 1,4.
The outlet and rubber are dirty Empty the machine and clean the entire tap throughly;
fit it back on the machine as directed in section 1.4.
T
he sealing gasket needs
replacing
Contact service personnel
Water is
escaping from
the level tank
Temperature too high Lower the temperature
The sealing gasket of the level
tube needs replacing
Contact service personnel
The water level is above the MAX
indication when the machine is at
room temperature
Allow the machine to cool down and empty the boiler
until reaching the level indicated
Product leaks
from the
bottom of the
transparent
bowl
The bowl has not been fit correctly
in place
Empty the machine, remove the bowl and fit in place
according to the instructions provided in section 1.3.
The seal needs replacing Contact service personnel
Machine
shutdown
The temperature sensor activated Unplug & let cool down the machine completely. Then,
RESET the temperature sensor according to the
section 1.14.
If the machine malfunctions due to causes other than those listed in this table or the proposed remedies do
not solve the problem, contact a specialized technician.
18
EN
The technical data and features are listed below
Model 274125 274149
Machine dimensions P: 410mm x L: 280mm x A: 460mm P: 410mm x L: 280mm x A: 580mm
Weight (blow empty) 7.3 kg 8 kg
Maximum Electrical Input (W) 1006 W
Operating voltage (V) 220-240V~ 50Hz
Ambient operating temperature Min. 10°C (50°F), Max. 32°C (89.6°F)
Number of bowls 1
Capacity of bowl 5 Liters 10 Liters
Sound pressure level << 70 dB
Class I
Temperature regulator setting 65°C to 85°C
Remarks: Technical data is subjected to change without prior notification.
Basic warning diagram
Supplied voltage: 220-240V~
Item Description
P main power switch
Ts temperature sensor
M mixer motor
Tr temperature regulator
R heating element
19
EN
Warranty
Any defect affecting the functionality of the ap-
pliance which becomes apparent within one year
after purchase will be repaired by free repair or re-
placement provided the appliance has been used
and maintained in accordance with the instructions
and has not been abused or misused in any way.
Your statutory rights are not affected. If the appli-
ance is claimed under warranty, state where and
when it was purchased and include proof of pur-
chase (e.g. receipt).
In line with our policy of continuous product devel-
opment we reserve the right to change the product,
packaging and documentation specifications with-
out notice.
Discarding & Environment
When decommissioning the appliance, the prod-
uct must not be disposed of with other household
waste. Instead, it is your responsibility to dispose to
your waste equipment by handing it over to a des-
ignated collection point. Failure to follow this rule
may be penalized in accordance with applicable
regulations on waste disposal. The separate col-
lection and recycling of your waste equipment at
the time of disposal will help conserve natural re-
sources and ensure that it is recycled in a manner
that protects human health and the environment.
For more information about where you can drop off
your waste for recycling, please contact your local
waste collection company. The manufacturers and
importers do not take responsibility for recycling,
treatment and ecological disposal, either directly
or through a public system.
20
DE
Sehr geehrter Kunde,
Vielen Dank für den Kauf dieses Hendi Gerät. Lesen Sie dieses Handbuch sorgfältig und achten Sie
besonders auf die unten aufgeführten Sicherheitsvorschriften, bevor Sie dieses Gerät zum ersten Mal
installieren und verwenden.
Sicherheitsvorschriften
Dieses Gerät ist für den Buffet- und Haushaltsgebrauch bestimmt.
Verwenden Sie das Gerät nur für den vorgesehenen Zweck, für den es entworfen wurde,
wie in diesem Handbuch beschrieben.
Der Hersteller haftet nicht für Schäden, die durch fehlerhafte Bedienung und
unsachgemäße Verwendung verursacht werden.
Halten Sie das Gerät und den elektrischen Stecker von Wasser und anderen Flüssigkeiten
fern. Falls das Gerät in Wasser fällt, entfernen Sie sofort den Netzstecker von der
Steckdose. Verwenden Sie das Gerät erst, wenn es von einem zertifizierten Techniker
überprüft wurde. Die Nichtbefolgung dieser Anweisungen führt zu lebensbedrohlichen
Risiken.
• Versuchen Sie niemals, das Gehäuse des Geräts selbst zu öffnen.
• Legen Sie keine Objekte in das Gehäuse der Appliance ein.
• Berühren Sie den Stecker nicht mit nassen oder feuchten Händen.
Gefahr eines elektrischen Schlags! Versuchen Sie nicht, das Gerät selbst zu
reparieren, Reparaturen sind nur von qualifiziertem Personal durchzuführen.
Verwenden Sie niemals ein beschädigtes Gerät! Wenn es beschädigt ist, trennen Sie das
Gerät von der Steckdose und wenden Sie sich an den Händler.
Warnung! Tauchen Sie die elektrischen Teile des Geräts nicht in Wasser oder andere
Flüssigkeiten ein.
• Halten Sie das Gerät niemals unter fließendem Wasser.
Überprüfen Sie regelmäßig den Netzstecker und das Kabel auf Beschädigungen. Bei
Beschädigung muss es durch einen Dienstleister oder eine ähnlich qualifizierte Person
ersetzt werden, um Gefahren oder Verletzungen zu vermeiden.
Stellen Sie sicher, dass das Kabel nicht mit scharfen oder heißen Gegenständen in
Berührung kommt und halten Sie es von offenem Feuer fern. Ziehen Sie niemals das
Netzkabel, um es von der Steckdose zu trennen, ziehen Sie stattdessen immer den
Stecker.
Stellen Sie sicher, dass das Netzkabel und/oder das Verlängerungskabel keine
Auslösegefahr verursachen.
• Lassen Sie die Appliance während des Gebrauchs niemals unbeaufsichtigt.
Warnung!
Solange sich der Stecker in der Steckdose befindet, wird das Gerät an die
Stromquelle angeschlossen.
• Schalten Sie die Appliance aus, bevor Sie sie vom Sockel trennen.
Schließen Sie den Netzstecker an eine leicht zugängliche Steckdose an, so dass das Gerät
im Notfall sofort abgenommen werden kann.
  • Page 1 1
  • Page 2 2
  • Page 3 3
  • Page 4 4
  • Page 5 5
  • Page 6 6
  • Page 7 7
  • Page 8 8
  • Page 9 9
  • Page 10 10
  • Page 11 11
  • Page 12 12
  • Page 13 13
  • Page 14 14
  • Page 15 15
  • Page 16 16
  • Page 17 17
  • Page 18 18
  • Page 19 19
  • Page 20 20
  • Page 21 21
  • Page 22 22
  • Page 23 23
  • Page 24 24
  • Page 25 25
  • Page 26 26
  • Page 27 27
  • Page 28 28
  • Page 29 29
  • Page 30 30
  • Page 31 31
  • Page 32 32
  • Page 33 33
  • Page 34 34
  • Page 35 35
  • Page 36 36
  • Page 37 37
  • Page 38 38
  • Page 39 39
  • Page 40 40
  • Page 41 41
  • Page 42 42
  • Page 43 43
  • Page 44 44
  • Page 45 45
  • Page 46 46
  • Page 47 47
  • Page 48 48
  • Page 49 49
  • Page 50 50
  • Page 51 51
  • Page 52 52
  • Page 53 53
  • Page 54 54
  • Page 55 55
  • Page 56 56
  • Page 57 57
  • Page 58 58
  • Page 59 59
  • Page 60 60
  • Page 61 61
  • Page 62 62
  • Page 63 63
  • Page 64 64
  • Page 65 65
  • Page 66 66
  • Page 67 67
  • Page 68 68
  • Page 69 69
  • Page 70 70
  • Page 71 71
  • Page 72 72
  • Page 73 73
  • Page 74 74
  • Page 75 75
  • Page 76 76
  • Page 77 77
  • Page 78 78
  • Page 79 79
  • Page 80 80
  • Page 81 81
  • Page 82 82
  • Page 83 83
  • Page 84 84
  • Page 85 85
  • Page 86 86
  • Page 87 87
  • Page 88 88
  • Page 89 89
  • Page 90 90
  • Page 91 91
  • Page 92 92
  • Page 93 93
  • Page 94 94
  • Page 95 95
  • Page 96 96
  • Page 97 97
  • Page 98 98
  • Page 99 99
  • Page 100 100
  • Page 101 101
  • Page 102 102
  • Page 103 103
  • Page 104 104
  • Page 105 105
  • Page 106 106
  • Page 107 107
  • Page 108 108
  • Page 109 109
  • Page 110 110
  • Page 111 111
  • Page 112 112
  • Page 113 113
  • Page 114 114
  • Page 115 115
  • Page 116 116
  • Page 117 117
  • Page 118 118
  • Page 119 119
  • Page 120 120
  • Page 121 121
  • Page 122 122
  • Page 123 123
  • Page 124 124
  • Page 125 125
  • Page 126 126
  • Page 127 127
  • Page 128 128
  • Page 129 129
  • Page 130 130
  • Page 131 131
  • Page 132 132
  • Page 133 133
  • Page 134 134
  • Page 135 135
  • Page 136 136
  • Page 137 137
  • Page 138 138
  • Page 139 139
  • Page 140 140
  • Page 141 141
  • Page 142 142
  • Page 143 143
  • Page 144 144
  • Page 145 145
  • Page 146 146
  • Page 147 147
  • Page 148 148
  • Page 149 149
  • Page 150 150
  • Page 151 151
  • Page 152 152
  • Page 153 153
  • Page 154 154
  • Page 155 155
  • Page 156 156
  • Page 157 157
  • Page 158 158
  • Page 159 159
  • Page 160 160
  • Page 161 161
  • Page 162 162
  • Page 163 163
  • Page 164 164
  • Page 165 165
  • Page 166 166
  • Page 167 167
  • Page 168 168

Hendi 299869 Руководство пользователя

Тип
Руководство пользователя
Это руководство также подходит для

Задайте вопрос, и я найду ответ в документе

Поиск информации в документе стал проще с помощью ИИ