Hyundai H-CMD2003 Руководство пользователя
- Категория
- Видеосистемы для автомобилей
- Тип
- Руководство пользователя

H-CMD2003
2 DIN DVD/CD/MP3 RECEIVER WITH BUILT-IN 5.5” TFT DISPLAY
Instruction manual
2 DIN МУЛЬТИМЕДИЙНЫЙ DVD/CD/MP3-РЕСИВЕР СО ВСТРОЕННЫМ 5.5”
TFT-ДИСПЛЕЕМ
Руководство по эксплуатации

2
Dear customer!
Thank you for purchasing our product. For safety, it is strongly recommended to read this manual carefully
before connecting, operating and/or adjusting the product and keep the manual for reference in the future.
Table of contents
Table of contents..................................................................................................................................................... 2
Important safeguards ..............................................................................................................................................4
Multizone device description.................................................................................................................................. 5
Installation/connection............................................................................................................................................ 6
Installation procedure ...................................................................................................................................... 7
Electrical Connection.......................................................................................................................................8
Unit controls ......................................................................................................................................................... 10
Monitor .......................................................................................................................................................... 10
Remote control 1 (general) ............................................................................................................................ 13
Remote control 2 (kid zone) ..........................................................................................................................15
Monitor operations................................................................................................................................................ 17
General operations ................................................................................................................................................20
Digital tuner operations ........................................................................................................................................ 21
Disc operations ..................................................................................................................................................... 24
Glossary .........................................................................................................................................................24
Discs for playback .........................................................................................................................................25
MP3 overview................................................................................................................................................ 34
SD/MMC card ...................................................................................................................................................... 36
System setup menu ...............................................................................................................................................38
Audio sound processing (ASP) configuration ............................................................................................... 39
General setup .................................................................................................................................................40

3
Screen CAL ................................................................................................................................................... 40
DVD setup menu .................................................................................................................................................. 41
Language........................................................................................................................................................ 42
Video..............................................................................................................................................................43
Audio ............................................................................................................................................................. 43
SPK configuration ......................................................................................................................................... 44
Surround FX .................................................................................................................................................. 44
Rating............................................................................................................................................................. 45
Other playback modes .......................................................................................................................................... 47
AUX-IN mode ............................................................................................................................................... 47
Rear view camera mode.................................................................................................................................47
NAVI mode.................................................................................................................................................... 47
Handling and cleaning discs ................................................................................................................................. 48
Troubleshooting guide .......................................................................................................................................... 49
Specification ......................................................................................................................................................... 50

4
Important safeguards
• Using the device at temperature below -10ºС may cause the breakage of the device.
Before using, please, heat up the passenger compartment to the recommended temperature!
• Read carefully through this manual to familiarize yourself with this high-quality car stereo system.
• Disconnect the vehicle's negative battery terminal while mounting and connecting the unit.
• When replacing the fuse, be sure to use one with an identical amperage rating. Using a fuse with a higher
amperage rating may cause serious damage to the unit.
• DO NOT attempt to disassemble the unit. Laser beams from the optical pickup are dangerous to the eyes.
• Make sure that pins or other foreign objects do not get inside the unit; they may cause malfunctions, or
create safety hazards such as electrical shock or laser beam exposure.
• If you have parked the car for a long time in hot or cold weather, wait until the temperature in the car
becomes normal before operating the unit.
• DO NOT open covers and do not repair yourself. Consult the dealer or an experienced technician for help.
• Make sure you disconnect the power supply and aerial if you will not be using the system for a long period
or during a thunderstorm.
• Make sure you disconnect the power supply if the system appears to be working incorrectly, is making an
unusual sound, has a strange smell, has smoke emitting from it or liquids have got inside it. Have a
qualified technician check the system.
• The unit is designed for negative terminal of the battery, which is connected to the vehicle metal. Please
confirm it before installation.
• Do not allow the speaker wires to be shorted together when the unit is switched on. Otherwise it may
overload or burn out the power amplifier.
• Install the unit horizontally. Install the unit more than 30 degree vertically may result in worse
performance.
• Do not block the cooling fan exit to ensure sufficient heating dissipation of this unit, failure to do this
may result in damage to this unit.

5
Multizone device description
Multizone definition means the ability of using the head device as the two synchronous signals source.
For example by means of the two different signals distribution the user can listen to the radio or see the
navigation information on the screen (the first zone), and the back passengers can look the DVD film at the
same time (the second zone). In first case the audio signal will be reproduced by front speaker, and in second
case – by rear speaker.
The variants of distributing are different and its amount depends on used audio and video sources.

6
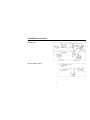
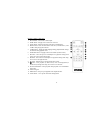
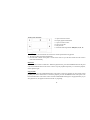
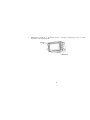
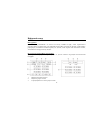
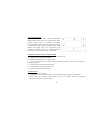
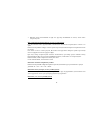
Installation/connection
Parking brake
Rear View Video Camera

7
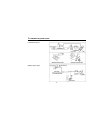
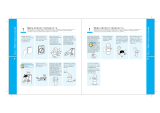
Installation procedure
1. Fix the bracket to the unit with the bolts in the accessories package. The installation method is shown as
follows.
2. Connect the unit with the suited wires according to the “Electrical Connection” diagram.
3. Dismantle the decoration frame of the instrument panel and push the unit along the installation hole until
the orientation beam in the installation hole locked by the orientation rivet joint of the unit.
4. Fix the bracket to the instrument panel with the special bolts of your car and then restore the decoration
frame.

8
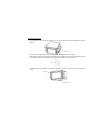
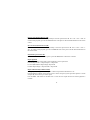
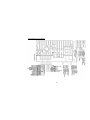
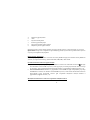
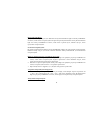
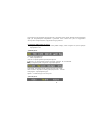
Electrical Connection

9
Caution: For some car models you may need to modify wiring of the supplied power cord. Contact your
authorized car dealer before installing this unit.
Using the ISO Connector
1. If your car is equipped with the ISO connector, then connect the ISO connectors as
illustrated.
2. For connections without the ISO connectors, check the wiring in the vehicle
carefully before connecting, incorrect connection may cause serious damage to this
unit.
3. Cut the connector, connect the colored leads of the power cord to the car battery as
shown in the wiring diagram.

10
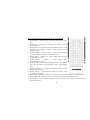
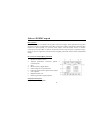
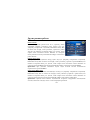
Unit controls
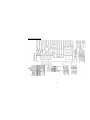
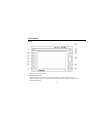
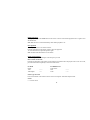
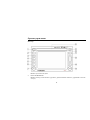
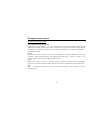
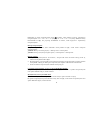
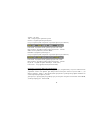
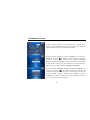
Monitor
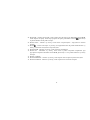
1. EJECT button
Press this button to eject the disc.
2. POWER/MUTE button
Press the button to turn the power on, press and hold for 2 seconds to turn the power off.
When the power is on press it to cut down the volume output, press it again to resume volume.
3. FM/AM/LOC button

11
Press it to enter the Radio mode. Press it repeatedly to change the bands.
In TUNER (RADIO) mode press it (LOC button) and hold for 2 seconds to select the LOCAL or
DISTANT mode for radio station searching.
4. DVD/2-6CH button
Press it to enter the DVD mode.
Press and hold for 2 seconds to choose between 2-6 channel audio mode.
5. WIDE/PIC button
Press it to adjust display aspect.
Press it and hold for 2 seconds to enter the setting mode. To adjust the setting press cursor buttons. Press
WIDE/PIC button and hold for 2 seconds to exit the mode.
6. SRC button
Press it to switch play source. Press and hold for 2 seconds to turn on/turn off rear zone.
7. VOL +/-/SEL knob (button)
Rotate it to increase/decrease volume step by step.
Press it (the SEL button) and hold for two seconds to enter the audio setting mode. Press it again to select
the setting. Rotate the VOL +/- knob to adjust setting.
8. Disc slot
9. Infra red sensor
10. RESET button
Press this button to restore the factory (default) settings.
11. SD button
Short press to enter SD card source.
12. SD card slot
13. NAVI button (optional)
Press it to enter the navigation mode.
14. TURNER/ENT knob (button)

12
Press it to switch manual search/automatic search radio mode;
Press and hold for 2 seconds to automatic search radio.
DVD mode :
Pause/Play or for enter function.

13
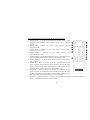
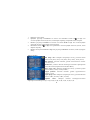
Remote control 1 (general)
1. EJECT button – Press it to eject the disc.
2. SRC button - Select the playback source.
3. MUTE button - Turn on/off volume output.
4. POWER button - Turn on/off the power.
5. TITLE button - Enter the title menu of the disc (in DVD source).
6. MENU button - Enter the main menu of the disc (in DVD source). Turn
on PBC when playing VCD.
7. AUDIO button - Change the audio language during playback DVD.
Change the channel during playback VCD.
8. SUBTITLE button - Change subtitle language during playback a DVD
disc.
9. ANGLE button - Playback a DVD disc in different angle of a scene.
Playback Picture CD with different angles of picture displayed.
10. DISP button - Display playback information.
11. REPT A-B button - Press to repeat playback from time frame A to time
frame B (in DVD source).
12. REPT button - Press to repeat playback each chapter/title disc (in DVD
mode).
13. DVD button – Enter the DVD mode.
14. WIDE button - Select aspect ratio mode.
15. SD button – Enter the SD mode.
16. TUNER button – Enter the radio mode.
17. DISC ▼ button - Select the next disc to playback in DVDC source (Not supported by this unit).
18. DISC ▲button - Select the previous disc to playback in DVDC source (Not supported by this unit).

14
19. VOL- button - Decrease volume.
20. VOL+ button - Increase volume.
21. STOP/BAND button - stop playback, select FM/AM band.
22. button - Fast forward the current disc in DVD source. During menu setup, move to upper selection.
23. SCN button - Play the first ten second of each chapter in DVD player.
24. RDM button - Play all chapters in random order in DVD player.
25. button - Select the previous track/chapter for playback. During menu setup, move to left selection.
Searching an available FM/AM radio station by decreasing tuning frequency.
26. PLAY/PAUSE button - Pause playback. Start playback. This button is also used to enter the menu setup.
Scan tuning FM/AM radio station playback.
27. button - Select the next track/chapter to playback. During menu setup, move to the right selection.
Searching an available FM/AM radio station by increasing tuning frequency.
28. SEL button – Enter/Exit the audio adjustment mode.
29. GOTO button – Go to specific time frame and playback.
30.
button - Slow playback the disc in DVD source. Slow rewind playback the disc in DVD source. During
menu setup, move to the lower selection.
31. ZOOM button - Zoom in image during playback DVD/VCD disc.
32. PIC button - Press it to enter setting mode. To adjust the setting press the / buttons. Press it again to
exit the mode.
33. Numeric keypad
34. DVD SETUP button - Playback function setup for DVD player.
35. SYS SETUP button - System function setup of the unit.

15
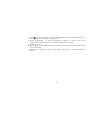
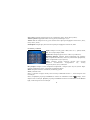
Remote control 2 (kid zone)
1. MUTE button - Turn on/off volume output.
2. R.SRC button - Playing source selection for rear zone.
3. TITLE button - Enter the title menu of the disc (in DVD Player).
4. MENU button - Enter the main menu of the disc (in DVD Source). Turn
on PBC when playing the VCD disc.
5. AUDIO button - Change the audio language during playback DVD. Change
the channel during playback VCD.
6. SUBTITLE button - Language selection for subtitle (in DVD source).
7. button - Select the previous track/chapter for playback. During menu
setup, move cursor to the left selection.
8. button - Select the next track/chapter for playback. During menu setup,
move cursor to the right selection.
9. button - In DVD source, fast forward the disc content.
10. button - Slow playback (in DVD source). Slow rewind playback (in
DVD source). During menu setup, move to the lower selection.
11. PLAY/PAUSE button - Pause playback. Start playback. Act as ENTER for
menu setup.
12. Numeric keypad
13. REPT button - Setup to repeat playback each chapter/title/disc.
14. GOTO button – Go to specific time frame and playback.

16
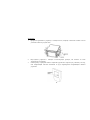
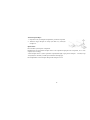
Changing the battery
1. Press the catch and at the same time pull out the battery tray.
2. Insert the 1 x lithium battery, type CR2025 (3V) battery with the stamped (+)
mark facing upward. Insert the battery tray into the remote control.
Warning: Store the battery where children cannot reach. If a child accidentally swallows the battery, consult a
doctor immediately.
Do not recharge, short, disassemble or heat the battery or dispose it in a fire.
Do not expose or bring into contact the battery with other metallic materials. Doing this may cause the battery
to give off heat, crack or start a fire.
When throwing away or saving the battery, wrap it in tape and insulate; otherwise, the battery may give off
heat, crack or start a fire.

17
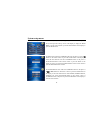
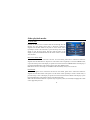
Monitor operations
Aspect ratio
The aspect ratio alters according to the following while pressing the WIDE/PIC button on the panel or the WIDE
button on the remote control: CINEMA -> WIDE -> NORMAL -> STANDBY.
CINEMA – The screen is extended horizontally as a whole to the aspect ratio of 16 to 9. The extension ratio is
the same at any point of the screen.
WIDE – The screen is extended horizontally to the aspect ratio of 16 to 9. The extension ratio increases toward
the right and left edge of the screen.
NORMAL – The conventional display image has a 4 to 3 ratio of horizontal to vertical. In this case, a blank
area remains on the right and left sides of the display.
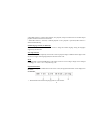
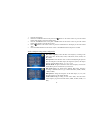
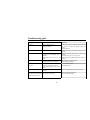
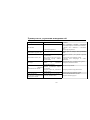
Image setting
The video output format for the each playing source is listed as below:
Playing source Video output format
TUNER
DVD
SD Card
NAVI
RGB mode
AUX IN
CAMERA
CVBS mode
1. Press the PIC button on the remote control or press and hold for 2 seconds the WIDE/PIC button on the
panel to open the image adjustment menu.
In RGB mode, only BRIGHT is available for adjustment.
In CVBS mode, PICTURE, COLOR, CONTRAST, BRIGHT and TINT are available for adjustment.
2. Press the / button on the remote control to select the needed value.

18
3. Press the / buttons on the remote control or rotate the TUNER/ENT knob on the panel to adjust the
selected setting.
4. Press the PIC button on the remote control or the WIDE/PIC on the panel to save settings.
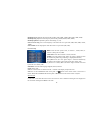
Audio Setting
Audio control allows you to easily adjust the audio system to meet the in-car acoustic characteristics that vary
depending on the type of car and its measurement.
1. Press and hold the VOL/SEL knob on the panel or press the SEL button on the remote control to enter audio
setting mode.
2. Rotate the TUNER/ENT knob on the panel or press the / buttons on the remote control to select a
setting item: EQ – Bass – Mid – Treble – Bal – Fade – SUB.W – Center. You can also perform this
operation by pressing the corresponding menu item button on the display.
3. To adjust the value rotate the VOL/SEL knob on the panel or press the / buttons on the remote control.
You can also perform this operation by pressing the +/- buttons corresponding to each menu item on the
display.
4. Press and hold the VOL/SEL knob on the panel or press the SEL button on the remote control to exit audio
setting mode.
Notes: EQ modes: User, Flat, Danc, Pop, Latin, Rock, Acou. Bass, Mid and Treble items can be adjusted only
in User mode.
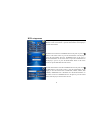
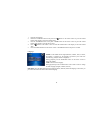
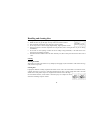
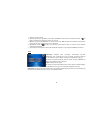
When parking brake applied
If "PRK SW" cable is connected to hand brake switch, the video picture of the TFT display will be controlled
by driving status, system setup and video sources.
• When “Parking” is set to “Off” or the car is parking or the video input source is
“Camera”, the video picture of the TFT display will be normal.

19
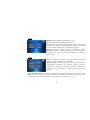
• When “Parking” is set to “On” and the car is moving ahead, blue screen will be displayed with warning
information to prevent the driver from watching other content when driving. The passengers at the rear can
watch normally.
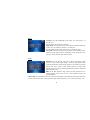
Auto brightness control
To avoid the display being too bright at night time, if the cable for headlight is connected to ILLUMI (for more
details, please refer to “Electrical Connection” diagram), turning on the headlight dims the backlight of TFT
display and vice versa.
Line mute
If the MUTE is connected, other audio outputs are closed when a call is received by the car phone (for more
details, please refer to “Electrical Connection” diagram).
Reverse Driving
If the rear view video camera is connected, the unit automatically switches to CAMERA source during reverse
driving. The unit returns to the original work mode after the reverse driving is done.

20
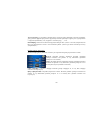
General operations
Reset the unit
When operating the unit for the first time or after replacing the car battery, or if the unit is working abnormally,
you should reset the unit. Press the RESET button on the panel to restore the unit to the default factory settings.
Power on/off
Press POWER/MUTE button on the panel or the POWER button on the remote control to turn the unit on. Press
and hold the POWER/MUTE button or press the POWER button on the remote control to turn the unit power
off.
Note: After the unit is off, the volume level and radio current settings will be memorized, and when you turn
the unit on it will resume the stored status that you set.
Volume control
Press the VOL +/- on the RC or rotate the VOL/SEL knob on the panel to increase/decrease the volume level.
Mute function
When the unit power is on press the POWER/MUTE button on the panel or the MUTE button on the remote
control to turn off the sound. Press it again or press the VOL +/- button to resume the volume.
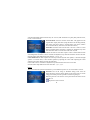
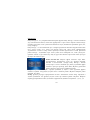
Mode selecting
Short press the SRC button on panel or on the remote control to enter playback source menu, and press this
button repeatedly to select and enter a playback source (or press the sensor button): TUNER => DVD => SD
=> NAVI => AUX IN => CAMERA.
Страница загружается ...
Страница загружается ...
Страница загружается ...
Страница загружается ...
Страница загружается ...
Страница загружается ...
Страница загружается ...
Страница загружается ...
Страница загружается ...
Страница загружается ...
Страница загружается ...
Страница загружается ...
Страница загружается ...
Страница загружается ...
Страница загружается ...
Страница загружается ...
Страница загружается ...
Страница загружается ...
Страница загружается ...
Страница загружается ...
Страница загружается ...
Страница загружается ...
Страница загружается ...
Страница загружается ...
Страница загружается ...
Страница загружается ...
Страница загружается ...
Страница загружается ...
Страница загружается ...
Страница загружается ...
Страница загружается ...
Страница загружается ...
Страница загружается ...
Страница загружается ...
Страница загружается ...
Страница загружается ...
Страница загружается ...
Страница загружается ...
Страница загружается ...
Страница загружается ...
Страница загружается ...
Страница загружается ...
Страница загружается ...
Страница загружается ...
Страница загружается ...
Страница загружается ...
Страница загружается ...
Страница загружается ...
Страница загружается ...
Страница загружается ...
Страница загружается ...
Страница загружается ...
Страница загружается ...
Страница загружается ...
Страница загружается ...
Страница загружается ...
Страница загружается ...
Страница загружается ...
Страница загружается ...
Страница загружается ...
Страница загружается ...
Страница загружается ...
Страница загружается ...
Страница загружается ...
Страница загружается ...
Страница загружается ...
Страница загружается ...
Страница загружается ...
Страница загружается ...
Страница загружается ...
Страница загружается ...
Страница загружается ...
Страница загружается ...
Страница загружается ...
Страница загружается ...
Страница загружается ...
Страница загружается ...
Страница загружается ...
Страница загружается ...
Страница загружается ...
Страница загружается ...
Страница загружается ...
Страница загружается ...
Страница загружается ...
Страница загружается ...
Страница загружается ...
Страница загружается ...
Страница загружается ...
Страница загружается ...
-
 1
1
-
 2
2
-
 3
3
-
 4
4
-
 5
5
-
 6
6
-
 7
7
-
 8
8
-
 9
9
-
 10
10
-
 11
11
-
 12
12
-
 13
13
-
 14
14
-
 15
15
-
 16
16
-
 17
17
-
 18
18
-
 19
19
-
 20
20
-
 21
21
-
 22
22
-
 23
23
-
 24
24
-
 25
25
-
 26
26
-
 27
27
-
 28
28
-
 29
29
-
 30
30
-
 31
31
-
 32
32
-
 33
33
-
 34
34
-
 35
35
-
 36
36
-
 37
37
-
 38
38
-
 39
39
-
 40
40
-
 41
41
-
 42
42
-
 43
43
-
 44
44
-
 45
45
-
 46
46
-
 47
47
-
 48
48
-
 49
49
-
 50
50
-
 51
51
-
 52
52
-
 53
53
-
 54
54
-
 55
55
-
 56
56
-
 57
57
-
 58
58
-
 59
59
-
 60
60
-
 61
61
-
 62
62
-
 63
63
-
 64
64
-
 65
65
-
 66
66
-
 67
67
-
 68
68
-
 69
69
-
 70
70
-
 71
71
-
 72
72
-
 73
73
-
 74
74
-
 75
75
-
 76
76
-
 77
77
-
 78
78
-
 79
79
-
 80
80
-
 81
81
-
 82
82
-
 83
83
-
 84
84
-
 85
85
-
 86
86
-
 87
87
-
 88
88
-
 89
89
-
 90
90
-
 91
91
-
 92
92
-
 93
93
-
 94
94
-
 95
95
-
 96
96
-
 97
97
-
 98
98
-
 99
99
-
 100
100
-
 101
101
-
 102
102
-
 103
103
-
 104
104
-
 105
105
-
 106
106
-
 107
107
-
 108
108
-
 109
109


Hyundai H-CMD2003 Руководство пользователя
- Категория
- Видеосистемы для автомобилей
- Тип
- Руководство пользователя
Задайте вопрос, и я найду ответ в документе
Поиск информации в документе стал проще с помощью ИИ
на других языках
- English: Hyundai H-CMD2003 User manual
Похожие модели бренда
Модели других брендов
-
Varta V-AVM651F Руководство пользователя
-
Varta V-AVM700 Руководство пользователя
-
SoundMax SM-CMMD7000(чер) Руководство пользователя
-
JVC KV-AVX706 Руководство пользователя
-
-
-
-
ADA INSTRUMENTS 500 HV-G Servo Руководство пользователя
-
 Sorell SF3500ZS(1Gb) Руководство пользователя
