Страница загружается...

Руководство пользователя робота-пылесоса
Roborock серии S5 Max
Внимательное прочитайте это руководство пользователя перед использованием устройства
и сохраните его в надежном месте.
Roborock Robot Vacuum Cleaner S5 Max User Manual
Read this user manual carefully before using this product and store it properly for future reference.


Roborock Robot Vacuum Cleaner S5 Max User Manual
Read this user manual carefully before using this product and store it properly for future reference.
Руководство пользователя робота-пылесоса
Roborock серии S5 Max
Внимательное прочитайте это руководство пользователя перед использованием
устройства и сохраните его в надежном месте.
1
37

Safety Information 1
Table of Faults 5
Welcome 6
Product Introduction 7
Installation 12
Instructions for Use 18
Routine Maintenance 21
Basic Parameters 26
Troubleshooting 27
FAQs 29
EU Declaration of Conformity 30
WEEE Information 34
Warranty Information 35
•
•
•
•
•
•
•
•
•
•
•
•
•

• This product is designed for indoor floor cleaning only, do not use it outdoors
(such as on an open-ended terrace), on any surface other than the ground (such
as a sofa), or in any commercial or industrial environment.
• Do not use this product on elevated surfaces without barriers such as the floor of
a loft, an open-ended terrace, or on top of furniture.
• Do not use the product when the ambient temperature is higher than 104°F
(40°C), lower than 39°F (4°C), or if there are liquids or tacky substances on the
floor.
• Before using the product, move wires off the ground or place them to the side to
prevent them being pulled on by the cleaner.
• To prevent blocking the product and to avoid damage to valuables, remove
lighweight items (such as plastic bags) and fragile objects (such as vases) from the
floor before cleaning.
• Children should be supervised to ensure that they do not play with the appliance.
• This product is not intended for use by persons (including children) with reduced
physical, sensory or mental capabilities, or lack of experience and knowledge,
unless they have been given supervision or instruction concerning use of the
product by a person responsible for their safety (CB).
• This product can be used by children aged from 8 years and above and persons
Safety Information
Restrictions
1

with reduced physical, sensory or mental capabilities or lack of experience and
knowledge if they have been given supervision or instruction concerning use of
the product in a safe way and understand the hazards involved. Children shall not
play with the product. Cleaning and user maintenance shall not be made by
children without supervision (EU).
• Keep the main brush cleaning tools out of reach of children.
• Do not place any object (including children and pets) on the product, whether it is
in operation or not.
• Keep hair, loose clothing, fingers, and all parts of the body away from openings
and moving parts.
• Do not use the product on burning objects (such as cigarette butts).
• Do not use the product on high pile carpets (product effectiveness may also be
reduced on dark carpets).
• Do not use the product to clean hard or sharp objects (such as decoration wastes,
glass and nails).
• Do not carry the product using the laser scanner cap, main unit cover, or collision
buffer.
• The product must be switched off and the plug must be removed from
socket-outlet before cleaning or maintaining the product.
Safety Information
2

• Do not use wet cloth or liquids for cleaning the product.
• Do not use the mopping module on carpets.
• Use the product according to the manual. Any loss or damage caused from
improper use will be borne by the user.
• This product contains batteries that are only replaceable by skilled persons.
Safety Information
• Do not charge non-rechargeable batteries.
• For the purposes of recharging the battery, only use the detachable supply unit
roborock CDZ11RR or CDZ12RR provided with this product.
• Do not dismantle, repair or modify the battery or charging dock.
• Keep the charging dock away from heat (such as heating vents).
• The battery must be removed from the appliance before it is scrapped.
• The product must be disconnected from the supply mains when removing the
battery.
• The battery must be disposed of safely. Do not discard waste batteries. Leave
them with a professional recycling organization.
• Do not wipe or clean the charger prongs with wet cloth or wet hands.
Battery and Charging
WARNING
3

Safety Information
• If the power cord is damaged, stop using it immediately. It must be replaced by
the manufacturer, its service agent, or similarly qualified persons to avoid a
hazard.
• Make sure the product is powered off before shipment.
• Use of the original packaging is advised.
• If to be left unused for a long period of time, fully charge the product and switch it
off before storing it in a cool, dry place.
• Charge it at least every three months to avoid over discharging the battery.
• To satisfy RF exposure requirements, a separation distance of 20 cm or more
should be maintained between this device and persons during device operation.
• To ensure compliance, operations at closer than this distance is not
recommended.
• The antenna used for this transmitter must not be co-located in conjunction with
any other antenna or transmitter.
4
Item
Main Unit
Charging dock Main unit does not charge.
Main brush, side brush, fan or main wheel issue.
Does not power on.
Functions do not work.
Power cable Charging dock has no power.
Fault
Table of Faults
Table of Faults
5

Welcome
Thank you for choosing a Roborock Robot Vacuum Cleaner.
Treat yourself to crisp, just-mopped floors every day with S5 Max. Engineered for a seamless
automated mopping, it has a super-sized water tank, precision water control, virtual no-mop zones,
and more. Combined with precision laser mapping, advanced navigation, and intense vacuum
suction, it makes spotless floors easier than ever. All you need to do is set it and get on with living.
Roborock is committed to putting advanced technologies to work for you, so that you can waste
less time on chores and do more of the things you love.
6
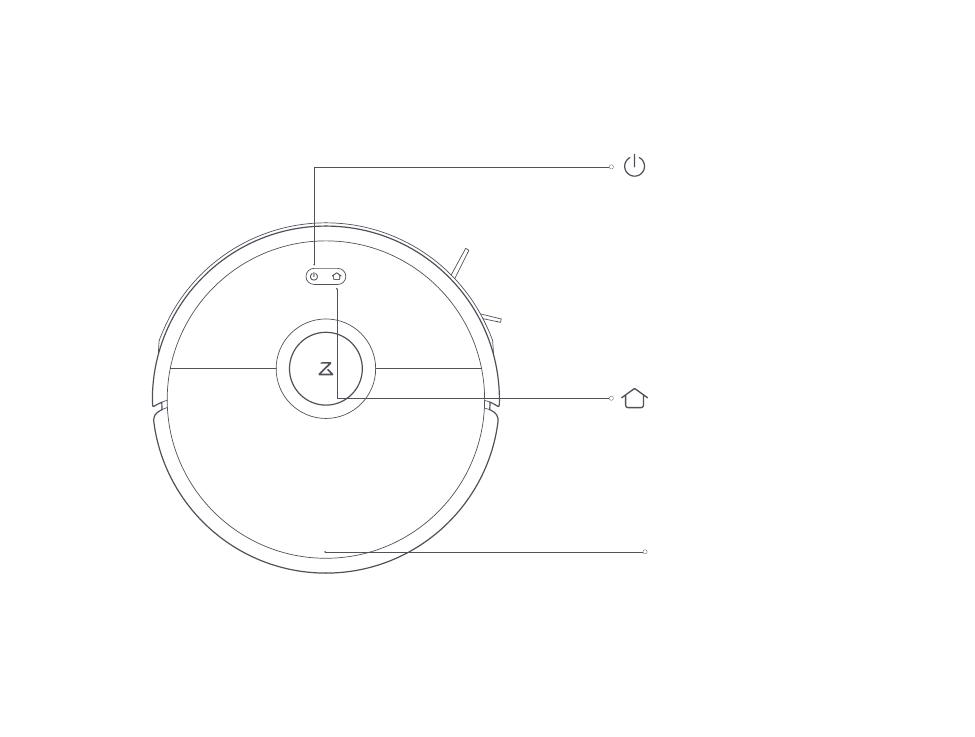
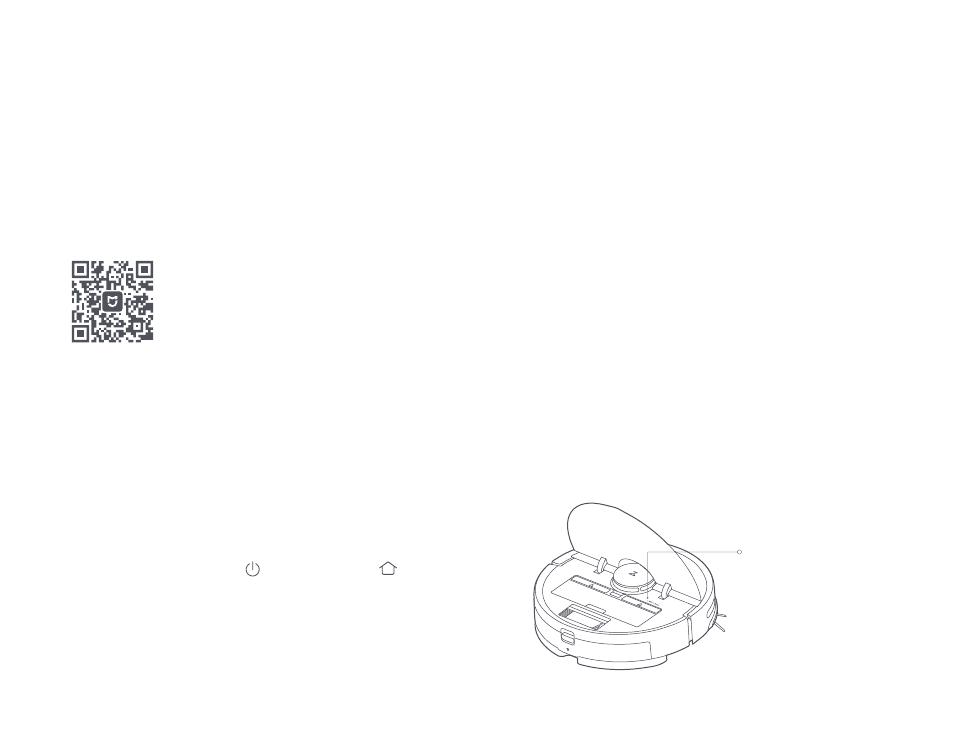
On/Off
• Press to start cleaning
• Press and hold to power on or off
Power indicator
• White: Battery level 20%
• Red: Battery level < 20%
• Flashing: Charging or starting up
• Flashing red: Error
Dock/Spot Clean
• Press to return to the dock
• Press and hold to spot clean
Cover latch
Product introduction
Robot
7
Note:
Press any button to pause cleaning, returning to
dock, or spot cleaning.
Product introduction
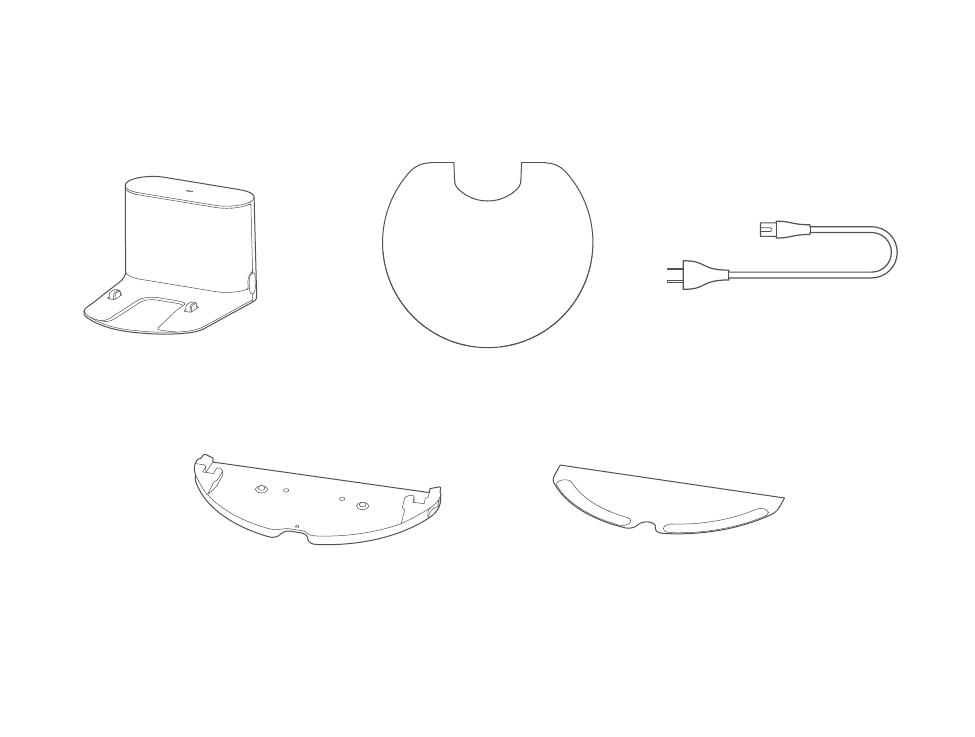
Parts list
8
Charging dock Power cable
Mop cloth mount Mop cloth
Moisture-proof mat
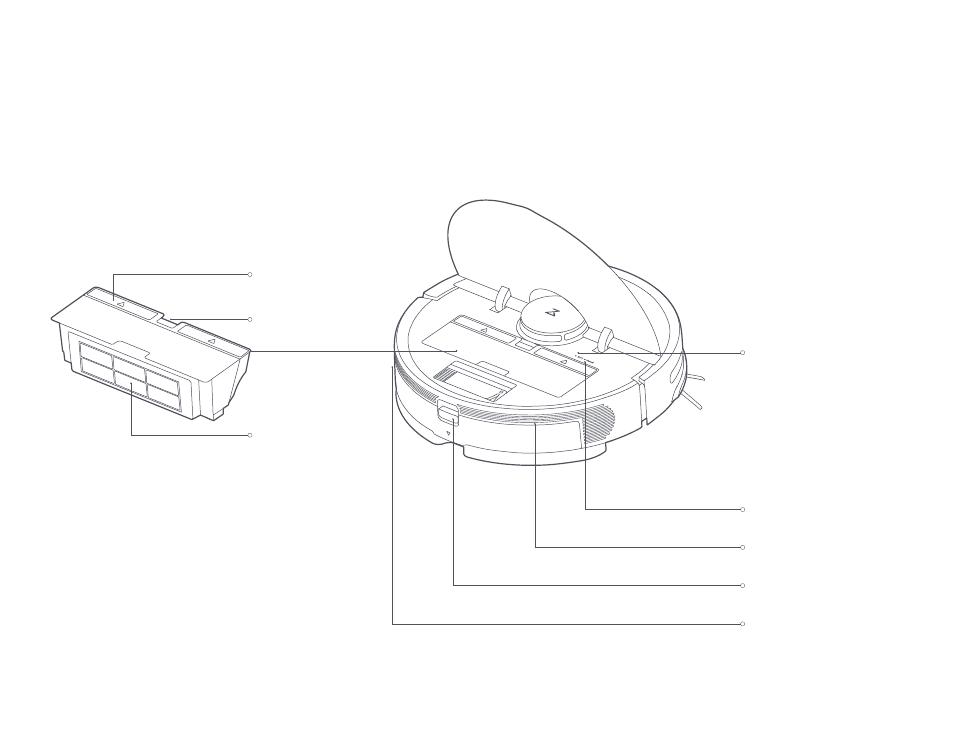
Product introduction
Dustbin Robot
System reset
Air vent
Air filter
Dustbin latch
Dustbin cover
Speaker
Water tank latch
WiFi indicator light
• Off: WiFi disabled
• Slow flashing: Waiting for
connection
• Fast flashing: Connecting
• Steady: WiFi connected
9
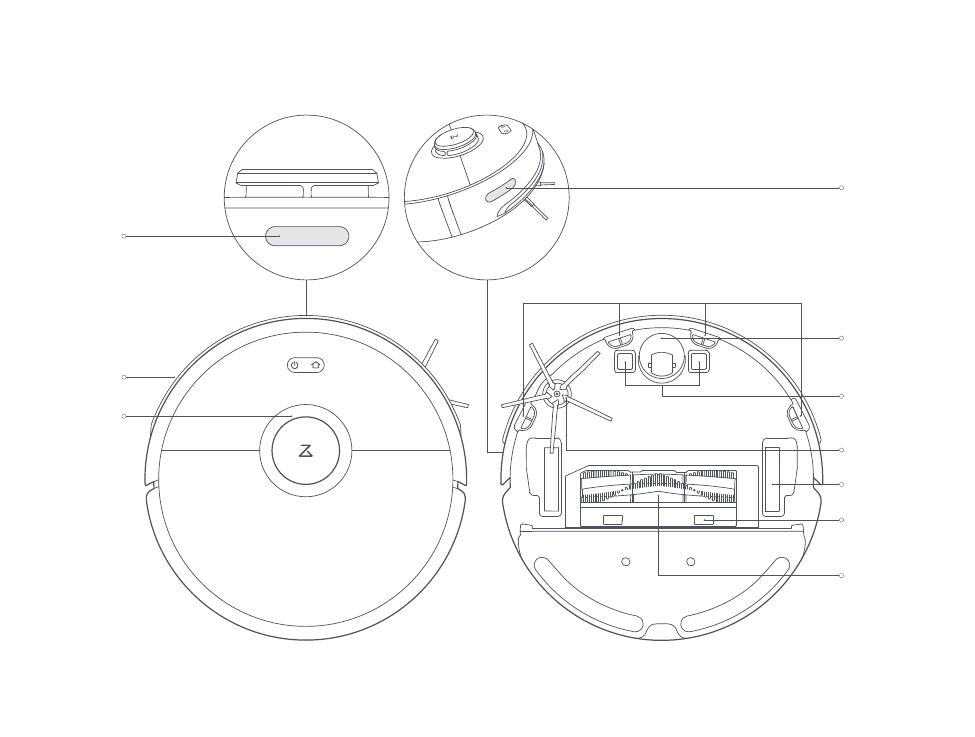
Product introduction
Machine and sensors
Bumper
Recharge
sensor
Laser
distance
sensor
Wall sensor
Side brush
Omnidirec-
tional wheel
Charging
contact
Main brush
Main brush
cover latch
Main wheels
Cliff sensor
10
Product introduction
Mopping module
Charging dock
Water tank
Water tank latch
Mop cloth att-
achment slot
Water tank stopper
Water filter
Mop cloth
Mop cloth
bracket clip
Attaching area
Mop cloth
bracket
Charging points
Signal transmitting area
Charging dock power indicator
Power socket
Charging points
11
Double-sided tape
Installation
Using the robot
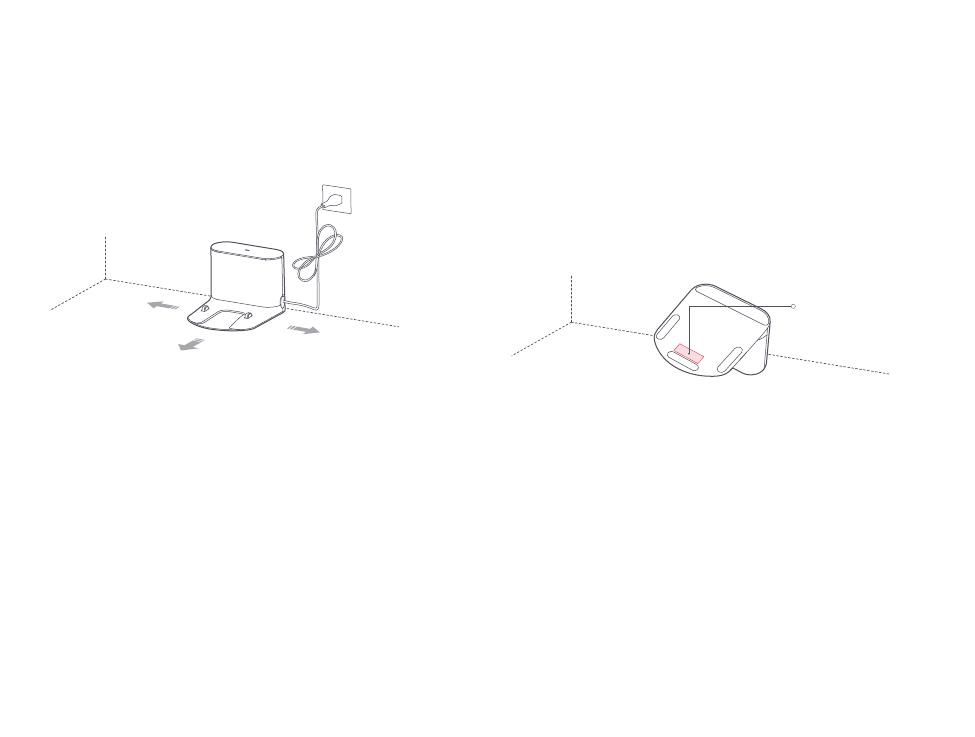
1. Place the charging dock against the wall on a flat surface
and plug it into the mains power.
Note:
• The charging dock should have more than 0.5m (1.6ft) of clearance on each
side, and more than 1.5m (5ft) in the front.
• If the power cable is vertical to the ground, it may be caught by the
machine, causing the charging dock to be disconnected.
• The charging dock indicator is on when the charging dock is electrified, and
off when the robot is charging.
More than 0.5m (1.6ft)
More than 0.5m (1.6ft)
More than 1.5m (5ft)
2. Secure the charging dock with the adhesive tape.
Wipe the floor of the area where the charging dock will be
placed with a dry cloth, then stick the enclosed
double-sided tape to the floor. Place the dock onto the
double-sided tape to secure it in place.
Note
• Use of the double-sided tape to secure the charging dock is optional.
• When necessary, remove the double-sided adhesive tape slowly to reduce
residue glue.
12
The color of the power
indicator indicates the
battery level.
• White: 20%
• Red: < 20%
Installation
Using the robot
Note:
The robot will not turn on when the battery is low. Place the robot directly
onto the charging dock to begin charging.
13
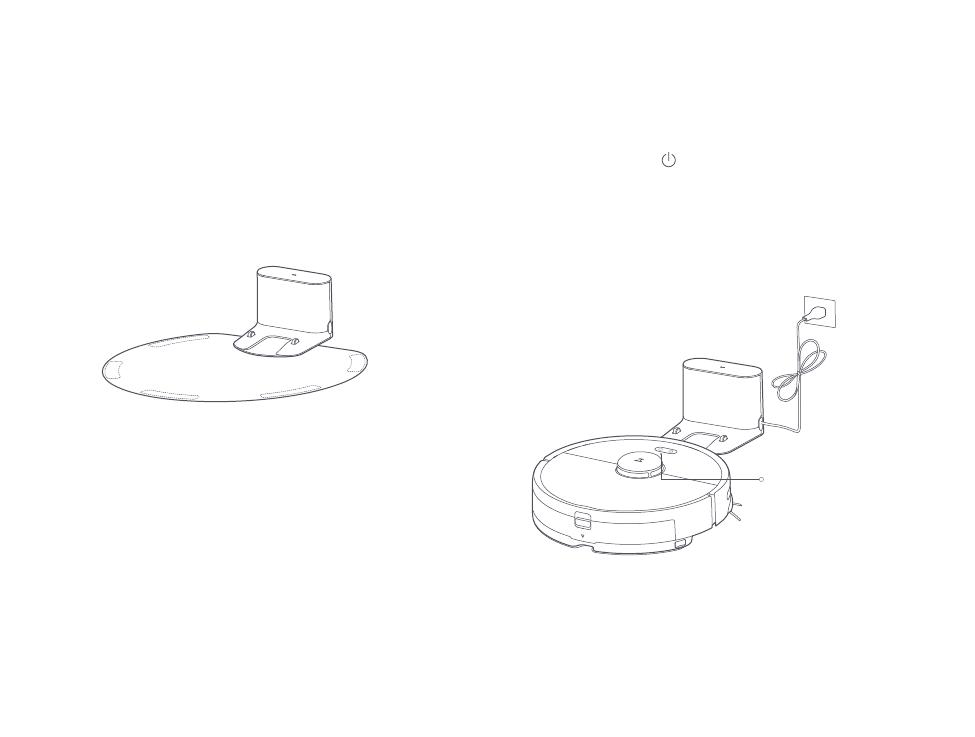
3. Secure the moisture-proof mat.
After securing the charging dock, wipe the area where the
moisture-proof mat will be placed with a dry cloth as
shown. Stick the double-sided tape first to the
moisture-proof mat then in position on the floor.
Note:
Always place the moisture-proof mat on a wooden floor
4. Power on and charge.
Press and hold the button to turn on the robot. When
the power indicator lights up, place the robot onto the
charging dock to begin charging. The robot uses a
high-performance lithium-ion rechargeable battery. To
maintain peak battery performance, always keep the
robot charged.
Installation
Connect to the app
Add Device
Open Xiaomi Home app, tap "+" on the upper right, and then follow prompts to add your device.
5. Quick Setup
Download Xiaomi Home app
Scan the QR code to download and install the app. You will be directed to the connection setup page if the app is installed
already. Or search "Xiaomi Home" in the app Store to download and install it.
14
WiFi indicator light
• Off: WiFi disabled
• Slow flashing: Waiting for
connection
• Fast flashing: Connecting
• Steady: WiFi connected
This product works with Xiaomi Home app . Control your device, and interact it and other smart home devices with Xiaomi
Home app.
Note: For specific connection instructions, visit the Roborock website and download guidelines for iOS and Android devices.
Note: The version of the app might have been updated, please follow the instructions based on the current app version. WIFI connection only supports
networks in the 2.4 GHz band, not the 5 GHz band.
The app is referred to as Xiaomi Home app in Europe (except for Russia). The name of the app displayed on your device should be taken as the default.
*
Reset WIFI
If you experience any WIFI problems, reset the WIFI to
defaults. Open the top cover to expose the WIFI indicator
then press and hold the button and the button until
you hear the "Reset WIFI" voice prompt. Reset is complete
when the WIFI indicator flashes slowly. The product will then
wait for a connection.
Note: If a mobile phone has never been connected to the product, or if there is a
problem with the connection, reset the WIFI before attempting connection.
Note:
• To prevent corrosion or damage, do not use cleaning fluid or disinfectant
in the water tank.
• Do not use hot water, which may cause the tank to deform.
Installation
1
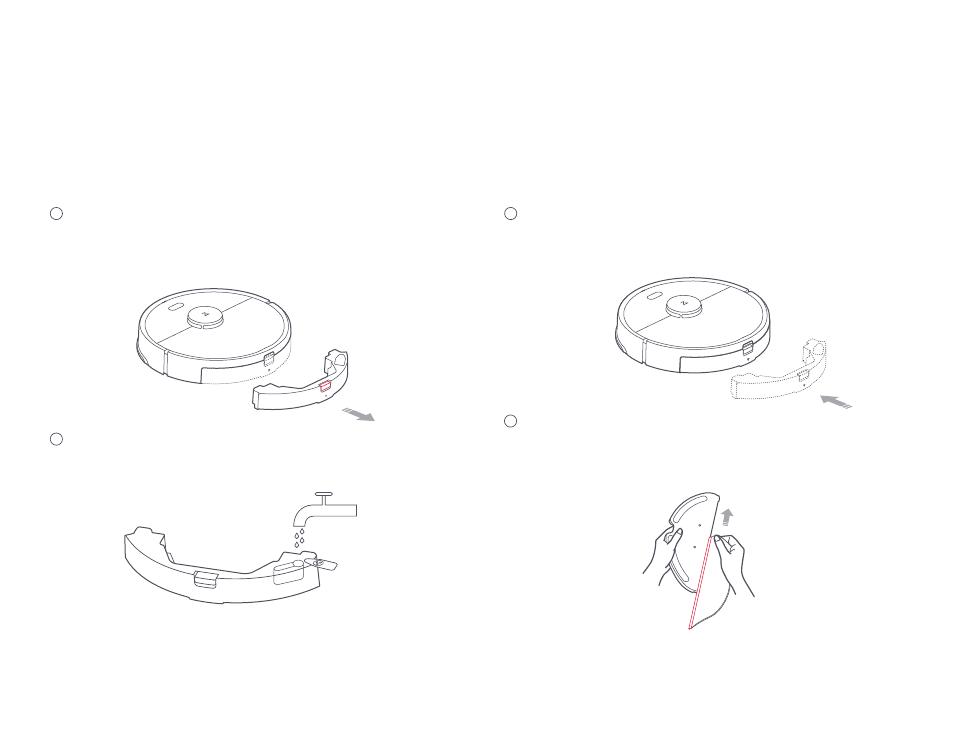
Remove the water tank
Press down the water tank latch and slide the tank
backwards to remove it.
3
Install the water tank
Slide the water tank into the robot until you hear it lock
with a click.
2
Fill the water tank
Open the water tank, fill it with water, and close it tightly.
Using the robot
6. Mopping
Note:
Use a barrier tape or no-mop zones to separate prevent mopping on
carpeted floors.
Install the mop cloth
If mopping immediately, dampen the mop cloth and
squeeze it dry then attach it to the mop cloth bracket.
4
15
Note:
It is recommended that all floors are vacuumed at least three times before the
first mopping session to reduce excessive dirt buildup on the mop.
Note:
Cleaning the mop cloth after 60-minutes of mopping is recommended
to ensure water flow and cleaning quality.
5
Note:
• When the charging dock is placed on a wooden floor, always use it with
the moisture-proof mat to prevent moisture damage.
• Removing and washing the mop cloth bracket, and emptying the water
tank frequently is recommended to prevent odors or mildew.
• Remove the mop cloth bracket if not mopping.
Installation
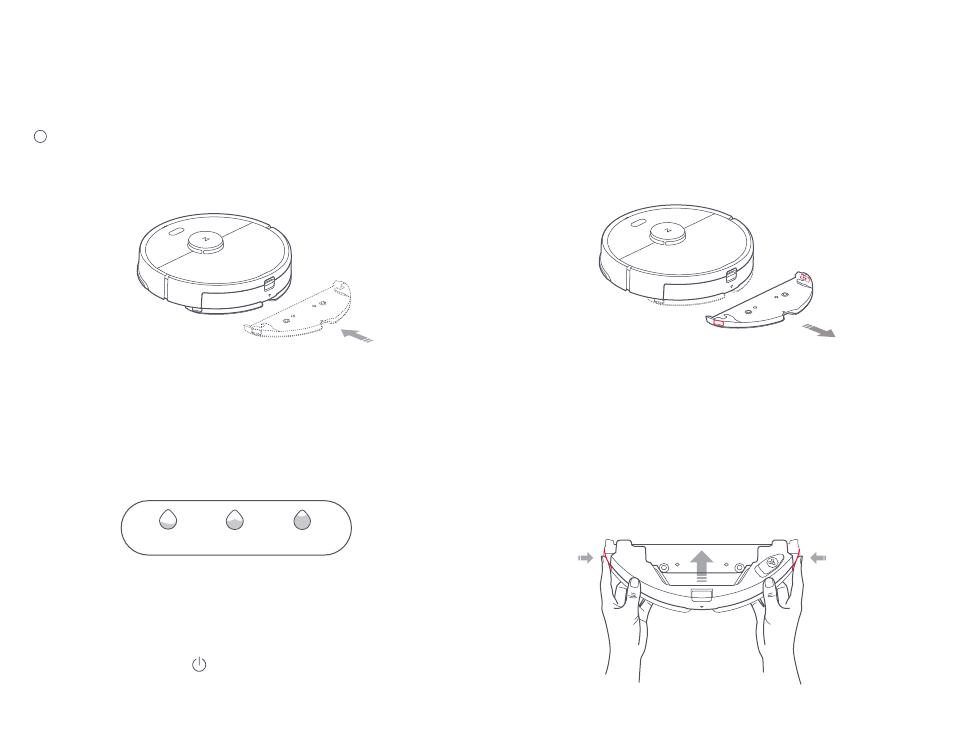
9. Remove the mop cloth bracket
To remove the mop cloth bracket, press the two clips
inwards and pull the bracket backwards.
10. Separating the water tank from the mop cloth bracket
As shown in the figure, press the two side clips inwards
and slide the mop cloth bracket backwards to separate it
from the water tank.
Using the robot
Attach the mop cloth bracket
Slide the mop cloth bracket under the water tank
following the alignment marks, until you hear a click.
8. Start cleaning
When the battery is fully charged, the power indicator will
remain lit. Press the button or use the app to start cleanup.
7. Adjust water flow rate
Use the mobile app to adjust the water flow as required.
Low
WaterLevel
Medium
Water Level
High
Water Level
16
/