Страница загружается...

DIGITAL CAMCORDER
DVC-340
USER MANUAL

CONTENTS
1. PARTS OF THE DIGITAL VIDEO CAMERA..................................................4
2. SETUP GUIDE . . . . . . . . . . . . . . . . . . . . . . . . . . . . . . . . . . . . . . . . . . . . . . . . . . . . . . . . . . . . . . . . . . . . . . . . . . . 5
2.1
HOW TO INSTALL THE BATTERY.................................................................. 5
2.2 HOW TO CHARGE THE BATTERY.................................................................. 6
2.3 HOW TO INSERT THE MEMORY CARD..............................................................7
2.4 HOW TO FORMAT THE MEMORY CARD............................................................ 8
2.5 HOW TO SELECT A LANGUAGE ................................................................... 9
2.6 HOW TO SET THE DATE AND TIME............................................................... 10
2.7 EXPLANATION OF THE MONITOR SCREEN DISPLAY .............................................11
3. HOW TO USE THE DIGITAL VIDEO CAMERA..............................................18
3.1 HOW TO TURN THE DIGITAL VIDEO CAMERA ON AND OFF . . . . . . . . . . . . . . . . . . . . . . . . . . . . . . . . . . . . . . . 18
3.2 HOW TO CHANGE THE RECORD MODE ..........................................................18
3.3 HOW TO RECORD A VIDEO CLIP . . . . . . . . . . . . . . . . . . . . . . . . . . . . . . . . . . . . . . . . . . . . . . . . . . . . . . . . . . . . . . . . . 19
3.4 HOW TO TAKE STILL IMAGES....................................................................20
3.5 HOW TO USE THE SELF
-
TIMER . . . . . . . . . . . . . . . . . . . . . . . . . . . . . . . . . . . . . . . . . . . . . . . . . . . . . . . . . . . . . . . . . . 21
3.6 HOW TO RECORD AUDIO........................................................................ 22
4. HOW TO USE THE MENU IN RECORD MODE .............................................22
4.1 MENU IN CAPTURE MODE ......................................................................22
4.2 CAPTURE MENU LIST ........................................................................... 23
4.3 MENU IN VIDEO MODE ......................................................................... 27
4.4 SETUP MENU ...................................................................................29
5. PLAYBACK.............................................................................31
5.1 HOW TO PLAYBACK MOVIE CLIPS ...............................................................31
5.2 HOW TO PLAYBACK STILL IMAGES .............................................................. 31
5.3 HOW TO PLAYBACK AUDIO FILES ...............................................................32
5.4 HOW TO VIEW THUMBNAILS ....................................................................32
5.5 MENU IN PLAYBACK MODE .....................................................................33
6. HOW TO CONNECT THE DIGITAL VIDEO CAMERA TO A TV/HDTV/PC ......................35
6.1 HOW TO CONNECT THE DIGITAL VIDEO CAMERA TO A TV ........................................35
6.2 HOW TO CONNECT THE DIGITAL VIDEO CAMERA TO A HDTV .....................................36
6.3 HOW TO CONNECT THE DIGITAL VIDEO CAMERA TO A PC . . . . . . . . . . . . . . . . . . . . . . . . . . . . . . . . . . . . . . . . 37
6.4 HOW TO USE THE CARD READER................................................................ 37
6.5 HOW TO CONNECT THE DIGITAL VIDEO CAMERA TO A PC WITH A USB CABLE .................... 38
7. TECHNICAL SPECIFICATIONS...........................................................39

3
Please read these operating instructions carefully in order to
use the digital video camera correctly. Keep the instructions in
a safe place after reading so that you can refer to them later.
Precautions:
Before using the digital video camera, please ensure that you
read and understand the safety precautions described below.
• Should the digital video camera malfunction in any way,
do not attempt to repair it yourself. Maintenance and repairs
should only be carried out by authorized service providers.
• Keep the digital video camera away from water and other
liquids. Do not use the camcorder with wet hands. Never use
the camcorder in the rain or snow. Moisture creates the risk of
electric shock.
• Use only the recommended power accessories. Use of power
sources not expressly recommended for this unit may lead to
overheating, distortion of the equipment, re, electrical shock
or other hazards.

4
1. PARTS OF THE DIGITAL VIDEO CAMERA
1. Playback Button.
2. Menu Button.
3. Delete.
4. Power Button.
5. Mode Button.
6. Up Button.
7. Zoom In Button.
8. Zoom Out Button.
9. HDMI Jack.
10. Power/Charging
Indicator Light.
11. Shutter Button.
12. SD Card Slot.
13. USB Jack.
14. AV Out Jack.
15. Right/LED On/Off
Button.
16. Down Button.

5
17. OK Button.
18. Left/Display
Button.
19. Speaker.
20. LCD Screen.
21. Self-timer LED.
22. Lens.
23. LED Light.
24. Microphone.
25. Tripod Socket.
26. Battery Cover.
27. Wrist Strap.
2. SETUP GUIDE
2.1 HOW TO INSTALL THE BATTERY
1. Slide the battery cover and open it.
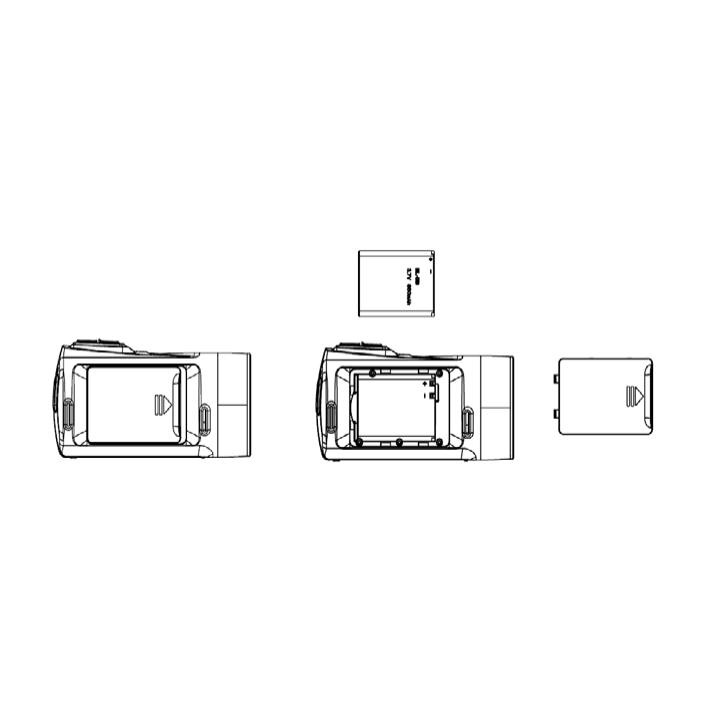
6
2. Place the accessory li-ion battery into the compartment.
Please note: The metallic contacts must be aligned with
the contacts in the compartment.
3. After the battery is properly installed, close the battery
cover.
2.2 HOW TO CHARGE THE BATTERY
Charge the battery for at least eight hours prior to rst use.
a. Power OFF and connect the USB cable to the digital video
camera and the computer for battery charging.
b. Charging starts when charging LED turns BLUE. The charge
indicator

7
light turns OFF when charging is completed.
c. Disconnect the camcorder.
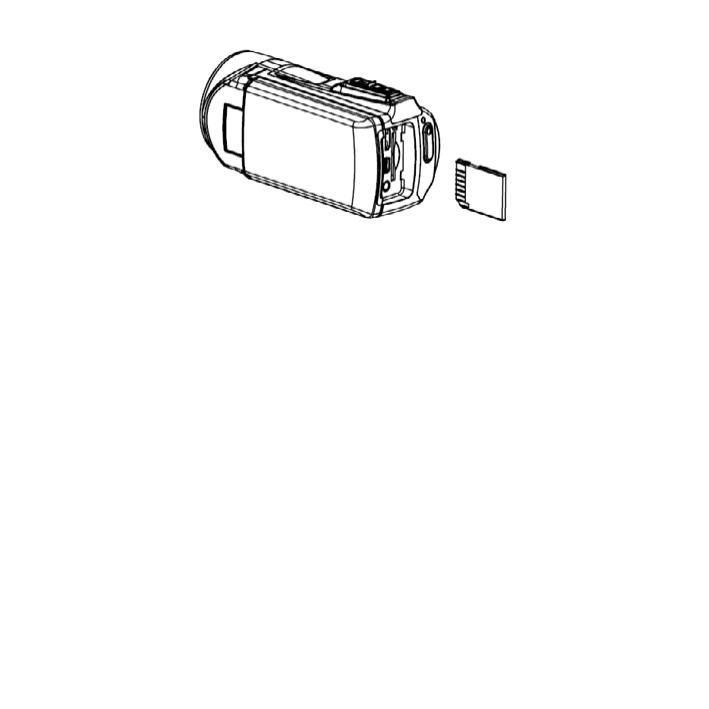
2.3 HOW TO INSERT THE MEMORY CARD
This digital video camera has no internal memory, it can’t re-
cord pictures or movie clips. If you want record you have to
use a SD or MMC card (The MAX.SD/MMC card that this digital
video camera could support is up to 32GB).Turn off the digital
video camera before inserting or removing the memory card.
Be sure to align and position the card correctly when insert-
ing it. Never try to force the memory card into the slot if you
feel resistance. The memory card has a write protect switch
which used to protect data from accidental deletion. There-
fore, whenever you want to record, format or delete les in the
SD card, disable the write protection beforehand.
8
1. Turn off the camcorder.
2. Find the rubber cover at the side of digital video camera
and then you will see the SD card slot.
3. Insert the memory card as illustrated.
4. Close the rubber cover.
5. To release the memory card, press the edge of the card
gently.
2.4 HOW TO FORMAT THE MEMORY CARD
It is important to format the memory card the rst time you
use this digital video camera. All data will be deleted includ-
ing protected les. Be sure to download the important les to
your computer before formatting.

9
1. Turn the power on, and set the digital video camera to the
Setup Menu.
2. Press the UP or DOWN buttons to select [Format], then
press OK button to launch the submenu.
3. Press the UP or DOWN buttons to select the item [YES]
and then press the OK button to erase all data.
2.5 HOW TO SELECT A LANGUAGE
Be sure to choose a language and set the date & time before
rst time
using the digital video camera.
1. Turn the power on, and set the digital video camera to the
Setup Menu.
2. Press the UP or DOWN buttons to select [Language] then
press OK button to launch the submenu.
3. Press the UP or DOWN buttons to select the desired
language and then press the OK button to conrm the
setting and exit the menu.
10
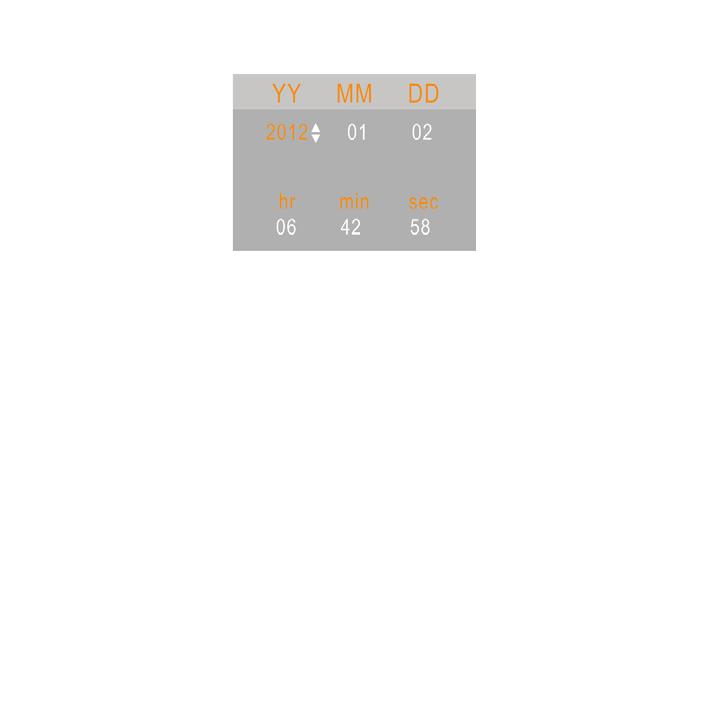
2.6 HOW TO SET THE DATE AND TIME
1. Turn the power on, press the MENU button to display the
menu, and then press the RIGHT button twice to select
[Setup] Menu.
2. Press the UP or DOWN buttons to select [Set Date] then
press the OK button to launch the submenu.
3. Press the UP or DOWN buttons to change the highlighted
value. Press the LEFT or RIGHT buttons to move the cursor
between settings.
4. Press the OK button to conrm the setting and close the
menu.

11
2.7 EXPLANATION OF THE MONITOR SCREEN DISPLAY
1 2 3
4
5
6
7
8 9 10 11 12 13
14 15
Capture Mode:[ ]
1. Camera Mode
Still Image Capture

12
2. Image Size.
21M
5616×3744
12M
4000×3000
8M
3264×2448
5M
2592×1944
3M
2048×1536
3. Scene Mode.
P
Auto
Sport
Night
Portrait
Landscape
Backlight
Party
Beach
High Sensitivity
4. Number of pictures availa-
ble in SD Card.
5. SD Card inserted.
No protect status
Protect status
6. Zoom Value Level.
7. Battery Power Level.
Full
Medium
Low
None
8. Smile Capture.
On
Off

13
9. Face Detect.
On
Off
10. Anti-Shake.
On
Off
11. Effect.
Normal IR
B & W Binary
Sepia Vivid
Red Undertone
Green Dog Eye
Blue Aibao
Sunset Gothic
Warm Japan Style
Cool LOMO
Over Exposure Negative

14
12. Exposure.
+3
+2
+1
0
-1
-2
-3
13. ISO.
Auto
100
200
400
14. Image Quality.
Super Fine
Fine
Normal
15. White Balance.
Auto
Daylight
Cloudy
Tungsten
Fluorescent
16. Date Imprint.

15
Video Record Mode: [ ]
1 2 3
4
5
6 7 8 9 10
1. Video recording icon.
2. Video size.
3. Recording time available.
4. SD Card inserted.
5. Zoom value level.
6. Battery power level.

16
7. Effect.
8. Exposure.
9. Video Quality.
10. White Balance.
Audio Mode:[
]
1 2
3
4
1. Audio recording icon.
2. Audio recording time available.
3. SD Card inserted.
4. Battery power level.

17
Playback Mode: [ ]
1 2 3
4
5 6
7
1.
Playback still image icon.
Playback movie clips icon.
Playback audio recording icon.
2. Image/Video size.
3. File catalogue on SD card / Current Image Number#/Video#.
4. Video recording time.

18
5. Battery Power Level.
6. Date Imprint.
7. Press the shutter button to playback video le.
3. HOW TO USE THE DIGITAL VIDEO CAMERA
3.1 HOW TO TURN THE DIGITAL VIDEO CAMERA ON AND OFF
1. Open the LCD panel to power on the digital video camera
and close the LCD panel to turn off the digital video
camera.
2. You can also press the POWER button to turn on the digital
video camera and press it again for 3 second to turn it off.
To save battery power, you can change the power-off time by
setting the function [Power Save] in the Setup menu.
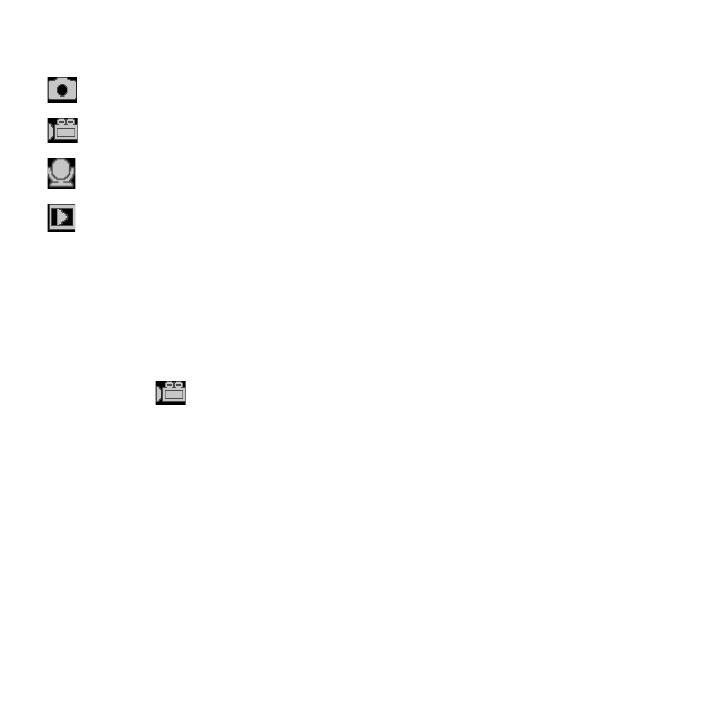
3.2 HOW TO CHANGE THE RECORD MODE
There are four modes in this digital video camera. Press the
MODE button to change the mode, each time the MODE but-
ton is press the mode is changed.
19
Display Title Description
Capture mode For taking still photos.
Video mode For recording movie clips.
Audio mode For recording audio les.
Playback mode For previewing record les.
Please Note: Press the playback button to enter playback mode.
3.3 HOW TO RECORD A VIDEO CLIP
1. Turn on the digital video camera and set it to video record
mode (
).
2. Zooming: Press the UP or DOWN buttons to zoom in or
zoom out the subject. The value of magnication level
appears on the LCD monitor.
3. Press the SHUTTER button to start recording.
4. Press the OK button to pause and press it again to continue
to recording.

20
5. Press the SHUTTER button again to end the recording. If
the memory is full the video camera will stop recording
automatically.
• On the upper of the LCD monitor displays the recorded time.
• When the light is insufcient press the RIGHT/LED ON/OFF
button to turn on the compensating lamp and when the light is
enough press the RIGHT/LED ON/OFF button again to turn off.
3.4 HOW TO TAKE STILL IMAGES
1. Set the digital video camerar to capture mode, the icon
appears on the LCD screen.
2. Zooming: Press the ZOOM IN or ZOOM OUT buttons to
zoom in or zoom out the screen. The value of magnication
level appears on the LCD monitor.
3. Hold the camcorder steady and then press the SHUTTER
button down to take a picture.
• When the light is insufcient press the RIGHT/LED ON/OFF
button to turn on the compensating lamp and when the light
is enough press the RIGHT/LED ON/OFF button again to turn
off.
/