Страница загружается...
EN
RU
UK
KK
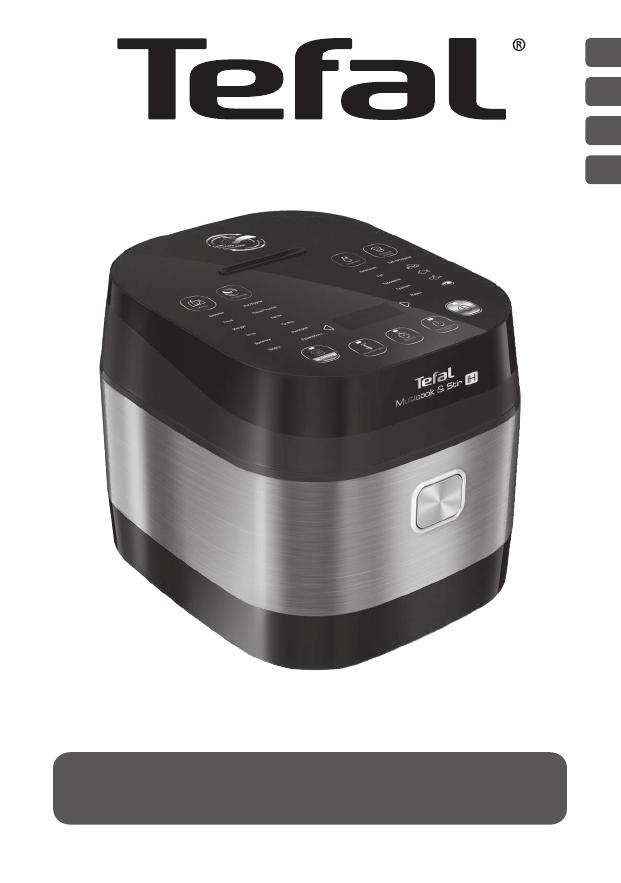
MULTICOOK & STIR IH
www.tefal.com
1
2
2a
3
7
8
12
11
9
10
6
13, 14
a
c
d
or
b
4 5
CLICK
×5
5
×5
10
Max
1
2
1
2
10 cups
MAX.
Fig.1 Fig.2 Fig.3 Fig.4
Fig.5 Fig.6 Fig.7 Fig.8
Fig.14 Fig.15 Fig.16
Fig.17
Fig.18
Fig.9 Fig.11Fig.10 Fig.12
Fig.13
1
2
2a
3
7
8
12
11
9
10
6
13, 14
a
c
d
or
b
4 5
CLICK
×5
5
×5
10
Max
1
2
1
2
10 cups
MAX.
Fig.1 Fig.2 Fig.3 Fig.4
Fig.5 Fig.6 Fig.7 Fig.8
Fig.14 Fig.15 Fig.16
Fig.17
Fig.18
Fig.9 Fig.11Fig.10 Fig.12
Fig.13

4
a
13
e
b
g
c
f
d
k
h i j
14
a
b
m
n1
m1
n2
m2
n3
m3
n4
m4
n5
c
d
e
f
g
h
i
j
k
l
CONTROL PANEL

5
EN
DESCRIPTION
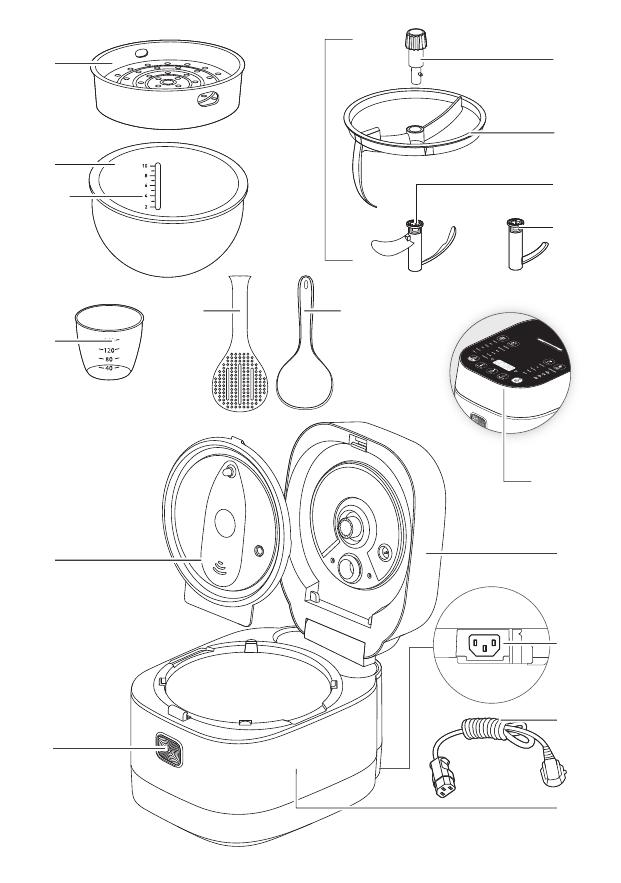
1 Steam basket
2 Removable inner pot
2a Water level graduation for
rice cooking
3 Measuring cup
4 Rice Spoon
5 Soup spoon
6 Lid
7 Removable inner lid
8 Lid opening button
9 Stirring accessory
a bottom connector
b support ring
c stirring paddle
d cleaning tool
10 Power cord connector
11 Power cord
12 Product body
13 Control Panel
a MENU selection key
b “Stirring” ON/OFF Key (when
possible)
c DIY mode selection key
d Auto Clean function
e “ - “ time & temperature
adjustment key
f “ + “ time & temperature
adjustment key
g Cancel / Keep Warm
h Temperature selection key
i Timer selection key
j Delayed Start key
k START / setting selection key
14 Program description
a Jam
b Rice/Cereal
c Porridge
d Pilaf/Risotto
e Yogurt
f Pasta
g Bread Rising
h Sous-Vide
i Dessert
j Reheat
k Cottage Cheese
l Defrost
m TYPE OF FOOD
m1 Vegetables
m2 Fish
m3 Poultry
m4 Meat
n1 BAKING
n2 SOUP
n3 STEAM
n4 STEW
n5 CRUST/FRY
a
13
e
b
g
c
f
d
k
h i j
14
a
b
m
n1
m1
n2
m2
n3
m3
n4
m4
n5
c
d
e
f
g
h
i
j
k
l

6
SAFETY INSTRUCTION
IMPORTANT SAFEGUARDS
SAFETY INSTRUCTIONS
Read and follow the instructions for use. Keep
them safe.
• This appliance is not intended to be operated by
means of an external timer or a separate remote-
control system.
• This appliance can be used by children aged
from 8 years and above if they have been
given supervision or instruction concerning
use of the appliance in a safe way and if they
understand the hazards involved. Cleaning and
user maintenance shall not be made by children.
Keep the appliance and its cord out of reach of
children aged less than 8 years.
• Appliances can be used by persons with reduced
physical, sensory or mental capabilities or lack
of experience and knowledge if they have been
given supervision or instruction concerning use
of the appliance in a safe way and understand
the hazards involved.
• Children shall not play with the appliance.
• This appliance is not intended for use by
persons (including children) with reduced
physical, sensory or mental capabilities, or lack
of experience and knowledge, unless they have
been given supervision or instruction concerning

7
EN
use of the appliance by a person responsible for
their safety.
• As this appliance is for household use only, it is
not intended for use in the following applications
and the guarantee will not apply for:
− Sta kitchen areas in shops, oces and other
working environments
− Farm houses
− By clients in hotels, motels and other residential
type environments
− Bed and breakfast type environments
• If your appliance is tted with a removable
power cord: if the power cord is damaged,
it must be replaced by a special cord or unit
available from a authorised service centre.
• If your appliance is tted with xed power
cord: if the power supply cord is damage, it
must be replaced by the manufacturer, the
manufacturer’s after-sales service department or
similarly qualied person in order to avoid any
danger.
• The appliance must not be immersed in water or
any other liquid.
• Use a damp cloth or sponge with diswashing
liquid to clean the accessories and parts in
contact with foodstu. Rince with a damp cloth
or sponge. Drying accessories and parts in
contact with food with a dry cloth.
• If the symbol is marked on the appliance, this
symbol means “ Caution: surfaces may become

8
hot during use ”.
• Caution: the surface of heating element is subject
to residual heat after use.
• Caution: risk of injury due to improper use of the
appliance.
• Caution: if your appliance has a removable power
cord, do not spill liquid on the connector.
• Always unplug the appliance:
− immediately after use
− when moving it
− prior to any cleaning or maintenance
− if it fails to function correctly
• Burns can occur by touching the hot surface of
the appliance, the hot water, steam or the food.
• During cooking, the appliance gives out heat
and steam. Keep face and hands away.
• Cooking appliances should be positioned in
a stable situation with the handles (if any)
positioned to avoid spillage of the hot liquids.
• Do not get face and hands close to the steam
outlet. Do not obstruct the steam outlet.
• For any problems or queries please contact our
Customer Relations Team or consult our web site.
• The appliance can be used up to an altitude of
2000 m.
• For your safety, this appliance complies with the safety regulations and
directives in eect at the time of manufacture (Low-voltage Directive,
Electromagnetic Compatibility, Food Contact Materials Regulations,
Environment…).
• Check that the power supply voltage corresponds to that shown on the
appliance (alternating current).

9
EN
• Given the diverse standards in eect, if the appliance is used in a
country other than that in which it is purchased, have it checked by an
approved service centre.
Connecting to the power supply
• Do not use the appliance if:
− the appliance or the cord is damaged
− the appliance has fallen or shows visible damage or does not work
properly
− In the event of the above, the appliance must be sent to an approved
Service Centre. Do not take the appliance apart yourself.
• Do not leave the cord hanging
• Always plug the appliance into an earthed socket.
• Do not use an extension lead. If you accept liability for doing so, only
use an extension lead which is in good condition, has an earthed plug
and is suited to the power of the appliance.
• Do not unplug the appliance by pulling on the cord.
• Allways disconnect the appliance from the supply if it is left unattended
and before assembling, disassembling or cleaning.
Using
• Use a at, stable, heat-resistant work surface away from any water
splashes.
• Do not allow the base of the appliance to come into contact with water
• Never try to operate the appliance when the bowl is empty or without
the bowl.
• The cooking function/knob must be allowed to operate freely. Do not
prevent or obstruct the function from automatically changing to the
keep warm function.
• Do not remove the bowl while the appliance is working.
• Do not put the appliance directly onto a hot surface, or any other source
of heat or ame, as it will cause a failure or danger.
• The bowl and the heating plate should be in direct contact. Any object
or food inserted between these two parts would with the correct
operation.
• Do not place the appliance near a heat source or in a hot oven, as
serious damage could result.
• Do not put any food or water into the appliance until the bowl is in
place.
• Respect the levels indicated in the recipes.

10
• Should any part of your appliance catch re, do not attempt to put it
out with water. To smother the ames use a damp tea towel.
• Any intervention should only be made by a service centre with original
spare parts.
Protect the environment
• Your appliance has been designed to run for many years. However,
when you decide to replace it, remember to think about how you can
contribute to protecting the environment.
• Before discarding your appliance you should remove the battery
from the timer and dispose of it at a local civic waste collection centre
(according to model).
Environment protection rst!
Your appliance contains valuable materials which can be recovered or
recycled.
Leave it at a local civic waste collection point.

11
EN
BEFORE THE FIRST USE
Unpack the appliance
• Remove the appliance from the packaging and unpack all the
accessories and printed documents.
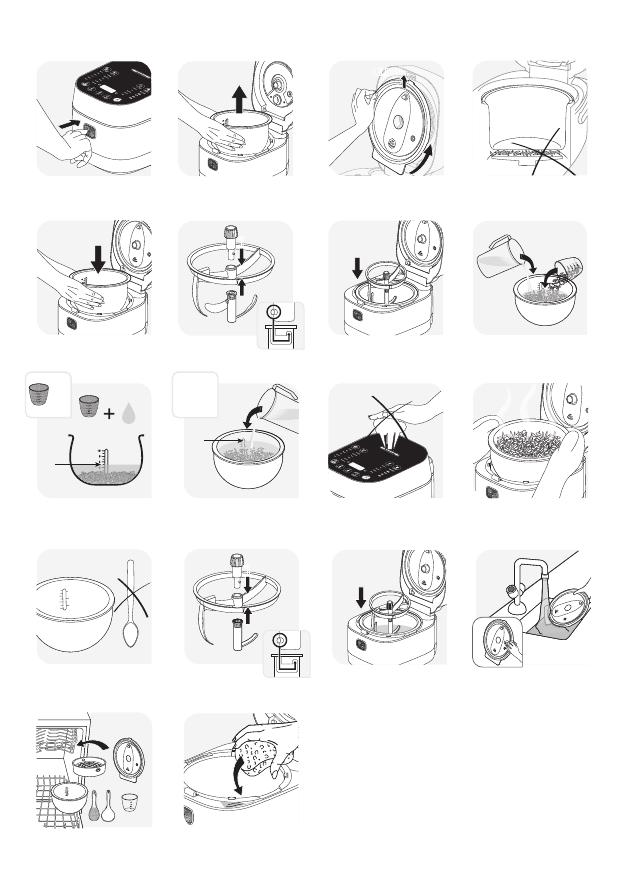
• Open the lid by pushing the opening button on the housing – g.1.
Read the Instructions and carefully follow the operation method.
Clean the appliance
• Remove the bowl – g.2, the inner lid – g.3.
• Clean the bowl, and the inner lid with a sponge and washing up liquid.
• Wipe the outside of the appliance and the lid with a damp cloth.
• Dry o carefully.
• Put all the elements back in their original position. Install the inner lid in
the right positions on the top lid of machine. Install the detachable cord
into the socket on the cooker base.
FOR THE APPLIANCE AND ALL FUNCTIONS
• Carefully wipe the outside of the bowl (especially the bottom). Make
sure that there are no foreign residues or liquid underneath the bowl
and on the heating element – g.4.
• Place the bowl into the appliance, making sure that it is correctly
positioned – g.5.
• If you wish to use the stirring function, assemble the paddle with the
bottom connector, the support ring, and the stir paddle - g.6 and
place it into the bowl - g.7.
• Make sure that the inner lid is correctly in position.
• Close the lid in place so you hear a “click”.
• Install the power cord (item 11) into the socket of multicooker base
(item 10) and then plug into the power outlet. The appliance will ring a
long sound «Beep», all the indicators on the control box will light up for
an instant. Then the screen display will show «----», and all the indicators
will switch o. The appliance enters into standby mode, you can select
the menu functions as you wish.
• Do not touch the heating element when the product is plugged in or
after cooking. Do not carry the product in use or just after cooking.

12
• This appliance is only intended for indoor use.
Never place your hand on the steam vent during cooking, as there is
a danger of burns – g.11.
After start the cooking, if you wish to change the selected cooking
menu because of an error, press «KEEP WARM/CANCEL» key and re-
choose the menu you want.
Only use the inner pot provided with the appliance.
Do not pour water or put ingredients in the appliance without the
bowl inside.
The maximum quantity of water + ingredient should not exceed the
highest mark inside the bowl - g.10.

13
EN
Programs Food Type
Cooking Time
Stirring paddle
Delayed Start Temperature Lid Position
Keep
warm
Default time Range Adjustable Range Adjustable Default (°C) Range (°C) Closed Open
Jam - 1h 5min-2h 5min Normally on up to 24h 5min 100 °C 90/100/110 °C
• •
Porridge - 25min 5min-2h 5min Normally on up to 24h 5min 100 °C 90/95/100 °C
• •
Yogurt - 8h 1h-12h 15min Possible - No 40 °C -
•
Bread rising - 1h 10min-2h 5min No - No 40 °C -
•
Dessert (baked) - 45min 30min-1h30min 5min Possible up to 24h 5min 160 °C 130/140/150/160 °C
• •
Cottage Cheese - 45min 30min-4h 5min No - No 80 °C -
•
Rice/Cereals - Automatic Automatic - Possible up to 24h 5min Automatic -
• •
Pilaf/Risotto - Automatic Automatic - Possible up to 24h 5min Automatic -
• •
Pasta - 10min 3min-3h 1min Possible up to 24h 5min 100 °C -
• •
Sous vide - 30min 15min-20h 1min No up to 24h 5min 58°C 1°C step from 58°C to 90°C
• •
Reheat - 25min 5min-1h 5min Possible up to 24h 5min 100 °C 80/100°C
• •
Defrost - 1h30min 10min-4h 5min No No 70°C -
•
Baking
Vegetable 35min
5min-4h 5min Possible up to 24h 5min 160 °C 140/150/160 °C
• •
Fish 20min
Poultry 40min
Meat 50min
Soup
Vegetable 40min
10min-4h 5min Possible up to 24h 5min 100 °C -
• •
Fish 45min
Poultry 50min
Meat 60min
Steam
Vegetable 35min
5min-3h 5min No up to 24h 5min 100 °C -
• •
Fish 25min
Poultry 45min
Meat 55min
Stew (Slow Cook)
Vegetable 30min
20min-9h 5min Normally on up to 24h 5min 100 °C 80/100/120°C
• •
Fish 40min
Poultry 50min
Meat 1h20min
Crust/Fry
Vegetable 12min
5min-1h30m 1min Normally on - No 160 °C
100/110/120/130/
140 /150/160 °C
• • •
Fish 10min
Poultry 15min
Meat 20min
DIY - 30min 5min-9h 5min Possible up to 24h 5min 100 °C 40/50......150/160 °C
• •
Auto-rinse - 10min 1min-20min 1min Normally on - No 100 °C -
•
Delayed Start -
COOKING PROGRAM TABLE

14
MENU KEY
• When starting your multicooker, press the “MENU” selection key to go
through the dierent programs.
• The menus will be scrolled following this order:
Jam Porridge Yogurt Bread rising Dessert Cottage
cheese Rice /Cereals Pilaf/Risotto Pasta Sous-vide
Reheat Defrost Baking Soup Steam Stew/Slow
cook Crust/Fry
• When you enter into menus [Baking], [Soup], [Steam], [Stew], [Crust/
Fry], you can choose an ingredient.
• The screen displays the default cooking time of each function (except
Rice/Cereals, Pilaf/Risotto). If available for the chosen program, “Keep
warm” and “Stir” indicators ashes. “Start” button light ashes and the
linked function lights up.
JAM FUNCTION
• Press «Menu» key to select function «Jam». The screen displays the default
cooking time, the light of «Start» will ash.
• Press «Timer» key to activate the time setting function and then press «<»
and «>» to change the cooking time. Press «Temperature» to change the
temperature by pressing «<» and «>».
• The light of “Stir” is ON by default. It means the “Stir” function is activated
by default. Press the «Stir» key to turn OFF the “Stir” function. Press again to
activate. If no action is done before starting the cooking, the stirring function
will be on. Do not forget to place the stirring paddle inside the cooking pot
(g. 6 & g.7) if you activate the “Stir” function. You may prefer to place the
paddle in the pot before placing all the ingredients, in order to facilitate the
installation.
• Press «Start» key. The multicooker will start the “Jam” cooking program and
the “Start” light will remain ON. The screen will display the remaining cooking
time.
• At the end of cooking, the multicooker will “beep” three times.
Note: No keep warm function for this function

15
EN
PORRIDGE FUNCTION
• Press «Menu» key to select function «Porridge». The screen displays the
default cooking time, the light of «Start» will ash.
• Press «Timer» key to activate the time setting function and then press
«<» and «>» to change the cooking time.
• Press «Temperature» key to activate the temperature setting function
and then press «<» and «>» to change the cooking temperature.
• The light of “Stir” is ON by default. It means the “Stir” function is activated
by default. Press the “Stir” key to turn OFF the “Stir” function. If the “Stir”
icon does not light up it means the function will be OFF. Do not forget
to place the stirring paddle inside the cooking pot (g.6 & g.7) if you
activate the “Stir” function.
• Press «Start» key. The multicooker will start the “Porridge” cooking
program and the “Start” light will come on. The screen will display the
remaining cooking time.
• At the end of cooking, the multicooker will “beep” three times and
begin the keep warm program, the “Keep Warm” indicator will come on
and the screen will display the time for which the keep warm function
has been active.
YOGURT FUNCTION
• Press «Menu» key to select function «Yogurt». The screen displays the
default cooking time «08:00», the light of «Start» will ash.
• Press «Timer» key to activate the time setting function and then press
«<» and «>» to change the cooking time.
• Press «Stir» key and the light of “Stir” lights up. Press again and
the “Stir” function will be o. If no action is done before starting the
cooking, the stirring function will be o. For this function, if the paddle
is activated, it will only stir during the last 15 min of the cooking time in
order to do mixed yogurt.
• Press «Start» key. The multicooker will start the “Yogurt” cooking
program and the “Start” light will remain ON. The screen will display the
remaining cooking time.
• At the end of cooking, the multicooker will “beep” three times.
Note: No keep warm function for this function

16
CHOICE OF INGREDIENTS FOR YOGURT
Milk
What milk should you use?
All our recipes (unless otherwise stipulated) are prepared using cow’s
milk. You can use plant milk such as soya milk for example as well as
sheep or goat’s milk but, in this case, the rmness of the yogurt may vary
depending on the milk used. Raw milk or long-life milks and all the milks
described below are suitable for your appliance:
• Long-life sterilised milk: UHT whole milk results in rmer yogurt.
Using semi-skimmed milk will result in less rm yogurt. However, you
can use semi-skimmed milk and add one or two pots of powdered milk.
• Pasteurised milk: this milk gives a more creamy yogurt with a little bit
of skin on the top.
• Raw milk (farm milk): this must be boiled. It is also recommended to let
it boil for a long time. It would be dangerous to use this milk without
boiling it. You must then leave it to cool before using it in your appliance.
Culturing using yogurt prepared with raw milk is not recommended.
• Powdered milk: using powdered milk will result in very creamy yogurt.
Follow the instructions on the manufacturer’s box.
Choose a whole milk, preferably long-life UHT.
Raw (fresh) or pasteurised milk must be boiled then cooled and
needs the skin removing.
The ferment
For yogurt
This is made either from:
• One shop-bought natural yogurt with the longest expiry date
possible; your yogurt will therefore contain more active ferment for a
rmer yogurt.
• From a freeze-dried ferment. In this case, follow the activation time
specied on the ferment instructions. You can nd these ferments in
supermarkets, pharmacies and in certain health product stores.
• From one of your recently prepared yogurt – this must be natural and
recently prepared. This is called culturing. After ve culturing processes,
the used yogurt loses active ferments and therefore risks giving a less
rm consistency. You then need to start again using a shopbought
yogurt or freeze-dried ferment.
If you have boiled the milk, wait until it has reached room temperature
before adding the ferment.

17
EN
Too high a heat may destroy the properties of your ferment.
Fermentation time
• Your yogurt will need between 6 and 12 hours of fermentation,
depending on the basic ingredients and the result you are after.
Fluid
6h 7h 8h 9h 10h 11h 12h
Firm
Sweet Acidic
• Once the yogurt cooking process is nished, the yogurt should be
placed in a refrigerator for at least 4 hours and it can be kept max 7 days
in refrigerator.
BREAD RISING FUNCTION
This function is to rise bread dough at 30 °C or 40°C after manual kneading
and before baking.
• Press «Menu» key to select function «Bread rising». The screen displays
the default cooking time “01:00” , the light of «Start» will ash.
• Press «Timer» key to activate the time setting function and then press
«<» and «>» to change the cooking time.
• Press «Start» key. The multicooker will start the “Bread Rising” cooking
program and the “Start” light will come on. The screen will display the
remaining cooking time.
• At the end of cooking, the multicooker will “beep” three times.
Note: No keep warm function for this function
Recommendations Dough proong (Bread rising):
• To prepare the dough separately and put it in the inner bowl, close the
lid and select «Bread rising» function.
• Once your dough is ready, you can use “Baking” function at 160°C
to bake for 20-23 minutes. Then turn it on other side for another 23
minutes approximate (depending on quantity of ingredients).

18
This function is to make Cottage Cheese. Ker is used as the basis for
cottage cheese. The ratio of ker: cottage cheese is approximately 4: 1.
• Press «Menu» key to select function «Cottage cheese». The screen
displays the default cooking time «45.00» mins, the light of «Start» will
ash.
• Press «Timer» key to activate the time setting function and then press
«<» and «>» to change the cooking time.
• Press «Start» key. The multicooker will start the “Cottage cheese”
cooking program and the “Start” light will come on. The screen will
display the remaining cooking time.
• At the end of cooking, the multicooker will “beep” three times.
Note: No keep warm function for this function
COTTAGE CHEESE FUNCTION
RICE/CEREALS FUNCTION
• Pour the required quantity of rice into the bowl using the measuring
cup provided (item 3).
• Fill with cold water up to the corresponding “CUP” mark printed in the
bowl – g.9.
• Close the lid.
Note: Always add the rice rst otherwise you will have too much
water.
Press «Menu» key to select function «Rice/Cereals». The screen displays
« », the light of «Start» will ash, then press «Start» key. The muticooker
will start the “Rice/Cereals” cooking programand the “Start” light will
come on, the screen ickers « ». The cooking time and temperature are
determined automatically by the appliance, depending on the number of
ingredients.
• At the end of cooking, the multicooker will “beep” three times and
begin the keep warm program, the “Keep Warm” indicator will come on
and the screen will display the time for which the keep warm function
has been active.
19
EN
PILAF/RISOTTO FUNCTION
• Press «Menu» key to select function «Pilaf/Risotto». The screen displays
« », the light of «Start» will ash.
• The light of “Stir” ashes. It means you have the possibility to activate
this function. Press the “Stir” key. The light will stop ashing but remain
ON. It means you have selected the “Stir” function for this menu. If you
press the key until the icon light turns OFF, it means the “Stir” function
will be deactivated for this menu. Do not forget to place the stirring
paddle inside the cooking pot (g.6 & g.7) if you activate the “Stir”
function.
• Press «Start» key. The muticooker will start the “Pilaf/Risotto” cooking
program and the “Start” light will come on, the screen ickers « ».
The cooking time and temperature are determined automatically by
the appliance, depending on the number of ingredients.
• At the end of cooking, the multicooker will “beep” three times and
begin the keep warm program, the “Keep Warm” indicator will come on
and the screen will display the time for which the keep warm function
has been active.
RECOMMENDATIONS FOR BEST RICE COOKING (Rice/ Cereals and
Pilaf/Risotto functions)
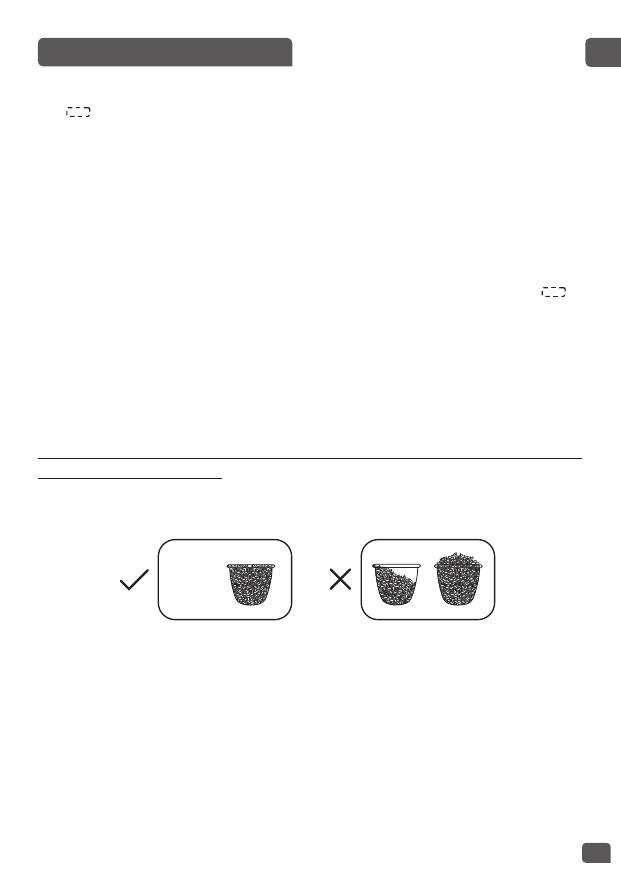
• Before cooking, measuring the rice with measuring cup and rinse it
except risotto rice.
1 cup =
~150g raw rice
• Put the rinsed rice well distributed around the whole surface of the bowl.
Fill it with water to the corresponding water level (The graduations in
cups).
• For example, if you are cooking 5 cups of rice, put your washed rice
evenly inside the cooking pot, then add water up to level 5 – g.9.
• When the rice is ready, when the “Keep Warm” indicator light is on, stir
the rice and then leave it in the multicooker for a few minutes longer in
order to get perfect rice with separated grains.
This table below gives a guide to cook rice:

20
COOKING GUIDE FOR WHITE RICE – 10 cups
Quantity of raw
rice
( in number of
cups)
Quantity of raw
rice
(equivalent in
gr.)
Water level in
the bowl (+ rice)
Serves
2 300 g 2 cup mark 3per. – 4per.
4 600 g 4 cup mark 5per. – 6per.
6 900 g 6 cup mark 8per. – 10per.
8 1200 g 8 cup mark 13per. – 14per.
10 1500 g 10 cup mark 16per. – 18per.
The time and temperature are automatic for rice cooking.
Please note that there are 7 steps:
Preheat => Water absorb => Temperature quick rise => Keep boiling =>
Water evaporation => Braise rice => Keep warm.
The cooking time depends on the quantity and type of rice.
PASTA FUNCTION
It is important to wait until the water reaches good temperature before
adding pasta.
• Press «Menu» key to select function «Pasta». The screen displays the
default cooking time, the light of «Start» will ash.
• Press «Timer» key to activate the time setting function and then press
«<» and «>» to change the pasta cooking time.
• Press “Stir” key and the “Stir” light will come on. Press again and the stir
function will be o. If no action is done before starting the cooking, the
stirring function will be o.
• Press «Start» key. The muticooker will start the “Pasta” cooking program
and the “Start” light will come on. The screen displays « ».
• The Multicooker ring when the water is at good temperature. Put pasta
into the water and press again start to start timer. Until user do not
press start, cooking time do not start and multicooker keep water at
good temperature. During the pasta cooking, the lid must be open.
• At the end of cooking, the multicooker will “beep” three times.
Note: No keep warm function for this function
/