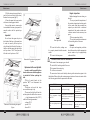
Kuppersberg HO 658 W Руководство пользователя
- Категория
- Печи
- Тип
- Руководство пользователя

TECHNICAL PASSPORT
ПАСПОРТ ТЕХНИЧЕСКОГО ИЗДЕЛИЯ
ELECTRIC OVENS
ЭЛЕКТРИЧЕСКИЕ ДУХОВЫЕ ШКАФЫ
HO 658 T, HO 658 W

2 3
TECHNICAL PASSPORT ENGLISH ENGLISH TECHNICAL PASSPORT
Electric oven Electric oven
SAFETY INSTRUCTIONS ..................................................................................................... 3
DESCRIPTION OF THE APPLIANCE ............................................................................... 5
INSTALLATION .......................................................................................................................... 6
OPERATION ................................................................................................................................. 8
BAKING IN THE OVEN
–
PRACTICAL HINTS .............................................................. 14
CLEANING AND MAINTENANCE ...................................................................................... 16
TECHNICAL DATA ..................................................................................................................... 20
DEAR CUSTOMER,
The oven is exceptionally easy to use
and extremely effi cient. After reading
the instruction manual, operating the
oven will be easy.
Before being packaged and leaving
the manufacturer, the oven was
thoroughly checked with regard to
safety and functionality.
Before using the appliance, please
read the instruction manual carefully.
By following these instructions
carefully you will be able to avoid any
problems in using the appliance.
It is important to keep the instruction
manual and store it in a safe place so
that it can be consulted at any time.
It is necessary to follow the
instructions in the manual carefully in
order to avoid possible accidents.
Caution!
Do not use the oven until you have
read this instruction manual.
The oven is intended for household
use only.
The manufacturer reserves the right
to introduce changes which do not
affect the operation of the appliance.
SAFETY INSTRUCTIONS
Warning: The appliance and its
accessible parts become hot during use.
Care should be taken to avoid touching
heating elements. Children less than 8
years of age shall be kept away unless
continuously supervised.
This appliance can be used by
children aged from 8 years and above
and persons with reduced physical,
sensory or mental capabilities or lack of
experience and knowledge if they have
been given supervision or instruction
concerning use of the appliance in
a safe way and understand the ha-
zards involved. Children shall not play
with the appliance. Cleaning and user
maintenance shall not be made by chil-
dren without supervision.
During use the appliance becomes
hot. Care should be taken to avoid
touching heating elements inside the
oven.
Accessible parts may become hot
during use. Young children should be
kept away.
Warning: Do not use harsh abrasive
cleaners or sharp metal scrapers to
clean the oven door glass since they can
scratch the surface, which may result in
shattering of the glass.
Warning: Ensure that the appliance
is switched off before replacing the
lamp to avoid the possibillity of electric
shock.
You should not use steam cleaning
devices to clean the appliance.
Ensure that small items of
household equipment, including
connection leads, do not touch the hot
oven as the insulation material of this
equipment is usually not resistant to
high temperatures.
Do not leave the oven unattended
when frying. Oils and fats may catch fi re
due to overheating or boiling over.
Do not put pans weighing over
15 kg on the opened door of the oven.
Do not use harsh cleaning agents
or sharp metal objects to clean the door
as they can scratch the surface, which
could then result in the glass cracking.

4 5
TECHNICAL PASSPORT ENGLISH ENGLISH TECHNICAL PASSPORT
Electric oven Electric oven
Do not use the oven in the event
of a technical fault. Any faults must be
fi xed by an appropriately qualifi ed and
authorised person.
In the event of any incident
caused by a technical fault, disconnect
the power and report the fault to the
service centre to be repaired.
The rules and provisions
contained in this instruction manual
should be strictly observed. Do not
allow anybody who is not familiar with
the contents of this instruc tion manual
to operate the oven.
The appliance has been designed
only for cooking. Any other use (for
example for heating) does not comply
with its operating profi le and may cause
danger.
HOW TO SAVE ENERGY
Using energy in a respon sible way
not only saves money but also helps the
environment. So let’s save energy! And
this is how you can do it:
Do not uncover the pan too often
(a watched pot never boils!).
Do not open the oven door
unnecessarily often.
Only use the oven when cooking
larger dishes.
Meat of up to 1 kg can be prepared
more economically in a pan on the
cooker hob.
Make use of residual heat from
the oven.
If the cooking time is greater than 40
minutes switch off the oven 10 minutes
before the end time.
Important!
When using the timer, set
appropriately shorter cooking times
according to the dish being prepared.
Make sure the oven door is
properly closed.
Heat can leak through spillages on
the door seals. Clean up any spillages
immediately.
Do not install the cooker in the
direct vicinity of refrigerators/freezers.
Otherwise energy consumption
increases unnecessarily.
UNPACKING
During transportation, protec-
tive packaging was used to protect
the appliance against any damage.
After unpack ing, please dispose of all
elements of packaging in a way that will
not cause dam age to the environment.
All materials used for packaging the
appli ance are environmentally friendly;
they are 100% recyclable and are
marked with the appropriate symbol.
Caution! During unpacking, the
packag ing materials (polythene bags,
polystyrene pieces, etc.) should be kept
out of reach of children.
DISPOSAL OF THE APPLIANCE
Old appliances should not sim ply be disposed of with normal
household waste, but should be delivered to a collection and
recycling centre for electric and electronic equipment. A symbol
shown on the product, the instruction manual or the packaging
shows that it is suitable for recycling.
Materials used inside the appliance are recyclable and are labelled with
information concerning this. By recycling materials or other parts from used devices
you are making a signifi cant contribution to the protection of our environment.
Information on appropriate disposal centres for used devices can be provided by
your local authority.`
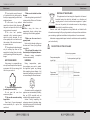
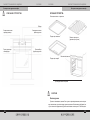
DESCRIPTION OF THE APPLIANCE
Temperatureregulator
signal light
Temperature
adjust ment knob
Electronic programmer
Cooker operation signal light
Oven function
selector knob

6 7
TECHNICAL PASSPORT ENGLISH ENGLISH TECHNICAL PASSPORT
Electric oven Electric oven
SPECIFICATIONS OF THE APPLIANCE
Cooker fi ttings:
Baking tray*
Grill grate (drying rack)
Roasting tray*
*optional
Side racks
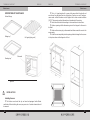
INSTALLATION
This is a Y–type design built–in oven, which means that its back wall and
one side wall can be placed next to a high piece of furniture or a wall. Coating or
veneer used on fi tted furniture must be applied with a heat–resistant adhesive
(100°C). This prevents surface deforma tion or detachment of the coating.
Hoods should be installed according to the manufacturer’s instructions.
Make an opening with the dimensions given in the diagram for the oven to
be fi tted.
Make sure the mains plug is disconnected and then connect the oven to the
mains supply.
Insert the oven completely into the open ing without allowing the four screws
in the places shown in the diagram to fall out.
Installing the oven
The kitchen area should be dry and aired and equipped with effi cient
ventillation. When installing the oven, easy access to all control elements should
be ensured.

8 9
TECHNICAL PASSPORT ENGLISH ENGLISH TECHNICAL PASSPORT
Electric oven Electric oven
Electrical connection
The oven is manufactured to work
with a one-phase alternating current
(230V 1N~50 Hz) and is equipped with
a 3 x 1,5 mm2 connection lead of 1.5
mm length with a plug including a
protection contact.
A connection socket for electricity
supply should be equipped with a
protection pin and may not be located
above the cooker. After the cooker is
positioned, it is necessary to make the
connection socket accessible to the
user.
Before connecting the oven to
the socket, check if:
the fuse and electricity supply
are able to withstand the cooker load,
the electricity supply is
equipped with an effi cacious ground
system which meets the requirements of
current standards and provisions,
the plug is within easy reach.
Important!
If the fi xed power supply cable
is damaged, it should be replaced at
the manufacturer or at an au thorized
servicing outlet, or by a qualifi ed person
to avoid danger.
OPERATION
Before using the oven for the
fi rst time
Remove packaging, clean the
interior of the oven and the hob.
Take out and wash the oven
fi ttings with warm water and a little
washing–up liq uid.
Switch on the ventillation in the
room or open a window.
Heat the oven (to a temperature
of 250°C, for approx. 30 min.), remove
any stains and wash carefully; the
heating zones of the hob should be
heated for around 4 min. without a pan.
The oven is equipped with a
retractable knobs. In order to select a
function do the following:
1. Gently press and release a knob
which will pop out,
2. Turn the oven functions selection
knob to the desired function.
Symbols printed around the knob
indicate available oven functions.
1.
2.
Important!
In ovens equipped with the
electronic programmer Ts, the time
“0.00” will start fl ashing in the display
fi eld upon connection to the power
supply.
The programmer should be set
with the current time. (See Electronic
programmer ). If the current time is not
set operation of the oven is impossible.
The electronic prgrammer Ts is
equipped with electronic sensors which
are switched on by touching or press-
ing the sensor surface for at least one
second.
Each sensor reaction is confi rmed by
the beep.Keep the sensor surface clean
at all times.
Electronic programmer
functions
MENU – function selection button
< – sensor “–”
> – sensor “+”
The electronic prgrammer is
equipped with electronic sensors which
are switched on by touching or pressing
the sensor surface for at least one
second.
Each sensor reaction is confi rmed by
the beep.
Keep the sensor surface clean at all
times.
Setting the time
After connection to the mains or
reconnec tion after a power cut the
display shows fl ash
reconnec tion after a power cut the
Touch and hold MENU (or
simultaneously touch < and >) until you
will see
on the display and the dot
below the symbol is fl ashing,
Touch < or > within 7 seconds to
set the current time.
To store the new time setting, wait
approxi mately 7 seconds after time has
been set. The dot below the
symbol
will stop fl ashing.
You can adjust the time later. To do
this touch < / >, simultaneously and
adjust the current time while the dot
below the
symbol is fl ashing.
Caution!
If the correct time is not set then
proper opera tion of the oven is not
possible.
Timer
The timer can be activated at any
time, re gardless of the status of other
functions. The timer can be set for from
1 minute to up to 23 hours and 59
minutes.
To set the timer you should:
Press sensor MENU, then the
display will show fl ashing
,

10 11
TECHNICAL PASSPORT ENGLISH ENGLISH TECHNICAL PASSPORT
Electric oven Electric oven
set the timer using sensors < / >.
The time set is shown on the display
and the signal function is on.
Press sensor MENU, < / > in order
to switch off the signal, the signal
function will go out and the display will
show the current time.
Caution!
If the alarm signal is not turned
off manually, it will be turned off
automatically after approx. 7 minutes.
Semi–automatic operation
If the oven is to be switched off at a
given time, then you should:
Set the oven function knob and
the tem perature regulator knob to the
setting at which you want the oven to
operate.
Press sensor MENU until the
display will show:
Set the required time using
sensors < / >, within a range from 1
minute to 10 hours.
The set time will be introduced to
the memory after approx. 7 seconds and
the display will show AUTO function.
When the set time has passed the
oven is switched off automatically, the
alarm signal is activated and the signal
function AUTO fl ashing again;
Set the oven function knob and
the tem perature regulator knob to the
switched–off position.
Press sensor MENU, < / > in order
to switch off the signal; the signal
function will go out and the display will
show the current time.
Caution!
In ovens equipped with one
control knob, the oven function knob
is integrated with the temperature
regulator knob.
Automatic operation
If the oven is to be switched on for
a specifi ed period of time and switched
off at a fi xed hour then you should set
the operation time and the operation
end time:
Press sensor MENU until the
display will show:
Set the required time using the
sensors < / > within a range from 1
minute to 10 hours.
Press sensor MENU until the
display will show:
Set the switch–off time
(operation end time) using sensors < / >,
which is limited to a period of 23 hours
and 59 minutes from the current time.
Set the oven function knob and
the tem perature regulator knob to the
setting at which you want the oven to
operate.
The signal lights by
and
are
now on; the oven will start operating
from the point when the difference
between the set operation end time and
the operation duration time occurs (e.g.
the operation time is set to 1 hour, the
operation end time is set to 14.00, so the
oven will start working automatically at
13.00).
The function AUTO is now on; the
oven will start operating from the point
when the differ ence between the set
operation end time and the operation
duration time occurs (e.g. the operation
time is set to 1 hour, the operation end
time is set to 14.00, so the oven will
start working automatically at 13.00).
When the oven reaches the operation
end time it will switch off automatically,
the alarm will be activated and the
function AUTO will start fl ashing again.
Set the oven function knob and
the tem perature regulator knob to the
switched–off position.
Press sensor MENU, < / > in order
to switch off the alarm; the function
AUTO will go out and the display will
show the current time.
Cancel settings
Timer and automatic function
settings may be cancelled at any time.
Cancel automatic function settings:
press sensors < / > simultaneously,
Cancel timer settings:
press sensor MENU to select
timer settings,
press sensors < / > again,
Change the timer beeps
The tone of the timer beeps may be
changed as follows:
press sensors < / > simultaneously,
select “tone” function with the
1 sensor, the display panel will start to
blink:

12 13
TECHNICAL PASSPORT ENGLISH ENGLISH TECHNICAL PASSPORT
Electric oven Electric oven
with the > sensor press the
appropriate sen sors from 1 to 3 to
select the option you wish.
Oven functions and operation.
Oven with automatic air
circulation (including a fan and
top and bottom heaters)
The oven can be warmed up using
the bottom and top heaters, as well
as the grill. Operation of the oven is
controlled by the oven function knob
– to set a required function you should
turn the knob to the selected position,
as well as the temperature regulator
knob – to set a required function you
should turn the knob to the selected
position.
The oven is equipped with a
retractable knobs. In order to select a
function do the following:
- Gently press and release a knob
which will pop out,
- Turn the oven functions selection
knob to the desired function.
Symbols printed around the knob
indicate available oven functions.
The oven can be switched off by
setting both of these knobs to the
position “”/“0”.
Caution!
When selecting any heating func-
tion (switching a heater on etc.) the
oven will only be switched on after
the temperature has ben set by the
temperature regulator knob.
0
Oven is off
Independent oven lighting
Set the knob in this position to light
up the oven interior.
Rapid Preheating
Top heater, roaster and fan on. Use to
preheat the oven.
Defrosting
Only fan is on and all heaters are off.
Fan and combined grill on
When the knob is turned to this posi-
tion, the oven activates the combined
grill and fan function. In practice, this
function allows the grilling process to
be speeded up and an improvement in
the taste of the dish. You should only
use the grill with the oven door shut.
Enhanced roaster (super roaster)
In this setting both roaster and
top heater are on. This increases tem-
perature in the top part of the oven’s
interior, which makes it suitable for
browning and roasting of larger por-
tions of food.
Roaster on.
Roasting is used for cooking of small
portions of meat: steaks, schnitzel, fi sh,
toasts, Frankfurter sausages, (thickness
of roasted dish should not exceed 2-3
cm and should be turned over during
roasting).
Bottom heater on
When the knob is set to this position
the oven is heated using only the
bottom heater. Baking of cakes from the
bottom until done (moist cakes with
fruit stuffi ng).
Top and bottom heaters on
Set the knob in this position for co-
nventional baking. This setting is ideal
for baking cakes, meat, fi sh, bread and
pizza (it is necessary to preheat the
oven and use a baking tray) on one oven
level.
Top heater, bottom heater and fan
are on.
This knob setting is most suitable
for baking cakes. Convection baking
(recommended for baking).
When the
functions have been
selected but the temperature knob is
set to zero only the fan will be on. With
this function you can cool the dish or
the oven chamber.
Switching on the oven is indicated
by red signal light, turning on. If the
red light goes out, it means the oven
has reached the set temperature. If a
recipe recommends plac ing dishes in
a warmed-up oven, this should be not
done before the red light goes out for
the fi rst time. When baking, the red light
will temporarily come on and go out (to
maintain the temperature inside the
oven).

14 15
TECHNICAL PASSPORT ENGLISH ENGLISH TECHNICAL PASSPORT
Electric oven Electric oven
Use of the grill
The grilling process operates
through infrared rays emitted onto the
dish by the incandes cent grill heater.
In order to switch on the grill you
need to:
Set the oven knob to the position
marked grill,
Heat the oven for approx. 5
minutes (with the oven door shut).
Insert a tray with a dish onto the
appropri ate cooking level; and if you
are grilling on the grate insert a tray
for dripping on the level immediately
below (under the grate).
Close the oven door.
For grilling with the function grill
and com bined grill the temperature
must be set to 250ºC, but for the
function fan and grill it must be set to a
maximum of 190ºC.
Warning!
When using function grill it is rec-
ommended that the oven door is closed.
When the grill is in use accessible
parts can become hot.
It is best to keep children away from
the oven.
BAKING IN THE OVEN
–
PRACTICAL HINTS
Baking
we recommend using the baking
trays which were provided with your
cooker;
it is also possible to bake in cake
tins and trays bought elsewhere which
should be put on the drying rack; for
baking it is better to use black trays
which conduct heat better and shorten
the baking time;
shapes and trays with bright or
shiny surfaces are not recommended
when using the conventional heating
method (top and bottom heaters), use
of such tins can result in undercooking
the base of cakes;
when using the ultra-fan function
it is not necessary to initially heat up
the oven chamber, for other types of
heating you should warm up the oven
chamber before the cake is inserted;
before the cake is taken out of
the oven, check if it is ready using a
wooden stick (if the cake is ready the
stick should come out dry and clean
after being inserted into the cake);
after switching off the oven it is
advisable to leave the cake inside for
about 5 min.;
temperatures for baking with the
ultra-fan function are usually around
20 – 30 degrees lower than in normal
baking (using top and bottom heaters);
the baking parameters given
in Table are approximate and can be
corrected based on your own experience
and cooking preferences;
if information given in recipe
books is signifi cantly different from
the values included in this instruction
manual, please apply the instructions
from the manual.
Roasting meat
cook meat weighing over 1 kg in
the oven, but smaller pieces should be
cooked on the gas burners.
use heatproof ovenware for roasting, with handles that are also resistant to
high temperatures;
when roasting on the drying rack or the grate we recommend that you place a
baking tray with a small amount of water on the lowest level of the oven;
it is advisable to turn the meat over at least once during the roasting time
and during roasting you should also baste the meat with its juices or with hot salty
water – do not pour cold water over the meat.
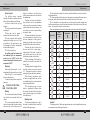
Oven with automatic air circulation (including a fan and top and bottom heaters)
Type of dish
Oven
functions
Temperature
Level
Time
in minutes
160-200 2-3 30-50
150 3 25-35
160-180 2 20 - 40*
150 3 65-70
220 - 240 3 10-15
210-220 2 45-60
190 2-3 60-70
230 - 250 4 14-18
225 - 250 2 120-150
160-230 2 90-120
190 2-3 50-60
160-180 2 45-60
190-210 2 40-50
170-190 3 40-50
* Baking smaller items
Caution!
The fi gures given in Tables are approximate and can be adapted based on your
own experience and cooking preferences.

16 17
TECHNICAL PASSPORT ENGLISH ENGLISH TECHNICAL PASSPORT
Electric oven Electric oven
CLEANING AND
MAINTENANCE
By ensuring proper cleaning and
mainte nance of your cooker you can
have a sig nifi cant infl uence on the
continuing fault-free operation of your
appliance.
Before you start cleaning, the cooker
must be switched off and you should
ensure that all knobs are set to the
position “off”. Do not start cleaning until
the cooker has completely cooled.
Oven
The oven should be cleaned
after every use. When cleaning the oven
the lighting should be switched on to
enable you to see the surfaces better.
The oven chamber should only
be washed with warm water and a small
amount of washing-up liquid.
After cleaning the oven chamber
wipe it dry.
Steam Cleaning function:
-pour 250ml of water (1 glass)
into a bowl placed in the oven on the
fi rst level from the bottom,
- close the oven door,
- set the temperature knob
to 50°C, and the function knob to the
bottom heater position
- heat the oven chamber for
approximately 30 minutes,
- open the oven door, wipe
the chamber inside with a cloth or
sponge and wash using warm water
with washing-up liqu id.,
After cleaning the oven chamber
wipe it dry.
Caution!
Do not use cleaning products
contain ing abrasive materials for the
cleaning and maintenance of the glass
front panel.
Important!
Do not use any abrasive agents,
harsh detergents or abrasive ob jects for
cleaning.
Only use warm water with a small
amount of dishwashing liquid to clean
the front of the appliance. Do not use
washing powders or creams.
Ovens in cookers marked with
the letter D are equipped with easily
removable wire shelf supports. To
remove them for washing, pull the front
catch, then tilt the support and remove
from the rear catch.
Removing wire shelf supports
Installing wire shelf supports
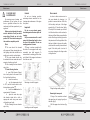
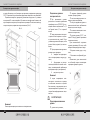
Door removal
In order to obtain easier access to
the oven chamber for cleaning, it is
possible to remove the door. To do this,
tilt the safety catch part of the hinge
upwards (fi g. A). Close the door lightly,
lift and pull it out towards you. In order
to fi t the door back on to the cooker, do
the inverse. When fi tting, ensure that the
notch of the hinge is correctly placed on
the protrusion of the hinge holder. After
the door is fi tted to the oven, the safety
catch should be carefully lowered down
again. If the safety catch is not set it
may cause damage to the hinge when
closing the door.
Tilting the hinge safety catches
Removing the inner panel
1. Using a fl at screwdriver unhook
the up per door slat, prying it gently on
the sides (fi g. B).
2. Pull the upper door slat loose. (fi g.
B, C)

18 19
TECHNICAL PASSPORT ENGLISH ENGLISH TECHNICAL PASSPORT
Electric oven Electric oven
3. Pull the inner glass panel from its
seat (in the lower section of the door).
Re move the inner panel (fi g. D).
4. Clean the panel with warm water
with some cleaning agent added.
Carry out the same in reverse order
to reassemble the inner glass panel. Its
smooth surface shall be pointed up-
wards.
Important!
Do not force the upper strip in on
both sides of the door at the same time.
In order to correctly fi t the top door
strip, fi rst put the left end of the strip on
the door and then press the right end in
until you hear a “click”. Then press the
left end in until you hear a “click”.
Removal of the internal glass panel.
3 glass.
Removal of the internal glass panel
2 glass.
Replacement of the oven light bulb
In order to avoid the possibility of an
electric shock ensure that the appliance
is switched off before replacing the
bulb.
Set all control knobs to the
position “”/“0” and disconnect the
mains plug,
unscrew and wash the lamp
cover and then wipe it dry.
unscrew the light bulb from the
socket, replace the bulb with a new one
– a high temperature bulb (300°C)
with the follow ing parameters:
- voltage 230 V
- power 25 W
- thread E14.
Oven light bulb
Screw the bulb in, making sure
it is prop erly inserted into the ceramic
socket.
Screw in the lamp cover.
Regular inspections
Besides keeping the oven clean, you
should:
carry out periodic inspections of
the con trol elements and cooking units
of the cooker. After the guarantee has
expired you should have a technical
inspection of the cooker carried out at
a service centre at least once every two
years,
fi x any operational faults,
carry out periodical maintenance
of the cooking units of the oven.
Caution!
All repairs and regulatory activities
should be carried out by the ap propriate
service centre or by an appropriately
authorised fi tter.
OPERATION IN CASE OF EMERGENCY
In the event of an emergency, you should:
switch off all working units of the oven
disconnect the mains plug
call the service centre
some minor faults can be fi xed by referring to the instructions given in the
table below. Before calling the customer support centre or the service centre check
the following points that are presented in the table.
PROBLEM REASON ACTION
1. The appliance does not work. Break in power supply.
Check the household fuse box; if
there is a blown fuse replace it
with a new one.
2. The programmer display
shows “0:00”.
The appliance was discon nected
from the mains or there was a
temporary power cut.
Set the current time
(see ‘Use of the programmer’).
3. The oven lighting does not
work.
The bulb is loose or damaged.
Tighten up or replace the
blown bulb (see ‘Cleaning and
Maintenance’).

20 21
TECHNICAL PASSPORT ENGLISH ENGLISH TECHNICAL PASSPORT
Electric oven Electric oven
TECHNICAL DATA
Voltage rating .........................................230V~50 Hz
Power rating ...........................................max. 2,9 kW
Cooker dimensions H/W/D ................59,5 / 59,5 / 57,5 cm
Complies with EU regulations EN 60335-1, EN 60335-2-6 standards
PRODUCT FICHE
The information in the product data sheet is given in accordance with the
Commission delegated Regulation (EU) No 65/2014 supplementing Directive ofthe
European Parliament and ofthe Council 2010/30/EU with regard toenergy labelling
ofhousehold ovens and range hoods
A Supplier name KUPPERSBERG
B1
Model identifi er
HO 658 T
10162.3ETsDHbX
56509
B2
HO 658 W
10162.3ETsDHbW
56510
C Energy effi ciency index (EEI cavity) 106,1
D Energy effi ciency class A
E
Energy consumption per cycle (EC electric cavity)
conventional mode [kWh]
fan-forced mode [kWh]
0,99
0,87
E1
E2
F Number ofcavities 1
G Heat source (electricity orgas) V / O
H Cavity volume [l] 65
In order to determine compliance with the eco-design requirements, the
measurement methods and calculations ofthe following standards were applied:
EN 60350-1
PRODUCT INFORMATION
Product information given inaccordance with Commission Regulation (EU) No
66/2014 supplementing Directive ofthe European Parliament and Council Directive
2009/125/EC with regard toeco-design requirements for household ovens, hobs
and range hoods
Household ovens
I1
Model identifi er
HO 658 T
10162.3ETsDHbX
56509
I2
HO 658 W
10162.3ETsDHbW
56510
J Oven type (electricity orgas) V / O
K Appliance weight [kg] 32,4
L Number ofcavities 1
M Source ofheat for each cavity (electricity orgas) V / O
N Volume ofeach cavity V[I] 65
O
Energy consumption needed to heat a standard charge in an
electric oven cavity during asingle cycle inconventional mode for
each cavity (fi nal electric energy consumption) ECelectric cavity
[kWh/cycle]
0,99
P
Energy consumption needed to heat a standard charge in an
electric oven cavity during asingle cycle infan-forced mode for
each cavity (fi nal electric energy consumption) ECelectric cavity
[kWh/cycle]
0,87
Q Energy effi ciency index EEI cavity for each cavity 106,1

22 23
TECHNICAL PASSPORT ENGLISH ENGLISH TECHNICAL PASSPORT
Electric oven Electric oven
SERIAL NUMBER CHART: NOTES / ДЛЯ ЗАМЕТОК
Manufacturers:
Amica S.A., Poland
Importers:
LLC «MG Rusland», 141400
Moscow region, Khimki, Butakovo, 4
Month
Year
XXXXXXXXXXX

24 25
ПАСПОРТ ТЕХНИЧЕСКОГО ИЗДЕЛИЯ РУССКИЙ РУССКИЙ ПАСПОРТ ТЕХНИЧЕСКОГО ИЗДЕЛИЯ
Электрические духовые шкафы Электрические духовые шкафы
ТЕХНИКА БЕЗОПАСНОСТИ ............................................................................................... 25
ОПИСАНИЕ УСТРОЙСТВА .................................................................................................. 28
МОНТАЖ .......................................................................................................................................29
ЭКСПЛУАТАЦИЯ ....................................................................................................................... 31
ПРИГОТОВЛЕНИЕ ПИЩИ В ДУХОВКЕ
-
ПРАКТИЧЕСКИЕ СОВЕТЫ ......... 37
OБСЛУЖИВАНИЕ И УХОД .................................................................................................. 40
ПОВЕДЕНИЕ В АВАРИЙНЫХ СИТУАЦИЯХ .............................................................. 43
ТЕХНИЧЕСКИЕ ДАННЫЕ .................................................................................................... 44
СОДЕРЖАНИЕ
УВАЖАЕМЫЙ
ПОКУПАТЕЛЬ,
Духовкa объединяет в себе такие
качества, как исключительная про-
стота эксплуата ции и стопроцентная
эффективность. После прочтения ин-
струкции у Вас не возникнет затрудне-
ний по обслуживанию духовки.
Духовкa, при выпуске с завода,
перед упаковкой была тщательно про-
верена на специ-альных стендах на
предмет безопасности и работоспо-
собности.
Просим Вас внимательно прочесть
инструкцию по эксплуатации перед
включением устройства. Следование
изложенным в ней указаниям предот-
вратит неправильное использование
духовки.
Инструкцию следует сохранить и
держать в легко доступном месте. Во
избежание не- счастных случаев не-
обходимо последовательно соблюдать
положения инструкции по эксплуата-
ции.
Внимание!
Духовкой пользоваться только
после ознакомления с данной ин-
струкцией. Духовкa предназначена
исключительно для домашнего ис-
пользования.
Изготовитель оставляет за собой
право внесения изменений, не влияю-
щих на работу устройства.
УКАЗАНИЯ ПО ТЕХНИКЕ
БЕЗОПАСНОСТИ
Внимание! Оборудование и его до-
ступные части нагреваются во время
эксплуатации. Всегда следует помнить,
что существует опасность травмы, при
прикосновении к нагревательным
элементам. Поэтому, во время работы
оборудования - быть особо бдитель-
ными! Дети младше 8 лет не должны
находиться вблизи оборудования, а
если находятся, то под постоянным
контролем взрослого ответственного
лица.
Данное оборудование может об-
служиваться детьми в возрасте от 8
лет и старше, лицами с физически-
ми, мануальными или умственными
ограничениями, либо лицами с недо-
статочным опытом и знаниями по экс-
плуатации оборудования, при усло-
вии, что происходит это под надзором
ответственного лица или согласно с
изученной с ответственным лицом ин-
струкцией эксплуатации.
Особое внимание обратить на де-
тей! Дети не могут играть оборудо-
ванием! Убрка и обслуживание обо-
рудования не могут производиться
детьми без надзора взрослых.
Во время работы оборудование
нагревается. Следует соблюдать осто-
рожность, не прикасаться к горячим
частям внутри духовки.

26 27
ПАСПОРТ ТЕХНИЧЕСКОГО ИЗДЕЛИЯ РУССКИЙ РУССКИЙ ПАСПОРТ ТЕХНИЧЕСКОГО ИЗДЕЛИЯ
Электрические духовые шкафы Электрические духовые шкафы
Когда используется духовка, до-
ступные части могут нагреться. Реко-
мендуется не подпускать к духовке
детей.
Внимание! Не применять для чист-
ки агрессивных моющих и чистящих
средств, острых металлических пред-
метов для чистки стекла дверей, так
как данные средства могут поцарапать
поверхность и привести к возникнове-
нию трещин на стекле.
Внимание. Для исключения воз-
можности поражения электриче-
ским током перед заменой лампочки
убеди тесь, что устройство выключено.
Для чистки духовки нельзя приме-
нять оборудование для чистки паром.
Необходимо следить, чтобы
мелкое кухонное оборудование и
провода не соприка сались с нагре-
той духовкой и варочной поверхно-
стью, поскольку изоляция этого обо-
рудования не рассчитана на высокие
температуры.
Нельзя оставлять духовкy без
присмотра во время жарения. Масла и
жиры могут загореться вследствие вы-
кипания или нагревания.
Не следует ставить на открытую
дверцу духовки посуду весом более
15 кг.
Нельзя пользоваться техниче-
ски неисправной духовкой . Все изъ-
яны должны устра няться только квали-
фицированным персоналом.
В любом случае технической
неисправности, немедленно отклю-
чить электропита ние духовки и сооб-
щить о необходимости ремонта.
Оборудование было запро-
ектировано исключительно для при-
готовления пищи. Вся кое другое его
применение (например, обогрева-
ние помещения) является несоответ-
ствующим его назначению и может
быть опасным.
КАК ЭКОНОМИТЬ
ЭЛЕКТРОЭНЕРГИЮ
Рациональное исполь зование
электроэнергии позволяет не только
сни зить расходы, но и сохра нить окру-
жающую среду. Выполнение следую-
щих простых правил позволит добить-
ся наилучших результатов:
Использование духовки только
для при готовления большого объема
пищи.
Мясо весом до 1 кг выгодней при-
готовить в кастрюле на варочной по-
верхности.
Использование остаточного
тепла ду ховки. Если блюдо готовится
более 40 минут отключить духовку за
10 минут до конца приготовления.
Внимание! Если используется тай-
мер, установить его на более короткое
время.
Аккуратно закрывать дверцу
духовки.
Загрязненные уплотнители двер-
цы ду ховки способствуют потере теп-
ла. За грязнения на уплотнителях сле-
дует устранять сразу.
Не располагайте плиту вблизи
холо дильников/морозильных камер
Без необходимости возрастает
потребле ние электричества
РАСПАКОВКА
Для транспортировки устрой ство
было защищено от по вреждений
упаковкой. После удаления упаков-
ки, просим Вас избавиться от ее ча-
стей способом, не наносящим ущерба
окружающей среде.
Все материалы, использованные
для изготовления упаковки, безвред-
ны, на 100% подлежат переработке
и обозначе ны соответствующим зна-
ком.
Внимание! К упаковочным мате-
риалам (полиэтиленовые пакеты, ку-
ски пено пласта и т.п.) в процессе рас-
паковки нельзя подпускать детей.
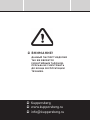
ИЗЪЯТИЕ ИЗ ЭКСПЛУАТАЦИИ
По окончании срока исполь-
зования данное устройство нельзя
выбросить, как обыч ные коммуналь-
ные отходы, его следует сдать в пункт
приема и переработки элек трических
и электронных устройств. Об этом ин-
формирует знак, расположенный на
устройстве, инструк ции по эксплуата-
ции и упаковке.
В устройстве использованы мате-
риалы, подлежащие повторному ис-
пользованию в соответствии с их обо-
значением. Благо даря переработке,
использованию мате риалов или иной
формой использования отслуживших
срок устройств вы внесете существен-
ный вклад в сохранение окру жающей
среды.
Сведения о соответствующем
пункте ути лизации использованного
оборудования вы можете получить в
местной админи страции.

28 29
ПАСПОРТ ТЕХНИЧЕСКОГО ИЗДЕЛИЯ РУССКИЙ РУССКИЙ ПАСПОРТ ТЕХНИЧЕСКОГО ИЗДЕЛИЯ
Электрические духовые шкафы Электрические духовые шкафы
ОПИСАНИЕ УСТРОЙСТВА
Контрольная лампа
терморегу лятора
Ручка регулятора
температуры
Ручка выбора
функции духовки
Таймер
Контрольная лампа
рабо ты духовки
ОПИСАНИЕ УСТРОЙСТВА
Оснащение плиты - перечень:
Поддон для выпечки*
Решетка для гриля
(решетка для сушки)
Поддон для жарки*
*для определенных моделей
Боковые лестнички
МОНТАЖ
Монтаж духовки
Кухонное помещение должно быть су хим и проветриваемым, иметь исправ-
ную вентиляцию, а расположение духовки должно обеспечивать свободный до-
ступ к элементам управления. Духовка изготов лена в категории Y. Мебель долж-

30 31
ПАСПОРТ ТЕХНИЧЕСКОГО ИЗДЕЛИЯ РУССКИЙ РУССКИЙ ПАСПОРТ ТЕХНИЧЕСКОГО ИЗДЕЛИЯ
Электрические духовые шкафы Электрические духовые шкафы
на иметь облицовку, а клей, которым она прикле ена, выдерживать температуру
100°C. В противном случае возможна деформация поверхности или облицовки.
Подготовить отверстие с размерами, ука занными на рисунках: A - установка
под крышкой, B - высокая встройка. При нали чии в шкафу задней стенки, в ней
нужно вырезать отверстия для электрических проводов. Полностью вставить ду-
ховку в отверстие, закрепив ее четырьмя винта ми. (Рис.C).
Рис.C
Рис. ВРис. А
Внимание!
Монтаж производить при отклю ченном электропитании.
Подключение духовки к
электрической сети
При производстве духовка
рассчита на на питание переменным
однофаз ным током (230В~50 Гц) и ос-
нащена кабелем подключения 3 x 1,5
мм2 дли ной около 1,5 м с закрытой
вилкой.
Гнездо подключения электросе-
ти должно быть закрытым и не долж-
но располагаться над плитой. После
установки духовки необходимо, чтобы
розетка была доступной для пользо-
вателя.
Перед подключением духовки к
розет ке нужно проверить:
- выдержат ли предохрани-
тели и элек тропроводка нагрузку ду-
ховки,
- оборудована ли электро-
система дей ственной системой зазем-
ления, соот ветствующей требованиям
действую щих норм и распоряжений,
- доступна ли розетка.
Внимание!
В случае повреждения неот-
ключаемого питательного про вода,
во избежание опасности он должен
быть заменен у производителя или в
специа лизированной ремонтной ма-
стерской квалифицированным специ-
алистом.
ЭКСПЛУАТАЦИЯ
Перед первым включением
духовки
удалить части упаковки,
аккуратно (медленно) удалить
этикет ки с дверок духовки,
очистить камеру духовки от за-
водских средств консервации,
вынуть содержимое духовки и
про мыть в теплой воде с добавлением
жидкости для мытья посуды,
включить вентиляцию в поме-
щении или открыть окно,
прогреть духовку (250°C, в те-
чение 30 минут), удалить загрязнения
и тща тельно помыть,
Ручки выключателей «спрятаны»
в пане ли управления. Для того, чтобы
выбрать желаемую функцию следует:
1.Осторожно нажать ручку и отпу-
стить,
2. Установить на выбранной функ-
циии.
Обозначения ручки выключателя
на ее бо ковой стороне соответствуют
очередным функциям духовки.
1.
2.

32 33
ПАСПОРТ ТЕХНИЧЕСКОГО ИЗДЕЛИЯ РУССКИЙ РУССКИЙ ПАСПОРТ ТЕХНИЧЕСКОГО ИЗДЕЛИЯ
Электрические духовые шкафы Электрические духовые шкафы
Внимание!
В плитах, оборудованных элек-
трон ным таймером, после подключе-
ния к сети дисплей будет показывать
„0.00”.
Нужно установить текущее время
таймера (см. инструкцию эксплуата-
ции таймера).
Если текущее время не установ-
лено, духовка работать не будет.
Внимание!
Электронный программатор Ts ос-
нащен сенсорами, обслужива-е мыми
прикосновением пальцем к обозна-
ченной поверхности.
Каждое изменение установки сен-
сора подтверждается звуковым сиг-
налом. Поверхность сенсоров следует
содержать в чистоте.
Камеру духовки нужно мыть
исключи тельно теплой водой с добав-
лением небольшого количества жид-
кости для мытья посуды.
Таймер
A -дисплей
обозначения рабочих
функций
MENU - сенсор выбора функций ра-
боты программатора
< - сенсор „-”
> - сенсор „+”
Установка текущего времени
После подключения к сети или по-
вторного включения после пропада-
ния напряжения в сети, дисплей пока-
зывает 0.00, и надпись AUTO мерцает,
нажать и удерживать сенсор
MENU (или одновременно сенсоры
< / >) до момента, пока на дисплее не
загорится символ
, точка под сим-
волом будет мигать,
в течение 7 сек. настроить акту-
альное время, используя сенсоры < / >.
Примерно через 7 сек. с момента
завер шения настройки актуального
времени новые данные сохраняются,
а точка под символом
перестает
мигать.
Откорректировать время можно
позже, на жимая одновременно сенсо-
ры < / >, когда точка под символом
начнет мигать, мож но откорректиро-
вать актуальное время.
Внимание!
Без установки текущего времени
невоз можна работа духовки.
Минутный таймер
Минутный таймер можно активи-
зировать в любой момент, несмотря на
активное состояние других функций
программатора. Время работы выстав-
ляется в пределах от 1 минуты до 23
часов 59 минут. Для того, чтобы устано-
вить минутный таймер, нужно:
нажать на сенсор MENU, ди-
сплей пока зывает
установить нужное время ра-
боты ми нутного таймера при помощи
сенсор < / >.
Установленное время минутника
показы вается на дисплеи, а функция
высве чивается на дисплеи.
По истечении установленного вре-
мени, включается звуковой сигнал.
Функция
начинает мигать.
Для выключения сигнала на-
жать на сенсор < / > или MENU. Значок
функции погаснет, а дисплей будет по-
казывать текущее время.
Внимание! Если звуковой сигнал
не вы ключится ручным способом, он
включит ся автоматически приблизи-
тельно через 7 минут.
Полуавтоматический режим
Для того, чтобы духовка выключи-
лась в определенное время:
yстановите ручку функции ду-
ховки и учку терморегулирования в
положение, при которых должна рабо-
тать духовка
нажмите и удерживайте сенсор
MENU, пока на дисплеи не высветится:
yстановите требуемое время
работы сенсорами < / > в пределах c
1 минуты до 10 часов. Установленное
время будет запомнено приблизи-
тельно через 7 сек, дисплей снова ука-
жет текущее время при высве ченной
функции AUTO.
По истечении установленного вре-
мени духовка выключится автомати-
чески. Вклю чится звуковой сигнал, а
функция AUTO начнет мигать.
yстановите ручки функции ду-
ховки и терморегулирования в поло-
жение «вы ключено»,
нажать на сенсор < / > или
MENU для выключения сигнала; функ-
ция AUTO погаснет, а дисплей будет
показывать текущее время.
Внимание! В духовках, оснащен-
ных одной ручкой управления, ручка
функций духовки присоединена к тер-
морегулятору.
Автоматический режим
Если духовку необходимо вклю-
чить на определенное рабочее время
и в уста новленное время выключить,
нужно уста новить рабочее время и
время окончания работы:

34 35
ПАСПОРТ ТЕХНИЧЕСКОГО ИЗДЕЛИЯ РУССКИЙ РУССКИЙ ПАСПОРТ ТЕХНИЧЕСКОГО ИЗДЕЛИЯ
Электрические духовые шкафы Электрические духовые шкафы
нажмите и удерживайте сенсор
MENU, пока на дисплей не появится:
yстановите требуемое время
работы сенсорами < / >, в пределах с
1 минуты до 10 часов,
нажмите и удерживайте кнопку
MENU, пока на дисплей не появится:
yстановите время выключения
(оконча ния работы) сенсорами < / >,
которое не превышает 23 часов 59ми-
нут,
yстановите ручку функции ду-
ховки и ручку терморегулирования в
требуемые положения, при которых
должна работать духовка.
Функция AUTO высвечивается, ра-
бота ду ховки начнется, учитывая раз-
ницу между установленным временем
окончания ра боты и установленным
временем работы духовки (например,
установленное время работы духовки
равняется 1 час, а установленное вре-
мя окончания работы 14.00. Духовка
включится автоматически в 13.00).
По достижении времени окон-
чания рабо ты, духовка выключится
автоматически, включится звуковой
сигнал, а функция AUTO на дисплее
начнет мигать.
yстановите ручки функций ду-
ховки и терморегулирования в поло-
жение «вы ключено»
нажать на сенсор < / > или
MENU для выключения сигнала; функ-
ция AUTO погаснет, а дисплей будет
показывать текущее время.
Отмена настроек
В любой момент можно отменить
на стройки, минутный таймер или
функции автоматической работы.
Отмена настроек автоматической
рабо ты:
одновременно нажать сенсор
< / >,
Отмена настроек минутный тай-
мер:
кнопкой MENU выбрать функ-
ции минут ный таймер,
повторно нажать сенсор < / >,
Изменение тона звукового
сигнала
Тон звукового сигнала можно из-
менить следующим образом:
одновременно нажать сенсор
< / >,
кнопкой MENU выбрать функ-
цию «тон», значения на дисплее будут
мигать:
сенсор < выбрать соответствую-
щий тон в диапазоне от 1 до 3.
Функции духовки и ее
обслужива ние.
Духовка с принудительной
цир куляцией воздуха (нижний
нагре ватель + верхний
нагреватель + вентилятор
Духовка может нагреваться верх-
ним и ниж ним нагревателями, грилем.
Управление
работой осуществляется при помо-
щи ручки выбора режима работы ду-
ховки – установка заключается в по-
вороте ручки на выбранную функцию,
a также ручки регулирования темпе-
ратуры – установка заключается в по-
вороте ручки на выбранную величину
температуры
Ручки выключателей «спрятаны»
в пане ли управления. Для того, чтобы
выбрать желаемую функцию следует:
- Осторожно нажать ручку и отпу-
стить,
- Установить на выбранной функ-
циии.
Обозначения ручки выключателя
на ее бо ковой стороне соответствуют
очередным функциям духовки.
Выключение осуществляется уста-
новкой обеих ручек в положение „” / „0”.
Внимание!
Включение нагревания (нагревате-
ля и т.п.) после включения какой-либо
функции духовки произойдет только
после выбора температуры.
0
нулевая установка
независимое освещение духовки
С помощью установки поворотной
ручки в данной позиции загорается
свет в духовом шкафу.

36 37
ПАСПОРТ ТЕХНИЧЕСКОГО ИЗДЕЛИЯ РУССКИЙ РУССКИЙ ПАСПОРТ ТЕХНИЧЕСКОГО ИЗДЕЛИЯ
Электрические духовые шкафы Электрические духовые шкафы
Быстрый разогрев
Включен верхний нагреватель,
функция запекания и вентилятор. При-
меняеся для предварительного нагре-
вания духовки.
Размораживание
Включен только вентилятор, без
использования каких-либо нагревате-
лей.
Турбо гриль и конвекция
В этом положении ручка духовки
выполняет функцию усиленного на-
грева с конвекцией. На практике это
позволяет ускорить процесс обжари-
вания и улучшить вкусовые качества
готовящегося блюда. Под жаривание
необходимо произво дить при закры-
той дверце духовки.
функция «Усиленный «ГРИЛЬ»
(«Суппер-Гриль»)
Включение функции «Усиленный
«ГРИЛЬ» позволяет на запекание
при одновременно включенном верх-
нем нагревателе. Данная функция
позволет применять более высокую
температуру в верхней ра- бочей ча-
сти духовки, в результате чего блю-
да больше зарумянивают- ся, данная
функция позоляет также на запекание
больших порций.
включена функция «ГРИЛЬ»
Запекание «ГРИЛЬ» до румяности
блюда, применяется для запекания
маленьких порций мяса: стейков, шни-
целей, рыбы, тостов, колбасок, запека-
нок (запекаемое блюдо не может быть
толще 2-3 см, в процес се запекания
блюдо надо перевер нуть на другую
сторону).
включен нижний нагреватель
В данном положении поворотной
ручки духовка нагревается исклю-
чительно с помощью нижнего на-
гревателя. Запекание теста снизу (на-
пример, «влажная» выпечка и выпечка
с фруктовой начинкой)
включен верхний и нижний на-
греватель
Установка поворотной ручки в
данной позиции позволяет нагре вать
духовку конвенциональным спосо-
бом. Прекрасно подходит для пече-
ния блюд из теста, рыбы, мяса, хлеба,
пиццы (обязательным является пред-
варительное разогре вание духовки,
а так же применение темных про-
тивеней), процесс пече ния на одном
уровне.
выключен вентилятор, а также
верхний и нижний нагреватель.
В данной рабочей позиции по-
воротной ручки духовка работает в
режиме «ТЕСТО». Конвенцио нальная
духовка с вентилятором (функция
рекомендуется во время процесса пе-
чения).
Контрольная лампа
Погасшая красная лампочка ин-
формирует о том, что в духовке уста-
новилась нужная температура. Если
кулинарные рекомен дации советуют
помещать блюдо в разо гретую духов-
ку, это нужно делать не ранее перво-
го отключения красной контрольной
лампочки. В процессе приготовления
красная лампочка будет включаться и
выключаться (поддержание темпера-
туры внутри духовки).
Использование печки
Обжаривание происходит в ре-
зультате воздействия на пищу инфра-
красных лу чей, создаваемых разо-
гревшимся грилем.
Для включения печки нужно:
Установить ручку духовки в по-
ложение, обозначенное символом
«гриль»
Разогреть духовку в течение 5
минут (при закрытой дверце духовки).
Поставить в духовку поднос с
продук тами питания на соответствую-
щий ра бочий уровень, а в случае об-
жаривания на вертеле - расположить
непосред ственно под ним (ниже вер-
тела) поддон для стекающего жира,
Обжаривание следует осущест-
влять при закрытой дверце духовки.
Для функции «гриль» и «усилен-
ный гриль» температуру нужно уста-
новить на 250°C, а для функции «кон-
векция и гриль» максимумна 190°C.
Внимание!
Когда используется духовка, до-
ступные части могут нагреться. Реко-
мендуется не подпускать к духовке
детей.
ПРИГОТОВЛЕНИЕ
ПИЩИ В ДУХОВКЕ
-
ПРАКТИЧЕСКИЕ СОВЕТЫ
Выпечка
Рекомендуется выпекать пироги
на поддонах, являющихся заводской
комплектацией плиты,
Выпечку можно производить в
формах и на поддонах промышлен-
ного про изводства, которые ставятся
на боковые направляющие. Для при-
готовления продуктов питания ре-
комендуется использовать поддоны
черного цвета, поскольку они лучше
проводят тепло и сокращают время
приготовления,
Не рекомендуется применять
формы и поддоны со светлой и бле-

38 39
ПАСПОРТ ТЕХНИЧЕСКОГО ИЗДЕЛИЯ РУССКИЙ РУССКИЙ ПАСПОРТ ТЕХНИЧЕСКОГО ИЗДЕЛИЯ
Электрические духовые шкафы Электрические духовые шкафы
стящей поверхностью при обычном
нагревании (верхний и нижний на-
греватели), применение такой посуды
может привести к тому, что тесто не
пропечется снизу,
При использовании кольцево-
го нагревателя предварительный про-
грев духовки не обязателен. Для про-
чих режимов, перед приготовлением
про дуктов духовку нужно разогреть,
Перед тем, как вынуть пироги
из духовки, нужно проверить их го-
товность при помощи палочки (кото-
рая должна остаться сухой и чистой),
Рекомендуется оставить вы-
печку в духовке на 5 минут после ее
выключе ния,
Температура выпечки, приго-
товленной с использованием функ-
ции цир куляции температуры обыч-
но на 20 -30 градусов ниже, чем при
обычной выпечке (с применением
нижнего и верхнего нагревателя),
Параметры выпечки, приве-
денные в таблицах справочные, и мо-
гут менять ся в соответствии с вашим
опытом и вкусами,
Если сведения в кулинарных
книгах значительно отличаются от на-
ших рекомендаций, просим руковод-
ствоваться настоящей инструкцией.
Поджаривание мяса
В духовке готовится мясо пор-
циями более 1 кг. Порции, вес кото-
рых меньше, рекомендуется готовить
на газовых горелках плиты,
Для приготовления рекомен-
дуется применять жаропрочную посу-
ду, с руч ками, не поддающимися воз-
действию высокой температуры,
При приготовлении пищи на
решетке или вертеле на самом низ-
ком уровне нужно разместить поддон
с небольшим количеством воды,
Минимум один раз, на этапе
полуготовности, нужно перевернуть
мясо на другую сторону, в процессе
выпечки время от времени поливать
мясо выделяющимся соком или горя-
чей соленой водой, поливать мясо хо-
лодной водой не рекомендуется.
Вид выпечки
продукт
Функции
духовки
Температура
Уровень
Время [мин.]
160-200 2-3 30-50
150 3 25-35
160-180 2 20 - 40*
150 3 65-70
220 - 240 3 10-15
210-220 2 45-60
190 2-3 60-70
230 - 250 4 14-18
225 - 250 2 120-150
160-230 2 90-120
190 2-3 50-60
160-180 2 45-60
190-210 2 40-50
170-190 3 40-50
Духовка с принудительной циркуляцией воздуха (нижний нагреватель +
верхний нагре ватель + вентилятор)
Внимание!
Параметры, приведенные в таблицах являются справочными и могут изме-
няться в зависимости от Ваших кулинарных пристрастий и опыта.
Страница загружается ...
Страница загружается ...
Страница загружается ...
Страница загружается ...
Страница загружается ...
Страница загружается ...
Страница загружается ...
-
 1
1
-
 2
2
-
 3
3
-
 4
4
-
 5
5
-
 6
6
-
 7
7
-
 8
8
-
 9
9
-
 10
10
-
 11
11
-
 12
12
-
 13
13
-
 14
14
-
 15
15
-
 16
16
-
 17
17
-
 18
18
-
 19
19
-
 20
20
-
 21
21
-
 22
22
-
 23
23
-
 24
24
-
 25
25
-
 26
26
-
 27
27


Kuppersberg HO 658 W Руководство пользователя
- Категория
- Печи
- Тип
- Руководство пользователя
Задайте вопрос, и я найду ответ в документе
Поиск информации в документе стал проще с помощью ИИ
на других языках
- English: Kuppersberg HO 658 W User manual
Похожие модели бренда
-
Kuppersberg HH 668 T Руководство пользователя
-
-
-
-
-
-
-
-
-