Hyundai H-LCDVD906T Black Руководство пользователя
- Категория
- Проигрыватели DVD
- Тип
- Руководство пользователя

ПОРТАТИВНЫЙ DVD-
ПРОИГРЫВАТЕЛЬ С 9” LED-
ДИСПЛЕЕМ И ТВ-ТЮНЕРОМ
PORTABLE DVD PLAYER WITH
9” LED DISPLAY AND TV TUNER
Руководство по эксплуатации Instruction manual
H-LCDVD906T

2 3
Table of contents Before you start
Dear customer!
Thank you for purchasing our product. For safety, it is strongly recommended to read this
manual carefully before connecting, operating and/or adjusting the product and keep the
manual for reference in the future.
8
8
9
9
10
10
10
11
11
11
11
12
12
13
13
13
14
14
14
14
15
16
Table of contents
Before you start
Utilization of the product
Important safeguards
Connection
Operation
Control elements
Main controllers
Right panel
Remote controller
Changing the battery
Button functions
ON/OFF switch
OPEN button
STEP
GOTO
MUTE
SOURCE
Number buttons
SUBTITLE
ANGLE
AUDIO
RIPPING/MENU
COPY/TITLE
STOP
PLAY
PAUSE
Cursor buttons
VOL+/VOL-
ENTER
SLOW
SETUP
A-B
FUNCTION
ZOOM
REPEAT
OSD
Previous/Next
2
3
3
3
4
5
5
6
6
6
6
7
7
7
7
7
7
7
7
7
7
7
7
7
7
7
7
7
8
8
8
8
8
8
8
8
8
8
Rewind/Fast forward
System setup
General setup
Audio setup
Dolby digital setup
Video setup
Preference setup
Other functions
MP3/JPEG/MPEG4 background
Inserting disc
Playback operations
USB/SD/MMC operation
Ripping
Copying data
Deleting data from USB/SD/MMC
Rotary screen
General information
Handling compact discs
Cleaning discs
Accessories
Troubleshooting
Specification

2 3
Table of contents Before you start
If you want to dispose this product, do not mix it with general household waste. There is
a separate collection system for used electronic products in accordance with legislation
that requires proper treatment, recovery and recycling.
Please contact your local authorities for the correct method of disposal. By doing so, you
will ensure that your disposed product undergoes the necessary treatment, recovery and
recycling and thus prevent potential negative effects on the environment and human health.
Utilization of the product
Important safeguards
Alerts the user to the presence
of dangerous voltage within the
product’s enclosure.
Alerts the user to the presence
of important operating
instructions.
To reduce the risk of electric shock
or fire, do not open the cover. Refer
servicing to qualified service
personnel.
This mark indicates this unit belongs
to class 1 laser product.
• To prevent the risk of fire or electric shock,
don’t allow water to come into contact with
the device and don’t use the device in high
humidity conditions.
• The device is equipped with high voltage
components and a laser system, hence you
shall not open the device and repair it by
yourself. The laser beam is dangerous to eyes
when the housing is removed. Don’t look at it.
• When the device is moved from cold
premises to the warm room or vice versa,
condensate may form on the laser head and
the device may not operate properly. In this
case please turn the device on for 1-2 hours
without disc before playback to heat it to a
proper operation temperature.
• Don’t try to manually open or close the
disc tray to load discs.
• Disconnect the receiver only when there is
no disc therein.
• If you are not going to use the device for a
long time disconnect it from the wall outlet.
• Before turning the device on, please make
sure that you have connected it properly,
adjust the volume of speakers and amplifiers
of your radio system to the minimum. Adjust
the volume as necessary only after normal
playback has started to avoid damage of your
audio system.
• Use supply sources of rated voltage,
otherwise the unit may not function or may be
damaged.
• Place the unit on a horizontal surface.
Keep the unit ventilated. Don’t block the heat
hole. Overheat may cause malfunction.
• Do not place any objects on the player’s
cover, this may make it function improperly
(incorrect playback).
• Please place the device in a dry and
well-aired area. Do not place it near heating
units or expose it to direct sunlight, mechanical
vibration, humidity or excessive dust.
• If using power plug and appliance coupler
as a cutting-connecting device, it should be
operated easily.
• Never use liquid detergents, abrasives or
organic compounds (alcohol, gasoline, etc) to
clean the unit body.
W a rning
RISK OF ELECTRIC SHOCK
DO NOT OPEN

4
Before you start
• All repairs and technical service should
be made by qualified specialist from service
centers.
All images provided herein are schematic
drawings and they may differ from the real
objects.
Connection
Before you start connection of external
devices, ensure that power of the unit is
switched off.
Following outputs are available in this unit.
Audio/video output
Audio-video output is intended for
connecting an external display to this unit. For
connection use the included audio-video cable.
Coaxial audio output
The coaxial output is intended for connection
of an external multi-channel amplifier with
digital input. For connection use a cable with
3.5-mm jack.
Headphone jack
Connect your headphones to this unit by
using the headphone output. When headphone
is connected, the built-in speakers are mute.
Power connection
• For power supply from the electric mains
outlet 220 V, connect the included power
adaptor to the DC adaptor jack of this unit. Do
not use other DC adaptors.
• For power supply from the vehicle power
circuit, connect the car adaptor to the DC
adaptor jack of this unit. Do not use other car
adaptors.
• Power supply can be performed from the
built-in Li-Ion battery of this unit. The battery
power is enough for about 1-1.5 hours of
operation. The battery charge is performed
automatically when the unit is connected to
external power supply.
TV antenna jack
Connect the included TV antenna to the TV
antenna jack for reception of TV signal.

5
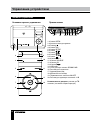
Operation
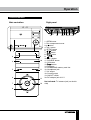
Control elements
Main controllers
1 2
3
4
5
6
7
8
9
10
11
12
13
Right panel
14 15 1617 18 19 20
1. OPEN button
2. Disc compartment cover
3. button
4. VOL- button
5. SETUP button
6. / button
7. / button
8.
/ button
9.
button
10. VOL+ button
11. SOURCE button
12. OK button
13.
/ button
14. USB port
15. SD/MMC/MS memory card slot
16. Headphone jack
17. AV output
18. Coaxial output
19. ON/OFF switch
20. DC adaptor jack 9-12 V
Not indicated: TV antenna jack (on the left
side)

6
Operation
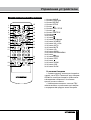
Remote controller (RC)
1
2
3
4
5
6
7
8
9
10
11
12
13
14
15
16
17
18
19
20
21
22
23
24
25
26
1. ANGLE button
2. FUNCTION button
3. REPEAT button
4. SETUP button
5.
button
6. COPY/TITLE button
7. button
8. SUBTITLE button
9. button
10. button
11. button
12. Digit buttons
13. SOURCE button
14. VOL+/VOL- button
15. GOTO button
16. MUTE button
17. A-B button
18. AUDIO button
19. RIPPING/MENU button
20. button
21. ENTER button
22. STEP button
23. button
24. ZOOM button
25. OSD button
26. SLOW button
Changing the battery
• Remove the battery compartment cover on
the back of the RC. Insert one CR2025 battery
into the battery compartment making sure
that the correct polarity is observed. Install the
cover back.
• The RC should be pointed at remote
sensor within 8 meters and within 30 degrees
at the left or the right side.
• Take the battery out of the RC if it is not
used for a long time.
• Weak batteries can leak and severely
damage the RC.

7
Operation
Button functions
ON/OFF switch
To switch on the unit, set the ON/OFF switch
to ON position. To turn off the power set the
ON/OFF switch to OFF position.
OPEN button
Press OPEN button on the unit to open the
disc compartment cover.
STEP
When playing DVD, SVCD, VCD, MPEG,
press STEP button repeatedly to play video
frame by frame. Press ENTER or button to
resume normal playback.
GOTO
Press this button to display menu in which
you can input track/chapter/title number or disc
playback time by pressing number buttons.
After you input the data, playback will start
from the input point.
MUTE
Press MUTE button; the sound output will
be muted. Press this button again or adjust
volume to resume the sound.
SOURCE
Press this button to switch between TV, disc,
USB and memory card mode (select the mode
with / buttons). Mode selection is available
only if the corresponding storage is inserted
into the unit.
Number buttons
Press number buttons to input digits and
numbers (e.g. track/chapter number, playback
time, channel numbers etc.).
SUBTITLE
When playing a disc with multi-language
subtitle, press SUBTITLE button continually,
the subtitle languages are changed in a circle,
and you can select the needed one.
ANGLE
When playing the disc with multi-angle,
press ANGLE button to select the view angle.
AUDIO
• When playing DVD with more than one
audio stream, press this button to select the
needed language.
• When playing CD/VCD/MPEG, press this
button to select audio channel (left mono/right
mono/mix-mono/stereo).
RIPPING/MENU
• When playing a VCD disc, press this
button to turn on or off Playback Control (PBC)
function.
• When playing a DVD disc, press this
button to switch between the disc root menu
and current playback point.
• When a USB is connected, press this
button to access Ripping menu.
COPY/TITLE
• When playing a DVD disc, press TITLE
button to return to the main title menu of the
disc.
• When a USB/SD/MMC is connected, press
this button to access Copying menu.
(STOP)
When playing DVD/SVCD/VCD/CD disc,
press this button once, the unit will memorize
the previous ending point; when afterwards you
play the same disc, playback will start from the
memorized point. Press button twice, playback
will stop without memorizing the stop point.
(PLAY)
When the playback is paused or stopped,
or a file/track is selected in a menu, press
button to start playback.
(PAUSE)
During playback press this button to pause
playback.
Cursor buttons

8 9
Operation Operation
Press cursor buttons to navigate in various
menus.
VOL+/VOL-
Press VOL+ button to adjust volume up.
Press VOL- button to adjust volume down.
ENTER
Press ENTER button for confirmation of
chosen options.
SLOW
Press SLOW button repeatedly to change
slow playback speed as follows: 1/2 => 1/4 =>
1/8 => 1/16 => normal.
SETUP
Press SETUP button to enter or exit the
system setup menu.
A-B
Press A-B button to set the initial point of a
video fragment. Press A-B button again to set
the final point; the selected fragment will be
played repeatedly. Press this button again to
cancel framgent poayback.
FUNCTION
Press FUNCTION button to switch between
16:9 and 4:3 screen aspect modes.
ZOOM
When playing DVD/VCD disc, press ZOOM
button to zoom in the picture as follows: 2x =>
3x => 4x => 1/2 => 1/3 => 1/4 => normal. In
zoom in mode, press cursor buttons to move
the picture for viewing.
REPEAT
Press REPEAT button to repeat a title,
chapter, track or the whole disc (available
repeat modes depend of the disc and file type).
OSD
Press OSD button to display various info on
the current playback: title/chapter number or
time elapsed/remaining, etc.
/ (Previous/Next)
• When playing DVD disc, press button
to go to the previous chapter.
• When playing SVCD, VCD, CD disc, press
button to go to the previous track.
• When playing DVD disc, press button
to go to the next chapter.
• When playing SVCD, VCD, CD disc, press
button to go to the next track.
/ (Rewind/Fast forward)
Press button repeatedly for quick rewind
search. Press button repeatedly for quick
forward search. Search speed will increase
with each pressing: 2x => 4x => 8x => 16x =>
32x => normal.
System setup
1. Press SETUP button to enter the setup
menu. In Setup menu, press SETUP button
again to quit the setup page.
2. Use / buttons to choose a setup page.
3. Press button to enter the setup page
selected.
4. Use / buttons to select the option you
want to adjust.
5. Press button to enter the adjustment
list. Use / buttons to select the adjustment
and press ENTER button to confirm and
button to return to options list.
6. To return to setup page list press button
when in the option list.
The items in gray can’t be set up. The
setup is memorized and kept after power is off.

8 9
Operation Operation
General setup page
General
General setup page
TV display
Angle mark
OSD language
Closed captions
Screen saver
Last memory
Audio Dolby Video Preference
• TV DISPLAY
4:3 PanScan: the wide-screen image shows
on the full screen, but some part is cut off.
4:3 LetterBox: the wide-screen image shows
and black bars appear on the top and bottom
of screen.
16:9: Use this item for wide-screen image.
• ANGLE MARK
It will show the angle mark when playing
DVD disc with multi-angle view if selecting On.
• OSD LANGUAGE
Select on-screen display language: English,
Russian.
• CLOSED CAPTIONS
This function doesn’t work when the disc
without caption. If the caption is Off, press
SUBTITLE button on the RC to make caption
on. The default setup is On.
• SCREEN SAVER
If the Screen saver is set On and the unit is
switched on without a disc playing for several
minutes, a moving picture appears on the
screen, and the unit will go to standby mode
after several minutes. You can press any
button to wake it up.
• LAST MEMORY
When this function is on, the unit can
memorize the time elapsed from the last time
you played the disc. Then at the next playing, it
will resume playing from the memorized time.
Audio setup page
General
Audio setup page
Analog audio
Digital audio
Audio Dolby Video Preference
Analog audio setup page
General
Analog audio setup page
Downmix
Audio Dolby Video Preference
• DOWNMIX
LT/RT: The audio out is Left and Right
channels format even if the original sound is
5.1CH format.
Stereo: The audio out format is stereo even
if the original sound is 5.1CH format.
Digital audio setup
General
Digital audio setup
Digital output
LPCM output
Audio Dolby Video Preference

10
Operation
• DIGITAL OUTPUT
SPDIF/OFF: no digital signal out (coaxial
output off), only analog audio output.
SPDIF/RAW: digital signal output in the
original format recorded in the disc.
SPDIF/PCM: digital signal output in the
decoded PCM form.
• LPCM OUTPUT
Select PCM frequency at 48 kHz or 96 kHz.
Some amplifiers don’t support 96 kHz
sampling and cause coaxial output abnormal.
Dolby digital setup
General
Dolby digital setup page
Dual mono
Dynamic
Audio Dolby Video Preference
• DUAL MONO
Stereo: stereo output signal,
L-Mono: left output signal,
R-Mono: right output signal,
Mix-Mono: left/right output average signal.
• DYNAMIC
If watching large dynamic scope movie
program at night, to select this mode you can
reduce the volume to a very low level, at the
same time, to keep the fine details sounds. In
this case, this doesn’t disturb the family and
keep the quality sounds.
Video setup
General
Video setup page
Color setting
Panel quality
TV
Audio Dolby Video Preference
• COLOR SETTING
You can set the Sharpness, Brightness,
Contrast, Gamma, Hue and Saturation
according to your preference.
• PANEL QUALITY
You can set the Sharpness, Brightness,
Contrast, Gamma, Hue and Saturation
according to your preference.
• TV (available only in TV mode)
Auto search: the unit will scan the frequency
range and save all available Tv channels in
memory.
Manual search: adjust the current frequency
step by step manually.
TV system: select TV system (NTSC/PAL-DK/
PAL-GB/PAL-I/SECAM-DK/SECAM-BG).
Preference setup
General
Preference page
TV type
PBC
Audio
Subtitle
Disc menu
Parental
Password
Default
Audio Dolby Video Preference
• TV TYPE
This unit is suitable for all kinds of TV
systems. You can select one of the PAL, NTSC
or Auto.

11
Operation
20 times less then the original images.
MPEG4 - standard for transmitting audio and
video data via channels with low capacity. This
format is very popular since it made possible
to place full-length movies with good enough
resolution in one CD.
Manufacturer guarantees regular
playback of licensed discs only. Some AVI files
cannot be played due to their parameters and
recording conditions. Video files more than 2 Gb
having AVI extension can be played partially.
Inserting disc
Press OPEN button on the unit to open the
disc compartment cover. Put a disc onto the
spindle and press on the center until it is fixed.
Close the compartment cover.
Playback operations
When a disc, a USB or a memory card
containing files of these formats is inserted,
following interface will be displayed:
1 32
1. Playback info window - shows current
playback time, track number, volume level,
playback status (stop/play/pause) etc.
2. Directory window - shows the currently
selected directory.
3. Address window - shows directory
address at which the currently played file is
found.
Use / buttons to select the directory
you want and press or ENTER button to
enter it. Select a file and press or ENTER
button to start its playback. For more playback
AUTO: the TV system is auto switched
according to the disc system.
NTSC: this system is used in USA, Taiwan,
Japan etc.
PAL: this system is used in China, Europe,
Hong Kong etc.
• PBC
When playing a VCD disc, select ON to
activate Playback Control (PBC) function (only
for discs encoded with PBC function.
• AUDIO, SUBTITLE, DISC MENU language
These are the initial settings by your
preference. If a setting is supported by disc
content, it will work. Otherwise the disc default
value works. And these settings can be
changed respectively by pressing AUDIO and
SUBTITLE buttons when playing.
• PARENTAL
The control level is for parental to control
playing content and protect your children from
violence and erotic. The disc, the level of which
is higher than the setting level can not be played.
• PASSWORD
Change the password. The initial factory
password is 136900. You can set your own
password. If you forget your own password,
you can use 136900 as general password.
• DEFAULT
Reset to the initial factory setups (except
Parental and Password items).
Other functions
MP3/JPEG/MPEG4 background
MP3 - generally adopted standard of audio
compression, compressing audio data to 1/12
of their size. One CD disc mat store more than
600 minutes of music (170 songs). And the
quality of MP3 disc approximates to an audio
CD disc quality.
JPEG (Joint Photographic Expert Group) -
image compression algorithm, used all over the
world and providing high level of compression
of the source data. Any graphics editor may
edit images of this format and their size in 15-

12 13
Operation Operation
operations please refer to “Button functions“
chapter.
JPEG playback notes:
• While a file playback, press button, 12
thumbnails will be shown on the screen.
• Press cursor buttons to select the desired
picture.
• Press number buttons to input directly the
number of the desired picture.
• Use cursor buttons to select SLIDE SHOW
item, then press or ENTER button to start
slide show.
• Use cursor buttons to select MENU item,
then press or ENTER button to enter button
function menu.
The button function menu is as follows:
Button Function
Entering thumbnail mode
Next picture
Previous picture
To play picture
Select CONTINUE item and press ENTER
button to go to the other menu page:
Rotate 90 degrees
anticlockwise
Rotate 90 degrees clockwise
ZOOM Change zoom mode
Select EXIT MENU item and press ENTER
button to exit.
Depending on file volume and encoding,
some delay is possible when changing modes
or passing to the next menu item.
USB/SD/MMC operations
Insert a USB drive in the USB port, then
press SOURCE button and press / buttons
to select Media mode.
Insert an SD or MMC card into the Memory
card slot, then press SOURCE button and
press / buttons to select Media mode.
Operations with USB/SD/MMC file playback
are the same as file disc operations.
SD/MMC/USB up to 16 Gb are
supported by this unit. FAT32/NTFS file systems
are supported. Please use USB devices and
memory cards of famous brands; some models
of USB devices or memory cards cannot be
supported by this unit due to incompatibility.
Ripping
This unit has Ripping function making it
handy and quick to copy audio files (e.g.
music) from CDs. RIPPING is converting from
CDDA format to the compressed MP3 format
onto a USB drive. In the course of copying, ID3
tags are generated automatically in Russian
and English, depending on the source. If the
disc does not contain such information in
CD-text format, ID3 tags will be written as
“Unknown artist” and “Unknown album”.
RIPPING function has a simple and intuitive
menu. To display the Ripping menu, press
RIPPING/MENU button on the RC while CD
playback. A USB-drive should be connected to
the unit.
Create ID3 Yes
For navigation in the menu use cursor
buttons and press ENTER button to confirm
your option. In “Options” column you may
set speed and bit rate for ripping. In “Track”
column you may select tracks for ripping (press
ENTER button to select a highlighted track).
Besides, you can select all tracks (“Select all”)
or cancel your choice (“Select none”). To start
converting process, select “Start” and press
ENTER button.

12 13
Operation Operation
Summary
After the CD ripping procedure begins, the
system will proceed to the next menu page.
In Ripping window, there are a track
progress bar and a total progress bar showing
how much the ripping procedure for the current
track has been done and how much the total
task has been finished respectively.
During ripping, the option Cancel is
highlighted, so whenever you want to cancel
ripping, just press ENTER button.
The ripped tracks from CD or HDCD discs
will be stored in a folder created automatically
by the system in the connected USB drive. If
the selected track shares the same file name
with the existing one in that folder, the system
will pop up a dialogue box to warn you of that.
Press ENTER button to continue and replace
the existing one with the selected track. Select
option Cancel to quit.
And you can choose to create another folder
in the connected USB drive for ripping this track.
• Create a new folder for ripping: If you want
to create another folder in the connected USB
drive to save the ripped tracks, you need to
open the disc tray and then close it. The tracks
ripped afterwards will be saved in a newly
created folder.
Copying data
• Play data disc or USB/SD/MMC containing
MP3/JPG/DivX files.
• Press COPY button on RC, the COPY
menu will appear with option of ALL SELECT/
ALL UNSEL/COPY/DELETE/EXIT.
• Move the cursor to the target file or folder,
press ENTER button to tick it, or select ALL
SELECT item to select all the data.
• Move the cursor to COPY item, then press
ENTER button to display the destination (USB
or Memory card).
• Select the desired target device (USB or
Memory card), press ENTER button to display
the option BACK/NEXT.
• Choose NEXT item to start copying data
the selected device.
Deleting data from USB/SD/MMC
• Play USB device or memory card
containing the desired data.
• Press COPY button to get the menu of
ALL SELECT/ALL UNSEL/COPY/DELETE/
EXIT.
• Move the cursor to the target file or folder,
press ENTER button to tick it, then move to
DELETE item and press ENTER button to
delete the data from the device.
Rotary screen
This unit is equipped with a rotary screen.
When the screen is open, rotate is with both
hands clockwise (180
0
) and counterclockwise
(90
0
). When the screen is rotated, you can fold
the unit body for a more comfortable use.

14
General information
Handling compact discs
• Do not insert anything other than a CD into
the disc tray.
• Do not use cracked, chipped, warped, or
otherwise damaged discs as they may cause
damage to the player.
• Handle the disc only by the edges (as
shown in the picture). To keep discs clean do
not touch its surface.
• Store discs in their cases when not in use.
• Do not expose discs to direct sunlight, high
humidity, high temperature or dust.
• Prolonged exposure to extreme
temperature can wrap a disc.
• Do not attach labels, write on or apply
chemicals to the surface of the discs.
• Do not touch the recorded surface of the
discs.
• Use 12-cm CDs. Use only conventional,
fully circular discs. Do not use irregularly
shaped discs.
Cleaning discs
Fingerprints should be carefully wiped from
the surface of disc with a soft cloth. Unlike
conventional records, compact discs have no
grooves to collect dust and macroscopic dirt,
so gently wiping them with a soft cloth should
remove must panicles. Wipe in a straight
motion from the center to the edge.
Never use thinner benzine, record cleaner
or anti static spray on a compact disc. Such
chemicals can damage its plastic surface.
Accessories
DVD player 1 pc
Remote controller 1 pс
Audio-video cable 1 pc
Battery CR2025 1 pc
Headphones 1 pc
Car adaptor 1 pc
TV antenna 1 pc
AC/DC adaptor 1 pc
Battery pack (built-in) 1 pc
Protective bag 1 pc
Consumer information 1 pc
Warranty card 1 pc
Instruction manual 1 pc

15
General information
Troubleshooting
Below is a table describing simple measures that can help you eliminate most problems likely
to emerge when this unit is in use. If below measures do not help, turn to a service center or to the
nearest dealer.
Symptom Cause Solution
No sound Poor audio cable connection Make proper connection
Disc dirty or damaged Clean the disc
MUTE function is on Disable MUTE function
No image Poor video cable connection Make proper connection
Incorrect setting of your TV set Correct the settings of your TV set
Disc cannot be
read
Disc not inserted Insert the disc
Disc inserted incorrectly Install the disc with the label side facing up
Condensate on the unit laser
head
Switch the unit on without disc for an hour
Remote control
does not
operate
Remote control is incorrectly
directed at the unit
Use the remote controller according to the
manual
Distance and angle to the unit
are too large
Decrease the distance and angle
Run out batteries Replace both batteries
Some functions
do not work
Disc is recorded incorrectly Wait 5-10 seconds and the unit will
automatically return to normal style
Incorrect key sequence Repeat the operation one more time
Static voltage on the unit
housing
Switch the unit off for 1-2 minutes and then
switch it on again
Unstable image Incorrect TV settings Correct the TV settings

16
General information
Specifications
Appearance
Unit dimensions 240 mm x 180 mm x 44 mm
Net/Gross weight 0.95 kg/1.8 kg
Display 9” TFT LCD
Display format 16:9
Compatibility
Supports DVD/DVD±R/DVD±RW/CD/CD-R/CD-RW/USB/SD/MMC
Formats of playback DVD-video/DVD-audio/SVCD/VCD/HDCD/CDDA/MP3/
Kodak Picture CD/JPEG/MPEG4 (DivX/XviD)
Audio
Built-in Dolby Digital decoder +
Video
Color system NTSC/PAL
TV-tuner
TV system PAL/SECAM
Sound system DK/BG/I
Connectors
Audio-video out +
Earphone jack +
Coaxial out +
Functions
Children lock +
Rotary screen 270
0
Russian and English OSD +
Audio CD ripping in MP3 format to
USB flash drive/SD card +
Copy function from data discs to
USB flash drive/SD card +
Power
AC/DC adaptor +
Car adaptor +
Battery Li-ion +
Nominal voltage 9-12 V, 1.0 A
Nominal power consuimption 10 W
Specifications are subject to change without notice. Dimensions are approximate.

17
Содержание
Уважаемый покупатель!
Благодарим Вас за покупку нашего изделия. Чтобы понять, как правильно и безо-
пасно пользоваться приобретенным устройством, рекомендуется тщательно изучить
настоящее руководство перед подключением и эксплуатацией изделия. Сохраняйте
руководство для использования в будущем.
23
23
24
24
24
25
26
26
26
27
27
27
28
28
29
29
29
30
30
30
30
31
32
Содержание
Перед началом эксплуатации
Утилизация изделия
Меры предосторожности
Подключение
Управление устройством
Элементы управления
Основные органы управления
Правая панель
Пульт дистанционного управления
Установка батареек
Функции кнопок
Переключатель ON/OFF
Кнопка OPEN
STEP
GOTO
MUTE
SOURCE
Кнопки с цифрами
SUBTITLE
ANGLE
AUDIO
RIPPING/MENU
COPY/TITLE
Стоп
Воспроизведение
Пауза
Кнопки с цифрами
VOL+/VOL-
ENTER
SLOW
SETUP
A-B
FUNCTION
ZOOM
REPEAT
OSD
17
18
18
18
19
20
20
20
20
21
21
22
22
22
22
22
22
22
22
22
22
22
22
22
22
23
23
23
23
23
23
23
23
23
23
23
23
Предыдущий/Следующий
Назад/Вперед
Настройка системы
Страница общих настроек
Страница аудио установок
Настройки Dolby Digital
Страница установки видео
Настройка предпочтений
Прочие операции
Воспроизведение файлов MP3/JPEG/
MPEG4
Загрузка диска
Воспроизведение
Операции с USB/SD/MMC
Функция Ripping
Копирование данных
Удаление файлов с USB/SD/MMC
Поворотный экран
Общая информация
Обращение с компакт-дисками
Чистка дисков
Комплект поставки
Руководство по устранению
неисправностей
Технические характеристики

18
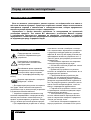
Перед началом эксплуатации
Если вы желаете утилизировать данное изделие, не выбрасывайте его вместе с
обычным бытовым мусором. Существует отдельная система сбора использованных
электронных изделий в соответствии с законодательством, которая предполагает
соответствующее обращение, возврат и переработку.
Обращайтесь в органы местного управления за инструкциями по правильной
утилизации продукта. Тем самым Вы обеспечите утилизацию Вашего изделия
с соблюдением обязательных процедур по обработке, утилизации и вторичной
переработке и, таким образом, предотвратите потенциальное негативное воздействие
на окружающую среду и здоровье людей.
Утилизация изделия
Меры предосторожности
Предупреждение о наличии
высокого напряжения внутри
устройства.
Напоминание о проведении
всех действий в соответствии
с инструкциями.
Во избежание риска поражения
электрическим током или пожара
не открывайте корпус изделия.
Обращайтесь к квалифицированному пер-
соналу.
Изделие принадлежит к лазерной
продукции 1 класса.
• Для предотвращения риска возгорания
или удара током избегайте попадания в
устройство воды и эксплуатации устройства
в условиях высокой влажности.
• Устройство содержит компоненты под
высоким напряжением и лазерную систему,
поэтому не пытайтесь самостоятельно от-
крывать и ремонтировать устройство. Лазер-
ный луч опасен при снятой крышке корпуса.
• При перемещении устройства из холод-
ного места в теплое и наоборот на лазер-
ной головке может образоваться конденсат
и устройство не будет работать должным
образом. В этом случае перед началом вос-
произведения включите устройство на 1-2
часа без диска для прогрева до комнатной
температуры.
• Не пытайтесь открывать или закрывать
лоток для загрузки дисков вручную.
• Отключайте питание устройства только
при отсутствии диска.
• Выключайте устройство из розетки,
если Вы не собираетесь использовать его в
течение долгого времени.
• Перед включением устройства убе-
дитесь, что оно подключено правильно,
установите на минимум уровень громкости
усилителя и динамиков Вашей аудиосисте-
мы. Регулируйте уровень громкости только
после начала воспроизведения, чтобы из-
бежать повреждения аудиосистемы.
• Подключайте устройство только к сети
с параметрами, соответствующими напря-
жению питания аппарата.
• Устанавливайте устройство горизон-
тально; обеспечивайте хорошую вентиля-
цию, не закрывайте отверстия, предназна-
ченные для отвода тепла.
• Не ставьте посторонние предметы на
корпус устройства; это может стать причи-
W a rning
RISK OF ELECTRIC SHOCK
DO NOT OPEN

19
Перед началом эксплуатации
ной некорректной работы устройства.
• Устройство должно находиться в сухом
и проветриваемом месте. Исключайте на-
хождение устройства вблизи нагреватель-
ных приборов, не подвергайте воздействию
солнечного света, механической вибрации,
влажности и пыли.
• Не используйте для чистки корпуса
устройства жидкие чистящие средства,
абразивные материалы или органические
соединения (алкоголь, бензин и др.).
• Для ремонта и технического обслужи-
вания устройства обращайтесь в сервисные
центры.
Все иллюстрации, приведенные в на-
стоящем руководстве, являются схе-
матическими изображениями, которые
могут отличаться от реальных объектов.
Подключение
Перед началом подключения устрой-
ства к другому оборудованию убедитесь,
что электропитание отключено.
Данное устройство оснащено следующи-
ми разъемами:
Аудио/видеовыход
Аудио/видеовыход предназначен для
подсоединения дополнительного внешне-
го монитора к данному устройству. Для
подсоединения используйте входящий в
комплект аудио/видеокабель
Коаксиальный аудиовыход
Коаксиальный выход предназначен для
подключения к данному устройству внешне-
го многоканального усилителя с цифровым
входом. Подключение осуществляется с по-
мощью кабеля со входным штекером 3,5 мм.
Разъем для наушников
Подсоедините наушники к разъему для
наушников данного устройства. При под-
ключенных наушниках звук через встро-
енный динамик устройства не воспроизво-
дится.
Питание устройства
• Дли питания от электросети 220 В под-
соедините входящий в комплект сетевой
адаптер к разъему для адаптера данного
устройства. Не используйте адаптеры, не
входящие в комплект поставки.
• Для питания от бортовой сети авто-
мобиля подсоедините автомобильный
адаптер, входящий в комплект поставки, к
разъему для адаптера данного устройства.
• Возможно питание от встроенной
батареи. Заряда батареи хватает прибли-
зительно на 1,5-2 часа работы устройства.
Зарядка батареи происходит автоматиче-
ски при подключении устройства к внешней
сети питания. При первом использовании
батарея будет заряжена не полностью, это
не является дефетом. Время зарядки бата-
реи зависит от степени ее разряжености.
Разъем для ТВ-антенны
Подсоедините входящую в комплект ТВ-
антенну к разъему для ТВ-антенны данного
устройства для получения ТВ-сигнала.

20 21
Управление устройством Управление устройством
Элементы управления
Основные органы управления
1 2
3
4
5
6
7
8
9
10
11
12
13
Правая панель
14 15 1617 18 19 20
1. Кнопка OPEN
2. Крышка отсека для дисков
3. Кнопка
4. Кнопка VOL-
5. Кнопка SETUP
6. Кнопка /
7. Кнопка /
8. Кнопка /
9. Кнопка
10. Кнопка VOL+
11. Кнопка SOURCE
12. Кнопка OK
13. Кнопка /
14. USB-порт
15. Слот для карт памяти SD/MMC/MS
16. Разъем для наушников
17. Аудиовидеовыход
18. Коаксиальный выход
19. Переключатель питания ON/OFF
20. Разъем для адаптера питания 9-12 В
Не показано на рисунке: разъем дя ТВ-
антенны (на левой стороне корпуса)
Страница загружается ...
Страница загружается ...
Страница загружается ...
Страница загружается ...
Страница загружается ...
Страница загружается ...
Страница загружается ...
Страница загружается ...
Страница загружается ...
Страница загружается ...
Страница загружается ...
Страница загружается ...
Страница загружается ...
-
 1
1
-
 2
2
-
 3
3
-
 4
4
-
 5
5
-
 6
6
-
 7
7
-
 8
8
-
 9
9
-
 10
10
-
 11
11
-
 12
12
-
 13
13
-
 14
14
-
 15
15
-
 16
16
-
 17
17
-
 18
18
-
 19
19
-
 20
20
-
 21
21
-
 22
22
-
 23
23
-
 24
24
-
 25
25
-
 26
26
-
 27
27
-
 28
28
-
 29
29
-
 30
30
-
 31
31
-
 32
32
-
 33
33


Hyundai H-LCDVD906T Black Руководство пользователя
- Категория
- Проигрыватели DVD
- Тип
- Руководство пользователя
Задайте вопрос, и я найду ответ в документе
Поиск информации в документе стал проще с помощью ИИ
на других языках
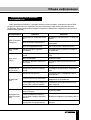
Похожие модели бренда
-
Hyundai H-MS1101 Руководство пользователя
-
-
-
-
-
-
-
Hyundai H-LCDVD725T Руководство пользователя
-
-