Electrolux EWP87100W Руководство пользователя
- Категория
- Стиральные машины
- Тип
- Руководство пользователя

EWP 87100 W
................................................ .............................................
EN WASHING MACHINE USER MANUAL 2
RU СТИРАЛЬНАЯ МАШИНА ИНСТРУКЦИЯ ПО
ЭКСПЛУАТАЦИИ
32

CONTENTS
1. SAFETY INFORMATION . . . . . . . . . . . . . . . . . . . . . . . . . . . . . . . . . . . . . . . . . . . . . . . . . . . 3
2. SAFETY INSTRUCTIONS . . . . . . . . . . . . . . . . . . . . . . . . . . . . . . . . . . . . . . . . . . . . . . . . . . 4
3. FROST PRECAUTION . . . . . . . . . . . . . . . . . . . . . . . . . . . . . . . . . . . . . . . . . . . . . . . . . . . . . 5
4. PRODUCT DESCRIPTION . . . . . . . . . . . . . . . . . . . . . . . . . . . . . . . . . . . . . . . . . . . . . . . . . 6
6. SPECIAL ACCESSORIES FOR INSTALLATION . . . . . . . . . . . . . . . . . . . . . . . . . . . . . . . . . . 6
7. TECHNICAL DATA . . . . . . . . . . . . . . . . . . . . . . . . . . . . . . . . . . . . . . . . . . . . . . . . . . . . . . . 7
8. INSTALLATION . . . . . . . . . . . . . . . . . . . . . . . . . . . . . . . . . . . . . . . . . . . . . . . . . . . . . . . . . . 7
9.
FIRST USE . . . . . . . . . . . . . . . . . . . . . . . . . . . . . . . . . . . . . . . . . . . . . . . . . . . . . . . . . . . . 11
10. DAILY USE . . . . . . . . . . . . . . . . . . . . . . . . . . . . . . . . . . . . . . . . . . . . . . . . . . . . . . . . . . . . 11
11.
WASHING PROGRAMMES . . . . . . . . . . . . . . . . . . . . . . . . . . . . . . . . . . . . . . . . . . . . . . . . 20
12. CONSUMPTION VALUES . . . . . . . . . . . . . . . . . . . . . . . . . . . . . . . . . . . . . . . . . . . . . . . . . 24
13.
CARE AND CLEANING . . . . . . . . . . . . . . . . . . . . . . . . . . . . . . . . . . . . . . . . . . . . . . . . . . . 24
14. WHAT TO DO IF… . . . . . . . . . . . . . . . . . . . . . . . . . . . . . . . . . . . . . . . . . . . . . . . . . . . . . . 27
WE’RE THINKING OF YOU
Thank you for purchasing an Electrolux appliance. You’ve chosen a product that brings with it
decades of professional experience and innovation. Ingenious and stylish, it has been designed
with you in mind. So whenever you use it, you can be safe in the knowledge that you’ll get great
results every time.
Welcome to Electrolux.
Visit our website for:
Get usage advice, brochures, trouble shooter, service information:
www.electrolux.com
Register your product for better service:
www.electrolux.com/productregistration
Buy Accessories, Consumables and Original spare parts for your appliance:
www.electrolux.com/shop
CUSTOMER CARE AND SERVICE
We recommend the use of original spare parts.
When contacting Service, ensure that you have the following data available.
The information can be found on the rating plate. Model, PNC, Serial Number.
Warning / Caution-Safety information
General information and tips
Environmental information
Subject to change without notice.
2
www.electrolux.com

1. SAFETY INFORMATION
Before the installation and use of the appliance, carefully
read the supplied instructions. The manufacturer is not
responsible if an incorrect installation and use causes in-
juries and damages. Always keep the instructions with
the appliance for future reference.
1.1 Children and vulnerable people safety
WARNING!
Risk of suffocation, injury or permanent disability.
• Do not let persons, children included, with reduced
physical sensory, reduced mental functions or lack of
experience and knowledge use the appliance. They
must have supervision or instruction for the operation
of the appliance by a person who is responsible for
their safety.
• Do not let children play with the appliance.
• Keep all packaging away from children.
• Keep all detergents away from children.
• Keep children and pets away from the appliance door
when it is open.
• If the appliance has a child safety device, we recom-
mend you activate it.
1.2 General Safety
• Before maintenance, deactivate the appliance and dis-
connect the mains plug from the mains socket.
• Do not change the specification of this appliance.
• Obey the maximum load volume of 7 kg (refer to the
“Programme chart” chapter).
• If the supply cord is damaged, it must be replaced by
the manufacturer, its service agent or similarly qualified
persons in order to avoid a hazard.
ENGLISH 3

• The operating water pressure (minimum and maximum)
must be between 0,5 bar (0,05 MPa) and 8 bar (0,8
MPa)
• The ventilation openings in the base (if applicable) must
not be obstructed by a carpet.
• The appliance is to be connected to the water mains
using the new supplied hose-sets. Old hose sets must
not be reused.
2.
SAFETY INSTRUCTIONS
2.1 Installation
• Remove all the packaging and the
transit bolts.
• Keep the transit bolts. When you move
the appliance again you must block the
drum.
• Do not install or use a damaged appli-
ance.
• Do not install or use the appliance
where the temperature is less than 0 °C
or where it is exposed to the weather.
• Obey the installation instruction sup-
plied with the appliance.
• Make sure that the floor where you in-
stall the appliance is flat, stable, heat
resistant and clean.
• Do not install the appliance where the
appliance door can not be fully opened.
• Always be careful when you move the
appliance because it is heavy. Always
wear safety gloves.
• Make sure that there is air circulation
between the appliance and the floor.
• Adjust the feet to have the necessary
space between the appliance and the
carpet.
Electrical connection
WARNING!
Risk of fire and electrical shock.
• The appliance must be earthed.
• Make sure that the electrical information
on the rating plate agrees with the pow-
er supply. If not, contact an electrician.
• Always use a correctly installed shock-
proof socket.
• Do not use multi-plug adapters and ex-
tension cables.
• Make sure not to cause damage to the
mains plug and to the mains cable.
Contact the Service or an electrician to
change a damaged mains cable.
• Connect the mains plug to the mains
socket only at the end of the installa-
tion. Make sure that there is access to
the mains plug after the installation.
• Do not pull the mains cable to discon-
nect the appliance. Always pull the
mains plug.
• Do not touch the mains cable or the
mains plug with wet hands.
• This appliance complies with the E.E.C.
Directives.
Water connection
• Make sure not to cause damage to the
water hoses.
• The appliance is to be connected to the
water mains using the new supplied
hose-sets. Old hose sets must not be
reused.
• Before you connect the appliance to
new pipes or pipes not used for a long
time, let the water flow until it is clean.
• The first time you use the appliance,
make sure that there is no leakage.
4
www.electrolux.com

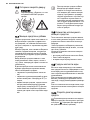
2.2 Use
WARNING!
Risk of injury, electrical shock, fire,
burns or damage to the appliance.
• Use this appliance in a household envi-
ronment.
• Obey the safety instructions on the de-
tergent packaging.
• Do not put flammable products or items
that are wet with flammable products
in, near or on the appliance.
• Do not touch the glass of the door
while a programme operates. The glass
can be hot.
• Make sure that you remove all metal
objects from the laundry.
• Do not put a container to collect possi-
ble water leakage under the appliance.
Contact the Service to ensure which
accessories can be used.
2.3 Care and Cleaning
WARNING!
Risk of injury or damage to the
appliance.
• Do not use water spray and steam to
clean the appliance.
• Clean the appliance with a moist soft
cloth. Only use neutral detergents. Do
not use abrasive products, abrasive
cleaning pads, solvents or metal ob-
jects.
2.4 Disposal
WARNING!
Risk of injury or suffocation.
• Disconnect the appliance from the
mains supply.
• Cut off the mains cable and discard it.
• Remove the door catch to prevent chil-
dren and pets to get closed in the ap-
pliance.
2.5 Service
• Contact the Service to repair the appli-
ance. We recommend only the use of
original spare parts.
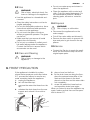
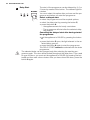
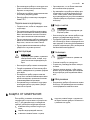
3. FROST PRECAUTION
If the appliance is installed in a place
where the temperature could drop below
0°C, proceed as follows to remove any
water remaining inside the appliance:
1.
unplug the appliance;
2.
turn off the water tap;
3.
unscrew the water inlet hose from the
tap;
4.
unfasten the drain hose from the rear
support and unhook it from sink or
spigot;
5.
place a bowl on the floor;
6.
let the drain hose run along the floor,
place the external extremities of the
drain and inlet hoses in the bowl
placed on the floor and let water drain
out completely;
7.
screw the water inlet hose back on
and reposition drain hose again;
When you intend to start the appliance up
again, make sure that the room tempera-
ture is above 0°C.
ENGLISH 5

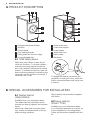
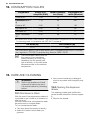
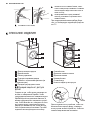
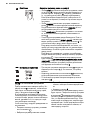
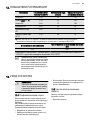
4. PRODUCT DESCRIPTION
1 2 3
4
5
6
9
7
10
11
12
8
1
Detergent dispenser drawer
2
Worktop
3
Control panel
4
Door opening handle
5
Rating plate (on the inner edge)
6
Front adjustable feet
7
Water drain hose
8
Drain hose support
9
Hose holders
10
Water inlet hose
11
Mains cable
12
Back feet
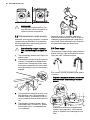
5.1 Child safety device
Make sure that children or pets do not
climb into the drum. To prevent children
and pets becoming trapped inside the
drum the machine incorporates a special
feature. To activate this device, rotate the
button (without pressing it) inside the door
clockwise until the groove is horizontal. If
necessary use a coin.
To disable this device and restore the
possibility of closing the door, rotate the
button counterclockwise until the groove
is vertical.
6. SPECIAL ACCESSORIES FOR INSTALLATION
6.1 Rubber feet kit
(4055126249)
Available from your authorized dealer.
The rubber feet are particularly recom-
mended on floating, slippery and wooden
floors.
Mount the rubber feet to prevent vibra-
tion, noises and displacement of the ap-
pliance during operation.
Read carefully the instructions supplied
with the kit.
6.2 Fixing plate kit
(4055171146)
Available from your authorized dealer.
If you install the appliance on a plinth, se-
cure the appliance in the fixing plates.
Follow the instructions supplied with the
kit.
6
www.electrolux.com

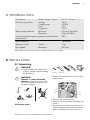
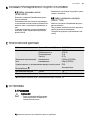
7. TECHNICAL DATA
Dimensions Width / Height / Depth 60 / 85 / 50 mm
Electrical connection Voltage
Overall power
Fuse
Frequency
230 V
2100 W
10 A
50 Hz
Water supply pressure Minimum
Maximum
0,5 bar (0,05 MPa)
8 bar (0,8 MPa)
Level of protection against ingress of solid particles
and moisture
IPX4
Water supply
1)
Cold water
Maximum Load Cotton 7 kg
Spin Speed Maximum 800 rpm
1)
Connect the water inlet hose to a water tap with a 3/4'' thread.
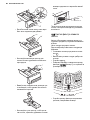
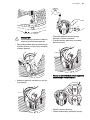
8. INSTALLATION
8.1 Unpacking
WARNING!
• Read carefully the "Safety infor-
mation" chapter before installing
the appliance.
WARNING!
Remove and keep all transit
devices so that they can be refit-
ted if the appliance ever has to be
transported again.
x 3
x 3
x 2
x 1
B
A
C
Necessary tools
1)
10 mm 30 mm
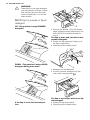
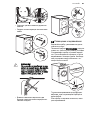
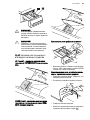
• Remove the external film. Use a cutter,
if necessary.
• Remove the cardboard top.
• Remove the polystyrene packaging ma-
terials.
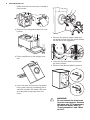
• Spread the front piece on the floor be-
hind the appliance and then lay the ap-
pliance carefully rear side down on it.
1)
These tools are not provided with the appliance.
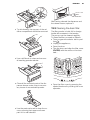
ENGLISH 7

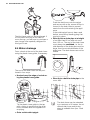
Make sure that no hoses are crushed in
the process.
• Remove the polystyrene base from the
bottom.
2
1
• Return appliance to the upright posi-
tion.
• Open the door and remove the plastic
hose guide, the bag containing the in-
struction booklet, the water inlet hose
and the plastic plug caps from the
drum.
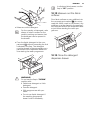
• Remove the power supply cable and
the draining hose from the hose holders
on the rear of the appliance.
• Unscrew the three bolts and remove
the hose holders.
• Slide out the relevant plastic spacers.
WARNING!
Do not remove the drain hose
from the rear support. Remove
this hose only if it is necessary
to drain the water. Refer to
"Frost precaution" and "What
to do if".
8
www.electrolux.com

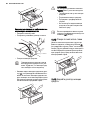
• Plug the smaller upper hole and the two
large ones with the corresponding plas-
tic plug caps.
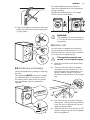
8.2 Positioning and levelling
Level the appliance by raising or lowering
the feet.
The appliance MUST be level and stable
on a flat hard floor. If necessary, check
the setting with a spirit level. Any neces-
sary adjustment can be made with a
spanner.
x 2
Accurate levelling prevents vibration,
noise and displacement of the appliance
during operation.
Repeat the levelling action, if the appli-
ance is not level and stable.
WARNING!
This appliance is free standing on-
ly. Do not remove the worktop for
any reason.
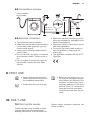
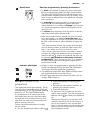
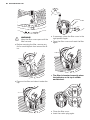
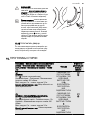
8.3 Water inlet
An inlet hose is supplied and can been
found inside the machine drum. Do not
use the hose from your previous machine
to connect to the water supply.
This appliance must be con-
nected to a cold water supply.
1.
Open the porthole and extract the in-
let hose.
2.
Connect the hose with the angled
connection to the machine. Do not
place the inlet hose downwards. An-
gle the hose to the left or right de-
pending on the position of your water
tap.
3.
Set the hose correctly by loosening
the ring nut. After positioning the inlet
hose, be sure to tighten the ring nut
again to prevent leaks.
4.
Connect the hose to a tap with a 3/4”
thread. Always use the hose supplied
with the appliance.
45°
35°
ENGLISH 9

The inlet hose must not be lengthened. If
it is too short and you do not wish to
move the tap, you will have to purchase a
new, longer hose specially designed for
this type of use.
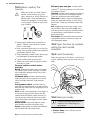
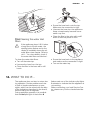
8.4 Water drainage
Form a hook at the end of the drain hose
using the plastic hose guide, if necessary.
The end of the drain hose can be posi-
tioned in four ways:
•
Hooked over the edge of a sink us-
ing the plastic hose guide.
Tie the plastic hose guide to the tap
with a string to prevent that the drain
hose unhooks when the appliance is
emptying.
• Onto a sink outlet spigot.
Push the drain hose onto the spigot
and secure with a clip, ensure a loop is
formed in the drain hose to prevent
waste from the sink entering the appli-
ance.
If the outlet spigot has not been used
before, remove any blanking plug that
may be in place.
•
Directly into a drain pipe at a height
of not less than 60 cm and not more
than 100 cm. The end of the drain hose
must always be ventilated, i.e. the in-
side diameter of the drain pipe must be
larger than the outside diameter of the
drain hose. The drain hose must not be
kinked.
• Directly to a built-in drain pipe in the
room wall.
The drain hose may be extended
to a maximum of 4 metres. An ad-
ditional drain hose and joining
piece is available from your Local
Centre.
10
www.electrolux.com

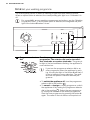
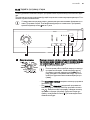
8.5 Connections overview
~max.400 cm
min. 60 cm
max. 100 cm
0.5 bar (0.05 MPa)
8 bar (0.8 MPa)
min.
60 cm
max.
100 cm
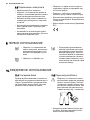
8.6 Electrical connection
• The appliance must be earthed.
• Make sure that the electrical information
on the rating plate agree with your do-
mestic power supply.
• Always use a correctly installed shock-
proof socket.
• Do not use multi-way plugs, connectors
and extension cables. There is a risk of
fire.
• Do not replace or modify the mains ca-
ble yourself. Contact the After Sales
Service.
• Make sure that the mains plug and ca-
ble is not squashed or damaged by the
back of the appliance.
• Make sure that the mains plug is acces-
sible after installation.
• Do not pull the mains cable to discon-
nect the appliance. Always pull the
mains plug.
• This appliance complies with the E.E.C.
Directives.
9. FIRST USE
• Ensure that the electrical and
water connections comply with
the installation instructions.
• Ensure that the drum is empty.
• Before the first wash, run a cot-
ton cycle at the highest temper-
ature without any laundry in the
machine, to remove any manu-
facturing residue from the drum
and tub. Pour 1/2 a measure of
detergent into the main wash
compartment and start the ma-
chine.
10. DAILY USE
10.1 Sort out the laundry
Follow the wash code symbols on each
garment label and the manufacturer’s
washing instructions. Sort the laundry as
follows: whites, coloureds, synthetics, del-
icates, woollens.
ENGLISH 11

10.2 Before Loading The
Laundry
Make sure that no metal objects
are left in the laundry (e.g. hair
clips, safety pins, pins). Button up
pillowcases, close zip fasteners,
hooks and poppers. Tie any belts
or long tapes. Remove any hooks
(e.g curtains).
• Never wash whites and coloureds to-
gether. Whites may lose their «white-
ness» in the wash.
• New coloured items may run in the first
wash; they should therefore be washed
separately the first time.
• Rub particularly soiled areas with a spe-
cial detergent or detergent paste.
• Treat curtains with special care.
• Wash the socks and the gloves inside
the bag or a net.
Remove stubborn stains before
washing:
Blood: treat fresh stains with cold water.
For dried stains, soak overnight in water
with a special detergent then rub in the
soap and water.
Oil based paint: moisten with benzine
stain remover, lay the garment on a soft
cloth and dab the stain; treat several
times.
Dried grease stains: moisten with tur-
pentine, lay the garment on a soft surface
and dab the stain with the fingertips and a
cotton cloth.
Rust: oxalic acid dissolved in hot water or
a rust removing product used cold. Be
careful with rust stains which are not re-
cent since the cellulose structure will al-
ready have been damaged and the fabric
tends to hole.
Mould stains: treat with bleach, rinse
well (whites and fast coloureds only).
Grass: soap lightly and treat with bleach
(whites and fast coloureds only).
Ball point pen and glue: moisten with
acetone
2)
, lay the garment on a soft cloth
and dab the stain.
Lipstick: moisten with acetone as above,
then treat stains with methylated spirits.
Treat any residual marks with bleach.
Red wine: soak in water and detergent,
rinse and treat with acetic or citric acid,
then rinse. Treat any residual marks with
bleach.
Ink: depending on the type of ink, mois-
ten the fabric first with acetone
2)
, then
with acetic acid; treat any residual marks
on white fabrics with bleach and then
rinse thoroughly.
Tar stains: first treat with stain remover,
methylated spirits or benzine, then rub
with detergent paste.
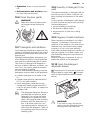
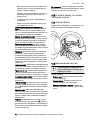
10.3 Open the door by carefully
pulling the door handle
outwards
10.4 Load the laundry
Place the laundry in the drum, one item at
a time, shaking them out as much as pos-
sible.
10.5 Maximum Loads
Recommended loads are indi-
cated in the «Washing Pro-
grammes».
General rules:
• Cotton, linen: drum full but not too
tightly packed;
2)
do not use acetone on artificial silk.
12
www.electrolux.com

• Synthetics: drum no more than half
full;
• Delicate fabrics and woollens: drum
no more than one third full.
10.6 Close the door gently
WARNING!
Make sure that any fabrics were
not trapped when closing the
door.
10.7 Detergents and additives
Good washing results also depend on the
choice of detergent and use of the correct
quantities to avoid waste and protect the
environment.
Although biodegradable, detergents con-
tain substances which, in large quantities,
can upset the delicate balance of nature.
The choice of detergent will depend on
the type of fabric (delicates, woollens, cot-
tons, etc.), the colour, washing tempera-
ture and degree of soiling.
All commonly available washing machine
detergents may be used in this appliance:
• powder detergents for all types of fab-
ric,
• powder detergents for delicate fabrics
(40°C max) and woollens,
• liquid detergents, preferably for low
temperature wash programmes (60°C
max) for all types of fabric, or special for
woollens only.
The detergent dispenser drawer is
provided with an insert for liquid
detergent. Do not use the insert
downwards for gelatinous deter-
gents, with programmes including
prewash, with the delay start op-
tion. In all these cases you can
use metering balls or sachets pro-
vided with the detergent, Take out
the metering aid at the end of the
washing cycle.
10.8 Quantity of detergent to be
used
The type and quantity of detergent will de-
pend on the type of fabric, load size, de-
gree of soiling and hardness of the water
used.
For the quantity of detergent, refer always
to what is written on the product packing.
Use less detergent if:
• you are washing a small load,
• the laundry is lightly soiled,
• large amounts of foam form during
washing.
10.9 Degrees of water hardness
Water hardness is classified in so-called
“degrees” of hardness. Information on
hardness of the water in your area can be
obtained from the relevant water supply
company, or from your local authority.
If the water hardness degree is medium or
high we suggest you to add a water soft-
ener following always the manufacturer’s
instructions.
When the degree of hardness is soft, re-
adjust the quantity of the detergent.
10.10 Open the detergent
dispenser drawer
Compartment for powder or liquid de-
tergent used for main wash.
Compart-
ment for liquid additives (fabric softener,
starch).
WARNING!
If you wish to carry out the pre-
wash, pour the detergent among
washing items into the drum.
ENGLISH 13

WARNING!
Depending on the type detergent
you use (powder of liquid), ensure
that the flap, placed in the main
wash compartment, is in the de-
sired position.
10.11 Flap for powder or liquid
detergent
UP- Flap position if using POWDER
detergent
PUSH
REMOVE
TO CLEAN
DOWN - Flap position if using LIQUID
detergent during main wash
PUSH
REMOVE
TO CLEAN
If the flap is not in the desired posi-
tion:
• Remove the drawer. Push the drawer
edge outwards where indicated by the
arrow (PUSH) to facilitate drawer re-
moval.
The flap is down and you wish to use
powder detergent:
• Rotate the flap upwards. Ensure to fit
the flap completely in.
• Carefully put the drawer back.
P
O
W
D
E
R
D
E
T
E
R
G
E
N
T
• Measure out the detergent.
• Pour the powder detergent into the
main wash compartment
.
The flap is up and you wish to use liq-
uid detergent:
• Rotate the flap downwards.
• Carefully put the drawer back.
14
www.electrolux.com

L
I
Q
U
I
D
D
E
T
E
R
G
E
N
T
1
2
0
m
l
6
0
m
l
• Measure out the detergent.
For the quantity of detergent, refer
always to what is written on the
product packing and ensure that
the detergent can be poured in
the drawer.
• Pour the liquid detergent in the com-
partment
without exceeding the limit
indicated in the flap. The detergent
must be placed in the appropriate com-
partments of the dispenser drawer be-
fore starting the wash programme.
WARNING!
Do not use the flap in "DOWN"
position with:
• Gelatinous detergent or thick
detergent.
• Powder detergent.
• With programmes with pre-
wash.
• Do not use liquid detergent if
the washing programme
doesn't start immediately.
In all above listed cases, use the
flap in "UP" position .
10.12 Measure out the fabric
softener
Pour fabric softener or any additives into
the compartment marked
(do not ex-
ceed the «MAX» mark in the drawer). Any
additives must be placed in the appropri-
ate compartments of the dispenser draw-
er just before starting the wash pro-
gramme.
10.13 Close the detergent
dispenser drawer
ENGLISH 15

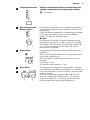
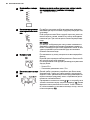
10.14 Set your washing programme
The control panel permits to select a washing programmes and different options.
When an option button is selected, the corresponding pilot light is on. Otherwise it is
off.
For compatibility among washing programmes and options, see the "Washing
Programme Chart". If an incorrect option is selected, the integrated red pilot
light of the button 6 flashes 3 times.
7
123465
1
Programme selector
dial
Turn the programme selector dial to the required
programme. The selector dial can be turned ei-
ther clockwise or counter-clockwise. The green pi-
lot light of the button 6 starts flashing: the appliance is
now switched on.
If you turn the programme selector dial to an-
other programme when the appliance is work-
ing, the red pilot light of the button 6 will flash 3
times to indicate a wrong selection. The appli-
ance will not perform the new selected pro-
gramme.
• To switch the appliance off, turn the programme
selector dial to the position
.
• To cancel or change a running programme, switch
the appliance off by turning the programme selector
dial to the position
. Select the new programme
by turning the selector to the desired programme.
Start the new programme by pressing the button 6
again. The water in the tub will be not emptied out.
16
www.electrolux.com

2
Temperature button
90°
60°
40°
30°
Temp.
Push the temperature button to select the most
suitable temperature for washing your laundry .
: Cold wash.
3
Spin reduction and
No Spin option
800
700
Spin
By selecting a programme, the appliance proposes au-
tomatically the maximum spin speed provided for that
programme.
Press this button repeatedly to change the spin speed,
if you want your laundry to be spun at a different
speed. The relevant light illuminates.
No Spin
By selecting this option, all spinning phases are sup-
pressed and replaced by a drain, so as not to wrinkle
the laundry. Recommended for extremely delicate fab-
rics. On some programmes the rinses will be per-
formed with more water.
4
Super Quick
By pressing this button the corresponding pilot light il-
luminates.
Short cycle for lightly soiled items or for laundry which
needs only freshening up.
With this option, a reduced load of laundry is recom-
mended:
• Cottons 3.5 Kg
• Synthetics and delicates 1.5 Kg
3
+
4
Extra Rinse This appliance is designed for saving water. However,
for people with very delicate skin (allergic to detergents)
it may be necessary to rinse the laundry using an extra
quantity of water.
Press simultaneously the buttons 3 and 4 for some
seconds: the pilot light 7.2 comes on. This function
stays permanently on. To remove it press the same
buttons again until the pilot light 7.2 goes off.
ENGLISH 17

5
Delay Start
The start of the programme can be delayed by 9, 6 or
3 hours by means of this button. The relevant light illu-
minates.
You must select this option after you have set the pro-
gramme and before you start the programme.
Select a delayed start:
• select the programme and the required options;
• select the delay start by pressing the button 5;
• press the button 6:
– the appliance starts its hourly countdown.
– The programme will start after the selected delay
has expired.
Cancelling the delayed start after having started
the programme:
• set the appliance to PAUSE by pressing the button
6;
• press the button 5 once, the light relevant to the se-
lected delay goes off;
• press the button 6 again to start the programme.
The DELAY START cannot be selected with the drain
programme.
The selected delay can be changed only after selecting the washing pro-
gramme again. The door will be locked throughout the delay time. If you need
to open the door, you must set the appliance to PAUSE (by pressing the but-
ton 6) and then wait a few minutes. After you have closed the door, press the
button 6 again.
18
www.electrolux.com

6
Start/Pause Start the programme by pressing the button 6
• To start the selected programme, press the button
6, the corresponding green pilot light stops flashing.
The pilot light 7.1 illuminates to indicate that the ap-
pliance starts operating and the door is locked. If you
have chosen a delayed start, the appliance will begin
the countdown.
• To interrupt a programme which is running, press
the button 6: the corresponding green pilot light
starts flashing. It is possible to change some options
of a running programme before the programme car-
ries them out.
• To restart the programme from the point at which it
was interrupted, press the button 6.
• After the programme has started the door is locked.
If, for any reason, you need to open the door, set
firstly the appliance to PAUSE by pressing the button
6. After a few minutes it will be possible to open the
door.
If the door remains locked, this means that the appli-
ance is already heating or that the water level is too
high. In any case, do not try to force the door!
If you cannot open the door but you need to open it
you have to switch the appliance off by turning the
selector dial to
. After a few minutes the door can
be opened (pay attention to the water level and
temperature!). After closing the door, it is necessary
to select the programme and options again and to
press the button 6.
7.1
7.2
7.3
Indicator pilot lights
• When you start the programme by pressing the but-
ton 6, the washing phase pilot light (7.1) illuminates.
This means that the appliance is operating.
• The additional rinses pilot light (7.2) illuminates when
the appliance performs an extra rinse.
• When the programme has finished the end cycle pi-
lot light (7.3) comes on.
10.15 At the end of the
programme
The appliance stops automatically. The pi-
lot light of the button 6 and the pilot light
corresponding to the just finished washing
phase go off. The light 7.3 illuminates.
If a programme or an option that ends
with water left in the tub has been selec-
ted and the door remains locked to indi-
cate that the water must be emptied out
before opening the door.
Follow the below instructions to empty
out the water:
•
Turn the programme selector dial to
.
• Select the draining or spinning pro-
gramme.
• Reduce the spin speed if needed, by
pressing the relevant button.
• Press the button 6.
At the end of the programme, the door
can be now opened. Turn the programme
selector dial to
to switch the appliance
off.
Remove the laundry from the drum and
carefully check that the drum is empty. If
you do not intend to carry out another
wash, close the water tap. Leave the door
open to prevent the formation of mildew
and unpleasant smells.
ENGLISH 19

WARNING!
If there are children or pets in the
house, activate the child safety
device in the inner side of the
door frame (for more details read "
Child safety" in the chapter "Prod-
uct description").
Stand by: during programme set-
ting up and once the programme
has finished, if the programme se-
lector dial and any button are not
touched, after a few minutes the
energy saving system is enabled.
The pilot lights go off. The green
pilot light of the button 6 flashes
with a low frequency. By pressing
any button the appliance will
come out of the energy saving
status.
10.16 Door seal
At the end of every cycle, check from the
door seal and remove objects that could
be trapped in the fold.
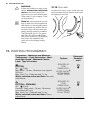
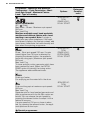
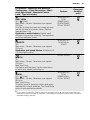
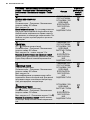
11. WASHING PROGRAMMES
Programme - Maximum and Minimum
Temperature - Cycle Description - Maxi-
mum Spin Speed - Maximum Fabrics
Load - Type of Laundry
Options
Detergent
Compart-
ment
COTTON
90°-
(Cold)
Main wash - Rinses - Maximum spin speed:
800 rpm
Max. load 7 kg - Reduced load 3.5 kg
White, coloured cotton and linen. Normally
soiled items.
SPIN REDUC-
TION,
RINSE HOLD,
SUPER QUICK
1)
,
EXTRA RINSE,
DELAY START
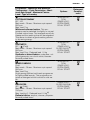
COTTON + PREWASH
90° -
(Cold)
Prewash - Main wash - Rinses - Maximum
spin speed: 800 rpm
Max. load 7 kg - Reduced load 3.5 kg
White, coloured cotton and linen. Heavy
soiled items.
SPIN REDUC-
TION,
RINSE HOLD,
SUPER QUICK
1)
,
EXTRA RINSE,
DELAY START
20
www.electrolux.com
Страница загружается ...
Страница загружается ...
Страница загружается ...
Страница загружается ...
Страница загружается ...
Страница загружается ...
Страница загружается ...
Страница загружается ...
Страница загружается ...
Страница загружается ...
Страница загружается ...
Страница загружается ...
Страница загружается ...
Страница загружается ...
Страница загружается ...
Страница загружается ...
Страница загружается ...
Страница загружается ...
Страница загружается ...
Страница загружается ...
Страница загружается ...
Страница загружается ...
Страница загружается ...
Страница загружается ...
Страница загружается ...
Страница загружается ...
Страница загружается ...
Страница загружается ...
Страница загружается ...
Страница загружается ...
Страница загружается ...
Страница загружается ...
Страница загружается ...
Страница загружается ...
Страница загружается ...
Страница загружается ...
Страница загружается ...
Страница загружается ...
Страница загружается ...
Страница загружается ...
Страница загружается ...
Страница загружается ...
Страница загружается ...
Страница загружается ...
-
 1
1
-
 2
2
-
 3
3
-
 4
4
-
 5
5
-
 6
6
-
 7
7
-
 8
8
-
 9
9
-
 10
10
-
 11
11
-
 12
12
-
 13
13
-
 14
14
-
 15
15
-
 16
16
-
 17
17
-
 18
18
-
 19
19
-
 20
20
-
 21
21
-
 22
22
-
 23
23
-
 24
24
-
 25
25
-
 26
26
-
 27
27
-
 28
28
-
 29
29
-
 30
30
-
 31
31
-
 32
32
-
 33
33
-
 34
34
-
 35
35
-
 36
36
-
 37
37
-
 38
38
-
 39
39
-
 40
40
-
 41
41
-
 42
42
-
 43
43
-
 44
44
-
 45
45
-
 46
46
-
 47
47
-
 48
48
-
 49
49
-
 50
50
-
 51
51
-
 52
52
-
 53
53
-
 54
54
-
 55
55
-
 56
56
-
 57
57
-
 58
58
-
 59
59
-
 60
60
-
 61
61
-
 62
62
-
 63
63
-
 64
64


Electrolux EWP87100W Руководство пользователя
- Категория
- Стиральные машины
- Тип
- Руководство пользователя
Задайте вопрос, и я найду ответ в документе
Поиск информации в документе стал проще с помощью ИИ
на других языках
- English: Electrolux EWP87100W User manual
Похожие модели бренда
-
Electrolux EWC1350 Руководство пользователя
-
Electrolux EWC1350 Руководство пользователя
-
-
-
-
-
Electrolux EWC1150 Руководство пользователя
-
-
-