2
✎ озкладіть на столі м’яку
тканину, щоб не пошкодити
екран телевізора, і покладіть
телевізор екраном донизу на
тканину.
✎ Вставте напрямну підставку у
гніздо внизу телевізора.
Технічні характеристики комплекту настінного кріплення (VESA)
Встановлюйте настінне кріплення на твердій стіні, перпендикулярній до підлоги. З питань встановлення кріплення
на іншому матеріалі звертайтеся до місцевого дилера. У разі встановлення на стелі або похилій стіні телевізор
може впасти і завдати серйозних травм користувачеві.
➣ У таблиці нижче наведено стандартні розміри комплектів настінного кріплення.
➣ У комплект настінного кріплення Samsung входить детальний посібник зі встановлення. Усі частини, необхідні для
встановлення, надаються.
➣ Не використовуйте гвинти, які не відповідають стандартним технічним характеристикам гвинтів VESA.
➣ Не використовуйте гвинти, довші за стандартні розміри або які не відповідають технічним характеристикам VESA.
Надто довгі гвинти можуть завдати пошкоджень внутрішнім деталям виробу.
➣ Для настінних кріплень, які не відповідають стандартним технічним характеристикам VESA, розмір гвинтів може бути
дещо іншим залежно від характеристик настінного кріплення.
➣ Не закручуйте гвинти надто сильно. Це може призвести до пошкодження виробу або спричинити його падіння і
відповідно фізичні травмування. Компанія Samsung не несе відповідальності за такі випадки.
➣ Компанія Samsung не несе відповідальності за пошкодження виробу або отримання травм користувачем у
разі використання кріплення, іншого аніж VESA, або будь-якого невідповідного кріплення, а також у випадку
недотримання користувачем вказівок щодо встановлення виробу.
➣ Не монтуйте телевізор із нахилом понад 15 градусів.
➣ Always have two people mount the TV on a wall.
дюйм
Размер
телевизора
в дюймах
Характеристики VESA
(A * B)
Стандартный винт
(Длина *
в мм)
Количество
HG**EC770
32~40 200 X 200
M8
4
46 400 X 400
Не выполняйте установку набора для настенного монтажа при включенном телевизоре.
Щоб зареєструвати виріб, відвідайте сторінку
www.samsung.com/register.
Короткий посібник зі встановлення
Список компонентів
➣ Надані компоненти можуть різнитися залежно від моделі.
1
2
3
4
5
6
7
8 9
1
Пульт дистанційного керування
(ДК) і батареї (ААА, 2 шт.)
2 Короткий посібник зі встановлення
Інструкція з техніки безпеки
3 к
абель передачі даних
4
Кабель живлення
5 Тримач для кабелів 6 Перехідник для компонентного роз’єму
7
Перехідник для аудіо-/відеороз’єму
8
Адаптер для картки стандартного інтерфейсу
(CI)
9
Втулка-трима
Встановлення підставки телевізора зі світлодіодною підсвіткою екрана
Элементы подставки
A B
C
(M4 X L12)
Підставка (1 шт.) Напрямна підставка (1 шт.)
Гвинт
Для крепления телевизора к подставке выполните следующие действия. Более подробные инструкции
содержатся в отдельном руководстве по установке подставки.
BN68-05850E-01
Обзор соединительной панели
2
1
3
4
5
6
7
890!@
HDMI IN 1
VOL-CTRL
RJP
HDMI IN
2 (ARC)
PC/DVI
AUDIO IN
HDMI IN
3 (DVI)
USB
(5V 0.5A)
/CLONING
VARIABLE
AUDIO OUT
Mixed Channel Map
Mixed Channel Map (Общая карта каналов) – это функция совместного отображения каналов антенного и
кабельного телевидения.
При отсутствии кабельных каналов данную функцию можно использовать для сортировки каналов.
– Элементы Mixed channel Map (Общая карта каналов), Channel Editor (Редактор каналов) и Auto Store
(Автонастройка каналов) теперь находятся в меню Hotel Option (Параметры отеля).
– Для совместного отображения каналов антенного и кабельного телевидения функция Mixed channel Map
(Общая карта каналов) должна быть включена.
– И
спользуйте “Редактор каналов” для сортировки каналов в соответствии с номерами, заданными пользователем.
Hospitality Mode Standalone
System
SI Vendor
OFF
Power On
Channel
Menu OSD
Clock
Music Mode
Remote Jack Pack
External Source
Bathroom Speaker
Eco Solution
Logo/Message
Cloning
REACH Solution
Security
<В зависимости от модели и региона некоторые элементы меню
могут отсутствовать>
Инструкции для совместного отображения каналов в автономном режиме.
Шаг Описание
1 Включите Mixed Channel Map (Общая карта каналов) в меню Hotel Option (Параметры отеля)
2
Запуск функции Channel Auto Store (Автонастройка каналов) в меню Hotel Option (Параметры отеля)
(Источник каналов:
3 Выбор пункта “Редактор каналов” в меню “Параметры отеля”
4 Создание таблицы с необходимым окончательным списком желаемых каналов
5 Переупорядочение каналов с помощью кнопки TOOLS на основе созданной таблицы
6 Нажмите кнопку EXIT или RETURN для выхода.
Підключення до телевізора приставки (SBB або STB)
PC/DVI
AUDIO IN
C
DV
A
DI
I
ETH MODEM
Сервер
отеляПриставка
Set Top Box или Set
Back Box
кабель передачі даних
[Задня панель телевізора]
Список постачальників і сумісних кабелів передачі даних, які
постачаються в комплекті з телевізором
Переконайтеся, що ви користуєтеся відповідним кабелем передачі даних для свого постачальника.
Дивіться наклейки з кодами на кабелях передачі даних.
Під’єднання до гнізда COMMON INTERFACE
Під’єднання адаптера для картки стандартного інтерфейсу
Під’єднайте адаптер, як показано на малюнку. Щоб під’єднати адаптер для картки
CI, виконайте описані нижче дії.
✎ Подсоедините адаптер до того, как телевизор будет прикреплен к стене.
1. Вставте адаптер для картки CI у два отвори на пристрої 1.
✎ Найдите два отверстия на задней панели телевизора рядом с разъемом
COMMON INTERFACE.
2. Подключите адаптер карты CI к порту COMMON INTERFACE.
3. Вставте картку CI або СI+.
Використання картки CI або СI+
Щоб переглядати платні канали, слід вставити картку CI або CI+.
• Як
що картку CI або CI+ не вставити, для деяких каналів на екрані
з’являтиметься повідомлення Scrambled Signal (Кодований сигнал).
• З
а 2-3 хвилини на екрані відображатиметься така інформація: номер
телефону, ідентифікатор картки CI або CI+, ідентифікатор головного
вузла тощо. Якщо з’явиться повідомлення про помилку, зверніться до
постачальника послуг.
• Після завершення конфігурації інформації каналу з’явиться
повідомлення про те, що оновлення завершено. Це означає, що
список каналів оновлено.
✎ ПРИМІТКА
• Картку CI або CI+ можна придбати в місцевого постачальника послуг кабельного телебачення.
• Виймаючи картку CI або CI+, будьте обережні, оскільки від падіння картка може вийти з ладу.
• Вставляйте картку CI або CI+ відповідно до позначок на ній.
• Розташування гнізда COMMON INTERFACE може різнитися залежно від моделі.
• Картки CI або CI+ не підтримуються в деяких країнах і регіонах. Докладніші відомості можна отримати в
місцевого уповноваженого дилера.
• У разі виникнення проблем звертайтеся до постачальника послуг.
• Вставте картку CI чи CI+, що відповідає поточним налаштуванням сигналу з антени.
Технічні характеристики
Элементы
Технические характеристики Комментарий
Система ТВ
PAL, SECAM, DVB-TC
Аудиовыход
Выходной разъем для
динамиков
32 дюймів / 40 дюймів / 46 дюймів : 10 Вт x 2
Аудиоразъем для
различных устройств
4W mono 8 ohm SPK'
Разъем для подключения гарнитуры
Звуковой разъем BTL
Вход
Компонентний
Y, Pb, Pr, Аудіо (лівий/правий)
PC
D-sub, Аудіо (лівий/правий)
A/V
Audio Video Jack
HDMI
Compatible with the HDMI Specications
Антенна
75 Ом, несбалансированный, разъем Din,
разъем F
VHF/UHF/CATV
ДАННЫЕ
ДАННЫЕ
RJ-12
RJP
RS232
Рабочая температура
10°C ~ 40°C (50°F ~104°F)
Рабочая влажность
10% ~ 80% без конденсации
Температура хранения
-20°C ~ 45°C (-4°F ~ 113°F)
Влажность при хранении
5% ~ 95% без конденсации
✎ Дизайн і технічні характеристики може бути змінено без повідомлення.
✎ Номінальні параметри живлення та відомості про енергоспоживання для цього виробу вказано на наклейці.
Обращение в SAMSUNG WORLDWIDE
Если у вас есть вопросы или предложения относительно продукции Samsung, обратитесь в центр
поддержки покупателей SAMSUNG.
Страна Центр поддержки покупателей
RUSSIA 8-800-555-55-55
GEORGIA 0-800-555-555
ARMENIA 0-800-05-555
AZERBAIJAN 088-55-55-555
KAZAKHSTAN 8-10-800-500-55-500(GSM: 7799, VIP care 7700)
UZBEKISTAN 8-10-800-500-55-500
KYRGYZSTAN 8-10-800-500-55-500
TADJIKISTAN 8-10-800-500-55-500
MONGOLIA ‘7-800-555-55-55
UKRAINE 0-800-502-000
BELARUS 810-800-500-55-500
MOLDOVA 0-800-614-40
Символ «не для пищевой продукции» применяется в соответствие с техническим регламентом Таможенного союза «О
безопасности упаковки» 005/2011 и указывает на то, что упаковка данного продукта не предназначена для повторного
использования и подлежит утилизации. Упаковку данного продукта запрещается использовать для хранения пищевой продукции.
Символ «петля Мебиуса» указывает на возможность утилизации упаковки. Символ может быть дополнен обозначением
материала упаковки в виде цифрового и/или буквенного обозначения.
Правильная утилизация данного устройства (Утилизация электрического и электронного
оборудования)
(Действует во всех странах Европейского Союза и других странах Европы, принявших систему
разделения отходов)
Подобная маркировка на изделии, принадлежностях или в руководстве к нему предупреждает, что по
истечении срока службы изделие или электронные принадлежности для него (например, зарядное
устройство, наушники, кабель USB) не следует выбрасывать вместе с другим бытовым мусором. Чтобы
избежать вредного воздействия на окружающую среду или на здоровье человека от неконтролируемой
утилизации отходов, следует отделять маркированные подобным образом изделия от другого мусора для
соответствующей переработки и повторного использования в качестве сырья. За подробной информацией
о месте и способе экологически безопасной утилизации бытовым потребителям следует обращаться
к продавцу данного изделия или в органы местного самоуправления. Промышленным потребителям
необходимо обратиться к поставщику, чтобы уточнить сроки и условия договора купли-продажи. Подобные
изделия и электронные принадлежности не следует утилизировать вместе с другими производственными
отходами.
Правильная утилизация аккумуляторов для этого продукта
(для стран ЕС и других европейских стран, использующих отдельные системы возврата
аккумуляторов)
Такая маркировка на аккумуляторе, руководстве или упаковке указывает на то, что аккумуляторы,
используемые в данном продукте, не должны выбрасываться вместе с другими бытовыми отходами по
окончании срока службы. Химические символы Hg, Cd или Pb означают то, что аккумулятор содержит
ртуть, кадмий или свинец в количествах, превышающих контрольный уровень в Директиве ЕС 2006/66.
Если аккумуляторы утилизированы неправильно, эти вещества могут нанести вред здоровью людей
или окружающей среде. Для защиты природных ресурсов и с целью повторного использования ценных
материалов, отделяйте аккумуляторы от остального мусора и сдавайте их на переработку через местную
систему бесплатного обмена аккумуляторов.
x4 (M4 X L12)
B
A
C
Вид сверху
ВНИМАНИЕ
НЕ
ИСПОЛЬЗУЙТЕ
ХИМИКАТЫ
НЕ
ИСПОЛЬЗУЙТЕ
СМАЗКИ
НЕ
ИСПОЛЬЗУЙТЕ
МАСЛА
1
3
Вид сбоку
(правильная сборка)
(неправильная сборка)
4
x4 (M4 X L12)
➣ Перед тим, як під’єднати зовнішній пристрій до
телевізора, вимкніть живлення телевізора.
➣ Під’єднуючи зовнішній пристрій, пам’ятайте, що
кольори кабелів повинні відповідати кольорам
роз’ємів.
1 RJP
2 VARIABLE AUDIO OUT
3 VOL-CTRL
4 USB (5V/0.5A) / CLONING
5 HDMI IN 1, 2(ARC), 3(DVI)
6 PC/DVI AUDIO IN
7 HEADPHONE JACK
8 HP-ID
9 ANT IN
0 PC IN
! COMPONENT IN / AV IN
@ DATA
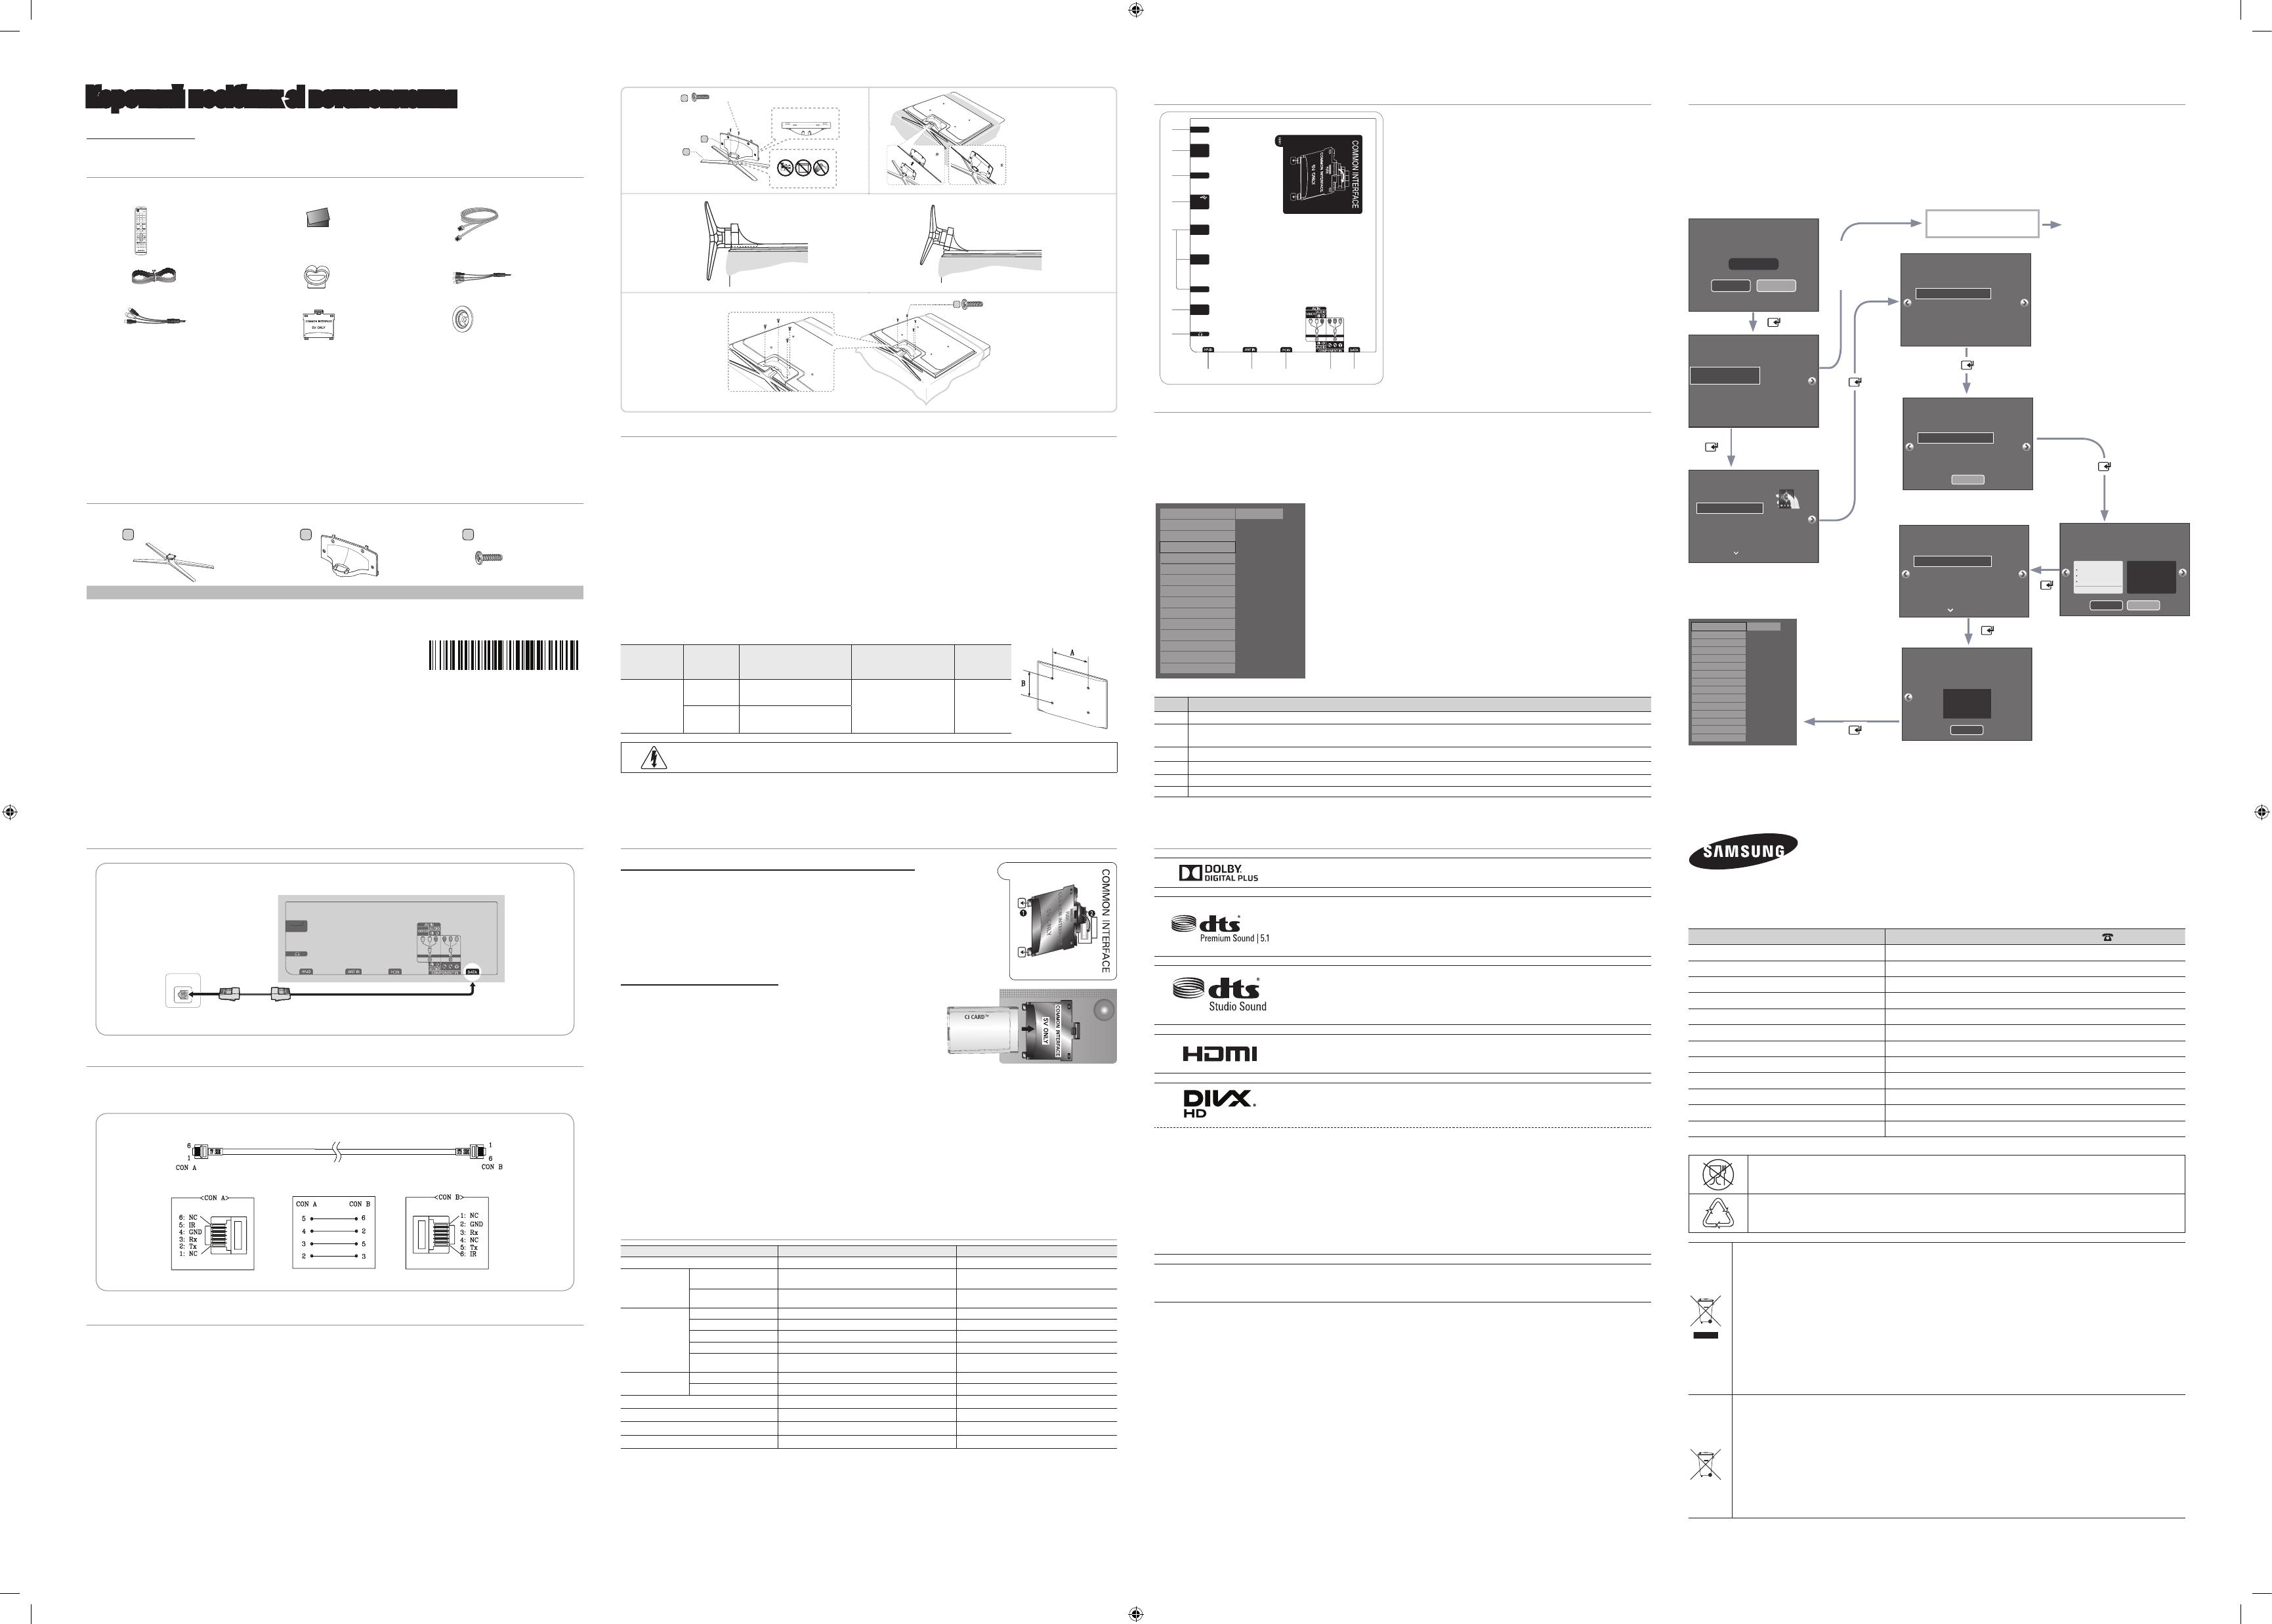
Функція Plug & Play для готельного телевізора
Функция “Plug & Play для отеля” автоматически осуществляет выбор режима отеля, выбор страны,
настройки часов и режима изображения.
– Функция “Plug & Play для отеля” доступна только при первом включении телевизора.
– После установки первого телевизора и копирования настроек из памяти телевизора на устройство USB
– Для настройки следующего телевизора необходимо закрыть экран Hotel Plug & Play (Функция Plug &
Play для отеля), подключить устройство USB и скопировать данные с устройства USB на телевизор.
♦ Інтерфейс користувача
To receive channels, congure the options
below then select Scan.
Auto Tuning
Aerial Air
Channel Type Digital & Analogue
Scan
Select the connected aerial
that you want to use to get
channels.
Auto Tuning Complete.
Auto Tuning
Digital
TV
Radio
Data/Other
Analogue
0
0
0
0
Change Settings
Scan Again
0
Clock
Clock Mode
Date
Time
Time Zone
DST
Auto
--/--/----
--:--
Auto
Off
--:--
You can adjust your time to set DST, Time
Zone and clock mode
Set current date and time
Select your information in the
categories below.
Configure your TV
Country
Picture Mode
Bulgaria
Standard
Select the country that
you're in now
Easy Set up
Interactive
(Hotel Menu)
Standalone Setup
(Continue Setup)
Standalone Only
(End Setup)
If you select this, the
setup process will be
completed and go to
hotel menu
c
Hospitality Mode Standalone System
SI Vendor
OFF
Power On
Channel
Menu OSD
Clock
Music Mode
Remote Jack Pack
External Source
Bathroom Speaker
Eco Solution
Logo/Message
Cloning
REACH Solution
Security
Local Set
Change Local Set if Located in North America, Latin America and Europe.
In other regions, Please press SKIP button move to the next step.
Current Localset : EU
Change Skip
Select your language to start the on screen setup.
English
Eesti
Suomi
Français
Deutsch
Select your Language
Press the ▲▼◄►
buttons to move the
highlight.
Press the enter button
to select.
The Language Setting will be applied to Main Menu and not Plug and Play.
TV Setup Complete!
Your TV is now ready to use.
Ok
Автономный режим
установлен
Телевизор перейдет в
режим RF
При нажатии кнопки “ОК”
в левой части экрана
отображается меню
для отеля. Настройте
необходимые параметры
меню для отеля и
перезагрузите телевизор.
Теперь телевизор можно
использовать.
Если выбран режим
Standalone Plug & Play
(Автономн. Plug & Play)
<В зависимости от региона
данный этап может
отсутствовать.> После
выбора страны в меню
“Страна” на некоторых
моделях может отобразиться
дополнительный параметр
для настройки PIN-кода.
Если вы забыли PIN-код,
в меню отеля выберите
ОБСЛУЖ → ТВ Сброс.
Повторно задайте PIN-код в
меню Plug & Play.
Если выбран
только
автономный
режим
After
Searching the
channels.
Лицензии
Произведено по лицензии Dolby Laboratories. Dolby и символ двойного D являются
товарными знаками Dolby Laboratories.
Manufactured under a license from U.S. Patent No’s: 5,956,674, 5,974,380, 5,978,762,
6,487,535, 6,226,616, 7,212,872, 7,003,467, 7,272,567, 7,668,723, 7,392,195,
7,930,184, 7,333,929 and 7,548,853. DTS, the Symbol, and DTS and the Symbol
together are registered trademarks & DTS Premium Sound is a trademark of DTS, Inc.
©2012 DTS, Inc. All Rights Reserved.
Manufactured under a license from U.S. Patent No’s: 6,285,767, 8,027,477, 5,319,713,
5,333,201, 5,638,452, 5,771,295, 5,970,152, 5,912,976, 7,200,236, 7,492,907,
8,050,434, 7,720,240, 7,031,474, 7,907,736 and 7,764,802. DTS, the Symbol, and
DTS and the Symbol together are registered trademarks & DTS Studio Sound is a
trademark of DTS, Inc. ©2012 DTS, Inc. All Rights Reserved.
The terms HDMI and HDMI High-Denition Multimedia Interface, and the HDMI Logo
are trademarks or registered trademarks of HDMI Licensing LLC in the United States
and other countries.
DivX Certied® to play DivX® video up to HD 1080p, including premium content.
ABOUT DIVX VIDEO: DivX® is a digital video format created by DivX, LLC, a subsidiary of Rovi Corporation. This is an
ofcial DivX Certied® device that has passed rigorous testing to verify that it plays DivX video. Visit divx.com for more
information and software tools to convert your les into DivX videos.
ABOUT DIVX VIDEO-ON-DEMAND: This DivX Certied® device must be registered in order to play purchased DivX
Video-on-Demand (VOD) movies.
To obtain your registration code, locate the DivX VOD section in your device setup menu. Go to vod.divx.com for more
information on how to complete your registration.
DivX®, DivX Certied® and associated logos are trademarks of Rovi Corporation or its subsidiaries and are used under
license.
Covered by one or more of the following U.S. patents: 7,295,673; 7,460,668; 7,515,710; 7,519,274
Open Source License Notice
In the case of using open source software, Open Source Licenses are available on the product menu.
Open Source License Notice is written only English.
[QSG-HC770-EU-RUS]BN68-05850E-01ENG RUS.indd 2 2014-03-05 4:41:43

