Electrolux ESI63010X Руководство пользователя
- Категория
- Посудомоечные машины
- Тип
- Руководство пользователя

user manual
Инструкция по
эксплуатации
Dishwasher
Посудомоечная машина
ESI63010

Electrolux. Thinking of you.
Share more of our thinking at www.electrolux.com
Contents
Safety information 2
Product description 3
Control panel 4
Use of the appliance 5
Setting the water softener 5
Use of dishwasher salt 6
Use of rinse aid 6
Loading cutlery and dishes 7
Use of detergent 9
Setting and starting a washing programme
10
Washing programmes 11
Care and cleaning 12
What to do if… 13
Technical data 15
Installation 15
Water connection 15
Electrical connection 16
Environment concerns 16
Subject to change without notice
Safety information
For your safety and correct operation of
the appliance, read this manual carefully
before installation and use. Always keep
these instructions with the appliance
even if you move or sell it. Users must
fully know the operation and safety fea-
tures of the appliance.
Correct use
• The appliance is designed exclusively for
domestic use.
• Only use the appliance to clean household
utensils that are applicable for dishwash-
ers.
• Do not put solvents in the appliance. Risk
of explosion.
• Put the knives and all items with sharp
points in the cutlery basket with their
points down. If not, put in a horizontal po-
sition in the upper basket.
• Use only branded products for dishwash-
ers (detergent, salt, rinse aid).
• If you open the door while the appliance is
in operation, hot steam can escape. Risk
of skin burns.
•Do not remove dishes from the dishwasher
before the end of the washing programme.
• When the washing programme is comple-
ted, disconnect the mains plug from the
mains socket and close the water tap.
• Only an authorised service engineer can
repair this appliance. Use only original
spare parts.
• Do not do repairs yourself to prevent injury
and damage to the appliance. Always con-
tact your local Service Force Centre.
General safety
• Persons (including children) with reduced
physical sensory, mental capabilities or
lack of experience and knowledge must
not use the appliance. They must have su-
pervision or instruction for the operation of
the appliance by a person responsible for
their safety.
• Obey the safety instructions from the man-
ufacturer of the dishwasher detergent to
prevent burns to eyes, mouth and throat.
• Do not drink the water from the dishwash-
er. Detergent residues can stay in your ap-
pliance.
• Always close the door when you do not
use the appliance to prevent injury and not
to stumble over the open door.
• Do not sit or stand on the open door.
Child safety
• Only adults can use this appliance. Chil-
dren must get supervision to make sure
that they do not play with the appliance.
• Keep all the packaging away from children.
There is a risk of suffocation.
2 electrolux

• Keep all detergents in a safe area. Do not
let children touch the detergents.
• Keep children away from the appliance
when the door is open.
Installation
• Make sure that the appliance is not dam-
aged because of transport. Do not con-
nect a damaged appliance. If necessary,
contact the supplier.
• Remove all packaging before first use.
• A qualified and competent person must do
the electrical installation.
• A qualified and competent person must do
the plumbing installation.
• Do not change the specifications or modify
this product. Risk of injury and damage to
the appliance.
• Do not use the appliance:
– if the mains cable or water hoses are
damaged,
– if the control panel, worktop or plinth
area are damaged, that you can get ac-
cess to the inner side of the appliance.
Contact your local Service Force Centre.
• Do not drill into the sides of the appliance
to prevent damage to hydraulic and elec-
trical components.
Warning! Carefully obey the
instructions for electrical and water
connections.
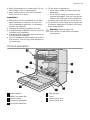
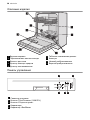
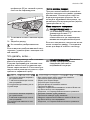
Product description
1 Upper basket
2 Water hardness dial
3 Salt container
4 Detergent dispenser
5 Rinse aid dispenser
6 Rating plate
7 Filters
8 Lower spray arm
9 Upper spray arm
electrolux 3

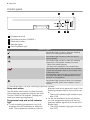
Control panel
123
45
1 Programme knob
2 Start/cancel button (CANCEL)
3 Delay start button
4 Indicator lights
5 On/off indicator light
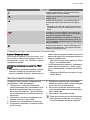
Indicator lights
The indicator light comes on when the washing
phase or the rinsing phase operates.
The indicator light comes on when the drying
phase operates.
The indicator light comes on when the washing
programme is completed. Auxiliary functions:
• Level of the water softener.
• An alarm if the appliance has a malfunction.
1)
The indicator light comes on when it is necessary
to fill the salt container. Refer to the chapter 'Use
of dishwasher salt'.
The salt indicator light can stay on for some hours,
but it does not have an unwanted effect on the
operation of the appliance.
1)
The indicator light comes on when it is necessary
to fill the rinse aid. Refer to the chapter 'Use of
rinse aid'.
1) The indicator light is off while a washing programme operates.
Delay start button
Use the delay start button to delay the start
of the washing programme with an interval of
3 hours. Refer to the chapter 'Setting and
starting a washing programme'.
Programme knob and on/off indicator
light
• To set a washing programme, turn the
programme knob clockwise or anticlock-
wise. The programme marker on the pro-
gramme knob must agree with one of the
washing programmes on the control pan-
el.
– The on/off indicator light comes on (po-
sition ON).
• To set the appliance to the off position,
turn the programme knob until the pro-
gramme marker agrees with the on/off in-
dicator light.
– The on/off indicator light goes off (posi-
tion OFF).
4 electrolux

Use of the appliance
Refer to the following instructions for each
step of procedure:
1. Make a check if the water softener level
is correct for the water hardness in your
area. If necessary set the water softener.
2. Fill the salt container with dishwasher salt.
3. Fill the rinse aid dispenser with rinse aid.
4. Load cutlery and dishes into the dish-
washer.
5. Set the correct washing programme for
the type of load and soil.
6. Fill the detergent dispenser with the cor-
rect quantity of detergent.
7. Start the washing programme.
If you use detergent tablets, refer to the
chapter 'Use of detergent'.
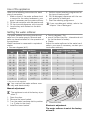
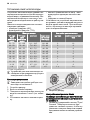
Setting the water softener
The water softener removes minerals and
salts from the water supply. Minerals and
salts can have bad effect on the operation of
the appliance.
Water hardness is measured in equivalent
scales:
• German degrees (dH°).
• French degrees (°TH).
• mmol/l (millimol per litre - international unit
for the hardness of water).
•Clarke.
Adjust the water softener to the water hard-
ness in your area. If necessary, contact your
local water authority.
Water hardness Water hardness setting
°dH °TH mmol/l Clarke manually electronically
51 - 70 91 - 125 9,1 - 12,5 64 - 88 2 10
43 - 50 76 - 90 7,6 - 9,0 53 - 63 2 9
37 - 42 65 - 75 6,5 - 7,5 46 - 52 2 8
29 - 36 51 - 64 5,1 - 6,4 36 - 45 2 7
23 - 28 40 - 50 4,0 - 5,0 28 - 35 2 6
19 - 22 33 - 39 3,3 - 3,9 23 - 27 2 5
15 - 18 26 - 32 2,6 - 3,2 18 - 22 1 4
11 - 14 19 - 25 1,9 - 2,5 13 - 17 1 3
4 - 10 7 - 18 0,7 - 1,8 5 - 12 1 2
< 4 < 7 < 0,7 < 5
1
1)
1
1)
1) No use of salt required.
You must set the water softener man-
ually and electronically.
Manual adjustment
The appliance is set at the factory at po-
sition 2.
1. Open the door.
2. Remove the lower basket.
3. Turn the water hardness dial to position
1 or 2 (refer to the chart).
4. Install the lower basket.
5. Close the door.
Electronic adjustment
The water softener is set at the factory
at level 5.
electrolux 5

1. Press and hold the start/cancel button.
Turn the programme knob clockwise until
the programme marker agrees with the
first washing programme on the control
panel.
2. Release the start/cancel button when the
on/off indicator light and the start/cancel
indicator light start to flash.
– At the same time, the end indicator
light flashes to show the level of the
water softener.
Example:
5 flashes, pause, 5 flashes, pause,
etc... = level 5
3. Press the start/cancel button one time to
increase the water softener level by one
step.
The end indicator light shows the new
level.
4. Turn the programme knob to the off po-
sition to save the operation.
Use of dishwasher salt
Caution! Only use dishwashers salt.
Types of salt that are not applicable for
dishwashers cause damage to the water
softener.
Caution! Grains of salt and salty water
on the bottom of the appliance can
cause corrosion. Fill the appliance with
salt before you start a washing
programme to prevent corrosion.
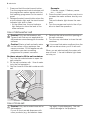
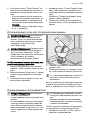
Do these steps to fill the salt container:
1. Turn the cap anticlockwise to open the
salt container.
2. Fill the salt container with 1 litre of water
(only the first operation).
3. Use the funnel to fill the salt container with
salt.
4. Remove the salt around the opening of
the salt container.
5. Turn the cap clockwise to close the salt
container.
It is normal that water overflows from the
salt container when you fill it with salt.
When you set electronically the water soft-
ener to level 1, the salt indicator light does
not stay on.
Use of rinse aid
Caution! Only use branded rinse aid for
dishwashers.
Do not fill the rinse aid dispenser with
other products (e.g. dishwasher clean-
ing agent, liquid detergent). This can
cause damage to the appliance.
6 electrolux

Rinse aid makes it possible to dry the
dishes without streaks and stains.
Rinse aid is automatically added during
the last rinsing phase.
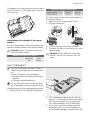
Do these steps to fill the rinse aid dispenser:
1. Press the release button (A) to open the
rinse aid dispenser.
2. Fill the rinse aid dispenser with rinse aid.
The mark 'max.' shows the maximum
level.
3. Remove the spilled rinse aid with an ab-
sorbent cloth to prevent too much foam
during the subsequent washing pro-
gramme.
4. Close the rinse aid dispenser.
Adjusting the rinse aid dosage
The rinse aid is set at the factory at position
4.
You can set the rinse aid dosage between
position 1 (lowest dosage) and position 6
(highest dosage).
1. Turn the rinse aid dial to increase or de-
crease the dosage.
– Increase the dosage if there are water
droplets or limescale on the dishes.
– Decrease the dosage if there are
streaks, whitish stains or bluish layers
on the dishes.
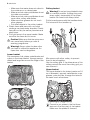
Loading cutlery and dishes
Helpful hints and tips
Caution! Only use the appliance for
household utensils that are applicable
for dishwashers.
Do not use the appliance to clean objects
that can absorb water (sponges, household
cloths, etc.).
• Before you load cutlery and dishes, do
these steps:
– Remove all food remainings and debris.
– Make burnt, remaining food in pans soft.
• While you load cutlery and dishes, do
these steps:
– Load hollow items (e.g. cups, glasses
and pans) with the opening down.
electrolux 7

– Make sure that water does not collect in
the container or in a deep base.
– Make sure that cutlery and dishes do not
lie inside one another.
– Make sure that cutlery and dishes do not
cover other cutlery and dishes.
– Make sure that glasses do not touch
other glasses.
– Put small objects in the cutlery basket.
• Plastic items and pans with non-stick
coatings can keep water droplets. Plastic
items do not dry as well as porcelain and
steel items.
• Put light items in the upper basket. Make
sure that the items do not move.
Caution! Make sure that the spray arms
can move freely before you start a
washing programme.
Warning! Always close the door after
you load or unload the appliance. An
open door can be dangerous.
Lower basket
Put saucepans, lids, plates, salad bowls and
cutlery in the lower basket. Arrange service
dishes and large lids around the edge of the
basket.
Cutlery basket
Warning! Do not put long-bladed knives
in a vertical position. Arrange long and
sharp cutlery horizontally in the upper
basket. Be careful with sharp items.
Put forks and spoons with the handles down.
Put knives with the handles up.
Mix spoons with other cutlery to prevent
them to bond together.
Use the cutlery grid. If the dimensions of the
cutlery prevent the use of the cutlery grid, you
can remove it.
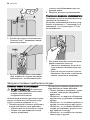
Upper basket
The upper basket is for plates (maximum 24
cm in diameter), saucers, salad bowls, cups,
glasses, pots and lids. Arrange the items to
let water touch all surfaces.
Prevent to put plates in the first three
sectors in the front part of the basket.
Make sure the plates tilt forward.
8 electrolux

Put glasses with long stems in the cup racks
with the stems up. For longer items, fold the
cup racks up.
Adjustment of the height of the upper
basket
If you put large plates in the lower basket, first
move the upper basket to the upper position.
Caution! Adjust the height before you
load the upper basket.
Maximum height of the dishes
upper bas-
ket
lower
basket
Maximum height of the dishes
Upper position 20 cm 31 cm
Lower position 24 cm 27 cm
Do these steps to move the upper basket to
the upper position:
1. Move the front runner stops (A) out.
2. Pull the basket out.
3. Put the basket in the upper position.
4. Put back the front runner stops (A) in their
initial position.
Caution! If the basket is in the upper
position, do not put cups on the cup
racks.
Use of detergent
Only use detergents (powder, liquid or
tablet) that are applicable for dishwash-
ers.
Follow the data on the packaging:
• Dosage recommended by the manu-
facturer.
• Storage recommendations.
Do not use more than the correct quan-
tity of detergent to save an environment.
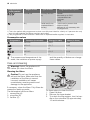
Do these steps to fill the detergent dispenser:
1. Open the lid of the detergent dispenser.
2. Fill the detergent dispenser (A) with de-
tergent. The marking shows the dosage:
20 = approximately 20 g of detergent
30 = approximately 30 g of detergent.
3. If you use a washing programme with
prewash phase, put more detergent in
the prewash detergent compartment (B).
electrolux 9

A
B
4. If you use detergent tablets, put the de-
tergent tablet in the detergent dispenser
(A).
5. Close the lid of the detergent dispenser.
Press the lid until it locks into position.
Use of detergent tablets
Put the detergent tablet in the detergent dis-
penser (A).
Detergent tablets contain:
• detergent
•rinse aid
• other cleaning agents.
Do these steps to use detergent tablets:
1. Make sure that the detergent tablets are
applicable for your water hardness. Refer
to the instructions from the manufacturer.
2. Set the lowest levels of water hardness
and rinse aid dosage.
It is not necessary to fill the salt container
and the rinse aid dispenser.
Do these steps when the drying results
are not satisfactory:
1. Fill the rinse aid dispenser with rinse aid.
2. Set the rinse aid dosage to position 2.
Do these steps to use the detergent
powder again:
1. Fill the salt container and the rinse aid
dispenser.
2. Set the water softener to the highest level.
3. Do a washing programme without
dishes.
4. Adjust the water softener. Refer to the
chapter 'Setting the water softener'.
5. Adjust the rinse aid dosage.
Different brands of detergent dissolve in
different times. Some detergent tablets
do not have the best cleaning results
during short washing programmes. Use
long washing programmes when you
use detergent tablets to fully remove the
detergent.
Setting and starting a washing programme
Do these steps to set and start a washing
programme:
1. Close the door.
2. Turn the programme knob to set the
washing programme. Refer to the chap-
ter 'Washing programmes'.
– The on/off indicator light comes on.
– The phase indicator light for the wash-
ing programme starts to flash.
3. Press the start/cancel button.
– The washing programme starts auto-
matically.
– The start/cancel indicator light comes
on.
– When the programme starts, only the
phase in progress indicator light stays
on.
When the washing programme oper-
ates, you cannot change the pro-
gramme. Cancel the washing pro-
gramme.
Warning! Only interrupt or cancel a
washing programme if necessary.
10 electrolux

Caution! Open the door carefully. Hot
steam can come free.
Cancelling a washing programme
•Press and hold the start/cancel button for
approximately 5 seconds.
– The start/cancel indicator light goes off.
– The phase indicator lights starts to flash.
The washing programme is cancelled.
At this time you can do these steps:
1. Switch off the appliance.
2. Set a new washing programme.
Fill the detergent dispenser with detergent
before you set a new washing programme.
Interrupting a washing programme
Open the door.
• The programme stops.
Close the door.
• The programme continues from the point
of interruption.
Setting and starting a washing
programme with delay start
1. Set a washing programme.
2. Press the delay start button.
– The delay start indicator light comes
on.
3. Press the start/cancel button.
– The countdown of the delay start
starts.
– The phase indicator lights go off.
When the countdown is completed, the
washing programme automatically starts.
• The delay start indicator light goes off.
• The phase indicator light comes on.
Do not open the door during the count-
down to prevent interruption of the
countdown. When you close the door
again, the countdown continues from
the point of interruption.
Cancelling a delay start:
1. Press and hold the start/cancel button for
approximately 5 seconds.
– The start/cancel indicator light and de-
lay start indicator light go off.
– The phase indicator lights start to flash.
2. Press the start/cancel button to start the
washing programme.
End of the washing programme
Switch off the appliance in these conditions:
• The appliance stops automatically.
• The end indicator light comes on.
For better drying results, keep the door ajar
for some minutes before you remove the
dishes.
Let the dishes cool down before you remove
them from the appliance. Hot dishes are
easily damaged.
Removing the load
• First remove items from the lower basket,
then from the upper basket.
• There can be water on the sides and door
of the appliance. Stainless steel becomes
cool more quickly than the dishes.
Washing programmes
Washing programmes
Programme and
knob position
Degree of soil Type of load Programme description
Heavy soil Crockery, cutlery,
pots and pans
Prewash
Main wash up to 70°C
2 intermediate rinses
Final rinse
Drying
Normal soil Crockery and cut-
lery
Prewash
Main wash up to 65°C
2 intermediate rinses
Final rinse
Drying
1)
Normal or light soil Crockery and cut-
lery
Main wash up to 60°C
Final rinse
electrolux 11

Programme and
knob position
Degree of soil Type of load Programme description
2)
Normal soil Crockery and cut-
lery
Prewash
Main wash up to 50°C
1 intermediate rinse
Final rinse
Drying
Any Partial load (to be
completed later in
the day).
1 cold rinse (to prevent food
scraps to bond).
Detergent is not necessary with
this programme.
1) This is the perfect daily programme to clean a not fully load. Ideal for a family of 4 persons who only
want to load breakfast and dinner crockery and cutlery.
2) Test programme for test institutes. Please refer to separate leaflet supplied, for test data.
Consumption values
Programme Duration (in minutes) Energy (in kWh) Water (in litres)
120-130 1,8-2,0 22-24
105-115 1,5-1,7 23-25
30 0,9 9
130-140 1,0-1,2 14-16
12 0,1 5
The pressure and temperature of the
water, the variations of power supply
and the quantity of dishes can change
these values.
Care and cleaning
Warning! Switch the appliance off
before you clean the filters.
Cleaning the filters
Caution! Do not use the appliance
without the filters. Make sure that the
installation of the filters is correct.
Incorrect installation will cause
unsatisfactory washing results and
damage to the appliance.
If necessary, clean the filters. Dirty filters de-
crease the washing results.
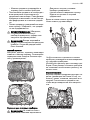
The dishwasher has three filters:
1. coarse filter (A)
2. microfilter (B)
3. flat filter (C)
A
B
C
A
B
C
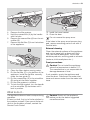
Do these steps to clean the filters:
1. Open the door.
2. Remove the lower basket.
3. To unlock the filter system, turn the han-
dle on the microfilter (B) approximately
1/4 anticlockwise.
12 electrolux

4. Remove the filter system.
5. Hold the coarse filter (A) by the handle
with the hole.
6. Remove the coarse filter (A) from the mi-
crofilter (B).
7. Remove the flat filter (C) from the bottom
of the appliance.
D
8. Clean the filters below running water.
9. Put the flat filter (C) in the bottom of the
appliance. Install the flat filter correctly
under the two guide (D).
10. Put the coarse filter (A) in the microfilter
(B) and push the filters together.
11. Put the filter system in position.
12. To lock the filter system, turn the handle
on the microfilter (B) clockwise until it
lock in position.
13. Install the lower basket.
14. Close the door.
Do not remove the spray arms.
If the holes in the spray arms become clog-
ged, remove remaining parts of soil with a
cocktail stick.
External cleaning
Clean the external surfaces of the appliance
and control panel with a damp soft cloth.
Only use neutral detergents. Do not use
abrasive products, scouring pads or solvents
(acetone, trichloroethylene etc...).
Frost precautions
Caution! Do not install the appliance
where the temperature is below 0 °C.
The manufacturer is not responsible for
damage because of frost.
If not possible, empty the appliance and
close the door. Disconnect the water inlet
hose and remove water from the water inlet
hose.
What to do if…
The appliance does not start or stops during
operation.
If there is a fault, first try to find a solution to
the problem yourself. If you cannot find a sol-
ution to the problem yourself, contact the
Service Force Centre.
Caution! Switch off the appliance
before you do the below suggested
corrective actions.
electrolux 13

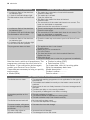
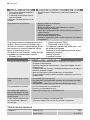
Fault code and malfunction Possible cause and solution
• continuous flash of the start/can-
cel indicator light
• 1 flash of the end indicator light
The dishwasher does not fill with wa-
ter
• The water tap is blocked or furred with limescale.
Clean the water tap.
• The water tap is closed.
Open the water tap.
• The filter in the water inlet hose is blocked.
Clean the filter.
• The connection of the water inlet hose is not correct. The
hose can be kinked or squashed.
Make sure that the connection is correct.
• continuous flash of the start/can-
cel indicator light
• 2 flashes of the end indicator light
The dishwasher will not drain
• There is a blockage in the sink spigot.
Clean the sink spigot.
• The connection of the water drain hose is not correct. The
hose can be kinked or squashed.
Make sure that the connection is correct.
• continuous flash of the start/can-
cel indicator light
• 3 flashes of the end indicator light
The anti-flood device operates
• Close the water tap and contact your local Service Force
Centre.
The programme does not start • The appliance door is not closed.
Close the door.
• Mains plug is not connected in.
Put in the mains.
• The fuse has blown out in the household fuse box.
Replace the fuse.
• Delay start is set.
Cancel the delay start to start the programme immediately.
After the check, switch on the appliance. The
programme continues from the point of in-
terruption. If the malfunction shows again,
contact your Service Force Centre.
These data are necessary to help you quickly
and correctly:
•Model (Mod.)
• Product number (PNC)
• Serial number (S.N.)
For these data, refer to the rating plate.
Write the necessary data here:
Model description : ..........
Product number : ..........
Serial number : ..........
The cleaning results are not satisfactory
The dishes are not clean • The selected washing programme is not applicable for the type of
load and soil.
• The baskets are loaded incorrectly so that water cannot reach all
surfaces.
• Spray arms do not turn freely because of incorrect arrangement of
the load.
• The filters are dirty or not correctly installed.
• The quantity of detergent is too little or missing.
Limescales particles on the
dishes
• The salt container is empty.
• The water softener is adjusted on a wrong level.
• The salt container cap is not closed correctly.
The dishes are wet and dull • No rinse aid has been used.
• The rinse aid dispenser is empty.
There are streaks, milky spots
or a bluish coating on glasses
and dishes
• Decrease the rinse aid dosage.
Dry water drop signs on
glasses and dishes
• Increase rinse aid dosage.
• The detergent can be the cause.
14 electrolux

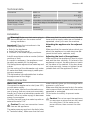
Technical data
Dimensions Width cm 59,6
Height cm 81,8-87,8
Depth cm 57,5
Electrical connection - Voltage -
Overall power - Fuse
Information on the electrical connection is given on the rating plate
on the inner edge of the dishwasher door.
Water supply pressure Minimum 0,5 bar (0,05 MPa)
Maximum 8 bar (0,8 MPa)
Capacity Place settings 12
Installation
Warning! Make sure that mains plug is
disconnected from the mains socket
during installation.
Important! Obey the instructions in the
enclosed template to:
• Build-in the appliance.
• Install the furniture panel.
• Connect to the water supply and drain.
Install the appliance under a counter (kitchen
worktop or sink).
If a repair is necessary, the appliance must
be easily accessible for the engineer.
Put the appliance adjacent to a water tap and
a drain.
For the venting of the dishwasher only water
fill, water drain and power supply cable open-
ings are necessary.
The dishwasher has adjustable feet to allow
the adjustment of the height.
Make sure that the water inlet hose, the drain
hose and the supply cable are not kinked or
squashed, when you insert the machine.
Attaching the appliance to the adjacent
units
Make sure that the counter below which you
attach the appliance is a safe structure (ad-
jacent kitchen units, cabinets, wall).
Adjusting the level of the appliance
Make sure that the appliance is level to close
and seal the door correctly. If the level of the
appliance is correct, the door does not catch
on the sides of the cabinet. If the door does
not close correctly, loosen or tighten the ad-
justable feet until the appliance is level.
Water connection
Water inlet hose
Connected the appliance to a hot (max. 60°)
or cold water supply.
If the hot water comes from alternative sour-
ces of energy that are more environmentally
friendly (e.g. solar or photovoltaic panels and
aeolian), use a hot water supply to decrease
energy consumption.
Connect the inlet hose to a water tap with an
external thread of 3/4”.
Caution! Do not use connection hoses
from an old appliance.
The water pressure must be in the limits (refer
to 'Technical data'). Make sure that the local
water authority gives you the average mains
pressure in your area.
Make sure that there are no kinks in the water
inlet hose and that the water inlet hose is not
squashed or entangled.
Fit the locknut correctly to prevent water
leaks.
Caution! Do not connect the appliance
to new pipes or pipes that are not used
for a long time. Let the water run for
some minutes, then connect the inlet
hose.
electrolux 15

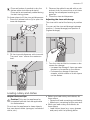
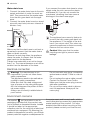
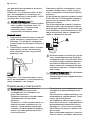
Water drain hose
1. Connect the water drain hose to the sink
spigot and attach it under the work sur-
face. This prevents that the waste water
from the sink goes back into the appli-
ance.
2. Connect the water drain hose to a stand
pipe with vent-hole (minimum internal di-
ameter 4 cm).
max 85 cm
min 40 cm
max 400 cm
Make sure that the drain hose is not bent or
squashed to prevent that the water drains
does not drain correctly.
Remove the sink plug when the appliance
drains the water to prevent that the water
goes back into the appliance.
A drain hose extension must not be longer
than 2 m. The internal diameter must not be
smaller than the diameter of the hose.
If you connect the water drain hose to a trap
spigot under the sink, remove the plastic
membrane (A). If you do not remove the
membrane, remaining food can cause a
blockage in the drain hose spigot
The appliance has a security feature to
prevent that dirty water goes back into
the appliance. If, the spigot of the sink
has a 'non-return valve', this valve can
cause the appliance to drain incorrectly.
Remove the non-return valve.
Caution! Make sure that the water
couplings are tight to prevent water
leakage.
Electrical connection
Warning! The manufacturer is not
responsible if you do not follow these
safety precautions.
This appliance needs to be earthed ac-
cording to safety precautions.
Make sure that the rated voltage and
type of power on the rating plate agree
with the voltage and the power of the lo-
cal power supply.
Always use a correctly installed shock-
proof socket.
Do not use multi-way plugs, connectors
and extension cables. There is a risk of
fire.
Do not replace the mains cable yourself.
Contact the Service Force Centre.
Make sure that the mains plug is acces-
sible after installation.
Do not pull the mains cable to discon-
nect the appliance. Always pull the
mains plug.
Environment concerns
The symbol on the product or on its
packaging indicates that this product may
not be treated as household waste. Instead
it should be taken to the appropriate
collection point for the recycling of electrical
and electronic equipment. By ensuring this
product is disposed of correctly, you will help
prevent potential negative consequences for
the environment and human health, which
could otherwise be caused by inappropriate
waste handling of this product. For more
detailed information about recycling of this
product, please contact your local council,
16 electrolux

your household waste disposal service or the
shop where you purchased the product.
The packaging materials are environmentally
friendly and can be recycled. The plastic
components are identified by markings, e.g.
>PE<, >PS<, etc. Discard the packaging
materials in the applicable container at the
community waste disposal facilities.
Warning! To discard the appliance,
follow the procedure:
• Pull the mains plug out of the socket.
• Cut off the mains cable and mains
plug and discard them.
• Discard the door catch. This prevents
the children to close themselves in-
side the appliance and endanger their
lives.
electrolux 17

Electrolux. Thinking of you.
Обменяйтесь с нами своими мыслями на
www.electrolux.com
Содержание
Сведения по технике безопасности
18
Описание изделия 20
Панель управления 20
Эксплуатация изделия 21
Установка смягчителя воды 22
Использование соли для
посудомоечных машин 23
Использование ополаскивателя 23
Загрузка столовых приборов и посуды
24
Использование моющих средств 26
Выбор и запуск программы мойки 28
Программы мойки 29
Уход и чистка 30
Что делать, если ... 31
Технические данные 32
Установка 33
Подключение к водопроводу 33
Подключение к электросети 34
Охрана окружающей среды 35
Право на изменения сохраняется
Сведения по технике безопасности
Для собственной безопасности и
правильной эксплуатации машины
перед ее установкой и использова‐
нием внимательно прочитайте на‐
стоящее руководство. Всегда храни‐
те настоящие инструкции вместе с
машиной, даже если передаете или
продаете ее. Пользователи должны
хорошо знать, как работает машина,
и правила безопасности при ее
эксплуатации.
Правильное применение
• Данный прибор предназначен только
для бытового применения.
• Используйте прибор только для мытья
бытовой посуды, пригодной для посу‐
домоечных машин.
• Не заливайте в прибор никаких рас‐
творителей. Опасность взрыва.
• Ножи и прочие заостренные предметы
кладите в корзину для столовых при‐
боров острием вниз. Если это невоз‐
можно, кладите их горизонтально в
верхнюю корзину.
• Используйте только фирменную про‐
дукцию для посудомоечных машин
(моющее средство, соль, ополаскива‐
тель).
• Если открыть дверцу прибора во вре‐
мя его работы, из него может вырвать‐
ся горячий пар. Опасность ожога кожи.
• Не вынимайте посуду из посудомоеч‐
ной машины до завершения програм‐
мы мойки.
• Когда программа мойки закончится,
выньте вилку сетевого шнура из ро‐
зетки и закройте кран подачи воды.
• Ремонтировать этот прибор разре‐
шается только уполномоченному спе‐
циалисту. Применяйте только ориги‐
нальные запасные части.
• Не выполняйте ремонт самостоятель‐
но во избежание получения травм и
повреждения прибора. Всегда обра‐
щайтесь в местный сервисный центр.
Общие правила техники безопасности
• Лица (включая детей) с нарушенными
физическими сенсорными или ум‐
ственными способностями или с недо‐
статком опыта или знаний не должны
пользоваться данным прибором. Они
должны находиться под присмотром
или получать инструкции от лица, от‐
ветственного за их безопасность.
• Соблюдайте инструкции по технике
безопасности от производителя мою‐
щего средства для посудомоечных ма‐
18 electrolux

шин, чтобы предотвратить ожоги глаз,
рта и горла.
• Не пейте воду из посудомоечной ма‐
шины. В машине могут быть остатки
моющего средства.
• Чтобы предотвратить травмы и не
споткнуться об открытую дверцу, все‐
гда закрывайте ее, если не пользуе‐
тесь машиной.
• Не садитесь и не вставайте на откры‐
тую дверцу.
Безопасность детей
• Этим прибором могут пользоваться
только взрослые. Следите за тем, что‐
бы маленькие дети не играли с прибо‐
ром.
• Храните все упаковочные материалы
в недоступном для детей месте. Су‐
ществует риск смерти от удушения.
• Храните все моющие средства в без‐
опасном месте. Не позволяйте детям
прикасаться к моющим средствам.
• Не подпускайте детей к посудомоеч‐
ной машине, когда ее дверца открыта.
Установка
• Убедитесь, что машина не поврежде‐
на при транспортировке. Не подклю‐
чайте поврежденную машину. При не‐
обходимости свяжитесь с поставщи‐
ком.
• Перед тем, как приступать к
эксплуатации, удалите всю упаковку.
• Подключение к электросети должно
выполняться квалифицированным
компетентным лицом.
• Подключение к сети водоснабжения и
канализации должно выполняться ква‐
лифицированным компетентным ли‐
цом.
• Не меняйте технические характери‐
стики или конструкцию этого изделия.
Риск получения травм или поврежде‐
ния изделия.
•Не включайте машину:
– если повреждены кабель электропи‐
тания или шланги для воды,
– если панель управления, рабочая
поверхность или цоколь поврежде‐
ны настолько, что стала доступной
внутренняя часть машины.
Обращайтесь в местный авторизован‐
ный сервисный центр.
• Не сверлите боковые стенки машины,
чтобы не повредить гидравлические
или электрические компоненты.
ВНИМАНИЕ! Строго
придерживайтесь инструкций по
подключению к сетям электро- и
водоснабжения.
electrolux 19

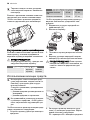
Описание изделия
1 Верхняя корзина
2 Переключатель жесткости воды
3 Емкость для соли
4 Дозатор моющих средств
5 Дозатор ополаскивателя
6 Табличка технических данных
7 Фильтры
8 Нижний разбрызгиватель
9 Верхний разбрызгиватель
Панель управления
123
45
1 Селектор программ
2 Кнопка «Пуск/Отмена» (CANCEL)
3 Кнопка «Отсрочка пуска»
4 Индикаторы
5 Индикатор «Вкл/Выкл»
20 electrolux
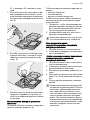
Страница загружается ...
Страница загружается ...
Страница загружается ...
Страница загружается ...
Страница загружается ...
Страница загружается ...
Страница загружается ...
Страница загружается ...
Страница загружается ...
Страница загружается ...
Страница загружается ...
Страница загружается ...
Страница загружается ...
Страница загружается ...
Страница загружается ...
Страница загружается ...
-
 1
1
-
 2
2
-
 3
3
-
 4
4
-
 5
5
-
 6
6
-
 7
7
-
 8
8
-
 9
9
-
 10
10
-
 11
11
-
 12
12
-
 13
13
-
 14
14
-
 15
15
-
 16
16
-
 17
17
-
 18
18
-
 19
19
-
 20
20
-
 21
21
-
 22
22
-
 23
23
-
 24
24
-
 25
25
-
 26
26
-
 27
27
-
 28
28
-
 29
29
-
 30
30
-
 31
31
-
 32
32
-
 33
33
-
 34
34
-
 35
35
-
 36
36


Electrolux ESI63010X Руководство пользователя
- Категория
- Посудомоечные машины
- Тип
- Руководство пользователя
Задайте вопрос, и я найду ответ в документе
Поиск информации в документе стал проще с помощью ИИ
на других языках
- English: Electrolux ESI63010X User manual