
KWMT 1070 / 1485 / 0860СТИРАЛЬНАЯ МАШИНА

2
Поздравляем Вас с приобретением продукции KÖRTING!
Перед использованием новой техники внимательно изучите Руководство Пользователя. Соблюдение
правил безопасности, эксплуатации и профилактики, обеспечит длительный срок использования
прибора, а также позволит сэкономить Ваше время и деньги.
Пожалуйста, сохраните данное Руководство Пользователя, и используйте в течение всего срока
службы.
Нам очень важно Ваше мнение о нашем продукте.
Мы будем признательны, если Вы пришлете свои наблюдения по работе, качеству исполнения и
удобству пользования купленного Вами товара на адрес: info@korting.ru
ВНИМАНИЕ! ДАННЫЙ ПРИБОР ПРЕДНАЗНАЧЕН ТОЛЬКО ДЛЯ ИСПОЛЬЗОВАНИЯ В
ДОМАШНИХ УСЛОВИЯХ И НЕ ПРЕДНАЗНАЧЕН ДЛЯ ИСПОЛЬЗОВАНИЯ В ИНЫХ, В ТОМ
ЧИСЛЕ, КОММЕРЧЕСКИХ ЦЕЛЯХ И ПУБЛИЧНЫХ МЕСТАХ. ГАРАНТИЯ СОХРАНЯЕТСЯ
ТОЛЬКО ПРИ СЛЕДОВАНИИ ЭТИМ УСЛОВИЯМ.
ВНИМАТЕЛЬНО ОЗНАКОМЬТЕСЬ С ДАННЫМ РУКОВОДСТВОМ ПО ЭКСПЛУАТАЦИИ,
ПРЕЖДЕ ЧЕМ ПРИСТУПИТЬ К ИСПОЛЬЗОВАНИЮ ДАННОГО ПРИБОРА. В ДАННОМ
РУКОВОДСТВЕ СОДЕРЖИТСЯ ВАЖНАЯ ИНФОРМАЦИЯ О ТЕХНИКЕ БЕЗОПАСНОСТИ
ВО ВРЕМЯ УСТАНОВКИ, ЭКСПЛУАТАЦИИ, РЕМОНТА, УХОДА, А ТАКЖЕ ПЕРЕМЕЩЕНИЯ
ДАННОГО ПРИБОРА.
ИНФОРМАЦИЯ О ПРИБОРЕ
ВНИМАНИЕ! НА СТИРАЛЬНОЙ МАШИНЕ
ИМЕЕТСЯ СЕРВИСНАЯ ТАБЛИЧКА,
ИНФОРМАЦИЯ ИЗ КОТОРОЙ МОЖЕТ
ПОНАДОБИТЬСЯ ПРИ СЕРВИСНОМ
ОБРАЩЕНИИ. НЕ ОТРЫВАЙТЕ ЕЁ.
Сервисная линия KÖRTING может уточнить у вас
информацию:
Название модели
Серийный номер прибора
Артикульный номер прибора
22
SM3130
EN
pump W
model
220 V
N ° 204276237
kg wash
kg dry
A
total w
heating wash W
heating dryer W
wash motor W
spin motor W
dryer motor W
Hz
5 / 100 N/cm
2
26
If the appliance is not working properly, check through the following troubleshooting list before calling
for technical assistance.In some models malfunctions are shown with a code at the end of the cycle.
Code: E:00 Carry out all checks listed in paragraphed marked with *
E:01 Carry out all checks listed in paragraphed marked with **
E:02 Technical malfunction “Call Customer Service”
E:03 Technical malfunction “Call Customer Service”
The washing machine does not work (warning
lights are off) (Display off)
• check that:
1) The mains power supply is working
2) The plug is inserted correctly in the socket
3) The On/Off button has been pressed, or if
there isn’t any, that the programming knob is
positioned on a program.
The washing machine does not work (warning
lights are off) (Display on)*
• check that:
1) The program has been selected
2) The Top is closed properly
3) The ”Start” button has been pressed (elec
-
tronic models only)
4) check the indications provided under ”The
washing machine does not fill with water”
The washing machine does not fill with water*:
• check that:
1) There is water in the water supply system
2) The water supply hose is connected to the
washing machine
3) The water supply tap is open
4) The filter is not blocked. If it is, clean the
filter after unplugging the appliance from the
power supply
The washing machine continuously fills and
drains the water**:
• check that:
1) The drain hose has been installed at the
proper height (60-90 cm)
2) The end of the drain hose is not under water
The washing machine does not drain or spin**:
• check that:
1) The drain hose is properly connected
2) The drain hose is not bent
3) The drainage filter is not blocked
4) The no-spin function has not been selected
5) The “stop with water” function has not been
selected.
The washing machine vibrates and is noisy
• check that:
1) All the blocking elements used for transporta
-
tion have been removed.
2) the washing machine is level
3) Bulky items such as sheets, tablecloths etc.
are not all in one part of the drum
The top does not open
• check that:
1) the wash cycle is finished.
2) the “stop with water” function has not been
selected (automatic on some models).
The washing has not been properly spun
• check that:
1) The washing is evenly distributed in the drum
2) The correct spin speed has been selected
The washing machine stops during the wash
• check that:
1) The mains power supply is working
There is still a lot of detergent in the compart
-
ment
• check that:
1) The water supply tap is open
2) The filter between the tap and the supply
hose is clean
TROUBLESHOOTING
MAINTENANCE
If, after trying the above remedies, the machine still does not work, refer
the fault to the nearest authorised service centre.
When calling the service centre, inform them of the machine model, the
serial number and the type of fault.
This information will allow the technical service staff to select the ap-
propriate spare parts, thus making the repair service quicker and more
efficient (fig. 26).

3
ОБЩИЕ РЕКОМЕНДАЦИИ
Символ перечеркнутого контейнера для отходов на изделии означает, что после
истечения его срока службы утилизация осуществляется отдельно от бытовых от-
ходов; изделие необходимо сдать в специализированный пункт сбора электриче-
ских и электронных приборов с истекшим сроком службы или передать дилеру во
время приобретения нового аналогичного прибора.
Во время утилизации пользователь несет ответственность за сдачу устройства на
соответствующий пункт сбора. Невыполнение этого условия повлечет санкции,
предусмотренные действующим законодательством по утилизации отходов. Раз-
дельная утилизация необходима для того, чтобы вышедший из строя или
устаревший прибор можно было передать для экологически безопасной пе-
реработки, обработки и разборки, во избежание возможного отрицательного воздействия на
окружающую среду или угрозы здоровью, а также для повторного использования составляющих
материалов.
Более подробную информацию об имеющихся системах сбора можно получить в местных службах
по утилизации или в торговой точке, где прибор был приобретен.
ВНИМАНИЕ! ПРОИЗВОДИТЕЛЬ НЕ НЕСЕТ ГРАЖДАНСКОЙ ИЛИ УГОЛОВНОЙ
ОТВЕТСТВЕННОСТИ В СЛУЧАЕ НЕКАЧЕСТВЕННОЙ ИЛИ НЕПРАВИЛЬНОЙ
УСТАНОВКИ ПРИБОРА.ПРОИЗВОДИТЕЛЬ ОСТАВЛЯЕТ ЗА СОБОЙ ПРАВО НА
ВНЕСЕНИЕ ВСЕХ НЕОБХОДИМЫХ И ПОЛЕЗНЫХ ИЗМЕНЕНИЙ В СВОИ ИЗДЕЛИЯ БЕЗ
ПРЕДВАРИТЕЛЬНОГО УВЕДОМЛЕНИЯ.
Упаковочные материалы утилизируются в соответствии с действующими местными стандартами.
Перед установкой или эксплуатацией прибора следует внимательно ознакомиться с данной ин-
струкцией для получения всей необходимой информации по установке, техническому обслужива-
нию и эксплуатации.
Данную инструкцию следует хранить вместе с прибором в течение всего срока его службы, а также
на случай передачи прибора другим пользователям.
Данный прибор предназначен только для бытового использования. Прочее применение, отличное
от указанного в данном руководстве, считается некорректным и – как следствие – опасным.
Данное бытовое устройство соответствует положениям Директивы EU 2012/19/EU.

4
15
SM3130
NOTES AND ADVICE FOR THE USER
DESCRIPTION OF THE APPLIANCE
A - Top cover
B - Drum
C - Detergent compartment
D - Control panel
E - Filter door
F - Feet
EN
Unplug the washing ma-
chine from the power
supply before servicing
and cleaning.
Do not plug-in or un-
plug the machine with
wet hands.
The power supply sock-
et must be earthed and
must comply with the
safety requirements.
Extension leads or mul-
tiple adapters must not
be used to connect the
washing ma chine to
the mains supply..
After the end of each
washing cycle it is ad-
visable to unplug the
machine and shut-off
the water supply.
The washing machine
can be opened only
after the led or display
indicate the end of the
cycle. On some models,
this is indicated by the
start button flashing.
To disconnect the ma-
chine from the power
supply, pull the plug and
not the cable.
Do not expose the ap-
pliance to atmospheric
agents.
1
A
B
C
D
E
F
A - Загрузочный люк
B - Барабан
C - Диспенсер
D - Панель управления
E - Крышка фильтра
F - Ножки
16
SM3130
For transportation, the machine’s oscillating parts are
blocked by two spacers with screws.
Remove these spacers and screws before starting the
machine.
Preserve them for any future moves.
Close the holes with the caps provided inside of the document bag.
INSTALLING THE MACHINE
The machine must be installed by qualified personnel following the manufacturer’s
instructions. Incorrect installation can lead to injuries for persons and damage to
objects.
When deciding where to install the washing machine, consider the following advice:
▼ The room must have a water and electrical system. (Remember that cables
and hoses at the back of the washing machine must not be crushed).
▼ The washing machine must be placed on a flat and solid surface.
▼ Do not install the machine in a room where the temperature could go below
3°C.
▼ Place the machine in the chosen location and remove external packaging (fig.
2).
▼ Lift the washing machine and remove the polystyrene base and the plastic
spacer (fig. 3).
This appliance is intended to be used in household and similar applications such as:
▼ Staff kitchen areas in shops, offices and other working environments;
▼ Farm houses;
▼ By clients in hotels, motels and other residential type environments;
▼ Bed and breakfast type environments.
EN
3
4
2
5
▼ Incline the washing machine and extract the two internal polystyrene corner
pieces (if present) by pulling the two cardboard strips, first E and then F (fig.5).
▼ Remove the polystyrene spacer (fig. 6).
F
E
6
UNPACKING AND UNBLOCKING THE MACHINE
17
SM3130
EN
INSTALLING THE MACHINE
9
LEVELLING THE WASHING MACHINE
WHERE PROVIDED, use the handling wheel to help moving. To use it, push the lever
on the bottom right moving it to the other side. Move the lever back to the original
position after moving (fig.8).
UNPACKING AND UNBLOCKING THE MACHINE
8
7
▼ Remove the polystyrene spacer (fig. 7).
10
11
CONNECTING TO THE POWER SUPPLY
Make sure that the voltage indicated on the identification plate
attached to the inside of the filter door corresponds to that of the
mains supply (fig. 10)
All cut-outs, electric wiring and mains sockets must have a rating such that
enables them to support the maximum load indicated on the identification plate.
Once the appliance has been installed, it must be connected to the mains supply
through a single-pole switch.
The mains supply to which the appliance is connected must be fitted with an
earthing system. If this is not the case, the manufacturer will not be held liable
for any incidents that may occur (fig. 11).
If the mains socket to which the appliance is connected is faulty or unsuitable,
it must be replaced by a qualified electrician.
The washing machine must not be connected to the mains supply using indirect
methods such as extension leads or multiple adapters.
During maintenance work, the washing machine must be disconnected from
the mains electricity supply.
Having chosen the adapt place, set the adjustable feet well so that the machine is
level (Fig. 9).
Pay particular attention to the choice of the position, to levelling the washing machine
and to securing the counternuts.
If the washing machine is not levelled correctly, it will be instable
and make noise when operating causing damage.
If the machine is placed on a rug, make sure that air circulates freely between the
washing machine and the floor.
18
SM3130
INSTALLING THE MACHINE
EN
WATER CONNECTION
The mains water pressure must be between 0.05 and 1.00 MPa
(0,5 - 10 bar.)
▼ Before connection, open the tap and let the water run in order to clean the pipes
from impurities like sand and rust. (This operation is very important when the
washing machine has been inactive for a long time or when connected to new
piping).
▼ The water supply hose must be connected to the cold water outlet with a 3/4”
threaded opening.
▼ Connect the supply hose (fig. 12/13).
Use the new hose provided with the machine. Do not reuse the
old one.
Do not connect to the hot water supply.
▼ The water supply tap must be completely open during washing.
▼ Connect the drain hose to a drain piping or wall drain between 60 and 90 cm
from the ground without squeezing it (fig.14).
▼ If the water drains directly into the drain piping, the free end of the machine
hose must be inserted in the piping with an inside diameter no smaller than 40
mm.
▼ If water is drained into the washbasin or another drain, the free end of the hose
must be previously reinforced at the bending with an appropriate hook, provided
with the washing machine. Then place the hose at the edge of the washbasin
and fix the hook to prevent the hose from falling (fig. 15). The washbasin must
have its drain clean to allow water to drain freely.
12
13
14
15
INSTALLING THE MACHINE
Do not insert or remove the plug from the mains socket with wet hands.
If the power supply cable is damaged in any way, contact the appropriate specialised service centre.
The plug used to connect the machine to the power supply must never be fixed behind the machine,
but must be in a position easily accessible in an emergency.

5
18
SM3130
INSTALLING THE MACHINE
EN
WATER CONNECTION
The mains water pressure must be between 0.05 and 1.00 MPa
(0,5 - 10 bar.)
▼ Before connection, open the tap and let the water run in order to clean the pipes
from impurities like sand and rust. (This operation is very important when the
washing machine has been inactive for a long time or when connected to new
piping).
▼ The water supply hose must be connected to the cold water outlet with a 3/4”
threaded opening.
▼ Connect the supply hose (fig. 12/13).
Use the new hose provided with the machine. Do not reuse the
old one.
Do not connect to the hot water supply.
▼ The water supply tap must be completely open during washing.
▼ Connect the drain hose to a drain piping or wall drain between 60 and 90 cm
from the ground without squeezing it (fig.14).
▼ If the water drains directly into the drain piping, the free end of the machine
hose must be inserted in the piping with an inside diameter no smaller than 40
mm.
▼ If water is drained into the washbasin or another drain, the free end of the hose
must be previously reinforced at the bending with an appropriate hook, provided
with the washing machine. Then place the hose at the edge of the washbasin
and fix the hook to prevent the hose from falling (fig. 15). The washbasin must
have its drain clean to allow water to drain freely.
12
13
14
15
INSTALLING THE MACHINE
Do not insert or remove the plug from the mains socket with wet hands.
If the power supply cable is damaged in any way, contact the appropriate specialised service centre.
The plug used to connect the machine to the power supply must never be fixed behind the machine,
but must be in a position easily accessible in an emergency.
19
SM3130
The washing machine has a compartment for detergent and additives with three
chambers (fig. 19).
prewash detergent chamber.
main wash detergent chamber.
rinsing liquid, softener, fragrance and starch chamber.
Use reduced foam detergents and softeners (if needed) for automatic washing ma
-
chines. Follow instructions on the package for dosages. When water is particularly
hard, use water softener together with the detergent, preventing scaling from forming
on the heat element.
WASHING MACHINE USE
Use of liquid detergent is possible only for programs without
prewash.
▼ High quantities of detergent can produce too much foam and affect
washing results negatively. Too little detergent causes insufficient
washing.
▼ When filling the chamber with detergent, it is important that is does
not go into the softener part since there would be rinsing with foam
and fabrics could have white stains. Vice versa, if softener goes
into the detergent section it would be less effective.
EN
INFORMATION BEFORE USE
There could be a small amount of water inside the machine due
to inspection tests. Before washing laundry for the first time, it
is advised to run a brief wash cycle without laundry or detergent
in order to clean the drum.
Attention: it is important to open and close the drum carefully to avoid
damage to the laundry and washing machine
At each wash cycle make sure that:
▼ Hydraulic connections are correct, the drain hose well positioned, (see hydraulic
connection) and the tap is open (fig. 14/15).
▼ Insert the plug in the socket with dry hands.
▼ Sort the laundry according to the type of fabric (see item labelling).
▼ Make sure there are no objects in the pockets of the clothing to be washed
which could cause damage to laundry, the machine or the filter
▼ Open the top of the washing machine lightly pressing downwards before lifting it.
▼ Open the drum doors holding both parts with one hand and pressing the open
-
ing button with the other (fig. 16).
▼ Put the laundry in the drum being careful not to exceed the maximum program
load indicated in the separate program table.
▼ Close the drum doors making sure they are well hooked.
▼ Press down first the front half and then the back so that the closing hooks are
inserted and locked. The hooking sound confirms proper closing (fig.18).).
▼ Make sure laundry is not stuck between the doors or between the doors and
the drum.
17
16
19
20
USE OF DETERGENT
18
19
SM3130
The washing machine has a compartment for detergent and additives with three
chambers (fig. 19).
prewash detergent chamber.
main wash detergent chamber.
rinsing liquid, softener, fragrance and starch chamber.
Use reduced foam detergents and softeners (if needed) for automatic washing ma
-
chines. Follow instructions on the package for dosages. When water is particularly
hard, use water softener together with the detergent, preventing scaling from forming
on the heat element.
WASHING MACHINE USE
Use of liquid detergent is possible only for programs without
prewash.
▼ High quantities of detergent can produce too much foam and affect
washing results negatively. Too little detergent causes insufficient
washing.
▼ When filling the chamber with detergent, it is important that is does
not go into the softener part since there would be rinsing with foam
and fabrics could have white stains. Vice versa, if softener goes
into the detergent section it would be less effective.
EN
INFORMATION BEFORE USE
There could be a small amount of water inside the machine due
to inspection tests. Before washing laundry for the first time, it
is advised to run a brief wash cycle without laundry or detergent
in order to clean the drum.
Attention: it is important to open and close the drum carefully to avoid
damage to the laundry and washing machine
At each wash cycle make sure that:
▼ Hydraulic connections are correct, the drain hose well positioned, (see hydraulic
connection) and the tap is open (fig. 14/15).
▼ Insert the plug in the socket with dry hands.
▼ Sort the laundry according to the type of fabric (see item labelling).
▼ Make sure there are no objects in the pockets of the clothing to be washed
which could cause damage to laundry, the machine or the filter
▼ Open the top of the washing machine lightly pressing downwards before lifting it.
▼ Open the drum doors holding both parts with one hand and pressing the open
-
ing button with the other (fig. 16).
▼ Put the laundry in the drum being careful not to exceed the maximum program
load indicated in the separate program table.
▼ Close the drum doors making sure they are well hooked.
▼ Press down first the front half and then the back so that the closing hooks are
inserted and locked. The hooking sound confirms proper closing (fig.18).).
▼ Make sure laundry is not stuck between the doors or between the doors and
the drum.
17
16
19
20
USE OF DETERGENT
18
21
SM3130
CLEANING THE FILTER
EN
MAINTENANCE
22
21
24
25
Make sure the washing machine is empty before starting the
operations described below. Do not remove the filter while the
machine is running or when it is full of water.
Place a recipient underneath the filter to gather water remaining inside. Open the
filter door. Unscrew it anti-clockwise and remove it.
A tool might be needed to open the door. (fig. 25).
Rinse the filter under running water and remove any residue.
Put the filter back inversely repeating all the operations.
If an object falls by accident in between the drum and the basin, it can be recovered
by means of an extractable plug on the drum:
1. Disconnect the appliance from the electrical mains.
2. Take the laundry out of the drum.
3. Close the drum doors and rotate it on half turn.
4. Using a tool, press the metal edge or, if present, unscrew the screw by sliding
the blade from left to right.
5. The plastic plug will fall into the drum.
6. Open the drum: recover the objects through the holes.
7. Place the blade from inside the drum; place making sure that the metal tab
or the fixing hole are on the right side, slide the blade from right to left until it
engages.
In the presence of the screw, to match the mounting holes and proceed to the
tightening of the screw itself (fig. 24).
8. Close the drum doors, rotate it a half turn and check the positioning of the plug
at all its fixing points.
RECOVERING FALLEN ITEMS BETWEEN DRUM AND BASIN
23
CLEANING THE WASHING MACHINE
The washing machine has been designed to reduce maintenance to a minimum. It
is however important to remember to clean it regularly.
Before cleaning, make sure the appliance is disconnected from the electrical mains
and the water supply is closed.
The outer structure and the plastic parts must be cleaned only with a moist cloth.
Never use chemical agents, abrasive products, alcohol, soap,
petrol or other solvents to clean the machine since they could
damage it.
After a wash, leave the top open for awhile in order to dry the rubber parts. Wash
the detergent chambers periodically. To do this, take out the detergent compartment
and rinse it under running water (fig. 21). Then put it back in.
▼ To take the detergent compartment out, press “PUSH” with your right hand and
with the other hand pull the drawer out pulling it towards you (fig. 22).
The detergent compartment must always be inserted in its hous
-
ing for proper machine operation.
21
SM3130
CLEANING THE FILTER
EN
MAINTENANCE
22
21
24
25
Make sure the washing machine is empty before starting the
operations described below. Do not remove the filter while the
machine is running or when it is full of water.
Place a recipient underneath the filter to gather water remaining inside. Open the
filter door. Unscrew it anti-clockwise and remove it.
A tool might be needed to open the door. (fig. 25).
Rinse the filter under running water and remove any residue.
Put the filter back inversely repeating all the operations.
If an object falls by accident in between the drum and the basin, it can be recovered
by means of an extractable plug on the drum:
1. Disconnect the appliance from the electrical mains.
2. Take the laundry out of the drum.
3. Close the drum doors and rotate it on half turn.
4. Using a tool, press the metal edge or, if present, unscrew the screw by sliding
the blade from left to right.
5. The plastic plug will fall into the drum.
6. Open the drum: recover the objects through the holes.
7. Place the blade from inside the drum; place making sure that the metal tab
or the fixing hole are on the right side, slide the blade from right to left until it
engages.
In the presence of the screw, to match the mounting holes and proceed to the
tightening of the screw itself (fig. 24).
8. Close the drum doors, rotate it a half turn and check the positioning of the plug
at all its fixing points.
RECOVERING FALLEN ITEMS BETWEEN DRUM AND BASIN
23
CLEANING THE WASHING MACHINE
The washing machine has been designed to reduce maintenance to a minimum. It
is however important to remember to clean it regularly.
Before cleaning, make sure the appliance is disconnected from the electrical mains
and the water supply is closed.
The outer structure and the plastic parts must be cleaned only with a moist cloth.
Never use chemical agents, abrasive products, alcohol, soap,
petrol or other solvents to clean the machine since they could
damage it.
After a wash, leave the top open for awhile in order to dry the rubber parts. Wash
the detergent chambers periodically. To do this, take out the detergent compartment
and rinse it under running water (fig. 21). Then put it back in.
▼ To take the detergent compartment out, press “PUSH” with your right hand and
with the other hand pull the drawer out pulling it towards you (fig. 22).
The detergent compartment must always be inserted in its hous
-
ing for proper machine operation.
20
SM3130
EN
USING THE WASHING MACHINE
Stains exist that cannot be removed by machine washing alone. Before trying to remove any type of
stain by hand, first try the removal procedure on a small area of hidden fabric. Start from the edge of
the stain and working inwards, this will prevent a dark ring from forming around the site of the stain. A
few methods to adopt for removing stains are reported below.
▼
Wax: Scrape the wax using a rounded point
in order not to damage the fabric. Then, with
the fabric placed between two pieces of ab
-
sorbent paper, run a hot iron over the stain.
▼
Ball Point Pens and felt-tiP Pens: clean using
a soft cloth soaked in ethyl alcohol. Take care
not to spread the stain.
▼
damP and moUld: if the fabric supports the
use of bleach, carry out a wash cycle adding
bleach. Otherwise, soak the soiled part in
hydrogen peroxide (10 volumes) and leave
for 10 to 15 minutes.
▼
light sCorCh marks left By ironing: follow the
instructions for mould and damp.
▼
rUst: use products specially designed for rust
stains, following the manufacturer’s instruc-
tions written on the packet.
▼
CheWing gUm: rub ice over the fabric, scrape
away as much chewing gum as possible
and then rub with a piece of cotton soaked
in acetone.
INTERNATIONAL CLOTHING CARE SYMBOLS
Before placing the clothes in the washing machine and selecting the wash programme, examine the
symbols on the manufacturer’s label. The table reported below will provide a useful guide to reading
the symbols.
▼
Paint: do not allow the paint to dry. Rub the
area with the solvent recommended by the
paint manufacturer (e.g. water, turps, trichlo
-
roethylene), soap and then rinse.
▼
liPstiCk: stains on cotton or wool can be elimi-
nated using a cloth soaked in ether. Stains
on silk require the use of trichloroethylene.
▼
nail Varnish: place a sheet of absorbent
paper on the stained material, then dampen
the back of the fabric with acetone, frequently
changing the absorbent paper placed over
the stain. Continue in this manner until the
stain has disappeared.
▼
tar or dirt: spread a little fresh butter over
the stain, allow to stand and then wash with
oil of turpentine.
▼
grass: delicately soap the stain, use diluted
bleach. Good results can be obtained on
woollen fabrics using 90% alcohol.
▼
Blood: put into soak in cold water with added
salt, then wash with washing soap.
HOW TO REMOVE SOME STAINS
Макс. температура 95°C
Макс. температура 60°C
Макс. температура 40°C
Макс. температура 30°C
Глажка до 200°
Глажка до 150°
Глажка до 100°
Не гладить
Сухая чистка с растворителем
Сухая чистка с бензином,
с этиловым спиртом, либо R113
Сухая чистка с этиловым
перхлоратом, бензином,
этиловым спиртом, R113, R111
Не подвергать сухой чистке
Сушить горизонтально
Сушить вертикально
Сушить на вешалке
Сушить в стиральной машине
при нормальной температуре
Сушить в стиральной машине
при низкой температуре
Не сушить в стиральной
машине
ТАБЛИЦА СИМВОЛОВ НА БИРКАХ ИЗДЕЛИЙ
Обычная стирка
Деликатная стирка
Ручная стирка
Только сухая чистка
Отбеливать в холодной
воде
Не отбеливать

6
ОБЩИЕ ПРАВИЛА БЕЗОПАСНОСТИ
ВНИМАНИЕ! ДАННЫМ ПРИБОРОМ НЕЛЬЗЯ ПОЛЬЗОВАТЬСЯ ЛЮДЯМ
(
ДЕТЯМ
МЛАДШЕ 8 ЛЕТ
)
, С ОГРАНИЧЕННЫМИ ФИЗИЧЕСКИМИ И МЕНТАЛЬНЫМИ ВОЗ-
МОЖНОСТЯМИ ИЛИ ЛЮДЯМ, НЕ ИМЕЮЩИМ ДОСТАТОЧНОГО ОПЫТА И ЗНАНИЙ,
ЕСЛИ ОНИ НЕ НАХОДЯТСЯ ПОД ПРИСМОТРОМ ЛЮДЕЙ, ДАВШИХ ИМ НЕОБХО-
ДИМЫЕ ИНСТРУКЦИИ ПО ИСПОЛЬЗОВАНИЮ ИЗДЕЛИЯ И ОТВЕЧАЮЩИХ ЗА ИХ
БЕЗОПАСНОСТЬ.
Перед загрузкой вещей в стиральную машину, удалите из карманов личные вещи,
легковоспламеняющиеся предметы (спички, зажигалки и т.д).
ТЕХНИКА БЕЗОПАСНОСТИ
ВНИМАНИЕ! В СЛУЧАЕ ПОВРЕЖДЕНИЯ ПРИБОРА ПУТЕМ МЕХАНИЧЕСКОГО,
ЭЛЕКТРИЧЕСКОГО ВОЗДЕЙСТВИЯ ИЛИ В ПРОЦЕССЕ УСТАНОВКИ, ГАРАНТИЯ
МОЖЕТ БЫТЬ ОТОЗВАНА.
Не пользуйтесь сетевыми тройниками, переходниками и удлинителями.
Стиральная машина оснащена электрическим кабелем с заземлением. Убедитесь в том, что
Ваша электросеть имеет заземление. В случае его отсутствия, обратитесь к квалифицированным
специалистам.
ВНИМАНИЕ! В СЛУЧАЕ ПОВРЕЖДЕНИЯ ИЛИ НЕОБХОДИМОСТИ ЗАМЕНЫ ЭЛЕК-
ТРОКАБЕЛЯ, ОБРАТИТЕСЬ В АВТОРИЗОВАННЫЙ СЕРВИСНЫЙ ЦЕНТР. ЭКСПЛУА-
ТАЦИЯ ПРИБОРА БЕЗ ПОДКЛЮЧЕНИЯ ЗАЗЕМЛЕНИЯ ЗАПРЕЩЕНА!
При отключения от электросети стиральной машины не тяните за провод электропитания.
ВНИМАНИЕ! В СЛУЧАЕ НЕИСПРАВНОСТИ СТИРАЛЬНОЙ МАШИНЫ, ОТКЛЮЧИТЕ
ЕЕ ОТ ЭЛЕКТРОСЕТИ, ЗАКРОЙТЕ КРАН ПОДАЧИ ВОДЫ. НЕ ПЫТАЙТЕСЬ ПОЛЬ-
ЗОВАТЬСЯ ПРИБОРОМ! ОБРАТИТЕСЬ В АВТОРИЗОВАННЫЙ СЕРВИСНЫЙ ЦЕНТР.
Не подвергайте прибор воздействию дождя, прямых солнечных лучей и прочих погодных влияний.
Не подвергайте прибор замораживанию.
При транспортировке не держите прибор за ручки управления, отсек диспенсера и загрузочный
люк. Перемещайте прибор вдвоем.
Прежде чем открыть крышку загрузочного люка, убедитесь в отсутствии воды в барабане стиральной
машины.
ВНИМАНИЕ! ВОДА В СТИРАЛЬНОЙ МАШИНЕ МОЖЕТ ДОСТИГАТЬ ВЫСОКИХ ТЕМ-
ПЕРАТУР!

7
УСТАНОВКА
Перед установкой убедитесь, что в помещение подведены вода и электроэнергия. Убедитесь в
целосности шлангов и электрокабеля. Температура в помещении не должна опускаться ниже 3°C.
Разместите стиральную машину вблизи места ее использования удалив упаковочный материал
(рис. 2).
Приподнимите прибор и удалите подставку и ограничители (рис. 3).
Открутите 4 болта на задней стенке и извлеките 4 траспортировочные втулки. Закройте 4 отверстия
специальными заглушками из комплекта стиральной машины (рис. 4).
ВНИМАНИЕ! СОХРАНИТЕ ТРАНСПОРТИРОВОЧНЫЕ БОЛТЫ НА СЛУЧАЙ ПЕРЕМЕ-
ЩЕНИЯ И ПЕРЕВОЗКИ СТИРАЛЬНОЙ МАШИНЫ.
Наклоните прибор и извлеките изнутри два пенопластовых фиксатора, потянув за ленты из картона
(рис. 5).
Извлеките пенопласт из загрузочного люка (рис. 6).
РЕГУЛИРОВКА НОЖЕК
В зависимости от модели прибор может оснащаться транспортными колесами для облегчения
перемещения.
Чтобы задействовать транспортые колеса, передвиньте рычаг в противоположную сторону (рис. 8).
После перемещения, верните рычаг в исходное положение.
После того как прибор будет установлен в место предполагаемого использования, отрегулируйте его
по уровню с помощью инструмента, затем зафиксируйте положение ножек с помощью контргайки
(рис. 9).
ВНИМАНИЕ! ЕСЛИ ПРИБОР НЕ ВЫСТАВЛЕН ПО УРОВНЮ, ТО ЭТО МОЖЕТ ПРИ-
ВЕСТИ К ВОЗНИКНОВЕНИЮ ИЗБЫТОЧНОГО ШУМА И ВИБРАЦИИ, ЧТО В СВОЮ
ОЧЕРЕДЬ МОЖЕТ ПРИВЕСТИ К ПОЛОМКЕ ПРИБОРА.
ВНИМАНИЕ! ЕСЛИ СТИРАЛЬНАЯ МАШИНА РАСПОЛОЖЕНА НА КОВРОВОМ ПО-
КРЫТИИ, УБЕДИТЕСЬ ЧТО ВЕНТИЛЯЦИОННЫЕ ОТВЕРСТИЯ НЕ ЗАБЛОКИРОВА-
НЫ.
ВНИМАНИЕ! ПОСЛЕ УСТАНОВКИ И ПОДКЛЮЧЕНИЯ СТИРАЛЬНАЯ МАШИНА
ДОЛЖНА БЫТЬ РАСПОЛОЖЕНА ТАКИМ ОБРАЗОМ, ЧТОБЫ РОЗЕТКА БЫЛА ЛЕГКО-
ДОСТУПНОЙ.
ПОДКЛЮЧЕНИЕ К ЭЛЕКТРОСЕТИ
ВНИМАНИЕ! УБЕДИТЕСЬ ЧТО ПАРАМЕТРЫ ЭЛЕКТРОСЕТИ, УКАЗАННЫЕ НА ВНУ-
ТРЕННЕЙ СТОРОНЕ КРЫШКИ ФИЛЬТРА, СООТВЕТСТВУЮТ ПАРАМЕТРАМ ВАШЕЙ
ЭЛЕКТРОСЕТИ
(
РИС. 10
)
.
Прибор должен быть заземлен (рис. 11). Включайте прибор только в установленную надлежащим
образом электророзетку с защитным контактом. Убедитесь, что указанные на табличке с техниче-
скими данными параметры электропитания соответствуют параметрам электросети. В противном
случае обратитесь к эле ктрику. Не используйте тройники и удлинители. Позаботьтесь о том, чтобы
не повредить вилку и сетевой кабель. В случае необходимости замены сетевого шнура она должна
быть выполнена нашим авторизованным сервисным центром. Вставляйте вилку сетевого кабеля в

8
розетку только по окончании установки прибора. Убедитесь, что после установки прибора к вилке
электропитания имеется свободный доступ. Не беритесь за кабель электропитания или за его вилку
мокрыми руками. Для отключения прибора от электросети не тяните за кабель электропитания.
Всегда беритесь за саму вилку.
ПОДКЛЮЧЕНИЕ ВОДОСНАБЖЕНИЯ
Перед подключением заливного шланга откройте кран и пропустите некоторое количество воды.
Это необходимо во избежание попадания песка и ржавчины, если водопровод не использовался
длительный период времени.
Затем подсоедините заливной шланг к водопроводному крану и прибору (рис. 12-13).
ВНИМАНИЕ! ИСПОЛЬЗУЙТЕ НОВЫЙ ЗАЛИВНОЙ ШЛАНГ ПОСТАВЛЯЕМЫЙ В
КОМПЛЕКТЕ. ПОВТОРНОЕ И СПОЛЬЗОВАНИЕ СТАРОГО ЗАЛИВНОГО ШЛАНГА НЕ
ДОПУСКАЕТСЯ.
ВНИМАНИЕ! НЕ ПОДКЛЮЧАЙТЕ ПРИБОР К ГОРЯЧЕЙ ВОДЕ.
Стиральная машина должна быть установлена таким образом, чтобы заливные и сливные шланги не
были зажаты и не имели перегибов.
Гофрированный сливной шланг должен быть подключен к трубе на высоте 60-90 см от пола,
используйте изогнутый держатель поставляемый в комплекте (рис. 14)
Если в качестве слива используется раковина, гофрированный сливной шланг должен быть
расположен над отверстием перелива для предотвращения скопления воды. Для более надежного
крепления на борту раковины используйте изогнутый держатель (рис. 15).
ЭКСПЛУАТАЦИЯ И УХОД
Перед каждым циклом стирки убедитесь что:
Сливные и заливные шланги подключены.
Сливной шланг расположен правильно (рис. 14-15) и водопроводный кран открыт.
Белье отсортировано согласно типу ткани (см бирку на одежде).
В карманах одежды нет предметов.
При работе со стиральной машиной следуйте советам ниже:
Не прилагайте чрезмерных усилий при нажатии на кнопку крышки стиральной машины.
Для открытия створок барабана, придерживайте одной рукой створки, другой - нажимайте на
кнопку (рис. 16).
Не превышайте допустимый вес белья, указанный в таблице программ стирки.
При закрытии створок барабана, нажимите на переднюю, затем на заднюю часть кнопки, так
чтобы защелки были заблокированы. При этом вы услышите характерный щелчок (рис. 18).
Створки должны быть зафиксированы.
Убедитесь что белье не застряло между створками дверей или между люком и барабаном.

9
ДИСПЕСЕР ДЛЯ МОЮЩИХ СРЕДСТВ
Диспенсер для моющих средств имеет 3 отделения (рис. 19).
1) Предварительная стирка
2) Основная стирка
) Специальные добавки: смягчители, ополаскиватели, жидкий крахмал, ароматизаторы и т.д.
ВНИМАНИЕ! ВО ВРЕМЯ РАБОТЫ ПРИБОРА ДИСПЕНСЕР ВСЕГДА ДОЛЖЕН
НАХОДИТЬСЯ НА СВОЕМ МЕСТЕ.
ВНИМАНИЕ! ИСПОЛЬЗОВАНИЕ ЖИДКОГО МОЮЩЕГО СРЕДСТВА ВОЗМОЖНО
ТОЛЬКО С ПРОГРАММАМИ БЕЗ ПРЕДВАРИТЕЛЬНОЙ СТИРКИ.
ВНИМАНИЕ! ИСПОЛЬЗУЙТЕ СПЕЦИАЛЬНЫЕ ДОБАВКИ ТОЛЬКО В ЖИДКОМ ВИДЕ.
ВНИМАНИЕ! БОЛЬШОЕ КОЛИЧЕСТВО МОЮЩЕГО СРЕДСТВА МОЖЕТ ПРИВЕСТИ
К ОБИЛЬНОМУ ПЕНООБРАЗОВАНИЮ И НЕГАТИВНО СКАЗАТЬСЯ НА КАЧЕСТВЕ
СТИРКИ. СЛИШКОМ МАЛЕНЬКОЕ КОЛИЧЕСТВО МОЮЩЕГО СРЕДСТВА ТАКЖЕ
МОЖЕТ НЕГАТИВНО СКАЗАТЬСЯ НА КАЧЕСТВЕ СТИРКИ.
ВНИМАНИЕ! СЛЕДУЙТЕ ИНСТРУКЦИЯМ НА УПАКОВКАХ МОЮЩИХ СРЕДСТВ.
ВНИМАНИЕ! ПРИ ЗАПОЛНЕНИИ ОТСЕКОВ ДИСПЕНСЕРА НЕ ДОПУСКАЙТЕ СМЕ-
ШИВАНИЯ МОЮЩИХ СРЕДСТВ В РАЗЛИЧНЫХ ОТСЕКАХ ДИСПЕНСЕРА
(
РИС. 20
)
.
ТИПЫ ЗАГРЯЗНЕНИЙ И СПОСОБЫ ИХ УСТРАНЕНИЯ
Воск: Удалите воск используя закругленный
предмет чтобы не испортить ткань. Затем
положите ткань между двумя слоями
абсорбирующей бумаги (напр. салфетки)
и горячим утюгом прогладьте по месту
загрязнения.
Краска: Необходимо обработать как
можно быстрее, не дав краске засохнуть.
Обработайте место загрязнения растворителем
(трихлорэтилен, скипидар или другой
рекомендованный производителем краски).
Помойте с мылом и прополощите.
Шариковая ручка и фломастеры: Используйте
мягкую ткань, смоченную этиловым спиртом.
Губная помада: Пятна на шерсти или хлопке
могут быть устранены с помощью ткани,
смоченной в эфире. Пятна на шелковой ткани
требуют использования трихлорэтилена.
Плесень: Если ткань допускает использование
отбеливателя, запустите цикл стирки с его
использованием. Также можно замочить
загрязненный участок ткани в перикиси
водорода на 10-15 минут.
Лак для ногтей: Поместите лист абсорбирующей
бумаги (напр. салфетки) на место загрязнения,
затем смочите обратную сторону ткани
ацетоном, при этом несколько раз меняя
бумагу. Продолжайте процедуру до полного
удаления загрязнения.
Следы после глажки: См. пункт «Плесень» Смола: Размажьте кусочек сливочного масла
по месту загрязнения, оставьте на некоторое
время и затем промойте скипидаром.
Ржавчина: Используйте специальные средства
от ржавчины, при этом следуя инструкциям на
упаковке.
Трава: Аккуратно намыльте место загрязнения,
примените разбавленный растворитель. Для
загрязнений на шерстяных вещах используйте
90% - спирт.
Жевательная резинка: Потрите кусочком
льда место загрязнения, затем обработайте
кусочком хлопковой ткани, предварительно
смоченной в ацетоне.
Кровь: Замочите место загрязнения в холодной
воде добавив при этом соль, затем смойте при
помощи хозяйственного мыла.

10
УХОД
Перед тем как выполнять любые операции по уходу за прибором, убедитесь в том, что электропитание
отключено и подача воды перекрыта.
Внешние корпусные элементы прибора и пластиковые части следует очищать мягкой и влажной
тканью.
ВНИМАНИЕ! НЕ ИСПОЛЬЗУЙТЕ ХИМИЧЕСКИ АГРЕССИВНЫЕ, АБРАЗИВНЫЕ
ВЕЩЕСТВА, А ТАКЖЕ СПИРТ, МЫЛО, БЕНЗИН И ДРУГИЕ РАСТВОРИТЕЛИ ДЛЯ
УХОДА ЗА ПРИБОРОМ. ЭТО МОЖЕТ ПРИВЕСТИ К ВЫХОДУ ПРИБОРА ИЗ СТРОЯ И
НАРУШЕНИЮ ВНЕШНЕГО ВИДА ПРИБОРА.
После каждого цикла стирки на некоторое время оставляйте открытым загрузочный люк для того,
чтобы резиновые части прибора могли просохнуть. Регулярно промывайте отсеки диспенсера под
проточной водой (рис. 21).
Для того чтобы снять диспенсер, нажмите на надпись «PUSH» одной рукой, другой рукой потяните
диспенсер на себя (рис. 22).
ИЗВЛЕЧЕНИЕ ПОСТОРОННИХ ПРЕДМЕТОВ
Если предмет оказался между барабаном и стенкой прибора, он может быть извлечен с помощью
специальной заглушки на барабане. Следуйте инструкциям ниже:
1. Отключите прибор от электропитания.
2. Извлеките белье из барабана.
3. Закройте створки барабана и проверните барабан на пол оборота.
4. С помощью инструмента нажмите на металлическую кромку или, если имеется, открутите винт,
сдвинув пластину слева направо.
5. Пластиковая заглушка окажется в барабане.
6. Откройте барабан и извлеките посторонние предметы через образовавшиеся отверстия.
7. Установите пластину с внутренней стороны барабана, убедившись в правильности установки,
переместите пластину справа налево до полной ее фиксации. Совместите отверстия под шурупы и
затяните шурупы (рис. 24).
8. Закройте створки барабана, поверните барабан на полоборота и убедитесь в правильности
установки пластиковой заглушки.
ОЧИСТКА ФИЛЬТРА
ВНИМАНИЕ! ПЕРЕД ВЫПОЛНЕНИЕМ ОПЕРАЦИЙ, ОПИСАННЫХ НИЖЕ, УБЕДИ-
ТЕСЬ В ТОМ, ЧТО ПРИБОР НЕ ЗАГРУЖЕН. НЕ ИЗВЛЕКАЙТЕ ФИЛЬТР В ПРОЦЕССЕ
ЕГО РАБОТЫ ИЛИ ЕСЛИ В ПРИБОРЕ НАХОДИТСЯ ВОДА.
1. Для проведения этой операции может понадобиться инструмент (рис. 25). Используйте
подходящую емкость для воды, поместив ее под фильтр. Откройте дверцу фильтра, поверните
фильтр против часовой стрелки и аккуратно потяните на себя.
2. Промойте фильтр проточной водой удалив при этом все загрязнения.
3. Установите фильтр, не прилагая чрезмерных усилий, закрутите его по часовой стрелке.

11
УСТРАНЕНИЕ НЕИСПРАВНОСТЕЙ
Если Вы заметили, что Ваша стиральная машина работает некорректно, обратитесь к справочной
таблице ниже для совета по устранению наиболее распространенных проблем.
Код ошибки Возможные причины и практические решения
E:00
Стиральная машина не работает (дисплей светится)
Убедитесь, что нажата кнопка старта.
Убедитесь, что присутствует необходимое давление воды.
Убедитесь, что фильтр заливного шланга не засорен.
Убедитесь, что заливной шланг подключен и открыт водопроводный каран.
Неправильно закрыта дверь: откройте и снова закройте ее.
Проверьте, правильно ли выбрана программа и нажата кнопка старта
Убедитесь, что стиральная машина не находится в режиме паузы или в
режиме отложенного старта.
E:01
Стиральная машина неприрывно набирает и сливает воду
Убедитесь, что сливной шланг установлен правильно (см раздел
подключение водоснабжения).
Убедитесь, что выходное отверстие сливного шланга не погружено в воду.
Стиральная машина не сливает воду / барабан не вращается
Убедитесь, что сливной шланг установлен правильно и не перегнут (см
раздел подключение водоснабжения).
Убедитесь, что программа отжима выбрана.
E:03
E:02
Обратитесь в авторизованный сервисный центр

12
ДРУГИЕ НЕИСПРАВНОСТИ
Проблема Возможные причины и практические решения
Стиральная
машина не
работает
(дисплей не
светится)
Убедитесь, что вилка питания прибора включена в рабочую розетку.
Убедитесь, что электроэнергия включена.
Убедитесь, что розетка работает, проверив ее с помощью другого прибора,
например светильника.
Не правильно закрыта дверь: откройте и снова закройте ее.
Проверьте, правильно ли выбрана программа и нажата кнопка вкл/выкл.
Сильные
вибрации /
шумы при
отжиме
Стиральная машина не выравнена: при необходимости отрегулируйте
ножки, как указано в соответствующем разделе.
Убедитесь, что транспортировочные винты, резиновые заглушки, втулки,
удалены.
Убедитесь в отсутствии посторонних предметов внутри барабана (монеты,
петли, кнопки, и т. д.).
Крышка
стиральной
машины не
открывается
Убедитесь, что цикл стирки завершен.
Белье после
стирки
становится
перекрученым
Убедитесь, что белье равномерно распределено внутри барабана.
Убедитесь, что выбрана подходящая скорость отжима.
Стиральная
машина
останавливается
во время стирки
Убедитесь, что не происходит перебоев в электропитании.
После стрики
в диспенсере
остается
порошок
Убедитесь, что водопроводный кран открыт.
Убедитесь, что фильтр заливного шланга не засорен.
ВНИМАНИЕ! СТАНДАРТНАЯ ГАРАНТИЯ ПРОИЗВОДИТЕЛЯ РАСПРОСТРАНЯЕТСЯ
НА НЕДОСТАТКИ, ВЫЗВАННЫЕ ЭЛЕКТРИЧЕСКИМИ ИЛИ МЕХАНИЧЕСКИМИ
НЕИСПРАВНОСТЯМИ В ПРОДУКЦИИ В РЕЗУЛЬТАТЕ ДЕЙСТВИЯ ИЛИ УПУЩЕНИЯ
ПРОИЗВОДИТЕЛЯ.
ЕСЛИ НЕИСПРАВНОСТИ БЫЛИ ВЫЗВАНЫ ФАКТОРАМИ, НАХОДЯЩИМИСЯ
ВНЕ ПОСТАВЛЯЕМОЙ ПРОДУКЦИИ, ПРИ НЕПРАВИЛЬНОМ ИСПОЛЬЗОВАНИИ
ИЛИ В РЕЗУЛЬТАТЕ НАРУШЕНИЯ ПРАВИЛ ПО ЭКСПЛУАТАЦИИ, ГАРАНТИЙНЫЕ
ОБЯЗАТЕЛЬСТВА МОГУТ БЫТЬ АННУЛИРОВАНЫ.

13
Использование экологически безвредных моющих средств, без фосфатов, может привести к
следующему:
Вода, выходящая из сливного шланга машины, при ополаскивании может быть мутной: этот
эффект может быть связан с веществами, которые не влияют на эффективность ополаскивания.
Белый порошок на белье в конце стирки: это нормально, порошок не поглощается тканью и не
меняет цвет ткани, чтобы удалить излишки порошка, запустите полоскание. В будущем исполь-
зуйте меньшее количество порошка.
Пена в воде при последнем ополаскивании: это не означает плохое ополаскивание, при следу-
ющих стирках используйте меньшее количество порошка.
Обильное пенообразование: чаще всего это происходит из-за анионных ПАВ, находящихся в
составе средств для стирки. В этом случае не пытайтесь повторно запускать полоскание, это не
приведет к желаемому результату. Мы рекомендуем провести техническую промывку, исполь-
зуя специализированное чистящее средство.
ВНИМАНИЕ! ЕСЛИ ПРОБЛЕМА НЕ РЕШЕНА ИЛИ ВЫ ЗАМЕТИЛИ НЕИСПРАВНОСТЬ,
ОБРАТИТЕСЬ В АВТОРИЗОВАННЫЙ СЕРВИСНЫЙ ЦЕНТР.
ВНИМАНИЕ! ИСПОЛЬЗУЙТЕ ТОЛЬКО ОРИГИНАЛЬНЫЕ ЗАПЧАСТИ, КОТОРЫЕ ДО-
СТУПНЫ ТОЛЬКО В АВТОРИЗОВАННОМ СЕРВИСНОМ ЦЕНТРЕ.

14
УПРАВЛЕНИЕ И ПРОГРАММЫ СТИРКИ
ВНИМАНИЕ! ОЗНАКОМЬТЕСЬ С СИМВОЛАМИ НА БИРКАХ ИЗДЕЛИЙ ПЕРЕД НА-
ЧАЛОМ СТИРКИ!
1. Засыпьте необходимое количество стирального порошка в отсек II если вы планируете
активировать функцию предварительной стирки, добавьте моющее средство в отсек I. Используйте
отсек диспенсера для загрузки специальных добавок.
2. Выберите подходящую программу стирки в соответствии с типом ткани. Для этого поверните
переключатель A согласно инструкциям в таблице программ. На панели включится один из
символов обозначающий фазу стирки. По окончании цикла стирки высветится соответствующий
LED-индикатор. Модели, имеющие цифровой дисплей I, будут отображать время до окончания
стирки, по завершении цикла стирки на дисплее высветится END.
3. С помощью кнопки С можно выбрать скорость отжима, отличную от той что предусмотрена
выбранной программой. Кнопка D позволяет активировать функцию отложенного старта с
максимальным временем отсрочки в 8 часов. При активации данных функций на панели включатся
соответствующие LED-индикаторы.
4. С помощью кнопки E можно активировать функцию дополнительного полоскания. Кнопка F
позволяет активировать функцию предварительной стирки. При выборе данных программ на
панели включится соответствующий LED-индикатор. Продолжительность стирки будет зависеть от
выбранных параметров.
5. Нажмите кнопку старта G для запуска цикла стирки. Через несколько секунд включится
соответствующий LED-индикатор выбранной программы стирки.
LED-ИНДИКАТОРЫ ПРОГРАММ
На каждом этапе цикла стирки будет светится соответствующий индикатор.
(Предварительная стирка / Стирка / Полоскание / Отжим / Стирка закончена)
*ЦИФРОВОЙ ДИСПЛЕЙ (В ЗАВИСИМОСТИ ОТ МОДЕЛИ)
Показывает продолжительность выбранной программы и после запуска отображает время,
оставшееся до окончания цикла стирки. Время стирки может зависеть от следующих факторов:
температура воды, гидравлическое давление (давление в водопроводе), температура окружающего
воздуха, количество стирального порошка, степени загрузки и дополнительных выбранных настроек.
По окончании цикла стирки на дисплее отобразится END.
SM3132
3
WASHING GUIDE
EN
WASH IN THE CORRECT WAY
Before attempting to operate the washing machine, ensure that the installation has been per-
formed correctly, as described in the instruction booklet.
Daily use
1. Before putting clothes in the washing machine, empty the pockets of any hard or sharp object (nails,
screws, coins, pins and stones) that may damage the machine and garments.
2. Open the top lid of the washing machine, exerting a slight downward pressure before raising it.
3. Press the drum doors slightly with one hand to open them, while the other presses the open button.
4. To improve washing performance, introduce laundry into the washing machine without compressing it
or overloading the machine. A whole load of highly absorbent fabrics, such as bathrobes and towels,
can unbalance the machine during the spin cycle. The automatic load balancing system arranges
laundry in the most even manner possible, and sets the optimum spin speed to minimise any vibrations.
5. Close the drum doors making sure they are well secured.
6. Put the correct amount of detergent in the drawer II. If you want to enable the prewash option, add
the detergent in the drawer I. Use the drawer marked with the symbol
for the softener.
7. Select the wash program most suitable to the type of fabrics by using knob A following the instructions
in the programs table. One of the LED’s of the function bar lights up indicating the phase in which the
program will start. When the end LED switches on this indicates the end of the cycle.
8. Pressing the C button, a different spin speed to that provided by the selected program can be set.
The D button allows you to delay the start of the wash cycle up to a maximum of 8 hours. Both values
are indicated by the respective LED’s.
9. Press buttons E, F to select the supplementary functions. The chosen options are indicated by the
relative LED’s lighting up. The duration of the wash cycle varies depending on the options enabled.
10. Press the start button G to start the wash cycle. After a few seconds, the start LED remains on steady
indicating that the program has started.
11. The end of the wash cycle is indicated by the end LED switching on. Turn the knob A back to the
“Arrét” position and open the lid to take out all the laundry.
12. The program can be cancelled at any time by turning knob A to the “Arrét” position.
13. To switch the machine off in case of an emergency, place the index of the program knob
at the “Arrét” position. The selection will be confirmed by two acoustic signals and all the
LED’s switching off.
Control panel:
A Program setting knob
B Temperature selection function
C Spin function
D Delay start function
E Extra rinse function
F Prewash function
G Start/pause function
H Washing phase icon
Detergent drawer:
Prewash
Washing
Softener
Диспенсер:
Предварительная
стирка
Стирка
Специальные
добавки
Панель управления:
Переключатель программ
Выбор температуры
Выбор скорости отжима
Отложеный старт
8:88
I*
E Дополнительное полоскание
F Предварительная стирка
G Старт/Пауза
H Символ программы стирки
I* Цифровой дисплей *(в зависимости от модели)

15
ОТЛОЖЕННЫЙ СТАРТ
Нажмите кнопку отложеный старт для отсрочки начала процесса стирки (макс. время отсрочки 8
часов). Нажимайте на кнопку до тех пор пока, на панели управления не отобразится требуемое
время отсрочки (будет активирован соответствующий LED-индикатор).
ТЕМПЕРАТУРА
Нажмите кнопку температура чтобы установить требуемую температуру стирки (см таблицу
программ). На панели высветится соответствующий LED-индикатор. Чтобы запустить цикл стирки с
холодной водой, нажимайте кнопку температуры до тех пор пока все LED-индикаторы не погаснут.
ВНИМАНИЕ! ЗНАЧЕНИЕ ТЕМПЕРАТУРЫ, ВЫСТАВЛЕННОЕ ВРУЧНУЮ, НЕ МОЖЕТ
БЫТЬ ВЫШЕ МАКСИМАЛЬНОЙ ТЕМПЕРАТУРЫ, ПРЕДУСМОТРЕННОЙ ДЛЯ
ВЫБРАННОЙ ПРОГРАММЫ СТИРКИ.
ПРЕДВАРИТЕЛЬНАЯ СТИРКА
Для запуска предварительной стирки нажмите соответствующую кнопку. На панели высветится
соответствующий LED-индикатор.
Заполните отсек I диспенсера.
Максимальная температура предварительной стирки составляет 40°C. Рекомендуется для тканей с
загрязнениями от пыли, грязи, песка, а также с трудновыводимыми пятнами (см таблицу программ).
ОТЖИМ
Для регулировки скорости отжима нажмите соответствующую кнопку. На панели высветится
соответствующий LED-индикатор. Нажмите для отключения отжима в конце стирки.
ВНИМАНИЕ! СКОРОСТЬ ОТЖИМА, ВЫСТАВЛЕННАЯ ВРУЧНУЮ, НЕ МОЖЕТ БЫТЬ
ВЫШЕ МАКСИМАЛЬНОЙ СКОРОСТИ, ПРЕДУСМОТРЕННОЙ ДЛЯ ВЫБРАННОЙ
ПРОГРАММЫ СТИРКИ.
ДОПОЛНИТЕЛЬНОЕ ПОЛОСКАНИЕ
Для запуска дополнительного полоскания нажмите соответствующую кнопку. На панели высветится
соответствующий LED-индикатор. Данную опцию рекомендуется использовать в случае если Ваша
кожа особено чувствительна к энзимам которые содержатся в стиральном порошке.
Данная программа может быть активирована с помощью заранее выбранной программы (см
таблицу программ).
СТАРТ/ПАУЗА
Нажмите кнопку СТАРТ/ПАУЗА после установки всех выбранных настроек, цикл стирки будет
запущен. На дисплее загорится соответствующий LED-индикатор. Во время цикла стирки прибор
можно ставить на паузу, удерживая в течение нескольких секунд кнопку СТАРТ/ПАУЗА. Во время
стирки Вы можете поставить стиральную машину на паузу, для этого нажмите кнопку СТАРТ/ПАУЗА
и удерживайте в течении нескольких секунд. После этого ранее выбранные настройки могут быть
изменены (возможность изменения настроек зависит от выбранной программы и фазы стирки).
Также по истечении 2 минут (если температура воды ниже 50°C) после активации паузы, можно
открыть люк для дополнительной загрузки/извлечения белья.
ВНИМАНИЕ! В ЗАВИСИМОСТИ ОТ СТЕПЕНИ ЗАГРУЗКИ СТИРАЛЬНОЙ МАШИНЫ,
РАСХОД ВОДЫ, ЭЛЕКТРОЭНЕРГИИ И ВРЕМЯ СТИРКИ НАСТРАИВАЕТСЯ
АВТОМАТИЧЕСКИ И МОЖЕТ ОТЛИЧАТЬСЯ.
ВНИМАНИЕ! ДАННАЯ СТИРАЛЬНАЯ МАШИНА ОБОРУДОВАНА СПЕЦИАЛЬНОЙ
СИСТЕМОЙ ЭЛЕКТРОННОГО УПРАВЛЕНИЯ ДЛЯ ПРАВИЛЬНОЙ БАЛАНСИРОВКИ
ЗАГРУЗКИ. ЕСЛИ БЕЛЬЕ РАСПРЕДЕЛЯЕТСЯ НЕРАВНОМЕРНО, ТО СКОРОСТЬ
КОНЕЧНОГО ОТЖИМА, ПО СООБРАЖЕНИЯМ БЕЗОПАСНОСТИ, УМЕНЬШАЕТСЯ.
В СЛУЧАЕ СИЛЬНОГО ДИСБАЛАНСА РАЗМЕЩЕНИЯ, ОТЖИМ ВООБЩЕ НЕ
ПРОИЗВОДИТСЯ.

16
10
Programs
Type of laundry
Options
M
a
x
i
m
u
m
s
p
i
n
s
p
e
e
d
(
r
e
v
/
m
i
n
)
Symbol
Maximum load
depending on the model
and program selected
(kg)
Max
temperature
60°C
40°C
90°C Max 8.0 7.0 6.0 5.0
Max 8.0 7.0 6.0 5.0
60°C 800 4.0 3.5 3.0 2.5
40°C 800 4.0 3.5 3.0 2.5
40°C 500 2.0 1.5 1.5 1.0
40°C 800 4.0 3.5 3.0 2.5
30°C Max 8.0 7.0 6.0 5.0
40°C Max 8.0 7.0 6.0 5.0
20°C 500 2.0 1.5 1.5 1.0
30°C 800 4.0 3.5 3.0 2.5
40°C 800 2.0 1.5 1.5 1.0
20°C 800 4.0 3.5 3.0 2.5
30°C 500 2.0 1.5 1.5 1.0
- Max 8.0 7.0 6.0 5.0
- Max 8.0 7.0 6.0 5.0
White linens and heavily soiled cotton, including organic
stains.
The standard 60°C and 40°C cotton programs are suitable to
clean normally soiled cotton laundry and they are the most
efficient programs in terms of combined energy and water
consumption for washing that type of cotton laundry. The
above mentioned programs are compliant with European
Regulations 1015/2010 and 1061/2010 on the specific
ecodesign requirements. The actual water temperature may
differ from the declared cycle temperature. The standard 60°C
and 40°C cotton programs were verified in compliance with
standard EN60456.
Synthetic fabrics with delicate colors.
The special jeans program gently washes at 40°C, taking care
of the denim fibers and simultaneously preventing colors from
running. Faded denim garments will always come out looking
like new.
The shirt program reduces ironing time. The temperature,
water level, intensity of washing and spin speed are adjusted
electronically to prevent creases and making ironing of
blouses and shirts easier.
The sportswear program is designed for sports and casual
wear. The 40°C wash cycle helps retain the shape of the fabric
and the elasticity of modern synthetic fibers.
The color program allows you to wash different colored
garments together. You can safely wash light and dark colored
laundry without any risk of color running.
The antibacterial program ensures that any germs or bacteria in
the laundry are efficiently removed. The program ensures
maximum hygiene for white, colored and synthetic fiber fabrics
.
Delicate garments require special care and are usually hand
washed. The specific hand wash option ensures garments are
washed gently.
Quick wash cycle is suitable for refreshing, in just 20 minutes,
lightly soiled laundry. Quick wash cycle allows you to save
precious time, performing a wash cycle at 30°C.
The wool program is ideal for washing delicate items with
labels stating “machine washable.” It ensures color care and
that garments stay in good shape.
The mix special program allows you to wash different fabrics
together (cotton, synthetics, mixed) with a perfect result.
For silk, viscose and lingerie clothes.
The rinse
program is useful for re-rinsing hand washed
laundry or for refreshing items that have been stored for a long
time.
The spin speed is adjustable to suit every type of fabric.
PROGRAM TABLE
EN
(*) Actual water temperature may differ from the value indicated in the program.
Программы стирки
Описание программ
Макс
температура*
Обозначение
Дополнительные
опции
ТАБЛИЦА ПРОГРАММ
(*) Фактическая температура воды может отличаться от указанной в программе.
При изменении заданной температуры, время стирки сокращается. При изменении оборотов отжима, время не
меняется. Время сократится, если отключить отжим.
Белое бельё и сильно загрязнённый хлопок, в том числе с
пятнами органического типа. Длительность: 2 ч. 52 мин.
Стандартная программа для хлопка при 60°C или 40°C
подходит для стирки белья из хлопка средней
загрязненности и является наиболее эффективной с точки
зрения общего потребления воды и электроэнергии.
Программы соответствуют требованиям Европейских
регламентов: 1015/2010 и 1061/2010.Реальная температура
воды может отличаться от указанной для конкретного цикла
стирки. Стандартные программы для хлопка при 60°C и 40°C.
Длительность: 3 ч. 13 мин.
Изделия из синтетических тканей.
Длительность: 3 ч. 13 мин.
Специальная программа для стирки джинсов выполяняет
деликатную стирку при температуре 40°С, не повреждая
волокон джинсовой ткани и в то же время предотвращая
выцветание окраски.
Длительность: 2 ч. 05 мин.
Программа для стирки рубашек и блузок, сокращает время,
требуемое для глажки. Для предотвращения образования
складок и облегчения процесса глажки, температура,
расход воды, интенсивность стирки и отжима, регулируются
автоматически. Длительность: 53 мин.
Предназначена для спортивной и повседневной одежды.
Цикл стирки при 40°С позволяет сохранить форму и
эластичность современных синтетических тканей.
Длительность: 1 ч. 47 мин.
Программа для цветных тканей позволяет стирать
одежду разных цветов. Вы можете одновременно стирать
белье светлых и темных тонов без риска окрашивания.
Длительность: 1 ч. 55 мин.
Программа обеспечивает удаление бактерий и спор во всех
типах тканей.
Длительность: 1 ч. 55 мин.
Программа деликатной стирки позволяет бережно стирать
ткани, подлежащие ручной стирке.
Длительность: 49 мин.
Быстрый цикл стирки подходит для слегка загрязнённого
белья. Позволяет экономить электроэнергию и ваше время,
стирая при температуре 30°С в течение 20 минут.
Длительность: 20 мин.
Программа для стирки шерсти позволяет стирать
деликатные шерстяные изделия, подлежащие машинной
стирке. Бережно сохраняет цвет и форму ткани.
Длительность: 49 мин.
Позволяет стирать различные типы тканей одновременно
(хлопок, синтетика, комбинированные), достигая отличного
результата. Длительность: 1 ч. 38 мин.
Подходит для шелка, вискозы и нижнего белья.
Длительность: 53 мин.
Эта программа предназначена для полоскания одежды,
постиранной вручную, а также приведения в порядок вещей,
хранившихся длительное время. Длительность: 53 мин.
Скорость отжима настраивается под любой тип тканей.
Длительность: 24 мин.
Хлопок Эко
Макс. загрузка (кг)
(в зависимости от программы
стирки и модели)
Макс. скорость
отжима
(об/мин)
Антибакте
риальная
Полоскание
Хлопок
Синтетика
Джинсы
Рубашки
Спорт
Цветное
Ручная
стирка
Быстрая
Шерсть
Смешанное
Шелк
Отжим

17
ТЕХНИЧЕСКИЕ ПАРАМЕТРЫ
Основные характеристики
KWMT
1070
KWMT
1485
KWMT
0860
Вес загрузки, кг 7 8 6
Оборотов в минуту 1000 1400 800
Тип управления Электронный
LED-индикаторы Да
Класс энергопотребления A
Цвет корпуса Белый
Цифровой дисплей - Да -
Количество программ 15
Размер прибора, ВхШхГ, мм 900x400x600
Безопасность
Блокировка люка загрузки Да
Электронное управление скоростью отжима Да
Электронный контроль за балансом Да

18
ГАРАНТИЯ
Гарантийный талон должен быть заполнен, в случае необходимости, его необходимо предоставить
в авторизованный сервисный центр. Авторизованный сервисный центр оставляет за собой право
запроить документ, подтверждающий дату приобретения.
Производитель снимает с себя ответственность за ошибки, имеющиеся в данной инструкции. Кроме
того, он также оставляет за собой право вносить изменения, технические усовершенствования
продукта без смены его основных характеристик.

19
ИНФОРМАЦИЯ ОТ ПРОИЗВОДИТЕЛЯ
Торговая марка KÖRTING®
Тип продукции Стиральная машина
Модель KWMT 1070 / 1485 / 0860
Производитель (Фабрика)
JP Industries S.p.A, Италия, Via Dante, 284 60044
Fabriano (AN)
Поставщик на территории РФ,
уполномоченный на принятие претензий
ООО «Кёртинг РУС», 125252, г. Москва, ул.
Гризодубовой, д. 4, к. 3, этаж 1, пом. 1, комн. 2.
тел. +7 (495) 662-95-41
www.korting.ru
Импортер
ООО «Кёртинг РУС», 125252, г. Москва, ул.
Гризодубовой, д. 4, к. 3, этаж 1, пом. 1, комн. 2.
Гарантийный срок 12 месяцев
Срок службы 10 лет
Серийный номер:
Серийный номер указан на люке фильтра
с фронтальной стороны Вашей стиральной
машины.
Серийный номер состоит из:
С/Н-АААА-BB-CCCCC
(А) - год производства
(В) - неделя
(С) - производственный номер
UM KWMT 1070 / 1485 / 0860 Ver. 1

-
 1
1
-
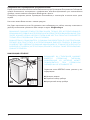 2
2
-
 3
3
-
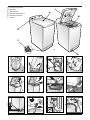 4
4
-
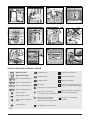 5
5
-
 6
6
-
 7
7
-
 8
8
-
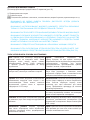 9
9
-
 10
10
-
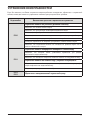 11
11
-
 12
12
-
 13
13
-
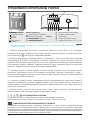 14
14
-
 15
15
-
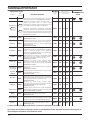 16
16
-
 17
17
-
 18
18
-
 19
19
-
 20
20


Korting KWMT 0860 Руководство пользователя
- Категория
- Стиральные машины
- Тип
- Руководство пользователя
Задайте вопрос, и я найду ответ в документе
Поиск информации в документе стал проще с помощью ИИ
на других языках
- English: Korting KWMT 0860 User manual
Похожие модели бренда
Модели других брендов
-
Ardo TL107SW Руководство пользователя
-
Indesit ARTXD 109 (EU) Руководство пользователя
-
Zigmund & Shtain BWM 01.0814 W Руководство пользователя
-
-
-
Hotpoint ARTF 104 (EU) Руководство пользователя
-
-
-
-