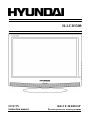
Hyundai H-LCD1509 Руководство пользователя
- Категория
- ЖК-телевизоры
- Тип
- Руководство пользователя

H-LCD1509
LCD TV
Instruction manual

2
Table of contents
Table of contents ......................................................................................................................................... 2
Important safety precautions ........................................................................................................................ 3
General introduction.................................................................................................................................... 5
Accessories.................................................................................................................................................. 5
Controls and connection............................................................................................................................... 6
Remote control (RC).................................................................................................................................... 8
General operations......................................................................................................................................10
OSD operations ..........................................................................................................................................11
Troubleshooting..........................................................................................................................................15
The causes of interference...........................................................................................................................15
Specifications .............................................................................................................................................16

3
Thank you very much for buying our product – the most natural Colour Television Receiver. To enjoy your
set to the full from the very beginning, read this manual carefully and keep it for future reference.
Important safety precautions
Warning
Please unplug the power cord from the AC outlet and contact our service personnel to repair under the fol-
lowing conditions:
Any obvious abnormality appears in the product, such as smoky, peculiar smell or strange sound.
When a liquid has been spilled or other objects have fallen into the product.
No picture or sound.
Cover or panel is broken.
Although you have operated the product by following the operating instructions, it still cannot work
normally.
Warning
Be careful about the power cord or the plug to avoid the fire or the electric shock.
Always disconnect the power cord and antenna during the storm.
Do not fix the power cord with the metal nail.
Unplug the power cord from the AC outlet; also unplug the signal cables from the input ports when the
product is unused for long periods of time or during a lightning storm.
When unplug the plug, always hold the wide slot, do not touch the metal part, and do not destroy, refit,
twist, pull or roast the power cord.
Please contact the personnel service immediately if you found that the core is showed in the air or is
been broken.
Please replace the AC outlet if the metal bolt cannot be inserted into the power socket completely or it
cannot be fastened even when it was pushed in, otherwise, any accidents of shocks and fires would hap-
pen.
Never touch the antenna lie or power plug if it stars to thunder.
Do not touch the power plug with wet hands.
Do not use any non-rated power socket with numerous devices jointed on one power socket or cable de-
vice. The wire of non-designated capacity may cause the fire due to the generation of heat.
Instructions
All instructions must be read and understood well before you operating this product. Heed all warnings and
follow all instructions.
Attachments
Please use the attachment recommended by the manufacturer. Use the inadequate attachments may result in
accidents.
Adjustment
Please adjust the product through the panel buttons or the remote control, do not remove the cover or attempt
to service the product by yourself. Do not disassemble back cover and do not make maintenance by yourself
to avoid the electric shock.
Caution: Over-press the panel may destroy the product.
Placement
Do not place the product on an unstable cart, stand surface, tripod, bracket, or table. The product may
fall, causing serious accidents as well as the damage to the product.
Please place the product on a flat surface in a well-ventilated location. Keep it away from the burning-
light, direct sunlight, vibration, high-temperature and humidity. Store the product with a temperature
from –20
0
C ~50
0
C; Otherwise you may destroy the product.

4
Do not place any vase, potted plant, cup, medicine and any container with water on this product. If the
liquid is spilt, it may cause the fire, electric shock or breakdown.
Do not install it at the place on the strong magnetic field or current field. It may cause break down. This
equipment may be observed deterioration of the picture by electromagnetic radiation in electromagnetic
environment.
Fasten the wheel of the product or shelf with wheels when installing this product. If it moves or is
tipped over, it may be damaged.
Do not place any fire source such as candlelight close to this product or place it on this product.
If it is tipped over or fallen down, it may cause damage or fire.
Caution: Do not place the LCD TV into closed space of TV for better ventilation; it can reduce the
product lifetime. Keep a space at list 10cm at above, left, and right of the TV.
Remote control
Do not expose the remote control to shock, liquids, and do not place it in an area with high humidity.
Please use the qualified batteries and do not mix batteries with different types.
Do not mix old and new batteries, and do not place the batteries to burn or disassemble them. If the re-
mote control is unused for an extend period of time, remove batteries from the remote control.
Cords
Please place all the signal cords behind of rear panel.
Cleaning
Unplug the power cord from the AC outlet before cleaning the product. Do not use liquid cleaners or
aerosol cleaners and others; use the special LCD Panel cleaners. Keep the power off before LCD panel
dry completely.
Clean the dust on the power plug periodically.
Caution: Do not use volatile cleaner or you may damage the LCD Panel/Covers.
Transportation
Do not overexert or touch the panel when you convey the product. Do not transfer the LCD TV up or
down display direction.
Do not transport it with the power cord or the connection cable connected. If you move this product
with the power cord or the connection cable connected, the damaged power cord, connection cable or
connection terminal may cause the fire, the electric shock or breakdown.
2 persons or more shall transport the device, which is heavier than 18 kg. If you drop or tip over the de-
vice, it may damage it.
Other objects
To ensure not to get an electric shock or short circuit, please do not spill liquid or other objects into the venti-
lation holes of the product.
Heating
The temperature of the product’s body becomes a little higher after a long period use. This phenomenon in-
dicates about heat exchange in normal working mode, thus please do not let children or anyone who is sensi-
tive of temperature to touch.
Note: All the OSD and illustrations in this manual may be somewhat different from the actual situation.
Please take the LCD Color TV menu as the standard.

5
General introduction
Size of the screen: 15"/38 cm
Aspect ratio: 4:3
Screen resolution: 1024x768
Brightness: 250 cd/m2
Contrast: 450:1
Angle of view: 140º/140º
Response time: 16 ms
TV systems: PAL/SECAM; BG/DK/I/L
Connections: RF antenna, S-Video, Composite, SCART, VGA, PC audio input
Teletext
200 channels memory
Sleep timer
Digital comb filter
OSD menu in Russian and English languages
Power supply: 110-240V, 50/60Hz
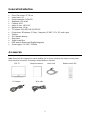
Accessories
Note: Please keep the wrapping box and the padding well for future convenient use when you convey them.
Please check the accessories. If anything is missed address to the seller.
LCD TV Instruction manual Power cord Remote control (RC)
DC adapter RCA cable

6
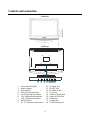
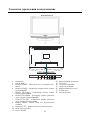
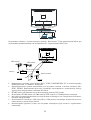
Controls and connection
Front view
Back view
1. Power indication light
2. Remote sensor
3. Power button
4. CH+/Up direction button
5. CH-/Down direction button
6. VOL+/Right direction button
7. VOL-/Left direction button
8. MENU button
9. AV /TV function switch button
10. DC input jack
11. SCART jack
12. PC audio in jack
13. VGA jack
14. Audio in (Right) jack
15. Audio in (Left) jack
16. Video jack
17. S-video jack
18. TVRF antenna jack
10
11
12
13
14
15
16
17
18

7
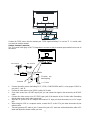
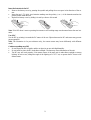
Connect the TVRF source with the antenna port. TVRF signal including: You can use 75 coaxial cable
to connect the outdoor antenna.
Outdoor Antenna Connection:
Use 75coaxial cable plug or 300-75impedance converter to plug in antenna input terminal on the rear of
the cabinet.
Connect the audio sources (Including DVD, VCDR, CAMCORDER and PC) to the proper AUDIO in-
put jacks ‘L’ and ‘R’.
Connect the video source to the VIDEO jack by RCA cable.
If the video source has a SCART output jack, you can connect the signal to the monitor by the SCART
cable.
Connect the video source to the S-VIDEO input jack of the monitor by the S-video cable (Pretending
that the video source has S-video output jack).
Insert the AC power to the DC adaptor, then connect 12V input jack from the monitor to it’s DC output
jack.
When using the LCD as a computer screen, connect the PC to the VGA jack from the monitor by the
relevant cable.
This unit possesses PC audio in jack. Connect this jack to PC main unit with related audio cable in PC
mode and adjust the volume to what you want.
75
Co
-
axis
Ant
enna in
75Co-axis cable
VHF antenna
Mixer
UHF antenna
Co-axis an-
tenna plug

8
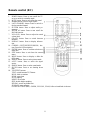
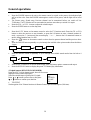
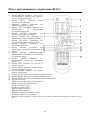
Remote control (RC)
1. POWER button. Press to turn on/off the TV
set or to switch it to standby mode.
2. MUTE button. Press to turn off/on the sound.
3. Number buttons. Press to input figures.
4. LAST CHANNEL button. Press to switch to
the last watched channel.
5. SYSTEM button. Press to adjust audio pa-
rameters.
6. NICAM A2 button. Press to turn on/off the
NICAM function.
7. VOL+/VOL- button. Press to adjust the sound
volume level.
8. CH+/CH- button. Press to switch between
channels.
9. DISPLAY button. Press to display informa-
tion.
10. CURSOR (LEFT/RIGHT/UP/DOWN) but-
tons. Press for OSD navigation.
11. ENTER button. Press to confirm selection or
input data.
12. EXIT button. Press to exit from the current
menu.
13. MENU button. Press to display or hide the
OSD menu.
14. PMODE button. Press to select picture mode.
15. AV/TV button. Press to select the signal
source.
16. SMODE button. Press to select sound mode.
17. SLEEP button. Press to set shutting down
time.
18. TELETEXT buttons:
TEXT: switch between TV/Teletext
HOLD: hold or continue
PGDN: page down
PGUP: page up
INDEX: do to index
SIZE: double height rendering
REVEAL: reveal any hidden text
SUBPAGE: enter subpage
COLOR BUTTONS (RED, GREEN, YELLOW, CYAN) follow colored links in the text.

9
Insert the batteries in the RC
Remove the battery cover by pressing the symbol and pulling the cover space in the direction of the ar-
row.
Insert the two 1.5V (AAA size) batteries making sure the polarity (+ or -) of the batteries matches the
polarity marks inside the unit.
Replace the battery cover by sliding it in until you hear a click sound.
Note: If the RC doesn’t react to pressing the buttons or the working range was decreased insert the new bat-
teries.
Use of RC
Use the RC by pointing it towards the RC sensor of the set. Objects between the RC and sensor may prevent
proper operation.
Note: The illustration is for your reference only; the remote sensor may locate differently with different
model.
Cautions regarding use of RC
Do not expose the RC to liquids, and do not place in an area with high humidity.
Do not install or place the RC under direct sunlight. The heat may cause deformation of the unit.
The RC may not work properly if the remote sensor of the main unit is under direct sunlight or strong
lighting. In such a case, change the angle of the lighting or LCD TV set, or operate the RC closer to the
remote sensor.

10
General operations
Press the POWER button on the unit or the remote control to switch on the power; the indication light
will be in blue color. Press the POWER button again to switch off the power, and the light will be in red
color.
The Picture setup, Sound setup, Previous channel can be memorized before you switch off the
TV/Monitor. The TV/Monitor will re-start under the previous state when you switch on it again.
Press the VOL - or VOL + button to adjust the volume output.
Press the SLEEP button to set the sleep time
Press the AV/TV button on the remote control to select the TV function mode. Press the CH- or CH+
button to select the previous or next channels; or press the 0-9 buttons to enter a channel number di-
rectly, or press the -/-- button until the screen display ‘-’ or ‘--’, then use the 0-9 numerical buttons to
enter a channel number from 1 to 200.
Press the button on the remote control to select from the present channel and the previous chan-
nel.
Press the PMODE button repeatedly to cycle through the available video picture modes from the below
4 types
Press the SMODE button to repeatedly to cycle through the available sound modes from the below 4
types.
Press the MUTE button to cut off the sound output, press this button again to resume sound output.
Press the DISPLAY button to display the preset TV channel play information.
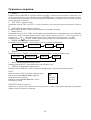
AV signal sources (DVD/VCR/CAMCORDER)
Press the AV/TV on the remote control, here will be a menu
displayed on the screens right figure:
Select the suitable input to pickup the AV signal.
Press
or button to select source, then press
or button to confirm your selection.
TELETEXT
See decryption of the Teletext functions in Remote Control operation description (18th item).
TV
AV
SVIDEO
SCART
PC
User Normal Soft Vivid
User Normal News Movie

11
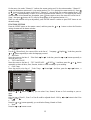
OSD operations
In this manual, the OSD Menu maybe changed and different from your real TV’s screen shown with-
out further notice. Because this manual is just a sample to help you how to operate TV menu setting.
PICTURE SETTING
Press the MENU button on the remote control, there will be a menu displayed on the screen as below:
Use the
button firstly, the cursor will be on the line of “Picture Mode: Vivid”. And then, press the
or button repeatedly to select the picture mode from Vivid, User, Normal or Soft
After select the Picture Mode, you can use the
or button to select the item of Brightness, Con-
trast, Saturation, Sharpness and Hue. And then use the
or button to adjust the value of each item.
Note: Only the item of Brightness and Contrast could be operated in the PC signal source.
When you are satisfied with your adjustment, press ENTER button to confirm or press EXIT button to exit
the menu setting.
SOUND SETTING
Press the MENU button on the remote control, and then press the
or button to select the Sound setting,
the menu will be shown as below:
Use the
button firstly, the cursor will be on the line of “Sound Mode: Normal”. And then, press the
or button repeatedly to select the sound mode from Normal, News, Movie or User.
After select the Sound Mode, you can use the
or button to select the item of Volume, Bass,
Treble and Balance. And then use the or button to adjust the value of each item.
When you are satisfied with your adjustment, press ENTER button to confirm or press EXIT button to exit
the menu setting.
CHANNEL SETTING
(FOR ANALOGUE TV SIGNAL SOURCE ONLY)
Press the MENU button on the remote control, and then press the
or button to select the Channel set-
ting, the menu will be shown as below:

12
Auto Tune
Use the
button firstly, the cursor will be on the line of “Auto Tune”. And then, press the button
again, a menu will be displayed as followed:
As shown on the menu, the TV will automatically search stations. When searching, press the MENU button
to cancel searching. After the searching, the TV will begin to play the station 1.
Manual Tune
Select the ‘Manual Tune’ first, and then press the
button:
As shown on the menu, the channel number will display on the screen. Press the or button repeatedly
until you search a required station. Then press the
or button to move cursor to Search, and press or
button to search TV signal .At last press the or button to move cursor to Store, and press but-
ton to save your selected channel.
Fine Tune
Select the ‘Fine Tune’ first, and then press the
or button:
As shown on the menu, the TV signal could be fine tuned by
or button repeatedly until you get the
best playing effect. Press the
or button to move cursor to Store, and press button to save
Skip
Press the
or button to select the skip setting, and press the or button repeatedly to select On
or Off. Setting to “On”, the current Channel No. will not be showed by Channel Up/Down keys unless you
research TV programs by Auto Searching.
Sound SYS
Press the or button to select the Sound SYS. setting, and press the or button repeatedly to se-
lect .You could choose available one showed in screen according to your local TV sound system.
Swap
Select the “Channel Swap”, and then press the
button, the screen will display:
M/N

13
On the menu, the words “Channel 1” indicate the current station and 6 is the station number; “Channel 2 ”
means the destination station and 1 is the station number. The TV is playing the current station (6). Press
or button to keep the cursor on the line of “Channel 2”, you can enter into a station number from 1-200
by
or button repeatedly to select ,to be as the appointed station number (***) for replacing the current
station number. After entered into the number, press button again to move the cursor will on the line of “
Swap”, then press
button, the TV will play the programs of the appointed station (***).
When you are satisfied with your adjustment, press ENTER button to confirm or press EXIT button to exit
the menu setting.
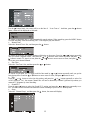
FUNCTION SETTING
Press the MENU button on the remote control, and then press the
or button to select the Function
setting, the menu will be shown as below:
Language
Use the
button firstly, the cursor will be on the line of “Language English ”. And then, press the
or button repeatedly to select the language you need.
Blue Back
Move the cursor to the line of “Blue Back On ”. And then, press the or button repeatedly to
select the On or Off.
TXT LANGUAGE
Move the cursor to the line of “TXT LANGUAGE
WEST ”. And then, press the or button
repeatedly to select the West, East, Russian, Arabic or Farsi according to your meaning.
Color Temp
Move the cursor to the line of “Color Temp.
Normal ”. And then, press the or button , a
menu will be displayed as followed:
Press the
or button repeatedly, you can select User, Normal, Warm or Cool according to your re-
quest.
Note:
Only the item of User-R , User-G or User-B could be adjusted from 0 ~100 by or button in the Color
Temp
User .
DNR
Press the
or button repeatedly, you could select Strong, Normal or Weak.
Reset
Press the
or button to reset

14
Timer
Move the cursor to this line. And then, press the
or button, a menu will be displayed as followed:
- CURRENT
Move the cursor to this line. The unit displays current working time. Press the
or button select hour
or minute setting, and enter into numeric by
or button.
- TURN OFF
Move the cursor to this line. The unit displays turn off time. Press the
or button select hour or minute
setting, and enter into numeric by
or button.
- TURN ON
Move the cursor to this line. The unit displays turn on time. Press the
or button select hour or minute
setting, and enter into numeric by
or button.
- TURN ON PROGRAM
Move the cursor to this line the unit display turn on program. Press the or button select turn on pro-
gram you want to set
When you are satisfied with your adjustment, press ENTER button to confirm or press EXIT button to exit
the menu setting.
Note:
Only the item of Language , Color Temp. Reset and Timer could be operated in the PC and SCART
signal source.
The item of Blue Back could not be operated in AV and SVIDEO signal source.
PC SETTING ( FOR PC SIGNAL SOURCE ONLY)
Press the MENU button on the remote control to display the menu, and then press the
or button to se-
lect the PC setting, and the menu will be shown on the screen as below:
You can use the
or button to select the item of Clock, Phase, H-Position or V-Position. And then
use the or button to adjust the value of each item respectively from 0~100.
When you are satisfied with your adjustment, press ENTER button to confirm or press EXIT button to exit the menu
setting.

15
Troubleshooting
Before calling a technician, please check the following items to see whether you can easily diagnose and fix
the encountered symptoms on your own.
Symptoms Possible Cause Correction
No picture, no
sound, and no
indicator light
The power cord is not plugged in.
Contrast, brightness, sharpness, color and
volume are all in the minimum value or
TV is in mute mode.
Plug the power cord in.
Alter the value of contrast, brightness,
sharpness, color and volume.
Picture and
sound with ab-
normity
Contrast and color are set improperly.
Color system is set improperly.
Sound system is set improperly.
Set the value of Contrast and color prop-
erly.
Set the sound system properly.
Picture is spotted
or with snow
Signal source is low-grade or the signal is
in a lower quality.
Use the qualified signal cord.
Blue background
No video signal or the signal cord is im-
properly/not connected.
Connect the signal cord properly.
PC Picture is not
in the middle of
the screen
Picture is not well adjusted.
Press the CH+/CH- buttons at one time to
adjust it.
Adjust H/V- position manually to adjust it.
No sound
No audio signal or the signal cord is im-
properly/not connected.
Connect the audio signal cord properly.
Set the sound system properly.
The RC does not
work
Batteries are improperly installed or ex-
hausted.
Make sure the positive and the negative
polarities are correct.
Reattach the battery lid.
Replace the batteries.
The causes of interference
Incorporated in your TV receiver are the most up-to-date devices to eliminate interference. Local radiation
however, can create disturbances, which visibly affect your picture. Proper installations, a good aerial are
your best safeguards against these disturbances.
RF INTERFERENCE
Moving ripples across the screen are caused by nearby transmitting or receiving short-wave radio
equipment.
DIATHERMY
Herringbone pattern and partial picture loss can result from the operation of diathermy equipment from
a nearby doctor's surgery or hospital.
SNOW
Weak TV signals from long distant stations result in an instead picture and give the effect of falling
snow. An antenna adjustment or antenna amplifier may be needed.
GHOST
Multiple image, caused by TV signals reflected back from surrounding buildings, hills, aircraft, etc. is
minimized by correct aerial positioning.
CAR IGNITION
Nearby cars and electrical motors can cause small streaks across the picture or make the picture roll.

16
Specifications
Size (diagonal) 15” (38 cm)
Brightness 250 (cd/m
2
)
Contrast 450:1
Angle of view 140°/140°
Speed response 16 ms
Resolution 1024 x 768
LCD panel items
Aspect ratio 4:3
Color system PAL, SECAM
Sound system DK, I, BG, L
S-video in Yes
Composite video Yes
Input Composite video, RGB, Audio L+R
SCART
Output Composite video, Audio
PC audio input Yes
VGA Yes
Russian OSD Yes
Digital comb filter Yes
Sleep timer Yes
Quantity of channels 200
Teletext Yes
Voltage input
~110-240V, 50/60Hz
Note: The LCD panel is a high technology product with many thin film transistors that can give
you a fine picture details. Occasionally, a few non-active pixels may appear on the
screen as a fixed point of blue, green, red, black or white, please note that this does not
affect the performance of your LCD TV.
Warning: Specifications may be subject to change without notice for improvement.

17
...............................................................................................................................................17
...................................................................................................................................18
..................................................................................................................................20
...................................................................................................................................20
.....................................................................................................21
()..............................................................................................23
..................................................................................................................................25
.........................................................................................................................................26
...........................................................................................30
......................................................................................................................................30
...................................................................................................................31

18
LCD HYUNDAI!
, , -
.
, -
:
, , , -
.
.
.
.
, .
.
-
, .
.
-
, -
.
, -
, , ,
.
, , -
, .
,
. -
.
.
, .
.
.
.
, .
.
, -
. -
, -
, .
, , ,
, . ,
. , -
.
,
. , ,
, .
–20° +50°. .

19
, . -
.
. -
. .
, , .
.
:
; LCD-
-
( 10 ).
, ,
. ,
.
, .
, ,
. -
, .
. , , -
.
.
, , , . -
LCD .
LCD .
.
:
, LCD -
.
.
, .
. ,
, .
18 , 2 . -
.
:
.
.
. -
.
.
:
. ,
LCD .

20
: 15"/38
: 4:3
: 1024x768
: 250 ²
: 450:1
: 140º/140º
: 16
: PAL/SECAM; BG/DK/I/L
: RF , S-Video, , SCART, VGA,
200
«»
: 110-240B, 50/60
: , -
. , .
.
()
RCA
Страница загружается ...
Страница загружается ...
Страница загружается ...
Страница загружается ...
Страница загружается ...
Страница загружается ...
Страница загружается ...
Страница загружается ...
Страница загружается ...
Страница загружается ...
Страница загружается ...
-
 1
1
-
 2
2
-
 3
3
-
 4
4
-
 5
5
-
 6
6
-
 7
7
-
 8
8
-
 9
9
-
 10
10
-
 11
11
-
 12
12
-
 13
13
-
 14
14
-
 15
15
-
 16
16
-
 17
17
-
 18
18
-
 19
19
-
 20
20
-
 21
21
-
 22
22
-
 23
23
-
 24
24
-
 25
25
-
 26
26
-
 27
27
-
 28
28
-
 29
29
-
 30
30
-
 31
31


Hyundai H-LCD1509 Руководство пользователя
- Категория
- ЖК-телевизоры
- Тип
- Руководство пользователя
Задайте вопрос, и я найду ответ в документе
Поиск информации в документе стал проще с помощью ИИ
на других языках
- English: Hyundai H-LCD1509 User manual
Похожие модели бренда
-
Hyundai H-CMD7086 Руководство пользователя
-
-
-
-
-
-
Модели других брендов
-
SoundMax SM-CMMD7000(чер) Руководство пользователя
-
SoundMax SM-CMD5003G Руководство пользователя
-
Telefunken TF-LED32S36T2 Руководство пользователя
-
-
-
-
-
Yamaha AVXS100 Руководство пользователя
-
Acer F-19" Руководство пользователя
-
 Red Square Tesla TKL RGB(RSQ-20008) Руководство пользователя
