Zanussi ZWP582 Руководство пользователя
- Категория
- Стиральные машины
- Тип
- Руководство пользователя

EN
User manual 2
RU
Инструкция по
эксплуатации
14
Washing Machine
Стиральная машина
ZWP 582

Contents
Safety information _ _ _ _ _ _ _ _ _ _ _ _ _ _ 2
Safety instructions _ _ _ _ _ _ _ _ _ _ _ _ _ _ 3
Product description _ _ _ _ _ _ _ _ _ _ _ _ _ 4
How to run a wash cycle? _ _ _ _ _ _ _ _ _ _ 5
Daily use _ _ _ _ _ _ _ _ _ _ _ _ _ _ _ _ _ _ _ 5
Washing programmes _ _ _ _ _ _ _ _ _ _ _ _ 7
Consumption values _ _ _ _ _ _ _ _ _ _ _ _ _ 8
Care and cleaning _ _ _ _ _ _ _ _ _ _ _ _ _ _ 8
Operating Problems _ _ _ _ _ _ _ _ _ _ _ _ 10
Detergents and Additives _ _ _ _ _ _ _ _ _ _ 11
Technical Specifications _ _ _ _ _ _ _ _ _ _ 11
Installation _ _ _ _ _ _ _ _ _ _ _ _ _ _ _ _ _ _ 12
Environment concerns _ _ _ _ _ _ _ _ _ _ _ 13
Subject to change without notice.
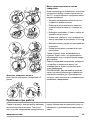
Safety information
Before the installation and use of the appliance, carefully read the
supplied instructions. The manufacturer is not responsible if an in-
correct installation and use causes injuries and damages. Always
keep the instructions with the appliance for future reference.
Children and vulnerable people safety
Warning! Risk of suffocation, injury or permanent disability.
• Do not let persons, children included, with reduced physical sen-
sory, reduced mental functions or lack of experience and knowl-
edge use the appliance. They must have supervision or instruction
for the operation of the appliance by a person who is responsible
for their safety.
• Do not let children play with the appliance.
• Keep all packaging away from children.
• Keep all detergents away from children.
• Keep children and pets away from the appliance door when it is
open.
• If the appliance has a child safety device, we recommend you ac-
tivate it.
General Safety
• Before maintenance, deactivate the appliance and disconnect the
mains plug from the mains socket.
• Do not change the specification of this appliance.
2
www.zanussi.com

• Obey the maximum load volume of 6 kg (refer to the “Programme
chart” chapter).
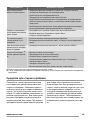
Safety instructions
Installation
• Remove all the packaging and the transit
bolts.
• Keep the transit bolts. When you move the
appliance again you must block the drum.
• Do not install or use a damaged appliance.
• Do not install or use the appliance where the
temperature is less than 0 °C or where it is
exposed to the weather.
• Obey the installation instruction supplied
with the appliance.
• Make sure that the floor where you install the
appliance is flat, stable, heat resistant and
clean.
• Do not install the appliance where the appli-
ance door can not be fully opened.
• Always be careful when you move the appli-
ance because it is heavy. Always wear safety
gloves.
• Make sure that there is air circulation be-
tween the appliance and the floor.
• Adjust the feet to have the necessary space
between the appliance and the carpet.
Electrical connection
Warning! Risk of fire and electrical shock.
• The appliance must be earthed.
• Make sure that the electrical information on
the rating plate agrees with the power sup-
ply. If not, contact an electrician.
• Always use a correctly installed shockproof
socket.
• Do not use multi-plug adapters and exten-
sion cables.
• Make sure not to cause damage to the mains
plug and to the mains cable. Contact the
Service or an electrician to change a dam-
aged mains cable.
• Connect the mains plug to the mains socket
only at the end of the installation. Make sure
that there is access to the mains plug after
the installation.
• Do not pull the mains cable to disconnect
the appliance. Always pull the mains plug.
• Do not touch the mains cable or the mains
plug with wet hands.
• This appliance complies with the E.E.C. Di-
rectives.
Water connection
• Make sure not to cause damage to the water
hoses.
• The appliance is to be connected to the wa-
ter mains using the new supplied hose-sets.
Old hose sets must not be reused.
• Before you connect the appliance to new
pipes or pipes not used for a long time, let
the water flow until it is clean.
• The first time you use the appliance, make
sure that there is no leakage.
Use
Warning! Risk of injury, electrical shock,
fire, burns or damage to the appliance.
• Use this appliance in a household only.
• Obey the safety instructions on the detergent
packaging.
• Do not put flammable products or items that
are wet with flammable products in, near or
on the appliance.
• Make sure that you remove all metal objects
from the laundry.
• Do not put a container to collect possible
water leakage under the appliance. Contact
the Service to ensure which accessories can
be used.
Care and Cleaning
3
www.zanussi.com

Warning! Risk of injury or damage to the
appliance.
• Do not use water spray and steam to clean
the appliance.
• Clean the appliance with a moist soft cloth.
Only use neutral detergents. Do not use
abrasive products, abrasive cleaning pads,
solvents or metal objects.
Disposal
Warning! Risk of injury or suffocation.
• Disconnect the appliance from the mains
supply.
• Cut off the mains cable and discard it.
• Remove the door catch to prevent children
and pets to get closed in the appliance.
Service
• Contact the Service to repair the appliance.
We recommend only the use of original
spare parts.
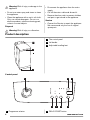
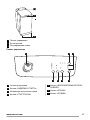
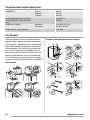
Product description
1
3
2
1
The control panel
2
Lid handle
3
Adjustable levelling feet
Control panel
1
2 3
4567
1
Programme selector
2
DELAY START button
4
www.zanussi.com

3
Lights of cycle progress
4
START/PAUSE button
5
EXTRA RINSE button
6
OPTIONS button
7
SPIN button
Dispenser box
Prewash
Wash
Softener (do not fill above the MAX
symbol
M
)
How to run a wash cycle?
Using for the first time
• Ensure the electrical and water connec-
tions comply with the installation in-
structions.
• Remove the polystyrene insert and all
other items inside the drum.
• Run an initial wash cycle at 90°C, with-
out any washing but with detergent to
clean the water tank.
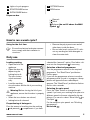
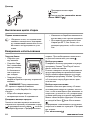
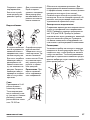
Daily use
Loading washing
• Open the lid of the
appliance.
• Open the drum by
depressing the
locking button A:
The two shutters
unlock automati-
cally.
•Load the washing,
close the drum and the lid of your washing
machine.
Warning! Before closing the lid of your
appliance, ensure that the drum is properly
closed :
• When the two shutters are closed,
• locking button A released.
Proportioning of detergents
Pour the amount of washing into the washing
and prewash compartments if you have
A
selected the “prewash” option. Pour fabric soft-
ener into the compartment
if necessary.
Selection of desired programme
Turn the programme selector to the required
programme. The “Start/Pause” pushbutton
flashes green.
If you turn the programme selector to another
programme while a cycle is in progress, the ap-
pliance will ignore the new selected pro-
gramme. The “Start/Pause” pushbutton flashes
red for a few seconds.
Selecting the spin speed
Press the “Spin” button to change the spin
speed, if you want your washing to be spun at a
different speed to the one selected by the ap-
pliance. You can also select “Rinse hold”
or
“No Spin”
.
For the maximum spin speeds see "Washing
programmes".
Rinse hold
5
www.zanussi.com

By selecting this function the water of the last
rinse is not emptied out to prevent the fabrics
from creasing.
No spin
By selecting this option, all spinning phases are
suppressed and replaced by a drain, so as not
to wrinkle the laundry. Recommended for ex-
tremely delicate fabrics.
At the end of the programme, if you have selec-
ted “Rinse hold”
, you then need to select a
“Spin” or “Drain” programme to finish the cycle
and empty the water.
Selecting options
You must select the different options after se-
lecting the programme and before pressing the
“Start/Pause” button (see “Washing pro-
grammes”). Press the desired button(s) : the
corresponding lights come on. If pressed again,
the lights go out. If one of the options is not
compatible with the selected programme, the
“Start/Pause” button flashes red.
“Prewash” option
The appliance runs a prewash at 30°C max.
“Super quick” option
The washing time will be reduced depending
on the programme selected.
“Extra rinse” option
The washing machine will add one or more rin-
ses during the cycle. This option is recommen-
ded for people with sensitive skin and in soft
water areas.
“Delay start”
This option allows you to delay the start of a
wash programme by 3, 6 or 9 hours by press-
ing the “Delay start” button.
You can change or cancel the delayed start
time at any time before you press the “Start/
Pause” button by pressing the “Delay start”
button again (when all indicators are off, the
wash programme will start immediately).
If you have already pressed the “Start/Pause”
button and you want to change or cancel the
delayed start, proceed as follows :
• To cancel the delay start and start the cycle
immediately, press “Start/Pause” and then
“Delay start”. Press “Start/Pause” to start the
cycle.
• To change the timer delay period, you must
go through the “Stop” position
and re-
programme your cycle.
The lid will be locked during the delayed start
time. If you need to open it, you must first pause
the appliance by pressing the “Start/Pause”
button. After closing the lid again, press the
“Start/Pause” button.
Start of the programme
Press the “Start/Pause” button to start the cy-
cle. The corresponding light will come on
green. It is normal for the programme selector
to remain stationary during the cycle. The light
corresponding to the current cycle is illumina-
ted.
+ : Prewash + Wash
+ : Rinses + Spin
: End of cycle
The drain pump can operate for a short
time when the appliance fills water.
Interrupting a programme
Adding washing during the first 10 mi-
nutes
Press the “Start/Pause” button : the corre-
sponding light will flash green while the appli-
ance is paused. The lid can only be opened
around 2 minutes after the washing machine
has come to a stop. Press the “Start/Pause”
button again to continue the programme.
Modifying the programme in progress
Before making any changes to the current pro-
gramme, you need to pause the washing ma-
chine by pressing the “Start/Pause” button. If
the modification is not possible, the “Start/
Pause” button flashes red for a few seconds. If
you still decide to change the programme, you
must cancel the current programme (see be-
low).
Cancelling the programme
If you want to cancel the programme, turn the
programme selector to the “Stop” position
.
End of the programme
The washing machine stops automatically, the
“Start/Pause” button goes out and the light
6
www.zanussi.com

“End of cycle” comes on. The lid can only
be opened around 2 minutes after the washing
machine has come to a stop. Turn the pro-
gramme selector to the “Stop” position . Re-
move washing. Unplug and close water inlet
tap.
Washing programmes
Programme / Type of washing Load Available options
Cotton (30° - 90°) : White or colour cotton
items, e.g. normally soiled work clothes, bed lin-
en, table linen, body linen, towels.
Max. spin speed: 850 rpm
6 kg Rinse hold, No spin, Super quick, Pre-
wash, Extra rinse, Delay start
Cotton economy (40° and 60°)
1)
: White or
colour cotton items, e.g. normally soiled work
clothes, bed linen, table linen, body linen, towels.
Max. spin speed: 850 rpm
6 kg Rinse hold, No spin, Prewash, Extra
rinse, Delay start
Synthetics (30° - 60°) : Synthetic fabrics,
body linen, coloured fabrics, non-iron shirts, blou-
ses.
Max. spin speed: 850 rpm
2,5 kg Rinse hold, No spin, Super quick, Pre-
wash, Extra rinse, Delay start
Easy iron (40°) : For cottons and synthetics. Re-
duces creasing and makes ironing easier.
Max. spin speed: 850 rpm
1,0 kg Rinse hold, No spin, Prewash, Extra
rinse, Delay start
Delicates (30° - 40°) : Delicate fabrics:
acrylics, viscose, polyester.
Max. spin speed: 700 rpm
2,5 kg Rinse hold, No spin, Super quick, Pre-
wash, Extra rinse, Delay start
Handwash (30° - 40°) : Very delicate items
carrying the “wash by hand” label.
Max. spin speed: 850 rpm
1,0 kg Rinse hold, No spin, Delay start
Wool (40°) : Machine washable wool carrying
the labels “pure new wool, machine washable,
does not shrink”.
Max. spin speed: 850 rpm
1,0 kg Rinse hold, No spin, Delay start
Sport intensive (40°) : For normally and heavily
soiled outdoor sport clothes. machine will add
automatically a prewash phase before the main
wash to eliminate mud stains.
2)
Max. spin speed: 850 rpm
2,5 kg Rinse hold, No spin, Extra rinse, Delay
start
Curtains (40°) : For washing curtains. The Pre-
wash option is activated.
Max. spin speed: 700 rpm
2 kg Rinse hold, No spin, Extra rinse, Delay
start
Rinses : Hand washed items can be rinsed in
this programme.
Max. spin speed: 850 rpm
6 kg Rinse hold, No spin, Extra rinse, Delay
start
Drain : To empty out the water in cycles with
Rinse hold option selected.
6 kg
7
www.zanussi.com

Programme / Type of washing Load Available options
Spin : A spin cycle from 500 to 850 after a
Rinse hold option.
6 kg Delay start
1) Standard programmes for the Energy Label consumption values
According to regulation 1061/2010, the “Cotton economy 60 °C” and “Cotton economy 40 °C” are
respectively the “standard 60 °C cotton programme” and the “standard 40 °C cotton programme”. They are
the most efficient programmes in terms of combined energy and water consumptions for washing normally
soiled cotton laundry.
The water temperature of the washing phase may differ from the temperature declared for the selected
programme.
2) We recommend not to add any detergent for prewash phase.
Consumption values
The data of this table are approximate. Different causes can change the data: the quantity and
type of laundry, the water and ambient temperature.
Programmes Load
(kg)
Energy con-
sumption
(kWh)
Water con-
sumption (litre)
Approximate
programme
duration (mi-
nutes)
Remaining
moisture
(%)
1)
Cottons 60 °C 6 1.30 62 145 66
Cottons 40 °C 6 1.20 58 120 66
Synthetics 40 °C 2,5 0.65 48 80 37
Delicates 40 °C 2,5 0.55 53 70 37
Wool/Hand wash
30 °C
1 0.40 48 54 37
Standard cotton programmes
Standard 60 °C
cotton
6 1.03 48 224 66
Standard 60 °C
cotton
3 0.78 41 150 66
Standard 40 °C
cotton
3 0.60 42 138 66
1) At the end of spin phase.
Off Mode (W) Left On Mode (W)
0.1 1.6
The information given in the charts above are in compliance with the EU Commission regulation 2015/2010
implementing directive 2009/125/EC.
Care and cleaning
Unplug the appliance before cleaning.
8
www.zanussi.com

Descaling the appliance
To descale the appliance, use an appropriate
non-corrosive product designed for washing
machines. Read product label for recommen-
ded amounts and how often descaling should
be carried out.
The exterior
Use warm soapy water to clean the exterior of
the appliance. Never use alcohol, solvents or
similar products.
Dispenser box
To clean, proceed as follows :
1
2
4
3
Drain filter
Regularly clean the drain filter which is located
at the bottom of the drum :
1
2
4
3
5
6
7
8
9
10
CLACK
11
CLACK
Water inlet filters
To clean, proceed as follows :
Precautions to be taken against frost
If your appliance is exposed to temperatures
below 0°C, the following precautions must be
taken:
• Close the tap and disconnect the inlet hose.
• Place the end of this hose and the drain hose
in a basin on the floor.
• Select the Drain programme let it run until
the end of the cycle.
• Disconnect the appliance from the power
supply by turning the programme selector to
“Stop”
.
• Unplug the appliance.
• Replace the inlet hose and drain hose.
This way, the water remaining in the hoses will
be drained away, avoiding any ice formation
which would damage your appliance.
Before turning your appliance on again, ensure
that it is installed in an area where the tempera-
ture will not fall below freezing.
9
www.zanussi.com

NOTE ! This machine is made for use in normal
inside temperature. Manufacturer is not respon-
sible for freezing damages.
Operating Problems
Numerous checks were carried out on your ap-
pliance before it left the factory. However,
should you notice a malfunction, please refer to
the sections below before contacting the after-
sales service.
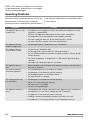
Problems Causes
The appliance doesn’t start
or doesn’t fill:
• the appliance isn’t plugged in correctly, the electrical installation isn’t work-
ing, there is a power failure,
• the lid of your appliance and the drum shutters aren’t closed firmly,
• the programme start command hasn’t been properly selected,
• the water supply has been cut off, the water inlet tap is closed,
• the water inlet filters are dirty (see “Care and cleaning ”).
The appliance fills but
empties straight away:
• the drainage U-piece is fixed too low (see “Installation”).
The appliance doesn’t
rinse or doesn’t empty:
• the drain hose is blocked or bent,
• the drainage filter is obstructed (see “Care and cleaning ”),
• the out of balance detector has been activated: washing is unevenly distrib-
uted in the drum,
• the “Drain” programme or “Night Cycle” or “Rinse hold” option have been
selected,
• the height of the drainage U-piece is unsuitable.
The appliance doesn’t
spin:
• balance problem with the laundry load: add more laundry or manually adjust
the items in the drum.
You have found water
around the appliance:
• too much detergent has caused foam to overflow,
• the detergent is unsuitable for machine washing,
• the drainage U-piece isn’t attached correctly,
• the water inlet hose is leaking.
The washing results are
not satisfactory :
• the detergent is unsuitable for machine washing,
• there is too much washing in the drum,
• the wash cycle is unsuitable,
• there isn’t enough detergent.
The appliance vibrates, is
noisy:
• all packaging have not been removed from the appliance (see “Installation”),
• the appliance isn’t level and is unbalanced (see “Installation”),
• the appliance is too close to the wall or furniture,
• washing is unevenly distributed in the drum, the load is too small,
• the appliance is in running in period, noise will disappear with time.
10
www.zanussi.com

Problems Causes
The wash cycle is much
too long:
• the water inlet filters are dirty (see “Care and cleaning ”),
• the power or water supply has been cut off,
• the motor overheating detector has been activated,
• the water inlet temperature is lower than usual,
• the foam detection security system has been activated (too much detergent)
and the washing machine has begun draining the foam,
• the out of balance detector has been activated: an extra phase has been
added to distribute washing more evenly in the drum.
The appliance stops during
a wash cycle:
• the water or electricity supply is defective,
• a “Rinse hold” has been selected,
• the drum shutters are open.
The lid doesn’t open at the
end of the cycle:
• the temperature inside the drum is too high,
• the lid unlocks 1 - 2 minutes after the end of the cycle.
Softener runs directly into
the drum when filling the
dispenser box:
• you have gone past the MAX indicator.
The “Start/Pause” push-
button
1)
flashes red
2)
:
• the lid is not closed properly,
• the drainage filter is obstructed,
• the drain hose is blocked or bent,
• the drain hose is fixed to high (see "Installation"),
• the drainage pump is blocked,
• the standpipes blocked,
• the water tap is closed, the water supply has been cut off.
1) On some models, the audible signals can sound
2) After solving any problems, press "Start/Pause" pushbutton to restart the interrupted programme.
Detergents and Additives
Only use detergents and additives designed for
use in a washing machine. We do not recom-
mend mixing different types of detergents. This
may spoil the washing. There are no restrictions
on the use of powder detergents. Use liquid
detergents for low temperature wash pro-
grammes. Liquid detergents must not be used
when a prewash has been selected. For cycles
without prewash, pour the liquid detergent di-
rectly into the drum or use a special dosing de-
vice (supplied by the detergent's manufacturer).
Detergent tablets or doses must be placed in
the detergent compartment of your appliance's
dispenser box.
Technical Specifications
DIMENSIONS Height
Width
Depth
850 mm
400 mm
600 mm
LINE VOLTAGE /FREQUENCY
POWER CONSUMPTION
230 V / 50 Hz
2300 W
11
www.zanussi.com

WATER PRESSURE Minimum
Maximum
0,05 MPa (0,5 bar)
0,8 MPa (8 bar)
Connection to water supply Type 20/27
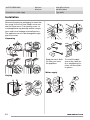
Installation
Remove all protective packaging for transit be-
fore using for the first time. Keep in case nee-
ded for future transit: Transporting a non-se-
cured appliance may damage internal compo-
nents and cause leakages and malfunctions.
The appliance can also be damaged through
physical contact.
Unpacking
2
1
1
2
2
1
Untying
AB
D
C
A
1
2
B
2
1
B
D
Keep the transit bolts
for when you move
the appliance.
To install the appli-
ance at the same lev-
el as neighboring fur-
niture, cut these plas-
tic pieces.
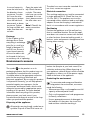
Water supply
90
O
90
O
90
O
12
www.zanussi.com

In case of necessity
move the inlet hose in
the direction shown
on picture. To make
this loose the inlet
hose ring nut and po-
sition the inlet hose
downwards as drawn
on picture. Tighten
the ring nut back and
make sure there are
no leaks.
Open the water inlet
tap. Check there are
no leaks. The water
inlet hose can not be
extended. If it is too
short, please contact
the after-sales serv-
ice.
Note ! Check if the
water connections
are tight.
Drainage
Fit the U-piece on the
drainage hose. Place
everything in a drainage
point (or in a sink) at a
height of between 70
and 100 cm. Ensure it
is positioned securely.
Air must be able to en-
ter the end of the hose,
to avoid any risk of siphoning.
max
100 cm
min
70 cm
The drain hose must never be stretched. If it is
too short, contact an engineer.
Electrical connection
This washing machine must only be connected
in single-phased 230 V. Check the fuse size:
10 A for 230 V. The appliance must not be
connected with an extension lead or multi-plug
adaptor. Ensure that the plug is earthed and
that it is in accordance with current regulations.
Positioning
Position the appliance on a flat and hard sur-
face in a ventilated location. Ensure the appli-
ance does not come into contact with the wall
or other furniture. Accurate levelling avoids vi-
brations, noise and prevents the appliance from
moving when running.
Environment concerns
The symbol on the product or on its
packaging indicates that this product may not
be treated as household waste. Instead it
should be taken to the appropriate collection
point for the recycling of electrical and
electronic equipment. By ensuring this product
is disposed of correctly, you will help prevent
potential negative consequences for the
environment and human health, which could
otherwise be caused by inappropriate waste
handling of this product. For more detailed
information about recycling of this product,
please contact your local council, your
household waste disposal service or the shop
where you purchased the product.
Disposing of the appliance
All materials carrying the
symbol are re-
cyclable. Dispose of them at a waste col-
lection site (enquire at your local council) for
collection and recycling. When disposing of
your appliance, remove all parts which could be
dangerous to others: cut off the power supply
cable at the base of the appliance.
Protecting the environment
To save water and energy and therefore
help protect the environment, we recom-
mend the following:
• Whenever possible, use the appliance at full
capacity and avoid partial loads.
• Only use the prewash and soak programmes
for heavily soiled items.
• Use an appropriate amount of detergent for
the hardness of the water, the size of the
load and how soiled the washing is.
13
www.zanussi.com

Содержание
Сведения по технике безопасности _ _ 14
Указания по безопасности _ _ _ _ _ _ _ 15
Описание изделия _ _ _ _ _ _ _ _ _ _ _ 16
Выполнение цикла стирки _ _ _ _ _ _ _ 18
Ежедневное использование _ _ _ _ _ _ 18
Программы стирки _ _ _ _ _ _ _ _ _ _ _ 20
Показатели потребления _ _ _ _ _ _ _ _ 21
Уход и очистка _ _ _ _ _ _ _ _ _ _ _ _ _ 22
Проблемы при работе _ _ _ _ _ _ _ _ _ 23
Средства для стирки и добавки _ _ _ _ 25
Технические характеристики _ _ _ _ _ _ 26
Установка _ _ _ _ _ _ _ _ _ _ _ _ _ _ _ _ 26
Охрана окружающей среды _ _ _ _ _ _ 28
Право на изменения сохраняется.
Сведения по технике безопасности
Перед установкой и эксплуатацией прибора внимательно оз-
накомьтесь с приложенным руководством. Производитель не
несет ответственность за травмы и повреждения, получен-
ные/вызванные неправильной установкой и эксплуатацией.
Позаботьтесь о том, чтобы данное руководство было у Вас
под рукой на протяжении всего срока службы прибора.
Безопасность детей и лиц с ограниченными
возможностями
ВНИМАНИЕ! Существует риск удушья, получения травм
или стойких нарушений нетрудоспособности.
• Не допускайте лиц, включая детей, с ограниченной чув-
ствительностью, умственными способностями или не обла-
дающих необходимыми знаниями, к эксплуатации прибора.
Они должны находиться под присмотром или получить ин-
струкции от лица, ответственного за их безопасность.
• Не позволяйте детям играть с
прибором.
• Храните все упаковочные материалы вне досягаемости де-
тей.
• Храните все средства для стирки вне досягаемости детей.
• Не подпускайте детей и домашних животных к прибору, ко-
гда его дверца открыта.
• Если прибор оснащен устройством защиты от детей, реко-
мендуем Вам включить это устройство.
14
www.zanussi.com

Общие правила техники безопасности
• Перед выполнением операций по чистке и уходу выключи-
те прибор и извлеките вилку сетевого шнура из розетки.
• Не изменяйте параметры данного прибора.
• Соблюдайте максимально допустимую загрузку в 6 кг (см.
Главу «Таблица программ»).
Указания по безопасности
Установка
• Удалите всю упаковку и вывинтите
транспортировочные болты.
• Сохраните транспортировочные болты.
Перед следующим перемещением при-
бора Вам будет необходимо заблокиро-
вать барабан.
• Не устанавливайте и не подключайте
прибор, если он имеет повреждения.
• Не устанавливайте и не эксплуатируйте
прибор в помещениях с температурой
ниже 0°C или в местах, где он может
оказаться под действием
атмосферных
условий.
• Следуйте приложенным к прибору ин-
струкциям по его установке.
• Убедитесь, что пол на месте установки
прибора ровный, прочный, чистый и не
боится нагрева.
• Не устанавливайте прибор там, где его
дверцу будет невозможно полностью от-
крыть.
• Прибор имеет большой вес: не забывай-
те о мерах предосторожности при его
перемещении. Обязательно
используй-
те защитные перчатки.
• Убедитесь, что между днищем прибора
и полом имеется достаточная вентиля-
ция.
• Для обеспечения необходимого про-
странства между прибором и ковровым
покрытием отрегулируйте высоту ножек
прибора.
Подключение к электросети
ВНИМАНИЕ! Существует риск пожара
и поражения электрическим током.
• Прибор должен быть заземлен.
• Убедитесь, что параметры электропита-
ния, указанные на табличке с техниче-
скими данными, соответствуют парамет-
рам электросети. В противном случае
вызовите электрика.
• Включайте прибор только в установлен-
ную надлежащим образом электроро-
зетку с защитным контактом.
• Не пользуйтесь тройниками
и удлините-
лями.
• Следите за тем, чтобы не повредить
вилку и сетевой кабель. Для замены се-
тевого кабеля обратитесь в сервисный
центр или к электрику.
• Вставляйте вилку сетевого кабеля в ро-
зетку только во конце установки прибо-
ра. Убедитесь, что после установки
имеется доступ к вилке.
• Для отключения прибора от электросети
не тяните за кабель электропитания.
Всегда беритесь за саму вилку.
• Не беритесь за кабель электропитания
или за его вилку мокрыми руками.
• Данный прибор соответствует евроди-
рективам E.E.C.
Подключение к водопроводу
• Следите за тем, чтобы не повредить
шланги для воды.
• При подключении прибора к водопрово-
ду должны использоваться новые поста-
15
www.zanussi.com

вляемые с ним комплекты шлангов. Ис-
пользовать старые комплекты шлангов
нельзя.
• Перед подключением прибора к новым
или давно не использовавшимся трубам
дайте воде стечь, пока она не станет чи-
стой.
• Перед первым использованием прибора
убедитесь в отсутствии протечек.
Эксплуатация
ВНИМАНИЕ! Существует риск
травмы, поражения электрическим
током, пожара, получения ожогов или
повреждения прибора.
• Используйте
прибор только в жилых по-
мещениях.
• Следуйте правилам по безопасному об-
ращению, приведенным на упаковке
средства для стирки.
• Не кладите на прибор, рядом с ним или
внутрь него легковоспламеняющиеся
материалы или изделия, пропитанные
легковоспламеняющимися веществами.
• Удостоверьтесь, что из белья извлечены
все металлические предметы.
• Не помещайте под прибор контейнер
для сбора воды
на случай возможной ее
протечки. Чтобы узнать, какие дополни-
тельные принадлежности могут исполь-
зоваться с Вашим прибором, обратитесь
в сервисный центр.
Уход и очистка
ВНИМАНИЕ! Существует риск
повреждения прибора или травм.
• Не используйте для очистки прибора по-
даваемую под давлением воду или пар.
• Протирайте прибор мягкой влажной
тряпкой. Используйте только нейтраль-
ные моющие средства. Не используйте
абразивные средства, царапающие губ-
ки, растворители или металлические
предметы.
Утилизация
ВНИМАНИЕ! Существует опасность
травмы или удушья.
• Отключите
прибор от электросети.
• Отрежьте и утилизируйте кабель элек-
тропитания.
• Удалите защелку дверцы, чтобы предот-
вратить риск ее запирания при попада-
нии внутрь прибора детей и домашних
животных.
Обслуживание
• Для ремонта прибора обратитесь в сер-
висный центр. Мы рекомендуем исполь-
зовать только фирменные запасные ча-
сти.
Описание изделия
16
www.zanussi.com

1
3
2
1
Панель управления
2
Ручка крышки
3
Регулировочная ножка
Панель управления
1
2 3
4567
1
Селектор программ
2
Кнопка «ЗАДЕРЖКА СТАРТА»
3
Индикаторы выполнения цикла
4
Кнопка «СТАРТ/ПАУЗА»
5
Кнопка «ДОПОЛНИТЕЛЬНОЕ ПОЛО-
СКАНИЕ»
6
Кнопка «ОПЦИИ»
7
Кнопка «ОТЖИМ»
17
www.zanussi.com

Дозатор
Предварительная стирка
Стирка
Смягчитель (не заполняйте выше
метки «МАКС»
M
)
Выполнение цикла стирки
Первое использование
• Убедитесь в том, что подключение
машины к электросети, водопрово-
ду и канализации выполнено в соот-
ветствии с инструкциями по уста-
новке.
• Извлеките из барабана пенопласто-
вую вставку и все прочие предметы.
• Для первого раза выполните цикл
стирки при 90°C, без белья, но с
моющим средством, чтобы очистить
бак.
Ежедневное использование
Загрузка белья
• Откройте кры-
шку машины.
• Откройте бара-
бан, нажав запи-
рающую кнопку
А: Автоматиче-
ски откроются
две створки.
• Загрузите белье,
закройте барабан и крышку стиральной
машины.
ВНИМАНИЕ! Перед закрыванием
крышки стиральной машины
проверьте, чтобы барабан был закрыт как
следует:
• Когда обе створки закрыты,
• запирающая кнопка А поднимается.
Дозировка моющих средств
Засыпьте
соответствующее количество
стирального порошка в отделения стирки
и предварительной стирки , если бы-
ла выбрана функция «Предварительная
A
стирка». При необходимости засыпьте в
отделение смягчитель для ткани
.
Выбор программы
Поверните селектор программ на нужную
программу. Кнопка "Пуск/Пауза" начнет
мигать зеленым светом.
Если вы повернете селектор программ на
другую программу во время выполнения
цикла, машина проигнорирует эту вновь
выбранную программу. Кнопка "Пуск/Пау-
за" несколько секунд будет мигать крас-
ным светом.
Выбор скорости отжима
Нажмите несколько раз кнопку «Отжим»
для изменения
скорости отжима, если хо-
тите, чтобы отжим белья был выполнен со
скоростью, отличной от той, которая пред-
ложена прибором для данной программы.
Можно также выбрать функцию «Останов-
ка с водой в баке»
или «Без отжима»
.
Информацию о максимально допустимых
скоростях отжима см. в разделе «Програм-
мы стирки».
Ост. полоскания
18
www.zanussi.com

При выборе этой функции вода после по-
следнего полоскания не сливается для
предотвращения образования складок на
белье.
Без отжима
При выборе этой функции все этапы отжи-
ма отменяются и заменяются сливом во
избежание образования складок на белье.
Рекомендуется для особо деликатных тка-
ней.
По окончании программы, если выбрана
остановка с водой в баке
, для завер-
шения цикла и слива воды следует вы-
брать программу «Отжим» или «Слив».
Выбор функций
После выбора программы и перед нажа-
тием кнопки «Старт/Пауза» следует вы-
брать определенные функции (см. раздел
«Таблица программ»). Нажмите на требуе-
мую кнопку (кнопки): при этом загорятся
соответствующие индикаторы. При по-
вторном нажатии индикаторы
погаснут. В
случае выбора функции, несовместимой с
выбранной программой, замигает красный
индикатор кнопки «Старт/Пауза».
Функция «Предварительная стирка»
Данный прибор выполняет предваритель-
ную стирку при максимальной температу-
ре 30°C.
Функция «Быстрая стирка»
Время стирки будет сокращено в зависи-
мости от выбранной программы.
Функция «Дополнительное
полоскание»
Стиральная машина добавит одно или не-
сколько полосканий во
время цикла. Дан-
ную функцию рекомендуется использовать
людям с чувствительной кожей и в регио-
нах с мягкой водой.
«Отсрочка пуска»
Эта дополнительная функция позволяет
отложить пуск программы стирки на 3, 6
или 9 часов. Для этого нужно нажать на
кнопку «Отсрочка пуска».
В любое время до нажатия на кнопку
«Пуск/Пауза» можно изменить или
отме-
нить время отсрочки пуска, нажав на кноп-
ку «Отсрочка пуска» еще раз (когда все ин-
дикаторы погаснут, программа стирки на-
чнется немедленно).
При необходимости изменения или отме-
ны отсрочки пуска после нажатия кнопки
«Пуск/Пауза» действуйте следующим об-
разом:
• Чтобы отменить отсрочку пуска или за-
пустить цикл немедленно, нажмите на
кнопку
«Пуск/Пауза», а затем – на кноп-
ку «Отсрочка пуска». Для запуска цикла
нажмите кнопку «Пуск/Пауза».
• Для того, чтобы изменить продолжи-
тельность отсрочки, следует повернуть
селектор через отметку «Стоп»
и пе-
репрограммировать заданный цикл.
В течение времени отсрочки пуска крышка
будет заблокирована. Если необходимо ее
открыть, сначала переведите прибор в ре-
жим паузы, нажав на кнопку «Пуск/Пауза».
После того, как Вы опять закроете крышку,
нажмите на кнопку «Пуск/Пауза».
Запуск программы
Для запуска цикла нажмите на кнопку
«Пуск/Пауза» Соответствующий
индикатор
загорится зеленым цветом. В ходе выпол-
нения цикла селектор программ остается
неподвижным; это нормально. Включен
индикатор, соответствующий текущему ци-
клу.
+ : Предварительная стирка + Ос-
новная стирка
+ : Полоскания + Отжим
: Завершение цикла
В ходе набора прибором воды на ко-
роткое время может включиться слив-
ной насос.
Прерывание программы
Добавление белья в течение первых 10
минут.
Нажмите кнопку «Пуск/Пауза»: соответ-
ствующий индикатор замигает зеленым, а
прибор перейдет в режим паузы. Крышку
можно открыть только через 2 минуты по-
сле остановки стиральной машины. Для
19
www.zanussi.com

возобновления выполнения программы
повторно нажмите на кнопку «Пуск/Пауза».
Изменение выполняемой программы
Перед внесением изменений в текущую
программу необходимо перевести сти-
ральную машину в режим паузы, нажав на
кнопку «Пуск/Пауза». Если требуемая мо-
дификация невозможна, красный индика-
тор кнопки «Пуск/Пауза» замигает в тече-
ние нескольких секунд. Если изменить
программу все же
необходимо, следует от-
менить текущую программу (см. ниже).
Отмена программы
Чтобы отменить программу, поверните се-
лектор программ на отметку «Стоп»
.
Завершение программы
Стиральная машина остановится автома-
тически, индикатор кнопки «Старт/Пауза»
погаснет и загорится индикатор «Оконча-
ние цикла»
. Дверцу можно открыть
только через 2 минуты после остановки
машины. Поверните селектор программ в
положение «Стоп»
. Извлеките белье.
Выньте вилку из розетки и закройте водо-
проводный кран.
Программы стирки
Программа / Тип ткани Загрузка Доступные функции
Хлопок (30°С – 90°С): изделия из белого
или цветного хлопка, например, рабочая
одежда средней степени загрязненности,
постельное белье, скатерти, нижнее белье,
полотенца.
Макс. скорость отжима: 850 об/мин
6 кг «Остановка с водой в баке», «Без от-
жима», «Быстрая стирка», «Предва-
рительная стирка», «Дополнитель-
ное полоскание», «Отсрочка пуска»
Хлопок экономичная (40°С и 60°С)
1)
: Из-
делия из белого или цветного хлопка, на-
пример, рабочая одежда средней степени
загрязненности, постельное белье, скатер-
ти, нижнее белье, полотенца.
Макс. скорость отжима: 850 об/мин
6 кг «Остановка с водой в баке», «Без от-
жима», «Предварительная стирка»,
«Дополнительное полоскание», «От-
срочка пуска»
Синтетика (30°C – 60°C): изделия из
синтетических тканей, нижнее белье, цвет-
ное белье, не требующие глажки блузки и
сорочки.
Макс. скорость отжима: 850 об/мин
2,5 кг «Остановка с водой в баке», «Без от-
жима», «Быстрая стирка», «Предва-
рительная стирка», «Дополнитель-
ное полоскание», «Отсрочка пуска»
Легкая глажка (40°): стирка изделий из
хлопка и синтетики. Уменьшает образова-
ние складок, тем самым облегчая глажку.
Макс. скорость отжима: 850 об/мин
1 кг «Остановка с водой в баке», «Без от-
жима», «Предварительная стирка»,
«Дополнительное полоскание», «От-
срочка пуска»
Деликатные ткани (30°С – 40°С): Изде-
лия из деликатных тканей: акрила, вискозы,
полиэстера.
Макс. скорость отжима: 700 об/мин
2,5 кг «Остановка с водой в баке», «Без от-
жима», «Быстрая стирка», «Предва-
рительная стирка», «Дополнитель-
ное полоскание», «Отсрочка пуска»
Ручная стирка (30°С – 40°С): стирка ве-
щей, требующих бережного обращения, с
ярлыком «ручная стирка».
Макс. скорость отжима: 850 об/мин
1 кг «Остановка с водой в баке», «Без от-
жима», «Отсрочка пуска»
20
www.zanussi.com
Страница загружается ...
Страница загружается ...
Страница загружается ...
Страница загружается ...
Страница загружается ...
Страница загружается ...
Страница загружается ...
Страница загружается ...
Страница загружается ...
Страница загружается ...
Страница загружается ...
Страница загружается ...
-
 1
1
-
 2
2
-
 3
3
-
 4
4
-
 5
5
-
 6
6
-
 7
7
-
 8
8
-
 9
9
-
 10
10
-
 11
11
-
 12
12
-
 13
13
-
 14
14
-
 15
15
-
 16
16
-
 17
17
-
 18
18
-
 19
19
-
 20
20
-
 21
21
-
 22
22
-
 23
23
-
 24
24
-
 25
25
-
 26
26
-
 27
27
-
 28
28
-
 29
29
-
 30
30
-
 31
31
-
 32
32


Zanussi ZWP582 Руководство пользователя
- Категория
- Стиральные машины
- Тип
- Руководство пользователя
Задайте вопрос, и я найду ответ в документе
Поиск информации в документе стал проще с помощью ИИ
на других языках
- English: Zanussi ZWP582 User manual
Похожие модели бренда
Модели других брендов
-
Electrolux EWT11730W Руководство пользователя
-
-
-
-
-
-
-
Samsung F1015 JGS/YLP Руководство пользователя
-