Corsair CO-9050092-WW Руководство пользователя

Тип
Руководство пользователя

Это руководство также подходит для

EMAIL: support@corsair.com
WEB: corsair.com
BLOG: corsair.com/blog
FORUM: forum.corsair.com
FACEBOOK: facebook.com/Corsair
TWITTER: twitter.com/Corsair
YOUTUBE: youtube.com/Corsair
USA and CANADA: (510) 657-8747 | INTERNATIONAL: (888) 222-4346 | FAX: (510) 657-8748
corsair.com
LL120 RGB
LL120 RGB
47100 Bayside Parkway • Fremont • California • 94538 • USA
PERFORMANCE FANS WITH CUSTOMIZABLE LIGHTING MODES AND COLORS
© 2017-2019 CORSAIR MEMORY, Inc. All Rights Reserved. The CORSAIR logo is a registered trademark of CORSAIR
in the United States and/or other countries. All other names and products are trademarks and property of their
respective owners. Printed in China. 49-001608 AC
English .............................................. –
Français ..........................................–
Deutsch ........................................ –
Italiano ......................................... –
Español ........................................ –
Россию ........................................... –
中文 ................................................ –
2
LL120 RGB FAN
Table Of Contents
1
Congratulations
The CORSAIR LL RGB series of fans give you high performance and individually
customizable RGB LED lighting in one package. Personalize your system lighting
and tailor your performance with PWM control.
LL RGB Kit Contents
Three Fan Kit
Fans 3
Fan Hub 1
CORSAIR Lighting Node PRO 1
Mounting Screws 12
Mounting Strips 2
Single Fan
Fan 1
Mounting Screws 4
Congratulations ......................................................................................................................................
LLRGBKitContents .............................................................................................................................
Installation ................................................................................................................................................
LightingNodePROInstallation .......................................................................................................
LEDHubInstallation .............................................................................................................................
DownloadCORSAIRiCUE ..................................................................................................................
4
LL120 RGB FANLL120 RGB FAN
3
Installation Lighting Node PRO Installation
> Connection Notes
Connect the fans in sequential order from
1 > 2 > 3 > 4 > 5 > 6.
Animations begin with fan 1 and proceed
through fan 6.
Any fan not connected in series will break
communication and the RGB LED lighting
function will not work.
> Mount the fan(s) to the location
of your choice in the chassis.
> Find a location for the RGB LED hub that allows
connection for all the fans RGB LED cables
installed in your system to reach the hub.
The CORSAIR Lighting Node PRO will also
need to be plugged into the RGB LED hub for
CORSAIR iCUE software control of the RGB
LED lighting.
> Mount the RGB LED hub with the provided
mounting strips.
> Turn your system o prior to installing your Lighting Node PRO.
> Find a location for the Lighting Node PRO that allows the cable to reach the
RGB LED hub.
> Mount the Lighting Node PRO with the provided mounting strip.
> Plug the mini USB cable into the back of the Lighting Node PRO then plug
the 9-pin end into an available internal USB 2.0 header in your system.
> Connect the SATA power connector to any available SATA connector
from your system power supply.
6
LL120 RGB FANLL120 RGB FAN
5
Download CORSAIR iCUELED Hub Installation
> Plug the RGB LED cable into an available LED header on the Lighting Node PRO
to connect the LED hub.
> Connect the SATA power connector to any available SATA
connector from your system power supply.
> For the full CORSAIR iCUE experience, please download our latest CORSAIR iCUE
software at www.corsair.com/downloads.
* An internet connection is required for software download.
CORSAIR iCUE is required for lighting control.
8
LL120 RGB FAN
7
Table Des Matières
Félicitations ..............................................................................................................................................
ContenudukitLLRGB ........................................................................................................................
Installation ................................................................................................................................................
InstallationduLightingNodePRO .............................................................................................
InstallationduhubLED .................................................................................................................... 
TéléchargerCORSAIRiCUE ............................................................................................................ 
Félicitations
Les ventilateurs de la gamme CORSAIR LL RGB vous orent de hautes performances
combinées à une technologie d'éclairage à LED RGB entièrement personnalisable.
Personnalisez l'éclairage du système et définissez les performances grâce au
contrôle PWM.
Contenu du kit LL RGB
Jeu de trois
ventilateurs
Ventilateurs 3
Hub du ventilateur 1
CORSAIR Lighting Node PRO 1
Vis de fixation 12
Bandes de fixation 2
Simple ventilateur
Ventilateurs 1
Vis de fixation 4
10
LL120 RGB FANLL120 RGB FAN
9
Installation Installation du LightingNodePRO
> Remarques sur la connectique
Connectez les ventilateurs dans l'ordre
séquentiel: 1 > 2 > 3 > 4 > 5 > 6.
Les animations commencent par le
ventilateur n°1 et continuent jusqu'au
ventilateur n°6.
Un ventilateur non connecté en série
entraînera l'arrêt de la communication et de
la fonction d'éclairage LED RGB.
> Montez les ventilateurs à l'emplacement
de votre choix dans le châssis.
> Trouvez pour le hub RGB LED un emplacement
susamment spacieux pour connecter tous les
câbles des LED RGB des ventilateurs installés
dans votre système.
Le CORSAIR Lighting Node PRO devra
également être branché au hub RGB LED
pour que le logiciel CORSAIR iCUE puisse
contrôler l'éclairage RGB LED.
> Installez le hub RGB LED à l'aide des bandes
de fixation fournies.
> Éteignez votre système avant d'installer le LightingNodePRO.
> Trouvez un emplacement pour le Lighting Node PRO. Il doit être susamment
spacieux pour que le câble atteigne le hub RGB LED.
> Installez le Lighting Node PRO à l'aide de la bande de fixation fournie.
> Branchez le câble mini-USB sur l'arrière du LightingNodePRO, puis branchez
l'extrémité à 9broches sur un cavalier USB 2.0 interne disponible de votre système.
> Connectez la fiche SATA sur une prise SATA disponible de l'alimentation
de votre système.
12
LL120 RGB FANLL120 RGB FAN
11
Télécharger CORSAIR iCUEInstallation du hub LED
> Branchez le câble RGB LED sur un cavalier LED disponible sur le Lighting Node PRO
pour connecter le hub LED.
> Connectez la fiche SATA sur une prise SATA disponible de l'alimentation de
votre système.
> Pour profiter de tout le potentiel de CORSAIR iCUE, téléchargez la dernière version
à l'adresse www.corsair.com/downloads.
* Une connexion Internet est nécessaire pour télécharger le logiciel.
CORSAIR iCUE est indispensable pour contrôler l'éclairage.
14
LL120 RGB FAN
13
Inhaltsverzeichnis
HerzlichenGlückwunsch .................................................................................................................. 
LLRGBKit-Komponenten .............................................................................................................. 
Installation .............................................................................................................................................
InstallationdesLightingNodePRO ...........................................................................................
InstallationderLED-Nabe ...............................................................................................................
CORSAIRiCUEherunterladen ....................................................................................................... 
Herzlichen Glückwunsch
Mit den Lüftern der LLRGB-Serie von CORSAIR erhalten sie hohe Leistung und eine
individuell anpassbare RGBLED-Beleuchtung in einem Gehäuse. Personalisieren Sie
Ihre Systembeleuchtung und passen Sie die Leistung mit der PWM-Steuerung
individuell an.
LL RGB Kit-Komponenten
Kit mit drei
Lüftern
Lüfter 3
Lüfternabe 1
CORSAIR Lighting Node PRO 1
Befestigungsschrauben 12
Montageleisten 2
Einzelner Lüfter
Lüfter 1
Befestigungsschrauben 4
16
LL120 RGB FANLL120 RGB FAN
15
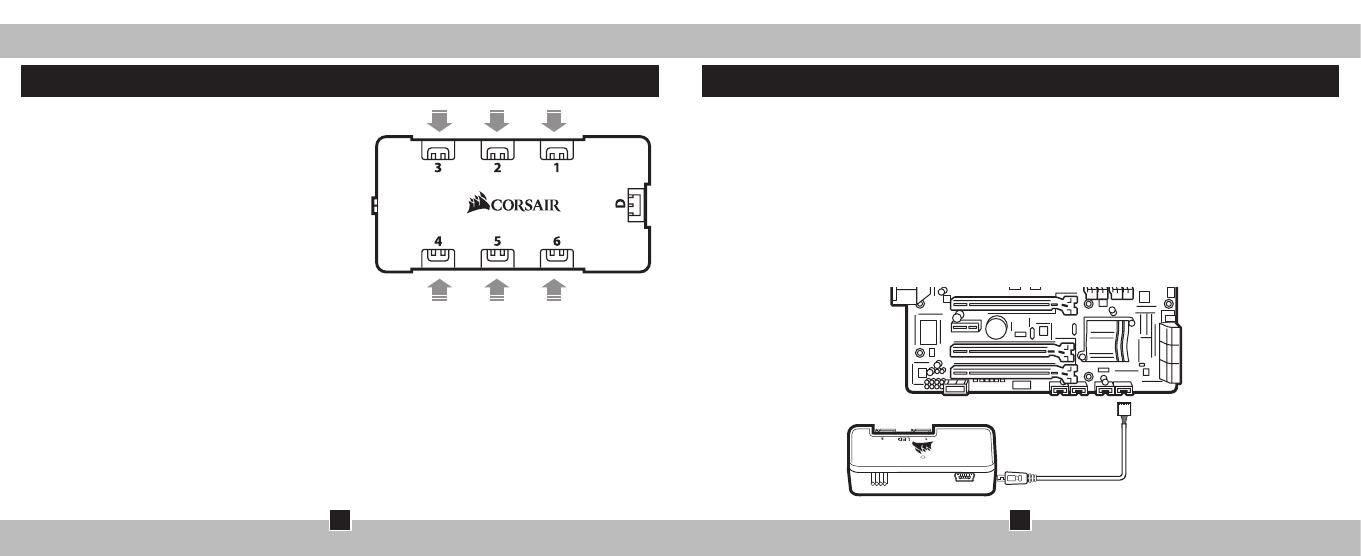
Installation Installation des Lighting Node PRO
> Schalten Sie Ihren Computer aus, bevor Sie den Lighting Node PRO installieren.
> Finden Sie eine Position für den Lighting Node PRO, von der aus die Kabel zu der
RGB-LED-Nabe geführt werden können.
> Montieren Sie den Lighting Node PRO mithilfe der mitgelieferten Montageleisten.
> Schließen Sie das Mini-USB-Kabel auf der Rückseite des Lighting Node PRO an und
verbinden Sie das neunpolige Ende mit einem freien internen USB-2.0-Anschluss in
Ihrem Computer.
> Schließen Sie das SATA-Netzkabel an einem freien SATA-Anschluss am Netzteil
Ihres Computers an.
> Anschlusshinweise
Schließen Sie die Lüfter in folgender
sequenzieller Reihenfolge an:
1 > 2 > 3 > 4 > 5 > 6.
Die Animationen beginnen mit Lüfter1 und
fahren anschließend bis Lüfter6 fort.
Jeder Lüfter, der nicht in der richtigen
Reihenfolge angeschlossen ist,
unterbricht die Kommunikation und
damit das Funktionieren der
RGB-LED-Beleuchtungsfunktion.
> Montieren Sie den/die Lüfter an der
gewünschten Stelle im Gehäuse.
> Suchen Sie eine geeignete Position für die RGB-
LED-Nabe, sodass alle RGB-LED-Kabel der in Ihrem
System installierten Lüfter bis zur Nabe reichen.
Der CORSAIR Lighting Node PRO muss zur
Steuerung der RGB-LED-Beleuchtung durch die
CORSAIR iCUE-Software ebenfalls an der
RGB-LED-Nabe angeschlossen werden.
> Montieren Sie die RGB-LED-Nabe mithilfe der
mitgelieferten Montageleisten.
18
LL120 RGB FANLL120 RGB FAN
17
CORSAIR iCUE herunterladenInstallation der LED-Nabe
> Schließen Sie das RGB-LED-Kabel an einem verfügbaren LED-Anschluss des Lighting
Node PRO an, um es mit der LED-Nabe zu verbinden.
> Schließen Sie das SATA-Netzkabel an einem freien SATA-Anschluss am Netzteil Ihres
Computers an.
> Laden Sie für ein umfassendes CORSAIR iCUE-Erlebnis die aktuelle Version
unserer CORSAIR iCUE-Software unter www.corsair.com/downloads herunter.
* Für den Download der Software ist eine Internetverbindung erforderlich.
CORSAIR iCUE ist für die Beleuchtungssteuerung erforderlich.
20
LL120 RGB FAN
19
SOMMARIO
Complimenti
Le ventole della serie CORSAIR LL RGB orono prestazioni elevate e un’illuminazione
LED RGB personalizzabile singolarmente in un’unica confezione. Personalizza
l’illuminazione del tuo sistema e regola le prestazioni in base alle tue esigenze grazie al
controllo PWM.
Contenuto del kit LL RGB
Kit da tre ventole
Ventole 3
Hub ventola 1
CORSAIR Lighting Node PRO 1
Viti di montaggio 12
Fascette di montaggio 2
Una ventola
Ventola 1
Viti di montaggio 4
Complimenti ..........................................................................................................................................
ContenutodelkitLLRGB ................................................................................................................ 
Installazione .......................................................................................................................................... 
InstallazionediLightingNodePRO ............................................................................................
Installazionedell’hubLED...............................................................................................................
ScaricaCORSAIRiCUE .....................................................................................................................
22
LL120 RGB FANLL120 RGB FAN
21
Installazione Installazione di Lighting Node PRO
> Note di cablaggio
Collegare le ventole in ordine sequenziale
da 1 > 2 > 3 > 4 > 5 > 6.
Le animazioni iniziano con la ventola 1 e
procedono fino alla 6.
Qualsiasi ventola non collegata in serie
interromperà la comunicazione impedendo
il funzionamento dell’illuminazione a
LED RGB.
> Montare le ventole nella posizione preferita
all’interno del telaio.
> Trovare una posizione per l’hub LED RGB che
consenta il collegamento di tutti i cavi RGB
LED delle ventole installati nel sistema in modo
che raggiunga l’hub.
CORSAIR Lighting Node PRO dovrà
anch’esso essere collegato all’hub LED RGB
per il controllo dell’illuminazione LED RGB
mediante il software CORSAIR iCUE.
> Montare l’hub LED RGB utilizzando le fascette
di montaggio fornite.
> Spegnere il sistema prima di procedere all’installazione di Lighting Node PRO.
> Trovare una posizione per Lighting Node PRO che consenta al cavo di raggiungere
l’hub LED RGB.
> Montare Lighting Node PRO utilizzando la fascetta di montaggio fornita.
> Collegare il cavo mini USB nella parte posteriore di Lighting Node PRO,
quindi collegare il cavo a 9 pin a un header USB 2.0 interno disponibile nel sistema.
> Collegare il connettore di alimentazione SATA a un connettore SATA libero
nell’alimentatore del sistema.
24
LL120 RGB FANLL120 RGB FAN
23
Scarica CORSAIR iCUEInstallazione dell’hub LED
> Collegare il cavo LED RGB a qualsiasi header LED disponibile su
Lighting Node PRO per collegare l’hub LED.
> Collegare il connettore di alimentazione SATA a qualsiasi connettore
SATA disponibile nell’alimentatore del sistema.
> Per sfruttare al massimo CORSAIR iCUE, scaricare l’ultima versione del
software CORSAIR iCUE disponibile alla pagina www.corsair.com/downloads.
* Per il download del software è richiesta una connessione Internet.
CORSAIR iCUE è richiesto per il controllo dell’illuminazione.
26
LL120 RGB FAN
25
Índice
Enhorabuena ......................................................................................................................................... 
ContenidodelkitLLRGB ................................................................................................................
Instalación ..............................................................................................................................................
InstalacióndeLightingNodePRO .............................................................................................. 
InstalacióndeconcentradorLED ................................................................................................. 
DescargarCORSAIRiCUE ............................................................................................................... 
Enhorabuena
La serie de ventiladores CORSAIR LL RGB le ofrece un rendimiento elevado e
iluminación LED RGB personalizable de forma individual en un paquete. Personalice la
iluminación de su sistema y adapte su rendimiento con el control PWM.
Contenido del kit LL RGB
Kit de tres
ventiladores
Ventiladores 3
Concentrador de ventilador 1
CORSAIR Lighting Node PRO 1
Tornillos de montaje 12
Tiras de montaje 2
Ventilador
individual
Ventiladores 1
Tornillos de montaje 4
28
LL120 RGB FANLL120 RGB FAN
27
Instalación Instalación de Lighting Node PRO
> Notas sobre conexiones
Conecte los ventiladores en orden
secuencial desde 1 > 2 > 3 > 4 > 5 > 6.
Las animaciones comienzan con el
ventilador 1 y continúan hasta el
ventilador 6.
Si un ventilador no está conectado en serie,
interrumpirá la comunicación y la función
de iluminación LED RGB no funcionará.
> Monte los ventiladores en la
ubicación elegida del chasis.
> Encuentre una ubicación para el concentrador
LED RGB que permita la conexión de todos los
cables LED RGB de los ventiladores instalados
en su sistema.
CORSAIR Lighting Node PRO también
deberá enchufarse al concentrador LED RGB
para poder controlar la iluminación LED RGB
mediante el software CORSAIR iCUE.
> Monte el concentrador LED RGB con las tiras
de montaje proporcionadas.
> Apague el sistema antes de instalar el Lighting Node PRO.
> Encuentre una ubicación para el Lighting Node PRO que permita que el cable llegue
al concentrador LED RGB.
> Monte el Lighting Node PRO con la tira de montaje proporcionada.
> Enchufe el cable mini USB en la parte trasera del Lighting Node PRO y luego enchufe
el extremo de 9 clavijas en un cabezal USB 2.0 interno disponible del sistema.
> Conecte el conector de alimentación SATA a cualquier conector SATA disponible de
la fuente de alimentación del sistema.
30
LL120 RGB FANLL120 RGB FAN
29
Descargar CORSAIR iCUEInstalación de concentrador LED
> Enchufe el cable LED RGB en un cabezal LED disponible del Lighting Node PRO
para conectar el concentrador LED.
> Conecte el conector de alimentación SATA a cualquier conector SATA disponible de
la fuente de alimentación del sistema.
> Para disfrutar plenamente de la experiencia CORSAIR iCUE, descargue el
software CORSAIR iCUE más reciente en www.corsair.com/downloads.
* Se requiere una conexión a Internet para la descarga del software.
CORSAIR iCUE es necesario para el control de iluminación.
32
LL120 RGB FAN
31
Оглавление
Поздравляем .......................................................................................................................................... 
Содержимое комплекта LLRGB ..................................................................................................... 
Установка ................................................................................................................................................. 
Установка LightingNodePRO ........................................................................................................ 
Установка концентратора светодиодной подсветки ................................................................... 
Скачивание CORSAIRiCUE .............................................................................................................. 
Поздравляем
Вентиляторы CORSAIR LL RGB Series отличаются высокой производительностью и оснащены
светодиодной подсветкой RGB с возможностью индивидуальной настройки. Настраивайте
подсветку системы и контролируйте производительность с помощью ШИМ-управления.
Содержимое комплекта LL RGB
Комплект из трех
вентиляторов
Вентиляторы
3
Концентратор вентилятора
1
CORSAIR Lighting Node PRO 1
Крепежные винты
12
Монтажные планки
2
Один вентилятор
Вентиляторы
1
Крепежные винты
4
34
LL120 RGB FANLL120 RGB FAN
33
Установка
Установка Lighting Node PRO
> Примечания по подключению
Подключите вентиляторы последовательно в
таком порядке: 1 > 2 > 3 > 4 > 5 > 6.
Анимации активируются в порядке с первого
по шестой вентилятор.
Если один из вентиляторов не подключен
последовательно, произойдет размыкание
соединения и функция светодиодной подсветки
RGB работать не будет.
> Установите вентиляторы внутри корпуса в
выбранном месте.
> Место для установки концентратора светодиодной подсветки
RGB следует выбирать таким образом, чтобы длины кабелей
светодиодной подсветки RGB всех вентиляторов системы
хватило для подключения к нему.
Для управления светодиодной подсветкой RGB с помощью
программного обеспечения CORSAIR iCUE контроллер
CORSAIR Lighting Node PRO также необходимо
подключить к концентратору светодиодной подсветки RGB.
> Установите концентратор светодиодной подсветки RGB с
помощью монтажных планок из комплекта.
> Перед установкой Lighting Node PRO отключите ПК.
> Расположите контроллер Lighting Node PRO таким образом, чтобы можно было
подвести кабель к концентратору светодиодной подсветки RGB.
> Закрепите Lighting Node PRO с помощью монтажной планки из комплекта.
> Вставьте штекер Mini USB в разъем на задней панели Lighting Node PRO, потом вставьте
9-контактный штекер в разъем USB2.0 на ПК.
> Подсоедините разъем питания SATA к любому свободному разъему SATA блока питания ПК.
36
LL120 RGB FANLL120 RGB FAN
35
Скачивание CORSAIR iCUE
Установка концентратора светодиодной подсветки
> Подсоедините кабель концентратора светодиодной подсветки RGB к свободному
разъему с пометкой LED на Lighting Node PRO для подключения концентратора
светодиодной подсветки.
> Подсоедините разъем питания SATA к любому свободному разъему SATA блока питания ПК.
> Чтобы в полной мере воспользоваться возможностями CORSAIR iCUE, скачайте последнюю
версию программного обеспечения CORSAIR iCUE с веб-страницы
www.corsair.com/downloads.
* Для скачивания программного обеспечения требуется интернет-соединение.
Для управления подсветкой требуется программное обеспечение CORSAIR iCUE.
  • Page 1 1
  • Page 2 2
  • Page 3 3
  • Page 4 4
  • Page 5 5
  • Page 6 6
  • Page 7 7
  • Page 8 8
  • Page 9 9
  • Page 10 10
  • Page 11 11
  • Page 12 12
  • Page 13 13
  • Page 14 14
  • Page 15 15
  • Page 16 16
  • Page 17 17
  • Page 18 18
  • Page 19 19
  • Page 20 20
  • Page 21 21
  • Page 22 22
  • Page 23 23

Corsair CO-9050092-WW Руководство пользователя

Тип
Руководство пользователя
Это руководство также подходит для

Задайте вопрос, и я найду ответ в документе

Поиск информации в документе стал проще с помощью ИИ