Hisense L1-04 Руководство пользователя

Тип
Руководство пользователя
Thank you very much for purchasing this Air Conditioner. Please
read this instructions carefully before using this appliance and keep
this manual for future reference.
ENGLISH ESPAÑOL PORTUGUÊS NEDERLANDS FRANÇAIS РУССКИЙ ЯЗЫК DEUTSCH
ITALIANO
Remote controller 1
Operation instructions
Operation modes 3
Airflow direction control 4
Smart mode 5
8°HEAT mode 6
Quiet mode 7
Super mode 6
Timer mode 7
Economy mode 7
Clock button 8
Ifeel mode 8
Dimmer button 8
Sleep mode 9
Remote controller Instructions
(L1-04)
Remote controller
1
Indication symbols on LCD:
Note: Each mode and relevant function will be further specified in following pages.
Signal transmit Display set temperature
Display set timer
Display current time
ON
OFF
Dry indicator Fan only indicator
Auto fan speed Higher fan speed High fan speed
Cooling indicator
Medium fan speed
Lower fan speed
Smart indicator Super indicator
Ifeel
Quiet indicator Economy indicator
Battery power indicator
Sleep 4 indicator
Sleep 3 indicatorSleep 2 indicator
Sleep 1 indicator
The remote controller transmits signals to the system.
FAN
Used to select fan speed in sequence auto,
higher, high, medium, low and lower.
SLEEP
Used to set or cancel Sleep Mode operation.
Used to enter fuzzy logic operation directly,
regardless of the unit is on or off.
POWER
The appliance will be started when it is
energized or will be stopped when it is
in operation, if you press this button.
MODE
Press this button to select the operation mode.
Remote controller
5
5
TEMP + -
Used to adjust the room temperature and
the timer, also real time.
DIMMER
When you press this button, all the display
of indoor unit will be closed. Press any
button to resume display.
SWING
Used to stop or start vertical adjustment
louver swinging and set the desired up/
down airflow direction.
Used to stop or start Horizontal adjustment
louver swinging and set the desired left/right
airflow direction.
SWING
QUIET
Used to set or cancel Quiet Mode operation.
ECONOMY
Used to set or cancel Economy Mode
operation.
SUPER
Used to start or stop the fast cooling/heating.
(Fast cooling operates at high fan speed with
16 set temp automatically ; Fast heating o-
perates at auto fan speed with 30set temp
automatically)
13
13
13
TIMER ON/CLOCK
Used to set or cancel the timer operation
and used to set the current time.
IFEEL
Used to set Mode operation,p
the I FEEL button for about 5 seconds, the tr-
ansmit signal in the display will disappear, the
I FEEL function will be shunted off.
IFEEL ress
8° HEAT(optional)
Used to set HEAT Mode.8°
ON
OFF
MODE
SMART
QUIET DIMMER
ECONOMY
FEEL
SUPER
FAN SPEED
TIMER OFF
SLEEP
TEMP.
TEMP.
TIMER OFF
Used to set or cancel the timer operation.
8 HEAT
TIMER ON
CLOCK
8
8 Heating indicator
8 Heating indicator
Low fan speed
SMART(invalid for multi system)
Remote controller
How to Insert the Batteries
How to Use
Remove the battery cover according to the arrow direction.
Insert new batteries making sure that the (+) and (-) of battery are matched correctly.
Reattach the cover by sliding it back into position.
Storage and Tips for Using the Remote Controller
The remote controller may be stored mounted on a wall with a holder.
Note: The remote controller holder is an optional part.
2
To operate the room air conditioner, aim the remote controller
to the signal receptor.The remote controller will operate the air
conditioner at a distance of up to 7m whenpointing at signal
receptor of indoor unit.
Remote controller
Note:
Use 2 LR03 AAA(1.5volt) batteries. Do not use rechargeable batteries. Replace batteries with new ones of the same type
when the display becomes dim.
Signal receptor
1.
2.
3.
1 2 3
ON
OFF
MODE
SMART
QUIET DIMMER
ECONOMY
FEEL
SUPER
FAN SPEED
TIMER OFF
SLEEP
TEMP.
TEMP.
8 HEAT
TIMER ON
CLOCK
8
OFF
OFF
Operation instructions
The operation modes changed in sequence:
The fan speed is changed in sequence:
Selecting mode
FAN mode
Heating mode is NOT available for cooling only air conditioner.
At "FAN ONLY" mode, the "AUTO" is not available.
At "DRY" mode, Fan speed is set at "AUTO” automatically, "FAN" button
is ineffective in this case.
Setting temperature
Turning on
SWING, SMART, TIMER ON, TIMER OFF, CLOCK, 8°HEAT,SLEEP and SUPER operation modes will be specified in the following
pages.
Changing modes during operation, sometimes the unit does not response at once. Wait 3 minutes.
Wait 3 minutes before restarting the appliance.
During heating operation, air flow is not discharged at the beginning. After 25 minutes, the air flow will be discharged
until temperature of indoor heat exchanger rises.
16~30
Range of available set temperature
*HEATING, COOLING
DRY -7 ~ 7
unable to set
FAN ONLY
3
Operation modes
*Note: Heating mode is NOT available for cooling only models.
*Note:
Remote controller
At “Dry” mode, a decrease or rise of up to 7 can be set
with if you still feel uncomfortable.
Press button once
TEMP.
Press button .
Result :
Result :
MODE
Press button once by once
Auto Higher High Medium Low Lower
HEATING
COOLING
DRY
FAN ONLY
Raise temperature setting by 1
Lower temperature setting by 1
TEMP.
Press button once
Result :
Result :
T he RUN indicator of the indoor unit lights up.
Result :
MODE
PRESS
FAN SPEED
FAN SPEED
PRESS
Operation instructions
Vertical airflow(Horizontal airflow) is automatically adjusted to a certain angle in accordance
with the operation mode after turning on the unit.
The direction of airflow can be also adjusted to your own requirement by pressing the " " button of
the remote controller.
Operation mode
Direction of airflow
COOLING, DRY
*HEATING,
FAN ONLY
horizontal
downward
Using remote controller to set various angles of flow or specific angle as you like.
Do not turn the vertical adjustment louvers manually, otherwise malfunction may occur. If that happens, turn off the unit
first and cut off the power supply, then restore power supply again.
It is better not to let the vertical adjustment louver tilt downward for a long time at COOLING or DRY mode to prevent
condensed water from dripping.
*Heating mode is only available for heat pump models.
Airflow direction control
Press " " button once.
Press " " button again .
A
B
The louvers swing to a suitable angle as desired.
The vertical adjustment louver will swing up and down automatically.Result :
Result :
Vertical airflow control (with the remote controller)
4
Using remote controller to set various angles of flow or specific angle as you like.
Press " " button once.
Press " " button again .
The horizontal adjustment louver will swing left and right automatically.
The louvers swing to a suitable angle as desired.
Result :
Result :
Horizontal airflow control (with the remote controller)
NOTE:If the unit doesn’t have four ways airflow function, you can adjust
horizontal airflow by yourself.
FEEL SLEEP
TEMP.
PRESS
PRESS
PRESS
PRESS
PRESS
PRESS
Operation instructions
Indoor temperature
SMART button is ineffective in SUPER mode.
Target temperature
21 or below 22
26Over 26
21-23
23-26
Your feeling
What you can do in SMART mode?
Button Adjust
Operation mode
HEATING
FAN ONLY
DRY
Room temperature
decrease 2 after
operate for 3 minutes
COOLING
Uncomfortable because
of unsuitable air flow
volume.
Uncomfortable because
of unsuitable flow
direction.
Note: Temperature, airflow and direction are controlled automatically in SMART mode.
However, for the inverter you can choose from -7 to 7. if you still feel uncomfortable.
5
Heat pump models
Cooling only models
Indoor temperature Target temperature
23 or below
26
Over 26
23-26
Operation mode
FAN ONLY
DRY
Room temperature
decrease 2 after
operate for 3 minutes
COOLING
How to set SMART mode?
Press the button.
SMART
Result : Enters SMART mode(fuzzy logic operation)
directly regardless of the unit is on or off.
Temperature and fan speed are automatically
set based on theactual room temperature.
How to cancel the SMART mode?
Press the button.
MODE
Result :
Indoor fan speed alternates among Higher, High,
Medium, low and Lower each time when this button
is pressed.
Press it once, the vertical adjustment louver(horizontal
adjustment louver) swings to change vertical airflow
direction(horizontal airflow direction). Press it again,
the swing stops.
The SMART mode will be cancelled.
Press MODE button cancel SMATR mode.
MODE
SMART
TEMP.
PRESS
MODE
SMART
TEMP.
PRESS
FAN SPEE D
SMART mode( )invalid for multi system SMART mode( )invalid for multi system
Operation instructions
Note:
Note:
The Appliance will continue working in SUPER mode for 15 minutes , if you don't escape from it by pressing any of the
buttons mentioned above.
SMART button is not available in SUPER mode.
6
SUPER mode can be set when the appliance is in operation or energized.
SUPER mode
SUPER mode is used to start or stop fast cooling or heating.
mode is used to set .
In 8°HEAT mode, the fan speed is set at "AUTO" automatically.
8°HEAT 8° heating mode
In SUPER mode, you can set airflow direction or timer.
mode can be set only when the air conditioner works in the heating mode.8°HEAT
mode8°HEAT
In mode, the temperature is set 8 .8°HEAT default
13
SUPER
FAN SPEED
TEMP.
TEMP.
SUPER
FAN SPEED
TEMP.
TEMP.
SUPER
How to set SUPER mode?
Press button at the cool mode.
Result : At higher fan speed ,the set temperature
automatically to 16.
SUPER
Press button at the heat mode.
Result : At auto fan speed ,the set temperature
automatically to 30.
How to cancel SUPER mode?
Press . SUPER , MODE, FAN, ON/OFF,SLEEP or TEMPERATURE SETTING button
Result : The display return to the original mode.
Escape from SUPER mode.
PRESS
PRESS
How to set mode?8°HEAT
Press button at the heating mode.
Result : The 8 heat mode will be started.°
How to cancel mode?8°HEAT
Press any button except for , and .
Result : The display will disappear and the 8°HEAT mode will be cancelled.
8
8
QUIET DIMMER
ECONOMY
TIMER OFF
TIMER OFF
8 HEAT
TIMER ON
CLOCK
PRESS
TIMER ON
CLOCK
8 HEAT
Cancel
Operation instructions
Timer mode
Note: It is similar to set TIMER OFF, you can make the appliance switch off
automatically at your desired time.
It is convenient to set the timer on with TIMER ON/CLOCK and TIMER OFF buttons when you go out in the
morning to achieve a comfortable room temperature at the time you get home. You can also set timer off at
night to enjoy a good sleep.
7
QUIET mode
In this mode, the air conditioner will work with low noise performance by low compressor frequency and low
fan speed. This mode is only available for inverter models.
Note: Press MODE,FAN,SMART,SUPER button can cancel QUIET mode.
Press the or button.
TEMP.
TEMP.
Once to increase or decrease the time setting by 1 minute.
One and a half seconds to increase or decrease the time setting
by 10 minute.
For a longer time to increase or decrease the time by 1 hour.
A "beep" can be heard.
The TIMER indicator on the indoor unit lights up.
"ON" stops flashing.
When your desired time displayed on LCD, press the TIMER ON button and confirm it.
After the set timer displayed for 5 seconds the clock will be displayed on the LCD of the remote controller
instead of set timer.
Result :
Result :
Press button.
ON
Press the button again.
A "beep" can be heard and the indicator disappears,
the time on mode has been canceled.
Result :
How to cancel TIMER ON?
How to set TIMER ON?
Result : “ON 12:00" flashes on the LCD.
1.
2.
3.
4.
SUPER
FAN SPEED
TEMP.
TEMP.
PRESS
QUIET DIMMER
ECONOMY
TIMER OFF
8 HEAT
TIMER ON
CLOCK
PRESS
QUIET DIMMER
ECONOMY
TIMER OFF
8 HEAT
TIMER ON
CLOCK
PRESS
QUIET DIMMER
ECONOMY
TIMER OFF
8 HEAT
TIMER ON
CLOCK
PRESS
QUIET DIMMER
ECONOMY
TIMER OFF
8 HEAT
TIMER ON
CLOCK
PRESS
TIMER ON
CLOCK
TIMER ON
CLOCK
ECONOMY mode
In this mode, the air conditioner will bring you energy saving performance by lower running currency.
Operation instructions
IFEEL mode
8
The temperature sensor built in remote controller is activated.It can sense its surrounding temperature,and
transmit the signal back the unit,the unit can adjust the temperature so as to provide maximum comfort.
How to cancel IFEEL mode ?
Note:
The default setting is IFEEL activing.
Press the button.
Dimmer button
Press the button to turn off the light and the display in the unit.
Note:
When the light is off,receive signal will turn on the light again.
How to set the DIMMER ?
How to set IFEEL mode?
Result :
The transmit signal in the display will disappear,
the IFEEL function will be shunted off.
i FEEL
Press the button for about 5 seconds.
Result :
IFEEL function will be started.
i FEEL
DIMMER
QUIET DIMMER
ECONOMY
TIMER OFF
8 HEAT
TIMER ON
CLOCK
PRESS
FEEL SLEEP
FEEL SLEEP
2th
1th
TEMP.
TEMP.
CLOCK button
How to adjust the real time?
Press button about 3 seconds.
Press and buttons.
Press button again .about 3 seconds
Result :
Result :
Result :
The time flashes on the LCD.
1.
2.
3.
The real time is set.
Once to increase or decrease the time setting by 1 minute.
One and a half seconds to increase or decrease the time setting
by 10 minute.
For a longer time to increase or decrease the time by 1 hour.
SUPER
FAN SPEED
TEMP.
TEMP.
PRESS
QUIET DIMMER
ECONOMY
TIMER OFF
8 HEAT
TIMER ON
CLOCK
PRESS
QUIET DIMMER
ECONOMY
TIMER OFF
8 HEAT
TIMER ON
CLOCK
PRESS
TIMER ON
CLOCK
TIMER ON
CLOCK
Operation instructions
9
SLEEP mode can be set in COOLING ,HEATING mode. or DRYING
This function gives you a more comfortable environment for sleep.
The appliance will stop operation automatically after operating for 8 hours.
Fan speed is automatically set at low speed.
Note: Heating is NOT available for cooling only air conditioner.
SLEEP mode
Set temperature will rise by 2 if the appliance operates in cooling at most mode for 2 hours constantly,
Set temperature will decrease by 2 at most if the appliance operates in heating mode for 2 hours
SLEEP mode 1:
Set temperature will rise by 2 if the appliance operates in cooling
by 1 after 6 hours, then decrease by 1 after 7 hours.
mode for 2 hours constantly, decrease
Set temperature will decrease by 2 if the appliance operates in heating mode for 2 hours constantly, rise
by 1 after 6 hours, then rise by 1 after 7 hours.
SLEEP mode 2:
Set temperature will rise by 1 if the appliance operates in cooling
hours, then decrease by 2 after 6 hours,
decrease by 1 after 7 hours.
mode for 1 hour , rise by 2 after 2
Set temperature will decrease by 2 if the appliance operates in heating mode for 1 hour , decrease by
2 after 2 hours, then rise by 2 after 6 hours, rise by 2 after 7 hours.
℃ ℃
SLEEP mode 3:
Set temperature will keeps steady.
SLEEP mode 4:
Each time button is pressed.
How to set SLEEP mode ?
Result : The operation mode is changed in sequence:
SLEEP
then keeps steady.
constantly, then keeps steady.
Note: Press SUPER ,SMART, MODE or FAN button cancel SLEEP mode.
Note: By pressing "Sleeping mode" four times, or selecting other modes like SUPER, SMART, OR FAN,
you could cancel the sleeping function of those units without four sleeping curves.
ON
SLEEP 2 SLEEP 3
QUIT SLEEP MODE
SLEEP 4
SLEEP 1
Version No.1822041-02
Grazie per aver acquistato il nostro condizionatore d’aria. Si prega di
leggere con la massima attenzione questo manuale d’istruzioni e
d’uso prima dell’installazione e dell’utilizzo di questa apparecchiatura
e conservare il presente manuale per successive consultazioni
ITALIANO
Telecomando 1
Istruzioni di funzionamento
Modalità di funzionamento 3
Controllo direzione del flusso d’aria 4
5
6
7
Modalità smart
Modalità 8°HEAT
Modalità super 6
Modalità timer 7
7
Modalità Quiet
Modalità Economy
Pulsante Clock 8
8
8
Modalità IFEEL
Pulsante Dimmer
Modalità sleep 9
Istruzioni d’uso del telecomando
(L1-04)
1
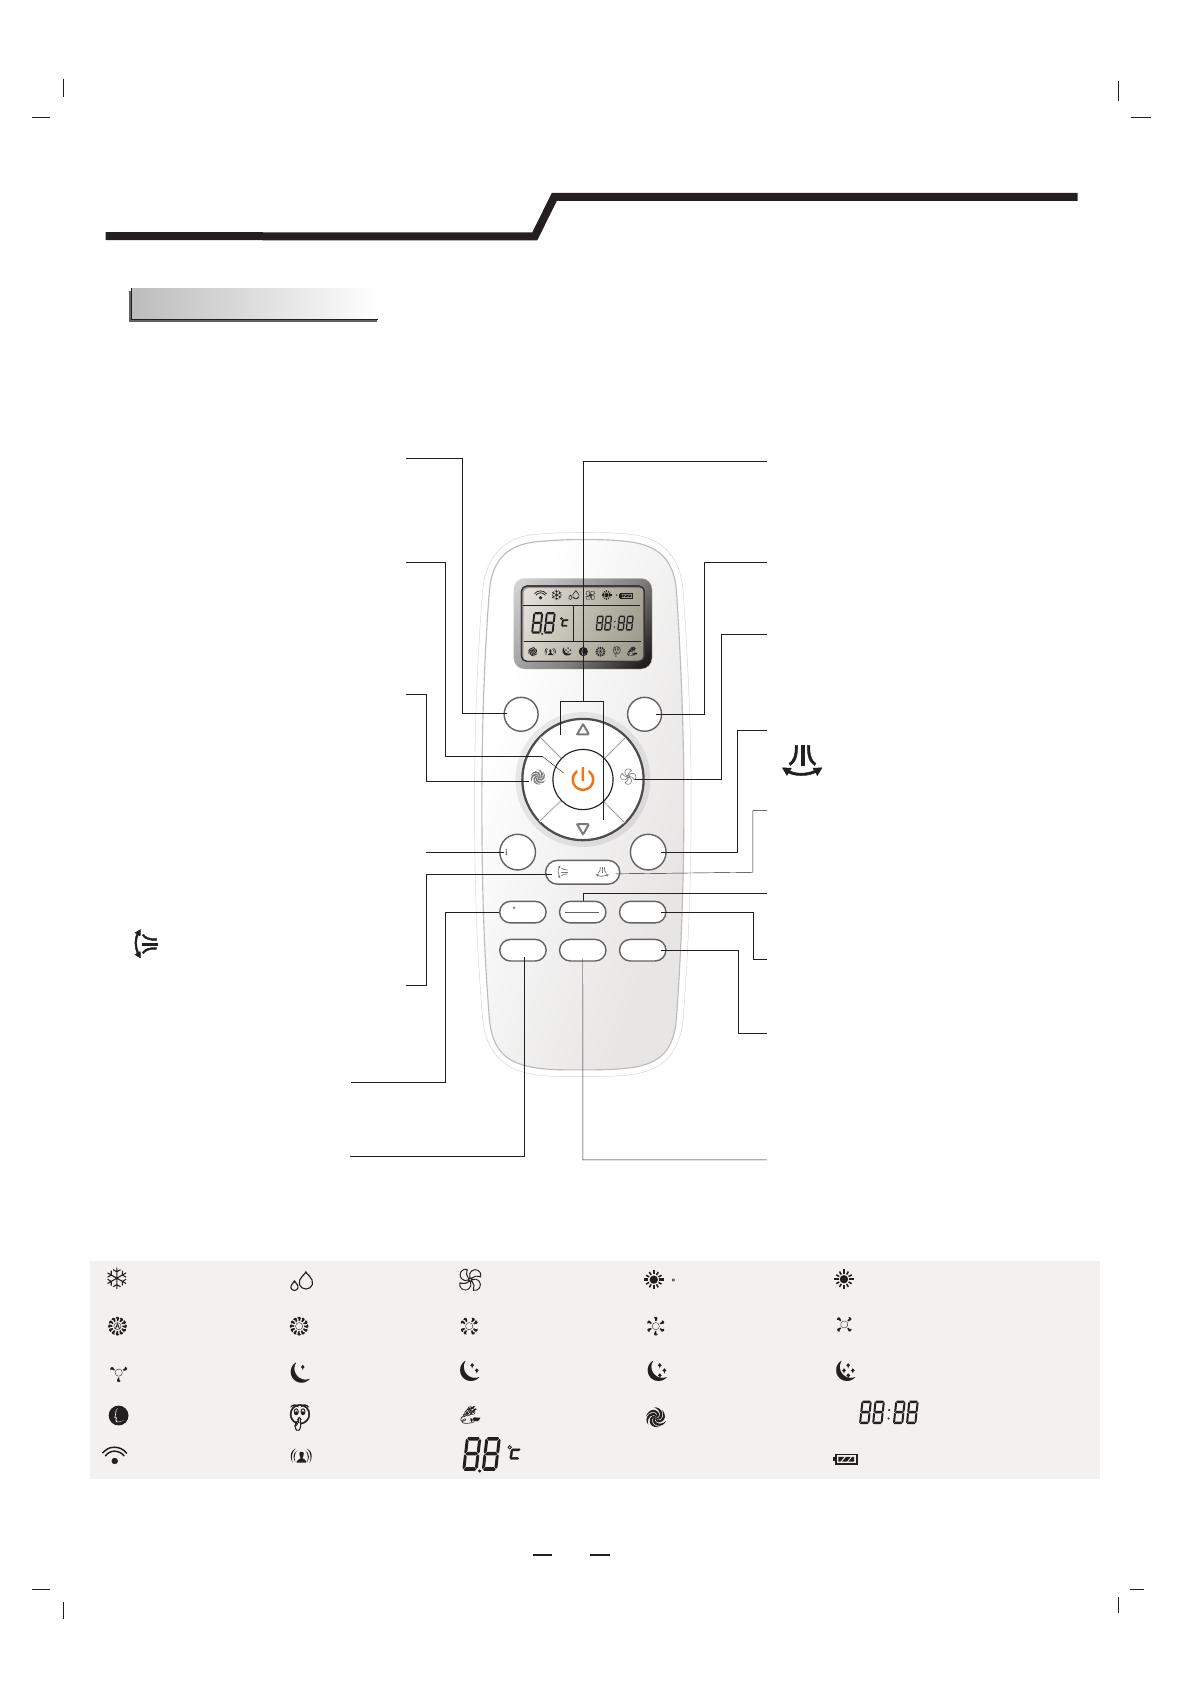
Simboli delle indicazioni sul display LCD:
Nota: Ogni modalità e le sue relative funzioni saranno successivamente specificate nelle pagine seguenti.
Trasmissione del segnale Display d’impostazione della temperatura
Display d’impostazione del
timer
ON
OFF
Indicatore del
deumidificatore
Indicatore di funzionamento
esclusivo del ventilatore
Velocità del ventilatore Ventilazione ad alta
velocità
Ventilazione ad alta
velocità
Indicatore di raffreddamento
Ventilazione a velocità
media
Ventilazione a bassa
velocità
Indicatore della modalità
Smart
Indicatore della modalità
super
Ifeel
Indicatore quiet Indicatore basso economy Display dell’orario attuale
Indicatore Sleep 4
Indicatore Sleep 3Indicatore Sleep 2
Indicatore Sleep 1
SMART (non valido per il
condizionatore multifunzionale)
POWER
Questo pulsante mette in funzione
l’apparecchio, se collegato
elettricamente o ne arresterà il
funzionamento se è acceso.
5
SWING
Utilizzato per attivare o arrestare
l’oscillazione del deflettore di
regolazione verticale e impostarne il
flusso d’aria verso l’alto o il basso,
secondo le proprie preferenze.
QUIET
Per impostare o annullare
la modalità Silenzioso.
ECONOMY
Per impostare o annullare la modalità
Basso consumo.
SUPER
Utilizzato per attivare o disattivare il
riscaldamento/raffreddamento
veloce. (Il raffreddamento veloce
funziona ad alta velocità di
ventilazione con la temperatura
impostata automaticamente a 16°C;
(Il riscaldamento veloce funziona
con la ventilazione ad alta velocità
con la temperatura impostata
automaticamente a 30°C).
13
13
13
TIMER ON/CLOCK
Utilizzato per impostare o cancellare il
funzionamento del temporizzatore e
per impostare l'ora attuale.
IFEEL
Per impostare la Modalità IFEEL,
premere il pulsante IFEEL per 5
secondi circa, il segnale di
trasmissione sul display scompare e
di conseguenza la funzione di
IFEEL sarà disattivata.
8° HEAT(opzionale)
Utilizzato per impostare la
Modalità 8° HEAT .
ON
OFF
MODE
SMART
QUIET DIMMER
ECONOMY
FEEL
SUPER
FAN SPEED
TIMER OFF
SLEEP
TEMP.
TEMP.
TIMER OFF
Per impostare o annullare il
funzionamento del temporizzatore.
8 HEAT
TIMER ON
CLOCK
8
8 Modalità RISCALDAMENTO
Ventilazione a bassa velocità
Telecomando
Telecomando
Questo telecomando trasmette i segnali di comando al sistema.
FAN
Pulsante utilizzato per regolare le
velocità del ventilatore tra alta, media,
bassa
SLEEP
Viene utilizzato per impostare o
annullare il funzionamento della
modalità sleep.
MODE
Premere questo pulsante per
selezionare le modalità di
funzionamento
TEMP + -
Per regolare la temperatura della
camera e il temporizzatore, oltre
all’ora attuale.
Utilizzato per attivare o arrestare
l’oscillazione del deflettore di
regolazione orizzontale e impostarne
il flusso d’aria verso l’alto o il basso,
secondo le proprie preferenze.
SWING
Premendo questo pulsante, tutte le
visualizzazioni relative all'unità
interna saranno isattivate. Premere
un tasto qualsiasi per ripristinarle.
DIMMER
Per avviare la selezione
automatica della modalità,
indipendentemente se l’unità è
accesa o spenta.
Modalità
RISCALDAMENTO 8°
Battery power indicator
2
Ricevitore del segnale
1 2 3
ON
OFF
MODE
SMART
QUIET DIMMER
ECONOMY
FEEL
SUPER
FAN SPEED
TIMER OFF
SLEEP
TEMP.
TEMP.
8 HEAT
TIMER ON
CLOCK
8
Telecomando
Come inserire le batterie
Aprire il coperchio del vano della batterie osservando la direzione della freccia.
Inserire le batterie nuove verificandone la corretta polarità.
Rimontare il coperchio slittando il suo retro nella posizione desiderata.
Telecomando
1.
2.
3.
Nota:
Utilizzare le 2 batterie LR03 AAA (1,5volt) . Non utilizzare mai le batterie ricaricabili. Sostituire le batterie con le nuove
dello stesso tipo quando il display diventa scuro.
Conservazione e precauzioni per l’uso del telecomando
Il telecomando può essere riposto in un supporto montato sulla parete.
Nota: il supporto del telecomando è un componente opzionale.
Come usare il telecomando
Per utilizzare il condizionatore da camera, indirizzare
il telecomando verso il ricevitore del segnale. Il
segnale sarà captato ad una distanza massima di 7
m etri.
3
Istruzioni di funzionamento
Modalità di funzionamento
Selezionare la modalità di funzionamento
la modalità di funzionamento risultano cambiate in sequenza:
la velocità del ventilatore ne risulta cambiata in sequenza:
Modalità FAN
NON è disponibile la modalità riscaldamento per i condizionatori di solo raffreddamento.
NElla modalità del FAN ONLY , sono disponibili solo ALTA,MEDIA e BASSA.
NElla modalità del DRY, la velocità viene impostata automaticamente in
AUTOMATICA e in tale caso il pulsante FAN non è attivo.
Risultato :
OFF
FAN SPEED
OFF
Risultato:
MODE
Premere il pulsante .
RISCALD
AMENTO
RAFFREDDAMENTO
DEUMIDIFI
CATORE
SOLA
VENTILAZIONE
Premere
MODE
Impostazione delle temperatura
Le modalità di funzionamento SWING, SMART, TIMER ON, TIMER OFF, OROLOGIO, SLEEP e SUPER saranno
descritte nelle pagine successive.
Cambiando le modalità durante il funzionamento può accadere che l’unità non risponda immediatamente. Si prega di
attendere 3 minuti.
Durante la funzione di riscaldamento, è attivo un sistema di prevenzione delle correnti fredde. Dopo 2-5 minuti lo
scambiatore di calore interno inizierà ad azionare la ventola e la temperatura inizierà ad aumentare.
Si prega di attendere 3 minuti prima di riavviare l’unità.
Premere il pulsante TE
M
P.
La temperatura impostata aumenta di 1
Premere il pulsante
Risultato:
Risultato:
Avvio
Premere il pulsante
Risultato: l’indicatore di funzionamento dell’unità interna si accende.
T
E
M
P. una volta sola.
La temperatura impostata diminuisce di 1
16~ 30
Gamma delle temperature disponibili
*RISCALDAMENTO,
RAFFREDDAMENTO
DEUMIDIFICATORE -7 ~ 7
Non regolabile
SOLA VENTILAZIONE
*Nota: la modalità di riscaldamento NON entra in
funzione per i modelli di raffreddamento solo.
*Nota: alla modalità DRY, l’unità può abbassare od
alzare 7
la temperatura del locale.
Ad alta A bassa
FAN SPEED
Premere
Automatica Alta Media
Bassa
Istruzioni di funzionamento
Controllo direzione del flusso d’aria
Il flusso verticale(flusso orizzontale) viene regolato automaticamente secondo le modalità impostate e
l’angolazione desiderata.
La direzione del flusso d’aria può anche essere regolata secondo le proprie preferenze premendo il
pulsante " "del telecomando.
Controllo del flusso d’aria verticale (con il telecomando)
Con il telecomando è possibile definire l’angolazione del flusso d’aria desiderata.
Non azionare mai il deflettore verticale a mano, altrimenti potrebbe causarne il malfunzionamento. Nel caso ciò
accada, arrestare prima l’unità interna, quindi disattivare e riattivare l’alimentazione elettrica.
Si consiglia di non inclinare il deflettore verticale verso il basso per molto tempo durante le modalità di
RAFFREDDAMENTO o DEUMIDIFICATORE per evitare che l’acqua condensata goccioli dal drenaggio.
*La modalità di riscaldamento è disponibile soltanto per i modelli con pompa di calore.
Controllo del flusso d’aria orizzontale (con il telecomando)
Con il telecomando è possibile definire l’angolazione del flusso d’aria desiderata.
" .
" .
Premere di nuovo il pulsante" "
Premere di nuovo il pulsante" " .
A
B
Il deflettore del flusso d’aria orizzontale oscillerà automaticamente
verso l’alto e verso il basso .
Il deflettore oscilla nell’angolazione desiderata.
Il deflettore del flusso d’aria verticale oscillerà automaticamente verso
l’alto e verso il basso .
Premere il pulsare "
Risultato:
Premere il pulsare "
Risultato:
4
FEEL SLEEP
Premere
Premere
Premere
Premere
Premere
Premere
NOTA: Se l’ unità interna non possiede la funzione di 4 canali per il flusso d’aria, è possibile regolare
manualmente il flusso d’aria orizzontale .
TEMP.
Modalità di
funzionamento Direzione del flusso d’aria
RAFFREDDAMENTO
, DEUMIDIFICATORE
*RISCALDAMENT
O, SOLA
VENTILAZIONE
Orizzontale
Verso il basso
Risultato:
Risultato:
MODE
SMART
TEMP.
MODE
SMART
TEMP.
Istruzioni di funzionamento
Modelli con pompa di calore
Temperatura interna Temperatura desiderate
21°C o più bassa 22
26
21- 23
23- 26
Sensazione personale
Funzioni della modalità SMART?
Pulsante Regolazione
Modalità di funzionamento
RISCALDAMENTO
SOLA VENTILAZIONE
DEUMIDIFICATORE
La temperatura della camera
diminuisce di 2°C dopo un
funzionamento di 3 minuti
RAFFREDDAMENTO
Non confortevole a causa del
volume del flusso d’aria non
idoneo.
Non confortevole a causa
della direzione del flusso
d’aria non idonea.
Nota: la temperatura, il flusso d’aria e la direzione sono controllati automaticamente nella modalità SMART.
Per il modello con invertitore è comunque possibile aumentare o diminuire la temperatura di 7°C se non è
ancora ottimale.
5
Superiore a 26
Modelli di solo raffreddamento
Temperatura interna Temperatura desiderate
23 o più bassa
26
Over 26
23-26
Modalità di funzionamento
SOLA VENTILAZIONE
DEUMIDIFICATORE
La temperatura della camera
diminuisce di 2°C dopo un
funzionamento di 3 minuti
RAFFREDDAMENTO
FAN SPEE D
Premere questo pulsante .
SMART
Risultato: Attiva la modalità SMART (definizione automatica)
indipendentemente se l’unità è accesa o spenta.
La temperatura e la velocità del ventilatore vengono definite
automaticamente secondo la temperatura della camera.
Premere
Come annullare la modalità SMART?
Premere
La velocità del ventilatore interno è selezionabile tra: Più
Alta, Alta, Media, Bassa e Più Bassa.
Premendo questo pulsante una volta, il deflettore verticale
(o quello orizzontale) dirige il flusso d’aria nella direzione
opposta (verticale o orizzontale).Premendolo di nuovo, il
deflettore si ferma.
Il pulsante SMART non funziona nella modalità SUPER.
Premere il pulsante MODE per annullare la modalità SMART.
MODE
Premere il pulsante .
Risultato: La modalità SMART sarà annullata.
Modalità SMART (non valido per il condizionatore multifunzionale)
Come impostare la modalità SMART?
scomparirà e la modalità 8°HEAT sarà annullata.
Istruzioni di funzionamento
Nota:
6
Modalità SUPER
Nella modalità 8°HEAT la temperatura predefinita è impostata a 8° C.
La modalità 8°HEAT può essere impostata solo quando il condizionatore d'aria funziona in modalità di riscaldamento.
Modalità 8°HEAT
13
La modalità 8°HEAT viene utilizzata per impostare la modalità di riscaldamento a 8°.
Nella modalità 8°HEAT, la velocità del ventilatore è impostata automaticamente su "AUTO."
Premere il pulsante nella modalità di riscaldamento.
Risultato : si avvierà la modalità di 8°HEAT.
Come annullare la modalità 8°HEAT?
Premere qualsiasi pulsante tranne , e
Risultato : il simbolo
8
8
QUIET DIMMER
ECONOMY
TIMER OFF
8 HEAT
TIMER ON
CLOCK
Premere
TIMER ON
CLOCK
8 HEAT
SUPER
FAN SPEED
TEMP.
TEMP.
SUPER
FAN SPEED
TEMP.
TEMP.
SU
PER
Nota:
Il pulsante SMART non è disponibile nella modalità SUPER.
Il condizionatore d’aria continuerà a funzionare nella modalità SUPER, se non si esce da tale
modalità in seguito alla pressione di uno dei pulsanti sopra indicati.
Come impostare la modalità SUPER?
Premere il pulsante nella modalità raffreddamento.
Risultato: Ad un’alta velocità del ventilatore, la
temperatura si imposta automaticamente
ai 16 .
Risultato: Ad un’alta velocità del ventilatore, la
temperatura si imposta automaticamente
ai 30.
Come annullare la modalità SUPER
Premere un qualsiasi pulsante tra SUPER, MODE, FAN, ON/OFF,
SLEEP o TEMPERATURE SETTING.
Risultato:
La modalità SUPER è utilizzata per attivare o disattivare velocemente il riscaldamento o il raffreddamento.
La modalità SUPER può essere impostata quando l’apparecchio è collegato elettricamente o in funzionamento.
In modalità SUPER si può impostare la direzione del flusso d’aria o il timer.
Il display ritorna allo stato originale.
Uscire dalla modalità SUPER
Premere
Annullare
Premere
Premere il pulsante durante la modalità riscaldamento.
SU
PER
Come impostare la modalità 8°HEAT?
TIMER OFF
  • Page 1 1
  • Page 2 2
  • Page 3 3
  • Page 4 4
  • Page 5 5
  • Page 6 6
  • Page 7 7
  • Page 8 8
  • Page 9 9
  • Page 10 10
  • Page 11 11
  • Page 12 12
  • Page 13 13
  • Page 14 14
  • Page 15 15
  • Page 16 16
  • Page 17 17
  • Page 18 18
  • Page 19 19
  • Page 20 20
  • Page 21 21
  • Page 22 22
  • Page 23 23
  • Page 24 24
  • Page 25 25
  • Page 26 26
  • Page 27 27
  • Page 28 28
  • Page 29 29
  • Page 30 30
  • Page 31 31
  • Page 32 32
  • Page 33 33
  • Page 34 34
  • Page 35 35
  • Page 36 36
  • Page 37 37
  • Page 38 38
  • Page 39 39
  • Page 40 40
  • Page 41 41
  • Page 42 42
  • Page 43 43
  • Page 44 44
  • Page 45 45
  • Page 46 46
  • Page 47 47
  • Page 48 48
  • Page 49 49
  • Page 50 50
  • Page 51 51
  • Page 52 52
  • Page 53 53
  • Page 54 54
  • Page 55 55
  • Page 56 56
  • Page 57 57
  • Page 58 58
  • Page 59 59
  • Page 60 60
  • Page 61 61
  • Page 62 62
  • Page 63 63
  • Page 64 64
  • Page 65 65
  • Page 66 66
  • Page 67 67
  • Page 68 68
  • Page 69 69
  • Page 70 70
  • Page 71 71
  • Page 72 72
  • Page 73 73
  • Page 74 74
  • Page 75 75
  • Page 76 76
  • Page 77 77
  • Page 78 78
  • Page 79 79
  • Page 80 80
  • Page 81 81
  • Page 82 82
  • Page 83 83
  • Page 84 84
  • Page 85 85
  • Page 86 86
  • Page 87 87
  • Page 88 88
  • Page 89 89
  • Page 90 90
  • Page 91 91
  • Page 92 92
  • Page 93 93
  • Page 94 94
  • Page 95 95
  • Page 96 96

Hisense L1-04 Руководство пользователя

Тип
Руководство пользователя

Задайте вопрос, и я найду ответ в документе

Поиск информации в документе стал проще с помощью ИИ