LG 50PN450B Руководство пользователя

Категория
ЖК-телевизоры
Тип
Руководство пользователя
Drawn Approved
Signature
Danbi.park Jongok.kim
MMM/DD/YYYY
Dec/26/2012 Dec/26/2012
42PN450D-ZA LG MFL67710001
EE 42PN450D (1301-REV00)
:LGEAK :LGEKR :LGERS
:LGEAZ :LGEMA :LGESY
:LGEEG :LGEMX :LGETH
Checked
Dec/26/2012
Yena.park
:Part number
1. Model Description
Printing specification
Printed in Mexico
Printed in Poland
Printed in Kazakhstan
Printed in Brazil
:5. Bindery
:6. Language
:7. Number of pages
:Model name
:2nd, 3rd Suffix
:Brand name
:Product name
:1. Trim size (Format)
2. Printing colors
: • Cover
: • Inside
Printed in Korea
: • Inside
:4. Printing method
(Revision number)
2. Printing Specification
Eng/Hun/Pol/Cze/Slk/Rom/Bul/Est/Lit/Lat/Ser/Alb/Bos/Mac/Cro/Rus (16)
182 mm x 257 mm (B5)
1 Color (Black)
1 Color (Black)
Coated, Snow white paper 150 g/
Uncoated, wood-free paper 60 g/
Off set
Perfect binding
368
3. Origin Notification
Printed in MexicoPrinted in Egypt
3. Stock (Paper)
: • Cover
N
O
T
E
“This part contains Eco-hazardous substances (Pb, Cd, Hg, Cr6+, PBB, PBDE, etc.) within LG standard level,
Details should be followed Eco-SCM management standard[LG(56)-A-2524].
Especially, Part should be followed and controlled the following specification.
(1) Eco-hazardous substances test report should be submitted when Part certification test and First Mass Production.
(2) Especially, Don’t use or contain lead(Pb) and cadmium(Cd) in ink.
Printed in China
Printed in Thailand
:LGEIL :LGEND :LGEVN
:LGEIN :LGERA :LGEWR
Rev. Number MMM/DD/YYYY
4. Changes
Printed in India
Printed in Indonesia
Signature Change ContentsECO Number
Printed in Russia
Printed in China Printed in Vietnam
Printed in Poland
1
10
9
8
7
6
5
4
3
2
Front
(Eng)
P/No. A-2 A-3 A-4
Front
(Eng)
2 …… …… 20
Front
(Hun)
2 …… …… 20
Front
(Pol)
2 …… …… 20
Front
(Cze)
2 …… …… 20
(1301-REV00)(Revision number)
:Total pages 368 pages
:Part number MFL67710001
Pagination sheet
Front
(Slk)
2 …… …… 20
Front
(Rom)
2 …… …… 20
Front
(Bul)
2 …… …… 20
Front
(Est)
2 …… …… 20
Front
(Lit)
2 …… …… 20
Front
(Lat)
2 …… …… 20
Front
(Ser)
2 …… …… 20
Front
(Alb)
2 …… …… 20
Front
(Bos)
2 …… …… 20
Front
(Mac)
2 …… …… 20
(Revision number) (1301-REV00)
:Total pages 368 pages
:Part number MFL67710001
Front
(Cro)
2 …… …… 20
Front
(Rus)
2 …… …… 20
Making Back
Connect Cover
B-2 B-40 Blank Blank Blank (Eng)
OWNER’S MANUAL
PLASMA TV
Please read this manual carefully before operating
your set and retain it for future reference.
www.lg.com
PN45**
PN65**
P/NO : MFL67710001 (1301-REV00)
Printed in Korea
A-2
TABLE OF CONTENTS
TABLE OF CONTENTS
A-3 SETTiNg up ThE TV
A-3 Attaching the stand
A-4 Tidying cables
COMMON
LANguAgE
LANguAgE LiST
English
Magyar
Polski
Česky
Slovenčina
Română
Български
Eesti
Lietuviųk.
Latviešu
Srpski
Shqip
Bosanski
Македонски
Hrvatski
Русский
COMMON
B-1 MAKiNg CONNECTiONS
B-1 Antenna Connection
B-5 Satellite dish Connection
B-7 HDMI Connection
B-11 DVI to HDMI Connection
B-14 Component Connection
B-16 Composite Connection
B-18 Audio Connection
B-18 - Digital optical audio connection
B-22 USB Connection
B-24 CI module Connection
B-26 Euro Scart Connection
B-39 SpECiFiCATiONS
A-4
SETTING UP THE TV
Tidying cables
1 Install the Power Cord Holder and Power
Cord.Itwillhelppreventthepowercablefrom
beingremovedbyaccident.
(Only 42PN45**)
Power cord holder
(Only 50PN45**, 50/60PN65**)
Power cord holder
2 Gather and bind the cables with the Cable
Holder.
Cable holder
CAUTION
y
Do not move the TV by holding the cable
holder and power cable holder, as the cable
holders may break, and injuries and damage
totheTVmayoccur.
1
2
1
2
2
Protection
cover
M5 x 16
1 EA
CAUTION
y
When attaching the stand to the TV
set, place the screen facing down on a
cushioned table or flat surface to protect the
screenfromscratches.
y
Make sure that the screws are inserted
correctlyandfastenedsecurely.Iftheyare
not fastened securely enough, the TV may
tiltforwardafterbeinginstalled.Donotuse
too much force and over tighten the screws;
otherwise screw may be damaged and not
tightencorrectly.
NOTE
y
When installing the wall mounting bracket,
usetheProtectionCover.
y
This will protect the opening from
accumulatingdustanddirt.
y
Remove the stand before installing the TV
on a wall mount by performing the stand
attachmentinreverse.
2
ENGLISH
TABLE OF CONTENTS
WARNING
y
If you ignore the warning message, you may
be seriously injured or there is a possibility
of accident or death.
CAUTION
y
If you ignore the caution message, you may
be slightly injured or the product may be
damaged.
NOTE
y
The note helps you understand and use
the product safely. Please read the note
carefully before using the product.
TABLE OF CONTENTS
3 LICENSES
3 OPEN SOURCE SOFTWARE NOTICE
3 EXTERNAL CONTROL DEVICE
SETUP
4 SAFETY INSTRUCTIONS
10 INSTALLATION PROCEDURE
10 ASSEMBLING AND PREPARING
10 Unpacking
13 Separate purchase
14 Parts and buttons
15 Lifting and moving the TV
16 Mounting on a table
17 Mounting on a wall
18 REMOTE CONTROL
19 USING THE USER GUIDE
20 MAINTENANCE
20 Cleaning your TV
20 - Screen, frame, cabinet and stand
20 - Power cord
20 TROUBLESHOOTING
10
ENGLISH
INSTALLATION PROCEDURE / ASSEMBLING AND PREPARING
NOTE
y
Image shown may differ from your TV.
y
Your TV’s OSD (On Screen Display) may differ slightly from that shown in this manual.
y
The available menus and options may differ from the input source or product model that you are
using.
y
New features may be added to this TV in the future.
y
The TV can be placed in standby mode in order to reduce the power consumption. And the TV should
be turned off if it will not be watched for some time, as this will reduce energy consumption.
y
The energy consumed during use can be significantly reduced if the level of brightness of the picture
is reduced, and this will reduce the overall running cost.
INSTALLATION PROCEDURE
1 Open the package and make sure all the accessories are included.
2 Attach the stand to the TV set.
3 Connect an external device to the TV set.
ASSEMBLING AND PREPARING
Unpacking
Check your product box for the following items. If there are any missing accessories, contact the local
dealer where you purchased your product. The illustrations in this manual may differ from the actual
product and item.
CAUTION
y
Do not use any unapproved items to ensure the safety and product life span.
y
Any damage or injuries caused by using unapproved items are not covered by the warranty.
y
Some models have a thin film attached on to the screen and this must not be removed.
11
ENGLISH
ASSEMBLING AND PREPARING
Remote Control,
Batteries (AAA)
(See p. 18)
Owners manual
Power Cord
Ferrite core
(Depending on model)
(See p. 12)
x 1
M4 x 14
x 7
M5 x 16
x 7
Power Cord Holder
(See p. A-4)
Desk-mount Screw
(Only 42PN45**)
(See
p. 16
)
Screw for assembly
(Only 42PN45**)
(See p. A-3)
Screw for assembly
(Only 50PN45**,
50/60PN65**)
(See p. A-3)
Stand Body / Stand
Base
(See p. A-3)
Protection Cover
(Only 50PN45**,
50PN65**)
(See p. A-4)
12
ENGLISH
ASSEMBLING AND PREPARING
NOTE
1 Use the ferrite core to reduce the electromagnetic interference in the power cable.
Wind the power cable on the ferrite core once. Place the ferrite core close to the TV and a wall plug.
2 Use the ferrite core to reduce the electromagnetic interference in the cable.
Place the ferrite core close to the TV.
[to a wall plug]
[to the TV]
[Figure 1]
- If there are three ferrite cores, follow as shown in Figures 1 and 2.
- If there is LAN port, additionally follow as shown in Figure 3.
y
For an optimal connection, HDMI cables and USB
devices should have bezels less than 10 mm thick
and 18 mm width. Use an extension cable that
supports USB 2.0 if the USB cable or USB memory
stick does not fit into your TV’s USB port.
*A 10 mm
*B
18 mm
y
The items supplied with your product may vary depending on the model.
y
Product specifications or contents of this manual may be changed without prior notice due to upgrade
of product functions.
How to use the ferrite core
[Cross Section of
Ferrite Core]
(Black)
3 Use the ferrite core to reduce the electromagnetic interference in the LAN cable. Wind the LAN
cable once on the ferrite core B and thrice on the ferrite core A.
Place the ferrite core close to the
TV and an External device.
A (Gray) B (Gray)
[Cross Section of
Ferrite Core]
[to the TV]
[to an External
device]
B A A
[Figure 3]
[to an External device]
[Figure 2-1]
[to the TV]
10 mm(+ / - 5 mm)
Wind the
component Y, Pb, Pr, L, R cable
on the ferrite core once.
[to an External device]
[Figure 2-2]
[to the TV]
10 mm(+ / - 5 mm)
Gather and bind the
component Y, Pb, Pr, L, R
and scart cable with the
ferrite core.
[to an External device]
[Figure 2-3]
[to the TV]
10 mm(+ / - 5 mm)
Wind the PC audio cable on the ferrite core once.
[Cross Section of
Ferrite Core]
(Black)
13
ENGLISH
ASSEMBLING AND PREPARING
Separate purchase
Separate purchase items can be changed or modied for quality improvement without any notication.
Contact your dealer to buy these items.
These devices only work with certain models.
LG Audio Device
Compatibility
PN45** PN65**
LG Audio Device
The model name or design may be changed depending on the upgrade of product functions, manufacturer’s
circumstances or policies.
14
ENGLISH
ASSEMBLING AND PREPARING
Parts and buttons
Button Description
Turns the power on or off.
Selects the highlighted menu option or confirms an input
S
Accesses the main menus, or saves your input and exits the menus.
Changes the input source
H
Adjusts the volume level.
H
Scrolls through the saved programmes.
IN 1 (PC)
USB IN
AV IN 2
L/MONO
AV IN 1
LAN
ANTENNA/
CABLE IN
COMPONENT
IN
AUDIO IN (PC)
IN 2
P
OK
INPUT
HOME
OK
INPUT
HOME
P
Speakers
Buttons
Screen
Remote control sensor
Power indicator
19
ENGLISH
USING THE USER GUIDE
1 Press SETTINGS to access the main menus.
2 Press the RED button to access the Customer
Support menus.
3 Press the Navigation buttons to scroll to User
Guide and press OK.
Software Update
Picture Test
Sound Test
Signal Test
Product/Service Info.
User Guide
Close
PICTURE AUDIO SETUP TIME
MY MEDIAINPUTOPTIONLOCK
Press OK(
) to set picture settings.
Customer Support Exit
2
User Guide
OPTION
PROGRAMME Setting
PICTURE, SOUND Setting
Advabced Function
To use input device
To set TV lock options
To set country
Disabled Assistance
To set other options
To set language
To set time options
3
Information
1
1
Allows to select the category you want.
2
Allows to select the item you want.
You can use
H
to move between pages.
3
Allows to browse the description of the
function you want from the index.
1
2
User Guide
OPTION > To set language
Close
Zoom In
OPTION
PROGRAMME Setting
PICTURE, SOUND Setting
Advabced Function
Information
2
Close
Zoom Out
SETTING OPTION Language
You can select the language of the menu displayed on the screen and the digital
sound broadcasting.
y
Menu Language : Selects a language for the display text.
y
Audio Language [In Digital mode Only] : Selects the desired language when
watching digital broadcasting containg several voice languages.
y
Subtitle Language [In Digital mode Only] : Use the Subtitle function when two
or more subtitle languages are broadcast.
If subtitle data in a selected language is not broadcast, the default
language subtitle will be displayed.
1
Shows the description of the selected menu.
You can use
H
to move between pages.
2
Zooms in or out the screen.
USING THE USER GUIDE
User Guide allows you to more easily access the detailed TV information.
SETTING OPTION Language
You can select the language of the menu displayed on the screen and the digital
sound broadcasting.
y
Menu Language : Selects a language for the display text.
y
Audio Language [In Digital mode Only] : Selects the desired language when
watching digital broadcasting containg several voice languages.
y
Subtitle Language [In Digital mode Only] : Use the Subtitle function when two
or more subtitle languages are broadcast.
If subtitle data in a selected language is not broadcast, the default
language subtitle will be displayed.
HASZNÁLATI ÚTMUTATÓ
PLAZMA TV
A készülék használatbavétele előtt figyelmesen
olvassa el az útmutat, és őrizze meg, mert
sőbb szüksége lehet rá.
www.lg.com
11
HUNMAGYAR
ÖSSZESZERELÉS ÉS ELŐKÉSZÍTÉS
Távirányító és ele-
mek (AAA)
(Lásd a 18. oldalt)
Használati útmutató Tápkábel Ferritmag
(Típusfüggő)
(Lásd a 12. oldalt)
x 1
M4 x 14
x 7
M5 x 16
x 7
Tápkábeltart
(Lásd a A-4. oldalt)
Csavar asztalra sz-
ereléshez
(csak
42PN45**
)
(Lásd a 16. oldalt)
Csavar az
összeszereléshez
(
Csak
42PN45**)
(Lásd a A-3. oldalt)
Csavar az
összeszereléshez
(
Csak
50PN45**,
50/60PN65**)
(Lásd a A-3. oldalt)
Állványtest / Talpazat
(Lásd a A-3. oldalt)

(
Csak
50PN45**,
50PN65**)
(Lásd a A-4. oldalt)
14
HUNMAGYAR
ÖSSZESZERELÉS ÉS ELŐKÉSZÍTÉS
A készülék részei és gombjai
Gomb Leírás
A tápellátás be- és kikapcsolása.
A kijelölt menüpont kiválasztása, vagy a bevitt adatot megerősítése.
S
A Főmenü megnyitása, illetve a bevitt adatok mentése, valamint kilépés a me-
nükből.
A bemeneti jelforrás módosítása.
H
A hangerő szabályozása.
H
Tallózás a mentett programok között.
IN 1 (PC)
USB IN
AV IN 2
L/MONO
AV IN 1
LAN
ANTENNA/
CABLE IN
COMPONENT
IN
AUDIO IN (PC)
IN 2
P
OK
INPUT
HOME
OK
INPUT
HOME
P
Hangszórók
Gomb
Képernyő
A távirányító érzékelője
Bekapcsolás jelző
19
HUNMAGYAR
A HASZNÁLATI ÚTMUTATÓ HASZNÁLATA
A használati útmutató segítségével könnyebben elérhetők a TV részletes információi.
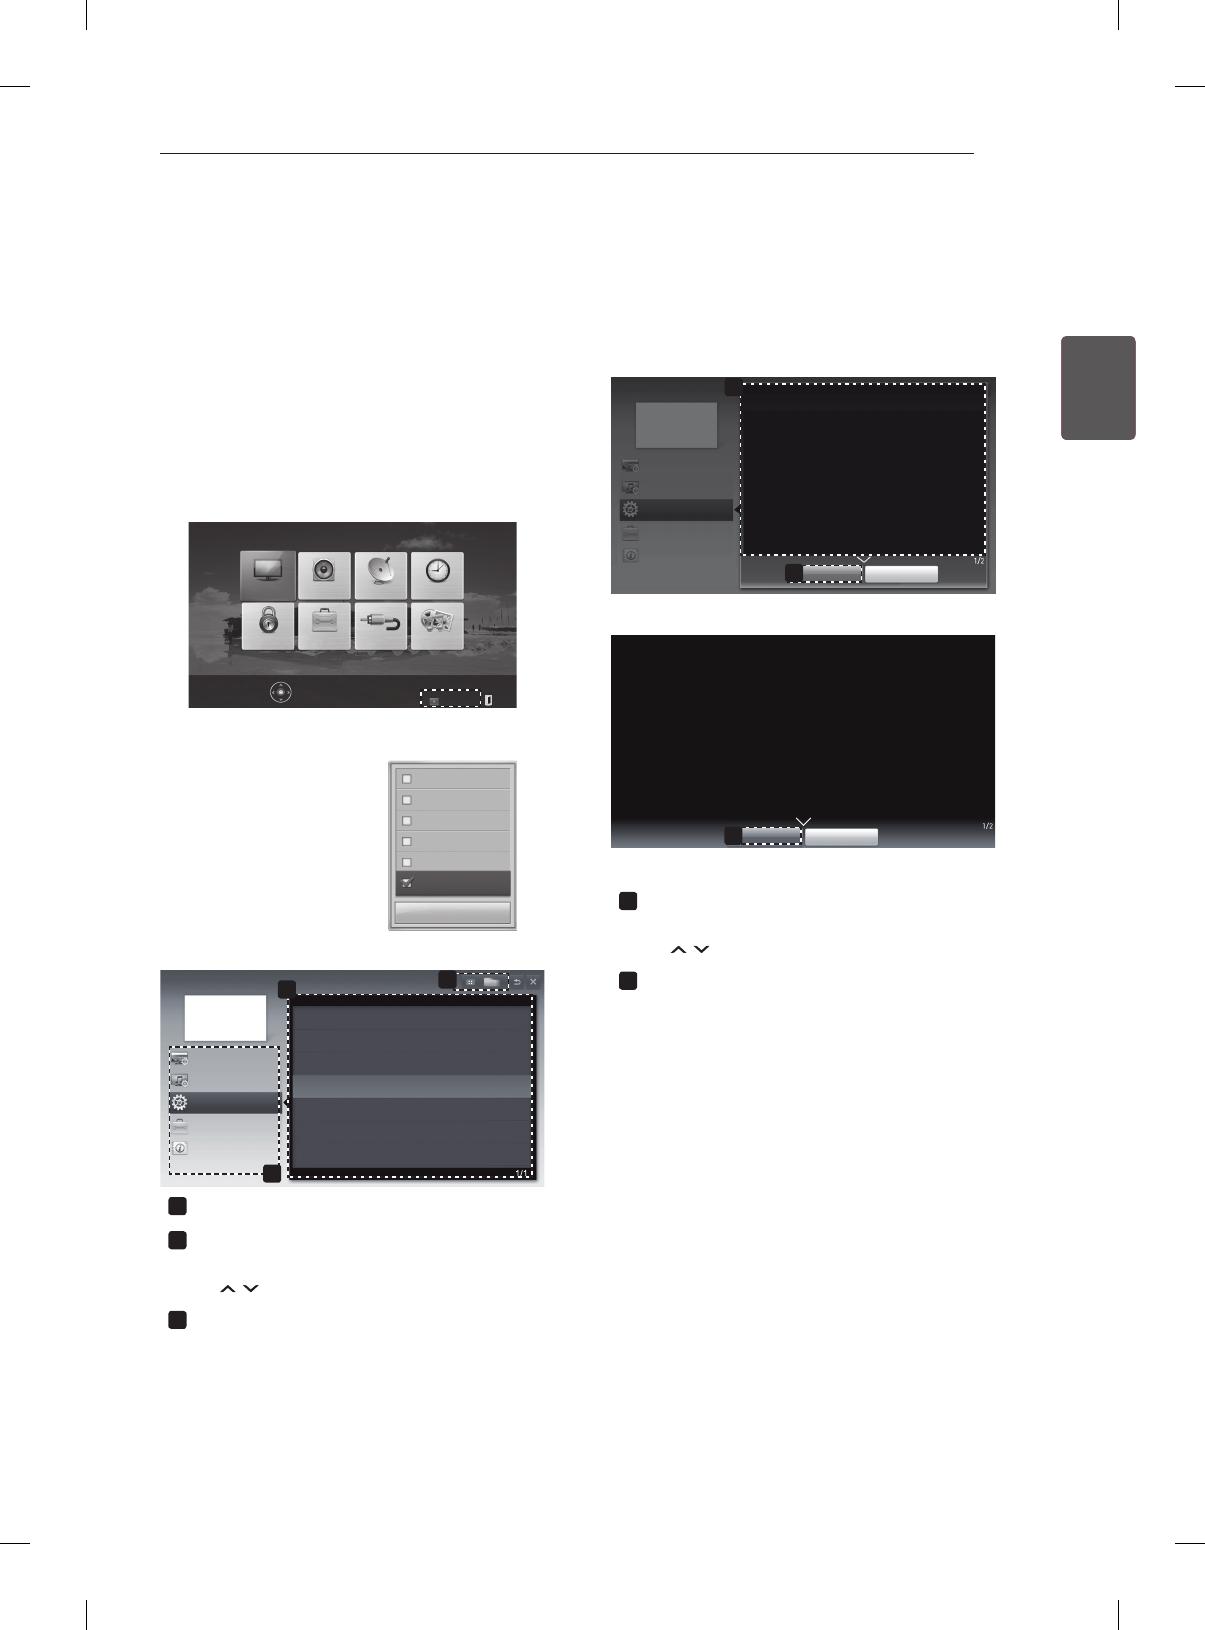
1 Nyomja meg a SETTINGS gombot a főmenük
eléréséhez.
2 Nyomja meg a PIROS gombot az
Ügyfélszolgálat menük eléréséhez.
3 Nyomja meg a navigációs gombokat a
Használati útmutató legördítéséhez, majd
nyomja meg az OK gombot.
Szoftverfrissítés
Képteszt
Hangteszt
Jelteszt
Termék-/Szolgáltatási infó
Használati útmutató
Bezárás
KÉP AUDIO BEÁLLÍTÁS AKTUÁLIS IDŐ
SAJÁT MÉDIABEMENETOPCIÓLEZÁRÁS
Nyomja meg az OK() gombot a Képbeál-
lítások módosításához.
Ügyfélszolgálat Kilép
2
Használati útmutató
OPCIÓ
CSATORNA-beállítás
KÉP és HANG beállítása
Haladó funkció
Bemeneti eszköz használatához
A zárolás opciók használatához
Egyéb opciók beállításához
Kiegészítő támogatás
Egyéb opciók beállításához
Nyelv beállításához
Időopciók beállításához
3
Információ
1
1
Kiválasztható a kívánt kategória.
2
Kiválasztható a kívánt elem.
Az oldalak közötti navigáláshoz használhatja
a
H
gombot.
3
Böngészhet az index kívánt funkciójának le-
írásában.
1
2
Használati útmutató
OPCIÓ > Nyelv beállításához
Bezárás
Közelítés
OPCIÓ
CSATORNA-beállítás
KÉP és HANG beállítása
Haladó funkció
Információ
SETTINGS
OPCIÓ
Nyelv
Kiválaszthatja a képernyőn megjelenő menü és a digitális
hangsugárzás nyelvét.
Menü nyelve : A megjelenített szöveg nyelvének kiválasztása.
Hang nyelve [Csak digitális módban] : A kívánt nyelv kiválasztása
több nyelven sugárzott digitális műsor megtekintése során.
Feliratok nyelve [Csak digitális módban] : Használja a Felirat
funkciót, ha legalább 2 nyelven érhető el felirat.
Ha az adó a kijelölt nyelven nem sugároz feliratot, a felirat az
alapértelmezett nyelven olvasható.
2
Bezárás
Távolítás
SETTINGS
OPCIÓ
Nyelv
Kiválaszthatja a képernyőn megjelenő menü és a digitális hangsugárzás
nyelvét.
Menü nyelve : A megjelenített szöveg nyelvének kiválasztása.
Hang nyelve [Csak digitális módban] : A kívánt nyelv kiválasztása
több nyelven sugárzott digitális műsor megtekintése során.
Feliratok nyelve [Csak digitális módban] : Használja a Felirat funkciót,
ha legalább 2 nyelven érhető el felirat.
Ha az adó a kijelölt nyelven nem sugároz feliratot, a felirat az
alapértelmezett nyelven olvasható.
1
A kiválasztott menü leírását jeleníti meg.
Az oldalak közötti navigáláshoz használhatja
a
H
gombot.
2
A képernyő nagyítása vagy kicsinyítése.
20
HUNMAGYAR
KARBANTARTÁS / HIBAELHÁRÍTÁS
KARBANTARTÁS
A TV-készülék tisztítása
Tisztítsa rendszeresen a TV-készüléket a legjobb teljesítmény és a hosszú élettartam elérése érdekében.
FIGYELEM
y
Először győződjön meg arról, hogy kikapcsolta-e a főkapcsolót és hogy a tápkábelt és a többi kábelt
kihúzta-e.
y
Ha a TV-t huzamosabb ideig nem használja, húzza ki a tápkábelt a fali aljzatból a lehetséges
villámlás vagy feszültségingadozás által okozott károsodás megelőzése érdekében.

y
A por és a könnyű szennyeződések eltávolításához a felületet száraz, tiszta és puha kendővel törölje le.
y
A nagyobb szennyeződések eltávolításához törölje le a felületet tiszta vízzel vagy hígított kíméletes
tisztítószerrel átitatott ruhával. Azt követően azonnal törölje át száraz ruhával.
FIGYELEM
y
Mindig tartózkodjon a képernyő megérintésétől, mert azzal a képernyő sérülését idézheti elő.
y
Ne nyomja, dörzsölje vagy ütögesse a képernyő felületét körmeivel vagy éles tárggyal, mivel
karcolások és képtorzulás következhet be.
y
Ne használjon vegyszert, mivel az károsíthatja a terméket.
y
Ne permetezzen folyadékot a felületre. A TV belsejébe kerülő víz tüzet, áramütést vagy meghibásodást okozhat.
Tápkábel tisztítása
Rendszeresen távolítsa el a tápkábelen összegyűlt port és szennyeződést.
HIBAELHÁRÍTÁS
Probléma Megoldás
A TV nem irányítható a
távirányítóval.
y
Ellenőrizze a készüléken a távirányító érzékelőjét, majd próbálkozzon újra.
y
Ellenőrizze, hogy nincs-e a jelet akadályozó tárgy a készülék és a távirányító
között.
y
Ellenőrizze, hogy az elemek továbbra is működnek-e és megfelelően be
vannak-e helyezve (
- , - ).
Nem látható kép és
nem hallható hang.
y
Ellenőrizze, be van-e kapcsolva a készülék.
y
Ellenőrizze, a tápkábel csatlakozik-e a fali aljzatba.
y
Más készülékek csatlakoztatásával ellenőrizze, hogy hibás-e a fali aljzat.
A TV hirtelen kikapcsol.
y
Ellenőrizze az energiaellátás beállításait. A tápellátás zavara állhat fenn.
y
Ellenőrizze, hogy az Automatikus kikapcsolás funkció aktív-e az
Időbellításokban.
y
Ha a TV bekapcsolt állapota közben nincs jel, a TV 15 perces inaktív
állapotot követően automatikusan kikapcsol.
A számítógéphez való
csatlakozásnál (HDMI DVI) a
„Nincs jel” vagy „Érvénytelen
formátum” üzenet jelenik
meg.
y
A távirányító segítségével kapcsolja ki, majd újra be a készüléket.
y
Csatlakoztassa ismét az HDMI kábelt.
y
Indítsa újra a számítógépet, úgy, hogy a TV-készülék már be van
kapcsolva.
2
PLPOLSKI
SPIS TREŚCI

 
 

 

 

 
 

10 Rozpakowywanie
13 Elementy do nabycia osobno
14 Złącza i przyciski sterujące
15 Podnoszenie i przenoszenie telewizora
16 Montaż na płaskiej powierzchni
17 Montaż na ścianie
 
 

 
20 Czyszczenie telewizora
20 - Ekran, ramka, obudowa i podstawa
20 - Przewód zasilający
 

y
Zignorowanie ostrzeżenia może
spowodować wypadek, a w konsekwencji
poważne obrażenia ciała lub śmierć.

y
Zignorowanie tego typu uwag może
spowodować obrażenia ciała lub
uszkodzenie produktu.

y
Uwagi ułatwiają zrozumienie działania
produktu i bezpieczne korzystanie z niego.
Przed rozpoczęciem korzystania z produktu
należy dokładnie zapoznać się z uwagami.
11
PLPOLSKI
MONTAŻ I PRZYGOTOWANIE DO PRACY
-

(Patrz str. 18)
  
(zależnie od modelu)
(Patrz str. 12)
x 1
M4 x 14
x 7
M5 x 16
x 7


(Patrz str. A-4)


(Tylko 42PN45**)
(Patrz str. 16)


(
Tylko modele
42PN45**)
(Patrz str. A-3)


(
Tylko mode-
le
50PN45**,
50/60PN65**)
(Patrz str. A-3)


(Patrz str. A-3)

(
Tylko modele
50PN45**, 50PN65**)
(Patrz str. A-4)
  • Page 1 1
  • Page 2 2
  • Page 3 3
  • Page 4 4
  • Page 5 5
  • Page 6 6
  • Page 7 7
  • Page 8 8
  • Page 9 9
  • Page 10 10
  • Page 11 11
  • Page 12 12
  • Page 13 13
  • Page 14 14
  • Page 15 15
  • Page 16 16
  • Page 17 17
  • Page 18 18
  • Page 19 19
  • Page 20 20
  • Page 21 21
  • Page 22 22
  • Page 23 23
  • Page 24 24
  • Page 25 25
  • Page 26 26
  • Page 27 27
  • Page 28 28
  • Page 29 29
  • Page 30 30
  • Page 31 31
  • Page 32 32
  • Page 33 33
  • Page 34 34
  • Page 35 35
  • Page 36 36
  • Page 37 37
  • Page 38 38
  • Page 39 39
  • Page 40 40
  • Page 41 41
  • Page 42 42
  • Page 43 43
  • Page 44 44
  • Page 45 45
  • Page 46 46
  • Page 47 47
  • Page 48 48
  • Page 49 49
  • Page 50 50
  • Page 51 51
  • Page 52 52
  • Page 53 53
  • Page 54 54
  • Page 55 55
  • Page 56 56
  • Page 57 57
  • Page 58 58
  • Page 59 59
  • Page 60 60
  • Page 61 61
  • Page 62 62
  • Page 63 63
  • Page 64 64
  • Page 65 65
  • Page 66 66
  • Page 67 67
  • Page 68 68
  • Page 69 69
  • Page 70 70
  • Page 71 71
  • Page 72 72
  • Page 73 73
  • Page 74 74
  • Page 75 75
  • Page 76 76
  • Page 77 77
  • Page 78 78
  • Page 79 79
  • Page 80 80
  • Page 81 81
  • Page 82 82
  • Page 83 83
  • Page 84 84
  • Page 85 85
  • Page 86 86
  • Page 87 87
  • Page 88 88
  • Page 89 89
  • Page 90 90
  • Page 91 91
  • Page 92 92
  • Page 93 93
  • Page 94 94
  • Page 95 95
  • Page 96 96
  • Page 97 97
  • Page 98 98
  • Page 99 99
  • Page 100 100
  • Page 101 101
  • Page 102 102
  • Page 103 103
  • Page 104 104
  • Page 105 105
  • Page 106 106
  • Page 107 107
  • Page 108 108
  • Page 109 109
  • Page 110 110
  • Page 111 111
  • Page 112 112
  • Page 113 113
  • Page 114 114
  • Page 115 115
  • Page 116 116
  • Page 117 117
  • Page 118 118
  • Page 119 119
  • Page 120 120
  • Page 121 121
  • Page 122 122
  • Page 123 123
  • Page 124 124
  • Page 125 125
  • Page 126 126
  • Page 127 127
  • Page 128 128
  • Page 129 129
  • Page 130 130
  • Page 131 131
  • Page 132 132
  • Page 133 133
  • Page 134 134
  • Page 135 135
  • Page 136 136
  • Page 137 137
  • Page 138 138
  • Page 139 139
  • Page 140 140
  • Page 141 141
  • Page 142 142
  • Page 143 143
  • Page 144 144
  • Page 145 145
  • Page 146 146
  • Page 147 147
  • Page 148 148
  • Page 149 149
  • Page 150 150
  • Page 151 151
  • Page 152 152
  • Page 153 153
  • Page 154 154
  • Page 155 155
  • Page 156 156
  • Page 157 157
  • Page 158 158
  • Page 159 159
  • Page 160 160
  • Page 161 161
  • Page 162 162
  • Page 163 163
  • Page 164 164
  • Page 165 165
  • Page 166 166
  • Page 167 167
  • Page 168 168
  • Page 169 169
  • Page 170 170
  • Page 171 171
  • Page 172 172
  • Page 173 173
  • Page 174 174
  • Page 175 175
  • Page 176 176
  • Page 177 177
  • Page 178 178
  • Page 179 179
  • Page 180 180
  • Page 181 181
  • Page 182 182
  • Page 183 183
  • Page 184 184
  • Page 185 185
  • Page 186 186
  • Page 187 187
  • Page 188 188
  • Page 189 189
  • Page 190 190
  • Page 191 191
  • Page 192 192
  • Page 193 193
  • Page 194 194
  • Page 195 195
  • Page 196 196
  • Page 197 197
  • Page 198 198
  • Page 199 199
  • Page 200 200
  • Page 201 201
  • Page 202 202
  • Page 203 203
  • Page 204 204
  • Page 205 205
  • Page 206 206
  • Page 207 207
  • Page 208 208
  • Page 209 209
  • Page 210 210
  • Page 211 211
  • Page 212 212
  • Page 213 213
  • Page 214 214
  • Page 215 215
  • Page 216 216
  • Page 217 217
  • Page 218 218
  • Page 219 219
  • Page 220 220
  • Page 221 221
  • Page 222 222
  • Page 223 223
  • Page 224 224
  • Page 225 225
  • Page 226 226
  • Page 227 227
  • Page 228 228
  • Page 229 229
  • Page 230 230
  • Page 231 231
  • Page 232 232
  • Page 233 233
  • Page 234 234
  • Page 235 235
  • Page 236 236
  • Page 237 237
  • Page 238 238
  • Page 239 239
  • Page 240 240
  • Page 241 241
  • Page 242 242
  • Page 243 243
  • Page 244 244
  • Page 245 245
  • Page 246 246
  • Page 247 247
  • Page 248 248
  • Page 249 249
  • Page 250 250
  • Page 251 251
  • Page 252 252
  • Page 253 253
  • Page 254 254
  • Page 255 255
  • Page 256 256
  • Page 257 257
  • Page 258 258
  • Page 259 259
  • Page 260 260
  • Page 261 261
  • Page 262 262
  • Page 263 263
  • Page 264 264
  • Page 265 265
  • Page 266 266
  • Page 267 267
  • Page 268 268
  • Page 269 269
  • Page 270 270
  • Page 271 271
  • Page 272 272
  • Page 273 273
  • Page 274 274
  • Page 275 275
  • Page 276 276
  • Page 277 277
  • Page 278 278
  • Page 279 279
  • Page 280 280
  • Page 281 281
  • Page 282 282
  • Page 283 283
  • Page 284 284
  • Page 285 285
  • Page 286 286
  • Page 287 287
  • Page 288 288
  • Page 289 289
  • Page 290 290
  • Page 291 291
  • Page 292 292
  • Page 293 293
  • Page 294 294
  • Page 295 295
  • Page 296 296
  • Page 297 297
  • Page 298 298
  • Page 299 299
  • Page 300 300
  • Page 301 301
  • Page 302 302
  • Page 303 303
  • Page 304 304
  • Page 305 305
  • Page 306 306
  • Page 307 307
  • Page 308 308
  • Page 309 309
  • Page 310 310
  • Page 311 311
  • Page 312 312
  • Page 313 313
  • Page 314 314
  • Page 315 315
  • Page 316 316
  • Page 317 317
  • Page 318 318
  • Page 319 319
  • Page 320 320
  • Page 321 321
  • Page 322 322
  • Page 323 323
  • Page 324 324
  • Page 325 325
  • Page 326 326
  • Page 327 327
  • Page 328 328
  • Page 329 329
  • Page 330 330
  • Page 331 331
  • Page 332 332
  • Page 333 333
  • Page 334 334
  • Page 335 335
  • Page 336 336
  • Page 337 337
  • Page 338 338
  • Page 339 339
  • Page 340 340
  • Page 341 341
  • Page 342 342
  • Page 343 343
  • Page 344 344
  • Page 345 345
  • Page 346 346
  • Page 347 347
  • Page 348 348
  • Page 349 349
  • Page 350 350
  • Page 351 351
  • Page 352 352
  • Page 353 353
  • Page 354 354
  • Page 355 355
  • Page 356 356
  • Page 357 357
  • Page 358 358
  • Page 359 359
  • Page 360 360
  • Page 361 361
  • Page 362 362
  • Page 363 363
  • Page 364 364
  • Page 365 365
  • Page 366 366
  • Page 367 367
  • Page 368 368
  • Page 369 369
  • Page 370 370
  • Page 371 371

LG 50PN450B Руководство пользователя

Категория
ЖК-телевизоры
Тип
Руководство пользователя

Задайте вопрос, и я найду ответ в документе

Поиск информации в документе стал проще с помощью ИИ