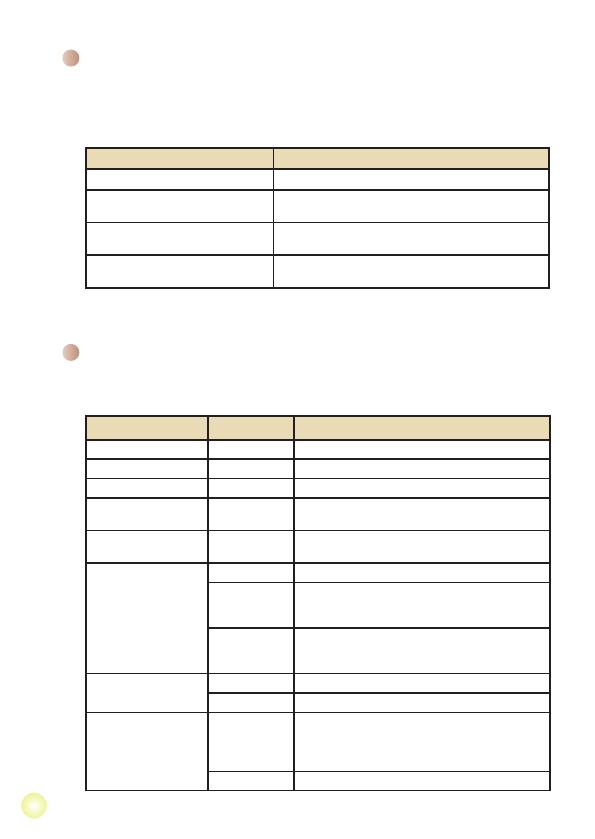
AIPTEK PocketCinema V10 Инструкция по применению

Категория
Цифровые фоторамки
Тип
Инструкция по применению

Это руководство также подходит для

1
Getting Started
Projector parts
Focus switch
Speaker
Strap holder
USB connector
Tripod socket
Lens
Battery cover
SD/MMC card slot
Speaker
AV jack
Left button
Right button
Menu button
Power button
Up button
Down button
OK button
Power/Charging
LED
1010
Playing back les in other devices
Connecting the projector to your media players
Steps of connecting projector with external player:
Before connecting your media player to projector, you need to have
media player dedicated composite AV-out cable and projector AV cable
ready.
1. Connect Composite AV-out cable to media player.
2. Connect both AV cables (Yellow to Yellow, white to white and red to
red).
3. Select “AV in” when you are asked to select “AV in” or “Audio out”.
4. Now you can project image and audio from projector. You also can
control the volume from control panel (Up/Down button).
Video/Music
Player
Mobile Phone
Portable Media
Player
Digital camcorder/
camera
AV OUT
<AV cable>
(red)
(yellow)
(white)
(red)
(yellow)
(white)
Projector AV cable Composite AV-out cable
1111
Connecting the projector to your laptop PC
Before connecting your laptop PC to projector, you need to have
Composite/S-video adapter, RCA (dual male) connector, and projector AV
cable ready.
1. Turn on laptop PC and projector rst.
2. Connect one end of the Composite/S-video adapter to the S-video port
of laptop PC and the other end to RCA (dual male) connector.
3. Connect the other end of RCA (dual male) connector to projector AV
cable (yellow).
4. Connect the AV cable to the AV jack of projector.
5. Select “AV in” when you are asked to select “AV in” or “Audio out”.
6. Switch the laptop display mode from LCD mode to TV mode.
Please make sure that your laptop PC is equipped with S-video port.
AV OUT
<AV cable>
(red)
(yellow)
(white)
S-video port
RCA (dual male) connector S-video cable
1212
Menu operation
The menu items provide several options for you to ne-tune your projector functions.
The following table gives details on menu operations.
How to... Action
Bring up the menu Press the MENU button.
Move the highlight bar Use the Up/Down button or Left/Right button.
Enter sub-menu/Conrm an item Press the OK button.
Exit menu/Go back to upper menu Press the MENU button (when in sub-menu).
Menu items in Settings mode
Power-on → Select the Settings mode → Press the OK button.
Item Option Description
Language
-
Lets you select the language used for OSD.
Brightness
-4 ~ +4
Set projection screen brightness.
Contrast
-4 ~ +4
Set projection screen contrast.
Saturation
-4 ~ +4
Set projection screen color saturation.
Slideshow
Speed
3 sec, 5 sec,
8 sec, 15 sec
Set the interval time between each slide
Auto
Power Off
Off
Disable Auto-off function.
3 min
The projector automatically shuts down when staying
inactive for over 3 minutes.
5 min
The projector automatically shuts down when staying
inactive for over 5 minutes.
Beep
On
Enable beep sound.
Off
Disable beep sound.
Default
Yes
Restore factory defaults. Note that your current settings will
be overridden.
No
Cancel action.
1515
Specications
Item Description
Optical Technology LCoS
Light Source White LED
Aspect Ratio 4:3
Luminous Flux 10 Lumens (Max.)
Resolution 640 x 480 (VGA)
Projection Image Size 6” ~ 50” (15cm ~ 127cm) (Diagonal)
Projection Distance 25cm ~ 180cm
Zoom & Focus Manual
Projection Source External from 3-in-1 AV jack, built-in memory or memory card
Play back format
Photo: .JPEG
Audio: .MP3
Video: .MPEG-4 (.AVI, .ASF, .MP4), H.264 (.MP4), M-JPEG
(.AVI) through ArcSoft Media Converter.
Audio speaker Stereo (0.5W x 2)
Memory Slot SD/SDHC/MMC/MS Pro
Power Supply AC power adapter or NP120 Li-Lon rechargeable battery
Operation temperature 0°C ~ 35°C
Dimension 125mm x 55mm x 23mm
Weight 100g (without battery)
Note: Specications are subject to change without notication.
1
Erste Schritte
Projector-Komponenten
Fokusregler
Lautsprecher
Trageriemenöse
USB-Anschluss
Stativgewinde
Objektiv
Akkufachdeckel
SD-/MMC-
Kartensteckplatz
Lautsprecher
AV-Anschluss
Linkstaste
Rechtstaste
Menütaste
Ein-/Austaste
Aufwärtstaste
Abwärtstaste
OK-Taste
Betrieb-/Laden-LED
1010
In anderen Geräten gespeicherte
Dateien wiedergeben
Verbinden des Projektors mit Medienplayern
So verbinden Sie den Projektor mit einem externen Gerät:
Um beispielsweise ein Medienplayer an den Projektor anzuschließen,
benötigen Sie einen Medienplayer mit einem speziellen AV-Ausgang und
ein passendes AV-Kabel.
1. Verbinden Sie das Composite-AV-Ausgabekabel mit dem
Medienplayer.
2. Verbinden Sie die beiden AV-Kabel (Gelb an Gelb, Weiß an Weiß, Rot
an Rot).
3. Wählen Sie “AV-Eingang”, wenn Sie gebeten werden, “AV-Eingang”
oder “Audioausgang” zu wählen.
4. Nun können Sie Bild und Ton über den Projektor wiedergeben. Mit
den Aufwärts-/Abwärtstasten am Bedienfeld können Sie auch die
Lautstärke steuern.
Projektor-AV-Kabel
Composite-AV-
Ausgabekabel
Video-/Musik-
Player
Mobiltelefon
Tragbarer
Medienplayer
Digitaler Camcorder/
Kamera
AV-Ausgang
<AV-Kabel>
(rot)
(gelb)
(weiß)
(rot)
(gelb)
(weiß)
1212
Menübedienung
Die Menüs bieten verschiedene Optionen, mit denen Sie Feineinstellungen der
Funktionen Ihres projector vornehmen können. Die nachstehende Tabelle enthält
Einzelheiten über die Menübedienung.
Funktion... Bedienschritte
Menü einblenden Drücken Sie die Menütaste.
Markierung verschieben
Verwenden Sie die Aufwärts-/Abwärtstasten oder
Links-/Rechtstasten.
Untermenü aufrufen/Eingabe
bestätigen
Drücken Sie die OK-Taste.
Menü verlassen/Zurück zum
nächsthöheren Menü
Drücken Sie die Menütaste (im Untermenü).
Menüelemente im Einstellungsmodus
Einschalten → Einstellungen-Modus wählen → OK-Taste drücken.
Element Optionen Beschreibung
Sprache
-
Ermöglicht Ihnen die Auswahl der Menüsprache.
Helligkeit
-4 ~ +4
Zum Einstellen der Projektionshelligkeit.
Kontrast
-4 ~ +4
Zum Einstellen des Bildkontrastes.
Sättigung
-4 ~ +4
Zum Einstellen der Farbsättigung des projizierten
Bildes.
Diaschaugeschw.
3 Sek., 5 Sek.,
8 Sek., 15 Sek.
Hier legen Sie die Anzeigezeit der einzelnen
Bilder einer Diaschau fest.
Auto-Abschaltung
Aus
Deaktiviert die automatische Abschaltfunktion.
3 min
Der Projektor schaltet sich automatisch ab, wenn
länger als 3 Minuten keine Bedienelemente
betätigt werden.
5 min.
Der Projektor schaltet sich automatisch ab, wenn
länger als 5 Minuten keine Bedienelemente
betätigt werden.
Pieper
Ein
Signaltöne werden ausgegeben.
Aus
Es werden keine Signaltöne ausgegeben.
Standard
Ja
Stellt die werkseitigen Standardeinstellungen
wieder her. Bitte beachten Sie, dass dadurch
alle von Ihnen vorgenommenen Einstellungen
zurückgesetzt werden.
Nein
Bricht den Vorgang ab.
1414
Symbole Beschreibung
Akku voll geladen
Akku halb voll
Akku fast leer
Akku ist leer
Hinweis 1: Um einen plötzlichen Ausfall der Stromversorgung zu vermeiden,
empfehlen wir, zuerst das Netzteil anzuschließen und dann erst den
Akku zu entnehmen, wenn ein niedriger Energiestand angezeigt wird.
Hinweis 2:
Wenn die Meldung “Batterie schwach” auf dem Bildschirm erscheint,
wird der Projektor automatisch ausgeschaltet.
Akkustandanzeige
Fernbedienung
Austaste
Lautstärketasten
Beenden-Taste
Rechtstaste
OK-/Wiedergabe-/
Pause-Taste
Linkstaste
Aufwärtstaste
Abwärtstaste
Menütaste
1515
Technische Daten
Element Beschreibung
Optische Technologie LCoS
Lichtquelle Weiße LED
Anzeigeformat 4:3
Lichtstärke 10 Lumen
Auösung 640 x 480 (VGA)
Projizierte Bildgröße 15 bis 127 cm (Diagonale)
Projektionsabstand 25cm bis 180cm
Zoom und Fokus Manuell
Projektionsquellen
Extern: 3-in-1-AV-Anschluss, integrierter Speicher oder
Speicherkarte
Wiedergabeformate
Bilder: JPEG
Audio: MP3
Video: MPEG-4 (AVI, ASF, MP4), H.264 (MP4), M-JPEG
(AVI) über ArcSoft Media Converter.
Lautsprecher Stereo (500 mW x 2)
Speicherkartensteckplatz SD/SDHC/MMC/MS Pro
Stromversorgung Netzteil oder Lithium-Ionen-Akku (NP120)
Betriebstemperatur 0 °C bis 35 °C
Abmessungen 125 mm x 55 mm x 23 mm
Gewicht 100g (ohne Batterie)
Hinweis: Technische Daten können sich ohne Vorankündigung ändern.
1
Pour commencer
Composants du projecteur
Sélecteur
mise au point
Haut-parleur
Point d'attache pour dragonne
Connecteur USB
Interface trépied
Objectif
Couvercle du
compartiment batterie
Logement de carte
SD/MMC
Haut-parleur
Prise AV
Bouton Gauche
Bouton Droit
Bouton MENU
Bouton
Alimentation
Bouton Haut
Bouton Bas
Bouton OK
Voyant LED
Alimentation/
Chargement
55
Cette fonction permet de sélectionner le type de mémoire pour la lecture et sa capacité
et l’espace disponible. Par défaut, c’est la mémoire intégrée.
1. Utilisez le bouton
Gauche/Droit pour sélectionner « Mémoire » puis appuyez sur le
bouton OK.
2. La case à cocher Mémoire s’afchera ci-dessous. Utilisez le bouton
Haut/Bas pour
sélectionner le type de mémoire.
Sélection Mémoire Disponible/Capacité
669Mo / 979Mo
1,9Go / 1,9Go
3. Appuyez sur le bouton OK après la sélection pour revenir au menu principal.
S’il n’y a aucune carte mémoire insérée, l’écran afchera uniquement l’état
de la mémoire interne intégrée.
Vérication de la mémoire
1212
Opération du menu
Les éléments du menu offrent plusieurs options pour que vous puissiez ajuster
nement les fonctions du projecteur. Le tableau suivant donne des détails à propos des
opérations de menu:
Comment faire pour... Action
Faire apparaître le menu
principal
Appuyez sur le bouton MENU.
Déplacer la barre de mise en
surbrillance
Utilisez le bouton Haut/Bas ou le bouton Gauche/Droit.
Accéder au sous-menu/
Conrmer un élément
Appuyez sur le bouton OK.
Quitter le menu/Revenir au
menu précédent
Appuyez sur le bouton MENU (une fois dans le sous-
menu).
Eléments du menu en mode Paramètres
Mettre sous tension → Sélectionnez le mode Paramètres → Appuyez sur le bouton
OK.
Elément Option Description
Langue
-
Vous permet de sélectionner la langue utilisée pour l’OSD.
Luminosité
-4 ~ +4
Pour régler la luminosité de l’écran de projection.
Contraste
-4 ~ +4
Pour régler le contraste de l’écran de projection.
Saturation
-4 ~ +4
Pour régler la saturation des couleurs de l’écran de projection.
Vitesse du
diaporama
3 sec, 5
sec, 8 sec,
15 sec
Pour régler la durée de l’intervalle entre chaque image du
diaporama.
Arrêt auto
Désactivé
Pour désactiver la fonction Arrêt auto.
3 min
Le projecteur s’arrêtera automatiquement s’il reste inactif
pendant 3 minutes.
5 min
Le projecteur s’arrêtera automatiquement s’il reste inactif
pendant 5 minutes.
Bip
Activé
Pour activer le bip sonore.
Désactivé
Pour désactiver le bip sonore.
Défaut
Oui
Pour restaurer aux paramètres d’usine par défaut. Notez que
les paramètres actuels seront annulés.
Non
Pour annuler l’action.
1515
Spécications
Elément Description
Technologie optique LCoS
Source lumineuse Voyant DEL blanc
Format d’écran 4:3
Flux lumineux 10 Lumens (Max.)
Résolution 640 x 480 (VGA)
Dimension de l’image
projetée
6pouces ~ 50pouces (15cm ~ 127cm) (Diagonale)
Distance de projection 25cm ~ 180cm
Zoom et mise au point Manuel
Source de projection
Externe depuis le connecteur AV 3-en-1, mémoire intégrée
ou carte mémoire
Format de lecture
Image: .JPEG
Audio: .MP3
Vidéo: .MPEG-4 (.AVI, .ASF, .MP4), H.264 (.MP4), M-JPEG
(.AVI) à travers le convertisseur de média ArcSoft.
Haut-parleur audio Stéréo (0,5W x 2)
Logement mémoire SD/SDHC/MMC/MS Pro
Alimentation
Adaptateur d’alimentation AC ou batterie rechargeable Li-Ion
NP120
Température de
fonctionnement
0°C ~ 35°C
Dimensions 125mm x 55mm x 23mm
Poids 100g (sans les piles)
Remarque: Les spécications sont sujettes à modication sans préavis.
1
Preparazione
Parti del proiettore
Interruttore
messa a fuoco
Cassa
Passante cinturino
Connettore USB
Aggancio treppiede
Obiettivo
Coperchio scomparto
battere
Alloggio scheda
SD/MMC
Cassa
Connettore AV
Tasto sinistra
Tasto destro
Tasto Menu
Tasto
d’alimentazione
Tasto Su
Tasto giù
Tasto OK
LED alimentazione/
caricamento
1212
Funzionamento dei menu
Le voci del menu forniscono varie opzioni che permettono di sintonizzare con
precisione le funzioni del proiettore. La tavola che segue illustra i dettagli sulle
operazioni dei menu.
Come fare per... Azione
Fare apparire il menu Premere il tasto MENU.
Spostare l’evidenziatore Usare il tasto Su/Giù o il tasto Sinistra/Destra.
Accedere ai menu secondari /
Confermare una voce
Premere il tasto OK.
Uscire dal menu / Tornare al menu
precedente
Premere il tasto MENU (quando si è nel menu
secondario).
Elementi del menu in modaliImpostazioni
Accendere → Selezionare la modalità Impostazione → Premere il tasto OK .
Voce Opzione Descrizione
Lingua
-
Permette di selezionare la lingua usata per il menu OSD.
Luminosità
-4 ~ +4
Imposta la luminosità dello schermo.
Contrasto
-4 ~ +4
Imposta il contrasto dello schermo.
Saturazione
-4 ~ +4
Imposta la saturazione dei colori dello schermo.
Velocità seq.
immagini
3 sec, 5 sec,
8 sec, 15 sec
Imposta l’intervallo di visualizzazione di ciascuna immagine.
Spegnimento
automatico
Disattiva
Disabilita la funzione di Spegnimento automatico.
3 min
Il proiettore si spegne automaticamente quando resta
inattivo per più di 3 minuti.
5 Min
Il proiettore si spegne automaticamente quando resta
inattivo per più di 5 minuti.
Avviso sonoro
Attiva
Abilita l’avviso sonoro.
Disattiva
Disabilita l’avviso sonoro.
Predenito
Ripristina le impostazioni predenite. Notare che le
impostazioni correnti saranno sovrascritte.
No
Annulla l’azione.
1515
Speciche
Voce Descrizione
Tecnologia ottica LCoS
Sorgente luminosa LED bianco
Rapporto d'immagine 4:3
Luminous Flux 10 Lumens (massimo)
Risoluzione 640 x 480 (VGA)
Dimensioni immagine
proiettata
6” ~ 50” (15 cm ~ 127 cm) (diagonale)
Distanza di proiezione 25cm ~ 180cm
Zoom e Fuoco Manuale
Origine di proiezione
Esterna da connettore AV 3 in 1, memoria interna o scheda
memoria
Formato riproduzione
Foto: .JPEG
Audio: .MP3
Video: .MPEG-4 (.AVI, .ASF, .MP4), H.264 (.MP4), M-JPEG
(.AVI) usando ArcSoft Media Converter.
Casse audio Stereo (2 x 0,5 W)
Alloggio memoria SD/SDHC/MMC/MS Pro
Fornitura
d'alimentazione
Adattatore CA o batteria ricaricabile agli ioni di litio NP120
Temperatura operativa 0°C ~ 35°C
Dimensioni 125 mm x 55 mm x 23 mm
Peso 100g (senza batteria)
Nota: Le speciche sono soggette a modica senza preavviso.
1
Introducción
Proyector parts
Selector de
enfoque
Altavoz
Gancho para la correa
Conector USB
Toma para trípode
Objetivo
Tapa de la batería
Ranura para tarjetas
SD y MMC
Altavoz
Conector de AV
Botón Izquierda
Botón Derecha
Botón Menú
Botón de
encendido
Botón Arriba
Botón Abajo
Botón Aceptar
LED de alimentación
y carga
1010
Reproducir archivos de otros dispositivos
Conectar el proyector a los reproductores
multimedia
Pasos para conectar el proyector a un reproductor externo:
Antes de conectar el reproductor multimedia al proyector, es necesario
tener el cable de salida de AV compuesta dedicado del reproductor
multimedia y el cable de AV del proyector preparados.
1. Conecte el cable de salida de AV compuesta al reproductor
multimedia.
2. Conecte ambos cables de AV (amarillo con amarillo, blanco con blanco
y rojo con rojo).
3. Seleccione “Entrada de AV” cuando se le pida que seleccione “Entrada
de AV” o “Salida de audio”.
4. Ahora puede proyectar imágenes y audio desde el proyector. También
puede controlar el volumen desde el panel de control (botón Arriba/
Abajo).
Reproductor de
vídeo y música
Teléfono móvil
Reproductor
multimedia portátil
Videocámara o
cámara digital
SALIDA DE AV
<Cable de AV>
(Rojo)
(Amarillo)
(Blanco)
(Rojo)
(Amarillo)
(Blanco)
Cable de AV del proyector
Cable de salida de AV
del proyector
1212
Uso de los menús
Los elementos del menú proporcionan varias opciones para ajustar con precisión las
funciones del proyector. La tabla siguiente ofrece detalles acerca de las operaciones
de los menús.
Cómo... Acción
Mostrar el menú. Presione el botón MENÚ .
Mover la barra de resalte.
Utilice el botón Arriba/Abajo o el botón Izquierda/
Derecha.
Entrar en un submenú o conrmar
un elemento
Presione el botón OK.
Salir del menú o retroceder al menú
de nivel superior
Presione el botón MENÚ (cuando esté en un
submenú).
Elementos de menú en el modo
Conguración
Encender → Seleccionar el modo Conguración → Presionar el botón OK.
Elemento Opción Descripción
Idioma
-
Permite seleccionar el idioma en el que se mostrarán los
menús OSD.
Brillo
-4 ~ +4
Permite seleccionar el brillo de la pantalla de proyección.
Contraste
-4 ~ +4
Permite establecer el contraste de la pantalla de
proyección.
Saturación
-4 ~ +4
Permite establecer la saturación del color de la pantalla
de proyección.
Velocidad de
presentación
3 s, 5 s, 8 s
y 15 s
Establece el intervalo de tiempo entre cada diapositiva.
Apagado
automático
Apagar
Deshabilita la función Apagado automático.
3 min
El proyector se apaga automáticamente cuando
permanece inactivo durante más de 3 minutos.
5 min
El proyector se apaga automáticamente cuando
permanece inactivo durante más de 5 minutos.
Pitido
Encender
Habilita el sonido de un pitido.
Apagar
Deshabilita el sonido de un pitido.
Predenido
Restaura los valores predeterminados de fábrica. Tenga
en cuenta que se sobrescribirá la conguración actual.
No
Anula la acción.
  • Page 1 1
  • Page 2 2
  • Page 3 3
  • Page 4 4
  • Page 5 5
  • Page 6 6
  • Page 7 7
  • Page 8 8
  • Page 9 9
  • Page 10 10
  • Page 11 11
  • Page 12 12
  • Page 13 13
  • Page 14 14
  • Page 15 15
  • Page 16 16
  • Page 17 17
  • Page 18 18
  • Page 19 19
  • Page 20 20
  • Page 21 21
  • Page 22 22
  • Page 23 23
  • Page 24 24
  • Page 25 25
  • Page 26 26
  • Page 27 27
  • Page 28 28
  • Page 29 29
  • Page 30 30
  • Page 31 31
  • Page 32 32
  • Page 33 33
  • Page 34 34
  • Page 35 35
  • Page 36 36
  • Page 37 37
  • Page 38 38
  • Page 39 39
  • Page 40 40
  • Page 41 41
  • Page 42 42
  • Page 43 43
  • Page 44 44
  • Page 45 45
  • Page 46 46
  • Page 47 47
  • Page 48 48
  • Page 49 49
  • Page 50 50
  • Page 51 51
  • Page 52 52
  • Page 53 53
  • Page 54 54
  • Page 55 55
  • Page 56 56
  • Page 57 57
  • Page 58 58
  • Page 59 59
  • Page 60 60
  • Page 61 61
  • Page 62 62
  • Page 63 63
  • Page 64 64
  • Page 65 65
  • Page 66 66
  • Page 67 67
  • Page 68 68
  • Page 69 69
  • Page 70 70
  • Page 71 71
  • Page 72 72
  • Page 73 73
  • Page 74 74
  • Page 75 75
  • Page 76 76
  • Page 77 77
  • Page 78 78
  • Page 79 79
  • Page 80 80
  • Page 81 81
  • Page 82 82
  • Page 83 83
  • Page 84 84
  • Page 85 85
  • Page 86 86
  • Page 87 87
  • Page 88 88
  • Page 89 89
  • Page 90 90
  • Page 91 91
  • Page 92 92
  • Page 93 93
  • Page 94 94
  • Page 95 95
  • Page 96 96
  • Page 97 97
  • Page 98 98
  • Page 99 99
  • Page 100 100
  • Page 101 101
  • Page 102 102
  • Page 103 103
  • Page 104 104
  • Page 105 105
  • Page 106 106
  • Page 107 107
  • Page 108 108
  • Page 109 109
  • Page 110 110
  • Page 111 111
  • Page 112 112
  • Page 113 113
  • Page 114 114
  • Page 115 115
  • Page 116 116
  • Page 117 117
  • Page 118 118
  • Page 119 119
  • Page 120 120
  • Page 121 121
  • Page 122 122
  • Page 123 123
  • Page 124 124
  • Page 125 125
  • Page 126 126
  • Page 127 127
  • Page 128 128
  • Page 129 129
  • Page 130 130
  • Page 131 131
  • Page 132 132
  • Page 133 133
  • Page 134 134
  • Page 135 135
  • Page 136 136
  • Page 137 137
  • Page 138 138
  • Page 139 139
  • Page 140 140
  • Page 141 141
  • Page 142 142
  • Page 143 143
  • Page 144 144
  • Page 145 145
  • Page 146 146
  • Page 147 147
  • Page 148 148
  • Page 149 149
  • Page 150 150
  • Page 151 151
  • Page 152 152
  • Page 153 153
  • Page 154 154
  • Page 155 155
  • Page 156 156
  • Page 157 157
  • Page 158 158
  • Page 159 159
  • Page 160 160
  • Page 161 161
  • Page 162 162
  • Page 163 163
  • Page 164 164
  • Page 165 165
  • Page 166 166
  • Page 167 167
  • Page 168 168
  • Page 169 169
  • Page 170 170
  • Page 171 171
  • Page 172 172
  • Page 173 173
  • Page 174 174
  • Page 175 175
  • Page 176 176
  • Page 177 177
  • Page 178 178
  • Page 179 179
  • Page 180 180
  • Page 181 181
  • Page 182 182
  • Page 183 183
  • Page 184 184
  • Page 185 185
  • Page 186 186
  • Page 187 187
  • Page 188 188
  • Page 189 189
  • Page 190 190
  • Page 191 191
  • Page 192 192
  • Page 193 193
  • Page 194 194
  • Page 195 195
  • Page 196 196
  • Page 197 197
  • Page 198 198
  • Page 199 199
  • Page 200 200
  • Page 201 201
  • Page 202 202
  • Page 203 203
  • Page 204 204
  • Page 205 205
  • Page 206 206
  • Page 207 207
  • Page 208 208
  • Page 209 209
  • Page 210 210
  • Page 211 211
  • Page 212 212
  • Page 213 213
  • Page 214 214
  • Page 215 215
  • Page 216 216
  • Page 217 217
  • Page 218 218
  • Page 219 219
  • Page 220 220
  • Page 221 221
  • Page 222 222
  • Page 223 223
  • Page 224 224
  • Page 225 225
  • Page 226 226
  • Page 227 227
  • Page 228 228
  • Page 229 229
  • Page 230 230
  • Page 231 231
  • Page 232 232
  • Page 233 233
  • Page 234 234
  • Page 235 235
  • Page 236 236
  • Page 237 237
  • Page 238 238
  • Page 239 239
  • Page 240 240
  • Page 241 241
  • Page 242 242
  • Page 243 243
  • Page 244 244
  • Page 245 245
  • Page 246 246
  • Page 247 247
  • Page 248 248
  • Page 249 249
  • Page 250 250
  • Page 251 251
  • Page 252 252
  • Page 253 253
  • Page 254 254
  • Page 255 255
  • Page 256 256
  • Page 257 257
  • Page 258 258
  • Page 259 259
  • Page 260 260
  • Page 261 261
  • Page 262 262
  • Page 263 263
  • Page 264 264
  • Page 265 265
  • Page 266 266
  • Page 267 267
  • Page 268 268
  • Page 269 269
  • Page 270 270
  • Page 271 271
  • Page 272 272
  • Page 273 273
  • Page 274 274
  • Page 275 275
  • Page 276 276
  • Page 277 277
  • Page 278 278
  • Page 279 279
  • Page 280 280
  • Page 281 281
  • Page 282 282
  • Page 283 283
  • Page 284 284
  • Page 285 285
  • Page 286 286
  • Page 287 287
  • Page 288 288
  • Page 289 289
  • Page 290 290

AIPTEK PocketCinema V10 Инструкция по применению

Категория
Цифровые фоторамки
Тип
Инструкция по применению
Это руководство также подходит для

Задайте вопрос, и я найду ответ в документе

Поиск информации в документе стал проще с помощью ИИ