Pioneer SC-LX78 Руководство пользователя

Категория
Видеосистемы для автомобилей
Тип
Руководство пользователя

Это руководство также подходит для

SC-LX88-
K/
-
S
SC-LX78-K/-S
AV Receiver
Amplificateur AV
AV Receiver
Sintoamplificatore AV
AV Receiver
Receptor AV
AV-ресивер
Quick Start Guide
Guide rapide
Kurzanleitung
Guida di avvio rapido
Snelstartgids
Guía de inicio rápido
Краткое руководство пользователя
What’s in the box
Contenu du carton d’emballage
Lieferumfang
Contenuto della confezione
Inhoud van de doos
Contenido de la caja
Комплект поставки
Thank you for buying this Pioneer product. This Quick Start
Guide includes instructions for basic connections and operations
to allow simple use of the receiver. For detailed descriptions of
the receiver, see the “Operating Instructions” provided on the
included CD-ROM ( ).
Merci pour l’achat de ce produit Pioneer. Ce guide rapide
contient les instructions relatives aux raccordements et
opérations de base permettant une utilisation simple de ce
récepteur. Pour des descriptions plus détaillées du récepteur,
référez-vous au “Mode d’emploi” sur le CD-ROM ( ) fourni.
Vielen Dank, dass Sie sich für dieses Pioneer-Produkt entschieden
haben. Die Kurzanleitung enthält Anweisungen für grundlegende
Verbindungen und Bedienvorgänge, um eine einfache Bedienung
des Receivers zu ermöglichen. Detaillierte Beschreibungen des
Receivers finden Sie in der „Bedienungsanleitung“ auf der
mitgelieferten CD-ROM ( ).
Vi ringraziamo per avere acquistato questo prodotto Pioneer.
Questa Guida di avvio rapido comprende istruzioni per i
collegamenti fondamentali e per le operazioni essenziali di
questo ricevitore. Per una descrizione dettagliata del ricevitore,
vedere le “Istruzioni per l’uso” contenute nel CD-ROM ( )
accluso.
Hartelijk dank voor de aanschaf van dit Pioneer product. In deze
snelstartgids vindt u de instructies voor de basisaansluitingen en
de basisbediening voor een eenvoudig gebruik van de receiver.
Voor meer gedetailleerde informatie wordt u verwezen naar de
“Handleiding” die op de bijgeleverde CD-ROM ( ) staat.
Muchas gracias por haber adquirido este producto de Pioneer.
Esta Guía de inicio rápido incluye instrucciones para hacer las
conexiones y operaciones básicas que le permitirán hacer un uso
sencillo del receptor. Para conocer una descripción detallada del
receptor, consulte el “Manual de instrucciones” suministrado con
el CD-ROM ( ) incluido.
Благодарим вас за приобретение данного изделия Pioneer.
В данном Кратком руководстве пользователя содержатся
инструкции по основным подключениям и операциям для
упрощенного использования ресивера. Подробное
описание ресивера см. в «Инструкции по эксплуатации»,
содержащихся на поставляемом CD-ROM ( ).
Remote Control
Télécommande
Fernbedienung
Telecomando
Afstandsbediening
Mando a distancia
Пульт дистанционного
управления
Setup microphone
Microphone de configuration
Mikrofon für die Einstellung
Impostazione microfono
Microfoon voor instellen
Micrófono de configuración
Установочный микрофон
AAA size IEC R03 dry cell batteries x2
Piles à anode sèche AAA IEC R03 x 2
AAA/IEC/R03 Trockenbatterien x2
Pile a secco AAA IEC R03 x2
AAA/IEC/R03 drogecelbatterijen x2
Pilas secas AAA, IEC R03 x 2
Сухие батарейки размера AAA IEC R03, 2 шт.
AM loop antenna
Antenne cadre AM
MW-Rahmenantenne
Antenna AM a telaio
AM-raamantenne
Antena de cuadro de AM
Рамочная антенна АМ
FM wire antenna
Antenne filaire FM
UKW-Drahtantenne
Antenna FM a filo
FM-draadantenne
Antena de hilos de FM
Проволочная антенна FM
These quick start guide
Le présent Guide de démarrage
Diese Kurzanleitung
Guida per l’avvio rapido
Deze Quick Start-gids
Esta guía de inicio rápido
Это краткое руководство пользователя
Power cord
Cordon d’alimentation
Netzkabel
Cavo di alimentazione
Netsnoer
Cable de alimentación
Кабель питания
Warranty card
Carte de garantie
Garantiekarte
Tarjeta de garantía
Documento di garanzia
Garantiebewijs
Гарантийный сертификат
Safety Brochure
Brochure sur la Sécurité
Sicherheritsbroshüre
Volantino sulla sicurezza
Veiligheidsbrochure
Folleto de Seguridad
Брошюра по безопасноти
CD-ROM
SC-LX88
SC-LX78
Wireless LAN converter (AXF7031)
— Start guide
— Connecting cable
Convertisseur LAN sans fil (AXF7031)
— Guide de démarrage
— Câble de liaison
Wireless LAN-Wandler (AXF7031)
— Kurzanleitung
— Verbindungskabel
Convertitore LAN wireless (AXF7031)
— Guida all’avvio
— Cavo di collegamento
Draadloze LAN-adapter (AXF7031)
— Startgids
— De kabel aansluiten
Convertidor LAN inalámbrico (AXF7031)
— Guía de inicio
— Cable de conexión
Преобразователь беспроводной
сети LAN (AXF7031)
— Руководство
— Кабель подключения
RECEIVER
D.ACCESS
DIMMER SLEEP
LIGHT
RCU SETUP
MPX
PRESET TUNE
BAND PTY
iPod
TUNER
INPUT
USB ADPT ROKU
BT
TV
TV
MHL
CD
OUT P.
DVDBD
ALL ZONE STBY
SOURCE
STANDBY/ON
MAIN
SAT
SUB ZONE CONTROL
SOURCE CONTROL
MUTE
VOLUME
VOL
TOP
MENU
HOME
MENU
TOOLS
MENU
ENTER
RETURN
CLASS
ENTER
CLR
CH
CH
2
546
8
0
79
13
AUDIO
DISP
SURRAUTO
CH LV.
ADV
STATUS
AUDIO P. VIDEO P.
Z2 Z3 HDZ
LISTENING MODE
HDMI
NET
ALL
Fav
RECEIVER
2
English
Connection and initial setup
Enjoy easy multichannel playback with this unit in 3 steps:
Connecting up
Initial setup
Basic playback
.
Connection and initial setup can be performed by referring to this Quick Start Guide, but it is easier when using the
Wiring Navi
in AVNavigator.
Perform connection and initial setup with either method according to the circumstances in which you are using AVNavigator.
Additionally, using the
Interactive Operation Guide
in AVNavigator allows you to learn basic operations effectively.
It is unnecessary to read this guide for explanations;
will be explained in the
Wiring Navi
.
Move on to “Using Built-in AVNavigator” in this guide.
You can use the
Interactive Operation Guide
in
.
The contents are linked interactively with the product, allowing you
to remember them while reading, and actually use the product while
becoming used to it.
Move on to
in this guide.
Quick Start
Guide
Connection and initial setup following the instructions
in the “Wiring Navi” in AVNavigator
(Connection to the network is required for the initial setup.)
Connection and initial setup by referring to
this Quick Start Guide
or
3
Using Built-in AVNavigator
Connecting to the network through
LAN interface
LAN
(
10/100
)
DC OUTPUT
for WIRELESS LAN
(
OUTPUT 5 V
0.6 A MAX
)
LAN
(
10/100
)
DC OUTPUT
for WIRELESS LAN
(
OUTPUT 5 V
0.6 A MAX
)
WAN
3
2
1
LAN
LAN cable (sold separately)
Internet
Modem
Router
Computer
Connecting to a wireless LAN
The wireless LAN converter can be connected to connect this
unit to a network wirelessly. Use the included AXF7031 for
connection.
Use only the furnished accessory connecting cable.
Certain settings are required to use a wireless LAN
converter (AXF7031). For instructions on making these
settings, see the operating instructions included with the
wireless LAN converter (AXF7031).
LAN
(
10/100
)
DC OUTPUT
for WIRELESS LAN
(
OUTPUT 5 V
0.6 A MAX
)
LAN
(
10/100
)
DC OUTPUT
for WIRELESS LAN
(
OUTPUT 5 V
0.6 A MAX
)
WAN
Wireless LAN converter (AXF7031)
Internet
Modem
Router
Plugging in the receiver
After connecting to a LAN, connect the power cord of the
receiver to a power outlet.
CAUTION
Handle the power cord by the plug part. Do not pull out
the plug by tugging the cord, and never touch the power
cord when your hands are wet, as this could cause a short
circuit or electric shock. Do not place the unit, a piece of
furniture, or other object on the power cord or pinch the
cord in any other way. Never make a knot in the cord or tie
it with other cables. The power cords should be routed so
that they are not likely to be stepped on. A damaged power
cord can cause a fire or give you an electric shock. Check
the power cord once in a while. If you find it damaged,
ask your nearest Pioneer authorized independent service
company for a replacement.
Do not use any power cord other than the one supplied
with this unit.
Do not use the supplied power cord for any purpose other
than that described below.
The receiver should be disconnected by removing the
mains plug from the wall socket when not in regular use,
e.g., when on vacation.
Make sure the blue
u
STANDBY/ON
light has gone out
before unplugging.
1
Plug the supplied power cord into the AC IN
socket on the back of the receiver.
2
Plug the other end into a power outlet.
Turning the power on
Press
u
STANDBY/ON
to switch on the receiver and your
computer.
Wait a few minutes after turning the power on before
performing the following operation.
STANDBY/ON
SELECTOR
4
Using Built-in AVNavigator (continued)
Launching the built-in AVNavigator
Operate AVNavigator by following the screen prompts of your
computer, etc.
Operating environment
AVNavigator can be used in the following environments.
Windows PC: Microsoft
®
Windows
®
XP/Windows Vista
®
/
Windows
®
7/Windows
®
8/Windows
®
8.1
Mac: Mac OSX (10.7, 10.8 or 10.9)
iPad/iPhone/iPod touch: iOS 7
Android device: Android 4.0.4, 4.1.1, 4.1.2, 4.2, 4.2.2, 4.4.2
AVNavigator uses an Internet browser. The following
browsers are supported:
Windows PC: Internet Explorer
®
8, 9, 10, 11
Mac/iPad/iPhone/iPod touch: Safari 6.0
Android device: Android browser
Depending on the computer network setting or security
setting, AVNavigator may not operate.
Using Windows PC
1
Start up Internet Explorer on your PC (open
any random Internet page).
2
Press STATUS on the remote control and check
the front panel display on the receiver (the IP
address of the receiver will appear).
(Example Text Display)
If 0.0.0.0 or 169.254.112.202 appears in the address, it indicates
that the receiver is not connected to the network. Check to
make sure that the receiver and router are properly connected.
3
Enter number in 2 above in the field in
Internet Explorer shown below and then press
the ENTER key.
(Example Input Format) 192.168.0.124
With a Windows PC other than Windows XP, you can use
the following method to launch AVNavigator.
Launch Explorer and then right-click <SC-LX88> or <SC-
LX78> displayed in the ‘
Network
’ folder, then click ‘
View
device webpage
’.
Using Mac
On a Mac, launch Safari and click <SC-LX88> or <SC-LX78>
displayed in ‘
Bonjour
’ on the Bookmarks bar.
If ‘
Bonjour
’ is not displayed, tick the ‘
Include Bonjour in
the Favorites bar
’ check box on the ‘
Advanced
’ tab in
the Safari ‘
Preferences...
’ menu.
Using iPad/iPhone/iPod touch
Download a free application, iControlAV5, from the App Store.
After launching iControlAV5, follow the instructions on the
screen. After that, on the Home screen, press ‘
AVNavigator
or the icon.
iPad
iPhone/iPod touch
5
Using iPad
On an iPad, you can operate AVNavigator for iPad. Download
AVNavigator for iPad from the App Store. After launching
AVNavigator for iPad, follow the instructions on the screen.
Using Android device
Download a free application, iControlAV5, from the Google Play
Store. After launching iControlAV5, follow the instructions on
the screen. After that, on the Home screen, press the icon.
Using Built-in AVNavigator (continued)
About using Wiring Navi
Wiring Navi starts when ‘
Wiring Navi
’ is pressed on the
AVNavigator screen.
When connection navigation is finished, proceed to
.
6
Connecting up
Connecting the speakers
The receiver will work with just two stereo speakers (the front speakers in the diagram) but using
at least five speakers is recommended, and a complete setup is best for surround sound.
To achieve the comfortable surround sound, install your speakers as shown below.
7.1 channel surorund system:
L
– Front Left
C
– Center
R
– Front Right
SL
– Surround Left
SR
– Surround Right
SBL
– Surround back Left
SBR
– Surround back Right
SW
– Subwoofer
Note
There are also other speaker connection
patterns (top middle, front height, front
wide, etc.). For details, see “Connecting
your equipment” of the operating
instructions.
Connecting the speaker cables
Make sure you connect the speaker on
the right to the right (
R
) terminal and the
speaker on the left to the left (
L
) terminal.
Also make sure the positive and negative
(
+/–
) terminals on the receiver match those
on the speakers.
1
Twist exposed wire strands together.
2
Loosen terminal and insert exposed wire.
3
Tighten terminal.
12 3
10 mm
CAUTION
Before making or changing
connections, switch off the power and
disconnect the power cord from the AC
outlet.
These speaker terminals carry
HAZARDOUS LIVE
voltage. To
prevent the risk of electric shock when
connecting or disconnecting the
speaker cables, disconnect the power
cord before touching any uninsulated
parts.
SL
L
R
SR
SBL
SBR
SW
C
After installing the speakers, connect them as shown below.
PRE OUT
SURROUND SURR BACK
T.MIDDLE
(Single)
(Single)
FRONT CENTER
SUBWOOFER
1
2
SPEAKERS
FRONT CENTER
A AB
RL
SURROUND
RL
SURROUND BACK
RL
TOP MIDDLE
RL
F WIDE
L
R
FRONT WIDE /
RL
LINE LEVEL
INPUT
Subwoofer
(
SW
)
Front Right
(
R
)
Surround Right
(
SR
)
Surround Left
(
SL
)
Front Left
(
L
)
Center
(
C
)
Surround back Right
(
SBR
)
Surround back Left
(
SBL
)
Note
When only connecting one surround back speaker, connect it to the
SURROUND BACK L
(Single)
terminals.
This unit supports speakers with a nominal impedance of 4
W
to 16
W
.
7
Connecting up (continued)
Connecting a TV and playback
components
OUT 3
(HDZONE)
OUT 2OUT 1
(CONTROL)
OPTICAL
SELECTABLE
ASSIGNABLE
IN
1
(
DVD
)
BD IN
IN
1
(
TV
)
IN
2
(
DVR/BDR
)
OUT 3
(HDZONE)
OUT 2OUT 1
(CONTROL)
SELECTABLE
IN
1
(
DVD
)
BD IN
OPTICAL
ASSIGNABLE
IN
1
(
TV
)
IN
2
(
DVR/BDR
)
DIGITAL OUT
COAXIAL
HDMI IN
HDMI OUT
OPTICAL
A
HDMI/DVI-compatible TV
HDMI/DVI-compatible
Blu-ray DIsc player
If the TV does not support the HDMI Audio Return Channel
function, optical digital cable (
A
) connection is required to
listen to the TV sound over the receiver.
If the TV supports the HDMI Audio Return Channel
function, the sound of the TV is input to the receiver via the
HDMI terminal, so there is no need to connect an optical
digital cable (
A
). In this case, set
ARC
at
HDMI Setup
to
ON
. For details, see “HDMI Setup” of the operating
instructions.
Please refer to the TV’s operation manual for directions on
connections and setup for the TV.
With factory default settings, video from the video cable
or component cable will not be output from the HDMI
terminal. To output video, you must switch video input to
the device connected with the video cable or component
cable and set
V.CONV
to
ON
. For details, see “Setting the
Video options” of the operating instructions.
Connecting antennas
ANTENNA
AM LOOP FM UNBAL 75
ANTENNA
AM LOOP FM UNBAL 75
1
4
5
2
3
ab c
FM wire
antenna
AM loop antenna
Note
Refer to the operating instructions in the included CD-
ROM if you wish to connect a TV or playback component
in a method other than an HDMI connection.
Refer to the operating instructions in the included CD-
ROM for other device connections.
Plugging in the receiver
Only plug in after you have connected all your components to
this receiver, including the speakers.
CAUTION
Handle the power cord by the plug part. Do not pull out
the plug by tugging the cord, and never touch the power
cord when your hands are wet, as this could cause a short
circuit or electric shock. Do not place the unit, a piece of
furniture, or other object on the power cord or pinch the
cord in any other way. Never make a knot in the cord or tie
it with other cables. The power cords should be routed so
that they are not likely to be stepped on. A damaged power
cord can cause a fire or give you an electric shock. Check
the power cord once in a while. If you find it damaged,
ask your nearest Pioneer authorized independent service
company for a replacement.
Do not use any power cord other than the one supplied
with this unit.
Do not use the supplied power cord for any purpose other
than that described below.
The receiver should be disconnected by removing the
mains plug from the wall socket when not in regular use,
e.g., when on vacation.
Make sure the blue
u
STANDBY/ON
light has gone out
before unplugging.
1
Plug the supplied power cord into the AC IN
socket on the back of the receiver.
2
Plug the other end into a power outlet.
VENTILATION CAUTION
When installing this unit, make sure to leave space
around the unit for ventilation to improve heat radiation
(at least 20 cm at top, 10 cm at rear
, and 20 cm at each
side)
.
WARNING
Slots and openings in the cabinet are provided for
ventilation to ensure reliable operation of the product,
and to protect it from overheating.
To prevent fire
hazard, the openings should never be blocked or
covered with items (such as newspapers, table-cloths,
curtains) or by operating the equipment on thick carpet
or a bed.
D3-4-2-1-7b*_A1_En
8
Initial Setup
Before you start
1
Put the batteries in the remote control.
The batteries included with the unit are to check initial
operations; they may not last over a long period. We
recommend using alkaline batteries that have a longer life.
2
Switch on the receiver and your TV.
ALL ZONE STBY
SOURCE
STANDBY/ON
MAIN
SUB ZONE CONTROL
Z2 Z3 HDZ
RECEIVER
3
Switch the TV input so that it connects to the
receiver.
4
Turn the subwoofer on and turn up the volume.
WARNING
Do not use or store batteries in direct sunlight or other
excessively hot place, such as inside a car or near a heater.
This can cause batteries to leak, overheat, explode or catch
fire. It can also reduce the life or performance of batteries.
CAUTION
When inserting the batteries, make sure not to damage
the springs on the battery’s (–) terminals. This can cause
batteries to leak or overheat.
When disposing of used batteries, please comply with
governmental regulations or environmental public
institution’s rules that apply in your country/area.
Automatically setting up for
surround sound (MCACC)
The Auto Multi-Channel ACoustic Calibration (MCACC) setup
uses the supplied setup microphone to measure and analyze
the test tone that is outputted by the speakers. This setup
enables automatic high precision measuring and settings;
utilizing it will create an optimum user listening environment.
Important
Measure in a quiet environment.
If you have a tripod, use it to place the microphone so that it’s
about ear level at your normal listening position. Otherwise,
place the microphone at ear level using a table or a chair.
Accurate measurements may not be possible if there are
obstacles between the speakers and the listening position
(microphone).
When measuring, step away from the listening position,
and operate using the remote control from the external
side of all the speakers.
1
Connect the supplied setup microphone.
MASTER
VOLUME
STANDBY/ON
INPUT
SELECTOR
iPod iPhoneHDMI
MCACC PRO
FL OFF
MCACC
SETUP
MIC
Tripod
Microphone
The
Full Auto MCACC
screen appears on your TV.
Speaker System : 7.2.2ch TMd/FW
1a.Full Auto MCACC
A/V RECEIVER
Exit Return
START
EQ Type : – – –
SP to ceiling : 3.00m
MCACC : M1.MEMORY 1
Dolby Enabled Speaker
: NO
Measurement Type : Basic
2
Press MAIN RECEIVER on the remote control
and operate.
When the cursor is brought to
Measurement Type
and
Basic
is selected, the
Speaker Setting
/
Channel Level
/
Speaker Distance
is adjusted automatically. Selecting
Expert
allows you to automatically adjust
Standing
Wave
/
Acoustic Cal EQ
(frequency characteristics)/
Full
Band Phase Control
as well.
3
Bring the cursor to START and press the ENTER
button.
Automatic measuring will start.
Measuring will take about 3 to 12 minutes.
4
Follow the instructions on-screen.
Automatic setting is complete when the Home Menu
screen appears.
1. MCACC PRO
2. MCACC Data Check
3. Data Management
4. System Setup
5. Network Information
6. Operation Mode Setup
Exit Return
HOME MENU
A/V RECEIVER
If
Reverse Phase
is displayed, the speaker’s wiring (+ and –)
may be inverted. Check the speaker connections.
Even if the connections are correct,
Reverse Phase
may be
displayed, depending on the speakers and the surrounding
environment. This does not affect measurements, however,
so select
Go Next
.
If the power cuts out, the core of the speaker cable may be
in contact with the rear panel, or the (+) and (–) cores may
be touching, causing the protection circuits to activate.
Re-twist the core of the speaker cable, and connect it so
that it does not protrude from the speaker terminal.
5
Make sure the setup microphone is
disconnected.
9
Basic playback
Multichannel playback
RECEIVER
D.ACCESS
DIMMER SLEEP
LIGHT
RCU SETUP
MPX
PRESET TUNE
BAND PTY
iPod
TUNER
INPUT
USBADPTROKU
BT
TV
TV
MHL
CD
OUT P.
DVDBD
ALL ZONE STBY
SOURCE
STANDBY/ON
MAIN
SAT
SUB ZONE CONTROL
SOURCE CONTROL
MUTE
VOLUME
VOL
TOP
MENU
HOME
MENU
TOOLS
MENU
ENTER
RETURN
CLASS
ENTER
CLR
CH
CH
2
546
8
0
79
13
AUDIO
DISP
SURRAUTO
CH LV.
ADV
STATUS
AUDIO P. VIDEO P.
Z2 Z3 HDZ
LISTENING MODE
HDMI
NET
ALL
Fav
RECEIVER
2
3
5
1
Switch on the playback component.
E.g.) Turn the Blu-ray Disc player connected to the
HDMI
BD IN
terminal on.
2
Switch the input of the receiver.
E.g.) Press
BD
to select the
BD
input.
3
Press AUTO to select ’AUTO SURROUND’.
Also press
SURR
or
ADV
for multichannel playback. Select
your preferred listening mode.
4
Start the playback component’s playback.
E.g.) Start playback of the Blu-ray Disc player.
5
Use VOLUME +/– to adjust the volume level.
When a sound can not be heard from center and rear
speakers, press
SURR
or
ADV
to change listening modes.
E.g.) Press the
ADV
button for several times to select
EXT.STEREO
.
When there is no sound from the subwoofer
Cause – The front speaker is set to LARGE.
When a 2-channel audio source is input, the low-frequency
component is not output from the subwoofer but is output
from the front speaker.
Solution – To output from the subwoofer, change the
speaker setting.
Method 1: Change the front speaker setting to
SMALL
.
The low-frequency component is not output from the front
speaker but is output from the subwoofer. When the low-
frequency playback capability of the front speaker is high,
we recommend the setting not be changed.
Method 2: Change the subwoofer setting to
PLUS
.
The low-frequency component is output from the front
speaker and subwoofer. For that reason, low sounds
are sometimes output too much. In such a case, we
recommend not to change or to change to Method 1.
For details, see “Speaker Setting” of the operating
instructions.
When no sound is emitted, increase the volume to
approximately –30 dB.
Note
When the remote control cannot be used to operate the unit
When operating the receiver, press
MAIN
RECEIVER
before using it.
When operating functions such as the network, TUNER, or
iPod, press the appropriate function button (
NET
,
TUNER
,
iPod
, etc.) before using.
Listening to the radio
1
Press TUNER to select the tuner.
If necessary, press
BAND
to change the band (FM or AM).
2
Press TUNE +/– to tune to a station.
Press and hold
TUNE +/–
for about a second. The receiver
will start searching for the next station.
If you’re listening to an FM station but the reception is
weak, press
MPX
to select FM MONO and set the receiver
to the mono reception mode.
Saving station presets
If you often listen to a particular radio station, it’s convenient to
have the receiver store the frequency for easy recall whenever
you want to listen to that station.
1
Press TOOLS while receiving a signal from the
station you want to store.
The preset number is blinking.
2
Press PRESET +/– to select the station preset
you want, then press ENTER.
The preset number stop blinking and the receiver stores
the station.
Listening to station presets
You will need to have some presets stored to do this.
Press PRESET +/– to select the station preset
you want.
10
Basic playback (continued)
To enjoy the many functions of the
unit to the fullest extent
Launch AVNavigator, and use the “Interactive
Operation Guide”.
Load the CD-ROM into your computer and
download the “Operating Instructions” (PDF)
from the menu screen to read.
Functions
#
Playing a USB device
#
Music playback using Bluetooth wireless technology
#
Playback with NETWORK feature
#
Setting the Audio options
#
Setting the Video options
#
Using the MULTI-ZONE controls
FAQ
Glossary
Features index
Note
This unit supports AirPlay. For details, see “Using AirPlay
on iPod touch, iPhone, iPad, and iTunes” of the operating
instructions and the Apple website (http://www.apple.
com).
This unit’s software can be updated (“Software Update
of the operating instructions). With Mac OS, it can be
updated using Safari (“Using Safari to update the firmware
of the operating instructions).
Playing an iPod
About one minute is required between turning the power
on and completion of startup.
1
Connect your iPod.
An iPod/iPhone can be connected to the receiver.
MASTER
VOLUME
STANDBY/ON
INPUT
SELECTOR
iPod iPhoneHDMI
MCACC PRO
FL OFF
5V 1
A
iPod/iPhone
USB cable
included with the iPod
2
Press iPod USB to select the iPod/USB input.
When the display shows the names of folders and files,
you’re ready to play music from the iPod.
3
Use
/
to select a category, then press
ENTER to browse that category.
• To return to the previous level any time, press
RETURN
.
4
Use
/
to browse the selected category (e.g.,
albums).
• Use
/
to move to previous/next levels.
5
Continue browsing until you arrive at what
you want to play, then press
to start
playback.
Listening to Internet radio stations
About one minute is required between turning the power
on and completion of startup.
Important
When using a broadband Internet connection, a contract
with an Internet service provider is required. For more
details, contact your nearest Internet service provider.
To listen to Internet radio stations, you must have high-
speed broadband Internet access. With a 56 K or ISDN
modem, you may not enjoy the full benefits of Internet
radio.
Access to content provided by third parties requires a
high speed internet connection and may also require
account registration and a paid subscription. Third
party content services may be changed, suspended,
interrupted, or discontinued at any time without notice,
and Pioneer disclaims any liability in connection with such
occurrences. Pioneer does not represent or warrant that
content services will continue to be provided or available
for a particular period of time, and any such warranty,
express or implied, is disclaimed.
1
Press NET repeatedly to select the INTERNET
RADIO input.
It may take several seconds for this receiver to access the
network.
2
Use
/
to select the Internet radio station to
play back, and then press ENTER.
© 2014 PIONEER HOME ELECTRONICS CORPORATION.
All rights reserved.
11
2
Français
Raccordement et configuration initiale
Profitez de la lecture multicanaux sur cet appareil en 3 points seulement :
Raccordement
Conguration initiale
Lecture de base
.
La connexion et la configuration initiale peuvent être réalisées en se référant au présent Guide rapide, mais il est plus facile d’utiliser le
Wiring Navi
dans l’AVNavigator. Réalisez la connexion et la configuration initiale avec l’une ou l’autre méthode, en fonction des circonstances
dans lesquelles vous utilisez l’AVNavigator. L’utilisation du
Interactive Operation Guide
dans l’AVNavigator vous permet en outre d’apprendre effi-
cacement les opérations de base.
Il est inutile de lire ce guide pour obtenir des explications ;
seront expliqués dans le
Wiring Navi
.
Poursuivez à la rubrique “Utilisation de l’AVNavigator intégré”
dans ce guide.
Vous pouvez utiliser le
Interactive Operation Guide
dans
.
Les contenus sont liés de manière interactive avec le produit, ce qui
vous permet de les mémoriser en les lisant et d’utiliser réellement le
produit tout en vous y familiarisant.
Passez à
dans ce guide.
Guide
rapide
Raccordement et conguration initiale en se référant aux
instructions dans “Wiring Navi” de l’AVNavigator
(Une connexion au réseau est nécessaire
pour la configuration initiale.)
Raccordement et conguration initiale
en suivant le guide rapide
ou
3
Utilisation de l’AVNavigator intégré
Raccordement au réseau par
l’interface LAN
LAN
(
10/100
)
DC OUTPUT
for WIRELESS LAN
(
OUTPUT 5 V
0.6 A MAX
)
LAN
(
10/100
)
DC OUTPUT
for WIRELESS LAN
(
OUTPUT 5 V
0.6 A MAX
)
WAN
3
2
1
LAN
Câble LAN (vendu séparément)
Internet
Modem
Routeur
Ordinateur
Raccordement à un réseau LAN
sans fil
Le convertisseur LAN sans fil peut être raccordé pour
connecter cet appareil à un réseau sans fil. Utilisez le AXF7031
inclus pour la connexion.
N’utilisez que le câble de liaison d’accessoire fourni.
Certains réglages doivent être effectués pour que le
convertisseur LAN sans fils (AXF7031) puisse être utilisé.
Pour le détail sur ces réglages, reportez-vous au mode
d’emploi fourni avec le convertisseur LAN sans fil (AXF7031).
LAN
(
10/100
)
DC OUTPUT
for WIRELESS LAN
(
OUTPUT 5 V
0.6 A MAX
)
LAN
(
10/100
)
DC OUTPUT
for WIRELESS LAN
(
OUTPUT 5 V
0.6 A MAX
)
WAN
Convertisseur LAN sans fil (AXF7031)
Internet
Modem
Routeur
Branchement du récepteur
Après la connexion à un réseau LAN, branchez le cordon
d’alimentation du récepteur à une prise électrique.
ATTENTION
Saisissez le cordon d’alimentation par la prise. Ne
débranchez jamais la fiche en tirant sur le cordon et ne
touchez jamais le cordon d’alimentation lorsque vous avez
les mains mouillées, car cela pourrait causer un court-
circuit ou une électrocution. Ne placez pas l’appareil, un
meuble ou tout autre objet sur le cordon d’alimentation et
ne coincez pas le cordon. Ne faites jamais de nœud sur
le cordon, et ne le nouez pas avec d’autres câbles. Les
cordons d’alimentation doivent être placés de telle sorte
que l’on ne risque pas de marcher dessus. Un cordon
d’alimentation endommagé peut entraîner un incendie
ou une électrocution. Vérifiez le cordon d’alimentation
de temps en temps. Si vous le trouvez abîmé, demandez
à votre service après-vente Pioneer le plus proche de le
remplacer.
Utilisez exclusivement le cordon d’alimentation fourni avec
cet appareil.
N’utilisez pas ce cordon à d’autres fins que celle indiquée
ci-dessous.
Lorsque le récepteur n’est pas utilisé régulièrement
(pendant les vacances, par exemple), il doit être débranché
de la prise d’alimentation murale.
Avant de le débrancher, assurez-vous que le témoin bleu
u
STANDBY/ON
est éteint.
1
Branchez le cordon d’alimentation fourni à la
prise AC IN située à l’arrière du récepteur.
2
Branchez l’autre extrémité sur une prise
électrique.
Mise en marche
Appuyez sur
u
STANDBY/ON
pour allumer le récepteur et
votre ordinateur.
Après la mise en marche, patientez quelques minutes avant
d’effectuer l’opération suivante.
STANDBY/ON
SELECTOR
4
Utilisation de l’AVNavigator intégré (suite)
Lancement de l’AVNavigator intégré
L’AVNavigator s’utilise en suivant les messages sur l’écran de
votre ordinateur, etc.
Environnement d’exploitation
L’AVNavigator peut être utilisé dans les environnements
suivants :
PC sous Windows : Microsoft
®
Windows
®
XP/Windows
Vista
®
/Windows
®
7/Windows
®
8/Windows
®
8.1
Mac : Mac OSX (10.7, 10.8 ou 10.9)
iPad/iPhone/iPod touch : iOS 7
Appareil Android : Android 4.0.4, 4.1.1, 4.1.2, 4.2, 4.2.2, 4.4.2
L’AVNavigator utilise un navigateur Internet. Les navigateurs
suivants sont pris en charge :
PC sous Windows : Internet Explorer
®
8, 9, 10, 11
Mac/iPad/iPhone/iPod touch : Safari 6.0
Appareil Android : navigateur Android
AVNavigator risque de ne pas fonctionner avec certains
paramétrages du réseau informatique ou de la sécurité.
Utilisation d’un PC sous Windows
1
Démarrez Internet Explorer sur votre
ordinateur (ouvrez n’importe quelle page
Internet).
2
Appuyez sur STATUS de la télécommande
et vérifiez l’afficheur du panneau avant
sur le récepteur (l’adresse IP du récepteur
apparaîtra).
(Exemple d’affichage de texte)
Si 0.0.0.0 ou 169.254.112.202 apparaît dans l’adresse,
cela signifie que le récepteur n’est pas raccordé au
réseau. Assurez-vous que le récepteur et le routeur sont
correctement raccordés.
3
Saisissez le numéro de l’étape 2 ci-dessus
dans le champ d’Internet Explorer indiqué ci-
dessous, puis appuyez sur la touche ENTER.
(Exemple de format d’entrée) 192.168.0.124
Sur un PC fonctionnant avec une version Windows différente de
Windows XP, vous pouvez utiliser la méthode suivante pour lancer
AVNavigator.
Lancez l’explorateur puis faites un clic droit sur
<SC-LX88> ou <SC-LX78> qui s’affiche dans le dossier ‘
Network
’,
puis cliquez sur ‘
View device webpage
’.
device webpage
’.
Utilisation d’un Mac
Sur un Mac, lancez Safari et cliquez sur <SC-LX88> ou <SC-LX78>
qui s’affiche dans ‘
Bonjour
’ sur la barre de signets.
Si ‘
Bonjour
’ n’apparaît pas, cochez la case à cocher
Include Bonjour in the Favorites bar
’ de l’onglet
Advanced
’ dans le menu ‘
Preferences...
’ de Safari.
Utilisation d’un iPad/iPhone/iPod touch
Téléchargez une application gratuite, iControlAV5, depuis l’App
Store. Après avoir lancé iControlAV5, suivez les instructions à
l’écran. Effleurez ensuite ‘
AVNavigator
’ ou l’icône sur l’écran
d’accueil.
iPad
iPhone/iPod touch
5
Utilisation d’un iPad
Sur un iPad, vous pouvez utiliser AVNavigator pour iPad.
Téléchargez AVNavigator for iPad depuis l’App Store. Après
avoir lancé AVNavigator for iPad, suivez les instructions à
l’écran.
Utilisation d’un appareil Android
Téléchargez une application gratuite, iControlAV5, depuis le
Google Play Store. Après avoir lancé iControlAV5, suivez les
instructions à l’écran. Effleurez ensuite l’icône sur l’écran
d’accueil.
Utilisation de l’AVNavigator intégré (suite)
À propos de l’utilisation de Wiring
Navi
Wiring Navi démarre lorsque vous appuyez sur ‘
Wiring Navi
sur l’écran d’AVNavigator.
Lorsque la navigation de connexion est terminée,
poursuivez avec
.
6
Raccordement
Raccordement des enceintes
Le récepteur fonctionne avec deux enceintes stéréo seulement (enceintes avant sur le schéma)
mais il est conseillé d’utiliser au moins cinq enceintes, et avec une configuration complète le
son surround sera bien meilleur.
Pour obtenir le son surround le plus agréable, installez vos enceintes comme illustré ci-dessous.
Système surround à 7.1 canaux :
L
– Avant Gauche
C
– Centre
R
– Avant Droite
SL
– Surround Gauche
SR
– Surround Droite
SBL
– Surround arrière Gauche
SBR
– Surround arrière Droite
SW
– Caisson de grave
Remarque
Il existe aussi d’autres façons de
connecter les enceintes (moyen haut,
avant haute, avant large, etc.). Reportez-
vous à la rubrique “Raccordement de votre
équipement” du mode d’emploi pour plus
d’informations.
Raccordement des câbles d’en-
ceintes
Veillez à bien raccorder l’enceinte de droite
à la borne droite (
R
) et l’enceinte de gauche
à la borne de gauche (
L
). Assurez-vous aussi
que les bornes positives et négatives (
+/–
)
sur le récepteur correspondent à celles des
enceintes.
1
Torsadez les fils ensemble.
2
Dévissez la borne et insérez la partie
dénudée des fils.
3
Serrez la borne.
12 3
10 mm
ATTENTION
Avant de réaliser ou de modifier des
liaisons, éteignez les appareils et
débranchez le cordon d’alimentation de
la prise électrique.
Ces bornes d’enceintes sont soumises à
une tension
DANGEREUSE
. Pour éviter
tout risque de décharge électrique lors
du branchement ou débranchement
des câbles d’enceintes, débranchez le
cordon d’alimentation avant de toucher
les parties non isolées.
SL
L
R
SR
SBL
SBR
SW
C
Après avoir installé les enceintes, raccordez-les de la façon ci-dessous.
PRE OUT
SURROUND SURR BACK
T.MIDDLE
(Single)
(Single)
FRONT CENTER
SUBWOOFER
1
2
SPEAKERS
FRONT CENTER
A AB
RL
SURROUND
RL
SURROUND BACK
RL
TOP MIDDLE
RL
F WIDE
L
R
FRONT WIDE /
RL
LINE LEVEL
INPUT
Caisson de
grave
(
SW
)
Avant Droite
(
R
)
Surround
Droite
(
SR
)
Surround
Gauche
(
SL
)
Avant
Gauche
(
L
)
Centre
(
C
)
Surround arrière Droite
(
SBR
)
Surround arrière Gauche
(
SBL
)
Remarque
Si vous raccordez une seule enceinte surround arrière, raccordez-la aux bornes
SURROUND
BACK L (Single)
.
Cet appareil accepte les enceintes ayant une impédance nominale de 4
W
à 16
W
.
7
Raccordement (suite)
Raccordement d’un téléviseur et de
lecteurs
OUT 3
(HDZONE)
OUT 2OUT 1
(CONTROL)
OPTICAL
SELECTABLE
ASSIGNABLE
IN
1
(
DVD
)
BD IN
IN
1
(
TV
)
IN
2
(
DVR/BDR
)
OUT 3
(HDZONE)
OUT 2OUT 1
(CONTROL)
SELECTABLE
IN
1
(
DVD
)
BD IN
OPTICAL
ASSIGNABLE
IN
1
(
TV
)
IN
2
(
DVR/BDR
)
DIGITAL OUT
COAXIAL
HDMI IN
HDMI OUT
OPTICAL
A
Téléviseur compatible HDMI/DVI
Lecteur de disque Blu-ray
compatible HDMI/DVI
Si votre téléviseur ne prend pas en charge la fonction HDMI
de canal de retour audio, vous devrez effectuer une liaison par
câble numérique optique (
A
) pour écouter le son du téléviseur
via le récepteur.
Si votre téléviseur prend en charge la fonction HDMI de
canal de retour audio, le son du téléviseur est transmis au
récepteur par la prise HDMI et il est inutile de raccorder un
câble numérique optique (
A
). Dans ce cas, réglez
ARC
dans
HDMI Setup
sur
ON
. Reportez-vous à la rubrique “Réglage
de l’HDMI” du mode d’emploi pour plus d’informations.
Veuillez vous reporter au Guide d’utilisation du téléviseur
pour consulter les instructions concernant les connexions
et la configuration du téléviseur.
Avec les paramètres d’usine par défaut, la vidéo depuis
le câble vidéo ou le câble du composant ne sera pas
restituée par la prise HDMI. Pour restituer la vidéo, vous
devez changer l’entrée vidéo sur l’appareil connecté à l’aide
du câble vidéo ou du câble du composant et régler
V.CONV
sur
ON
. Reportez-vous à la rubrique “Réglages des options
vidéo” du mode d’emploi pour plus d’informations.
Raccordement des antennes
ANTENNA
AM LOOP FM UNBAL 75
ANTENNA
AM LOOP FM UNBAL 75
1
4
5
2
3
ab c
Antenne fil
FM
Antenne cadre
AM
Remarque
Reportez-vous aux instructions sur le CD-ROM fourni si
vous voulez raccorder un téléviseur ou un lecteur d’une
autre façon que par une liaison HDMI.
Reportez-vous aux instructions sur le CD-ROM fourni pour
d’autres liaisons.
Branchement du récepteur
N’effectuez le branchement qu’après avoir raccordé tous les
composants au récepteur, y compris les enceintes.
ATTENTION
Saisissez le cordon d’alimentation par la prise. Ne
débranchez jamais la fiche en tirant sur le cordon et ne
touchez jamais le cordon d’alimentation lorsque vous avez
les mains mouillées, car cela pourrait causer un court-
circuit ou une électrocution. Ne placez pas l’appareil, un
meuble ou tout autre objet sur le cordon d’alimentation et
ne coincez pas le cordon. Ne faites jamais de nœud sur
le cordon, et ne le nouez pas avec d’autres câbles. Les
cordons d’alimentation doivent être placés de telle sorte
que l’on ne risque pas de marcher dessus. Un cordon
d’alimentation endommagé peut entraîner un incendie
ou une électrocution. Vérifiez le cordon d’alimentation
de temps en temps. Si vous le trouvez abîmé, demandez
à votre service après-vente Pioneer le plus proche de le
remplacer.
Utilisez exclusivement le cordon d’alimentation fourni avec
cet appareil.
N’utilisez pas ce cordon à d’autres fins que celle indiquée
ci-dessous.
Lorsque le récepteur n’est pas utilisé régulièrement
(pendant les vacances, par exemple), il doit être débranché
de la prise d’alimentation murale.
Avant de le débrancher, assurez-vous que le témoin bleu
u
STANDBY/ON
est éteint.
1
Branchez le cordon d’alimentation fourni à la
prise AC IN située à l’arrière du récepteur.
2
Branchez l’autre extrémité sur une prise
électrique.
TISSEMENT
, pour assurer un fonctionnement stable de
our éviter les
n’utilisez pas l’appareil posé sur un tapis
.
D3-4-2-1-7b*_A1_Fr
8
Configuration initiale
Avant de commencer
1
Insérez des piles dans la télécommande.
Les piles fournies avec l’appareil sont destinées à vérifier
le bon fonctionnement de l’appareil et risquent de ne pas
durer longtemps. Nous vous conseillons d’utiliser des
piles alcalines dont l’autonomie est plus longue.
2
Allumez le récepteur et votre téléviseur.
ALL ZONE STBY
SOURCE
STANDBY/ON
MAIN
SUB ZONE CONTROL
Z2 Z3 HDZ
RECEIVER
3
Sélectionnez l’entrée du téléviseur pour qu’il
se connecte au récepteur.
4
Allumez le caisson de grave et augmentez le
volume.
AVERTISSEMENT
N’utilisez pas ou ne rangez pas les piles en plein soleil ou à un
endroit très chaud, comme dans une voiture ou près d’un appareil de
chauffage. Les piles pourraient fuir, surchauffer, exploser ou prendre
feu. Cela peut aussi réduire leur durée de vie et leurs performances.
ATTENTION
Lors de l’insertion des piles, veillez à ne pas endommager
les ressorts au niveau des bornes (–) des piles. Les piles
pourraient fuir ou surchauffer.
Pour la mise au rebut des piles/batteries usées, veuillez
vous conformer aux réglementations gouvernementales
ou environnementales en vigueur dans votre pays/région.
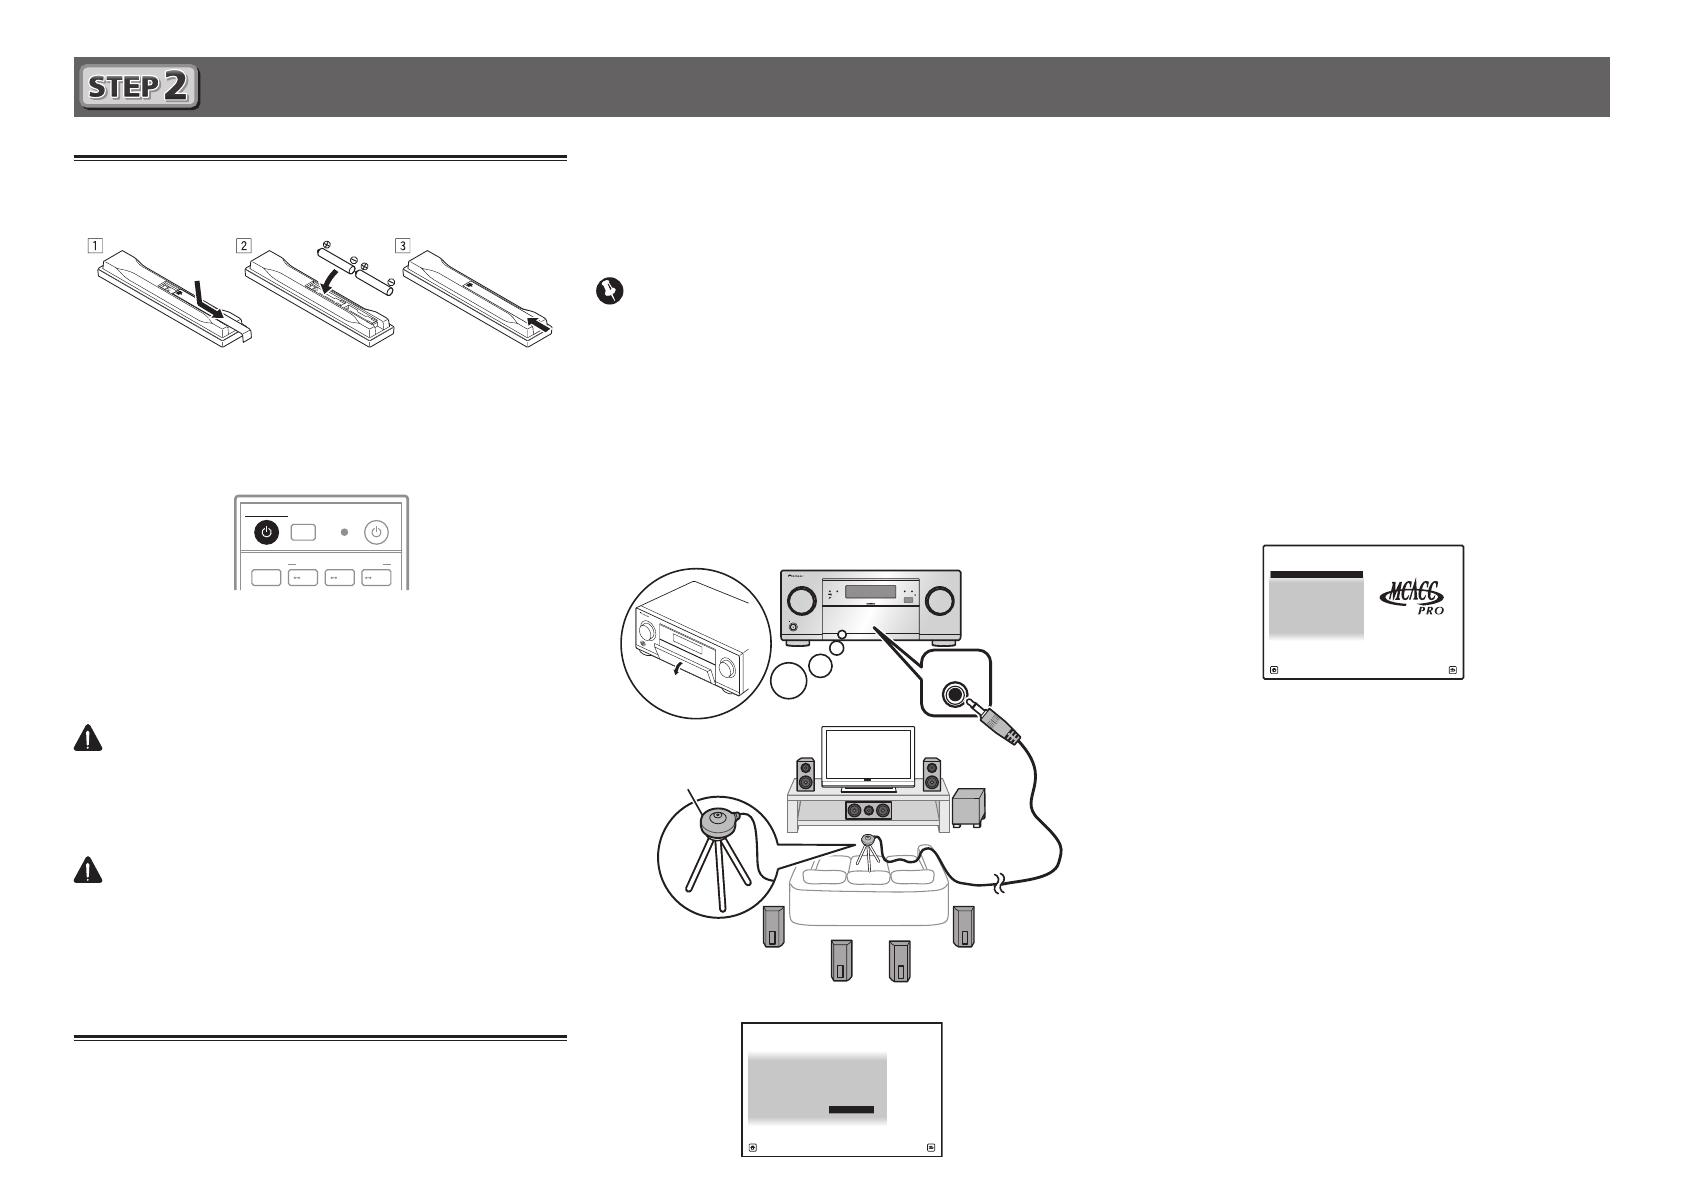
Configuration automatique du son
surround (MCACC)
Lors du calibrage acoustique multicanaux automatique
(MCACC), le microphone de configuration fourni est utilisé
pour mesurer et analyser la tonalité de test émise par les
enceintes. Cette configuration permet d’effectuer des mesures
et réglages extrêmement précis et de créer un environnement
d’écoute optimal pour chaque situation.
Important
Les mesures doivent être faites dans un environnement calme.
Positionnez le microphone sur un trépied (si vous en avez un)
pour qu’il se trouve à hauteur d’oreilles en position d’écoute
normale. Sinon, positionnez le microphone à hauteur d’oreille
en le posant sur une table ou sur une chaise.
Il ne sera pas possible d’obtenir des mesures précises s’il y a des
obstacles entre les enceintes et la position d’écoute (microphone).
Pendant les mesures éloignez-vous de la position d’écoute
et actionnez la télécommande loin de toutes les enceintes.
1
Raccordez le microphone de configuration fourni.
MASTER
VOLUME
STANDBY/ON
INPUT
SELECTOR
iPod iPhoneHDMI
MCACC PRO
FL OFF
MCACC
SETUP
MIC
Trépied
Microphone
L’écran
Full Auto MCACC
apparaît sur votre téléviseur.
Speaker System : 7.2.2ch TMd/FW
1a.Full Auto MCACC
A/V RECEIVER
Exit Return
START
EQ Type : – – –
SP to ceiling : 3.00m
MCACC : M1.MEMORY 1
Dolby Enabled Speaker
: NO
Measurement Type : Basic
2
Appuyez sur MAIN RECEIVER de la
télécommande pour effectuer les opérations.
Lorsque le curseur est amené sur
Measurement Type
et que
Basic
est sélectionné,
Speaker Setting
/
Channel
Level
/
Speaker Distance
est ajustés automatiquement.
Sélectionner
Expert
permet également d’ajuster
automatiquement
Standing Wave
/
Acoustic Cal EQ
(caractéristiques de fréquence)/
Full Band Phase Control
.
3
Amenez le curseur sur START et appuyez sur la
touche ENTER.
La mesure automatique commence.
La mesure dure de 3 à 12 minutes.
4
Suivez les instructions affichées à l’écran.
Le réglage automatique est terminé lorsque la page Home
Menu apparaît.
1. MCACC PRO
2. MCACC Data Check
3. Data Management
4. System Setup
5. Network Information
6. Operation Mode Setup
Exit Return
HOME MENU
A/V RECEIVER
Si
Reverse Phase
s’affiche, les fils du cordon d’enceinte
(+ et –) ont peut-être été inversés. Vérifiez les liaisons des
enceintes.
Même si les liaisons sont correctes,
Reverse Phase
peut s’afficher, selon les enceintes et l’environnement
surround. Ceci n’a cependant aucun effet sur les mesures,
et vous pouvez sélectionner
Go Next
.
Si l’alimentation électrique se coupe, l’âme du câble des
enceintes est peut-être en contact avec le panneau arrière
ou alors les fils (+) et (–) se touchent, ce qui provoque
l’activation des circuits de protection. Torsadez de nouveau
l’âme du câble des enceintes et raccordez-le de manière à
ce qu’il ne dépasse pas hors de la borne d’enceinte.
5
Assurez-vous de débrancher le microphone de
configuration.
9
Lecture de base
Lecture multicanaux
RECEIVER
D.ACCESS
DIMMER SLEEP
LIGHT
RCU SETUP
MPX
PRESET TUNE
BAND PTY
iPod
TUNER
INPUT
USBADPTROKU
BT
TV
TV
MHL
CD
OUT P.
DVDBD
ALL ZONE STBY
SOURCE
STANDBY/ON
MAIN
SAT
SUB ZONE CONTROL
SOURCE CONTROL
MUTE
VOLUME
VOL
TOP
MENU
HOME
MENU
TOOLS
MENU
ENTER
RETURN
CLASS
ENTER
CLR
CH
CH
2
546
8
0
79
13
AUDIO
DISP
SURRAUTO
CH LV.
ADV
STATUS
AUDIO P. VIDEO P.
Z2 Z3 HDZ
LISTENING MODE
HDMI
NET
ALL
Fav
RECEIVER
2
3
5
1
Allumez le lecteur.
Ex.) Allumez le lecteur de disque Blu-ray raccordé à la
prise
HDMI BD IN
.
2
Sélectionnez l’entrée du récepteur.
Ex.) Appuyez sur
BD
pour sélectionner l’entrée
BD
.
3
Appuyez sur AUTO pour sélectionner ‘AUTO
SURROUND’.
Appuyez aussi sur
SURR
ou
ADV
pour la lecture
multicanaux. Sélectionnez votre mode d’écoute préférée.
4
Démarrez la lecture sur le lecteur.
Ex.) Démarrez la lecture sur le lecteur de disque Blu-ray.
5
Utilisez VOLUME +/– pour régler le volume.
Si aucun son ne sort des enceintes centrales et arrière,
appuyez sur
SURR
ou
ADV
pour modifier les modes
d’écoute.
Ex.) Appuyez plusieurs fois sur la touche
ADV
pour
sélectionner
EXT.STEREO
.
Aucun son n’est émis du caisson de grave
Cause - les enceintes avant sont réglées sur LARGE.
Si la source audio est à 2 voies, la composante basses
fréquences n’est pas émise par le caisson de grave, mais
par les enceintes avant.
Solution – Pour une écoute du caisson de grave,
modifiez le réglage des enceintes.
Méthode 1 : Modifiez le réglage des enceintes avant en
SMALL
.
La composante basses fréquences est à présent émise
par le caisson de grave et non pas des enceintes avant.
Lorsque les enceintes avant présentes de bonnes
performances de reproduction des basses fréquences,
nous recommandons de ne pas modifier ce réglage.
Méthode 2 : Modifiez le réglage du caisson de grave en
PLUS
.
La composante basses fréquences est émise par les
enceintes avant et le caisson de grave. De ce fait, les
sons graves sont parfois trop puissants. Dans ce cas,
nous recommandons de ne pas modifier le réglage ou
d’appliquer la méthode 1.
Reportez-vous à la rubrique “Réglage des enceintes” du
mode d’emploi pour plus d’informations.
Si aucun son n’est émis, augmentez le volume à environ
–30 dB.
Remarque
Lorsque la télécommande est inopérante sur l’appareil
Lorsque vous utilisez le récepteur, appuyez sur
MAIN
RECEIVER
avant de l’utiliser.
Lorsque vous voulez utiliser des fonctions comme le réseau,
le TUNER ou l’iPod, appuyez sur la touche de fonction
appropriée (
NET
,
TUNER
,
iPod
, etc.) avant de l’utiliser.
Écoute de la radio
1
Appuyez sur TUNER pour sélectionner le tuner.
Si nécessaire, appuyez sur
BAND
pour changer de bande
(FM ou AM).
2
Appuyez sur TUNE +/– pour accorder une station.
Appuyez sur
TUNE +/–
et maintenez une seconde
enfoncée. Le récepteur recherche la station suivante.
Si vous écoutez une station FM mais que la réception est
faible, appuyez sur
MPX
pour sélectionner FM MONO et
réglez le récepteur sur le mode de réception mono.
Sauvegarde des stations préréglées
Si vous écoutez souvent une station radio précise, il est
intéressant d’en mémoriser la fréquence pour faire l’accord
rapidement sur cette station lorsque vous souhaitez l’écouter.
1
Appuyez sur TOOLS pendant la réception
du signal de la station que vous voulez
sauvegarder.
Le numéro de préréglage clignote.
2
Appuyez sur PRESET +/– pour sélectionner le
numéro de préréglage souhaité, puis appuyez
sur ENTER.
Le numéro de préréglage cesse de clignoter et la station
est sauvegardée.
Écouter des stations préréglées
Pour ce faire, vous devez avoir préréglé des stations.
Appuyez sur PRESET +/– pour sélectionner la
station préréglée de votre choix.
10
Lecture de base (suite)
Pour proter au maximum des
nombreuses fonctions de l’appareil
Lancez l’AVNavigator et utilisez le “Interactive
Operation Guide”.
Insérez le CD-ROM dans votre ordinateur
et téléchargez le “Mode d’emploi” (PDF)
apparaissant sur le menu pour le lire.
Fonctions
#
Lecture d’un dispositif USB
#
Lecture de musique à l’aide de la technologie sans fil
Bluetooth
#
Lecture avec la fonction NETWORK
#
Réglage des options audio
#
Réglages des options vidéo
#
Utilisation des commandes MULTI-ZONE
FAQ
Glossaire
Index des fonctions
Remarque
Cet appareil prend en charge AirPlay. Pour les détails,
reportez-vous à la rubrique “Utilisation d’AirPlay sur un
iPod touch, iPhone, iPad et iTunes” du mode d’emploi et au
site d’Apple (http://www.apple.com).
Le logiciel de cet appareil peut être mis à jour (“Mise à
jour du logiciel” dans le mode d’emploi). Avec Mac OS, il
peut être mis à jour avec Safari (“Utilisation de Safari pour
mettre à jour le micrologiciel” dans le mode d’emploi).
Lecture d’un iPod
Environ une minute est nécessaire entre la mise sous
tension et la fin de la phase de démarrage.
1
Raccordez votre iPod.
Vous pouvez raccorder un iPod/iPhone au récepteur.
MASTER
VOLUME
STANDBY/ON
INPUT
SELECTOR
iPod iPhoneHDMI
MCACC PRO
FL OFF
5V 1
A
2
Appuyez sur iPod USB pour sélectionner
l’entrée iPod/USB.
Lorsque les noms de dossiers et de fichiers apparaissent
sur l’afficheur, vous pouvez écouter la musique enregistrée
sur l’iPod.
3
Utilisez
/
pour sélectionner une catégorie,
puis appuyez sur ENTER pour naviguer dans
cette catégorie.
• Pour revenir à tout moment au niveau précédent,
appuyez sur
RETURN
.
4
Utilisez
/
pour naviguer dans la catégorie
sélectionnée (par exemple, albums).
• Utilisez
/
pour passer au niveau précédent/suivant.
5
Poursuivez votre navigation jusqu’à atteindre
les éléments que vous souhaitez lire, puis
appuyez sur
pour lancer la lecture.
Ecoute des stations radio Internet
Environ une minute est nécessaire entre la mise sous
tension et la fin de la phase de démarrage.
Important
Pour utiliser une connexion Internet à haut débit, il faut
être abonné à un fournisseur de service Internet. Pour le
détail, contactez le fournisseur de service Internet le plus
proche.
Pour écouter les stations radio Internet, vous devez avoir
un accès haute vitesse à Internet par une large bande.
Avec un modem de 56 K ou ISDN, vous ne pourrez pas
profiter pleinement de la radio Internet.
L’accès aux contenus fournis par des tiers exige une
connexion Internet haut débit et peut aussi exiger la
création d’un compte et des droits de souscription. Les
services de contenus de tiers peuvent être changés,
suspendus ou interrompus à tout moment sans préavis,
et Pioneer décline toute responsabilité quant à ces
changements. Pioneer ne certifie ou garantit que les
services de contenus continueront d’être fournis ou
disponibles pendant une période précise et décline toute
garantie explicite ou implicite de ce type.
1
Appuyez plusieurs fois de suite sur NET pour
sélectionner l’entrée INTERNET RADIO.
Il faut quelques secondes au récepteur pour accéder au
réseau.
2
Utilisez
/
pour sélectionner la station
radio Internet que vous voulez écouter, puis
appuyez sur ENTER.
iPod/iPhone
© 2014 PIONEER HOME ELECTRONICS CORPORATION.
Tous droits de reproduction et de traduction réservés.
Câble USB
fourni avec l’iPod
  • Page 1 1
  • Page 2 2
  • Page 3 3
  • Page 4 4
  • Page 5 5
  • Page 6 6
  • Page 7 7
  • Page 8 8
  • Page 9 9
  • Page 10 10
  • Page 11 11
  • Page 12 12
  • Page 13 13
  • Page 14 14
  • Page 15 15
  • Page 16 16
  • Page 17 17
  • Page 18 18
  • Page 19 19
  • Page 20 20
  • Page 21 21
  • Page 22 22
  • Page 23 23
  • Page 24 24
  • Page 25 25
  • Page 26 26
  • Page 27 27
  • Page 28 28
  • Page 29 29
  • Page 30 30
  • Page 31 31
  • Page 32 32
  • Page 33 33
  • Page 34 34
  • Page 35 35
  • Page 36 36
  • Page 37 37
  • Page 38 38
  • Page 39 39
  • Page 40 40
  • Page 41 41
  • Page 42 42
  • Page 43 43
  • Page 44 44
  • Page 45 45
  • Page 46 46
  • Page 47 47
  • Page 48 48
  • Page 49 49
  • Page 50 50
  • Page 51 51
  • Page 52 52
  • Page 53 53
  • Page 54 54
  • Page 55 55
  • Page 56 56
  • Page 57 57
  • Page 58 58
  • Page 59 59
  • Page 60 60
  • Page 61 61
  • Page 62 62
  • Page 63 63
  • Page 64 64
  • Page 65 65
  • Page 66 66
  • Page 67 67
  • Page 68 68
  • Page 69 69
  • Page 70 70
  • Page 71 71
  • Page 72 72
  • Page 73 73
  • Page 74 74
  • Page 75 75
  • Page 76 76

Pioneer SC-LX78 Руководство пользователя

Категория
Видеосистемы для автомобилей
Тип
Руководство пользователя
Это руководство также подходит для

Задайте вопрос, и я найду ответ в документе

Поиск информации в документе стал проще с помощью ИИ