Indesit TAA 5 1 Руководство пользователя

Тип
Руководство пользователя

Это руководство также подходит для

TA 5 xx
TAA 5 xx
GB
English
Operating Instructions
2-DOOR FRIDGE
Operating Instructions, 1
Assistance, 3
Description of the appliance, 8
Reversible doors, 13
Installation, 14
Start-up and use, 14
Maintenance and care, 15
Precautions and tips, 16
Troubleshooting, 17
Contents
DE
Deutsch
Gebrauchsanleitung
2-TÜREN-KÜHLSCHRANK
Gebrauchsanleitung, 1
Kundendienst, 3
Gerätebeschreibung, 8
Türanschlagwechsel, 13
Installation, 18
Inbetriebnahme und Gebrauch, 18
Wartung und Pege, 19
Hinweise und Tipps, 20
Anleitung zur Fehlersuche, 21
Inhalt
FR
Français
Consignes d'utilisation
RÉFRIGÉRATEUR 2 PORTES
Consignes d'utilisation, 1
Assistance, 4
Description de l'appareil, 9
Portes réversibles, 13
Installation, 22
Démarrage et utilisation, 22
Entretien et maintenance, 23
Précautions et conseils, 24
Dépannage, 25
Table des matières
NL
Nederlands
Gebruiksaanwijzing
KOELKAST 2 DEUREN
Gebruiksaanwijzing, 1
Service, 4
Beschrijving van het apparaat, 9
Omkeerbare deuren, 13
Installatie, 26
Start en gebruik, 26
Onderhoud en reiniging, 27
Voorzorgsmaatregelen en tips, 28
Probleemoplossing, 29
Inhoudsopgave
IT
Italiano
Istruzioni per l’uso
FRIGORIFERO DOPPIA PORTA
Istruzioni per l’uso, 1
Assistenza, 5
Descrizione dell’apparecchio, 10
Porte reversibili, 13
Installazione, 30
Avvio e utilizzo, 30
Manutenzione e pulizia, 31
Precauzioni e consigli, 32
Anomalie e rimedi, 33
Sommario
2
ES
Español
Manual de instrucciones
FRIGORÍFICO DE 2 PUERTAS
Manual de instrucciones, 2
Asistencia, 5
Descripción del aparato, 10
Puertas reversibles, 13
Instalación, 34
Puesta en funcionamiento y uso, 34
Mantenimiento y cuidados, 35
Precauciones y consejos, 36
Resolución de problemas, 37
Sumario
HU
Magyar
Használati útmuta
2 AJTÓS HŰTŐSZEKRÉNY
Használati útmutató, 2
Műszaki segítségnyújtás, 6
A készülék bemutatása, 11
Megfordítható ajtók, 13
Üzembe helyezés, 38
Első használat és napi használat, 38
Ápolás és karbantartás, 39
Figyelmeztetések és tanácsok, 40
Hibaelhárítás, 41
Tartalom
KZ
ҚАЗАҚ
Іске пайдалану туралы
нұсқаулар
2 ЕСІКТІ ТОҢАЗЫТҚЫШ
Іске пайдалану туралы нұсқаулар, 2
Көмек, 6
Құрылғының сипаттамасы, 11
Керісінше ілінетін есіктер, 13
Орнату, 42
Іске қосу және пайдалану, 42
Техникалық қызмет көрсету және күтіп ұстау, 43
Сақтық шаралары мен кеңестер, 44
Ақаулықты анықтау, 45
Мазмұны
RO
Română
Instrucţiuni de utilizare
FRIGIDER CU 2 UI
Instruciuni de utilizare, 2
Serviciul de asistenă tehnică, 7
Descrierea aparatului, 12
Ui reversibile, 13
Instalare, 46
Pornire i utilizare, 46
Întreinere i îngrijire, 47
Măsuri de precauie i recomandări, 48
Depanarea, 49
Cuprins
RU

Инструкция по эксплуатации
 
  , 2
, 7
 , 12
 , 13
, 50
  , 50
  , 51
  , 52
   , 53

3
GB
Assistance
Before calling for Assistance:
Check if the malfunction can be solved on your own (see
Troubleshooting).
If after all the checks, the appliance still does not operate or
the problem persists, call the nearest Service Centre.
Communicating:
type of malfunction
appliance model (Mod.)
serial number (S/N)
This information can be found on the data plate located on the
bottom left side of the refrigerator compartment.
Never call on unauthorized technicians and always refuse
spare parts which are not originals.
GB
- model
DE
- Modell
FR
- modèle
NL
- model
IT
- modello
ES
- modelo
HU
- modell
KZ
- үлгі
RO
- model
RU
- модель
GB
- serial number
DE
- Seriennummer
FR
- numéro de série
NL
- serienummer
IT
- numero di serie
ES
- número de serie
HU
- gyári szám
KZ
- сериялық нөмірі
RO
- număr de serie
RU
- серийный номер
DE
Kundendienst
Bevor Sie sich an den Kundendienst wenden:
Prüfen Sie, ob die Störung selbst behoben werden kann
(siehe Anleitung zur Fehlersuche).
Sollte trotz aller Kontrollen das Gerät nicht funktionieren und
der von Ihnen festgestellte Fehler weiter bestehen bleiben,
dann fordern Sie bitte den nächstgelegenen technischen
Kundendienst an und teilen Sie dort zusammen mit Ihrer
Fehlerbeschreibung folgende Daten mit.
Geben Sie bitte Folgendes an:
die Art der Störung
das Gerätemodell (Mod.)
Seriennummer (S/N)
Diese Informationen finden Sie auf dem Typenschild auf der
unteren linken Seite des Kühlschranks.
Beauftragen Sie auf keinen Fall einen nicht befugten
Kundendienst und lassen Sie ausschließlich Original-
Ersatzteile.
4
FR
Assistance
Avant de contacter le centre d'Assistance :
Vérifiez si vous pouvez résoudre l'anomalie vous-même (
voir Anomalie et Remèdes).
Si, malgré tous ces contrôles, l'appareil ne fonctionne
toujours pas et si l'inconvénient persiste, appelez le service
après-vente le plus proche.
Signalez-lui :
le type d'anomalie
le modèle d'appareil (Mod.)
le numéro de série (S/N)
Vous trouverez ces informations sur la plaque signalétique située
sur le côté inférieur gauche du compartiment réfrigérateur..
Ne vous adressez jamais à des techniciens non agréés et
exigez toujours l'installation de pièces détachées originales.
NL
Service
Voordat u de Servicedienst belt:
Controleer of u de storing niet zelf kunt oplossen (zie
Probleemoplossing).
Indien, ondanks alle controles, het apparaat niet goed
werkt en de storing blijft bestaan, kunt u zich tot de
dichtstbijzijnde Technische Dienst wenden.
U moet doorgeven:
het type storing
het model apparaat (Mod.)
serienummer (S/N)
Deze informatie vindt u op het gegevensplaatje links onder in
het koelkastcompartiment.
Wendt u zich nooit tot onbevoegde installateurs en weiger
altijd de installatie van niet-originele onderdelen.
GB
- model
DE
- Modell
FR
- modèle
NL
- model
IT
- modello
ES
- modelo
HU
- modell
KZ
- үлгі
RO
- model
RU
- модель
GB
- serial number
DE
- Seriennummer
FR
- numéro de série
NL
- serienummer
IT
- numero di serie
ES
- número de serie
HU
- gyári szám
KZ
- сериялық нөмірі
RO
- număr de serie
RU
- серийный номер
5
IT ES
Asistencia
Antes de llamar al Servicio de Asistencia Técnica:
Verifique si usted mismo puede resolver el problema de
mal funcionamiento (consulte Resolución de problemas).
Si, no obstante los controles, el aparato no funciona y el
inconveniente que usted ha detectado continúa, llame al
Centro de Asistencia Técnica más cercano.
Comunique:
el tipo de problema de mal funcionamiento
el modelo del aparato (Mod.)
el número de serie (S/N)
Esta información se encuentra en la placa de datos situada en
la parte inferior izquierda del compartimento frigorífico.
No recurra nunca a técnicos no autorizados y rechace
siempre la instalación de repuestos que no sean originales.
GB
- model
DE
- Modell
FR
- modèle
NL
- model
IT
- modello
ES
- modelo
HU
- modell
KZ
- үлгі
RO
- model
RU
- модель
GB
- serial number
DE
- Seriennummer
FR
- numéro de série
NL
- serienummer
IT
- numero di serie
ES
- número de serie
HU
- gyári szám
KZ
- сериялық нөмірі
RO
- număr de serie
RU
- серийный номер
6
HU
Műszaki segítségnyújtás
Mielőtt a szervizt hívná:
Ellenőrizze, hogy el tudja-e egyedül hárítani a hibát (lásd a
Hibaelhárítás című részt).
Ha minden ellenőrzést elvégzett, és a készülék továbbra
sem működik, illetve a probléma még mindig fennáll, hívja a
legközelebbi vevőszolgálatot.
Közölje:
a meghibásodás jellegét
a készülék típusát (modell)
a gyári számot (S/N)
Ezt az információt a hűtőtér bal oldalának alsó részén található
típustábla tartalmazza.
Soha ne kérje felhatalmazással nem rendelkező szakember
segítségét, és ne fogadjon el nem eredeti pótalkatrészeket.
KZ
Көмек
Көмек алу үшін қоңырау шалу алдында:
Ақаулықты өзіңіздің түзете алатыныңызды тексеріңіз
(Ақаулықтарды анықтау тарауын қараңыз).
Егер барлық тексерістерден кейін құрылғы жұмыс
істемесе немесе мәселе қайталанса, ең жақын қызмет
көрсету орталығына хабарласыңыз.
Байланыс:
ақаулық түрі
құрылғы үлгісі (үлгі)
сериялық нөмірі (S/N)
Бұл ақпаратты тоңазытқыш бөлімшенің сол жақ түбінде
орналасқан деректер тақтайшасынан табуға болады.
Рұқсаты жоқ техниктерге ешқашан қоңырау шалмаңыз
және түпнұсқалар емес қосалқы бөлшектерді тастаңыз.
GB
- model
DE
- Modell
FR
- modèle
NL
- model
IT
- modello
ES
- modelo
HU
- modell
KZ
- үлгі
RO
- model
RU
- модель
GB
- serial number
DE
- Seriennummer
FR
- numéro de série
NL
- serienummer
IT
- numero di serie
ES
- número de serie
HU
- gyári szám
KZ
- сериялық нөмірі
RO
- număr de serie
RU
- серийный номер
7
RO
Serviciul de asistenţă tehnică
Înainte de a contacta Serviciul de asistenţă:
Vericai dacă putei remedia pe cont propriu defeciunea
(consultai seciunea Remedierea defeciunilor).
Dacă, după efectuarea tuturor vericărilor, aparatul tot nu
funcionează sau defeciunea persistă, contactai Centrul de
service.
Specicaţi:
tipul de defeciune
modelul aparatului (Mod.)
numărul de serie (S/N)
Aceste informaii pot  găsite pe plăcua cu date de identicare,
amplasată în partea inferioară din stânga a compartimentului frigider.
Nu solicitaţi niciodată serviciile unor tehnicieni neautorizaţi şi
refuzaţi întotdeauna montarea de piese de schimb care nu sunt
originale.
RU
Сервис
Прежде чем обращаться в Сервис:
    (.
“   ”).
     -  
  ,   
 .
Укажите:
 ;
  (Mod.);
  (S/N)
      ,
      .
Не обращайтесь в неавторизованные мастерские, не
допускайте использования неоригинальных запасных
частей.
GB
- model
DE
- Modell
FR
- modèle
NL
- model
IT
- modello
ES
- modelo
HU
- modell
KZ
- үлгі
RO
- model
RU
- модель
GB
- serial number
DE
- Seriennummer
FR
- numéro de série
NL
- serienummer
IT
- numero di serie
ES
- número de serie
HU
- gyári szám
KZ
- сериялық нөмірі
RO
- număr de serie
RU
- серийный номер
8
GB
Description of the appliance
Overall view
The instructions contained in this manual are applicable to
different model refrigerators. The diagrams may not directly
represent the appliance purchased. For more complex
features, consult the following pages.
1 Levelling FEET
2 FRUIT and VEGETABLE bin
3 SHELVES*
4 TEMPERATURE REGULATING Knob
5 FREEZER and STORAGE compartment
6 Removable multipurpose SHELVES*
7 CAN SHELVES*
8 Removable CAN SHELVES*
9 BOTTLE shelf
* Varies by number and/or position, available only on certain
models.
2
6
1
7
4
8
3
5
9
DE
Gerätebeschreibung
Gesamtansicht
Die Anweisungen in diesem Handbuch können für
verschiedene Kühlschrankversionen angewendet werden. Die
Diagramme stellen nicht direkt das gekaufte Gerät dar. Für
weitere Funktionen, siehe die folgenden Seiten.
1 VERSTELLFÜSSE
2 OBST- und GEMÜSEFACH
3 ABLAGEN *
4 TEMPERATUREINSTELLUNGS-Knopf
5 GEFRIER- und STAUFACH
6 Herausnehmbare MEHRZWECKREGALE *
7 DOSEN-ABLAGEFLÄCHEN*
8 Abnehmbare DOSEN-ABLAGEFLÄCHEN*
9 Abstellfach für FLASCHEN
* Variiert je nach Anzahl und/oder Position, verfügbar nur für
bestimmte Modelle.
9
FR
Description de l'appareil
Vue globale
Les consignes disponibles dans ce manuel s’appliquent aux
différents modèles de réfrigérateur. Les schémas peuvent
être différents de l’appareil que vous avez acheté. Pour les
caractéristiques plus complexes, consultez les pages qui
suivent.
1 Nivelage SUPPORT
2 Bac à FRUITS ET LÉGUMES
3 CLAYETTES *
4 Bouton de RÉGLAGE DE LA TEMPÉRATURE
5 Compartiment de CONGÉLATION et de RANGEMENT
6 CLAYETTES à usage multiple amovibles*
7 CLAYETTES POUR BOÎTES*
8 CLAYETTES POUR BOÎTES amovibles*
9 Clayette pour BOUTEILLES
* Varie en nombre et/ou position, disponible uniquement sur
certains modèles.
NL
Beschrijving van het apparaat
Algemeen overzicht
De instructies in deze handleiding zijn van toepassing op
verschillende koelkastmodellen. De schetsen zijn mogelijk geen
exacte voorstelling van het apparaat dat u heeft gekocht. Voor
complexere kenmerken raadpleegt u de volgende pagina's.
1 StelPOOTJES
2 FRUIT en GROENTEN bak
3 SCHAPPEN *
4 TEMPERATUURREGELING knop
5 VRIEZER en OPSLAGcompartiment
6 Uitneembare polyvalente SCHAPPEN *
7 BLIKJESSCHAPPEN*
8 Uitneembare BLIKJESSCHAPPEN*
9 FLESSENvak
* Varieert in aantal en/of positie, alleen voor bepaalde modellen
verkrijgbaar.
2
6
1
7
4
8
3
5
9
10
IT
Descrizione dell’apparecchio
Vista d’insieme
Le presenti istruzioni d’uso valgono per diversi modelli di
frigorifero, perciò è possibile che le figure non rappresentino
esattamente l’apparecchio acquistato. Le funzioni più
complesse sono descritte alle pagine seguenti.
1 PIEDINI di regolazione altezza
2 Cassetto FRUTTA e VERDURA
3 RIPIANI *
4 Manopola di REGOLAZIONE DELLA TEMPERATURA
5 Comparto di CONGELAMENTO e CONSERVAZIONE
6 RIPIANI universali amovibili
7 MENSOLE PORTALATTINE*
8 MENSOLE PORTALATTINE* amovibili
9 Balconcino BOTTIGLIE
* Variabili per numero e/o posizione, presenti solo in alcuni
modelli.
ES
Descripción del aparato
Vista en conjunto
Las instrucciones sobre el uso son válidas para distintos modelos.
y por lo tanto es posible que la figura presente detalles diferentes
a los del aparato que Ud. ha adquirido. La descripción de las
piezas más complejas se encuentra en las páginas sucesivas.
1 PIES niveladores
2 Recipiente de FRUTA y VERDURA
3 ESTANTES *
4 Selector de REGULACIÓN DE TEMPERATURA
5 Zona de CONGELADOR y CONSERVACIÓN
6 ESTANTES extraíbles multipropósito*
7 ESTANTES PARA LATAS*
8 ESTANTES PARA LATAS*extraíbles
9 Estante de BOTELLAS
* La cantidad y/o su ubicación pueden variar, se encuentra solo
en algunos modelos.
2
6
1
7
4
8
3
5
9
11
HU
A készülék bemutatása
Általános ismertetés
Az Útmutatóban található utasítások egyszerre többféle modellre
is érvényesek. Ezért az ábrák esetenként nem feltétlenül pontosan
ábrázolják az Ön által vásárolt készüléket. Részletesebb tartalomért,
kérjük, hogy olvassa el az alábbi fejezeteket.
1 Állítható LÁBAK
2 GYÜMÖLCS és ZÖLDSÉG rekesz
3 POLCOK*
4 HŐMÉRSÉKLET-SZABÁLYZÓ gomb
5 FAGYASZTÓ- és TÁROLÓrekesz
6 Kivehető, többfunkciós POLCOK *
7 POLCOK DOBOZOS ITALOKNAK*
8 Kivehető POLCOK DOBOZOS ITALOKNAK*
9 PALACKTARTÓ polc
* Számuk és/vagy helyük változó, csak bizonyos modelleknél elérhetők.
KZ
Құрылғының сипаттамасы
Жалпы көрінісі
Осы нұсқаулықта жазылған нұсқаулар тоңазытқыштың түрлі
үлгілеріне қолданылады. Диаграммаларда сатып алынған
құрылғыңыздың дәл өзі көрсетілмеуі мүмкін. Мүмкіндіктерінің
толық жинағын келесі беттерден қараңыз.
1 Деңгейлегіш ТІРЕУЛЕР
2 ЖЕМІС-ЖИДЕК пен КӨКӨНІС жәшігі
3 СӨРЕЛЕР *
4 ТЕМПЕРАТУРАНЫ РЕТТЕУ тетігі
5 МҰЗДАТУ және САҚТАУ бөлімшесіt
6 Алмалы-салмалы көп мақсатты СӨРЕЛЕР *
7 КОНТЕЙНЕР СӨРЕЛЕРІ*
8 Алмалы-салмалы КОНТЕЙНЕР СӨРЕЛЕРІ*
9 ШӨЛМЕК сөресі
* Саны және (немесе) орналасуы әр түрлі болады, тек
кейбір үлгілерде ғана бар.
2
6
1
7
4
8
3
5
9
12
RO
Descrierea aparatului
Prezentare generală
Instrucţiunile din acest manual se aplică în cazul mai multor modele
diferite de frigidere. Este posibil ca diagramele să nu reprezinte în
mod direct aparatul achiziţionat. Pentru caracteristici mai complexe,
consultaţi următoarele pagini.
1 PICIORUŞE de echilibrare
2 Sertar pentru FRUCTE i LEGUME
3 RAFTURI*
4 Selector de REGLARE A TEMPERATURII
5 Compartiment CONGELATOR i de DEPOZITARE
6 RAFTURI * demontabile multifuncionale
7 RAFTURI PENTRU DOZE*
8 RAFTURI PENTRU DOZE demontabile*
9 Raft pentru STICLE
* Variază în funcţie de număr şi/sau poziţie, disponibil numai la
anumite modele.
2
6
1
7
4
8
3
5
9
RU
Описание прибора
Общий вид
Указания, содержащиеся в настоящей инструкции, относятся
к различным моделям холодильников. Рисунки могут не
воспроизводить точный вид приобретенного вами прибора.
Подробная информация приведена на следующих страницах.
1  НОЖКИ
2   ОВОЩЕЙФРУКТОВ
3 ПОЛКИ*
4  РЕГУЛИРОВКИ ТЕМПЕРАТУРЫ
5   ЗАМОРАЖИВАНИЯХРАНЕНИЯ
6   ПОЛКИ *
7 ПОЛКИ ДЛЯ БАНОК*
8 ПОЛКИ ДЛЯ БАНОК*
9   БУТЫЛОК
* Наличие, количество и расположение может варьироваться в
зависимости от модели.
13
1
2
3
4
5
3
mm
GB
Reversible doors
DE
Türanschlagwechsel
FR
Portes réversibles
NL
Omkeerbare deuren
IT
Porte reversibili
ES
Puertas reversibles
HU
Megfordítható ajtók
KZ
Керісінше ілінетін есіктер
RO
Uşi reversibile
RU
Перенавешиваемые дверцы
14
GB
Installation
! Before placing your new appliance into operation please read
these operating instructions carefully. They contain important
information for safe use, for installation and for care of the
appliance.
! Please keep these operating instructions for future reference.
Pass them on to possible new owners of the appliance.
Positioning and connection
Positioning
1. Place the appliance in a well-ventilated humidity-free room.
2. Do not obstruct the rear fan grills. The compressor and
condenser give off heat and require good ventilation to
operate correctly and save energy.
3. Leave a space of at least 10 cm between the top part of
the appliance and any furniture above it, and at least 5 cm
between the sides and any furniture/side walls.
4. Ensure the appliance is away from any sources of heat (direct
sunlight, electric stove, etc.).
5. In order to maintain the correct distance between the
appliance and the wall behind it, fit the spacers supplied in
the installation kit, following the instructions provided.
Levelling
1. Install the appliance on a level and rigid floor.
2. If the floor is not perfectly horizontal, adjust the refrigerator by
tightening or loosening the front feet.
Electrical connections
After the appliance has been transported, carefully place it
vertically and wait at least 3 hours before connecting it to the
electricity mains. Before inserting the plug into the electrical
socket ensure the following:
The appliance is earthed and the plug is compliant with the law.
The socket can withstand the maximum power of the
appliance, which is indicated on the data plate located on the
bottom left side of the fridge (e.g. 150 W).
The voltage must be in the range between the values
indicated on the data plate located on the bottom left side
(e.g. 220-240V).
The socket is compatible with the plug of the appliance. If
the socket is incompatible with the plug, ask an authorised
technician to replace it (see Assistance). Do not use extension
cords or multiple sockets.
! Once the appliance has been installed, the power supply cable
and the electrical socket must be easily accessible.
! The cable must not be bent or compressed.
! The cable must be checked regularly and replaced by
authorised technicians only (see Assistance).
! The manufacturer declines any liability should these safety
measures not be observed.
Start-up and use
Starting the appliance
! Before starting the appliance, follow the installation
instructions (see Installation).
! Before connecting the appliance, clean the compartments and
accessories well with lukewarm water and bicarbonate.
1. Insert the plug into the socket and ensure that the internal light
illuminates.
2. Turn the TEMPERATURE ADJUSTMENT knob to an average
value. After a few hours you will be able to put food in the
refrigerator.
Setting the temperature
The temperature inside the refrigerator compartment
automatically adjusts itself according to the position of the
TEMPERATURE ADJUSTMENT knob.
1 = warmest 5 = coldest
We recommend, however, a medium position.
The cooling section of the refrigerator is located inside the back
wall of the refrigerator compartment for increased space and
improved aesthetics. During operation, the back wall will be
covered in frost or water droplets depending on whether the
compressor is operating or paused. Do not worry, the refrigerator
is functioning normally.
If the TEMPERATURE ADJUSTMENT knob has been set on high
values with large quantities of food and with a high ambient
temperature, the appliance can operate continuously, resulting
in excessive frost formation and excessive energy consumption:
compensate for this by shifting the knob towards lower values
(defrosting will occur automatically). In static appliances, the
air circulates in a natural way: the colder air tends to move
downwards as it is heavier. The food should be stored as follows:
Food
Arrangement inside the
refrigerator
Fresh fish and meat Above the fruit and vegetable bins
Fresh cheese Above the fruit and vegetable bins
Cooked food On any shelf
Salami, loaves of
bread, chocolate
On any shelf
Fruit and vegetables
In the fruit and vegetable
compartment bins
Eggs On the shelf provided
Butter and margarine On the shelf provided
Bottles, drinks, milk On the shelves provided
GB
15
Using the refrigerator to its full potential
Place only cold or lukewarm foods in the compartment, not hot
foods (see Precautions and tips).
Remember that cooked foods do not last longer than raw foods.
Do not store liquids in open containers. They will increase
humidity in the refrigerator and cause condensation to form.
SHELVES: with or without grill.
Due to the special guides the shelves are removable and the
height is adjustable (see diagram), allowing easy storage of large
containers and food. Height can be adjusted without complete
removal of the shelf.
BEVERAGE CAN shelves.
The can rack on the inner door allows you to store not only cans,
but also yoghurt, butter and other containers, according to your
requirements.
TEMPERATURE* Indicator light: to identify the coldest area in
the refrigerator.
1. Check that OK appears clearly on the indicator light (see
diagram).
2. If the word “OK” does not appear it means that the
temperature is too high: adjust the REFRIGERATOR
OPERATION knob to a higher (colder) position and wait
approximately 10 hours until the temperature has stabilised.
3. Check the indicator light again: if necessary, readjust it
following the initial process. If large quantities of food have
been added or if the refrigerator door has been opened
frequently, it is normal for the indicator not to show OK.
Wait at least 10 hours before adjusting the REFRIGERATOR
OPERATION knob to a higher setting.
Using the freezer to its full potential
Do not re-freeze food that is defrosting or that has already
been defrosted. These foods must be cooked and eaten
(within 24 hours).
Fresh food that needs to be frozen must not come into contact
with food that has already been defrosted. Fresh food must
be stored above the grill in the freezer compartment and if
possible be in direct contact with the walls (side and rear),
where the temperature drops below -18°C and guarantees
rapid freezing.
Do not place glass bottles which contain liquids, and which
are corked or hermetically sealed in the freezer because they
could break.
The maximum quantity of food that may be frozen daily is
indicated on the plate containing the technical properties
located on the bottom left side of the refrigerator compartment
(for example: Kg/24h: 4).
! Do not open the door during freezing.
! If there is a power cut or malfunction, do not open the freezer
door. This will help maintain the temperature inside the freezer,
ensuring that foods are conserved for at least 9 -14 hours.
! If the room temperature drops below 14°C for an extended
period of time, the ideal temperature will not be reached in the
freezer compartment and food preservation will be reduced.
Maintenance and care
Switching the appliance off
During cleaning and maintenance it is necessary to disconnect
the appliance from the electricity supply.
It is not sufficient to set the temperature adjustment knobs on
(appliance off) to eliminate all electrical contact.
Cleaning the appliance
The external and internal parts, as well as the rubber seals
may be cleaned using a sponge that has been soaked in
lukewarm water and bicarbonate of soda or neutral soap. Do
not use solvents, abrasive products, bleach or ammonia.
The removable accessories may be soaked in warm water and
soap or dishwashing liquid. Rinse and dry them carefully.
The back of the appliance may collect dust which can be
removed by delicately using the hose of a vacuum cleaner set
on medium power. The appliance must be switched off and
the plug must be pulled out before cleaning the appliance.
Avoiding mould and unpleasant odours
The appliance is manufactured with hygienic materials which
are odour free. In order to maintain an odour free refrigerator
and to prevent the formation of stains, food must always be
covered or sealed properly.
If you want to switch the appliance off for an extended period
of time, clean the inside and leave the doors open.
* Varies by number and/or position, available only on certain
models.
16
GB
Defrosting the appliance
! Follow the instructions below.
Do not use objects with sharp or pointed edges to defrost the
appliance as these may damage the refrigeration circuit beyond
repair.
Defrosting the refrigerator compartment
The refrigerator has an automatic defrosting function: water is
ducted to the back of the appliance by a special discharge outlet
(see diagram) where the heat produced by the compressor
causes it to evaporate. It is necessary to clean the discharge hole
regularly so that the water can flow out easily.
Defrosting the freezer compartment
If the frost layer is greater than 5 mm, it is necessary to defrost
manually:
1. Set the TEMPERATURE ADJUSTMENT knob to the position .
2. Wrap frozen foods in newspaper and place them in another
freezer or in a cool place.
3. Leave the door open until the frost has melted completely.
This can be made easier by placing containers with lukewarm
water in the freezer compartment.
4. Clean and dry the freezer compartment carefully before
switching the appliance on again.
5. Wait for approximately 2 hours, i.e. until the ideal storage
conditions have been restored, before placing food in the
freezer compartment.
Replacing the light bulb
To replace the light bulb in the refrigerator compartment, pull out
the plug from the electrical socket. Follow the instructions below.
Access the light bulb by removing the cover as indicated in the
diagram. Replace it with a similar light bulb within the power
range indicated on the cover (15W or 25W).
1
2
Precautions and tips
! The appliance was designed and manufactured in compliance
with international safety standards. The following warnings are
provided for safety reasons and must be read carefully.
This appliance complies with the following Community Directives:
- 73/23/EEC of 19/02/73 (Low Voltage) and subsequent
amendments;
-89/336/EEC of 03.05.89 (Electromagnetic Compatibility) and
subsequent amendments;
- 2002/96/CE.
General safety
The appliance was designed for domestic use inside the home
and is not intended for commercial or industrial use.
The appliance must be used to store and freeze food products
by adults only and according to the instructions in this manual.
The appliance must not be installed outdoors, even in covered
areas. It is extremely dangerous to leave the appliance
exposed to rain and storms.
Do not touch the appliance with bare feet or with wet or moist
hands and feet.
Do not touch the internal cooling elements: this could cause
skin abrasions or frost/freezer burns.
When unplugging the appliance always pull the plug from the
mains socket, do not pull on the cable.
Before cleaning and maintenance, always switch off the
appliance and disconnect it from the electrical supply. It is
not sufficient to set the temperature adjustment knobs on
(appliance off) to eliminate all electrical contact.
In the case of a malfunction, under no circumstances should
you attempt to repair the appliance yourself. Repairs carried
out by inexperienced persons may cause injury or further
malfunctioning of the appliance.
Do not use any sharp or pointed utensils or electrical
equipment - other than the type recommended by the
manufacturer - inside the frozen food storage compartments.
Do not put ice cubes taken directly from the freezer into your
mouth.
This appliance is not intended for use by persons (including
children) with reduced physical, sensory or lack of experience
and knowledge unless they have been given supervision
or instruction concerning use of the appliance by a person
responsible for their safety. Children should be supervised to
ensure that they do not play with the appliance.
Keep packaging material out of the reach of children! It can
become a choking or suffocation hazard.
Disposal
Observe local environmental standards when disposing
packaging material for recycling purposes.
The European Directive 2002/96/EC on Waste Electrical and
Electronic Equipment (WEEE), requires that old household
electrical appliances must not be disposed of in the normal
unsorted municipal waste stream. Old appliances must be
collected separately in order to optimise the recovery and
recycling of the materials they contain and reduce the impact
on human health and the environment. The crossed out
“wheeled bin” symbol on the product reminds you of your
obligation, that when you dispose of the appliance it must be
separately collected. Consumers should contact their local
authority or retailer for information concerning the correct
disposal of their old appliance.
GB
17
Respecting and conserving the
environment
Install the appliance in a fresh and well-ventilated room.
Ensure that it is protected from direct sunlight and do not
place it near heat sources.
Try to avoid keeping the door open for long periods or
opening the door too frequently in order to conserve energy.
Do not fill the appliance with too much food: cold air must
circulate freely for food to be preserved properly. If circulation
is impeded, the compressor will work continuously.
Do not place hot food directly into the refrigerator. The internal
temperature will increase and force the compressor to work
harder and will consume more energy.
Defrost the appliance if ice forms (see Maintenance). A thick
layer of ice makes cold transference to food products more
difficult and results in increased energy consumption.
Regularly check the door seals and wipe clean to ensure they
are free of debris and to prevent cold air from escaping (see
Maintenance).
Troubleshooting
If the appliance does not work, before calling for Assistance (see
Assistance), check for a solution from the following list.
The internal light does not illuminate.
The plug has not been inserted into the electrical socket, or
not far enough to make contact, or there is no power in the
house.
The refrigerator and the freezer do not cool well.
The doors do not close properly or the seals are damaged.
The doors are opened too frequently.
The TEMPERATURE ADJUSTMENT knob is not in the correct
position.
The refrigerator or the freezer have been over-filled.
The atmospheric temperature of the area surrounding the
appliance is lower than 14°C.
The food inside the refrigerator is beginning to freeze.
The TEMPERATURE ADJUSTMENT knob is not in the correct
position.
The food is in contact with the back inside wall of the
refrigerator.
The motor runs continuously.
The door is not closed properly or is continuously opened.
The outside ambient temperature is very high.
The thickness of the frost exceeds 2-3 mm (see Maintenance).
The appliance makes a lot of noise.
The appliance has not been installed on a level surface (see
Installation).
The appliance has been installed between cabinets that
vibrate and make noise.
The internal refrigerant makes a slight noise even when the
compressor is off. This is not a defect, it is normal.
Some of the external parts of the refrigerator become hot.
These raised temperatures are necessary in order to avoid the
formation of condensation on certain parts of the product.
The back wall of the refrigerator unit is covered in frost or
droplets of water.
This shows the appliance is operating normally.
There is water at the bottom of the refrigerator.
The water discharge hole is blocked (see Maintenance).
18
DE
Installation
! Vor Inbetriebnahme Ihres neuen Gerätes, diese
Gebrauchsanweisungen sorgfältig durchlesen. Sie enthalten
wichtige Informationen für den sicheren Gebrauch, die
Installation und Pflege des Gerätes.
! Bewahren Sie diese Gebrauchsanleitung sorgfältig auf.
Beim Verkauf, diese an die neuen Eigentümer des Gerätes
übergeben.
Aufstellung und Anschluss
Aufstellung
1. Stellen Sie das Gerät in einem gut belüfteten Raum ohne
Feuchtigkeit auf.
2. Die hinteren Lüftergitter nicht abdecken. Der Kompressor
und Kondensator geben Hitze ab und benötigen eine gute
Belüftung, um richtig arbeiten zu können und Energie zu
sparen.
3. Einen Abstand von mindestens 10 cm zwischen dem Oberteil
des Gerätes und anderen Möbeln darüber lassen, und
mindestens 5 cm zwischen den Seiten und anderen Möbeln/
Seitenwänden.
4. Sicherstellen, dass sich das Gerät entfernt von Hitzequellen
befindet (direktes Sonnenlicht, Elektroherd, usw.).
5. Um den richtigen Abstand zwischen dem Gerät und der
Wand dahinter beizubehalten, die Abstandhalter aus dem
Installationskit einsetzen, dabei die gegebenen Anweisungen
befolgen.
Nivellierung
1. Installieren Sie das Gerät auf einem festen und ebenen Boden.
2. Wenn der Boden nicht absolut waagrecht ist, den Kühlschrank
durch Anziehen oder Lösen der vorderen Füße anpassen.
Elektrischer Anschluss
Nach dem Transport des Gerätes, dieses vorsichtig senkrecht
aufstellen und mindestens 3 Stunden warten, bevor es an das
Stromnetz angeschlossen wird. Vor Einstecken des Steckers in
die Steckdose, Folgendes sicherstellen:
Das Gerät ist geerdet und der Stecker ist in Übereinstimmung
mit den Vorschriften.
• Die Steckdose kann der maximalen Geräteleistung
standhalten, die auf dem Typenschild am Geräteboden links
angegeben sind (z.B. 150 W).
• Die Spannung muss innerhalb der Werte liegen, die auf dem
Typenschild am Geräteboden links angegeben sind (z.B. 220-
240V).
Die Steckdose ist kompatibel mit dem Gerätestecker. Wenn
die Steckdose nicht mit dem Stecker kompatibel ist, einen
autorisierten Techniker mit dem Austausch beauftragen (siehe
Kundendienst). Verwenden Sie keine Verlängerungskabel
oder Mehrfachstecker.
! Wenn das Gerät installiert wurde, müssen das
Versorgungskabel und die Steckdose einfach zugänglich sein.
! Das Kabel darf nicht geknickt oder zusammengedrückt sein.
! Das Kabel muss regelmäßig geprüft und ausschließlich
durch autorisierte Techniker ausgetauscht werden (siehe
Kundendienst).
! Der Hersteller lehnt jegliche Haftung ab, wenn diese
Sicherheitsmaßnahmen nicht beachtet werden.
Inbetriebnahme und
Gebrauch
Einschalten des Geräts
! Vor Einschalten des Gerätes, die Installationsanweisungen
beachten (siehe Installation).
! Vor dem Anschluss des Gerätes, die Fächer und die
Zubehörteile gründlich mit lauwarmen Wasser und Bikarbonat
reinigen.
1. Den Stecker in die Steckdose einstecken und sicherstellen,
dass das Innenlicht leuchtet.
2. Den Knopf zur TEMPERATUREINSTELLUNG auf einen
Durchschnittswert drehen. Nach einigen Stunden können
Lebensmittel in den Kühlschrank gegeben werden.
Einstellen der Temperatur
Die Temperatur im Kühlschrankfach stellt sich
automatisch selbst ein, je nach Position des Knopfes zur
TEMPERATUREINSTELLUNG.
1 = am wärmsten 5 = am kältesten
Wir empfehlen trotzdem eine Mittelposition.
Der Kühlabschnitt des Kühlschranks befindet sich in der
Rückwand des Kühlschrankfachs für mehr Raum und verbesserte
Ästhetik. Während dem Betrieb weist die Rückwand Frost oder
Wassertropfen auf, je nachdem ob der Kompressor in Betrieb
ist oder in Pause. Keine Bedenken, der Kühlschrank funktioniert
normal.
Wenn der Knopf zur TEMPERATUREINSTELLUNG auf
die höchsten Werte gestellt wurde mit hohen Mengen an
Lebensmitteln und bei hoher Umgebungstemperatur, kann das
Gerät durchgehend arbeiten, was zu erhöhter Frostbildung und
erhöhtem Energieverbrauch kommt: um dies auszugleichen,
den Knopf auf die niedrigeren Werten stellen (das Abtauen
erfolgt automatisch). Bei statischen Geräten, zirkuliert die Luft
auf natürliche Weise: kältere Luft neigt dazu, sich nach unten zu
bewegen, da sie schwerer ist. Die Lebensmittel sollten wie folgt
gelagert werden:
Speise Anordnung in dem Kühlschrank
Frischer Fisch und
Fleisch
Über den Obst- und
Gemüsefächern
Frischkäse
Über den Obst- und
Gemüsefächern
Gekochte Speisen Auf allen Ablagen
Salami, Brotlaibe,
Schokolade
Auf allen Ablagen
Obst und Gemüse In den Obst- und Gemüsefächern
Eier Auf der Ablage
Butter und Margarine Auf der Ablage
Flaschen, Getränke,
Milch
Auf den Ablagen
DE
19
Verwendung des Kühlschranks in seiner vollen
Leistung
Nur kalte oder lauwarme Lebensmittel in das Fach geben, keine
heißen Lebensmittel (siehe Vorsichtsmaßnahmen und Tipps).
Bitte beachten, dass gegarte Lebensmittel nicht länger haltbar sind
als rohe Lebensmittel.
Flüssigkeiten nicht in offenen Behältern aufbewahren. Sie
erhöhen die Feuchtigkeit im Kühlschrank und führen zu
Kondenswasserbildung.
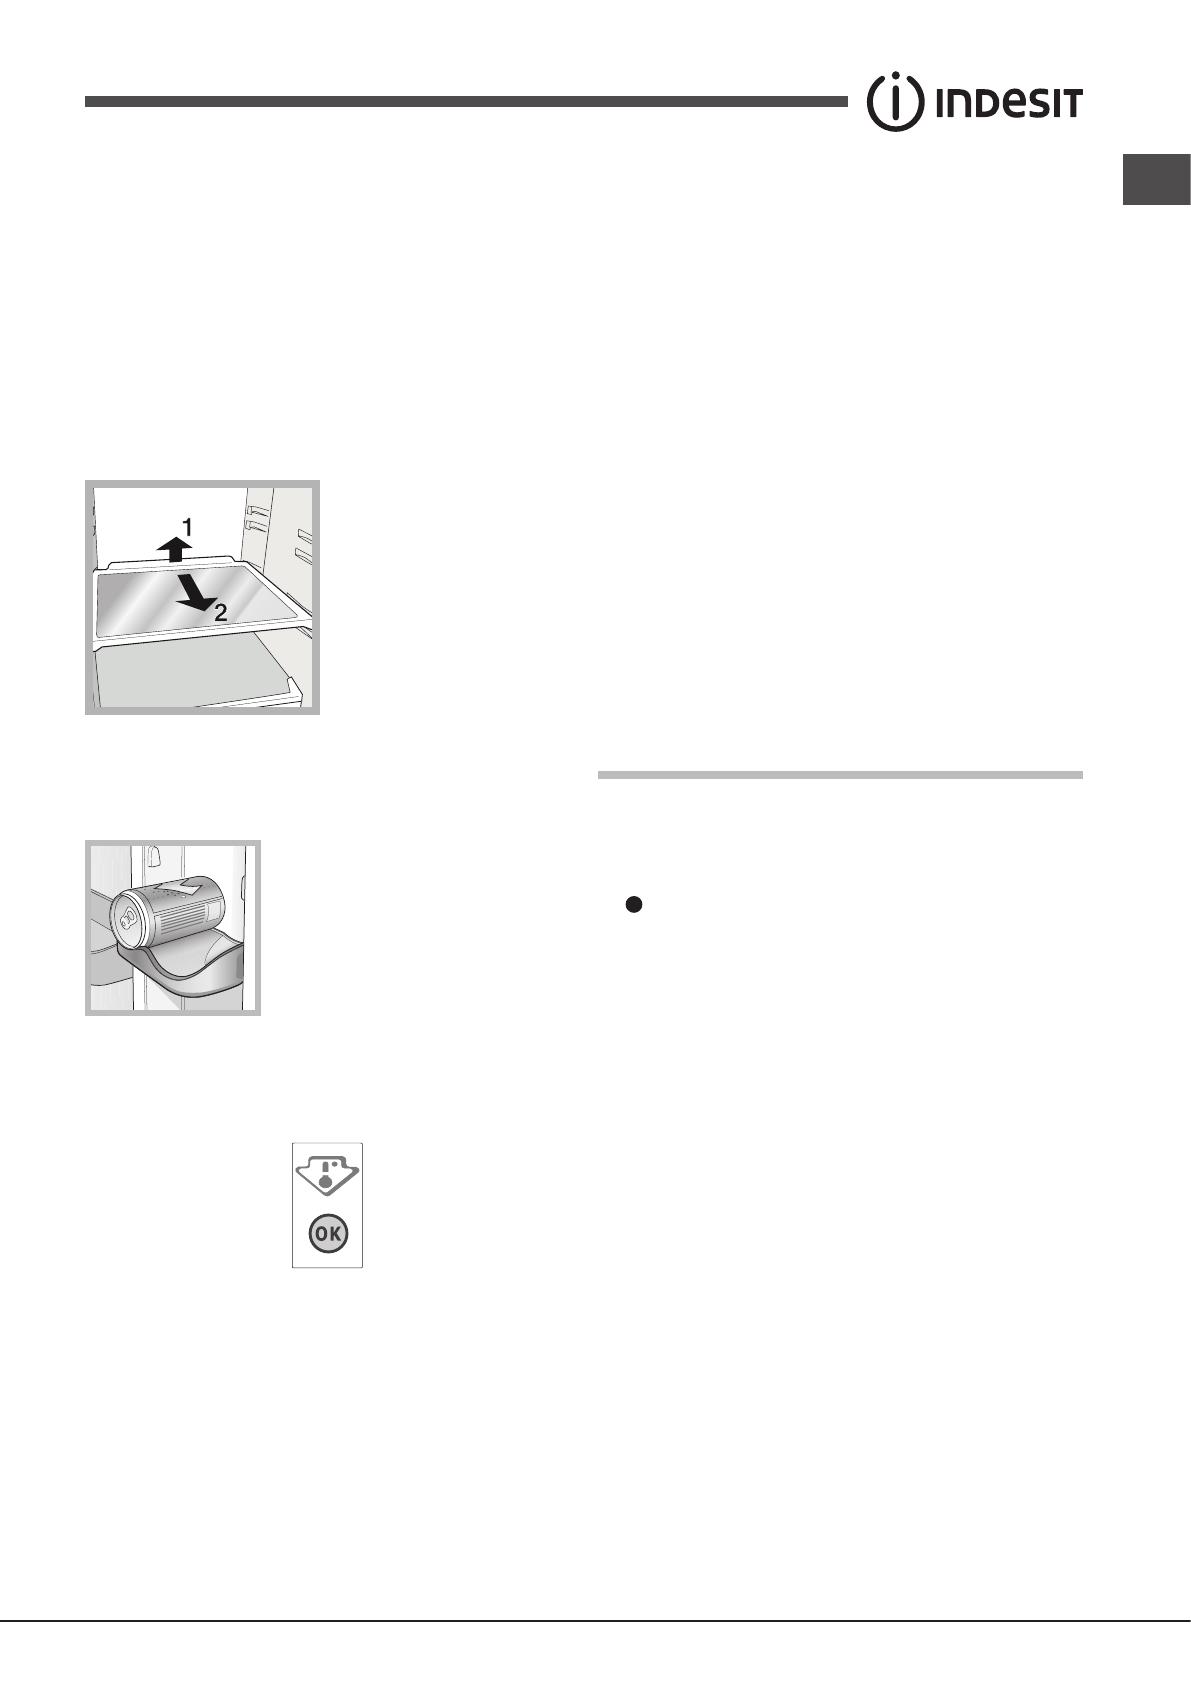
ABLAGEN: mit oder ohne Gitter.
Dank der speziellen Führungen können die Ablagen herausgenommen
werden und die Höhe ist einstellbar (siehe Diagramm), dies ermöglicht
eine einfache Lagerung von großen Behältern und Lebensmitteln. Die
Höhe kann ohne komplette Entnahme der Ablage angepasst werden.
GETRÄNKEDOSEN-Ablageflächen.
Das Dosengestell an der Innentür ermöglicht es Ihnen nicht nur
Dosen aufzubewahren, sondern auch Joghurt, Butter und andere
Behälter, je nach Ihren Bedürfnissen.
TEMPERATUR*-Anzeigelicht : Zum Feststellen des kältesten
Bereichs im Kühlschrank.
1. Prüfen, dass OK klar auf dem Anzeigelicht erscheint (siehe
Diagramm).
2. Wenn das Wort “OK” nicht erscheint, bedeutet dies,
dass die Temperatur zu hoch ist: Der Knopf für den
KÜHLSCHRANKBETRIEB auf eine höhere (kältere) Position
stellen und ungefähr 10 Stunden warten, bis die Temperatur
sich stabilisiert hat.
3. Das Anzeigelicht erneut prüfen: bei Bedarf erneut einstellen
unter Durchführung des Startvorgangs. Wenn große Mengen
an Lebensmitteln zugegeben wurden oder wenn die
Kühlschranktür häufig geöffnet wird, ist es normal, dass die
Anzeige kein OK anzeigt. Mindestens 10 Stunden warten,
bevor der Knopf für den KÜHLSCHRANKBETRIEB auf einen
höheren Wert eingestellt wird.
Verwendung des Gefrierers in seiner vollen
Leistung
• Frieren Sie auftauende oder bereits aufgetaute Lebensmittel
nicht wieder ein. Diese Lebensmittel müssen gekocht und
gegessen werden (innerhalb von 24 Stunden).
Frische Speisen, die eingefroren werden müssen, dürfen nicht
in Kontakt mit Speisen kommen, die bereits abgetaut wurden.
Frische Speisen müssen über dem Gitter in dem Gefrierfach
gelagert werden und wenn möglich in direktem Kontakt
mit den Wänden (Seitenwänden und Rückwand), wo die
Temperatur auf -18°C fällt und schnelles Gefrieren garantiert.
• Legen Sie keine Glasflaschen, die Flüssigkeiten enthalten und
die einen Korken haben oder hermetisch versiegelt sind in
den Gefrierer, da sie brechen könnten.
• Die maximale Menge an Lebensmitteln, die täglich eingefroren
werden können, ist auf dem Schild mit den technischen
Eigenschaften links auf dem Boden des Kühlschranks
angegeben (zum Beispiel: Kg/24h: 4).
! Während dem Gefrieren die Tür nicht öffnen.
! Bei einem Stromausfall oder einer Störung, die Gefrierertür
nicht öffnen. Somit kann die Temperatur im Gefrier aufrecht
erhalten werden, um sicherzustellen, dass die Lebensmittel für
mindestens 9-14 Stunden konserviert sind.
! Wenn die Raumtemperatur für eine lange Zeitspanne unter
14°C, wird die ideale Temperatur in dem Gefrierfach nicht
erreicht und die Lebensmittelkonservierung wird verringert.
Wartung und Pflege
Abschalten des Gerätes
Während der Reinigung und Wartung muss das Gerät von der
Stromversorgung getrennt werden.
Es ist nicht ausreichend, den Knopf der Temperatureinstellung
auf (Gerät aus) zu stellen, um den gesamten Stromkontakt zu
entfernen.
Reinigung des Gerätes
Die Außen- und Innenteile sowie die Gummidichtungen
können mit einem Schwamm gereinigt werden, der in
lauwarmes Wasser und Bikarbonat oder neutrale Seife
getaucht wurde. Keine Lösungsmittel, Scheuermittel,
Bleichmittel oder Ammoniak verwenden.
Die herausnehmbaren Zubehörteile können in warmen
Wasser und Seife oder Spülmittel eingeweicht werden. Diese
sorgfältig mit Wasser abspülen und trocknen.
Auf der Rückseite des Gerätes kann sich Staub
angesammelt haben, der durch vorsichtige Verwendung des
Staubsaugerschlauchs bei mittlerer Geschwindigkeit entfernt
werden kann. Das Gerät muss ausgeschaltet und der Stecker
ausgesteckt werden, bevor die Reinigung des Gerätes
beginnt.
Schimmel oder unangenehme Gerüche
vermeiden
Das Gerät ist mit geruchlosen hygienischen Materialien
hergestellt. Um einen geruchlosen Kühlschrank zu erhalten
und um die Bildung von Verschmutzungen zu vermeiden,
sollten die Lebensmittel stets abgedeckt oder entsprechend
versiegelt sein.
Wenn Sie das Gerät für einen längeren Zeitraum ausschalten
möchten, die Innenseite reinigen und die Türen offen lassen.
* Variiert je nach Anzahl und/oder Position, verfügbar nur für
bestimmte Modelle.
20
DE
Das gerät abtauen
!Die unten stehenden Anweisungen befolgen.
Verwenden Sie keine Gegenstände mit scharfen oder spitzen
Kanten, um die Geräte abzutauen, da diese den Kältekreislauf über
die Reparatur hinaus beschädigen können.
Abtauen des Kühlfachs
Der Kühlschrank hat eine automatische Abtaufunktion: Wasser
wird auf die Rückseite des Gerätes geleitet durch eine spezielle
Abflussöffnung (siehe Diagramm), wo die Hitze, die durch den
Kompressor produziert wird, zur Verdampfung des Wassers führt.
Das Abflussrohr muss regelmäßig gereinigt werden, so dass das
Wasser einfach ausfließen kann.
Gefrierfach entfrosten
Wenn die Frostschicht höher als 5 mm ist, muss manuell abgetaut
werden:
1. Den Knopf zur TEMPERATUREINSTELLUNG auf stellen.
2. Gefrorene Lebensmittel in Zeitungspapier einwickeln und in einen
anderen Gefrierer oder an einen kühleren Platz legen.
3. Die Tür offen lassen, bis der Frost komplett geschmolzen ist. Dies
kann vereinfacht werden, indem Behälter mit lauwarmen Wasser
in das Gefrierfach gestellt werden.
4. Das Gefrierfach vorsichtig reinigen und trocknen, bevor das
Gerät wieder eingeschaltet wird.
5. Ungefähr 2 Stunden warten, d.h. bis die ideale Lagertemperatur
wieder hergestellt wurde, bevor die Lebensmittel in den Gefrierer
gelegt werden.
Austausch der Glühbirne
Für den Austausch der Glühbirne im Kühlschrankfach, den Stecker
aus der Steckdose ziehen. Die unten stehenden Anweisungen
befolgen.
Für den Zugriff auf die Glühbirne, die Abdeckung entfernen, wie in
der Abbildung dargestellt. Diese durch eine ähnliche Glühbirne, mit
dem auf der Abdeckung angegebenen Leistungsbereich, ersetzen
(15W oder 25W)..
1
2
Hinweise und Tipps
! Das Gerät wurde entwickelt und hergestellt in Übereinstimmung
mit internationalen Sicherheitsstandards. Die folgenden Warnungen
werden aus Sicherheitsgründen gegeben und müssen sorgfältig
gelesen werden.
Dieses Gerät ist konform mit den folgenden Gemeinschaftsrichtlinien:
- 73/23/EWG vom 19/02/73 (Niederspannung) und nachfolgende
Änderungen;
-89/336/EWG vom 03.05.89 (Elektromagnetische Verträglichkeit) und
nachfolgende Änderungen;
- 2002/96/EG.
Allgemeine Sicherheit
Das Gerät wurde entwickelt für den Hausgebrauch und ist nicht für
kommerzielle oder industrielle Zwecke gedacht.
Das Gerät muss verwendet werden, um Lebensmittel durch
Erwachsene zu stauen und einzufrieren und gemäß den
Anweisungen in diesem Handbuch.
Das Gerät darf nicht im Freien installiert werden, auch nicht in
überdachten Bereichen. Es ist äußerst gefährlich das Gerät Regen
und Sturm auszusetzen.
Berühren Sie das Gerät nicht barfuß oder mit nassen oder feuchten
Händen und Füßen.
Die internen Kühlelemente nicht anfassen: dies könnte zu
Hautabschürfungen oder Frost/Gefrierbrand führen.
Beim Ausstecken des Gerätes stets den Stecker aus der Steckdose
ziehen, nicht an dem Kabel ziehen.
Vor jeder Reinigungs- und Wartungsarbeit stets das Gerät
ausschalten und den Netzstecker ziehen. Es ist nicht ausreichend,
den Knopf der Temperatureinstellung auf
(Gerät aus) zu stellen,
um den gesamten Stromkontakt zu entfernen.
Bei Störung unter keinen Umständen versuchen, das Gerät selbst
zu reparieren. Reparaturen, die durch unerfahrene Personen
ausgeführt werden, können zu Unfällen oder noch weiteren
Störungen des Gerätes führen.
Verwenden Sie keine scharfen oder spitzen Werkzeuge oder
elektrische Ausrüstung - anders als die von dem Hersteller
empfohlenen Typen - in dem Gefrierfach zur Lagerung von
Lebensmitteln.
Nehmen Sie keine Eiswürfel in den Mund, die direkt aus dem
Gefrierer genommen wurden.
Das Gerät darf von Personen (einschließlich Kindern) mit
herabgesetzten physischen, sensorischen oder geistigen
Fähigkeiten und Mangel an Erfahrung und Kenntnissen nur unter
Aufsicht oder nach ausreichender Einweisung durch eine für ihre
Sicherheit verantwortliche Person benutzt werden. Kleine Kinder
davon abhalten, mit dem Gerät zu spielen.
Bewahren Sie das gesamte Verpackungsmaterial außerhalb der
Reichweite von Kindern auf! Dies kann zu Erstickungsgefahr führen.
Entsorgung
Beachten Sie die örtlichen Umweltstandards, wenn Sie
Verpackungsmaterialien für den Recyclingprozess entsorgen.
Die Europäische Richtlinie 2002/96/EU über Elektro- und Elektronik-
Altgeräte (WEEE), fordert, dass alte elektrische Haushaltsgeräte
nicht in der kommunalen Abfallentsorgung entsorgt wird. Altgeräte
müssen separat gesammelt werden, um die Rückgewinnung und
das Recycling der darin enthaltenen Materialien zu verbessern
und um die Auswirkung auf die Gesundheit von Personen und die
Umgebung zu reduzieren. Das Symbol der durchgestrichenen
"Mülltonne“ auf dem Produkt weist darauf hin, dass es bei der
Entsorgung des Gerätes separat gesammelt werden muss.
Verbraucher sollten ihre Lokalbehörde oder Händler kontaktieren für
Informationen über die korrekte Entsorgung von Altgeräten.
  • Page 1 1
  • Page 2 2
  • Page 3 3
  • Page 4 4
  • Page 5 5
  • Page 6 6
  • Page 7 7
  • Page 8 8
  • Page 9 9
  • Page 10 10
  • Page 11 11
  • Page 12 12
  • Page 13 13
  • Page 14 14
  • Page 15 15
  • Page 16 16
  • Page 17 17
  • Page 18 18
  • Page 19 19
  • Page 20 20
  • Page 21 21
  • Page 22 22
  • Page 23 23
  • Page 24 24
  • Page 25 25
  • Page 26 26
  • Page 27 27
  • Page 28 28
  • Page 29 29
  • Page 30 30
  • Page 31 31
  • Page 32 32
  • Page 33 33
  • Page 34 34
  • Page 35 35
  • Page 36 36
  • Page 37 37
  • Page 38 38
  • Page 39 39
  • Page 40 40
  • Page 41 41
  • Page 42 42
  • Page 43 43
  • Page 44 44
  • Page 45 45
  • Page 46 46
  • Page 47 47
  • Page 48 48
  • Page 49 49
  • Page 50 50
  • Page 51 51
  • Page 52 52
  • Page 53 53
  • Page 54 54
  • Page 55 55
  • Page 56 56

Indesit TAA 5 1 Руководство пользователя

Тип
Руководство пользователя
Это руководство также подходит для

Задайте вопрос, и я найду ответ в документе

Поиск информации в документе стал проще с помощью ИИ