Whirlpool BLVM 8110/PT Руководство пользователя
- Категория
- Микроволновые печи
- Тип
- Руководство пользователя

User and maintenance manual
Návod k použití a údržbě
Felhasználói és karbantartási kézikönyv
Руководство по эксплуатации
и техобслуживанию
Інструкція з експлуатації і технічного
обслуговування
UK
BLVM 8110


GB1
YOUR SAFETY AND THAT OF OTHERS IS PARAMOUNT
This manual and the appliance itself provide important safety warnings, to be read and observed at all
times.
All safety warnings give specific details of the potential risk present and indicate
how to reduce risk of injury, damage and electric shock resulting from improper
use of the appliance. Carefully observe the following instructions:
- The appliance must be disconnected from the power supply before carrying
out any installation work.
- Installation and maintenance must be carried out by a qualified technician,
in compliance with the manufacturer’s instructions and local safety
regulations. Do not repair or replace any part of the appliance unless
specifically stated in the user manual.
- Power cable replacement must be carried out by qualified electician.
Contact an authorizes service centre.
- Regulations require that the appliance is earthed.
- The power cable must be long enough for connecting the appliance, once
fitted in its housing, to the power supply socket.
- For installation to comply with current safety regulations, an all-pole
disconnect switch with minimum contact gap of 3 mm must be utilized.
- Do not use multiple plug adapters or extension leads.
- Do not pull the power supply cable in order to unplug the appliance.
- The electrical components must not be accessible to the user after
installation.
- Do not touch the appliance with any wet part of the body and do not
operate it when barefoot.
- This appliance is designed solely for use as a domestic appliance for cooking
food. No other type of use is permitted (e.g.: heating rooms). The
Manufacturer declines all responsibility for inappropriate use or incorrect
setting of the controls.
- This appliance can be used by children aged from 8 years and above and
persons with reduced physical, sensory or mental capabilities or lack of
experience and knowledge if they have been given supervision or
instruction concerning use of the appliance in a safe way and understand
hazards involved. Children shall not play with the appliance. Cleaning and
user maintenance shall not be made by children without supervision.
IMPORTANT SAFETY INSTRUCTIONS
This is the danger symbol, pertaining to safety, which alerts users to potential risks to themselves
and others.
All safety warnings are preceded by the danger symbol and the following terms:
DANGER
Indicates a hazardous situation which, if not avoided, will cause serious injury.
WARNING
Indicates a hazardous situation which, if not avoided, could cause serious injury.

GB2
- The accessible parts of the appliance may become very hot during use.
Young children should be kept away from the appliance and supervised to
ensure that they do not play with it.
- The appliance and its accessible parts become hot during use. Care should
be taken to avoid touching heating elements. Children less than 8 years old
shall be kept away, unless continuosly supervised.
- During and after use, do not touch the heating elements or interior surfaces
of the appliance - risk of burns. Do not allow the appliance to come into
contact with cloths or other flammable materials until all the components
have cooled sufficiently.
- At the end of cooking, exercise caution when opening the appliance door,
letting the hot air or steam exit gradually before accessing the oven. When
the appliance door is shut, hot air is vented from the aperture above the
control panel. Do not obstruct the vent apertures.
- Use oven gloves to remove pans and accessories, taking care not to touch
the heating elements.
- Do not place flammable materials in or near the appliance: a fire may break
out if the appliance is inadvertently switched on.
- Do not heat or cook sealed jars or containers in the appliance. The pressure
that builds up inside might cause the jar to explode, damaging the appliance.
- Do not use containers made of synthetic materials.
- Overheated oils and fats catch fire easily. Always remain vigilant when
cooking foods rich in fat and oil.
- Never leave the appliance unattended during food drying.
- If alcoholic beverages are used when cooking foods (e.g. rum, cognac,
wine), remember that alcohol evaporates at high temperatures. As a result,
there is a risk that vapours released by the alcohol may catch fire upon
coming into contact with the electrical heating element.
- Never use steam cleaning equipment.
- Do not touch the oven during the pyrolysys cycle. Keep children away from
the oven during the pyrolysis cycle.(only for ovens with Pyrolisis function).
- Only use the temperature probe recommended for this oven.
- Do not use harsh abrasive cleaners or sharp metal scrapers to clean the
oven door glass since they can scratch the surface, which may result in
shattering of the glass.
- Ensure that the appliance is switched off before replacing the lamp to avoid
the possibility of electric shock.

GB3
Scrapping of household appliances
- This appliance is manufactured with recyclable or reusable materials. Scrap the appliance in
accordance with local regulations on waste disposal. Before scrapping, cut off the power cords so that
the appliances cannot be connected to the mains.
- For further information on the treatment, recovery and recycling of household electrical appliances,
contact your competent local authority, the collection service for household waste or the store where
you purchased the appliance.
Unpack the oven and make sure that the oven has not been damaged during transport and that the oven
door closes properly. In the event of problems, contact the dealer or your nearest After-sales Service. To
prevent any damage, only remove the oven from its polystyrene foam base at the time of installation.
PREPARING THE HOUSING UNIT
• Kitchen units in contact with the oven must be heat resistant (min 90°C).
• Carry out all cabinet cutting work before fitting the oven in the housing and carefully remove all
wood chips and sawdust.
• After installation, the bottom of the oven must no longer be accessible.
• For correct appliance operation, do not obstruct the minimum gap between the worktop and the
upper edge of the oven.
ELECTRICAL CONNECTION
Make sure the power voltage specified on the appliance dataplate is the same as the mains voltage. The
dataplate is on the front edge of the oven (visible when the door is open).
• Power cable replacement (type H05 RR-F 3 x 1.5 mm
2
) must be carried out by a qualified electrician.
Contact an authorized service centre.
GENERAL RECOMMENDATIONS
Before use:
- Remove cardboard protection pieces, protective film and adhesive labels from accessories.
- Remove the accessories from the oven and heat it 200°C for about an hour to eliminate the smell of
the protective grease and insulating materials.
During use:
- Do not place heavy objects on the door as they could damage it.
- Do not cling to the door or hang anything from the handle.
- Do not cover the inside of the oven with aluminium foil.
- Do not pour water into the inside of a hot oven; this could damage the enamel coating.
- Never drag pots or pans across the bottom of the oven as this could damage the enamel coating.
- Make sure that the electrical cables of other appliances do not touch hot parts of the oven or become
trapped in the door.
- Never expose the oven to atmospheric agents.
Disposal of packaging materials
The packing material is 100% recyclable and is marked with the recycle symbol ( ). The various parts of
the packing must therefore be disposed of responsibly and in full compliance with local authority
regulations governing waste disposal.
Scrapping the product
- This appliance is marked in compliance with European Directive 2002/96/EC, Waste Electrical and
Electronic Equipment (WEEE).
- By ensuring this product is disposed of correctly, you will help prevent potential negative
consequences for the environment and human health, which could otherwise be caused by
inappropriate waste handling of this product.
- The symbol on the product or on the accompanying documentation indicates that it should not be
treated as domestic waste but must be taken to an appropriate collection centre for the recycling of
electrical and electronic equipment.
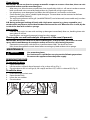
INSTALLATION
SAFEGUARDING THE ENVIRONMENT

GB4
Energy saving
- Only pre-heat the oven if specified in the cooking table or your recipe.
- Use dark lacquered or enamelled baking moulds as they absorb heat far better.
- Switch the oven off 10/15 minutes before the set cooking time. Food requiring prolonged cooking will
continue to cook even once the oven is switched off.
- This oven, which is intended to come into contact with foodstuffs, complies with European
Regulation ( ) n. 1935/2004 and has been designed, manufactured and sold in conformity with the
safety requirements of the “Low Voltage” directive 2006/95/CE (which replaces 73/23/CEE and
subsequent amendments), the protection requirements of “EMC” 2004/108/CE.
Oven not working:
• Check for the presence of mains electrical power and if the oven is connected to the electrical supply.
• Turn off the oven and restart it to see if the fault persists.
The electronic programmer does not work:
• If the display shows the letter “ ” followed by a number, contact your nearest After-sales Service.
Specify in this case the number after the letter “ ”.
Before calling the After-Sales Service:
1. See if you can solve the problem yourself with the help of the suggestions given in the
“Troubleshooting guide”.
2. Switch the appliance off and then on again it to see if the problem has been eliminated.
If the fault persists after the above checks, contact the nearest After-sales Service.
Always specify:
• a brief description of the fault;
• the type and exact model of the oven;
• the service number (number after the word Service on the rating plate), located on the right hand
edge of the oven cavity (visible when the oven door is open). The service number is also indicated on
the guarantee booklet;
• your full address;
• your telephone number.
If any repairs are required, contact an authorised After-sales Technical Service (to guarantee the use of
original spare parts and correct repair).
Exterior of the oven
IMPORTANT: do not use corrosive or abrasive detergents. If any of these products accidentally
comes into contact with the appliance, clean immediately with a damp cloth.
• Clean the surfaces with a damp cloth. If it is very dirty, add a few drops of washing up detergent to the
water. Finish off with a dry cloth.
DECLARATION OF CONFORMITY
TROUBLESHOOTING GUIDE
AFTER-SALES SERVICE
CLEANING
WARNING
- Do not use steam cleaners.
- Only clean the oven when it is cool to the touch.
- Disconnect the appliance from the power supply.

GB5
Oven interior
IMPORTANT: do not use abrasive sponges or metallic scrapers or scourers. Over time, these can ruin
enamelled surfaces and the oven door glass.
• After every use, allow the oven to cool then clean it preferably while it is still warm in order to remove
built-up dirt and stains caused by food residues (e.g. food with a high sugar content.
• Use proprietary oven detergents and follow the manufacturer’s instructions to the letter.
• Clean the door glass with a suitable liquid detergent. The oven door can be removed to facilitate
cleaning (see MAINTENANCE).
• The top heating element of the grill (see MAINTENANCE) can be lowered (some models only) to clean
the roof of the oven.
N.B: during prolonged cooking of foods with a high water content (e.g. pizza, vegetables, etc.)
condensation may form on the inside of the door and around the seal. When the oven is cold, dry the
inside of the door with a cloth or sponge.
Accessories:
• Soak the accessories in water with washing up detergent immediately after use, handling them with
oven gloves if still hot.
• Food residues can be easily removed using a brush or sponge.
Cleaning the rear wall and catalytic side panels of the oven (if present):
IMPORTANT: do not use corrosive or abrasive detergents, coarse brushes, pot scourers or oven
sprays which could damage the catalytic surface and ruin its self-cleaning properties.
• Operate the oven empty with the fan-assisted function at 200°C for about one hour.
• Next, leave the appliance to cool down before removing any food residue with a sponge.
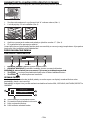
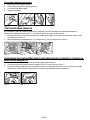
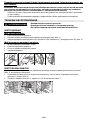
REMOVING THE DOOR
To remove the door:
1. Open the door fully.
2. Lift the catches and push them forwards as far as they will go (Fig. 1).
3. Close the door as far as it will go (A), lift it up (B) and turn it (C) until it is released (D) (Fig. 2).
To refit the door:
1. Insert the hinges in their seats.
2. Open the door fully.
3. Lower the two catches.
4. Close the door.
MAINTENANCE
WARNING
- Use protective gloves.
- Ensure the oven is cold before carrying out the following operations.
- Disconnect the appliance from the power supply.
Fig. 1 Fig. 2

GB6
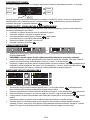
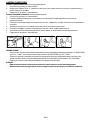
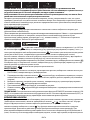
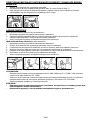
TO REMOVE THE SIDE GRILLES
In some models, the side accessory holder grilles are equipped with fixing screws (Fig. 3) for optimum stability.
1. Remove the screws and relative plates on the right and left with the aid of a coin or tool (Fig. 4).
2. To remove the grilles, lift the up (1) and turn them (2) as shown in Fig. 5.
MOVING THE TOP HEATING ELEMENT (SOME MODELS ONLY)
1. Remove the side accessory holder grilles.
2. Pull the heating element out a little (Fig. 6) and lower it (Fig. 7).
3. To reposition the heating element, lift it up, pulling it slightly towards you, making sure it comes to
rest on the lateral supports.
REPLACING THE OVEN LAMP
To replace the rear lamp (if present):
1. Disconnect the oven from the power supply.
2. Unscrew the lamp cover (Fig. 8), replace the lamp (see note for lamp type) and screw the lamp cover
back on.
3. Reconnect the oven to the power supply.
To replace the side lamp (if present):
1. Disconnect the oven from the power supply.
2. Remove the side accessory holder grilles, if present.
3. Use a screwdriver to prise off the lamp cover.
4. Replace the lamp (see note for lamp type).
5. Refit the lamp cover, pushing it on firmly until it clicks into place.
6. Refit the side accessory holder grilles.
7. Reconnect the oven to the power supply.
N.B:
- Only use 25-40W/230V type E-14, T300°C incandescent lamps, or 20-40W/230 V type G9, T300°C
halogen lamps.
- The lamp used in the appliance is specifically designed for electrical appliances and is not suitable for
household room illumination (Commission Regulation (EC) No 244/2009).
- Lamps are available from our After-sales Service.
IMPORTANT:
- If using halogen lamps, do not handle with bare hands since fingerprints can damage them.
- Do not use the oven until the lamp cover has been repositioned.
Fig. 3 Fig. 4 Fig. 5
Fig. 6 Fig. 7
Fig. 8 Fig. 9 Fig. 10 Fig. 11

GB7
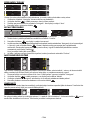
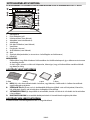
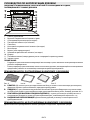
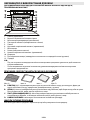
FOR THE ELECTRICAL CONNECTION, SEE THE SECTION ON INSTALLATION
1. Control panel
2. Upper heating element/grill
3. Cooling fan (not visible)
4. Dataplate (not to be removed)
5. Lamps
6. Circular heating element (not visible)
7. Fan
8. Turnspit (if provided)
9. Lower heating element (not visible)
10. Door
11. Position of shelves (the level number is indicated on the front of the oven)
12. Rear wall
N.B.:
- During cooking, the cooling fan may switch on intermittently in order to reduce energy consumption.
- At the end of cooking, after the oven has been switched off, the cooling fan may continue to run for a
while.
ACCESSORIES SUPPLIED
A. RACK (1): use to cook food or as a support for pots, cake tins and other suitable cooking receptacles.
B. DRIP-TRAY (1): use, placed under the rack, to collect fat or as a plate for cooking meat, fish,
vegetables, focaccia, etc.
C. BAKING TRAY (1): use for bakery and pastry products, but also roasts, fish en papillotte, etc.
D. RUNNERS: to facilitate insertion and removal of accessories.
ACCESSORIES NOT SUPPLIED
Other accessories can be purchased separately from the After-sales Service.
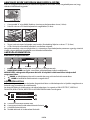
INSTRUCTIONS FOR OVEN USE
Fig. A Fig. B Fig. C Fig. D

GB8
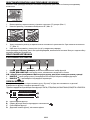
INSERTING RACKS AND OTHER ACCESSORIES IN THE OVEN
The rack and other accessories have a locking system to prevent their inadvertent removal.
1. Insert the rack horizontally, with the raised part “A” upwards (Fig. 1).
2. Tilt the rack when it reaches the locking position “B” (Fig. 2).
3. Return the rack to the horizontal position and push it in fully “C” (Fig. 3).
4. To remove the rack, proceed in reverse order.
The other accessories, such as the drip-tray and baking tray, are inserted in exactly the same way. The
protrusion on the flat part enables locking.
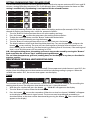
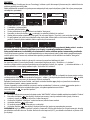
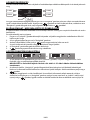
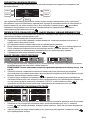
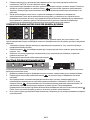
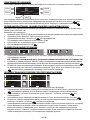
DESCRIPTION OF CONTROL PANEL
ELECTRONIC PROGRAMMER
1. FUNCTIONS KNOB: On/Off and function selection
2. BROWSE KNOB: for browsing the menu and adjusting preset values
N.B.:the two knobs are retractable. Press the knobs in the middle and they pop up.
3. BUTTON : to return to the previous screen or save the preferred function
4. BUTTON : to select and confirm settings
LIST OF FUNCTIONS
Turn the “Functions” knob to any position and the oven switches on: the display shows the functions or
their associated submenus.
The submenus are available and selectable by turning the knob to the functions GRILL, SPECIALS,
SETTINGS, RECIPES and FAVOURITES.
A. Icon for highlighted function
B. The highlighted function can be selected by pressing
C. Description of highlighted function
D. Other available and selectable functions.
Fig. 1
Fig. 2 Fig. 3
1 23 4
DISPLAY
Specials: For defrosting food
Keep Warm
Frozen Food
Defrosting
Specials: For defrosting food
Warm Keeping
Frozen Food
Defrost
A
D
C
B

GB9
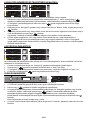
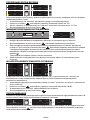
FUNCTION DETAILS
After selecting the desired function, the display will show further options and related details.
To move between the different zones, turn the “Browse” knob: the cursor goes next to the values
modifiable by following the order described above. Press the button to select the value, change it by
turning the “Browse” knob and confirm with the button .
USING THE APPLIANCE FOR THE FIRST TIME - LANGUAGE SELECTION AND SETTING
THE TIME
For correct use of the oven, when switched on for the first time it is necessary to select the desired language
and set the correct time.
Proceed as follows:
1. Turn the “Functions” knob to any position: the display will show the list of the first three available
languages.
2. Turn the “Browse” knob to scroll the list.
3. When the desired language is highlighted, press to select it.
After selecting the language, the display will show 12:00 flashing.
4. Set the time by turning the “Browse” knob.
5. Confirm the setting by pressing .
SELECTING COOKING FUNCTIONS
1. If the oven is off, turn the “Functions” knob; the display will show the cooking functions or related
submenus.
N.B.:for the list and description of functions, see the specific table on page14 and on page15.
2. Inside the submenu, browse the various options available by turning the “Browse” knob: the chosen
function is highlighted in white in the middle of the screen. To select it, press the button .
3. The cooking settings appear on the display. If the preselected values are those desired, turn the
“Browse” knob to position the cursor at “Start”, then press the button ; otherwise, proceed as
indicated below to modify them.
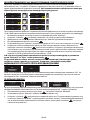
SETTING THE TEMPERATURE/GRILL POWER
To change the temperature or grill power, proceed as follows:
1. Make sure the cursor is positioned next to the temperature value (zone 1); press the button to
select the parameter to be modified: the temperature values flash.
2. Set the desired value by turning the “Browse” knob and press the button to confirm.
3. Turn the “Browse” knob to position the cursor at “Start”, then press the button .
4. The display indicates which level food should be placed on. Carry out the operation and press the
button to start cooking.
The set temperature can be changed even during cooking by following the same procedure.
Zone 3 Zone 4
Zone 5
Zone 2
Zone 1Cursor
PREHEAT
Yes
TEMPERATURE
180°C
COOK TIME
END TIME
Convection Bake
--:--
--:--
Start
PREHEAT
yes
TEMPERATURE
180°C
COOK TIME
END TIME
Convection Bake
--:--
--:--
Start
PREHEAT
Yes
TEMPERATURE
180°C
COOK TIME
END TIME
Convection Bake
--:--
--:--
Start
PREHEAT
No
TEMPERATURE
180°C
COOK TIME
END TIME
Conventional
--:--
--:--
Start
PREHEAT
No
TEMPERATURE
180°C
COOK TIME
END TIME
Conventional
--:--
--:--
Start
PREHEAT
No
TEMPERATURE
200°C
COOK TIME
END TIME
Conventional
--:--
--:--
Start
PREHEAT
No
TEMPERATURE
200°C
COOK TIME
END TIME
Conventional
--:--
--:--
Start

GB10
5. At the end of cooking, the cooking end message appears. The oven can now be switched off by
turning the “Functions” knob to 0 (zero), or cooking can be prolonged by turning the “Browse” knob
clockwise. When switched off, the display shows the cooling bar which indicates the temperature
inside the oven.
PREHEATING THE OVEN
To preheat the oven before placing food in it, the preselection must be modified as follows:
1. Turn the “Browse” knob to position the cursor at preheating.
2. Press the button to select the parameter: the message “No” flashes.
3. Modify the parameter by turning the “Browse” knob: “Yes” appears on the display.
4. Confirm the choice by pressing the button .
FAST PREHEATING
To preheat the oven quickly, proceed as follows:
1. Turn the “Functions” knob to select the fast preheating function.
2. Confirm by pressing the button : the settings appear on the display.
3. If the proposed temperature is that desired, turn the “Browse” knob to position the cursor at “Start”, then
press the button . To modify it, proceed as described in the previous sections. An acoustic signal will
sound when the oven has reached the set temperature. At the end of preheating, the oven automatically
selects the conventional function .
The food can now be placed in the oven for cooking.
4. To set a different cooking function, turn the “Functions” knob and select the required function.
SETTING THE COOKING DURATION
This function can be used to cook food for a set length of time, from a minimum of 1 minute to the
maximum time allowed by the selected function, after which the oven switches off automatically.
1. To select the function, turn the “Browse” knob to position the cursor at “cooking duration”.
2. Press the button to select the parameter; “00:00” flashes on the display.
3. Modify the value by turning the “Browse” knob to display the desired cooking time.
4. Confirm the selected value by pressing the button .
BROWNING
At the end of cooking, with certain functions, the display indicates the possibility of browning the surface of
your dish. This function can only be used when a cooking duration has been set.
At the end of cooking time, the display shows “^ to prolong, OK to brown”. Press the button , and the
oven starts a 5 minute browning cycle. This function can only be carried out once.
PREHEAT
No
TEMPERATURE
200°C
COOK TIME
END TIME
Conventional
--:--
--:--
Start
PREHEAT
No
TEMPERATURE
200°C
COOK TIME
END TIME
Conventional
--:--
--:--
Start
PREHEAT
Ye s
TEMPERATURE
200°C
COOK TIME
END TIME
Conventional
--:--
--:--
Start
PREHEAT
Ye s
TEMPERATURE
200°C
COOK TIME
END TIME
Conventional
--:--
--:--
Start
TEMPERATURE
180°C
Turn +/- to adjust ...
Start
Specials: For defrosting food
Warm Keeping
Frozen Food
Defrost
PREHEAT
No
TEMPERATURE
180°C
COOK TIME
END TIME
Conventional
--:--
--:--
Start
PREHEAT
No
TEMPERATURE
180°C
HH:MM
END TIME
Conventional
19:01
00:01
Start
PREHEAT
No
TEMPERATURE
180°C
HH:MM
END TIME
Conventional
19:01
- 00:30
Start
PREHEAT
No
TEMPERATURE
180°C
COOK TIME
END TIME
Conventional
19:20
- 00:30
Start
Browning
COOK TIME
END TIME
20:05
- 00:05
Cooking nished at 20:00
^ to prolong, OK to brown
Browning nished at 20:05

GB11
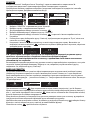
SETTING COOKING END TIME / DELAYED START
The desired cooking end time can be set, delaying oven switch-on by up to a maximum of 23 hours and 59
minutes, starting from the current time. This is possible only after a cooking duration has been set. This
setting is available only if preheating is not required for the selected function.
After setting the cooking duration, the display shows the cooking end time (for example 19:20). To delay
the end of cooking, postponing oven switch-on, proceed as follows:
1. Turn the “Browse” knob to position the cursor at the cooking end time.
2. Press the button to select the parameter: the cooking end time flashes.
3. To delay the cooking end time, turn the “Browse” knob to the desired value.
4. Confirm the selected value by pressing the button .
5. Turn the “Browse” knob to position the cursor at START, then press the button .
6. The display indicates which level food should be placed on. Carry out the operation and press the
button to start cooking. The oven will start cooking after a period of time calculated so as to
finish cooking at the set time (e.g. for food requiring a cooking time of 20 minutes, if the cooking end
time is set to 20:10 the oven will start cooking at 19:50).
N.B.:during the waiting phase, the cooking cycle can in any case be started by turning the “Browse”
knob to position the cursor at “Start” and then pressing the button .
The set values (temperature, grill level, cooking time) can be changed at any time, as described in
previous sections.
INDICATION OF RESIDUAL HEAT INSIDE THE OVEN
At the end of cooking, or when the oven is switched off, if the temperature inside the oven is over 50°C, the
display shows the temperature at that moment and the bar indicating cooling in progress. When the
residual heat reaches 50°C, the current time appears on the display.
TIMER
This function can be used only with the oven switched off and is useful, for example, for controlling the
cooking time of pasta. The maximum time which can be set is 1 hour 30 minutes.
1. With the oven switched off, press the button : “00:00:00” will appear on the display.
2. Turn the “Browse” knob to select the desired time.
3. Press the button to start the countdown. When the set time has elapsed, “00:00:00” will appear
on the display and an acoustic signal sounds. The time can now be prolonged, proceeding as
described above, or the timer can be deactivated by pressing the button (the current time will
appear on the display).
PREHEAT
No
TEMPERATURE
180°C
COOK TIME
END TIME
Conventional
19:20
- 00:30
Start
PREHEAT
No
TEMPERATURE
180°C
COOK TIME
END TIME
Conventional
19:20
- 00:30
Start
PREHEAT
No
TEMPERATURE
180°C
COOK TIME
END TIME
Conventional
20:10
- 00:30
Start
PREHEAT
No
TEMPERATURE
180°C
COOK TIME
END TIME
Conventional
20:10
- 00:30
Start
PREHEAT
No
TEMPERATURE
180°C
COOK TIME
END TIME
Conventional
20:10
- 00:29
Start
PREHEAT
No
TEMPERATURE
180°C
COOK TIME
END TIME
Conventional
20:10
- 00:30
Start
Residual Heat
168°
19:42
Turn +/- to set Timer, ✓ to Start
00 : 00 : 00
(HH) (MM) (SS)
Turn +/- to set Timer, ✓ to Start
00 : 30 : 00
(HH) (MM) (SS)
Timer
01 : 09 : 00

GB12
RECIPES
Thanks to “Intelligent Sensor Technology”, it is possible to use 30 preset recipes with the ideal cooking
function and temperature.
It is necessary to follow the recipe-book provided only regarding ingredients and preparation of the dish.
Then, proceed as follows:
1. Select “RECIPES” by turning the “Functions” knob.
2. Select the dish to be cooked from those proposed.
3. Confirm the selected dish with the button .
4. Select the desired recipe by turning the “Browse” knob.
5. Confirm by pressing the button : the display shows the approximate cooking time.
6. Place the dish in the oven and turn the “Browse” knob to position the cursor at “Start”, then press the
button .
7. The display indicates which level food should be placed on. Carry out the operation and press the
button to start cooking. To delay cooking, see the relevant section.
N.B.:Some dishes must be turned or stirred half way through cooking: an acoustic signal sounds and
the display shows the type of operation required.
The cooking time initially shown is only approximate: it can be prolonged automatically during
cooking.
Shortly before cooking time ends, the oven prompts you to check that the food is cooked as desired. If it is
not, the cooking time can be prolonged manually by turning the “Browse” knob.
FAVOURITE RECIPES
This oven allows the settings chosen for cooking your favourite dish to be saved.
At the end of cooking, the display intermittently shows the message “Press << to save”.
To save the settings used for that specific cooking (function, time, temperature, etc.), press the button <<.
The display will show the message “Press OK to save”.
Press the button , and the first available position from 1 to 10 will be proposed. To customise the
position, the number can be changed by turning the Browse knob (- or +) before confirming with the
button . The function is overwritten when the memory is full or the position is already occupied.
If you do not wish to save, just press the button again, go to another function by turning the respective
knob or switch off the oven.
To subsequently call up the saved settings, turn the Functions knob to the symbol and select one of
the stored functions, turning the Browse knob to display the required function.
Press the button and then start cooking.
Fully automatic Recipes
Traditional
Settings
Recipes
Fully automatic Recipes
Vegetables
Fish
Poultry
Recipes: See cookbook for description
Chicken Breasts
Roast Chicken
CONTROL
Automatic
COOK TIME
END TIME
Roast Chicken
19:45
- 00:45
CONTROL
Automatic
COOK TIME
END TIME
Cooking
19:45
- 00:44
Insert food on Level 3
Press when done
Please turn food
Cooking nearly nished
Please check on food
Cooking Finished at 19:45
Press to Prolong Cooking
Press OK to save,
<< to cancel
Favourite
has been saved
Press OK to save, << to cancel
Forced Air2

GB13
SETTINGS
1. To modify some display parameters, select “SETTINGS” from the main menu by turning the
“Functions” knob.
2. Confirm by pressing the button : the display shows the parameters that can be modified
(language, acoustic signal volume, display brightness, time of day, energy saving).
3. Select the setting to be changed by turning the “Browse” knob.
4. Press the button to confirm.
5. Follow the instructions on the display to modify the parameter.
6. Press the button ; a message confirming the operation appears on the display.
N.B.:when the oven is switched off, if the ECOMODE (energy saving) function is selected (ON), the display
switches off after a few seconds. If, on the other hand, the function is not selected (OFF), after a few seconds
the display is merely dimmed.
KEY-LOCK
This function can be used to lock the buttons and knobs on the control panel.
To activate it, press the buttons and together for at least 3 seconds. If activated, the functions of the
buttons are locked and the display shows a message and the icon . This function can also be activated
during cooking. To deactivate it, repeat the above procedure. When the key-lock function is activated, the
oven can be switched off by turning the knob to 0 (zero). In this case, however, the previously selected
function will have to be reset.

GB14
DESCRIPTION OF FUNCTIONS TABLE
FUNCTIONS KNOB
OFF To stop cooking and switch off the oven.
LAMP To switch the oven light on/off.
FAST PREHEATING To preheat the oven quickly.
CONVENTIONAL
To cook any type of dish on a single shelf. Use the 3rd level. To cook pizzas,
savoury pies and sweets with liquid fillings, use the 1st or 2nd level. The
oven does not have to be preheated.
GRILL
To grill steaks, kebabs and sausages; gratinate vegetables and toast bread.
It is advisable to place food on the 4th or 5th level. When grilling meat, it is
advisable to use the drip-tray to collect the cooking juices. Place it on the
3rd/4th level, adding approx. half a litre of water. The oven does not have
to be preheated. During cooking, the oven door must remain closed.
TURBO GRILL
To roast large pieces of meat (legs, roast beef, chickens). Place the food on
the middle levels. It is advisable to use the drip-tray to collect the cooking
juices. Place it on the 1st/2nd level, adding approx. half a litre of water. The
oven does not have to be preheated. During cooking, the oven door must
remain closed. With this function it is also possible to use the turnspit, if
provided.
FORCED AIR
To cook even different types of food (e.g. fish, vegetables, cakes), requiring
the same cooking temperature, on up to three shelves at the same time.
This function allows cooking without odours being transferred from one
food to another. Use the 3rd level to cook on one shelf only, the 1st and
4th to cook on two shelves, and the 1st, 3rd and 5th to cook on three
shelves. The oven does not have to be preheated.
CONVECTION BAKE
To cook meat, filled pies (cheesecake, strudel, fruit pies) and stuffed
vegetables on one level only. This function uses intermittent and gentle
ventilation, which prevents excessive drying of foods. It is advisable to use
2nd level. The oven does not have to be preheated.
SPECIALS See SPECIAL FUNCTIONS.
SETTINGS
Setting the display (language, time, brightness, acoustic signal volume,
energy saving).
RECIPES
Selecting 30 different preset recipes (see enclosed recipe-book). The oven
automatically sets the optimum cooking temperature, function and
duration. It is important to follow the instructions given in the recipe-book
regarding preparation, accessories and which level to use.
FAVOURITES
To directly access the 10 preferred functions. For the settings and methods
of saving and use, see the section “FAVOURITES”.

GB15
SPECIAL FUNCTIONS
DEFROST
To speed up defrosting of food. It is advisable to place food on the middle
level. It is advisable to leave food in its packaging to prevent it from
becoming dry on the outside.
KEEP WARM
To keep just-cooked food (e.g. meat, fried food, flans) hot and crisp. It is
advisable to place food on the middle level. The function will not activate
if the temperature in the oven is above 65°C.
RISING
To obtain optimum rising of sweet or savoury dough. In order to preserve
the quality of proving, the function will not activate if the temperature in
the oven is above 40°C. Place dough on the 2nd level. The oven does not
have to be preheated.
CONVENIENCE
To cook ready foods, kept at room temperature or in refrigerated counters
(biscuits, liquid preparations for cakes, muffins, first courses and bakery
products). The function cooks all dishes quickly and gently; it can also be
used to heat already cooked food. Follow the instructions on the package.
The oven does not have to be preheated.
MAXI COOKING
For cooking large pieces of meat (over 2.5 kg). Use the 1st or 2nd level,
depending on the size of the meat. The oven does not have to be
preheated. It is advisable to turn the meat over during cooking, to obtain
even browning on both sides. It is preferable to baste the meat every now
and again so that it does not become too dry.
FROZEN
FOOD
Lasagne
The function automatically selects the best cooking temperature and
mode for 5 different categories of ready frozen food. Use the 2nd or 3rd
level. The oven does not have to be preheated.
Pizza
Strudel
French
Fries
Bread
Custom
The temperature can be set from 50 to 250°C to cook other types of
products.
SLOW
COOKING
Slow
Cooking
Meat
To gently cook meat (at 90°C) and fish (at 85°C). This function carries out
slow cooking to keep the food more tender and succulent. Thanks to the
low temperature, the food does not brown on the outside and the end
result is similar to steam cooking. For roasts, it is advisable to brown the
meat in the pan first in order to help retain the juices. Cooking times range
from 2 hours for 300g fish to 4-5 hours for 3 kg fish; for meat, times range
from 4 hours for 1 kg roasts to 6-7 hours for 3 kg roasts. For optimum
results, and to avoid heat dispersion, do not open the oven door during
cooking; use the temperature probe provided (if available) or a normal
oven thermometer.
Slow
Cooking
Fish

GB16
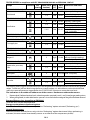
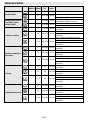
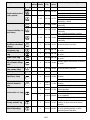
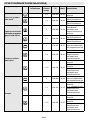
COOKING TABLE
Recipe Function Pre-
heating
Shelf (from
bottom)
Temp.
(°C)
Time
(min)
Accessories and notes
Leavened cakes
- 2/3 160-180 30-90 Cake tin on rack
- 1-4 160-180 30-90
Level 4: cake tin on rack
Level 1: cake tin on rack
Filled pies (cheese-
cake, strudel, fruit
pies)
- 2 160-200 35-90
Drip-tray / baking tray or
cake tin on rack
- 1-4 160-200 40-90
Level 4: cake tin on rack
Level 1: cake tin on rack
Biscuits / Tartlets
- 3 170-180 20-45 Drip-tray or baking tray
- 1-4 160-170 20-45
Level 4: rack
Level 1: drip-tray or baking
tray
- 1-3-5 160-170 20-45
Level 5: pan on rack
Level 3: pan on rack
Level 1: drip-tray or baking
tray
Choux buns
- 3 180-200 30-40 Drip-tray or baking tray
- 1-4 180-190 35-45
Level 4: pan on rack
Level 1: drip-tray or baking
tray
- 1-3-5 180-190 35-45
Level 5: pan on rack
Level 3: pan on rack
Level 1: drip-tray or baking
tray
Meringues
- 3 90 110-150 Drip-tray or baking tray
- 1-4 90 140-160
Level 4: pan on rack
Level 1: drip-tray or baking
tray
- 1-3-5 90 140-160
Level 5: pan on rack
Level 3: pan on rack
Level 1: drip-tray or baking
tray
Bread / Pizza /
Focaccia
-1/2190-250 15-50 Drip-tray or baking tray
- 1-4 190-250 20-50
Level 4: pan on rack
Level 1: drip-tray or baking
tray
- 1-3-5 190-250 25-50
Level 5: pan on rack
Level 3: pan on rack
Level 1: drip-tray or baking
tray

GB17
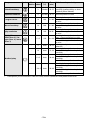
Savoury pies (vegeta-
ble pie, quiche lor-
raine)
- 2/3 190-200 35-55 Cake tin on rack
- 1-4 180-190 45-70
Level 4: cake tin on rack
Level 1: cake tin on rack
- 1-3-5 180-190 45-70
Level 5: cake tin on rack
Level 3: cake tin on rack
Level 1: drip-tray or baking
tray + cake tin
Vols-au-vent / Puff
pastry savouries
- 3 190-200 20-30 Drip-tray or baking tray
- 1-4 180-190 20-40
Level 4: pan on rack
Level 1: drip-tray or baking
tray
- 1-3-5 180-190 20-40
Level 5: pan on rack
Level 3: pan on rack
Level 1: drip-tray or baking
tray
Lasagna / Baked pasta
/ Cannelloni / Flans
- 3 190-200 45-55 Pan on rack
Lamb / Veal / Beef /
Pork 1 Kg
- 2 180-190 80-120 Drip-tray or pan on rack
Chicken / Rabbit /
Duck 1 Kg
- 3 200-220 50-100 Drip-tray or pan on rack
Turkey / Goose 3 Kg - 2 190-200 80-130 Drip-tray or pan on rack
Baked fish / en papil-
lote (fillet, whole)
- 3 180-200 40-60 Drip-tray or pan on rack
Stuffed vegetables
(tomatoes, cour-
gettes, aubergines)
- 2 170-190 30-60 Pan on rack
Toast - 5 High 3-6 Rack
Fish fillets / steaks - 4 Medium 20-30
Level 4: rack (turn food
halfway through cooking)
Level 3: drip-tray with water
Sausages / Kebabs /
Spare ribs / Hamburg-
ers
- 5
Medium-
High
15-30
Level 5: rack (turn food
halfway through cooking)
Level 4: drip-tray with water
Roast chicken 1-1.3 Kg
- 2 Medium 55-70
Level 2: rack (turn food two
thirds of the way through
cooking)
Level 1: drip-tray with water
- 2 High 60-80
Level 2: turnspit (if present)
Level 1: drip-tray with water
Roast beef rare 1 Kg - 3 Medium 35-45
Pan on rack (turn food two
thirds of the way through
cooking if necessary)
Leg of lamb / Shanks - 3 Medium 60-90
Drip-tray or pan on rack
(turn food two thirds of the
way through cooking if
necessary)
Recipe Function Pre-
heating
Shelf (from
bottom)
Temp.
(°C)
Time
(min)
Accessories and notes

GB18
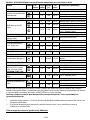
* Cooking time is approximate. Food can be removed from the oven at different times depending on
personal preference.
Baked potatoes - 3 Medium 45-55
Drip-tray or baking tray
(turn food two thirds of the
way through cooking if
necessary)
Vegetables au gratin - 3 High 10-15 Pan on rack
Lasagna & Meat - 1-4 200 50-100*
Level 4: pan on rack
Level 1: drip-tray or pan on
rack
Meat & Potatoes - 1-4 200 45-100*
Level 4: pan on rack
Level 1: drip-tray or pan on
rack
Fish & Vegetables - 1-4 180 30-50*
Level 4: pan on rack
Level 1: drip-tray or pan on
rack
Complete meal:
Tart (Level 5) / Lasa-
gna (Level 3) / Meat
(Level 1)
- 1-3-5 190 40-120*
Level 5: pan on rack
Level 3: pan on rack
Level 1: drip-tray or pan on
rack
Frozen pizza
- 3 Auto 10-15
Drip-tray / baking tray or
rack
- 1-4 Auto 15-20
Level 4: pan on rack
Level 1: drip-tray or baking
tray
- 1-3-5 Auto 20-30
Level 5: pan on rack
Level 3: drip-tray or baking
tray
Level 1: pan on rack
- 1-3-4-5 Auto 20-30
Level 5: pan on rack
Level 4: drip-tray or baking
tray
Level 3: drip-tray or baking
tray
Level 1: pan on rack
Recipe Function Pre-
heating
Shelf (from
bottom)
Temp.
(°C)
Time
(min)
Accessories and notes
Страница загружается ...
Страница загружается ...
Страница загружается ...
Страница загружается ...
Страница загружается ...
Страница загружается ...
Страница загружается ...
Страница загружается ...
Страница загружается ...
Страница загружается ...
Страница загружается ...
Страница загружается ...
Страница загружается ...
Страница загружается ...
Страница загружается ...
Страница загружается ...
Страница загружается ...
Страница загружается ...
Страница загружается ...
Страница загружается ...
Страница загружается ...
Страница загружается ...
Страница загружается ...
Страница загружается ...
Страница загружается ...
Страница загружается ...
Страница загружается ...
Страница загружается ...
Страница загружается ...
Страница загружается ...
Страница загружается ...
Страница загружается ...
Страница загружается ...
Страница загружается ...
Страница загружается ...
Страница загружается ...
Страница загружается ...
Страница загружается ...
Страница загружается ...
Страница загружается ...
Страница загружается ...
Страница загружается ...
Страница загружается ...
Страница загружается ...
Страница загружается ...
Страница загружается ...
Страница загружается ...
Страница загружается ...
Страница загружается ...
Страница загружается ...
Страница загружается ...
Страница загружается ...
Страница загружается ...
Страница загружается ...
Страница загружается ...
Страница загружается ...
Страница загружается ...
Страница загружается ...
Страница загружается ...
Страница загружается ...
Страница загружается ...
Страница загружается ...
Страница загружается ...
Страница загружается ...
Страница загружается ...
Страница загружается ...
Страница загружается ...
Страница загружается ...
Страница загружается ...
Страница загружается ...
Страница загружается ...
Страница загружается ...
Страница загружается ...
Страница загружается ...
Страница загружается ...
Страница загружается ...
Страница загружается ...
Страница загружается ...
Страница загружается ...
Страница загружается ...
Страница загружается ...
Страница загружается ...
Страница загружается ...
Страница загружается ...
Страница загружается ...
Страница загружается ...
Страница загружается ...
Страница загружается ...
Страница загружается ...
Страница загружается ...
Страница загружается ...
Страница загружается ...
Страница загружается ...
Страница загружается ...
Страница загружается ...
Страница загружается ...
Страница загружается ...
Страница загружается ...
-
 1
1
-
 2
2
-
 3
3
-
 4
4
-
 5
5
-
 6
6
-
 7
7
-
 8
8
-
 9
9
-
 10
10
-
 11
11
-
 12
12
-
 13
13
-
 14
14
-
 15
15
-
 16
16
-
 17
17
-
 18
18
-
 19
19
-
 20
20
-
 21
21
-
 22
22
-
 23
23
-
 24
24
-
 25
25
-
 26
26
-
 27
27
-
 28
28
-
 29
29
-
 30
30
-
 31
31
-
 32
32
-
 33
33
-
 34
34
-
 35
35
-
 36
36
-
 37
37
-
 38
38
-
 39
39
-
 40
40
-
 41
41
-
 42
42
-
 43
43
-
 44
44
-
 45
45
-
 46
46
-
 47
47
-
 48
48
-
 49
49
-
 50
50
-
 51
51
-
 52
52
-
 53
53
-
 54
54
-
 55
55
-
 56
56
-
 57
57
-
 58
58
-
 59
59
-
 60
60
-
 61
61
-
 62
62
-
 63
63
-
 64
64
-
 65
65
-
 66
66
-
 67
67
-
 68
68
-
 69
69
-
 70
70
-
 71
71
-
 72
72
-
 73
73
-
 74
74
-
 75
75
-
 76
76
-
 77
77
-
 78
78
-
 79
79
-
 80
80
-
 81
81
-
 82
82
-
 83
83
-
 84
84
-
 85
85
-
 86
86
-
 87
87
-
 88
88
-
 89
89
-
 90
90
-
 91
91
-
 92
92
-
 93
93
-
 94
94
-
 95
95
-
 96
96
-
 97
97
-
 98
98
-
 99
99
-
 100
100
-
 101
101
-
 102
102
-
 103
103
-
 104
104
-
 105
105
-
 106
106
-
 107
107
-
 108
108
-
 109
109
-
 110
110
-
 111
111
-
 112
112
-
 113
113
-
 114
114
-
 115
115
-
 116
116
-
 117
117
-
 118
118


Whirlpool BLVM 8110/PT Руководство пользователя
- Категория
- Микроволновые печи
- Тип
- Руководство пользователя
Задайте вопрос, и я найду ответ в документе
Поиск информации в документе стал проще с помощью ИИ
на других языках
- slovenčina: Whirlpool BLVM 8110/PT Užívateľská príručka
Похожие модели бренда
-
Whirlpool AKZM 6550/IX Руководство пользователя
-
Bauknecht BLVM 8110/PT Руководство пользователя
-
-
Bauknecht BLPM 8110/PT Руководство пользователя
-
Whirlpool AKZM 754/IX Руководство пользователя
-
-
-
-
-