Zanussi ZBB47460DA Руководство пользователя
- Категория
- Морозильные камеры
- Тип
- Руководство пользователя


Contents
Safety information 2
Safety instructions 3
Operation 4
Daily Use 6
Hints and tips 8
Care and cleaning 9
Troubleshooting 9
Installation 11
Technical information 15
Subject to change without notice.
Safety information
Before the installation and use of the appliance, carefully read the
supplied instructions. The manufacturer is not responsible if an
incorrect installation and use causes injuries and damages.
Always keep the instructions with the appliance for future
reference.
Children and vulnerable people safety
• This appliance can be used by children aged from 8 years and
above and persons with reduced physical, sensory or mental
capabilities or lack of experience and knowledge if they have
been given supervision or instruction concerning use of the
appliance in a safe way and understand the hazards involved.
• Do not let children play with the appliance.
• Cleaning and user maintenance shall not be made by children
without supervision.
• Keep all packaging away from children.
General Safety
• This appliance is intended to be used in household and similar
applications such as:
– Farm houses; staff kitchen areas in shops, offices and other
working environments
– By clients in hotels, motels, bed and breakfast and other
residential type environments
• Keep ventilation openings, in the appliance enclosure or in the
built-in structure, clear of obstruction.
2 www.zanussi.com

• Do not use mechanical devices or other means to accelerate
the defrosting process, other than those recommended by the
manufacturer.
• Do not damage the refrigerant circuit.
• Do not use electrical appliances inside the food storage
compartments of the appliance, unless they are of the type
recommended by the manufacturer.
• Do not use water spray and steam to clean the appliance.
• Clean the appliance with a moist soft cloth. Only use neutral
detergents. Do not use abrasive products, abrasive cleaning
pads, solvents or metal objects.
• Do not store explosive substances such as aerosol cans with a
flammable propellant in this appliance.
• If the supply cord is damaged, it must be replaced by the
manufacturer, its Authorised Service Centre or similarly
qualified persons in order to avoid a hazard.
Safety instructions
Installation
WARNING!
Only a qualified person must install
this appliance.
• Remove all the packaging.
• Do not install or use a damaged appliance.
• Obey the installation instruction supplied
with the appliance.
• Always be careful when you move the
appliance because it is heavy. Always wear
safety gloves.
• Make sure the air can circulate around the
appliance.
• Wait at least 4 hours before connecting the
appliance to the power supply. This is to
allow the oil to flow back in the compressor.
• Do not install the appliance close to
radiators or cookers, oven or hobs.
• The rear of the appliance must stand against
the wall.
• Do not install the appliance where there is
direct sunlight.
• Do not install this appliance in areas that are
too humid or too colds, such as the
construction appendices, garages or wine
cellars.
• When you move the appliance, lift it by the
front edge to avoid scratching the floor.
Electrical connection
WARNING!
Risk of fire and electrical shock.
• The appliance must be earthed.
• Make sure that the electrical information on
the rating plate agrees with the power
supply. If not, contact an electrician.
• Always use a correctly installed shockproof
socket.
• Do not use multi-plug adapters and
extension cables.
• Make sure not to cause damage to the
electrical components (e.g. mains plug,
mains cable, compressor). Contact the
Authorised Service Centre or an electrician
to change the electrical components.
• The mains cable must stay below the level of
the mains plug.
• Connect the mains plug to the mains socket
only at the end of the installation. Make sure
that there is access to the mains plug after
the installation.
• Do not pull the mains cable to disconnect
the appliance. Always pull the mains plug.
www.zanussi.com 3

Use
WARNING!
Risk of injury, burns, electrical shock
or fire.
• Do not change the specification of this
appliance.
• Do not put electrical appliances (e.g. ice
cream makers) in the appliance unless they
are stated applicable by the manufacturer.
• Be careful not to cause damage to the
refrigerant circuit. It contains isobutane
(R600a), a natural gas with a high level of
environmental compatibility. This gas is
flammable.
• If damage occurs to the refrigerant circuit,
make sure that there are no flames and
sources of ignition in the room. Ventilate the
room.
• Do not let hot items to touch the plastic
parts of the appliance.
• Do not put soft drinks in the freezer
compartment. This will create pressure on
the drink container.
• Do not store flammable gas and liquid in the
appliance.
• Do not put flammable products or items that
are wet with flammable products in, near or
on the appliance.
• Do not touch the compressor or the
condenser. They are hot.
• Do not remove or touch items from the
freezer compartment if your hands are wet or
damp.
• Do not freeze again food that has been
thawed.
• Obey the storage instructions on the
packaging of frozen food.
Care and cleaning
WARNING!
Risk of injury or damage to the
appliance.
• Before maintenance, deactivate the
appliance and disconnect the mains plug
from the mains socket.
• This appliance contains hydrocarbons in the
cooling unit. Only a qualified person must do
the maintenance and the recharging of the
unit.
• Regularly examine the drain of the appliance
and if necessary, clean it. If the drain is
blocked, defrosted water collects in the
bottom of the appliance.
Disposal
WARNING!
Risk of injury or suffocation.
• Disconnect the appliance from the mains
supply.
• Cut off the mains cable and discard it.
• Remove the door to prevent children and
pets to be closed inside of the appliance.
• The refrigerant circuit and the insulation
materials of this appliance are ozone-friendly.
• The insulation foam contains flammable gas.
Contact your municipal authority for
information on how to discard the appliance
correctly.
• Do not cause damage to the part of the
cooling unit that is near the heat exchanger.
Operation
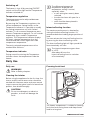
Freezer Control panel
1 2 73 4 5 6 98
1. Pilot light
2. ON/OFF switch
3. Temperature regulator (warmest)
4. Temperature indicator
5. Temperature regulator (coldest)
6. Alarm light
7. Alarm reset switch
8. QuickFreeze light
9. QuickFreeze switch
4 www.zanussi.com

Switching on
1. Insert the plug into the wall socket.
2. Press the ON/OFF switch.
The Pilot Light will light up.
Switching off
The freezer is shut off by pressing ON/OFF
switch until the Pilot light and the Temperature
indicator switched off.
Temperature regulation
The temperature can be adjusted between
-15°C and -24°C.
By pressing the Temperature regulators , the
current temperature setting flashes on the
Temperature indicator. It is possible to modify
the setting temperature only with flashed
indicator. In order to set a warmer temperature,
it is necessary to press warmest Temperature
regulator. To set a colder temperature-coldest
Temperature regulator. The Temperature
indicator displays the newly selected
temperature for a few seconds and then shows
again the inside compartment temperature.
The newly selected-temperature must be
reached after 24 hours.
During the stability period by the first
starting the temperature displayed
can not correspond to the setting
temperature.
Temperature indicator
During normal functioning the Temperature
indicator shows the temperature inside the
freezer.
The difference between the
temperature displayed and
temperature setting is normal,
especially when:
• a new setting has recently been
selected
• the door has been left open for a
long time
• warm food has been placed in
the compartment.
High temperature alarm
In the event of the abnormal temperature rise
inside the freezer (e.g. power cut) Alarm light
will start to flash and a buzzer will sound.
After the temperature has returned to normal,
the Alarm light will continue to flash, although
the buzzer has stopped.
When the Alarm reset switch is pressed, the
warmest temperature reached in the
compartment flashes on the Temperature
indicator.
QuickFreeze function
You can activate the QuickFreeze function by
pressing the QuickFreeze switch.
TheQuickFreeze light will light up.
This function stops automatically
after 52 hours.
It is possible to deactivate the
function at any time by pressing
QuickFreeze switch.
The QuickFreeze light will switch off.
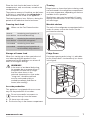
Fridge Control panel
1 2 73 4 5 6 98
1. Pilot light
2. ON/OFF switch
3. Temperature regulator (warmest)
4. Temperature indicator
5. Temperature regulator (coldest)
6. IntensiveCooling light
7. IntensiveCooling switch
Switching on
1. Insert the plug into the wall socket.
2. Press the ON/OFF switch.
The Pilot Light will light up.
www.zanussi.com 5

Switching off
The freezer is shut off by pressing ON/OFF
switch until the Pilot light and the Temperature
indicator switched off.
Temperature regulation
The temperature can be adjusted between
+2°C and +8°C.
By pressing the Temperature regulators, the
current temperature setting flashes on the
Temperature indicator. It is possible to modify
the setting temperature only with flashed
indicator. To set a warmer temperature, press
warmest Temperature regulator. To set a colder
temperature, press coldest Temperature
regulator. The Temperature indicator displays
the newly selected temperature for a few
seconds and then shows again the inside
compartment temperature.
The newly selected-temperature must be
reached after 24 hours.
Temperature indicator
During normal functioning the Temperature
indicator shows the temperature inside the
freezer.
The difference between the
temperature displayed and
temperature setting is normal,
especially when:
• a new setting has recently been
selected
• the door has been left open for a
long time
• warm food has been placed in
the compartment.
IntensiveCooling function
The maximum performance is obtained by
setting the IntensiveCooling function. It’s
recommended when loading large quantities of
food.
You can activate the IntensiveCooling function
by pressing the IntensiveCooling switch.
The IntensiveCooling light will light up and the
fan automatically will start.
The internal temperature goes down
to +2°C.
After about 6 hours the
IntensiveCooling function switches
off automatically.
Daily Use
Daily use
WARNING!
Refer to Safety chapters.
Cleaning the interior
Before using the appliance for the first time, the
interior and all internal accessories should be
washed with lukewarm water and some neutral
soap to remove the typical smell of a brand-new
product, then dried thoroughly.
CAUTION!
Do not use detergents or abrasive
powders, as these will damage the
finish.
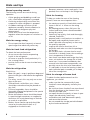
Freezing fresh food
The freezer compartment is suitable for freezing
fresh food and storing frozen and deep-frozen
food for a long time.
6 www.zanussi.com

Place the fresh food to be frozen in the left
compartments, and, once frozen, moved to the
storage baskets.
The maximum amount of food that can be frozen
in 24 hours is specified on the rating plate, a
label located on the inside of the appliance.
The freezing process lasts 24 hours: during this
period do not add other food to be frozen.
Freezing fresh food
When use the Fast Freeze function:
about 6
hours before
Introducing small quantities of
fresh food (about 5 kg)
about 24
hours before
Introducing the maximum quantity
of food (see rating plate)
not needed Introducing frozen food
not needed Introducing small quantities of
fresh food daily 2 kg maximum
Storage of frozen food
When first starting-up or after a period out of
use, before putting the products in the
compartment let the appliance run at least 2
hours on the higher settings.
WARNING!
In the event of accidental defrosting,
for example due to a power failure, if
the power has been off for longer
than the value shown in the
technical characteristics chart under
"rising time", the defrosted food
must be consumed quickly or
cooked immediately and then re-
frozen (after cooling).
Ice-cube production
This appliance is equipped with one or more
trays for the production of ice-cubes.
Do not use metallic instruments to
remove the trays from the freezer.
1. Fill these trays with water
2. Put the ice trays in the freezer compartment.
Thawing
Deep-frozen or frozen food, prior to being used,
can be thawed in the refrigerator compartment
or at room temperature, depending on the time
available for this operation.
Small pieces may even be cooked still frozen,
directly from the freezer: in this case, cooking
will take longer.
Movable shelves
The walls of the refrigerator are equipped with a
series of runners so that the shelves can be
positioned as desired.
Fridge Doors
For proper opening and closing, it is advisable
to act on both doors simultaneously (as shown
in the figure).
www.zanussi.com 7

Hints and tips
Normal operating sounds
The following sounds are normal during
operation:
• A faint gurgling and bubbling sound from
coils sound when refrigerant is pumped.
• A whirring and pulsating sound from the
compressor when refrigerant is pumped.
• A sudden cracking noise from inside
appliance caused by thermic dilatation (a
natural and not dangerous physical
phenomenon).
• A faint click noise from the temperature
regulator when the compressor switches on
or off.
Hints for energy saving
• Do not open the door frequently or leave it
open longer than absolutely necessary.
Hints for fresh food refrigeration
To obtain the best performance:
• do not store warm food or evaporating
liquids in the refrigerator
• do cover or wrap the food, particularly if it
has a strong flavour
• position food so that air can circulate freely
around it
Hints for refrigeration
Useful hints:
• Meat (all types) : wrap in polythene bags and
place on the glass shelf above the vegetable
drawer.
• For safety, store in this way only one or two
days at the most.
• Cooked foods, cold dishes, etc..: these
should be covered and may be placed on
any shelf.
• Fruit and vegetables: these should be
thoroughly cleaned and placed in the special
drawer(s) provided.
• Butter and cheese: these should be placed
in special airtight containers or wrapped in
aluminium foil or polythene bags to exclude
as much air as possible.
• Bottles: these need a cap and should be
stored on the door bottle shelf, or (if
equipped) on the bottle rack.
• Bananas, potatoes, onions and garlic, if not
packed, must not be kept in the refrigerator.
Hints for freezing
To help you make the most of the freezing
process, here are some important hints:
• the maximum quantity of food which can be
frozen in 24 hrs. is shown on the rating
plate;
• the freezing process takes 24 hours. No
further food to be frozen should be added
during this period;
• freeze only top quality, fresh and thoroughly
cleaned, foodstuffs;
• prepare food in small portions to enable it to
be rapidly and completely frozen and to
make it possible subsequently to thaw only
the quantity required;
• wrap up the food in aluminium foil or
polythene and make sure that the packages
are airtight;
• do not allow fresh, unfrozen food to touch
food which is already frozen, thus avoiding a
rise in temperature of the latter;
• lean foods store better and longer than fatty
ones; salt reduces the storage life of food;
• water ices, if consumed immediately after
removal from the freezer compartment, can
possibly cause the skin to be freeze burnt;
• it is advisable to show the freezing in date on
each individual pack to enable you to keep
tab of the storage time.
Hints for storage of frozen food
To obtain the best performance from this
appliance, you should:
• make sure that the commercially frozen
foodstuffs were adequately stored by the
retailer;
• be sure that frozen foodstuffs are transferred
from the foodstore to the freezer in the
shortest possible time;
• not open the door frequently or leave it open
longer than absolutely necessary;
• once defrosted, food deteriorates rapidly
and cannot be refrozen;
• do not exceed the storage period indicated
by the food manufacturer.
8 www.zanussi.com

Care and cleaning
WARNING!
Refer to Safety chapters.
Periodic cleaning
The equipment has to be cleaned regularly:
• clean the inside and accessories with
lukewarm water and some neutral soap.
• regularly check the door seals and wipe
clean to ensure they are clean and free from
debris.
• rinse and dry thoroughly.
Do not pull, move or damage any
pipes and/or cables inside the
cabinet.
Never use detergents, abrasive
powders, highly perfumed cleaning
products or wax polishes to clean
the interior as this will damage the
surface and leave a strong odour.
Defrosting of the refrigerator
Frost is automatically eliminated from the
evaporator of the refrigerator compartment
every time the motor compressor stops, during
normal use. The defrost water drains out
through a trough into a special container at the
back of the appliance, over the motor
compressor, where it evaporates.
It is important to periodically clean the defrost
water drain hole in the middle of the refrigerator
compartment channel to prevent the water
overflowing and dripping onto the food inside.
Defrosting the freezer
The freezer compartment is frost free. This
means that there is no build up of frost when it
is in operation, neither on the internal walls nor
on the foods.
The absence of frost is due to the continuous
circulation of cold air inside the compartment,
driven by an automatically controlled fan.
Periods of non-operation
When the appliance is not in use for long
periods, take the following precautions:
1. Disconnect the appliance from electricity
supply.
2. Remove all food.
3. Clean the appliance and all accessories.
4. Leave the door/doors open to prevent
unpleasant smells.
WARNING!
If the cabinet will be kept on, ask
somebody to check it once in a
while to prevent the food inside from
spoiling in case of a power failure.
Troubleshooting
WARNING!
Refer to Safety chapters.
www.zanussi.com 9

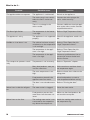
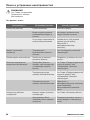
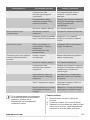
What to do if...
Problem Possible cause Solution
The appliance does not operate. The appliance is switched off. Switch on the appliance.
The mains plug is not connec-
ted to the mains socket cor-
rectly.
Connect the mains plug to the
mains socket correctly.
There is no voltage in the
mains socket.
Connect a different electrical appli-
ance to the mains socket. Contact
a qualified electrician.
The Alarm light flashes The temperature in the freezer
is too high.
Refer to 'High Temperature Alarm.
The appliance is noisy. The appliance is not supported
properly.
Check if the appliance stands sta-
ble.
Audible or visual alarm is on. The cabinet has been recently
switched on or the temperature
is still too high.
Refer to "Door Open Alarm"or
"High Temperature Alarm".
The temperature in the appli-
ance is too high.
Refer to "Door Open Alarm"or
"High Temperature Alarm".
The temperature in the appli-
ance is too high.
Contact a qualified electrician or
contact the nearest Authorised
Service Centre.
The compressor operates contin-
ually.
Temperature is set incorrectly. Refer to "Operation" chapter.
Many food products were put
in at the same time.
Wait some hours and then check
the temperature again.
The room temperature is too
high.
Refer to climate class chart on the
rating plate.
Food products placed in the
appliance were too warm.
Allow food products to cool to
room temperature before storing.
The door is not closed correct-
ly.
Refer to "Closing the door".
Water flows inside the refrigera-
tor.
The water outlet is clogged. Clean the water outlet.
Food products prevent that
water flows into the water col-
lector.
Make sure that food products do
not touch the rear plate.
Water flows on the floor. The melting water outlet is not
connected to the evaporative
tray above the compressor.
Attach the melting water outlet to
the evaporative tray.
10 www.zanussi.com

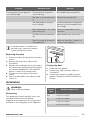
Problem Possible cause Solution
The temperature in the appliance
is too low/too high.
The temperature regulator is
not set correctly.
Set a higher/lower temperature.
The door is not closed correct-
ly.
Refer to "Closing the door".
The food products' tempera-
ture is too high.
Let the food products temperature
decrease to room temperature be-
fore storage.
Many food products are stored
at the same time.
Store less food products at the
same time.
The door has been opened of-
ten.
Open the door only if necessary.
There is no cold air circulation
in the appliance.
Make sure that there is cold air cir-
culation in the appliance.
If the advice does not lead to the
desired result, contact the nearest
Authorised Service Centre.
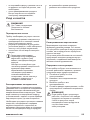
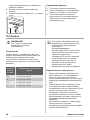
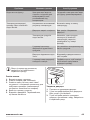
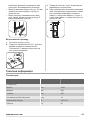
Replacing the lamp
1. Disconnect the mains plug from the mains
socket.
2. Remove the lamp cover (refer to the
illustration).
3. Replace the used lamp with a new lamp of
the same power and specifically designed
for household appliances. (the maximum
power is shown on the lamp cover).
4. Connect the mains plug to the mains
socket.
5. Open the door. Make sure that the lamp
comes on.
Closing the door
1. Clean the door gaskets.
2. If necessary, adjust the door. Refer to
"Installation".
3. If necessary, replace the defective door
gaskets. Contact the Authorised Service
Centre.
Installation
WARNING!
Refer to Safety chapters.
Positioning
This appliance can be installed in a dry, well
ventilated indoor where the ambient
temperature corresponds to the climate class
indicated on the rating plate of the appliance:
Climate
class
Ambient temperature
SN +10°C to + 32°C
N +16°C to + 32°C
ST +16°C to + 38°C
T +16°C to + 43°C
www.zanussi.com 11

Some functional problems might
occur for some types of models
when operating outside of that
range. The correct operation can
only be guaranteed within the
specified temperature range. If you
have any doubts regarding where to
install the appliance, please turn to
the vendor, to our customer service
or to the nearest Authorised Service
Centre.
Electrical connection
• Before plugging in, ensure that the voltage
and frequency shown on the rating plate
correspond to your domestic power supply.
• The appliance must be earthed. The power
supply cable plug is provided with a contact
for this purpose. If the domestic power
supply socket is not earthed, connect the
appliance to a separate earth in compliance
with current regulations, consulting a
qualified electrician.
• The manufacturer declines all responsibility if
the above safety precautions are not
observed.
• This appliance complies with the E.E.C.
Directives.
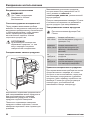
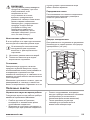
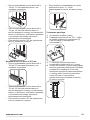
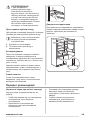
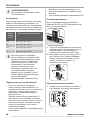
Height adjustment
The height of the appliance is adjustable from
820 to 870 mm to fine up with existing kitchen
units.
820
mm
870
mm
1. Before installing the appliance between
units, adjust the height of the feet and rear
wheels. The wheels are factory set for a
height of 820 mm.
2. To align the appliance to a height of 870
mm, raise it by adjusting the feet with a
spanner, then remove the wheels and refit
them in the lowest position.
820
870
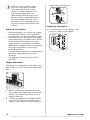
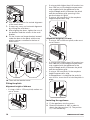
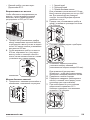
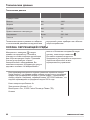
Fitting the side panels
1. Fit the brackets onto the panels in the
positions shown in the diagram.
A
17,5
1015
64
539
260*
280
15
820
15
30
B
C
541
12 www.zanussi.com

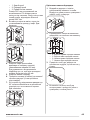
• 1. Rear edge
• 2. Front edge
• 3. Right hand side panel
The dimension of 260* mm is allowed for
fitting a 100 mm plinth below the panel. For
different plinth sizes, increase the dimension
of 260* mm accordingly.
2. Apply spacers to the hinges before
installing the appliance into the cabinet .
See picture
2
D
D
1a
1b
3. Rest the panels against the appliance.
45
4. Fit the rear brackets, taking into account the
thickness of the panels (maximum width of
unit 900 mm).
For a correct alignment make sure that the
distance between the appliance and the
cabinet is of 45 mm.
5. Secure the panels at the front.
6. Fix the squares (contained in the bag) to the
lower part of the door (references already
provided).
7. If necessary, door opening angle max 90°
can be obtained by introducing the pivots
supplied separately. See picture.
L
L
2
1
N
115°
90°
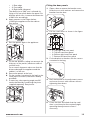
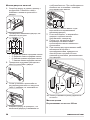
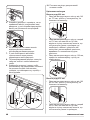
Fitting the door panels
1. Open a door a remove the bracket cover.
Undo the nuts with washers and remove the
bracket from the door.
1
2
2. Drill the small doors as shown in the figure.
1013
25
1013
25
60
4
4
60
444min.
447max.
444min.
447max.
4 5
6
7
25
25
193
193193
193
3min
214
214
• 4. Top right–and front panel
• 5. Top left-hand front panel
• 6. Bottom right-hand front panel
• 7. Bottom left-hand front panel
3. Fix the bracket to the door with the screws
contained in the bag.
4. Refit the bracket on the adjustment screws
and screw the nuts with washers without
tightening them down.
1
2
3
90
o
5. Close the door and check that the small
door is positioned at the required height,
operating the adjustment screws if
necessary.
www.zanussi.com 13

=
=
10
6. Use the same screws for vertical alignment
of the small doors.
7. If necessary, carry our horizontal alignment
by shifting the small doors.
8. After aligning the doors, tighten the nuts of
the brackets and the screws of the small
bracket.
9. Fix the shorter and longer bracket located
under the door to the panel with the two
plastic washers contained in the box of
accessories.
3
1
2
10. Then refit the bracket cover.
Fitting the plinth
Alignment height of 820 mm
• If using a 140 to 170 mm plinth, make a cut
out as shown.
820
870
170
220
140
190
30
100
900
• If using a plinth higher than 100 mm but less
than 140 mm, cut the height compensation
strip supplied with the appliance to the
required depth and fit it between the plinth
and the ventilation grille, pressing it into
position below this grille.
• If using a 100 mm plinth, fit the complete
height compensation strip.
140
190
Alignment height of 870 mm
• If using a 190 to 220 mm plinth, make a cut
out as shown.
100
150
30
100
• If using a plinth higher than 150 mm but less
than 190 mm, cut the height compensation
strip supplied with the appliance to the
required depth and fit it between the plinth
and the ventilation grille.
• If using a 150 mm plinth, fit the complete
height compensation strip.
• If the appliance is installed at the end of a
row of units, insert foot E to hold the plinth in
place.
E
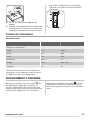
Installing the appliance
1. Fit the appliance into the recess.
2. Rotate the bracket of 180° in order to
obtain the right position ( 2). The position
(1) is on the delivery.
14 www.zanussi.com

1
2
3. Fix it to the wall with the appropriate
bracket.
4. The top of the appliance must be kept clear
to allow better air circulation. If a wall unit is
fitted above the appliance, there must be a
gap of 50 mm between this unit and the
wall and it must be at least 50 mm below
the ceiling.
50
50
50
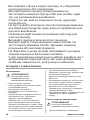
Technical information
Technical data
Dimensions of the recess
Height mm 1900
Width mm 860
Depth mm 550
Rising time Hours 14
Voltage Volts 230 - 240
Frequency Hz 50
The technical information are situated in the
rating plate, on the external or internal side of
the appliance and in the energy label.
ENVIRONMENT CONCERNS
Recycle the materials with the symbol . Put
the packaging in applicable containers to
recycle it. Help protect the environment and
human health and to recycle waste of electrical
and electronic appliances. Do not dispose
appliances marked with the symbol with the
household waste. Return the product to your
local recycling facility or contact your municipal
office.
www.zanussi.com 15

Содержание
Сведения по технике безопасности 16
Указания по безопасности 18
Описание работы 19
Ежедневное использование 22
Полезные советы 23
Уход и очистка 25
Поиск и устранение неисправностей 26
Установка 28
Технические данные 32
Право на изменения сохраняется.
Сведения по технике безопасности
Перед установкой и эксплуатацией прибора внимательно
ознакомьтесь с приложенным руководством.
Производитель не несет ответственность за травмы и
повреждения, полученные/вызванные неправильной
установкой и эксплуатацией. Позаботьтесь о том, чтобы
данное руководство было у Вас под рукой на протяжении
всего срока службы прибора.
Безопасность детей и лиц с ограниченными
возможностями
• Данный прибор может эксплуатироваться детьми старше
8 лет и лицами с ограниченными физическими,
сенсорными или умственными способностями и с
недостаточным опытом или знаниями только при
условии нахождения под присмотром лица, отвечающего
за их безопасность, или после получения
соответствующих инструкций, позволяющих им
безопасно эксплуатировать электроприбор и дающих им
представление об опасности, сопряженной с его
эксплуатацией.
• Не позволяйте детям играть с прибором.
• Очистка и доступное пользователю техническое
обслуживание не должно производиться детьми без
присмотра.
• Храните все упаковочные материалы вне досягаемости
детей.
16 www.zanussi.com

Общие правила техники безопасности
• Прибор предназначен для домашнего бытового и
аналогичного применения, например:
– В сельских жилых домах; в помещениях, служащих
кухнями для обслуживающего персонала в магазинах,
офисах и на других рабочих местах.
– Для использования клиентами отелей, мотелей мини-
гостиниц типа «ночлег и завтрак» и других мест
проживания.
• Не перекрывайте вентиляционные отверстия в корпусе
прибора или в мебели, в которую он встроен.
• Не используйте механические устройства или любые
другие средства, кроме рекомендованных
производителем, для ускорения процесса
размораживания.
• Не допускайте повреждения холодильного контура.
• Не используйте внутри отсеков для хранения пищевых
продуктов электрические приборы, если они не
рекомендованы производителем.
• Не используйте для очистки прибора подаваемую под
давлением воду или пар.
• Протирайте прибор мягкой влажной тряпкой.
Используйте только нейтральные моющие средства. Не
используйте абразивные средства, царапающие губки,
растворители или металлические предметы.
• Не используйте прибор для хранения взрывоопасных
веществ, таких как аэрозольные баллоны с
взрывоопасным газом-вытеснителем.
• В случае повреждения шнура питания во избежание
несчастного случая он должен быть заменен
изготовителем, авторизованным сервисным центром или
специалистом с равнозначной квалификацией.
www.zanussi.com 17

Указания по безопасности
Установка
ВНИМАНИЕ!
Установка прибора должна
осуществляться только
квалифицированным
персоналом!
• Удалите всю упаковку.
• Не устанавливайте и не подключайте
прибор, если он имеет повреждения.
• Следуйте приложенным к прибору
инструкциям по его установке.
• Прибор имеет большой вес: не
забывайте о мерах предосторожности
при его перемещении. Обязательно
используйте защитные перчатки.
• Убедитесь, что вокруг прибора имеется
достаточная вентиляция.
• Перед подключением прибора к
электросети подождите не менее 4
часов. Это необходимо сделать для
того, чтобы масло могло вернуться в
компрессор.
• Не устанавливайте прибор рядом с
радиаторами отопления, кухонными
плитами, духовыми шкафами или
варочными панелями.
• Задняя сторона прибора должна
располагаться у стены.
• Не устанавливайте прибор там, где на
него может падать прямой солнечный
свет.
• Не устанавливайте прибор в слишком
влажных или холодных местах,
например, в примыкающих пристройках,
гаражах или винных погребах.
• При перемещении прибора поднимайте
его за передний край, чтобы не
допустить появления на полу царапин.
Подключение к электросети
ВНИМАНИЕ!
Существует риск пожара и
поражения электрическим током.
• Прибор должен быть заземлен.
• Убедитесь, что параметры
электропитания, указанные на табличке
с техническими данными, соответствуют
параметрам электросети. В противном
случае вызовите электрика.
• Включайте прибор только в
установленную надлежащим образом
электророзетку с защитным контактом.
• Не пользуйтесь тройниками и
удлинителями.
• Следите за тем, чтобы не повредить
электрические компоненты прибора
(вилку кабеля электропитания, кабель
электропитания, компрессор и т.д.) Для
замены электрических компонентов
обратитесь в авторизованный
сервисный центр или к электрику.
• Кабель электропитания должен
располагаться ниже уровня вилки
электропитания.
• Вставляйте вилку сетевого кабеля в
розетку только во конце установки
прибора. Убедитесь, что после
установки имеется доступ к вилке.
• Для отключения прибора от электросети
не тяните за кабель электропитания.
Всегда беритесь за саму вилку.
Эксплуатация
ВНИМАНИЕ!
Существует риск получения
травмы, ожога, поражения
электрическим током или
пожара.
• Не изменяйте параметры данного
прибора.
• Не помещайте в прибор
электроприборы (например,
мороженицы), если их производителем
не указано, что подобное их
применение допустимо.
• Следите за тем, чтобы не повредить
контур холодильника. Он содержит
хладагент изобутан (R600a), природный
газ, безвредный для окружающей
среды. Данный газ огнеопасен.
• В случае повреждения контура
холодильника следует исключить
появление в помещении открытого
пламени и источников возгорания.
Хорошо проветрите помещение.
• Не ставьте на пластмассовые части
прибора горячую посуду.
• Не помещайте прохладительные
напитки в морозильное отделение. Это
приведет к возникновению излишнего
18 www.zanussi.com

давления в емкости, в которой
содержится напиток.
• Не храните внутри прибора горючие
газы и жидкости.
• Не помещайте на прибор, рядом с ним
или внутрь него
легковоспламеняющиеся вещества или
изделия, пропитанные
легковоспламеняющимися веществами.
• Не прикасайтесь к компрессору или
конденсатору. Они горячие.
• Не извлекайте и не касайтесь
предметов в морозильном отделении
мокрыми или влажными руками.
• На замораживайте повторно уже
размороженные продукты.
• Соблюдайте инструкции по хранению,
приведенные на упаковке
замороженных продуктов.
Уход и очистка
ВНИМАНИЕ!
Это может привести к
повреждению прибора или
травмам.
• Перед выполнением операций по чистке
и уходу выключите прибор и извлеките
вилку сетевого шнура из розетки.
• В холодильном контуре данного
прибора содержатся углеводороды.
Техническое обслуживание и
перезарядка должны выполняться
только квалифицированным
специалистом.
• Регулярно проверяйте сливное
отверстие в корпусе прибора и при
необходимости прочищайте его. В
случае засорения отверстия талая вода
будет скапливаться в нижней части
прибора.
Утилизация
ВНИМАНИЕ!
Существует опасность травмы
или удушья.
• Отключите прибор от электросети.
• Отрежьте и утилизируйте кабель
электропитания.
• Удалите дверцу, чтобы предотвратить
риск ее запирания при попадании
внутрь прибора детей и домашних
животных.
• Содержимое холодильного контура и
изоляционные материалы данного
прибора не вредят озоновому слою.
• Изоляционный пенопласт содержит
горючий газ. Для получения
информации о том, как надлежит
утилизировать данный прибор,
обратитесь в местные муниципальные
органы власти.
• Не повреждайте часть узла
охлаждения, которая находится рядом с
теплообменником.
Описание работы
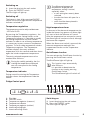
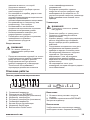
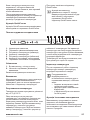
Панель управления морозильника
1 2 73 4 5 6 98
1. Сигнальный индикатор
2. Переключатель ВКЛ/ВЫКЛ
3. Регулятор температуры (повышение)
4. Индикатор температуры
5. Регулятор температуры (понижение)
6. Сигнальный индикатор
7. Кнопка сброса сигнализации
8. Индикатор QuickFreeze
9. Выключатель QuickFreeze
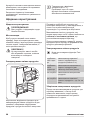
Включение
1. Вставьте вилку сетевого шнура в
розетку.
2. Нажмите переключатель ВКЛ/ВЫКЛ.
Загорится индикатор.
Выключение
Чтобы выключить морозильную камеру,
необходимо нажать переключатель ВКЛ/
www.zanussi.com 19

ВЫКЛ и удерживать его, пока не погаснет
индикатор и дисплей температуры.
Регулировка температуры
Температуру можно задавать в диапазоне
от -15°C до -24°C.
При нажатии кнопок регулировки
температуры на индикаторе температуры
начинает мигать текущая температура.
Изменить заданную температуру можно
только при мигающем индикаторе. Чтобы
установить большее значение
температуры, необходимо нажать на
кнопку повышения температуры. Чтобы
установить меньшее значение
температуры, нажмите на кнопку
понижения температуры. Дисплей
температуры в течение нескольких секунд
будет показывать новую заданную
температуру, после чего вернется в режим
отображения температуры внутри
отделения.
Вновь заданная температура должна
установиться через 24 часа.
В период стабилизации при
первом включении
отображаемая температура
может не соответствовать
заданной температуре.
Индикатор температуры
При нормальной работе дисплей
отображает заданную температуру внутри
морозильника.
Расхождение между
отображаемой и заданной
температурой является
нормальным явлением,
особенно в следующих случаях:
• недавно было задано новое
значение
• дверь была оставлена
открытой на длительное
время
• в отделение прибора были
помещены теплые продукты.
Сигнализация превышения
температуры
В случае аномального повышения
температуры внутри морозильной камеры
(например, при отключении
электропитания) начинает мигать
сигнальный индикатор и раздается
звуковой сигнал.
После возврата температуры к
нормальному значению сигнальный
индикатор продолжает мигать, а звуковой
сигнал выключается.
При нажатии кнопки сброса сигнализации
на дисплее будет мигать значение самой
высокой температуры, установившейся в
камере.
Функция QuickFreeze
Функцию QuickFreeze можно включить,
нажав на выключатель QuickFreeze.
Загорится индикатор QuickFreeze.
Эта функция автоматически
выключается через 52 часа.
Функцию можно в любой момент
отключить, нажав на
выключатель QuickFreeze.
Индикатор QuickFreeze погаснет.
20 www.zanussi.com
Страница загружается ...
Страница загружается ...
Страница загружается ...
Страница загружается ...
Страница загружается ...
Страница загружается ...
Страница загружается ...
Страница загружается ...
Страница загружается ...
Страница загружается ...
Страница загружается ...
Страница загружается ...
Страница загружается ...
Страница загружается ...
Страница загружается ...
Страница загружается ...
Страница загружается ...
Страница загружается ...
Страница загружается ...
Страница загружается ...
Страница загружается ...
Страница загружается ...
Страница загружается ...
Страница загружается ...
Страница загружается ...
Страница загружается ...
Страница загружается ...
Страница загружается ...
Страница загружается ...
Страница загружается ...
Страница загружается ...
Страница загружается ...
-
 1
1
-
 2
2
-
 3
3
-
 4
4
-
 5
5
-
 6
6
-
 7
7
-
 8
8
-
 9
9
-
 10
10
-
 11
11
-
 12
12
-
 13
13
-
 14
14
-
 15
15
-
 16
16
-
 17
17
-
 18
18
-
 19
19
-
 20
20
-
 21
21
-
 22
22
-
 23
23
-
 24
24
-
 25
25
-
 26
26
-
 27
27
-
 28
28
-
 29
29
-
 30
30
-
 31
31
-
 32
32
-
 33
33
-
 34
34
-
 35
35
-
 36
36
-
 37
37
-
 38
38
-
 39
39
-
 40
40
-
 41
41
-
 42
42
-
 43
43
-
 44
44
-
 45
45
-
 46
46
-
 47
47
-
 48
48
-
 49
49
-
 50
50
-
 51
51
-
 52
52


Zanussi ZBB47460DA Руководство пользователя
- Категория
- Морозильные камеры
- Тип
- Руководство пользователя
Задайте вопрос, и я найду ответ в документе
Поиск информации в документе стал проще с помощью ИИ
на других языках
- English: Zanussi ZBB47460DA User manual
Похожие модели бренда
-
Zanussi ZBB928651S Руководство пользователя
-
-
-
-
-
-
-
-
Zanussi ZFU25200WA Руководство пользователя
-