JVC Car Video System KD-AV7001 Руководство пользователя
- Категория
- Мультимедиа-приемники для автомобилей
- Тип
- Руководство пользователя
Это руководство также подходит для

LVT1172-009A
[EE]
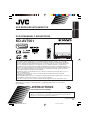
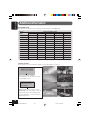
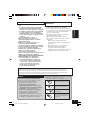
INSTRUCTIONS
ИНСТРУКЦИИ ПО ЭКСПЛУАТАЦИИ
For installation and connections, refer to the separate manual.
Указания по установке и выполнению соединений приводятся в отдельной
инструкции.
ENGLISH
РУCCKИЙ
DVD RECEIVER WITH MONITOR
KD-AV7001
• This unit is equipped with the display demonstration. To cancel it, see page 14.
• Данное устройство имеет функцию демонстрации на экране дисплея.
Порядок ее отмены смотрите на странице 14.
DVD-ПРИЕМНИК С МОНИТОРОМ
Detachable
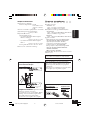
В соответствии с Законом Российской Федерации
“О защите прав потребителей” срок службы (годности) данного товара, “по истечении
которого он может представлять опасность для жизни, здоровья потребителя, причинять
вред его имуществу или окружающей среде” составляет семь (7) лет со дня производства.
Этот срок является временем, в течение которого потребитель данного товара может
безопасно им пользоваться при условии соблюдения инструкции по эксплуатации данного
товара, проводя необходимое обслуживание, включающее замену расходных материалов и/
или соответствующее ремонтное обеспечение в специализированном сервисном центре.
Дополнительные косметические материалы
к данному товару, поставляемые вместе с ним, могут храниться в течение двух (2) лет со
дня его производства.
Срок службы (годности), кроме срока хранения дополнительных косметических
материалов, упомянутых
в предыдущих двух пунктах, не затрагивает никаких других прав потребителя, в частности,
гарантийного свидетельства JVC, которое он может получить
в соответствии с законом о правах потребителя или других законов, связанных с ним.
ATT
MAIN SUB
ZOOM
ASPECT
MENU
VOLUME
TOPMENU
TUNER
564
231
8
97
11
/
012
/+1
0
10
DISC
OK
AV
GUI
SET UP
RETURN
DUAL
AVOUT VOL
Cover_KD-AV7001[EE]f.p65 4/27/05, 10:49 AM3

2
ENGLISH
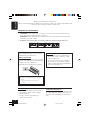
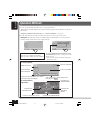
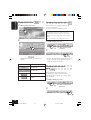
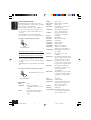
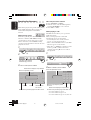
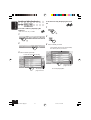
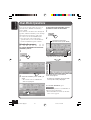
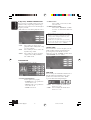
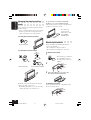
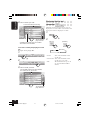
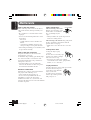
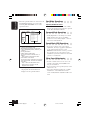
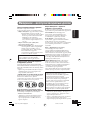
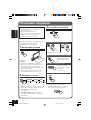
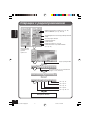
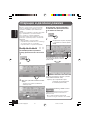
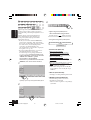
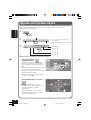
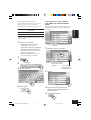
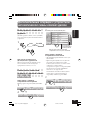
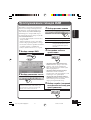
After installing the unit, reset it before use
following the procedure below:
How to reset your unit
Detach the control panel (see page 91), then
press the reset button on the main unit using
a ball-point pen or a similar tool.
This will reset the built-in microcomputer.
Your preset adjustments—such as preset
channels or sound adjustments—will also be
erased.
• The monitor will go into its place if
opened.
Thank you for purchasing a JVC product.
Please read all instructions carefully before operation, to ensure your complete understanding and
to obtain the best possible performance from the unit.
CAUTIONS:
• Do not insert any disc of unusual shape—
like a heart or flower; otherwise, it will
cause a malfunction.
• Do not expose discs to direct sunlight or
any heat source or place them in a place
subject to high temperature and humidity.
Do not leave them in a car.
For safety....
• Do not raise the volume level too much, as
this will block outside sounds, making
driving dangerous.
• Stop the car before performing any
complicated operations.
Temperature inside the car....
If you have parked the car for a long time in hot
or cold weather, wait until the temperature in
the car becomes normal before operating the
unit.
IMPORTANT FOR LASER PRODUCTS
1. CLASS 1 LASER PRODUCT
2. CAUTION: Do not open the top cover. There are no user serviceable parts inside the unit;
leave all servicing to qualified service personnel.
3. CAUTION: Visible and invisible laser radiation when open and interlock failed or defeated.
Avoid direct exposure to beam.
4. REPRODUCTION OF LABEL: CAUTION LABEL, PLACED OUTSIDE THE UNIT.
02-07_KD-AV7001[EE]f.p65 4/27/05, 2:02 PM2

3
ENGLISH
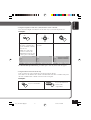
Press briefly.
Press repeatedly.
Press and hold until your
desired response begins.
Press either one.
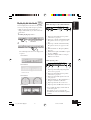
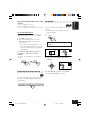
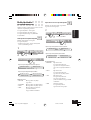
WARNINGS
• DO NOT install any unit in locations where;
– it may obstruct the steering wheel and
gearshift lever operations, as this may
result in a traffic accident.
– it may obstruct the operation of safety
devices such as air bags, as this may result
in a fatal accident.
– it may obstruct visibility.
• DO NOT operate any unit while manipulating
the steering wheel, as this may result in a
traffic accident.
• The driver must not watch the monitor while
driving.
If the driver watches the monitor while
driving, it may lead to carelessness and
cause an accident.
• If you need to operate the main unit while
driving, be sure to look ahead carefully or
you may be involved in a traffic accident.
• If the parking brake is not engaged, “DRIVER
MUST NOT WATCH THE MONITOR WHILE
DRIVING.” appears on the monitor, and no
playback picture will be shown.
– This warning appears only when the
parking brake wire is connected to the
parking brake system built in the car (refer
to the Installation/Connection Manual).
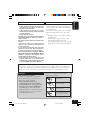
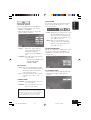
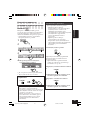
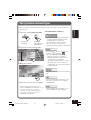
Important!
How to read this manual:
To make the explanations as simple and
easy-to-understand as possible, we have
adapted the following methods:
• Some related tips and notes are
explained later in the sections “More
about This Receiver” (see page 81), but
not in the same section explaining the
operations. If you want to know more
about the functions, or if you have a doubt
about the function, go to the section and
you will find the answers.
• Operations are explained only with the
illustrations as follows:
Hold
CAUTIONS on the monitor
• The monitor built in this receiver has been
produced with high precision, but it may have
some ineffective dots. This is inevitable and
is not malfunction.
• Do not expose the monitor to direct sunlight.
• When the temperature is very cold or very
hot...
– Chemical changes occur inside, causing it
to malfunction.
– Pictures may not appear clearly or may
move slowly. Pictures may not be
synchronized with the sound or the picture
quality may decline in such environments.
CAUTION on Volume Setting:
Discs produce very little noise compared with other sources. If the volume level is adjusted for
the tuner, for example, the speakers may be damaged by the sudden increase in the output level.
Therefore, lower the volume before playing a disc and adjust it as required during playback.
02-07_KD-AV7001[EE]f.p65 4/27/05, 10:52 AM3

4
ENGLISH
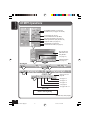
Contents
How to reset your unit ..................................... 2
Important! (How to read this manual) ............. 3
Introduction—Playable Discs ....................... 5
Quick Guide—How to Use the Controls ...... 6
Remote controller ............................................ 6
Main unit (front) .............................................. 8
Preparation (Remote Controller—
RM-RK220) .................................................... 9
Operation Methods ...................................... 10
Basic Operations .......................................... 12
Setting the clock ............................................ 13
Changing the source ...................................... 14
Changing the graphic screen ......................... 14
Changing the touch panel color ..................... 14
Displaying the level meter ............................. 15
Radio Operations ......................................... 16
Listening to the Radio ................................. 17
Storing stations in memory ............................ 18
Displaying the preset list ............................... 19
Searching for your favorite programme—
PTY Search ............................................. 20
Using the Standby Reception ........................ 21
RDS Setup—RDS SET ................................ 23
DVD/VCD Operations ................................. 25
CD/MP3 Operations .................................... 26
Basic Disc Operations ................................. 27
Changing the aspect ratio .............................. 29
Prohibiting disc ejection ................................ 29
Selecting MP3 folders ................................... 29
Operating the disc menu ................................ 30
Replaying the previous scenes ....................... 31
Zooming in .................................................... 31
Selecting subtitles .......................................... 32
Selecting audio languages ............................. 32
Selecting multi-angle views .......................... 33
Locating a folder/track using the list ............. 34
Displaying the disc text information ............. 35
Displaying the time information .................... 35
Selecting playback modes ............................. 35
Searching for scenes or songs ........................ 36
Dual Mode Operations ................................ 38
Selecting the sources ..................................... 38
Adjusting AV OUTPUT volume.................... 39
Surround Mode Operations........................ 40
Introducing surround/DSP mode ................... 41
Turning on and off the surround/DSP mode .... 42
Sound Modes (iEQ) Operations ................. 44
Selecting preset sound modes ........................ 45
Storing your own sound modes ..................... 45
Other Sound Adjustments .......................... 46
Monitor Adjustments .................................. 47
Initial Setup—DVD MENU ........................ 48
Initial Setup—MONITOR .......................... 50
Initial Setup—ON SCREEN ....................... 52
Initial Setup—AUDIO MENU/PSM .......... 54
Other Main Functions ................................. 58
Assigning titles to the sources ....................... 58
Changing the monitor position/angle ............ 60
Removing the monitor ................................... 60
CD Changer Operations ............................. 61
Basic CD Changer Operations ................... 62
Advanced CD Changer Operations ........... 63
Selecting disc/folders/tracks .......................... 63
Locating a disc/folder/track using the list ..... 63
Displaying the disc text information ............. 64
Selecting playback modes ............................. 65
Searching for songs ....................................... 66
External Component Operations ............... 67
TV Tuner Operations .................................. 68
Watching TV programs ................................. 69
Storing stations in memory ............................ 69
Displaying the preset list ............................... 71
DAB Tuner Operations ............................... 72
Listening to the DAB Tuner ........................ 73
Selecting ensembles and services .................. 74
Storing services in memory ........................... 74
Displaying the preset list ............................... 75
Displaying the DAB text ............................... 76
Using the Standby Reception ........................ 76
Using Announcement Standby Reception ..... 77
DAB Setup—DAB SET ............................... 78
Maintenance ................................................. 80
More about This Receiver ........................... 81
Troubleshooting ........................................... 86
Additional Information ............................... 88
Specifications ................................................ 90
02-07_KD-AV7001[EE]f.p65 4/27/05, 10:52 AM4

5
ENGLISH
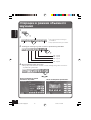
Discs you can play
You can play back the following discs on this
unit:
• DVD Video: whose video format is PAL or
NTSC and whose region code is “5.”
–DVD-Rs and DVD-RWs recorded in
the DVD-Video format can also be
played (see page 82).
• Video CD (VCD)/Audio CD
• MP3: CD-Rs or CD-RWs including MP3
files with the file extension code
<mp3>. They must be recorded in the
format compliant with ISO 9660 Level
1, ISO 9660 Level 2, Romeo, and Joliet.
On some discs, the actual operations may be
different from what is explained in this
manual.
The following discs cannot be played back
DVD Audio, DVD-ROM, DVD-RAM,
DVD-RW recorded in the DVD-VR format,
CD-ROM, CD-I (CD-I Ready), Photo CD, etc.
• Playing back these discs will generate noise
and damage the speakers.
* Note on Region Code
DVD players and DVD Video discs have their
own Region Code numbers. This unit can only
play back DVD discs whose Region Code
numbers include “5.”
If you insert a DVD Video disc of an incorrect
Region Code
“REGION CODE ERROR!” appears on the
monitor.
• “DVD Logo” is a trademark of DVD Format/
Logo Licensing Corporation registered in the
US, Japan and other countries.
Examples:
Introduction—Playable Discs
* Manufactured under license from Dolby
Laboratories. “Dolby”, “Pro Logic”, and
the double-D symbol are trademarks of
Dolby Laboratories.
** “DTS” and “DTS Digital Surround” are
registered trademarks of Digital Theater
Systems, Inc.
DVD Video—digital audio formats
The System can play back the following digital
audio formats.
Linear PCM: Uncompressed digital audio, the
same format used for CDs and most studio
masters.
Dolby Digital *: Compressed digital audio,
developed by Dolby Laboratories, which
enables multi-channel encode to create the
realistic surround sound.
DTS ** (Digital Theater Systems):
Compressed digital audio, developed by Digital
Theater Systems, Inc., which enables multi-
channel like Dolby Digital. As the compression
ratio is lower than for Dolby Digital, it provides
wider dynamic range and better separation.
MPEG Multichannel: Another compressed
digital audio which also enables multi-channel
encode to create the realistic surround sound.
However, this System downmix the multi-
channel signals into 2 channels (decoded PCM)
and play it back.
This product incorporates copyright
protection technology that is protected by
U.S. patents and other intellectual property
rights. Use of this copyright protection
technology must be authorized by
Macrovision, and is intended for home and
other limited viewing uses only unless
otherwise authorized by Macrovision.
Reverse engineering or disassembly is
prohibited.
02-07_KD-AV7001[EE]f.p65 4/27/05, 10:52 AM5

6
ENGLISH
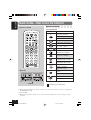
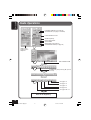
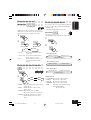
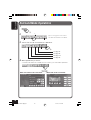
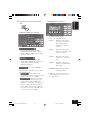
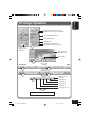
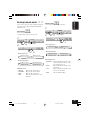
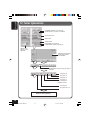
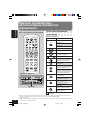
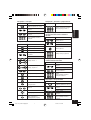
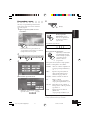
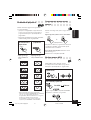
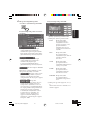
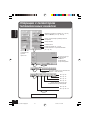
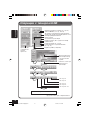
Remote controller
Quick Guide—How to Use the Controls
*1 When using Dual Mode, the remote controller operates either main or sub source depending on
the MAIN/SUB setting.
*2 Only for MP3
*3 While playing a DVD, chapter is selected; on the other hands, title is selected before or after
playback.
AT T
MAIN SUB
ZOOM
ASPECT
MENU
VOLUME
TOPMENU
TUNER
564
231
897
11
/
012
/+1
0
10
DISC
OK
AV
GUI
SET UP
RETURN
DUAL
AVOUT VOL
Buttons To do:
Turn on the main unit.
Turn off the main unit.
Attenuate sounds.
Select “TUNER” and “DAB.”
Select “DISC” and “CD-CH.”
Select external components:
TV = AV1 = AV2 =
Adjust the volume.
Set the main or sub-
operation for Dual Mode. *
1
Turn on/off Dual Mode.
Adjust the monitor angle
(with MAIN/SUB set MAIN).
Adjust the AV output level
(with MAIN/SUB set SUB).
Change the aspect ratio.
Display the monitor
adjustment screen.
Display and erase GUI
screen.
Display Setup Menus.
Change menu items.
Confirm.
General operations
AV
TUNER
DISC
VOLUME
ZOOM
DUAL
MAIN SUB
AVOUT VOL
ASPECT
GUI
SET UP
OK
AT T
: functions if pressed and held.
Remote controller
Main unit
Display
02-07_KD-AV7001[EE]f.p65 4/27/05, 10:52 AM6

7
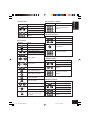
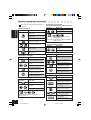
ENGLISH
Buttons To do:
Select the band.
Start Auto Search.
Start Manual Search.
Select services.
Change preset numbers.
Select preset numbers
directly.
TUNER
564
231
DAB Tuner operations
Buttons To do:
Select title/chapter/track
number. *
3
564
231
897
11
/
012
/+1
0
10
Disc operations—continued
OK
OK
then
Disc operations
Buttons To do:
Select the band.
Start Auto Search.
Start Manual Search.
Change preset numbers.
Select preset numbers
directly.
TUNER
564
231
Tuner operations
Buttons To do:
Play.
Pause.
Stop.
Select chapters/tracks.
Search.
Selects folders. *
2
Select tracks. *
2
Search.
Select audio language.
Select subtitle language.
Select view angle.
Zoom the picture.
Display disc menu.
Change menu items.
Confirm.
Return to the previous
screen while operating the
disc menu.
MENU
TOPMENU
OK
ZOOM
DUAL
OK
OK
then
RETURN
CD changer operations
Buttons To do:
Select folders. *
2
Select tracks.
Search.
Change discs.
Select disc numbers.
564
231
897
11
/
012
/+1
0
10
OK
TV tuner operations
Buttons To do:
Start Auto Search.
Start Manual Search.
Change preset channel
numbers.
Select preset channel
numbers.
564
231
897
11
/
012
/+1
0
10
02-07_KD-AV7001[EE]f.p65 4/27/05, 10:52 AM7

8
ENGLISH
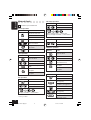
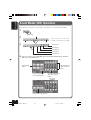
Main unit (front)
Buttons To do:
Turn on the main unit.
Turn off the main unit.
Attenuate sounds.
Change the sources.
Adjust the volume.
Change the display
information.
Detach the control panel.
General operations
Buttons To do:
Turn on the monitor.
Turn off the monitor.
Open/close the monitor.
(See page 60.)
Change the monitor angle
for a while. (See page 60.)
Slide in/out the monitor.
Remove the monitor.
Adjust the monitor angle.
(See page 60.)
Change the aspect ratio.
Display the monitor
adjustment screen.
Monitor operations
Buttons To do:
Eject the disc.
Select chapters/tracks.
Search.
Display “FOLDER” = select folders. *
1
Disc operations
then
Buttons To do:
Select tracks.
Search.
(once): Display “DISC” = select discs.
(twice): Display “FOLDER” = select folders.*
1
CD changer operations
then
Buttons To do:
Start Auto Search.
Start Manual Search.
TV tuner operations
*1 Only for MP3
Buttons To do:
Select the band.
Start Auto Search.
Start Manual Search.
Change FM reception
mode.
Turn on/off TA Standby
Reception.
Turn on/off PTY Standby
Reception.
Tuner operations
: functions if pressed and held.
Buttons To do:
Select the band.
Start Auto Search.
Start Manual Search.
Change Search Mode
(Ensemble/Service).
Turn on/off TA Standby
Reception.
Turn on/off PTY Standby
Reception.
DAB Tuner operations
08-11_KD-AV7001[EE]f.p65 4/27/05, 11:54 AM8

9
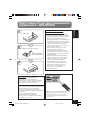
ENGLISH
3
2
1
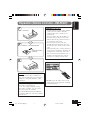
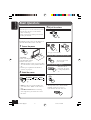
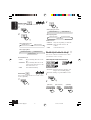
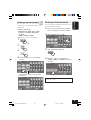
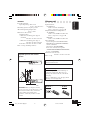
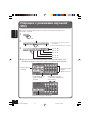
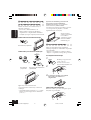
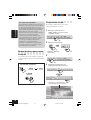
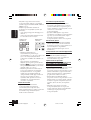
Preparation (Remote Controller—RM-RK220)
WARNINGS on the battery:
• Store the battery in a place where children
cannot reach. If a child accidentally
swallows the battery, consult a doctor
immediately.
• Do not recharge, short, disassemble, or
heat the battery or dispose of it in a fire.
These behaviors may cause the battery to
be overheated, crack or fire.
• Do not leave the battery with other
metallic materials. Doing this may cause
the battery to give off heat, crack, or start
a fire.
• When throwing away or saving the battery,
wrap it in tape and insulate; otherwise, the
battery may be overheated, crack or fire.
• Do not poke the battery with tweezers or
similar tools. Doing this may cause the
battery to be overheated, crack or fire.
CAUTION:
DO NOT leave the remote controller in a
place (such as dashboards) exposed to direct
sunlight for a long time. Otherwise, it may
be damaged.
This receiver is equipped with the steering
wheel remote control function.
If your car is equipped with the steering
wheel remote controller, you can operate
this receiver using the controller.
• See the Installation/Connection Manual
(separate volume) for connection to utilize
this function.
(back side)
Lithium coin battery
(CR2025)
With the + side facing upwards
DO NOT expose the remote sensor on the
control panel to strong light (direct sunlight
or artificial lighting).
08-11_KD-AV7001[EE]f.p65 4/27/05, 11:54 AM9

10
ENGLISH
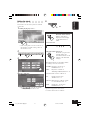
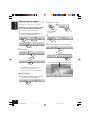
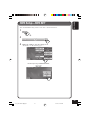
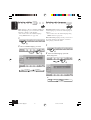
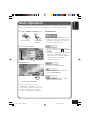
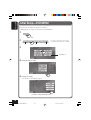
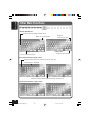
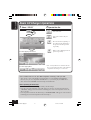
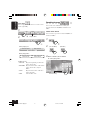
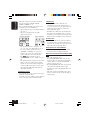
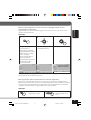
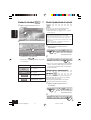
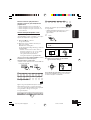
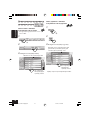
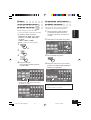
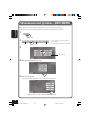
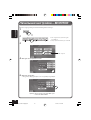
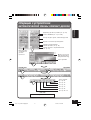
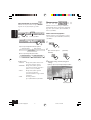
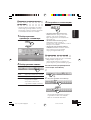
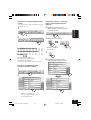
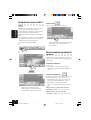
Operation Methods
You can operate this unit using three types of operation methods.
• This instruction manual explains the operations mainly using the Touch Panel Icons shown on
the monitor.
• Using the Touch Panel Icons directly (See “BLIND CONTROL” on page 51.)
Press the Touch Panel Icons with your finger directly (if you wear a glove, take it off).
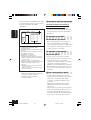
Examples: The following is just an example. On the actual monitor screen, the playback
picture is shown (while video source is played back).
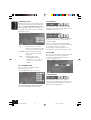
Clock time indication
Icons shown on this column change each
time you press .
Changes the function modes (icons shown
to the right change accordingly).
Changes the source.
Source and play
mode information
Ex. DVD playback
Returns to the previous screen.
Operation icon (FADER REAR)
Operation icon
(BALANCE
RIGHT)
Operation icon
(BALANCE LEFT)
Operation icon
(FADER FRONT)
Ex. Fader/balance
adjustment
To erase and display the Touch Panel icons
and indications, press the center portion of the
monitor screen.
• You can erase them only while viewing the
playback pictures.
Do not operate the Touch Panel using a
ball-point pen or similar tool with the
sharp tip (it may damage the Touch Panel).
Picture view window
08-11_KD-AV7001[EE]f.p65 4/27/05, 11:54 AM10

11
ENGLISH
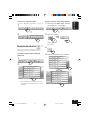
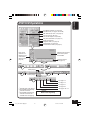
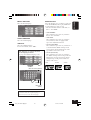
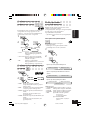
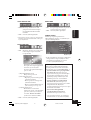
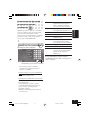
• Using the Graphic User Interface (GUI) from the remote controller
You can use the Graphic User Interface in the same way as you touch the panel icons.
Examples:
Display GUI on the monitor
(the cursor—yellow frame—
appears around the currently
selected icon).
• While one of the video
sources is selected, the
GUI function turns on and
off at a press of the button.
2
13
Move the cursor to an icon
you want.
Confirm.
• Using the buttons and controls directly
Some operations are only performed by pressing the buttons directly.
You can also use the buttons and controls on the main unit and remote controller if they have
the same or similar name or marks as shown on the touch panel.
Examples:
To eject a loaded disc.
To eject the monitor or
store it in the
compartment.
GUI
SET UP
To exit from GUI operation mode, press GUI again so that the yellow frame disappears.
OK
OK
08-11_KD-AV7001[EE]f.p65 4/27/05, 11:54 AM11

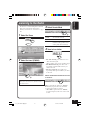
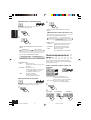
12
ENGLISH
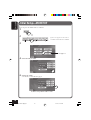
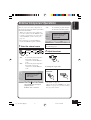
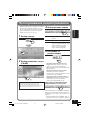
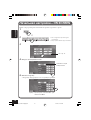
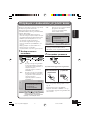
For turning on the power, use the buttons on
the main unit and the remote controller.
1
Turn on the power
“WAITING”
scrolls on the display
of the main unit (and the
monitor comes out *).
• When the monitor comes out, power comes
on to the monitor even if you have turned it
off.
• For the space required for the monitor
ejection, see page 91.
2
Select the source
• DISC: If a disc is not in the loading slot,
you cannot select “DISC” as the source to
play.
• CD-CH/TV/DAB: Without connecting
each component, you cannot select it for
the source.
Basic Operations
CAUTION on the monitor :
Do not open or close the monitor by hand.
Do not apply any force to the monitor
while it is moving.
Such a behavior may damage the monitor
loading mechanism.
To change the monitor angle:
• See page 60 for details.
To drop the volume in a moment (ATT):
To restore the sound,
press it again.
To store the monitor in place:
• When the unit is
turned off, the power
is temporarily turned
on.
To turn off the power:
Hold
Hold
3
Adjust the volume
1
2
* This depends on the “AUTO OPEN/
CLOSE” setting (see page 51).
If the monitor does not come out...
TUNER DISC AV1
AV2TVDAB
CD-CH
12-15_KD-AV7001[EE]f.p65 4/27/05, 11:54 AM12

13
ENGLISH
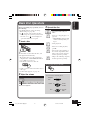
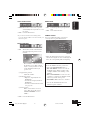
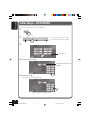
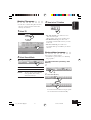
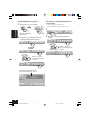
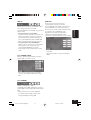
Setting the clock
You can also set the clock system to 24 hours
or 12 hours.
1
While playing any source...
• If the touch panel icons are not shown on
the monitor, touch the center portion of
the monitor screen.
2
3
4
Set the clock time.
• Press to start the clock time
counting exactly from 00 second.
Exit
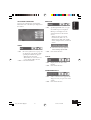
To display the clock time:
When the unit is turned
off, the clock time is
displayed on the display
of the main unit for a
while.
When the unit is turned on...
Each time you press and
hold the button, the
information shown on the
display of the main unit
changes.
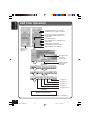
Information shown on the display differs
according to the selected source.
TUNER: Frequency = Clock =
Band&Preset no. =
DISC: Play time = Clock =
Title/Chapter/Folder/Track no. =
AV1/AV2:Source name = Clock =
TV: Channel = Clock =
TV&Preset no. =
CD-CH: Elapsed time = Clock = Disc
no. = Folder/Track no. =
DAB: Channel no. = Clock =
Band&Preset no. =
On the main unit
*
1
*
2
*
1
It does not appear for some sources.
*
2
It will be shaded when not available.
5
*
1
Hold
12-15_KD-AV7001[EE]f.p65 4/27/05, 11:54 AM13

14
ENGLISH
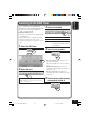
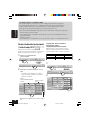
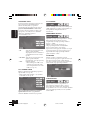
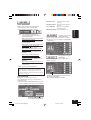
Changing the source
1
While playing any source...
2
The current source is highlighted.
Newly selected source operation screen
appears.
Other icons Reference pages
See page 38.
See page 38.
See pages 48 – 57.
Returns to the previous
screen.
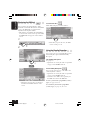
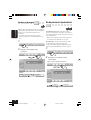
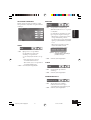
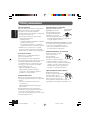
Changing the graphic screen
You can select one of eight graphics in the
picture view window.
• See page 88 for each graphic screen.
When shipped from the factory, display
demonstration has been activated, and starts
automatically when no operations are done for
about 30 seconds (except while playing a DVD/
VCD)..
To cancel it, select one of the graphic screen.
1
While playing any source...
2
• To view the playback picture from any video
source, select the screen where the actual
playback pictures are shown.
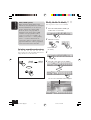
Changing the touch panel
color
You can change the touch panel color
(excluding the picture view window) by
selecting from four preset color—blue, silver,
red, and black.
1
While playing any source...
2
Ex. While listening to FM
broadcast.
Ex. While listening to FM
broadcast.
12-15_KD-AV7001[EE]f.p65 4/27/05, 11:54 AM14

15
ENGLISH
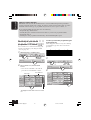
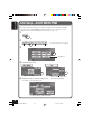
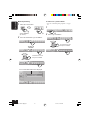
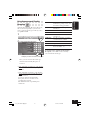
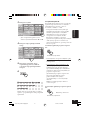
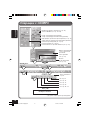
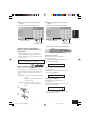
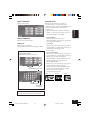
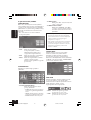
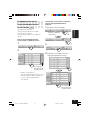
Displaying the level meter
You can display the level meter on the graphic
screen, by selecting from four preset patterns.
• While viewing the playback picture or
display demonstration, you cannot show the
level meter.
1
While playing any source...
2
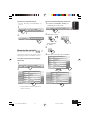
The following level meters are displayed in
sequence.
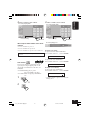
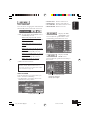
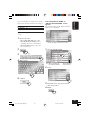
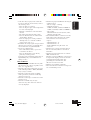
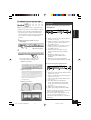
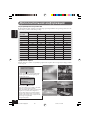
How to read the display of the main unit:
While listening to radio (FM/AM/DAB):
1 Lights up when Dolby Pro Logic II is
activated (see page 41).
2 Lights up or flashes when PTY Standby
Reception is in use (see pages 22 and
76).
3 Lights up or flashes when TA Standby
Reception is in use (see pages 21 and
76).
4 Main information—Frequency/Band/
Preset no.
5 MO indicator lights when FM reception
mode is “MONO.”
6 ST indicator lights while receiving an
FM stereo broadcast.
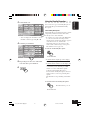
While playing a disc:
1 Lights up when Dolby Digital signal is
detected (see page 41).
2 Lights up when Dolby Pro Logic II is
activated (see page 41).
3 Lights up when DTS signal is detected
(see page 41).
4 Main information—Play time/Title no./
Chapter no./Folder no./Track no.
5 Lights up when the disc is detected.
6 Lights up when an MP3 CD is detected.
• You can dim the display and the buttons
on the front panel.
For details see page 51 and also the
Installation/Connection Manual (separate
volume).
4
5
21 3
6
Ex. While listening to FM
broadcast.
Level meter 1
Level meter 2
Level meter 3
Level meter 4
No level meter will appear when no
sound comes in.
4561 2 3
12-15_KD-AV7001[EE]f.p65 4/27/05, 11:54 AM15

16
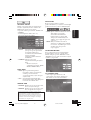
ENGLISH
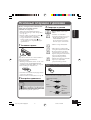
Radio Operations
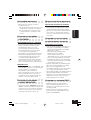
Back to the beginning
See page 14.
See page 14.
See page 15.
See page 44.
See pages 48 – 57.
Volume level
appears when
adjusted.
Dual Mode indicator (see page 38)
SOURCE icon (see pages 14 and 38)
Current band/Preset no.
Station frequency
FM reception mode
Search mode
Sound mode (see page 44)
Surround/DSP mode (see page 41)
Not available for AM.
Available only after pressing “M” (next to
this icon).
16-19_KD-AV7001[EE]f.p65 4/27/05, 11:55 AM16

17
ENGLISH
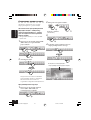
• To tune in to a station using Preset Search,
first store your favorite stations into
memory (6 stations for each band: see page
18).
1
Select the Tuner
2
Select the band (FM/AM)
This receiver has three FM bands (FM1, FM2,
FM3). You can use any one of them to listen to
an FM broadcast.
then
3
Select Search Mode
AUTO: To start Auto Search.
MANUAL: To start Manual Search.
PRESET: To select preset station
numbers (only possible after
storing stations in memory).
4
Tune in to a station
• For Auto Search, press either icon once.
“Auto Search” begins.
When a station is received, searching stops.
• For Manual Search, press either icon
repeatedly (or hold) until a station you
want is selected.
• For Preset Search, press either icon
repeatedly until a preset number you want
is selected.
When an FM stereo broadcast is hard
to receive:
FM reception mode changes to “MONO.”
Each time you press the icon, monaural
reception mode turns on and off.
• When FM reception mode is “MONO,”
reception improves, but stereo effect will
be lost.
Listening to the Radio
16-19_KD-AV7001[EE]f.p65 4/27/05, 11:55 AM17

18
ENGLISH
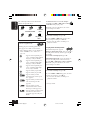
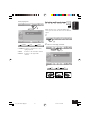
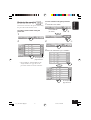
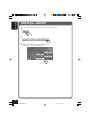
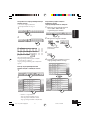
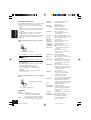
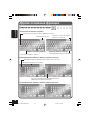
Storing stations in memory
You can preset 6 stations for each band.
FM station automatic presetting—SSM
(Strong-station Sequential Memory)
• This functions only for FM bands.
1
Select the FM band (FM1 – FM3) you
want to store FM stations into.
2
Start SSM.
Local FM stations with the strongest
signals are searched and stored
automatically in the selected FM band.
Manual presetting
1
Select the band (FM1 – FM3, and AM)
you want to store a station into.
2
Tune in to a station.
3
4
Store the station into a preset number.
then
then
then
Preset station information will be displayed.
Select “MANUAL”
(or “AUTO”).
16-19_KD-AV7001[EE]f.p65 4/27/05, 11:55 AM18

19
ENGLISH
To tune in to a preset station
• See also “Listening to the Radio” on page 17.
1
2
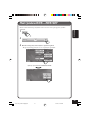
Displaying the preset list
You can store and select the preset stations
using the preset list on the monitor screen.
To select a preset station using the
preset list
1
2
• Preset numbers, station frequencies and
programme station (PS) names are shown
on the list.
To store a station using the preset list
1
Select the band (FM1 – FM3, and AM)
you want to store a station into.
2
Tune into a station.
3
4
Store the station into a preset number.
then
then
Select “MANUAL”
(or “AUTO”).
16-19_KD-AV7001[EE]f.p65 4/27/05, 11:55 AM19

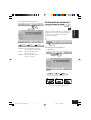
20
ENGLISH
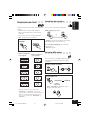
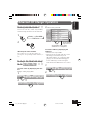
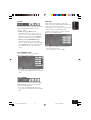
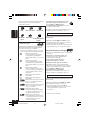
Searching for your favorite
programme—PTY Search
You can tune in to a station broadcasting your
favorite programme by searching for a PTY
code (see page 22).
1
While listening to an FM station...
2
Select a PTY code, and start PTY
Search.
• You can select the PTY code from the
preset list or from the PTY code list.
then
Preset list
PTY code list
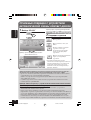
What you can do with RDS
RDS (Radio Data System) allows FM stations to send an additional signal along with their
regular programme signals. For example, the stations send their station names (PS), as well as
information about what type of programme they broadcast, such as sports or music, etc.
By receiving the RDS data, this unit can do the following:
• Programme Type (PTY) Search
• Standby Reception of Traffic Announcement (TA) or your favorite programme (PTY)
• Programme Search
• Tracking the same programme automatically—Network-Tracking Reception
To display the other codes in the PTY code
list
To store your favorite programme types
in the preset list
When shipped from the factory, the following
6 programme types have been stored in the
preset list.
1
2
Pop M
1
2
3
Rock M Easy M
45
6
Classics
Affairs
Varied
then
20-24_KD-AV7001[EE]f.p65 4/27/05, 11:55 AM20
Страница загружается ...
Страница загружается ...
Страница загружается ...
Страница загружается ...
Страница загружается ...
Страница загружается ...
Страница загружается ...
Страница загружается ...
Страница загружается ...
Страница загружается ...
Страница загружается ...
Страница загружается ...
Страница загружается ...
Страница загружается ...
Страница загружается ...
Страница загружается ...
Страница загружается ...
Страница загружается ...
Страница загружается ...
Страница загружается ...
Страница загружается ...
Страница загружается ...
Страница загружается ...
Страница загружается ...
Страница загружается ...
Страница загружается ...
Страница загружается ...
Страница загружается ...
Страница загружается ...
Страница загружается ...
Страница загружается ...
Страница загружается ...
Страница загружается ...
Страница загружается ...
Страница загружается ...
Страница загружается ...
Страница загружается ...
Страница загружается ...
Страница загружается ...
Страница загружается ...
Страница загружается ...
Страница загружается ...
Страница загружается ...
Страница загружается ...
Страница загружается ...
Страница загружается ...
Страница загружается ...
Страница загружается ...
Страница загружается ...
Страница загружается ...
Страница загружается ...
Страница загружается ...
Страница загружается ...
Страница загружается ...
Страница загружается ...
Страница загружается ...
Страница загружается ...
Страница загружается ...
Страница загружается ...
Страница загружается ...
Страница загружается ...
Страница загружается ...
Страница загружается ...
Страница загружается ...
Страница загружается ...
Страница загружается ...
Страница загружается ...
Страница загружается ...
Страница загружается ...
Страница загружается ...
Страница загружается ...
Страница загружается ...
Страница загружается ...
Страница загружается ...
Страница загружается ...
Страница загружается ...
Страница загружается ...
Страница загружается ...
Страница загружается ...
Страница загружается ...
Страница загружается ...
Страница загружается ...
Страница загружается ...
Страница загружается ...
Страница загружается ...
Страница загружается ...
Страница загружается ...
Страница загружается ...
Страница загружается ...
Страница загружается ...
Страница загружается ...
Страница загружается ...
Страница загружается ...
Страница загружается ...
Страница загружается ...
Страница загружается ...
Страница загружается ...
Страница загружается ...
Страница загружается ...
Страница загружается ...
Страница загружается ...
Страница загружается ...
Страница загружается ...
Страница загружается ...
Страница загружается ...
Страница загружается ...
Страница загружается ...
Страница загружается ...
Страница загружается ...
Страница загружается ...
Страница загружается ...
Страница загружается ...
Страница загружается ...
Страница загружается ...
Страница загружается ...
Страница загружается ...
Страница загружается ...
Страница загружается ...
Страница загружается ...
Страница загружается ...
Страница загружается ...
Страница загружается ...
Страница загружается ...
Страница загружается ...
Страница загружается ...
Страница загружается ...
Страница загружается ...
Страница загружается ...
Страница загружается ...
Страница загружается ...
Страница загружается ...
Страница загружается ...
Страница загружается ...
Страница загружается ...
Страница загружается ...
Страница загружается ...
Страница загружается ...
Страница загружается ...
Страница загружается ...
Страница загружается ...
Страница загружается ...
Страница загружается ...
Страница загружается ...
Страница загружается ...
Страница загружается ...
Страница загружается ...
Страница загружается ...
Страница загружается ...
Страница загружается ...
Страница загружается ...
Страница загружается ...
Страница загружается ...
Страница загружается ...
Страница загружается ...
Страница загружается ...
Страница загружается ...
Страница загружается ...
Страница загружается ...
Страница загружается ...
Страница загружается ...
Страница загружается ...
Страница загружается ...
Страница загружается ...
-
 1
1
-
 2
2
-
 3
3
-
 4
4
-
 5
5
-
 6
6
-
 7
7
-
 8
8
-
 9
9
-
 10
10
-
 11
11
-
 12
12
-
 13
13
-
 14
14
-
 15
15
-
 16
16
-
 17
17
-
 18
18
-
 19
19
-
 20
20
-
 21
21
-
 22
22
-
 23
23
-
 24
24
-
 25
25
-
 26
26
-
 27
27
-
 28
28
-
 29
29
-
 30
30
-
 31
31
-
 32
32
-
 33
33
-
 34
34
-
 35
35
-
 36
36
-
 37
37
-
 38
38
-
 39
39
-
 40
40
-
 41
41
-
 42
42
-
 43
43
-
 44
44
-
 45
45
-
 46
46
-
 47
47
-
 48
48
-
 49
49
-
 50
50
-
 51
51
-
 52
52
-
 53
53
-
 54
54
-
 55
55
-
 56
56
-
 57
57
-
 58
58
-
 59
59
-
 60
60
-
 61
61
-
 62
62
-
 63
63
-
 64
64
-
 65
65
-
 66
66
-
 67
67
-
 68
68
-
 69
69
-
 70
70
-
 71
71
-
 72
72
-
 73
73
-
 74
74
-
 75
75
-
 76
76
-
 77
77
-
 78
78
-
 79
79
-
 80
80
-
 81
81
-
 82
82
-
 83
83
-
 84
84
-
 85
85
-
 86
86
-
 87
87
-
 88
88
-
 89
89
-
 90
90
-
 91
91
-
 92
92
-
 93
93
-
 94
94
-
 95
95
-
 96
96
-
 97
97
-
 98
98
-
 99
99
-
 100
100
-
 101
101
-
 102
102
-
 103
103
-
 104
104
-
 105
105
-
 106
106
-
 107
107
-
 108
108
-
 109
109
-
 110
110
-
 111
111
-
 112
112
-
 113
113
-
 114
114
-
 115
115
-
 116
116
-
 117
117
-
 118
118
-
 119
119
-
 120
120
-
 121
121
-
 122
122
-
 123
123
-
 124
124
-
 125
125
-
 126
126
-
 127
127
-
 128
128
-
 129
129
-
 130
130
-
 131
131
-
 132
132
-
 133
133
-
 134
134
-
 135
135
-
 136
136
-
 137
137
-
 138
138
-
 139
139
-
 140
140
-
 141
141
-
 142
142
-
 143
143
-
 144
144
-
 145
145
-
 146
146
-
 147
147
-
 148
148
-
 149
149
-
 150
150
-
 151
151
-
 152
152
-
 153
153
-
 154
154
-
 155
155
-
 156
156
-
 157
157
-
 158
158
-
 159
159
-
 160
160
-
 161
161
-
 162
162
-
 163
163
-
 164
164
-
 165
165
-
 166
166
-
 167
167
-
 168
168
-
 169
169
-
 170
170
-
 171
171
-
 172
172
-
 173
173
-
 174
174
-
 175
175
-
 176
176
-
 177
177
-
 178
178
-
 179
179
-
 180
180
-
 181
181
-
 182
182
-
 183
183


JVC Car Video System KD-AV7001 Руководство пользователя
- Категория
- Мультимедиа-приемники для автомобилей
- Тип
- Руководство пользователя
- Это руководство также подходит для
Задайте вопрос, и я найду ответ в документе
Поиск информации в документе стал проще с помощью ИИ
на других языках
Похожие модели бренда
-
JVC KD-AV7001 DVD + TV тюнер Руководство пользователя
-
-
-
-
-
-
-
-
-