Kenwood KMM-102AY Руководство пользователя
- Категория
- Мультимедиа-приемники для автомобилей
- Тип
- Руководство пользователя

Data Size: B6L (182 mm x 128 mm)
Book Size: B6L (182 mm x 128 mm)
B5A-0893-01 (EN/E2N)© 2015 JVC KENWOOD Corporation
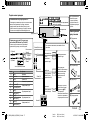
KMM-202
KMM-122Y
KMM-102RY
DIGITAL MEDIA RECEIVER
INSTRUCTION MANUAL
ЦИФРОВОЙ МЕДИА-РЕСИВЕР
ИHCTPУKЦИЯ ПO ЭKCПЛУATAЦИИ
KMM-102GY
KMM-102AY
JS_KWD_KMM_202_ENE2N_C01_1.indd 1JS_KWD_KMM_202_ENE2N_C01_1.indd 1 1/7/2015 9:57:54 AM1/7/2015 9:57:54 AM

i
Data Size: B6L (182 mm x 128 mm)
Book Size: B6L (182 mm x 128 mm)
Declaration of Conformity with regard to the EMC Directive
Declaration of Conformity with regard to the RoHS Directive 2011/65/EU
Manufacturer:
JVC KENWOOD Corporation
3-12, Moriya-cho, Kanagawa-ku, Yokohama-shi, Kanagawa, 221-0022, Japan
EU Representative:
JVCKENWOOD NEDERLAND B.V.
Amsterdamseweg 37, 1422 AC UITHOORN, The Netherlands
Декларация соответствия относительно Директивы Электромагнитная
совместимость
Декларация соответствия относительно Директивы 2011/65/EU об ограничении
содержания вредных веществ
Производитель:
ДжейВиСи КЕНВУД Корпорейшн
3-12, Moriya-cho, Kanagawa-ku, Yokohama-shi, Kanagawa, 221-0022, Япония
Представительство в EC:
ДжейВиСиКЕНВУД Нидерланд Би.Ви.
Amsterdamseweg 37, 1422 AC UITHOORN, Нидерланды
Information on Disposal of Old Electrical and Electronic Equipment and Batteries
(applicable for countries that have adopted separate waste collection systems)
Products and batteries with the symbol (crossed-out wheeled bin) cannot be disposed as
household waste.
Old electrical and electronic equipment and batteries should be recycled at a facility capable of
handling these items and their waste byproducts.
Contact your local authority for details in locating a recycle facility nearest to you. Proper
recycling and waste disposal will help conserve resources whilst preventing detrimental effects
on our health and the environment.
Notice:
The sign “Pb” below the symbol for batteries indicates that this battery contains lead.
For Israel
For Turkey
Bu ürün 28300 sayılı Resmi Gazete’de yayımlanan Atik Elektrikli ve Elektronik Eşyalarin
Kontrolü Yönetmeliğe uygun olarak üretilmiştir.
Eski Elektrik ve Elektronik Ekipmanların İmha Edilmesi Hakkında Bilgi (atık yan ürün
toplama sistemlerini kullanan ülkeleri için uygulanabilir)
Sembollü (üzerinde çarpı işareti olan çöp kutusu) ürünler ev atıkları olarak
atılamaz.
Eski elektrik ve elektronik ekipmanlar, bu ürünleri ve ürün atıklarını geri
dönüştürebilecek bir tesiste değerlendirilmelidir. Yaşadığınız bölgeye
en yakın geri dönüşüm tesisinin yerini öğrenmek için yerel makamlara
müracaat edin. Uygun geri dönüşüm ve atık imha yöntemi sağlığımız ve
çevremiz üzerindeki zararlı etkileri önlerken kaynakların korunmasına da
yardımcı olacaktır.
JS_KWD_KMM_202_ENE2N_S01_1.indd iJS_KWD_KMM_202_ENE2N_S01_1.indd i 29/6/2015 4:13:11 PM29/6/2015 4:13:11 PM

ii
Data Size: B6L (182 mm x 128 mm)
Book Size: B6L (182 mm x 128 mm)
Дата изготовления (месяц/год) находится на этикетке устройства.
В соответствии с Законом Российской Федерации “О защите прав потребителей” срок службы
(годности) данного товара “по истечении которого он может представлять опасность
для жизни, здоровья потребителя, причинять вред его имуществу или окружающей
среде” составляет семь (7) лет со дня производства. Этот срок является временем, в
течение которого потребитель данного товара может безопасно им пользоваться при
условии соблюдения инструкции по эксплуатации данного товара, проводя необходимое
обслуживание, включающее замену расходных материалов и/или соответствующее
ремонтное обеспечение в специализированном сервисном центре.
Дополнительные косметические материалы к данному товару, поставляемые вместе с ним,
могут храниться в течение двух (2) лет со дня его производства.
Срок службы (годности), кроме срока хранения дополнительных косметических материалов,
упомянутых в предыдущих двух пунктах, не затрагивает никаких других прав потребителя, в
частности, гарантийного свидетельства KENWOOD, которое он может получить в соответствии
с законом о правах потребителя или других законов, связанных с ним.
JS_KWD_KMM_202_ENE2N_S01_1.indd iiJS_KWD_KMM_202_ENE2N_S01_1.indd ii 29/6/2015 4:13:11 PM29/6/2015 4:13:11 PM

Data Size: B6L (182 mm x 128 mm)
Book Size: B6L (182 mm x 128 mm)
2
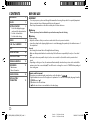
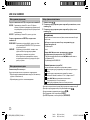
CONTENTS BEFORE USE
IMPORTANT
• To ensure proper use, please read through this manual before using this product. It is especially important
that you read and observe Warning and Caution in this manual.
• Please keep the manual in a safe and accessible place for future reference.
Warning
Do not operate any function that takes your attention away from safe driving.
Caution
Volume setting:
• Adjust the volume so that you can hear sounds outside the car to prevent accidents.
• Lower the volume before playing digital sources to avoid damaging the speakers by the sudden increase of
the output level.
General:
• Avoid using the external device if it might hinder safe driving.
• Make sure all important data has been backed up. We shall bear no responsibility for any loss of recorded
data.
• Never put or leave any metallic objects (such as coins or metal tools) inside the unit to prevent a short
circuit.
• Depending on the types of cars, the antenna will automatically extend when you turn on the unit with the
antenna control wire connected (
17
). Turn off the unit or change the source to STANDBY when parking at
a low ceiling area.
How to read this manual
• Operations are explained mainly using buttons on the faceplate of .
• English indications are used for the purpose of explanation. You can select the display language from the
[
FUNCTION
] menu. (
5
)
• [
XX
] indicates the selected items.
• (
XX
) indicates references are available on the stated page.
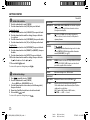
BEFORE USE 2
BASICS 3
GETTING STARTED 3
1 Select the display language
and cancel the demonstration
2 Set the clock and date
3 Set the initial settings
RADIO 5
USB / iPod / ANDROID 7
AUX 9
AUDIO SETTINGS 10
DISPLAY SETTINGS 11
TROUBLESHOOTING 12
REFERENCES 13
Maintenance
More information
SPECIFICATIONS 15
INSTALLATION /
CONNECTION 16
JS_KWD_KMM_202_ENE2N_EN_5.indd 2JS_KWD_KMM_202_ENE2N_EN_5.indd 2 19/8/2015 12:03:56 PM19/8/2015 12:03:56 PM

Data Size: B6L (182 mm x 128 mm)
Book Size: B6L (182 mm x 128 mm)
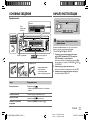
3
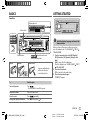
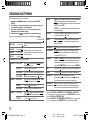
BASICS
To On the faceplate
Turn on the power
Press
.
• Press and hold to turn off the power.
Adjust the volume Turn the volume knob.
Select a source
Press
repeatedly.
Change the display information Press DISP repeatedly. (
14
)
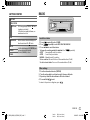
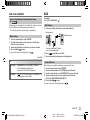
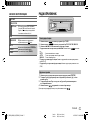
Faceplate
How to resetAttach Detach
: Flashes when the unit
enters searching status.
GETTING STARTED
Select the display language and cancel the
demonstration
When you turn on the power (or after you reset the
unit), the display shows: “SEL LANGUAGE”
“PRESS”
“VOLUME KNOB”
1 Turn the volume knob to select [
ENG
](English),
[
RUS
](Russian) or [
SPA
](Spanish), then press the
knob.
[
ENG
] is selected for the initial setup.
Then, the display shows: “CANCEL DEMO”
“PRESS”
“VOLUME KNOB”.
2 Press the volume knob.
[
YES
] is selected for the initial setup.
3 Press the volume knob again.
“DEMO OFF” appears.
1
ENGLISH
Display window
Your preset adjustments
will be erased except
stored radio stations.
Volume knob
Detach button
JS_KWD_KMM_202_ENE2N_EN_4.indd 3JS_KWD_KMM_202_ENE2N_EN_4.indd 3 27/7/2015 3:20:58 PM27/7/2015 3:20:58 PM

4
Data Size: B6L (182 mm x 128 mm)
Book Size: B6L (182 mm x 128 mm)
GETTING STARTED
Default:
XX
AUDIO CONTROL
SWITCH PREOUT
REAR
/
SUB-W
or
REAR
/
SUBWOOFER
: Selects whether rear speakers
or a subwoofer are connected to the line out terminals on the rear
(through an external amplifier).
SP SELECT OFF
/
5/4
/
6 × 9/6
/
OEM
: Selects according to the speaker size
(5inches or 4inches, 6×9inches or 6inches) or OEM speakers for
optimum performance.
DISPLAY
EASY MENU
(For )
ON
:Both display and button illumination change to white color when
entering [
FUNCTION
].;
OFF
:Both display and button illumination
remain as [
COLOR
SELECT
] color. (
11
)
TUNER SETTING
PRESET TYPE
NORMAL
:Memorizes one station for each preset button in each band
(FM1/ FM2/ FM3/ MW/ LW).;
MIX
:Memorizes one station for each
preset button, regardless of the selected band.
SYSTEM
KEY BEEP
ON
:Activates the keypress tone.;
OFF
:Deactivates.
SOURCE SELECT
BUILT-IN AUX
ON
:Enables AUX in source selection.;
OFF
:Disables. (
9
)
P-OFF WAIT
Applicable only when the demonstration mode is turned off.
Sets the duration when the unit will automatically turn off (while in
standby mode) to save the battery.
20M
: 20minutes;
40M
: 40minutes;
60M
: 60minutes;
WAIT TIME – – –
or
OFF – – –
:Cancels
Set the clock and date
1
Press the volume knob to enter [
FUNCTION
].
2 Turn the volume knob to select [
CLOCK
], then press the knob.
To adjust the clock
3 Turn the volume knob to select [
CLOCK ADJUST
], then press the knob.
4 Turn the volume knob to make the settings, then press the knob.
Hour
Minute
5 Turn the volume knob to select [
CLOCK FORMAT
], then press the knob.
6 Turn the volume knob to select [
12H
] or [
24H
], then press the knob.
To set the date
7 Turn the volume knob to select [
DATE FORMAT
], then press the knob.
8 Turn the volume knob to select [
DD/MM/YY
] or [
MM/DD/YY
], then press
the knob.
9 Turn the volume knob to select [
DATE SET
], then press the knob.
10 Turn the volume knob to make the settings, then press the knob.
Day
Month Year or Month Day Year
11 Press and hold to exit.
To return to the previous setting item, press .
Set the initial settings
1
Press repeatedly to enter STANDBY.
2 Press the volume knob to enter [
FUNCTION
].
• Pressing AUD enters [
AUDIO CONTROL
] directly.
3 Turn the volume knob to select an item (see the following table),
then press the knob.
4 Repeat step 3 until the desired item is selected or activated.
5 Press and hold to exit.
To return to the previous setting item, press .
3
2
JS_KWD_KMM_202_ENE2N_EN_4.indd 4JS_KWD_KMM_202_ENE2N_EN_4.indd 4 27/7/2015 3:21:00 PM27/7/2015 3:21:00 PM

ENGLISH
5
Data Size: B6L (182 mm x 128 mm)
Book Size: B6L (182 mm x 128 mm)
F/W UPDATE
UPDATE SYSTEM
F/W UP xx.xx
YES
:Starts upgrading the firmware.;
NO
:Cancels
(upgrading is not activated).
For details on how to update the firmware, see:
www.kenwood.com/cs/ce/
CLOCK
CLOCK DISPLAY
ON
:The clock time is shown on the display even
when the unit is turned off.;
OFF
:Cancels.
ENGLISH
Select the display language for [
FUNCTION
] menu
and music information if applicable.
By default, [
ENGLISH
] is selected.
РУССКИЙ
ESPANOL
GETTING STARTED RADIO
Search for a station
1
Press repeatedly to select TUNER.
2 Press repeatedly to select FM1/ FM2/ FM3/ MW/ LW.
3 Press S/T to search for a station.
• To change the searching method for S/T: Press repeatedly.
AUTO1 : Automatically search for a station.
AUTO2 : Search for a preset station.
MANUAL : Manually search for a station.
• To store a station: Press and hold one of the number buttons (1to6).
• To select a stored station: Press one of the number buttons (1to6).
Other settings
1
Press the volume knob to enter [
FUNCTION
].
2 Turn the volume knob to select an item
(
6
)
, then press the knob.
3 Repeat step 2 until the desired item is selected or activated.
4 Press and hold to exit.
To return to the previous setting item, press .
JS_KWD_KMM_202_ENE2N_EN_5.indd 5JS_KWD_KMM_202_ENE2N_EN_5.indd 5 14/8/2015 9:28:03 AM14/8/2015 9:28:03 AM

6
Data Size: B6L (182 mm x 128 mm)
Book Size: B6L (182 mm x 128 mm)
RADIO
Default:
XX
TUNER SETTING
LOCAL SEEK
ON
: Searches only stations with good reception. ;
OFF
: Cancels.
•
Settings made are applicable only to the selected source/station. Once
you change the source/station, you need to make the settings again.
AUTO
MEMORY
YES
:Automatically starts memorizing 6 stations with good reception.;
NO
:Cancels.
•
Selectable only if [
NORMAL
] is selected for [
PRESET TYPE
]. (
4
)
MONO SET ON
:Improves the FM reception, but the stereo effect may be lost.;
OFF
:Cancels.
NEWS SET ON
: The unit will temporarily switch to News Programme if available. ;
OFF
: Cancels.
REGIONAL ON
: Switches to another station only in the specific region using the “AF”
control.;
OFF
:Cancels.
AF SET ON
: Automatically searches for another station broadcasting the same
program in the same Radio Data System network with better reception
when the current reception is poor.;
OFF
:Cancels.
TI ON
:Allows the unit to temporarily switch to Traffic Information if available
(“TI” lights up).;
OFF
:Cancels.
PTY SEARCH
1
Press the volume knob to enter PTY language selection.
2
Turn the volume knob to select the PTY language (
ENGLISH
/
FRENCH
/
GERMAN
), then press the knob.
3
Turn the volume knob to select the available Program Type (see the
following).
4
Press
S / T
to start searching.
CLOCK
TIME SYNC
ON
:Synchronizes the unit’s time to the Radio Data System station time.;
OFF
:Cancels.
Available Program Type
SPEECH
:
NEWS
,
AFFAIRS
,
INFO
(information),
SPORT
,
EDUCATE
,
DRAMA
,
CULTURE
,
SCIENCE
,
VARIED
,
WEATHER
,
FINANCE
,
CHILDREN
,
SOCIAL
,
RELIGION
,
PHONE IN
,
TRAVEL
,
LEISURE
,
DOCUMENT
MUSIC
:
POP M
(music),
ROCK M
(music),
EASY M
(music),
LIGHT M
(music),
CLASSICS
,
OTHER M
(music),
JAZZ
,
COUNTRY
,
NATION M
(music),
OLDIES
,
FOLK M
(music)
The unit will search for the Program Type categorized under [
SPEECH
] or
[
MUSIC
] if selected.
• [
LOCAL SEEK
]/ [
MONO SET
]/ [
NEWS SET
]/ [
REGIONAL
]/ [
AF SET
]/ [
TI
]/ [
PTY SEARCH
]
is selectable only when the band is FM1/ FM2/ FM3.
• If the volume is adjusted during reception of traffic information or news
bulletin, the adjusted volume is memorized automatically. It will be
applied the next time traffic information or news bulletin is turned on.
JS_KWD_KMM_202_ENE2N_EN_2.indd 6JS_KWD_KMM_202_ENE2N_EN_2.indd 6 10/7/2015 8:44:07 AM10/7/2015 8:44:07 AM

ENGLISH
7
Data Size: B6L (182 mm x 128 mm)
Book Size: B6L (182 mm x 128 mm)
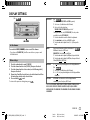
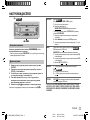
USB / iPod / ANDROID
Start playback
The source changes automatically and
playback starts.
*
1
KCA-iP102 : 30-pin type, KCA-iP103 : Lightning type
*
2
Do not leave the cable inside the car when not using.
To On the faceplate
Playback / pause Press .
Reverse / Fast-forward
*
4
Press and hold S/T.
Select a track/file
Press S/T.
Select a folder
*
5
Press J/K.
Repeat play
*
6
Press repeatedly.
FILE REPEAT
/
FOLDER REPEAT
/
ALL REPEAT
: MP3/WMA/WAV/FLAC file
FILE REPEAT
/
FOLDER REPEAT
/
REPEAT OFF
: iPod or ANDROID
Random play
*
6
Press repeatedly.
FOLDER RANDOM
/
RANDOM OFF
: MP3/WMA/WAV/FLAC file, iPod or
ANDROID
Press and hold
to select
ALL RANDOM
.
*
3
When connecting an Android device, “Press [VIEW] to install KENWOOD MUSIC PLAY APP” is shown. Follow the instructions
to install the application. You can also install the latest version of KENWOOD MUSIC PLAY application on your Android device
before connecting. (
13
)
*
4
For ANDROID: Applicable only when [
BROWSE MODE
] is selected. (
8
)
*
5
Only for MP3/WMA/WAV/FLAC files. This does not work for iPod/ ANDROID.
*
6
For iPod/ ANDROID: Applicable only when [
MODE OFF
]/ [
BROWSE MODE
] is selected. (
8
)
USB input terminal
CA-U1EX (max.: 500mA)
(optional accessory)
Micro USB 2.0 cable
*
2
(commercially available)
KCA-iP102 / KCA-iP103
(optional accessory)
*
1
or accessory cable of the
iPod/iPhone
*
2
USB
iPod/iPhone
(for )
ANDROID
*
3
JS_KWD_KMM_202_ENE2N_EN_2.indd 7JS_KWD_KMM_202_ENE2N_EN_2.indd 7 10/7/2015 8:44:07 AM10/7/2015 8:44:07 AM

8
Data Size: B6L (182 mm x 128 mm)
Book Size: B6L (182 mm x 128 mm)
USB / iPod / ANDROID
Select control mode
While in IPOD source, press 5 repeatedly.
MODE ON
: Control iPod using the iPod itself
. However,
you can
still play/pause, file skip, fast-forward or reverse from
this unit.
MODE OFF
: Control iPod from this unit.
While in ANDROID source, press 5 repeatedly.
BROWSE MODE
: Control Android device from this unit via
KENWOOD MUSIC PLAY application installed in the
Android device.
HAND MODE
: Control Android device using the Android device
itself via other media player applications installed
in the Android device. However, you can still play/
pause and file skip from this unit.
Select music drive
Press 5 repeatedly.
Stored songs in the following drive will be played back.
• Selected internal or external memory of a smartphone (Mass
Storage Class).
• Selected drive of a multiple drives device.
Select a file from a folder/list
1
Press .
2 Turn the volume knob to select a folder/list, then press the knob.
3 Turn the volume knob to select a file, then press the knob.
Quick Search
If you have many files, you can search through them quickly.
Turn the volume knob quickly to browse through the list quickly.
–
Not applicable for iPod.
(or)
Press S/T to search at a preset skip search ratio. (
9,
[
SKIP SEARCH
])
• Pressing and holding S/T searches at a 10
%
ratio.
–
Not applicable for MP3/WMA/WAV/FLAC files.
Alphabet Search
(applicable only for iPod)
You can search for a file according to the first character.
Turn the volume knob quickly to enter character search.
Turn the volume knob to select the character.
To search for a character other than A to Z and 0to9, enter only “
*
”.
Press S/T to move to the entry position.
• You can enter up to 3characters.
Press the volume knob to start searching.
• To return to the root folder/ first file/ top menu, press 5.
• To return to the previous setting item, press
.
• To cancel, press and hold
.
• For iPod, applicable only when [
MODE OFF
] is selected.
• For ANDROID, applicable only when [
BROWSE MODE
] is selected.
JS_KWD_KMM_202_ENE2N_EN_4.indd 8JS_KWD_KMM_202_ENE2N_EN_4.indd 8 27/7/2015 3:21:18 PM27/7/2015 3:21:18 PM

ENGLISH
9
Data Size: B6L (182 mm x 128 mm)
Book Size: B6L (182 mm x 128 mm)
USB / iPod / ANDROID
Listen to TuneIn Radio/ TuneIn Radio Pro/ Aupeo
(for )
While listening to TuneIn Radio, TuneIn Radio Pro or Aupeo, connect
the iPod/iPhone to the USB input terminal of the unit.
• The unit will output the sound from these applications.
Other settings
1
Press the volume knob to enter [
FUNCTION
].
2 Turn the volume knob to select an item (see the following
table), then press the knob.
3 Repeat step 2 until the desired item is selected or activated.
4 Press and hold to exit.
To return to the previous setting item, press .
Default:
XX
USB
MUSIC DRIVE DRIVE CHANGE
:The next drive ([
DRIVE 1
] to [
DRIVE 5
]) is
selected automatically and playback starts.
Repeat steps
1
to
3
to select the following drives.
SKIP SEARCH 0.5%
/
1%
/
5%
/
10%
: While listening to iPod or ANDROID, selects
the skip search ratio over the total files.
AUX
Preparation:
Select [
ON
] for [
BUILT-IN AUX
]. (
4
)
Start listening
1
Connect a portable audio player (commercially available).
2 Press repeatedly to select AUX.
3 Turn on the portable audio player and start playback.
Set the AUX name
While listening to a portable audio player connected to the unit...
1 Press the volume knob to enter [
FUNCTION
].
2 Turn the volume knob to select [
SYSTEM
], then press the knob.
3 Turn the volume knob to select [
AUX NAME SET
], then press the knob.
4 Turn the volume knob to select an item, then press the knob.
AUX
(default)/
DVD
/
PORTABLE
/
GAME
/
VIDEO
/
TV
5 Press and hold to exit.
To return to the previous setting item, press .
Auxiliary input jack
Portable audio player
3.5mm stereo mini plug with “L” shaped
connector (commercially available)
JS_KWD_KMM_202_ENE2N_EN_2.indd 9JS_KWD_KMM_202_ENE2N_EN_2.indd 9 10/7/2015 8:44:08 AM10/7/2015 8:44:08 AM

10
Data Size: B6L (182 mm x 128 mm)
Book Size: B6L (182 mm x 128 mm)
PRESET EQ DRIVE EQ
/
TOP40
/
POWERFUL
/
ROCK
/
POPS
/
EASY
/
JAZZ
/
NATURAL
/
USER
:Selects a preset equalizer suitable to the music
genre. (Select [
USER
] to use the settings made in [
EQ PRO
].)
[
DRIVE EQ
] is a preset equalizer that reduces noise outside the car or
running noise of the tyres.
BASS BOOST LV1
/
LV2
/
LV3
or
LEVEL1
/
LEVEL2
/
LEVEL3
:Selects your preferred
bass boost level.;
OFF
:Cancels.
LOUDNESS LV1
/
LV2
or
LEVEL1
/
LEVEL2
:Selects your preferred low and high
frequencies boost to produce a well-balanced sound at a low volume
level.;
OFF
:Cancels.
SUBWOOFER SET ON
:Turns on the subwoofer output.;
OFF
:Cancels.
LPF SUBWOOFER THROUGH
:All signals are sent to the subwoofer.;
85HZ
/
120HZ
/
160HZ
:Audio signals with frequencies lower than 85Hz/ 120Hz/
160Hz are sent to the subwoofer.
SUB-W PHASE REVERSE
(180°)/
NORMAL
(0°):Selects the phase of the subwoofer
output to be in line with the speaker output for optimum performance.
(Selectable only if a setting other than [
THROUGH
] is selected for
[
LPF SUBWOOFER
].)
FADER R15
to
F15
(
0
):Adjusts the rear and front speaker output balance.
BALANCE L15
to
R15
(
0
):Adjusts the left and right speaker output balance.
VOLUME OFFSET
For AUX:
–8
to
+8
(
0
) ; For other sources:
–8
to
0
:Preset the initial
volume level of each source. (Before adjustment, select the source you
want to adjust.)
SOUND RECNSTR
(Sound
reconstruction)
ON
:Creates realistic sound by compensating the high-frequency
components and restoring the rise-time of the waveform that are lost
in audio data compression.;
OFF
:Cancels.
• [
SUB-W LEVEL
]/ [
SUBWOOFER SET
]/ [
LPF SUBWOOFER
]/ [
SUB-W PHASE
] is
selectable only if [
SWITCH PREOUT
] is set to [
SUB-W
] or [
SUBWOOFER
]. (
4
)
• [
SUB-W LEVEL
]/ [
LPF SUBWOOFER
]/ [
SUB-W PHASE
] is selectable only if
[
SUBWOOFER SET
] is set to [
ON
].
AUDIO SETTINGS
While listening to any source...
1 Press AUD to enter [
AUDIO CONTROL
] directly.
2 Turn the volume knob to select an item (see the following table),
then press the knob.
3 Repeat step 2 until the desired item is selected or activated.
4 Press and hold to exit.
To return to the previous setting item, press .
Default:
XX
SUB-W LEVEL –15
to
+15
(
0
) Adjusts the subwoofer output level.
BASS LEVEL –8
to
+8
(
+2
)
Adjusts the level to memorize for each source. (Before
making an adjustment, select the source you want
to adjust.)
MID LEVEL –8
to
+8
(
+1
)
TRE LEVEL –8
to
+8
(
+1
)
EQ PRO
(This setting is stored to [
USER
].)
BASS ADJUST BASS CTR FRQ 60
/
80
/
100
/
200
or
60HZ
/
80HZ
/
100HZ
/
200HZ
:
Selects the center frequency.
BASS LEVEL –8
to
+8
(
+2
):Adjusts the level.
BASS Q FACTOR 1.00
/
1.25
/
1.50
/
2.00
:Adjusts the quality factor.
BASS EXTEND ON
:Turns on the extended bass.;
OFF
:Cancels.
MID ADJUST MID CTR FRQ 0.5K
/
1.0K
/
1.5K
/
2.5K
or
0.5KHZ
/
1.0KHZ
/
1.5KHZ
/
2.5KHZ
:Selects the center frequency.
MID LEVEL –8
to
+8
(
+1
):Adjusts the level.
MID Q FACTOR 0.75
/
1.00
/
1.25
:Adjusts the quality factor.
TRE ADJUST TRE CTR FRQ 10.0K
/
12.5K
/
15.0K
/
17.5K
or
10.0KHZ
/
12.5KHZ
/
15.0KHZ
/
17.5KHZ
:Selects the center frequency.
TRE LEVEL –8
to
+8
(
+1
):Adjusts the level.
JS_KWD_KMM_202_ENE2N_EN_4.indd 10JS_KWD_KMM_202_ENE2N_EN_4.indd 10 27/7/2015 3:28:26 PM27/7/2015 3:28:26 PM

ENGLISH
11
Data Size: B6L (182 mm x 128 mm)
Book Size: B6L (182 mm x 128 mm)
DISPLAY SETTINGS
Set the dimmer
Press and hold DISP (DIMMER) to turn on or off the dimmer.
• If you have set [
DIMMER TIME
], it will be canceled once you press and
hold this button.
Other settings
1
Press the volume knob to enter [
FUNCTION
].
2 Turn the volume knob to select [
DISPLAY
], then press the knob.
3 Turn the volume knob to select an item (see the following table),
then press the knob.
4 Repeat step 3 until the desired item is selected/activated or follow
the instructions stated on the selected item.
5 Press and hold to exit.
To return to the previous setting item, press .
COLOR SELECT
(For )
Select color for
ALL ZONE
,
ZONE 1
and
ZONE 2
separately.
1
Select a zone. (See illustration on the left column.)
2
Select a color for the selected zone.
VARIABLE SCAN
/
CUSTOM R/G/B
/
preset colors*
To make your own color, select [
CUSTOM R/G/B
]. The color you have
made will be stored in [
CUSTOM R/G/B
].
1
Press the volume knob to enter the detailed color adjustment.
2
Press
S
/
T
to select the color (
R
/
G
/
B
) to adjust.
3
Turn the volume knob to adjust the level (
0
—
9
), then press the
knob.
DIMMER
Dim the display illumination (and button illumination for ).
ON
:Dimmer is turned on.;
OFF
:Cancels.
DIMMER TIME
:Set the dimmer on and off time.
1
Turn the volume knob to adjust the [
ON
] time, then press the knob.
2
Turn the volume knob to adjust the [
OFF
] time, then press the knob.
(Default: [
ON
]:
18:00
; [
OFF
]:
6:00
)
BRIGHTNESS 0
—
31
: Select your preferred brightness level for display illumination.
(For )
1
Select a zone. (See illustration on the left column.)
2
0
—
31
: Select your preferred brightness level for display and button
illumination.
TEXT SCROLL AUTO
/
ONCE
:Select whether to scroll the display information
automatically, or scroll only once.;
OFF
:Cancels.
*
Preset colors:
RED1
/
RED2
/
RED3
/
PURPLE1
/
PURPLE2
/
PURPLE3
/
PURPLE4
/
BLUE1
/
BLUE2
/
BLUE3
/
SKYBLUE1
/
SKYBLUE2
/
LIGHTBLUE
/
AQUA1
/
AQUA2
/
GREEN1
/
GREEN2
/
GREEN3
/
YELLOWGREEN1
/
YELLOWGREEN2
/
YELLOW
/
ORANGE1
/
ORANGE2
/
ORANGERED
(For
)
JS_KWD_KMM_202_ENE2N_EN_5.indd 11JS_KWD_KMM_202_ENE2N_EN_5.indd 11 14/8/2015 9:35:09 AM14/8/2015 9:35:09 AM

12
Data Size: B6L (182 mm x 128 mm)
Book Size: B6L (182 mm x 128 mm)
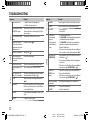
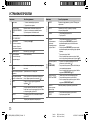
TROUBLESHOOTING
Symptom Remedy
General
Sound cannot be heard.
•
Adjust the volume to the optimum level.
•
Check the cords and connections.
“MISWIRING CHECK WIRING
THEN PWR ON” appears.
Turn the power off, then check to be sure the terminals
of the speaker wires are insulated properly. Turn the
power on again.
“PROTECTING SEND SERVICE”
appears.
Send the unit to the nearest service center.
•
Sound cannot be heard.
•
The unit does not turn on.
•
Information shown on the
display is incorrect.
Clean the connectors. (
13
)
The unit does not work at all. Reset the unit. (
3
)
Radio
•
Radio reception is poor.
•
Static noise while listening
to the radio.
Connect the antenna firmly.
USB / iPod
“READING” keeps flashing. Do not use too many hierarchical levels or folders.
Elapsed playing time is not
correct.
This is caused by how the tracks are recorded.
Correct characters are not
displayed (e.g. album name).
This unit can only display uppercase letters, numbers,
and a limited number of symbols. (
5
)
“NA FILE” Make sure the media contains supported audio files.
(
13
)
“READ ERROR” Copy the files and folders onto the USB device again. If
this does not solve the problem, reset the USB device
or use another USB device.
“NO DEVICE” Connect a USB device, and change the source to USB
again.
“COPY PRO” A copy-protected file is played.
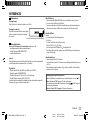
Symptom Remedy
USB / iPod
“NA DEVICE”
Connect a supported USB device, and check the connections.
“NO MUSIC” Connect a USB device that contains playable audio files.
“iPod ERROR”
•
Reconnect the iPod.
•
Reset the iPod.
ANDROID
•
Sound cannot
be heard during
playback.
•
Sound output only
from the Android
device.
•
Reconnect the Android device.
•
If in [
HAND MODE
], launch any media player application
on the Android device and start playback.
•
If in [
HAND MODE
], relaunch the current media player
application or use another media player application.
•
Restart the Android device.
•
If this does not solve the problem, the connected Android
device is unable to route the audio signal to unit. (
13
)
Cannot playback at
[
BROWSE MODE
].
•
Make sure KENWOOD MUSIC PLAY APP is installed on the
Android device. (
7
)
•
Reconnect the Android device and select the appropriate
control mode.
•
If this does not solve the problem, the connected Android
device does not support [
BROWSE MODE
]. (
13
)
“NO DEVICE” or
“READING” keeps
flashing.
•
Switch off the developer options on the Android device.
•
Reconnect the Android device.
•
If this does not solve the problem, the connected Android
device does not support [
BROWSE MODE
]. (
13
)
Playback is intermittent
or sound skips.
Turn off the power saving mode on the Android device.
“ANDROID ERROR” /
“NADEVICE”
•
Reconnect the Android device.
•
Restart the Android device.
JS_KWD_KMM_202_ENE2N_EN_5.indd 12JS_KWD_KMM_202_ENE2N_EN_5.indd 12 14/8/2015 9:35:10 AM14/8/2015 9:35:10 AM

ENGLISH
13
Data Size: B6L (182 mm x 128 mm)
Book Size: B6L (182 mm x 128 mm)
REFERENCES
Maintenance
Cleaning the unit
Wipe off dirt on the faceplate with a dry silicone or soft cloth.
Cleaning the connector
Detach the faceplate and clean the connector gently
with a cotton swab, being careful not to damage
the connector.
More information
Visit also the following website <www.kenwood.com/cs/ce/> for:
–
Latest firmware updates and latest compatible item list
–
Android™ application KENWOOD MUSIC PLAY
–
Any other latest information
General
Detailed information and notes about the playable audio files are stated in an online manual
on the following website: www.kenwood.com/cs/ce/audiofile/
Playable files
•
Playable audio file: MP3 (.mp3), WMA (.wma), WAV (.wav), FLAC (.flac)
•
Playable disc media: CD-R/CD-RW/CD-ROM
•
Playable disc file format: ISO 9660 Level 1/2, Joliet, Long file name.
•
Playable USB device file system: FAT12, FAT16, FAT32
Even when audio files comply with the standards listed above, playback may be impossible
depending on the types or conditions of media or device.
Connector (on the reverse side of the faceplate)
About USB devices
•
This unit can play MP3/WMA/WAV/FLAC files stored on a USB mass storage class device.
•
You cannot connect a USB device via a USB hub.
•
Connecting a cable whose total length is longer than 5m may result in abnormal playback.
•
This unit cannot recognize a USB device whose rating is other than 5V and exceeds 1A.
About iPod/iPhone
Made for
-
iPod touch (2nd, 3rd, 4th, and 5th generation)
-
iPod classic
-
iPod nano (3rd, 4th, 5th, 6th, and 7th generation)
-
iPhone 3G, 3GS, 4, 4S, 5, 5S, 5C, 6, 6 Plus
•
You cannot operate iPod if “KENWOOD” or “ ” is displayed on iPod.
•
Depending on the version of the operating system of the iPod/iPhone, some functions may
not operate on this unit.
About Android device
•
This unit supports Android OS 4.1 and above.
•
Some Android devices (with OS 4.1 and above) may not fully support Android Open Accessory
(AOA) 2.0.
•
If the Android device supports both mass storage class device and AOA 2.0, this unit always
playback via AOA 2.0 as priority.
Muting upon the reception of a phone call
Connect the MUTE wire to your telephone using a commercial telephone accessory. (
17
)
When a call comes in, “CALL” appears.
(The audio system pauses.)
•
To continue listening to the audio system during a call, press . “CALL” disappears
and the audio system resumes.
When the call ends, “CALL” disappears.
(The audio system resumes.)
JS_KWD_KMM_202_ENE2N_EN_5.indd 13JS_KWD_KMM_202_ENE2N_EN_5.indd 13 14/8/2015 9:39:48 AM14/8/2015 9:39:48 AM

14
Data Size: B6L (182 mm x 128 mm)
Book Size: B6L (182 mm x 128 mm)
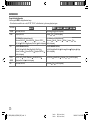
REFERENCES
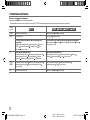
Change the display information
Each time you press
DISP
, the display information changes.
•
If the information is unavailable or not recorded,
“NO TEXT”, “NO INFO”, or other information (eg. station name, playing time) appears.
Source name
/ / /
STANDBY
Source name (Date/Clock) Source name Clock (back to the beginning)
TUNER
Frequency (Date/Clock) Frequency Clock (back to the beginning)
(For FM Radio Data System stations only)
Station name (Date/Clock) Radio text (Date/Clock) Radio text+ (R.TEXT+)
Title (Artist)
Title (Date/Clock) Frequency (Date/Clock) (back to the beginning)
(For FM Radio Data System stations only)
Station name Radio text Radio text+ Title/Artist Frequency Clock
(back to the beginning)
USB
(For MP3/WMA/WAV/FLAC files)
Track title (Artist) Track title (Album title) Track title (Date/Clock)
File name (Folder name)
File name (Date/Clock) Playing time (Date/Clock)
(back to the beginning)
(For MP3/WMA/WAV/FLAC files)
Track title/Artist Album title/Artist Folder name File name Playing time Clock
(back to the beginning)
IPOD or
ANDROID
Track title (Artist) Track title (Album name) Track title (Date/Clock)
Playing time (Date/Clock)
(back to the beginning)
Track title/Artist
Album title/Artist Playing time Clock (back to the beginning)
AUX
Source name (Date/Clock) Source name Clock (back to the beginning)
JS_KWD_KMM_202_ENE2N_EN_5.indd 14JS_KWD_KMM_202_ENE2N_EN_5.indd 14 19/8/2015 12:02:50 PM19/8/2015 12:02:50 PM

ENGLISH
15
Data Size: B6L (182 mm x 128 mm)
Book Size: B6L (182 mm x 128 mm)
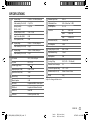
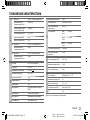
SPECIFICATIONS
Tuner
FM Frequency Range 87.5 MHz — 108.0 MHz (50 kHz space)
Usable Sensitivity (S/N=26dB) 0.71μV/75Ω
Quieting Sensitivity
(DINS/N=46dB)
2.0μV/75Ω
Frequency Response (±3dB) 30 Hz — 15 kHz
Signal-to-Noise Ratio (MONO) 64 dB
Stereo Separation (1kHz) 40dB
MW Frequency Range 531kHz — 1611kHz (9kHz space)
Usable Sensitivity (S/N=20dB) 28.2μV
LW Frequency Range 153kHz — 279kHz (9kHz space)
Usable Sensitivity (S/N=20dB) 50.0μV
USB
USB Standard USB1.1, USB2.0 Full Speed
File System FAT12/16/32
Maximum Supply Current DC5V
1A
Frequency Response (±1dB) 20Hz — 20kHz
Signal-to-Noise Ratio (1kHz) 105 dB
Dynamic Range 88dB
Channel Separation 90dB
MP3 Decode Compliant with MPEG-1/2 Audio Layer-3
WMA Decode Compliant with Windows Media Audio
WAV Decode Linear-PCM
FLAC Decode FLAC file (Up to 48kHz / 16bit)
Audio
Maximum Output Power 50W×4
Full Bandwidth Power 22W×4 (at less than 1% THD)
Speaker Impedance 4Ω—8Ω
Tone Action Bass 100Hz±8dB
Middle 1.0kHz±8dB
Treble 12.5kHz±8dB
Preout Level/Load (USB) 2500mV/10kΩ
Preout Impedance ≤600Ω
Auxiliary
Frequency Response (±3dB) 20Hz—20kHz
Input Maximum Voltage 1000mV
Input Impedance 30kΩ
General
Operating Voltage 14.4V (10.5V—16V allowable)
Maximum Current Consumption 10A
Operational Temperature Range –10°C—+60°C
Installation Size (W×H×D) 182mm×53mm×107mm
Weight 0.6kg
Subject to change without notice.
JS_KWD_KMM_202_ENE2N_EN_2.indd 15JS_KWD_KMM_202_ENE2N_EN_2.indd 15 10/7/2015 8:44:10 AM10/7/2015 8:44:10 AM

16
Data Size: B6L (182 mm x 128 mm)
Book Size: B6L (182 mm x 128 mm)
INSTALLATION / CONNECTION
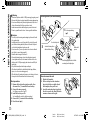
Warning
•
The unit can only be used with a 12V DC power supply, negative ground.
•
Disconnect the battery’s negative terminal before wiring and mounting.
•
Do not connect Battery wire (yellow) and Ignition wire (red) to the car
chassis or Ground wire (black) to prevent a short circuit.
•
Insulate unconnected wires with vinyl tape to prevent a short circuit.
•
Be sure to ground this unit to the car’s chassis again after installation.
Caution
•
For safety’s sake, leave wiring and mounting to professionals. Consult
the car audio dealer.
•
Install this unit in the console of your vehicle. Do not touch the metal
parts of this unit during and shortly after use of the unit. Metal parts
such as the heat sink and enclosure become hot.
•
Do not connect the
[
wires of speakers to the car chassis or Ground
wire (black), or connect them in parallel.
•
Mount the unit at an angle of less than 30º.
•
If your vehicle wiring harness does not have the ignition terminal,
connect Ignition wire (red) to the terminal on the vehicle’s fuse box
which provides 12 V DC power supply and is turned on and off by the
ignition key.
•
Keep all cables away from heat dissipate metal parts.
•
After the unit is installed, check whether the brake lamps, blinkers,
wipers, etc. on the car are working properly.
•
If the fuse blows, first make sure the wires are not touching car’s chassis,
then replace the old fuse with one that has the same rating.
Basic procedure
1
Remove the key from the ignition switch, then
disconnect the [ terminal of the car battery.
2 Connect the wires properly.
See Wiring connection. (
17
)
3 Install the unit to your car.
See Installing the unit (in-dash mounting).
4 Connect the [ terminal of the car battery.
5 Reset the unit. (
3
)
Do the required wiring.
(
17
)
Dashboard of
your car
Bend the appropriate tabs to hold the
mounting sleeve firmly in place.
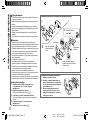
How to remove the unit
1
Detach the faceplate.
2 Fit the catch pin on the extraction
keys into the holes on both sides of
the trim plate, then pull it out.
3 Insert the extraction keys deeply into
the slots on each side, then follow the
arrows as shown on the right.
Installing the unit (in-dash mounting)
Hook on the top side
Orientate the trim plate as
illustrated before fitting.
JS_KWD_KMM_202_ENE2N_EN_2.indd 16JS_KWD_KMM_202_ENE2N_EN_2.indd 16 10/7/2015 8:44:10 AM10/7/2015 8:44:10 AM

ENGLISH
17
Data Size: B6L (182 mm x 128 mm)
Book Size: B6L (182 mm x 128 mm)
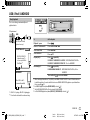
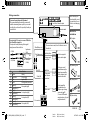
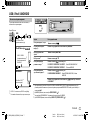
REMOTE CONT
STEERING WHEEL
REMOTE INPUT
P. CONT
ANT CONT
MUTE
Part list for
installation
(A)
Faceplate
Wiring connection
(C)
Mounting sleeve
(B)
Trim plate
(D)
Wiring harness
(E)
Extraction key
When connecting to an
external amplifier, connect
its ground wire to the car’s
chassis to avoid damaging
the unit.
If your car does not have an ISO terminal :
We recommend installing the unit with a commercially
available custom wiring harness specific for your car and
leave this job to professionals for your safety. Consult your
car audio dealer.
Fuse (10A)
Front/ Rear/ Subwoofer output
Antenna terminal
Light blue/yellow
(Steering remote
control wire)
To the steering wheel
remote control adapter
Blue/White
(Power control
wire/ Antenna
control wire)
Brown
(Mute control
wire)
To the power control
terminal when using the
optional power amplifier
or to the antenna control
terminal in the vehicle
To the terminal that
is grounded when the
telephone rings or during
conversation (
13
)
(To connect the Kenwood
navigation system, refer your
navigations manual.)
Yellow (A4)
Red (Ignition wire)
Red (A7)
Yellow (Battery wire)
Pin
Color and function
A4 Yellow : Battery
A5 Blue/White : Power control
A7 Red : Ignition (ACC)
A8 Black : Earth (ground) connection
B1
Purple
]
: Rear speaker (right)
B2
Purple/black
[
B3
Gray
]
: Front speaker (right)
B4
Gray/black
[
B5
White
]
: Front speaker (left)
B6
White/black
[
B7
Green
]
: Rear speaker (left)
B8
Green/black
[
ISO connectors
Connecting the ISO connectors on some VW/Audi or
Opel (Vauxhall) automobiles
You may need to modify the wiring of the supplied
wiring harness as illustrated below.
UnitVehicle
A7 (Red)
Ignition wire
(Red)
A4 (Yellow)
Default wiring
Battery wire
(Yellow)
If no connections are made, do not let the wire come out
from the tab.
JS_KWD_KMM_202_ENE2N_EN_2.indd 17JS_KWD_KMM_202_ENE2N_EN_2.indd 17 10/7/2015 8:44:11 AM10/7/2015 8:44:11 AM

Data Size: B6L (182 mm x 128 mm)
Book Size: B6L (182 mm x 128 mm)
2
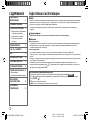
CОДЕРЖАНИЕ ПОДГОТОВКА К ЭКСПЛУАТАЦИИ
ВАЖНО
•
В целях обеспечения надлежащей эксплуатации, пожалуйста, перед тем как приступить к эксплуатации данного изделия,
внимательно прочтите настоящее руководство. Особенно важно, чтобы вы прочли и соблюдали все указания в данном
руководстве, отмеченные словами Предупреждение и Внимание.
•
Пожалуйста, держите данное руководство в надежном и доступном месте для обращения к нему за справками в
будущем.
Предупреждение
Не используйте функции, которые отвлекают внимание и мешают безопасному вождению.
Внимание
Настройка громкости:
•
Отрегулируйте громкость таким образом, чтобы слышать звуки за пределами автомобиля для предотвращения аварий.
•
Уменьшите громкость перед воспроизведением, чтобы предотвратить повреждение динамиков из-за внезапного
повышения уровня громкости на выходе.
Общие характеристики:
•
Не используйте внешние устройства, если это может отрицательно повлиять на безопасность движения.
•
Убедитесь в том, что созданы резервные копии всех важных данных. Мы не несем ответственность за потерю записанных
данных.
•
Никогда не оставляйте металлические предметы (например, монеты или металлические инструменты) внутри устройства
во избежание коротких замыканий.
•
В зависимости от типа автомобиля антенна может автоматически выдвигаться при включении устройства, если
подключен провод управления антенной (
17
). При парковке в месте с низким потолком выключайте устройство или
переключайте источник в режим STANDBY.
Как пользоваться данным руководством
•
Операции объясняются в основном с использованием кнопок на передней панели модели .
•
В объяснительных целях используются индикации на английском языке. Вы можете выбрать язык отображения из
меню [
FUNCTION
]. (
5
)
•
[
XX
] обозначает выбранные элементы.
•
(
XX
) означает, что материалы доступны на указанной странице.
ПОДГОТОВКА К
ЭКСПЛУАТАЦИИ 2
ОСНОВНЫЕ СВЕДЕНИЯ 3
НАЧАЛО ЭКСПЛУАТАЦИИ 3
1 Выбор языка отображения и
отмена демонстрации
2 Установка часов и даты
3 Установка начальных
настроек
РАДИОПРИЕМНИК 5
USB / iPod / ANDROID 7
AUX 9
ЗВУКОВЫЕ НАСТРОЙКИ 10
НАСТРОЙКИ ДИСПЛЕЯ 11
УСТРАНЕНИЕ ПРОБЛЕМ 12
СПРАВОЧНЫЕ МАТЕРИАЛЫ
13
Обслуживание
Дополнительная информация
ТЕХНИЧЕСКИЕ
ХАРАКТЕРИСТИКИ 15
УСТАНОВКА И
ПОДКЛЮЧЕНИЕ 16
JS_KWD_KMM_202_ENE2N_RU.indd 2JS_KWD_KMM_202_ENE2N_RU.indd 2 8/21/2015 10:08:22 AM8/21/2015 10:08:22 AM
Страница загружается ...
Страница загружается ...
Страница загружается ...
Страница загружается ...
Страница загружается ...
Страница загружается ...
Страница загружается ...
Страница загружается ...
Страница загружается ...
Страница загружается ...
Страница загружается ...
Страница загружается ...
Страница загружается ...
Страница загружается ...
Страница загружается ...
Страница загружается ...
-
 1
1
-
 2
2
-
 3
3
-
 4
4
-
 5
5
-
 6
6
-
 7
7
-
 8
8
-
 9
9
-
 10
10
-
 11
11
-
 12
12
-
 13
13
-
 14
14
-
 15
15
-
 16
16
-
 17
17
-
 18
18
-
 19
19
-
 20
20
-
 21
21
-
 22
22
-
 23
23
-
 24
24
-
 25
25
-
 26
26
-
 27
27
-
 28
28
-
 29
29
-
 30
30
-
 31
31
-
 32
32
-
 33
33
-
 34
34
-
 35
35
-
 36
36


Kenwood KMM-102AY Руководство пользователя
- Категория
- Мультимедиа-приемники для автомобилей
- Тип
- Руководство пользователя
Задайте вопрос, и я найду ответ в документе
Поиск информации в документе стал проще с помощью ИИ
на других языках
- English: Kenwood KMM-102AY User manual
Похожие модели бренда
-
Kenwood KMM-103RY Руководство пользователя
-
-
Kenwood KDC-100UG Руководство пользователя
-
Kenwood KDC-150RY Руководство пользователя
-
-
-
Kenwood KMM-100AY Руководство пользователя
-
-
Kenwood KMM-BT304 Инструкция по применению
-