HOTPOINT/ARISTON RPD 927 DX EU Руководство пользователя
- Категория
- Стиральные машины
- Тип
- Руководство пользователя

GB
1
Contents
Installation, 2-3
Unpacking and levelling
Connecting the electricity and water supplies
The first wash cycle
Technical data
Care and maintenance, 4
Cutting off the water or electricity supply
Cleaning the washing machine
Cleaning the detergent dispenser drawer
Caring for the door and drum of your appliance
Cleaning the pump
Checking the water inlet hose
Precautions and tips, 5
General safety
Disposal
Opening the porthole door manually
Description of the washing machine, 6-7
Control panel
Display
Running a wash cycle, 8
Wash cycles and functions, 9
Table of wash cycles
Wash functions
Detergents and laundry, 10
Detergent dispenser drawer
Preparing the laundry
Special wash cycles
Load balancing system
Troubleshooting, 11
Service, 12
RPD 927 D
Instructions for use
WASHING MACHINE
English,1
GB
PL
Polski,49
ΕΛΛΗΝΙΚΑ,25
GR
RU
Русский,37
UA
Українська,13
HU
Magyar,73
BG
Áúëãàðñêè,61

2
GB
Installation
! This instruction manual should be kept in a
safe place for future reference. If the washing
machine is sold, transferred or moved, make
sure that the instruction manual remains with
the machine so that the new owner is able to
familiarise himself/herself with its operation
and features.
! Read these instructions carefully: they con-
tain vital information relating to the safe instal-
lation and operation of the appliance.
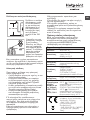
Unpacking and levelling
Unpacking
1. Remove the washing machine from its
packaging.
2. Make sure that the washing machine has
not been damaged during the transportation
process. If it has been damaged, contact the
retailer and do not proceed any further with
the installation process.
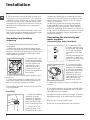
3. Remove the 4 pro-
tective screws (used
during transportation)
and the rubber wa-
sher with the cor-
responding spacer,
located on the rear
part of the appliance
(see figure).
4. Close off the holes using the plastic plugs
provided.
5. Keep all the parts in a safe place: you will
need them again if the washing machine ne-
eds to be moved to another location.
! Packaging materials should not be used as
toys for children.
Levelling
1. Install the washing
machine on a flat
sturdy floor, without
resting it up against
walls, furniture cabi-
nets or anything else.
2. If the floor is not
perfectly level, com-
pensate for any une-
venness by tightening or loosening the adju-
stable front feet (see figure); the angle of incli-
nation, measured in relation to the worktop,
must not exceed 2°.
Levelling the machine correctly will provide
it with stability, help to avoid vibrations and
excessive noise and prevent it from shifting
while it is operating. If it is placed on carpet or
a rug, adjust the feet in such a way as to allow
a sufficient ventilation space underneath the
washing machine.
Connecting the electricity and
water supplies
Connecting the water inlet hose
1. Connect the inlet
hose by screwing it to
a cold water tap using
a 3/4 gas threaded
connection (see figu-
re).
Before performing the
connection, allow the
water to run freely until
it is perfectly clear.
2. Connect the inlet
hose to the washing
machine by screwing
it onto the correspon-
ding water inlet of the
appliance, which is
situated on the top
right-hand side of the
rear part of the ap-
pliance (see figure).
3. Make sure that the hose is not folded over
or bent.
! The water pressure at the tap must fall within
the range of values indicated in the Technical
data table (see next page).
! If the inlet hose is not long enough, contact a
specialised shop or an authorised technician.
! Never use second-hand hoses.
! Use the ones supplied with the machine.

GB
3
Connecting the drain hose
Connect the drain
hose, without bending
it, to a drain duct or
a wall drain situated
between 65 and 100
cm from the floor;
alternatively, placed
it over the edge of a
basin, sink or tub, fa-
stening the duct sup-
plied to the tap (see
figure). The free end
of the hose should
not be underwater.
! We advise against the use of hose extensions;
if it is absolutely necessary, the extension must
have the same diameter as the original hose
and must not exceed 150 cm in length.
Electrical connections
Before plugging the appliance into the electri-
city socket, make sure that:
• thesocketisearthedandcomplieswithall
applicable laws;
• thesocketisabletowithstandthemaxi-
mum power load of the appliance as indicated
in the Technical data table (see opposite);
• thepowersupplyvoltagefallswithintheva-
lues indicated in the Technical data table (see
opposite);
• thesocketiscompatiblewiththeplugofthe
washing machine. If this is not the case, repla-
ce the socket or the plug.
! The washing machine must not be installed
outdoors, even in covered areas. It is extreme-
ly dangerous to leave the appliance exposed
to rain, storms and other weather conditions.
! When the washing machine has been instal-
led, the electricity socket must remain within
easy reach.
65 - 100 cm
! Do not use extension cords or multiple so-
ckets.
! The cable should not be bent or compressed.
! The power supply cable must only be repla-
ced by authorised technicians.
Warning! The company shall not be held re-
sponsible in the event that these standards are
not observed.
The first wash cycle
Once the appliance has been installed, and
before you use it for the first time, run a wash
cycle with detergent and no laundry, using
wash cycle auto clean (see “Cleaning the wa-
shing machine”).
Technical data
Model
RPD 927 D
Dimensions
width 59.5 cm
height 85 cm
depth 60,5 cm
Capacity
from 1 to 9 kg
Electrical
connections
please refer to the technical
data plate fixed to the ma-
chine
Water con-
nections
maximum pressure
1 MPa (10 bar)
minimum pressure
0.05 MPa (0.5 bar)
drum capacity 62 litres
Spin speed
up to 1200 rotations per
minute
Test wash
cycles in
accordance
with re-
gulations
1061/2010
1015/2010
Eco Cotton 60°C
60°/40°
:
programme 3 and Eco fun-
ction enabled.
Eco Cotton 40°C
60°/40°
:
programme 3, Eco function
enabled and lower the tem-
perature down to 40°C.
This appliance conforms to
the following EC Directives:
- EMC 2014/30/EU (Electro-
magnetic Compatibility)
- LVD 2014/35/EU (Low
Voltage)
- 2012/19/EU - (WEEE)

4
GB
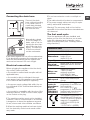
Caring for the door and drum of
your appliance
•Alwaysleavetheportholedoorajarinorder
to prevent unpleasant odours from forming.
Cleaning the pump
The washing machine is fitted with a self-clea-
ning pump which does not require any mainte-
nance. Sometimes, small items (such as coins
or buttons) may fall into the pre-chamber which
protects the pump, situated in its bottom part.
! Make sure the wash cycle has finished and
unplug the appliance.
To access the pre-chamber:
1. using a screwdri-
ver, remove the cover
panel on the lower
front part of the wa-
shing machine (see
figure);
2. unscrew the lid
by rotating it anti-
clockwise (see figu-
re): a little water may
trickle out. This is
perfectly normal;
3. clean the inside thoroughly;
4. screw the lid back on;
5. reposition the panel, making sure the hooks
are securely in place before you push it onto
the appliance.
Checking the water inlet hose
Check the inlet hose at least once a year. If
there are any cracks, it should be replaced
immediately: during the wash cycles, water
pressure is very strong and a cracked hose
could easily split open.
! Never use second-hand hoses.
Care and maintenance
Cutting off the water and electri-
city supplies
•Turnoffthewatertapaftereverywashcycle.
This will limit wear on the hydraulic system in-
side the washing machine and help to prevent
leaks.
•Unplugthewashingmachinewhencleaning
it and during all maintenance work.
Cleaning the washing machine
•Theouterpartsandrubbercomponents
of the appliance can be cleaned using a soft
cloth soaked in lukewarm soapy water. Do not
use solvents or abrasives.
•Thewashingmachinehasaautocleanpro-
gramme for its internal parts that must be run
with no load in the drum.
Amessageonthedisplaywillregularly(rou-
ghly every 50 cycles) advise the user to run
theAuto-cleaningcycletocleanthewashing
machine and combat limescale build-up and
bad odours.
For optimal maintenance we suggest using
WPRO Limescale and grease remover, ac-
cording to the instructions shown on the
package. The product can be purchased by
contacting the technical assistance service or
through the website www.hotpoint.eu.
Hotpoint declines all liability for any damages
to the appliance caused by the use of other
cleaning products for washing machines avai-
lable on the market.
To activate the programme, press the but-
tonfor5secondsthenpressSTART/PAUSE
to start the programme, which will last roughly
70 minutes.
Cleaning the detergent dispenser
drawer
Remove the dispenser
by raising it and pul-
ling it out (see figure).
Wash it under running
water; this operation
should be repeated
frequently.
1
2

GB
5
Precautions and tips
! This washing machine was designed and constructed in
accordance with international safety regulations. The fol-
lowing information is provided for safety reasons and must
therefore be read carefully.
General safety
• Thisappliancewasdesignedfordomesticuseonly.
• This appliance can be used by children aged
from 8 years and above and persons with
reduced physical, sensory or mental capabi-
lities or lack of experience and knowledge if
they have been given supervision or instruc-
tion concerning use of the appliance in a
safe way and understand the hazards invol-
ved. Children shall not play with the applian-
ce. Cleaning and user maintenance shall not
be made by children without supervision.
• Donottouchthemachinewhenbarefootorwithwetor
damp hands or feet.
• Donotpullonthepowersupplycablewhenunplugging
the appliance from the electricity socket. Hold the plug
and pull.
• Donotopenthedetergentdispenserdrawerwhilethe
machine is in operation.
• Donottouchthedrainedwaterasitmayreachextreme-
ly high temperatures.
• Neverforcetheportholedoor.Thiscoulddamagethesafety
lock mechanism designed to prevent accidental opening.
• Iftheappliancebreaksdown,donotunderanycircum-
stances access the internal mechanisms in an attempt
to repair it yourself.
• Alwayskeepchildrenwellawayfromtheappliancewhile
it is operating.
• Thedoorcanbecomequitehotduringthewashcycle.
• Iftheappliancehastobemoved,workinagroupoftwo
or three people and handle it with the utmost care. Never
try to do this alone, because the appliance is very heavy.
• Beforeloadinglaundryintothewashingmachine,make
sure the drum is empty.
Disposal
•Disposingofthepackagingmaterials:observelocalregu-
lations so that the packaging may be re-used.
•TheEuropeanDirective2012/19/EUonWasteElectrical
and Electronic Equipment, requires that old household
electrical appliances must not be disposed of in the normal
unsorted municipal waste stream. Old appliances must be
collected separately in order to optimise the recovery and
recycling of the materials they contain and reduce the im-
pact on human health and the environment. The crossed
out “wheeled bin” symbol on the product reminds you of
your obligation, that when you dispose of the appliance it
must be separately collected. Consumers should contact
their local authority or retailer for information concerning the
correct disposal of their old appliance.
Opening the porthole door manually
In the event that it is not possible to open the porthole
door due to a powercut, and if you wish to remove the
laundry, proceed as follows:
1. remove the plug from the
electrical socket.
2. make sure the water level
inside the machine is lower
than the door opening; if it
is not, remove excess water
using the drain hose, collec-
ting it in a bucket as indicated
in the figure.
3. using a screwdriver, remo-
ve the cover panel on the lo-
wer front part of the washing
machine (see figure).
4. pull outwards using the tab as indicated in the figure,
until the plastic tie-rod is freed from its stop position; pull
downwards and open the door at the same time.
5. reposition the panel, making sure the hooks are securely
in place before you push it onto the appliance.
20

6
GB
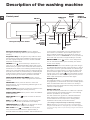
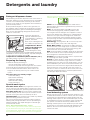
Detergent dispenser drawer: used to dispense
detergents and washing additives (see “Detergents and
laundry”).
Programme Key: the Programme Key inside the deter-
gent dispenser shows all the available programmes toge-
ther with a graphical guide on how to use the individual
dispenser compartments.
ON/OFF button : press this briefly to switch the ma-
chineonoroff.TheSTART/PAUSEindicatorlight,which
flashes slowly in a green colour shows that the machine is
switched on. To switch off the washing machine during the
wash cycle, press and hold the button for approximately 3
seconds; if the button is pressed briefly or accidentally the
machine will not switch off. If the machine is switched off
during a wash cycle, this wash cycle will be cancelled.
WASH CYCLE SELECTOR KNOB: used to set the
desired wash cycle (see “Table of programmes and wash
cycles”).
FUNCTION buttons: press the button to select the
desired function. The corresponding indicator light on the
display will switch on.
AUTO CLEAN button: press to clean the machine’s inter-
nal parts (see “Cleaning the washing machine”).
DIRECT INJECTION button: press to select the DIRECT
INJECTION option.
MULTI RINSE button : press to select the desired
rinse type.
SPIN button : press to reduce or completely exclude
the spin cycle - the value is indicated on the display.
TEMPERATURE button : press to decrease the tempe-
rature: the value will be shown on the display.
KEY LOCK button : to activate the control panel
lock, press and hold the button for approximately 2
seconds. When the display visualises “KEY LOCK ON” the
control panel is locked (apart from the ON/OFF button).
This means it is possible to prevent wash cycles from
being modified accidentally, especially where there are
children in the home. To deactivate the control panel lock,
press and hold the button for approximately 2 seconds.
DELAY TIMER button : press to set a delayed start
time for the selected wash cycle. The delay time will be
shown on the display.
START/PAUSE button with indicator light: when the gre-
en indicator light flashes slowly, press the button to start a
wash cycle. Once the cycle has started the indicator light
will remain lit in a fixed manner. To pause the wash cycle,
press the button again; the indicator light will flash in an
orange colour. If the symbol is not illuminated, the door
may be opened. To start the wash cycle from the point at
which it was interrupted, press the button again.
Standby mode
This washing machine, in compliance with new energy sa-
ving regulations, is fitted with an automatic standby system
which is enabled after about 30 minutes if no activity is
detected. Press the ON-OFF button briefly and wait for the
machine to start up again.
Antimicrobial seal
The seal around the porthole door is made from a special
mixture ensuring antimicrobial protection, thus reducing
bacterial proliferation up to 99.99%.
The seal contains zinc pyrithione, a biocidal substance
which reduces the proliferation of harmful microbes (*)
such as batteries and mould prone to causing stains,
unpleasant odours and product deterioration.
(*) According to tests performed by the University of Perugia,
Italy on: Staphylococcus aureus, Escherichia coll, Pseudomonas
aeruginosa, Candida albicans, Aspergillus niger, Penicillium digitatum.
In rare cases an allergic reaction may be caused by prolonged contact between
seal and skin.
Description of the washing machine
Control panel
TEMPERATURE
button
Detergent dispenser drawer
FUNCTION
buttons
ON/OFF
button
SPIN
button
START/PAUSE
button with indicator light
KEY LOCK
button
DELAY
TIMER
button
MULTI
RINSE
button
DISPLAY
AUTO
CLEAN
button
DIRECT
INJECTION
button
Programme
Key
WASH
CYCLE
SELECTOR
KNOB

GB
7
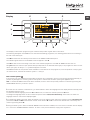
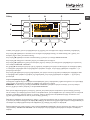
The display is useful when programming the machine and provides a great deal of information.
The following will appear in area A: the icon and selected washing programme, the washing phases and time remaining to
the end of the wash cycle.
AreaB will include the two intensity levels relative to the DIRECT INJECTION option.
The indicator lights relative to the available functions appear in area C.
AreaDwillhavethetimeremainingtothestartoftheselectedprogrammeiftheDELAYTIMERfunctionwasset.
String E shows the maximum spin speed value (this depends on the selected wash cycle); if the programme does not inclu-
de the spin cycle, the dimly lit “--” symbol will appear in the area.
AreaF will visualise the temperature value selectable on the basis of the set programme; if the temperature of the program-
me cannot be set, the area will show the symbol “--” dimly lit.
Door locked symbol
If the symbol is lit, this indicates that the washing machine door is blocked to prevent it from being opened accidentally. To
prevent any damage from occurring, wait for the symbol to switch itself off before opening the appliance door.
N.B.:iftheDELAYTIMERfunctionhasbeenactivated,thedoorcannotbeopened;pausesthemachinebypressingthe
START/PAUSEbuttonifyouwishtoopenit.
! The first time the machine is switched on, you will be asked to select the language and the display will automatically show
the language selection menu.
To select the desired language press the X and Y buttons; to confirm the selection press the Z button.
To change the language switch off the machine and press buttons G, H, I simultaneously until an alarm is heard: the
language-selection menu will be displayed again.
! To change the display luminosity, which by default is set to the highest value, switch the machine off then simultaneously
press buttons G, L and M until the buzzer sounds. Press buttons X and Y to choose the desired level of luminosity then
confirm by pressing button Z.
!DuringthewashcycleorwhentheDELAYTIMERfunctionhasbeenenabled,iftheuserdoesnotinteractwiththedisplay
for1minutethe“SCREENSAVER”activates.Toreturntothepreviouswindow,simplypressanybutton.
Display
H
G
Y
X Z
I
L
M
A
B
C
C
D
E
C
F

8
GB
Running a wash cycle
1. SWITCH THE MACHINE ON. Press the On/Off
button ; the text HOTPOINT will appear on the display
andtheSTART/PAUSEindicatorlightwillflashslowlyin
a green colour.
2. LOAD THE LAUNDRY. Open the porthole door.
Load the laundry, making sure you do not exceed
the maximum load value indicated in the table of
programmes on the following page.
3. MEASURE OUT THE DETERGENT. Open the
detergent dispenser drawer and pour the detergent into
the relevant compartments as described in “Detergents
and laundry”.
4. CLOSE THE DOOR.
5. SELECT THE WASH CYCLE. UsetheWASHCYCLE
SELECTOR knob to select the desired wash cycle; the
nameofthewashcyclewillappearonthedisplay.A
temperature and spin speed is set for each wash cycle;
these may be adjusted. The duration of the cycle will
appear on the display.
6. CUSTOMISE THE WASH CYCLE. Use the relevant
buttons:
Modifying the temperature and/or spin speed.
The machine automatically selects the maximum
temperature and spin speed set for the selected wash
cycle; these values cannot therefore be increased.
The temperature can be decreased by pressing the
button, until the cold wash (the display will visualise the
“--” symbol) setting is reached. The spin speed may be
progressively reduced by pressing the button, until
it is completely excluded (the display will visualise the
“--” symbol). If these buttons are pressed again, the
maximum values are restored.
! Exception: if the 2 programme is selected, the
temperature can be increased up to a value of 40°C.
! Exception: if the 3 programme is selected, the
temperature can be increased up to a value of 90°C.
! Exception: if the 4 programme is selected, the
temperature can be increased up to a value of 60°C..
Setting a delayed start.
To set a delayed start for the selected programme,
press the corresponding button repeatedly until the
required delay period has been reached. To remove the
delayed start function press the button until the text
“-- h” appears on the display.
Set the rinse type.
Option makes it possible to select the desired
rinse type for sensitive skin. Press the button once for
the “Extra +1” level, which makes it possible to select
an additional rinse after the standard cycle rinse and
remove all traces of detergent. Press the button again
for the “Extra +2” level, which makes it possible to
select two additional rinses to the standard cycle rinses;
it is recommended for very sensitive skin. When the
button is pressed for the third time, the “Extra +3” level
is set, thus allowing the selection of 3 rinses in addition
to the standard cycle’s rinses. The option - started with
cycles at a temperature of 40°C - makes it possible to
remove major allergens such as pollen, cat and dog
hair. With cycles at a temperature higher than 40° a very
good level of antiallergic protection is achieved. Press
the button again to go back to the “Normal rinse” rinse
type. If the current adjustment can be neither set nor
changed, the display will show “No Selection” or “No
Change”.
Modifying the cycle settings.
• Pressthebuttontoenablethefunction;the relevant
indicator light on the display will light up.
• Pressthebuttonagaintodisablethefunction;the
relevant indicator light on the display will switch off.
! If the selected function is incompatible with the set
programme, the relevant indicator light will appear dimly
lit; in addition, the incompatibility will be signalled by a
buzzer (3 beeps) and the wording “No Selection” will
appear on the display.
! If the selected function is incompatible with another
previously set function, the wording “No Selection”
will appear on the display and the function will not be
enabled.
! The functions may affect the recommended load value
and/or the duration of the cycle.
7. START THE PROGRAMME.PresstheSTART/
PAUSEbutton.Thecorrespondingindicatorlightwill
become green, remaining lit in a fixed manner, and the
door will be locked (the DOOR LOCKED symbol will
be on). During the wash cycle, the name of the phase in
progress will appear on the display. To change a wash
cycle while it is in progress, pause the washing machine
usingtheSTART/PAUSEbutton(theSTART/PAUSE
indicator light will flash slowly in an orange colour);
thenselectthedesiredcycleandpresstheSTART/
PAUSEbuttonagain.Toopenthedoorwhileacycle
isinprogress,presstheSTART/PAUSEbutton;ifthe
DOOR LOCKED symbol is switched off the door
maybeopened.PresstheSTART/PAUSEbuttonagain
to restart the wash cycle from the point at which it was
interrupted.
8. THE END OF THE WASH CYCLE. This will be
indicated by the text “CYCLE END” on the display;
when the DOOR LOCKED symbol switches off
the door may be opened. Open the door, unload the
laundry and switch off the machine.
! If you wish to cancel a cycle which has already begun,
press and hold the button. The cycle will be stopped
and the machine will switch off.
Direct Injection
The washing machine is equipped with the innovative
technology «Direct Injection» which pre-mixes water and
detergent, thus immediately activating the detergent’s
cleaning principles. This active emulsion is directly
introduced into the drum of the washing machine and
penetrates the fibres with more efficacy in cleaning
even heavily soiled garments at low temperatures, fully
preserving colours and fabrics.
The mode «Power» ensures the best cleaning performance
and the mode «EcoEnergy» allows more energy saving.

GB
9
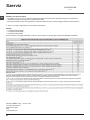
Wash cycles and functions
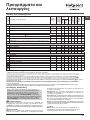
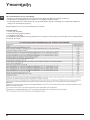
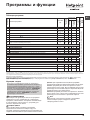
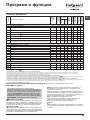
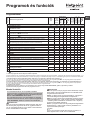
Table of wash cycles
Wash functions
! If the selected function is incompatible with the set program-
me, the relevant indicator light will appear dimly lit; in addition,
the incompatibility will be signalled by a buzzer (3 beeps) and
the wording “No Selection” will appear on the display.
! If the selected function is incompatible with another pre-
viously set function, the wording “No Selection” will appear
on the display and the function will not be enabled.
Time Saver
If you select this option, the wash cycle duration will be redu-
ced by up to 50%, depending on the selected cycle, thereby
guaranteeing simultaneous water and energy saving. Use this
cycle for lightly soiled garments.
Colour Care
Setting cycle 6 and selecting this function allows for choosing
among 3 different programmes specially designed for optimal-
ly preserving colour intensity and the brilliance of whites:
Colours: used to wash light coloured clothes. This program-
me is designed to maintain bright colours over time.
Darks: this programme is designed to maintain dark colours
over time. We recommend using a liquid detergent for best
results, preferably when washing dark-coloured garments.
Whites: this programme is designed to maintain the brightness of
white clothes over time. Use powder detergent for best results.
60°/40°
Eco
Pressing this button together with programme 3 allows for
running standard programmes at 60°C and 40°C.
1) Test wash cycle in compliance with regulations 1061/2010: set programme 3 and enable the Eco function
60°/40°
.
This cycle is designed for cotton loads with a normal soil level and is the most efficient in terms of both electricity and water consumption; it should be used for garments
which can be washed at 60°C . The actual washing temperature may differ from the indicated value.
2) Test wash cycle in compliance with regulations 1061/2010: set programme 3, enable the Eco function
60°/40°
and lower the temperature down to 40°C.
This cycle is designed for cotton loads with a normal soil level and is the most efficient in terms of both electricity and water consumption; it should be used for garments
which can be washed at 40°C . The actual washing temperature may differ from the indicated value.
For all Test Institutes:
3) Long wash cycle for cottons: set programme 3 at temperature 40°C and press the DIRECT INJECTION button under “Power” mode.
4) Long wash cycle for synthetics: set wash cycle 4 with a temperature of 40°C.
* If you select programme and exclude the spin cycle, the machine will drain only.
The length of cycle shown on the display or in this booklet is an estimation only and is calculated assuming standard working conditions. The actual duration can vary accor-
ding to factors such as water temperature and pressure, the amount of detergent used, the amount and type of load inserted, load balancing and any wash options selected.
** The duration of the wash cycle can be checked on the display.
Wash cycles
Description of the wash cycle
Max.
temp.
(°C)
Max.
speed
(rpm)
Detergents
Max. load (kg)
Residual dam-
pness%
Energy con-
sumptionkWh
Total water lt
Cycle duration
Wash
Fabric
softener
DAILY CLEAN
1
Anti-Stain Power 20°C
20° 1200
9 - - - **
2 Anti-Stain Turbo 45’
20°
(Max. 40°C)
1200
4,5 - - - **
3
Cotton: lightly soiled resistant and delicate colours.
40°
(Max. 90°C)
1200
9 - - - **
3
Eco Cotton 60°C
60°/40°
(1): heavily soiled whites and resistant colours.
60° 1200
9 53 0,70 56,5 330’
3
Eco Cotton 40°C
60°/40°
(2): lightly soiled resistant and delicate colours.
40° 1200
9 53 0,70 88 330’
3
Eco Cotton 40°C (3): lightly soiled resistant and delicate colours.
40° 1200
9 53 0,89 88 205’
4
Synthetics (4): lightly soiled resistant colours.
40°
(Max. 60°C)
1000
4,5 46 0,65 62 100’
5
Fast 30’: to refresh lightly soiled garments quickly (not suitable for wool, silk
and clothes which require washing by hand).
30° 800
3,5 71 0,19 47 30’
SPECIALS
6
Colour Care (default) => Colours 40° 1200
5 - - - **
7
Ultra Delicates
30°
--
1 - - - **
8
Wool: for wool, cashmere, etc. 40° 800
2 - - - **
9
Shirts
40° 600
2 - - - **
10
Baby
40° 1000
5 - - - **
EXTRA
11
Anti-Allergy
60° 1200
5 - - - **
12
Bed & Bath 7 Days: for bedlinen and towels. 60° 1200
9 - - - **
13
Silk & Curtains: for garments in silk and viscose, lingerie. 30°
--
2 - - - **
14
Duvets: for down-stuffed garments. 30° 1000
3,5 - - - **
Partial Programmes
Rinse
- 1200 -
9 - - - **
Spin + Pump out
- 1200 - - 9 - - - **
Pump out only * -
--
- - 9 - - - **

10
GB
Detergent dispenser drawer
Good washing results also depend on the correct dose of
detergent: adding too much detergent will not necessarily
result in a more efficient wash, and may in fact cause a
build up on the inside of your appliance and contribute to
environmental pollution.
! Use powder detergent for white cotton garments, for
pre-washing, and for washing at temperatures over 60°C.
! Follow the instructions given on the detergent packaging.
! Do not use hand washing detergents because these
create too much foam.
Open the detergent di-
spenser drawer and pour
in the detergent or washing
additive, as follows.
! Do not pour detergent into
the middle compartment (*).
compartment 1: Deter-
gent for the wash cycle
(powder or liquid)
If liquid detergent is used,
it is recommended that the removable plastic partition A
(supplied) be used for proper dosage. If powder detergent
is used, place the partition into slot B.
compartment 2: Additives (fabric softeners, etc.)
The fabric softener should not overflow the grid.
Preparing the laundry
•Dividethelaundryaccordingto:
- the type of fabric/the symbol on the label
- the colours: separate coloured garments from whites.
•Emptyallgarmentpocketsandcheckthebuttons.
• Donotexceedthelistedvalues,whichrefertothe
weight of the laundry when dry: see “Table of wash
cycles”.
How much does your laundry weigh?
1 sheet 400-500 g
1 pillow case 150-200 g
1 tablecloth 400-500 g
1 bathrobe 900-1200 g
1 towel 150-250 g
Special wash cycles
Anti-Stain Power 20°C: this programme ensures ma-
ximum stain removal capacity with no need for pre-treat-
ment at low temperatures, preserving fabrics and colours.
Anti-Stain Turbo 45’: this cycle ensures excellent stain
removal capacity even at 20°C in just 45 minutes. The tem-
perature of this cycle can be increased up to 40°C.
Ultra Delicates: use programme 7 to wash very delicate
garments having strasses or sequins.
We recommend turning the garments inside out before
washing and placing small items into the special bag for
washing delicates. Use liquid detergent on delicate gar-
ments for best results.
Wool - Woolmark Apparel Care - Green:
the wool wash cycle of this machine has been approved
by The Woolmark Company for the washing of wool gar-
ments labelled as “hand wash” provided that the products
are washed according to the instructions on the garment
label and those issued by the manufacturer of this washing
machine (M1127)
Shirts: use the special 9 wash cycle to wash shirts in
different fabrics and colours to guarantee they receive the
best possible care.
Baby: use the special wash cycle 10 to remove the
remove the soiling typically caused by babies, while
removing all traces of detergent from nappies in order to
prevent the delicate skin of babies from suffering allergic
reactions. The cycle has been designed to reduce the
amount of bacteria by using a greater quantity of water
and optimising the effect of special disinfecting additives
added to the detergent.
Anti-Allergy: use programme 11 to remove major aller-
gens such as pollen, mites, cat’s and dog’s hair.
Bed & Bath 7 days: use programme 12 to wash bed
linen and towels in one single cycle: it optimises softener
performance and helps you save time and energy. We
recommend the use of powder detergent
Silk: use special wash cycle 13 to wash all silk garments.
We recommend the use of special detergent which has
been designed to wash delicate clothes.
Curtains: fold curtains and place them in a pillow case
or mesh bag. Use wash cycle 13.
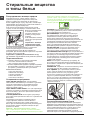
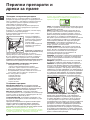
Duvets: to wash double or single duvets (the weight of
which should not exceed 3,5 kg), cushions or clothes
padded with goose down such as puffa jackets, use the
special 14 wash cycle. We recommend that duvets are
placed in the drum with their edges folded inwards (see
figure) and that no more than ¾ of the total volume of
the drum is used. To achieve the best results, we recom-
mend that a liquid detergent is used and placed inside
the detergent dispenser drawer.
Load balancing system
Before every spin cycle, to avoid excessive vibrations and
to distribute the load in a uniform manner, the drum rotates
continuously at a speed which is slightly greater than the
washing rotation speed. If, after several attempts, the load
is not balanced correctly, the machine spins at a reduced
spin speed. If the load is excessively unbalanced, the
washing machine performs the distribution process instead
of spinning. To encourage improved load distribution and
balance, we recommend small and large garments are
mixed in the load.
Detergents and laundry
1
2
A
B
*

GB
11
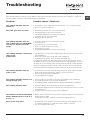
Troubleshooting
Yourwashingmachinecouldfailtowork.BeforecontactingtheTechnicalAssistanceCentre(see “Assistance”), make sure
that the problem cannot be solved easily using the following list.
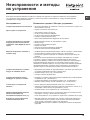
Problem:
The washing machine does not
switch on.
The wash cycle does not start.
The washing machine does not
take in water (the text “NO WATER,
Turn tap on” appears on the di-
splay).
The washing machine continuously
takes in and
drains water.
The washing machine does not
drain or spin.
The washing machine vibrates a lot
during the spin cycle.
The washing machine leaks.
The machine is locked and the display
flashes, indicating an error code (e.g.
F-01, F-..).
There is too much foam.
Possible causes / Solutions:
• Theapplianceisnotpluggedintothesocketfully,orisnotmakingcontact.
• Thereisnopowerinthehouse.
• Thewashingmachinedoorisnotclosedproperly.
• TheON/OFFbuttonhasnotbeenpressed.
• TheSTART/PAUSEbuttonhasnotbeenpressed.
• Thewatertaphasnotbeenopened.
• Adelayedstarthasbeenset.
• Thewaterinlethoseisnotconnectedtothetap.
• Thehoseisbent.
• Thewatertaphasnotbeenopened.
• Thereisnowatersupplyinthehouse.
• Thepressureistoolow.
• TheSTART/PAUSEbuttonhasnotbeenpressed.
• Thedrainhoseisnotfittedataheightbetween65and100cmfromthefloor
(see “Installation”).
• Thefreeendofthehoseisunderwater(see “Installation”).
• Thewalldrainagesystemisnotfittedwithabreatherpipe.
If the problem persists even after these checks, turn off the water tap, switch
theapplianceoffandcontacttheAssistanceService.Ifthedwellingisononeof
the upper floors of a building, there may be problems relating to water drainage,
causing the washing machine to fill with water and drain continuously. Special
anti-draining valves are available in shops and help to avoid this inconvenience.
• Thewashcycledoesnotincludedraining:somewashcyclesrequirethedrain
phase to be started manually (see “Wash cycles and functions”).
• Thedrainhoseisbent(see “Installation”).
• Thedrainageductisclogged.
• Thedrumwasnotunlockedcorrectlyduringinstallation(see “Installation”).
• Thewashingmachineisnotlevel(see “Installation”).
• Thewashingmachineistrappedbetweencabinetsandwalls(see “Installation”).
• Thewaterinlethoseisnotscrewedonproperly(see “Installation”).
• Thedetergentdispenserdrawerisblocked(forcleaninginstructions,see “Care
and maintenance”).
• Thedrainhoseisnotfixedproperly(see “Installation”).
• Switchoffthemachineandunplugit,waitforapproximately1minuteandthen
switch it back on again.
Iftheproblempersists,contacttheTechnicalAssistanceService.
• Thedetergentisnotsuitableformachinewashing(itshoulddisplaythetext
“for washing machines” or “hand and machine wash”, or the like).
• Toomuchdetergentwasused.

12
GB
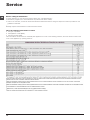
Before calling for Assistance:
• Check whether you can solve the problem alone (see “Troubleshooting”);
• Restarttheprogrammetocheckwhethertheproblemhasbeensolved;
• Ifthisisnotthecase,contactanauthorisedTechnicalAssistanceCentreusingthetelephonenumberprovidedonthe
guarantee certificate.
!Alwaysrequesttheassistanceofauthorisedtechnicians.
Have the following information to hand:
• thetypeofproblem;
• theappliancemodel(Mod.);
• theserialnumber(S/N).
This information can be found on the data plate applied to the rear of the washing machine, and can also be found on the
front of the appliance by opening the door.
Service

UA
13
Українська
Зміст
Встановлення, 14-15
Розпакування і вирівнювання
Підключення води та електроенергії
Перший цикл прання
Технiчнi данi
Технічне обслуговування та догляд, 16
Відключення води й електричного живлення
Очищення пральної машини
Чистка касети для миючих засобів
Догляд за люком та барабаном
Миття насосу
Контроль шланга для подачі води
Запобіжні заходи та поради, 17
Загальна безпека
Утилізація
Ручне відкривання дверцят люку
Опис пральної машини, 18-19
Панель керування
Дисплей
Як здійснювати цикл прання, 20
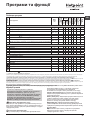
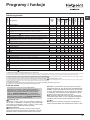
Програми та функції, 21
Таблиця програм
Функції прання
Миючі засоби і білизна, 22
Касета з миючим засобом
Підготовка білизни
Особливi програми
Система балансування завантаження
Несправності та засоби їх усунення, 23
Допомога, 24
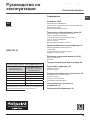
UA
RPD 927 D
Iнструкцiї з експлуатацiї
ПРАЛЬНА МАШИНА

14
UA
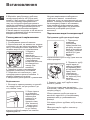
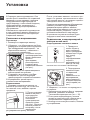
Встановлення
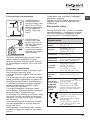
Належне вирiвнювання забезпечить
стабiльнiсть машинi та запобiжить
вiбрацiям, шуму та пересуванням пiд час
роботи. У випадку встановлення машини
на килимовому покритті або килимах,
ніжки необхідно відрегулювати таким
чином, щоб гарантувати під пральною
машиною необхідний простір для
вентиляції.
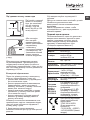
Підключення води й електроенергії
Пiд’єднання труби для подачі води
1. Підключити
живлячий
трубопровід,
прикрутивши його
до крану холодної
води за допомогою
штуцеру з газовою
різьбою 3/4 (див.
малюнок).
Перед
пiдключенням спустiть воду, доки вона не
стане прозорою.
2. Підключіть трубу
подачі води до
пральної машини,
під’єднавши його
до водорозбiрного
крану, який
знаходиться
угорі праворуч
на задньому боцi
машини
(див. малюнок).
3. Зверніть увагу, щоб труба не мала
згинів та утисків.
! Тиск води в крані має відповідати
значенням у таблиці Технічних даних (див.
сторінку поруч).
! Якщо довжини труби для води не
вистачає, зверніться у спеціалізовану
крамницю або до уповноваженого
фахівця.
! Не користуйтеся трубами, якi були вже у
вживаннi.
! Використовуйте труби з комплекту
постачання.
! Зберігайте дану брошуру, щоб мати
нагоду звернутися до неї у будь-який
момент. У раз продажу, передачі іншій
особі або переїзду переконайтеся в
тому, що інструкція перебуває разом із
пральною машиною й новий власник може
ознайомитися з її принципами роботи й
відповідними запобіжними заходами.
! Уважно вивчіть інструкцію: в ній міститься
важлива інформація щодо встановлення,
використання та безпеки.
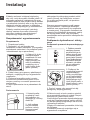
Розпакування й вирiвнювання
Розпакування
1. Розпакування пральної машини
2. Вдоскональтеся, що машина не зазнала
ушкоджень пiд час транспортування. Якщо
такі є, не виконуйте нiяких пiдключень та
негайно зверніться до постачальника.
3. Видаліть
запобіжнi
гвинти для
транспортування та
гумову прокладку
з відповідною
розпірною деталлю,
якi знаходяться
позаду (див.
малюнок).
4. Закрийте отвори пластмасовими
пробками з комплекту постачання.
5. Зберiгайте всi компоненти: у разi
транспортування пральної машини їх
потрiбно повернути на мiсце.
! Забороняйте дiтям гратися з упаковками.
Вирiвнювання
1. Встановіть пральну машину на плоскій
та твердій підлозі, не притуляючи її до
стін, меблів, тощо.
2. Якщо пiдлога
не є iдеально
горизонтальною,
компенсуйте
нерiвностi за
допомогою
переднiх нiжок
(див. малюнок)
– розкручуючи
чи закручуючи
їх; кут нахилу
вiдносно робочої поверхнi не повинен
перевищувати 2°.

UA
15
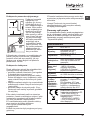
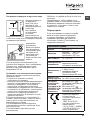
Пiд’єднання шлангу злива води
Пiд’єднайте зливний
шланг, не згинаючи
його, до каналізації
або до зливного
отвору у стіні на
висоті від 65 до 100
см від підлоги.
Або покладіть
його на край
вмивальника або
ванни; прив’язавши
направляючу
з комплекту
постачання докрана
(див.малюнок). Не
залишайте вільний
кінець зливного
шланга зануреним
у воду.
! Використання подовжувача шланга
не рекомендоване. При використаннi
подовжувача шланга (якщо це дiйсно є
необхiдним), переконайтеся у тому, що він
має той самий діаметр та його довжина не
перевищує 150 см.
Електричні підключення
Перш нiж увiмкнути вилку в електричну
розетку, переконайтеся в тому, що:
• розетка має заземлення у відповідності
до встановлених норм;
• розетка розрахована на максимальне
навантаження у межах потужності
машини, зазначене у таблиці Технічних
даних (див. малюнок поруч);
• напруга живлення перебуває у межах,
зазначених у таблиці Технічних даних
(див. малюнок поруч);
• розетка підходить до вилки пральної
машини. В іншому випадку замініть
розетку або вилку.
! Машину не можна встановлювати поза
приміщенням, навіть в захищених мiсцях,
тому що дуже небезпечно піддавати її
впливу дощу і грози.
! Коли машину вже встановлено,
забезпечте вільний доступ до електричної
розетки.
65 - 100 cm
! Не використовуйте подовжувачі й
трійники.
! Шнур не повинен мати згинів або утисків.
! Замiна шнура живлення має
виконуватися тiльки вповноваженими
фахiвцями.
Увага! Підприємство знімає з себе
відповідальність у разi недотримання
вказаних правил.
Перший цикл прання
Пiсля встановлення, перш нiж розпочати
використання машини, виконайте цикл
прання з пральним засобом, але не
завантажуючи бiлизну, встановивши
програму «Самоочищення» (див.
“Очищення пральної машини”).
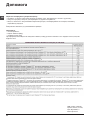
Технiчнi данi
Модель RPD 927 D
Розмiри
ширина 59,5 см
висота 85 см
глибина 60,5 см
Кiлькiсть
бiлизни
вiд 1 до 9 кг
Електричні
підключення
див. шильдік з технiчними
даними на машинi
Водопровднi
пiдключення
максимальний тиск
1 мПа (10 бар)
мiнiмальний тиск
0,05 мПа (0,5 бар)
об’єм баку – 62 лiтри
Швидкiсть
центрифуги
до 1200 обертiв на
хвилину
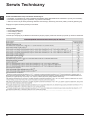
Програми
контролю
згiдно з
нормою
1061/2010
1015/2010
Ехо бавовна 60°C
60°/40°
:
програма 3, функція
енергозбереження Ехо
активована.
Ехо бавовна 40°C
60°/40°
:
програма 3, функція
енергозбереження Ехо
активована, знизьте
температуру до 40°C.
Цей прилад вiдповiдає
таким європейським
директивам:
- EMC 2014/30/EU
(Електромагнітна
сумiснiсть)
- 2012/19/EU - (WEEE)
- LVD 2014/35/EU (Низька
напруга)

16
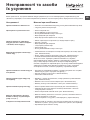
UA
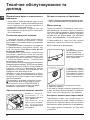
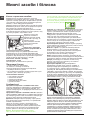
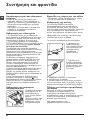
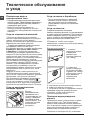
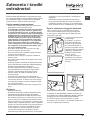
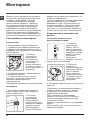
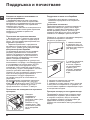
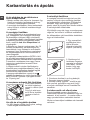
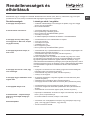
Догляд за люком та барабаном
• Завжди залишайте відкритими дверцята люку,
тоді не утворюватимуться неприємні запахи.
Миття насосу
Пральну машину обладнано насосом з
автоматичною чисткою, який не вимагає
технічного обслуговування. Може трапитися
так, що малі предмети (монети, ґудзики)
потраплять до форкамери, що захищає
насос, розташований у її нижній частині.
! Переконайтеся у тому, що цикл прання
закінчено, і витягніть штепсель з розетки.
Щоб потрапити до форкамери:
1. зніміть
декоративну панель
на лицевому боці
пральної машини за
допомогою викрутки
(див. малюнок);
2. відкрутіть кришку,
обертаючи її проти
годинникової стрілки
(див. малюнок): виток
незначної кiлькостi
води є нормальним;
3. акуратно очистіть внутрішню частину;
4. накрутіть кришку;
5. встановіть панель на місце, пересвідчіться
у тому, що крюки були вставлені у спеціальні
петлі, пiсля чого притиснiть її до машини.
Контроль шланга для подачі води
Перевіряйте шланг для подачі води не
менше одного разу на рік. Якщо на ньому є
тріщини, він підлягає заміні: під час прання
високий тиск може призвести до розірвання.
! Не користуйтеся шлангами, якi були вже
у вживаннi.
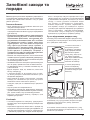
Відключення води й електричного
живлення
• Закривайте водопровідний кран після
кожного прання. У такий спосіб зменшується
знос гідравлічної частини машини й
усувається небезпека витоку.
• Виймайте штепсель з розетки під час
миття машини та під час робіт з технічного
обслуговування.
Очищення пральної машини
• Зовнішня частина і гумові деталі можуть
бути вимиті тканиною, змоченою у теплій
воді й милі. Не використовуйте розчинники
або абразиви.
• Пральна машина оснащена програмою
«Самоочищення» внутрішніх частин, яку
слід запускати без будь-яких речей
всередині барабану.
Повідомлення на дисплеї з’являється
регулярно (приблизно кожні 50 циклів)
для виконання циклу самоочищення: для
очищення пральної машини і боротьби
з відкладенням накипу і утворенням
неприємних запахів.
Для оптимального догляду ми рекомендуємо
використовувати продукт WPRO проти накипу
та для знежирення згідно з інструкціями на
упаковці, також за інформацією можна
звернутися до відділу обслуговування або
відвідати сайт www.hotpoint.eu.
Hotpoint не несе відповідальності за будь-
які збитки, завдані при використанні інших
продуктів, доступних на ринку, для очищення
пральної машини.
Для активації програми утримуйте кнопку
натисненою протягом 5 секунд, після
чого натисніть кнопку START/PAUSE, в
результаті чого розпочнеться програма
тривалістю приблизно 70 хвилин.
Чистка касети для миючих засобів
В и й м i т ь к а с ет у,
п i д н я в ш и ї ї т а
витягнувши назовнi
(див. малюнок).
П р о м и й т е п і д
проточною водою;
ц я п р о ц е д у р а
має проводитися
регулярно.
Технічне обслуговування та
догляд
1
2

UA
17
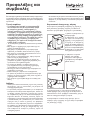
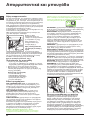
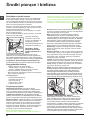
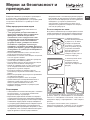
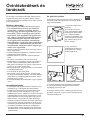
Ручне відкривання дверцят люку
У випадку, якщо неможливо відкрити дверцята люку
із-за відсутності електроенергії і ви хотіли б розвісити
речі, треба діяти таким чином:
1. витягніть штепсель з
електричної розетки.
2. перевірте, щоб рівень
води усередині машини
був нижчим за рівень
отвору люку; якщо це не
так, злийте надлишок
води через зливний шланг,
збираючи її у відрі, як
показано на малюнку.
3. зніміть декоративну
панель на лицевому
боці пральної машини за
допомогою викрутки (див.
малюнок).
4. За допомогою вказаного на малюнку язичка тягнiть
пластмасову тягу з упору назовнi, аж доки її не буде
звiльнено; потiм протягнiть її донизу, одночасно
вiдкриваючи дверцята.
5. встановіть панель на місце, пересвідчіться у тому,
що крюки були вставлені у спеціальні петлі, пiсля чого
притиснiть її до машини.
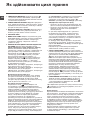
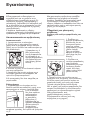
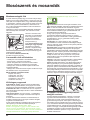
Запобіжні заходи та
поради
! Машину була спроектовано і вироблено у відповідності
з міжнародними нормами безпеки. Дані попередження
складені для забезпечення безпеки і тому їх треба
уважно прочитати.
Загальна безпека
• Дане обладнання було розроблене виключно для
побутового використання.
• Після використання машини обов’язково відключайте
її від мережі живлення змінюго струмута лерекривайте
кран водогону.
• Дозволяється користування цим приладом
дітьми віком від 8 років, а також особами з
обмеженими фізичними, сенсорними або
розумовими можливостями або особами
без належного досвіду і знань, якщо вони
перебувають під постійним контролем
або проінструктовані щодо правил з
небезпечного використання приладу і
усвідомлюють ступені ризику. Не дозволяйте
дітям гратися з приладом. Операції з
очищення і догляду не повинні виконуватися
дітьми без належного контролю.
• Машина має використовуватися тільки повнолітніми
особами і згідно з інструкціями, наведеними у даній брошурі.
• Не торкайтеся до машини голими ногами або мокрими
чи вологими руками й ногами.
• Не виймайте штепсель з електричної розетки, витягуючи
його за провід, тримайтеся тільки за самий штепсель.
• Не вiдкривайте касету з миючими засобами пiд час
роботи машини.
• Будьте обережні: вода, що зливається, може мати
високу температуру.
• У жодному випадку не застосовуйте силу до люку:
це може ушкодити запобiжний механiзм проти
випадкових вiдкривань.
• Якщо машина не працює у разi поломки, у жодному
випадку не намагайтеся дiстатися внутрiшнiх
механiзмiв з метою самостійного ремонту.
• Слiдкуйте, щоб дiти не наближалися до працюючої
машини.
• Пiд час прання люк нагрiватиметься.
• Пересування машини має здiйснюватися двома або
трьома особами за умови максимальної уваги. Нi в якому
разi - однiєю особою, тому що машина дуже важка.
• Перш ніж завантажити білизну, перевірте, щоб
барабан був порожній.
Утилізація
• Утилізація пакувального матеріалу: додержуйтесь
місцевих норм, так як пакування може бути використане
повторно.
• Європейська директива 2012/19/EU з відходів від
електричної й електронної апаратури передбачає, що
побутові електроприлади не можуть перероблятися
у звичайному порядку для твердих міських відходів.
Зняті з експлуатації побутові прилади мають бути
зібрані окремо для оптимізації ступеню відновлення
й рециклювання матеріалів, що входять до їхнього
складу, і з метою усунення потенційної шкоди
для здоров’я та навколишнього середовища.
Символ закресленої корзини, зображений на
всіх виробах, нагадує про необхідність окремої
утилізації. Для подальшої інформації про правильне
зняття з експлуатації побутових електроприладів,
їхні власники можутьз вернутися у відповідну
муницiпальну службу або до продавця приладу.
20

18
UA
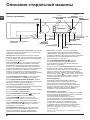
Касета з миючим засобом: для завантаження миючих
засобiв та присадок (див. “Миючi засоби та бiлизна”).
Панель: всередині лотку для пральних засобів
розташована панель, на якій представлені всі можливі
програми, а також графічно зображений спосіб
використання окремих відділів лотку.
Кнопка ON/OFF : швидко натисніть і відпустіть кнопку
для увiмкнення або вимикання машини. Iндикаторна
лампа START/PAUSE блимає зеленим свiтлом з
повільними інтервалами, вказуючи на те, що машину
ввiмкнено. Для вимикання пральної машини під час
прання необхідно утримувати кнопку натиснутою
приблизно більш ніж 3 сек.; короткочасне або випадкове
натискання не дозволить вимкнути машину. Вимикання
машини під час циклу прання вiдмiнює це прання.
РУЧКА ПРОГРАМ: для задання бажаної програми
(див. “Таблиця програм”).
Кнопки ФУНКЦIЯ: для вибору бажаної функції
натиснiтьна кнопку. На дисплеї запалиться спалахує
вiдповiдна iндикаторна лампа.
Кнопка
САМООЧИЩЕННЯ: натисність для
здійснення очищення внутрішніх частин машини
(див. “Очищення пральної машини”).
Кнопка
DIRECT INJECTION
: натисніть для того, щоб
вибрати опцію DIRECT INJECTION.
Кнопка
МУЛЬТИ ПОЛОСКАННЯ
: натиснути для
вибору бажаного типу ополіскування.
Кнопка ВIДЖИМУ : натискання викликає
зменшення або виключення режиму вiджиму взагалi;
значення вiдображається на дисплеї.
Кнопка ТЕМПЕРАТУРА : натискання викликає
зменшення температури: значення вiдображається на
дисплеї.
Кнопка БЛОКУВАННЯ КНОПОК : щоб активувати
блокування панелі управління натиснiть та утримуйте
кнопку впродовж 2 секунд. Відображення на дисплеї
надпису “KEY LOCK ON” (БЛОКУВАННЯ КНОПОК
АКТИВОВАНЕ) означає, що панель керування заблокована
(за винятком кнопки ON/OFF). У цей спосіб перешкоджають
випадковій зміні програм, передусім, якщо у домі є діти. Для
вiдключення блокування панелi управління натиснiть та
утримуйте кнопку впродовж 2 секунд.
Кнопка ВIДСТРОЧЕНИЙ ПУСК : натиснiть для
того, що б задати режим вiдстроченого пуску обраної
програми. Вiдстрочення вiдображатиметься на дисплеї.
Кнопка з індикаторною лампою START/PAUSE: коли
зелена індикаторна лампа блимає з повільними
інтервалами, натисніть на кнопку для запуску прання.
Якщо цикл розпочався, індикаторна лампа горить
постійно. Щоб увійти в режим паузи під час прання, знову
натисніть на кнопку; індикаторна лампа почне горіти
померанцевим кольором. Якщо позначка не свiтиться,
ви можете вiдкрити люк. Щоб продовжити прання з місця,
де воно було перерване, знову натисніть на кнопку.
Режим очiкування
Вiдповiдно до норм, пов’язаних з заощадження енергiї,
цю пральну машину оснащено системою автовимкнення
(stand by), яка активується через 30 секунд вiдсутностi
роботи з боку машини. Швидко натиснiть кнопку ON/OFF
та зачекайте вiдновлення роботи машини.
Антимікробна прокладка
Прокладка люку виконана із спеціальної суміші,
здатної забезпечити протимікробний захист,
зменшуючи ріст бактерій аж до 99,99 %.
Прокладка люку містить пірітіон цинку, що є
біоцидною речовиною, яка зменшує ріст шкідливих
мікробів (*), таких як бактерії та пліснява, що можуть
привезти до утворення плям, неприємного запаху та
погіршення якості одягу.
(*) За результатами випробувань, проведених в
Університеті м. Перуджа, щодо: Staphylococcus aureus,
Escherichia coll, Pseudomonas aeruginosa, Candida albicans,
Aspergillus niger, Penicillium digitatum.
В рідких випадках довготривалий контакт з прокладкою може спричинити
алергічну реакцію шкіри.
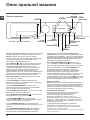
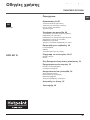
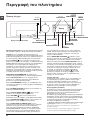
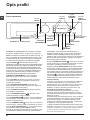
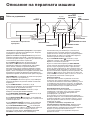
Опис пральної машини
Кнопка з індикаторною
лампою
START/PAUSE
Панель керування
Кнопка
ТЕМПЕРАТУРА
Кнопка
ВIДЖИМУ
Кнопки
ФУНКЦIЯ
Касета з миючим засобом
Кнопка
ON/OFF
Кнопка
БЛОКУВАННЯ
КНОПОК
Дисплей
Кнопка
ВIДСТРОЧЕНИЙ
ПУСК
Кнопка
САМО-
ОЧИЩЕННЯ
Кнопка
МУЛЬТИ
ПОЛОСКАННЯ
Панель
Кнопка
DIRECT
INJECTION
РУЧКА
ПРОГРАМ

UA
19
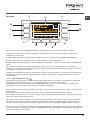
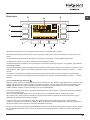
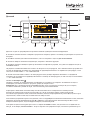
Дисплей
Дисплей є зручним для програмування машини; вiн надає рiзноманiтну iнформацiю.
В зоні A висвічується іконка та вибрана програма прання, фази та час, що залишився до закінчення циклу прання.
В зоні B висвічуються два рівня інтенсивності, що відповідають функції DIRECT INJECTION.
В зоні C знаходяться світлоіндикатори, що відповідають наявним функціям.
В зоні D висвічується час до запуску вибраної програми, у випадку якщо був встановлений ВIДСТРОЧЕНИЙ ПУСК.
В рядку E вiдображається максимальне значення швидкостi вiджиму, який машина виконує згiдно з встановленою
програмою; Якщо програма не передбачає активації центрифуги, на панелі відображається тьмяним світлом
символ “--”.
В зоні F з’являється значення температури, яку можливо завдати у відповідності до обраної програми; якщо
програма не передбачає встановлення температури, на панелі відображається тьмяним світлом символ “--”.
Позначка Люк заблоковано
Увiмкнена позначка вказує на те, що люк заблоковано, щоб запобiгти його випадковому вiдкриттю. З метою
запобiгання ушкоджень, перш нiж вiдкрити люк, переконайтеся вдоскональтеся, що позначка не горить.
Увага: при активованiй функцiї ВIДСТРОЧЕНИЙ ПУСК забороняється вiдкривати люк, для вiдкриття люку
встановiть машину в режим паузи, натиснувшни на кнопку START/PAUSE.
! При першому ввiмкненнi з’являється запит щодо вибору мови, дисплей автоматично ввiйде в меню вибору мови.
Для вибору бажаної мови натиснiть на кнопки X та Y, щоб пiдтвердити зроблений вибiр, натиснiть на кнопку Z.
Для зміни однієї мови на іншу вимкніть прилад, натисніть одночасно на кнопки G, H, I і зачекайте на звукову
сигналізацію, яка сповіщає про появу меню для вибору мови.
! У випадку, якщо Ви забажаєте змінити інтенсивність освітлення дисплею, яка за умовчанням встановлена на
самому високому рівні, вимкніть машину, одночасно натисніть кнопки G, L, M до звукового сигналу. Натисність
кнопки X та Y для вибору бажаного рівня яскравості, для підтвердження натисніть кнопку Z.
! Якщо під час циклу прання або заданого ВIДСТРОЧЕНИЙ ПУСК з дисплеєм не виконуються ніякі дії протягом
1 хвилини, активується функція “ЗБЕРІГАЧУ ЕКРАНУ”. Для повернення до попереднього екрану дисплею
достатньо натиснути будь-яку кнопку.
H
G
Y
X Z
I
L M
A
B
C
C
D
E
C
F

20
UA
Як здійснювати цикл прання
1. УВІМКНЕННЯ МАШИНИ. Натиснiтьна кнопку
: на дисплеї з’явиться HOTPOINT; iндикаторна
лампа START/PAUSE блиматиме зеленим свiтлом
з повiльними iнтервалами.
2. ЗАВАНТАЖЕННЯ БІЛИЗНИ. Відкрийте дверцята
люку. Завантажте білизну, звертаючи увагу, щоб не
перевищити кількість білизни, зазначену в таблиці
програм на наступній сторінці.
3. ДОДАННЯ МИЮЧОГО ЗАСОБУ. Витягніть касету
і додайте миючий засіб у відповідні ванночки, як
вказано в роздiлi “Миючі засоби і білизна”.
4. ЗАКРИЙТЕ ЛЮК.
5. ВИБІР ПРОГРАМИ. Вибрати за допомогою ручки
ПРОГРАМ бажану програму; ви можете змiнювати
пов’язанi з програмою значення температури
та швидкостi вiджиму. На дисплеї з’явиться
тривалiсть циклу.
6. НАЛАШТУВАННЯ ЦИКЛУ ПРАННЯ ПIД ВЛАСНI
ПОТРЕБИ. Використайте вiдповiднi кнопки:
Зміна температури та/або швидкостi віджиму.
Машина автоматично вибирає максимальну
температуру і швидкість віджиму, передбачені для
даної програми, тому неможливо їх збільшити.
Натискаючи на кнопку , поступово зменшують
температуру прання аж до прання у холодній
воді (на дисплеї висвічується символ “--”).
Натискаючи на кнопку поступово зменшують
швидкість віджиму, аж до його відключення (на
дисплеї висвічується символ “--”). Наступне
натискання на кнопки призводить до повернення
до максимальних значень.
! Виключення: при виборі програми 2, температура
може збільшитися до 40 градусів.
! Виключення: при виборі програми 3, температура
може збільшитися до 90 градусів.
! Виключення: при виборі програми 4, температура
може збільшитися до 60 градусів.
Встановiть вiдстрочений пуск.
Для встановлення вiдстроченого пуску обраної
програми натискайте на вiдповiдну кнопку, доки
не з’явиться необхiдний час вiдстрочки. Щоб
скасувати вiдстрочений пуск натискайте на кнопку,
доки на дисплеї не з’явиться “-- h”.
Як задати тип ополіскування.
За допомогою опції можна вибрати тип
ополіскування, спеціально передбачений для
чутливої шкіри. При першому натисканні на кнопку
задається “Extra +1” (Додаткове полоскання)
на додаток до стандартного, щоб видалити усі
залишки прального засобу. При другому натисканні
на кнопку задається опція “Extra +2” (Чутлива
шкіра), яка дозволяє обрати два додаткових
полоскання на додаток до стандартного;
рекомендується для осіб з підвищеною чутливістю
шкіри. Натисканням на кнопку тричі можна завдати
“Extra +3” (Протиалергійне полоскання) рівень,
який дозволяє обрати 3 додаткових ополіскування,
окрім стандартного. Таку опцію можна активувати
для циклів з температурою 40°, щоб видалити
основні алергени, такі як котяча й собача шерсть,
пилок, тому що при температурі вище 40°
забезпечується оптимальний рівень захисту проти
алергії Ще раз натисніть кнопку, щоб повернутися
до “Normal Rinse” (Нормального) ополіскування.
Якщо неможливо задати або змінити існуючі
параметри, на дисплеї з’явиться напис “No
Selection” (Ні Вибір) або “No Change” (Без Змін).
Модифiкацiя характеристик циклу.
• Натиснiть на кнопку для активацiї функцiї; На
дисплеї спалахує відповідний світлоіндикатор.
• Натисніть знову на кнопку, щоб вiдминити
функцiю; На дисплеї гасне відповідний
світлоіндикатор.
! У разі якщо обрана функція не є сумісною з
встановленою програмою, тьмяним світлом
загориться відповідний світлоіндикатор, крім
того, про таку несумісність попередить звукова
сигналізація (3 сигнали), а на дисплеї з’явиться
напис “No Selection” (Ні Вибір).
! У випадку якщо обрана функція є несумісною з
встановленою програмою, на дисплеї з’явиться
надпис “No Selection” (Ні Вибір), активація функції
буде неможливою.
! Функцiї можуть змiнювати рекомендоване
завантаження та/або тривалiсть циклу.
7. ЗАПУСК ПРОГРАМИ. Натисніть кнопку START/
PAUSE. Вiдповiдна iндикаторна лампа засвiтиться
зеленим свiтлом, при цьому люк буде заблоковано
(свiтитиметься позначка ЛЮК ЗАБЛОКОВАНО
) Пiд час прання на дисплеї з’являється
назва поточної фази. Для змiни програми пiд час
виконання циклу виведiть машину в режим паузи,
натиснувши на START/PAUSE (iндикаторна
кнопка START/PAUSE блиматиме померанцевим
кольором з повiльними iнтервалами); виберiть
бажаний цикл та знову натиснiть кнопку
START/PAUSE . Щоб відкрити дверцята люку
під час виконання циклу натисніть на кнопку
START/PAUSE; якщо індикаторна лампа ЛЮК
ЗАБЛОКОВАНО згасне, це означає, що люк
можна відкрити. Знову натисніть на кнопку START/
PAUSE, щоб запустити програму з того мiсця, де її
було перервано.
8. ЗАВЕРШЕННЯ ПРОГРАМИ. На це вказує надпис
“END OF CYCLE” (КІНЕЦЬ ЦИКЛУ) на дисплеї;
коли згасне позначка ЛЮК ЗАБЛОКОВАНО
, люк можна вiдкрити. Відкрийте люк, витягніть
білизну й вимкніть машину.
! Для вiдмiни вже працюючого циклу натиснiть кнопку
, утримуючи її, й цикл буде перервано, пiсля чого
машина вимкнеться.
Direct Injection
Пральна машина оснащена інноваційною технологією
«Direct Injection», що здійснює попереднє змішування
води та миючого засобу, відразу активуючи, таким
чином, очищаючі властивості прального засобу.
Така активна емульсія потрапляє безпосередньо
до барабану пральної машини та більш ефективно
проникає між волокон тканини, видаляючи найбільш
забруднені місця навіть при низьких температурах,
максимально зберігаючи кольори речей та не
деформуючи тканину.
Пральні машини оснащені режимом «Power», що
забезпечить більш високу ефективність прання,
а також режимом «EcoEnergy», для зменшення
споживання енергії.
Страница загружается ...
Страница загружается ...
Страница загружается ...
Страница загружается ...
Страница загружается ...
Страница загружается ...
Страница загружается ...
Страница загружается ...
Страница загружается ...
Страница загружается ...
Страница загружается ...
Страница загружается ...
Страница загружается ...
Страница загружается ...
Страница загружается ...
Страница загружается ...
Страница загружается ...
Страница загружается ...
Страница загружается ...
Страница загружается ...
Страница загружается ...
Страница загружается ...
Страница загружается ...
Страница загружается ...
Страница загружается ...
Страница загружается ...
Страница загружается ...
Страница загружается ...
Страница загружается ...
Страница загружается ...
Страница загружается ...
Страница загружается ...
Страница загружается ...
Страница загружается ...
Страница загружается ...
Страница загружается ...
Страница загружается ...
Страница загружается ...
Страница загружается ...
Страница загружается ...
Страница загружается ...
Страница загружается ...
Страница загружается ...
Страница загружается ...
Страница загружается ...
Страница загружается ...
Страница загружается ...
Страница загружается ...
Страница загружается ...
Страница загружается ...
Страница загружается ...
Страница загружается ...
Страница загружается ...
Страница загружается ...
Страница загружается ...
Страница загружается ...
Страница загружается ...
Страница загружается ...
Страница загружается ...
Страница загружается ...
Страница загружается ...
Страница загружается ...
Страница загружается ...
Страница загружается ...
-
 1
1
-
 2
2
-
 3
3
-
 4
4
-
 5
5
-
 6
6
-
 7
7
-
 8
8
-
 9
9
-
 10
10
-
 11
11
-
 12
12
-
 13
13
-
 14
14
-
 15
15
-
 16
16
-
 17
17
-
 18
18
-
 19
19
-
 20
20
-
 21
21
-
 22
22
-
 23
23
-
 24
24
-
 25
25
-
 26
26
-
 27
27
-
 28
28
-
 29
29
-
 30
30
-
 31
31
-
 32
32
-
 33
33
-
 34
34
-
 35
35
-
 36
36
-
 37
37
-
 38
38
-
 39
39
-
 40
40
-
 41
41
-
 42
42
-
 43
43
-
 44
44
-
 45
45
-
 46
46
-
 47
47
-
 48
48
-
 49
49
-
 50
50
-
 51
51
-
 52
52
-
 53
53
-
 54
54
-
 55
55
-
 56
56
-
 57
57
-
 58
58
-
 59
59
-
 60
60
-
 61
61
-
 62
62
-
 63
63
-
 64
64
-
 65
65
-
 66
66
-
 67
67
-
 68
68
-
 69
69
-
 70
70
-
 71
71
-
 72
72
-
 73
73
-
 74
74
-
 75
75
-
 76
76
-
 77
77
-
 78
78
-
 79
79
-
 80
80
-
 81
81
-
 82
82
-
 83
83
-
 84
84


HOTPOINT/ARISTON RPD 927 DX EU Руководство пользователя
- Категория
- Стиральные машины
- Тип
- Руководство пользователя
Задайте вопрос, и я найду ответ в документе
Поиск информации в документе стал проще с помощью ИИ