Indesit PWSE 6108 S (EU) Руководство пользователя
- Категория
- Стиральные машины
- Тип
- Руководство пользователя

1
GB
English, 1
GB
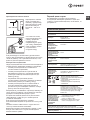
WASHING MACHINE
Contents
Installation, 2-3
Unpacking and levelling
Connecting the electricity and water supplies
The first wash cycle
Technical data
Description of the washing machine, 4-5
Control panel
Display
Running a wash cycle, 6
Wash cycles and options, 7
Table of programmes and wash cycles
Wash options
Detergents and laundry, 8
Detergent dispenser drawer
Preparing the laundry
Special wash cycles
Precautions and advice, 9
General safety
Disposal
Opening the porthole door manually
Care and maintenance, 10
Cutting off the water and electricity supplies
Cleaning the washing machine
Cleaning the detergent dispenser drawer
Cleaning the pump
Checking the water inlet hose
Troubleshooting, 11
Service, 12
PWSE 6108 S
Instructions for use
CIS
Русский,13

2
GB
Installation
! This instruction manual should be kept in a safe place for
future reference. If the washing machine is sold, transferred
or moved, make sure that the instruction manual remains
with the machine so that the new owner is able to
familiarise himself/herself with its operation and features.
! Read these instructions carefully: they contain vital
information relating to the safe installation and operation of
the appliance.
Unpacking and levelling
Unpacking
1. Remove the washing machine from its packaging.
2. Make sure that the washing machine has not been
damaged during the transportation process. If it has been
damaged, contact the retailer and do not proceed any
further with the installation process.
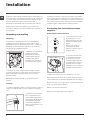
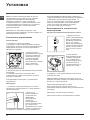
3. Remove the 4 protective
screws (used during
transportation) and the
rubber washer with the
corresponding spacer,
located on the rear part of
the appliance (see figure).
4. Close off the holes using the plastic plugs provided.
5. Keep all the parts in a safe place: you will need them
again if the washing machine needs to be moved to
another location.
! Packaging materials should not be used as toys for
children.
Levelling
1. Install the washing machine on a flat sturdy floor, without
resting it up against walls, furniture cabinets or anything
else.
2. If the floor is not perfectly
level, compensate for any
unevenness by tightening or
loosening the adjustable front
feet (see figure); the angle
of inclination, measured in
relation to the worktop, must
not exceed 2°.
Levelling the machine correctly will provide it with stability,
help to avoid vibrations and excessive noise and prevent it
from shifting while it is operating. If it is placed on carpet or
a rug, adjust the feet in such a way as to allow a sufficient
ventilation space underneath the washing machine.
Connecting the electricity and water
supplies
Connecting the water inlet hose
1. Connect the inlet hose
by screwing it to a cold
water tab using a 3/4 gas
threaded connection (see
figure).
Before performing the
connection, allow the
water to run freely until it is
perfectly clear.
2. Connect the inlet hose
to the washing machine
by screwing it onto the
corresponding water inlet
of the appliance, which is
situated on the top right-
hand side of the rear part of
the appliance (see figure).
3. Make sure that the hose is not folded over or bent.
! The water pressure at the tap must fall within the range of
values indicated in the Technical data table (see next page).
! If the inlet hose is not long enough, contact a specialised
shop or an authorised technician.
! Never use second-hand hoses.
! Use the ones supplied with the machine.

3
GB
Connecting the drain hose
Connect the drain hose,
without bending it, to a
drain duct or a wall drain
situated between 65 and
100 cm from the floor;
alternatively, place it over
the edge of a basin, sink
or tub, fastening the duct
supplied to the tap (see
figure). The free end of
the hose should not be
underwater.
! We advise against the use of hose extensions; if it is
absolutely necessary, the extension must have the same
diameter as the original hose and must not exceed 150 cm
in length.
Electrical connections
Before plugging the appliance into the electricity socket,
make sure that:
• thesocketisearthedandcomplieswithallapplicable
laws;
• thesocketisabletowithstandthemaximumpower
load of the appliance as indicated in the Technical data
table (see opposite);
• thepowersupplyvoltagefallswithinthevalues
indicated in the Technical data table (see opposite);
• thesocketiscompatiblewiththeplugofthewashing
machine. If this is not the case, replace the socket or the
plug.
! The washing machine must not be installed outdoors,
even in covered areas. It is extremely dangerous to leave
the appliance exposed to rain, storms and other weather
conditions.
! When the washing machine has been installed, the
electricity socket must remain within easy reach.
! Do not use extension cords or multiple sockets.
65 - 100 cm
! The cable should not be bent or compressed.
! The power supply cable must only be replaced by
authorised technicians.
Warning! The company shall not be held responsible in the
event that these standards are not observed.
The first wash cycle
Once the appliance has been installed, and before you use
it for the first time, run a wash cycle with detergent and no
laundry, using wash cycle number 2.
Technical data
Model
PWSE 6108 S
Dimensions
width 59.5 cm
height 85 cm
depth 44,5 cm
Capacity
from 1 to 6 kg
Electrical
connections
please refer to the technical data plate
fixed to the machine
Water connections
maximum pressure 1 MPa (10 bar)
minimum pressure 0.05 MPa (0.5 bar)
drum capacity 40 litres
Spin speed
up to 1000 rotations per minute
Energy rated
programmes
according to
regulation
EN 60456
programme 2; temperature 60°C;
using a load of 6 kg.
This appliance conforms to the following
EC Directives:
- 2004/108/EC (Electromagnetic Compa-
tibility)
- 2006/95/EC (Low Voltage)
- 2002/96/EC

4
GB
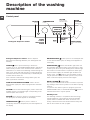
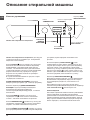
Description of the washing
machine
Control panel
TEMPERATURE
button
WASH
CYCLE
SELECTOR
KNOB
Detergent dispenser drawer
ON/OFF
button
SPIN
button
START/PAUSE
button and indicator
light
DISPLAY
DELAYED
START
button
OPTION
buttons and
indicator lights
DOOR
LOCKED
indicator light
Detergent dispenser drawer: used to dispense
detergents and washing additives ( see “Detergents and
laundry”).
ON/OFF
button: press this briefly to switch the
machine on or off. The START/PAUSE indicator light which
flashes slowly in a blue colour shows that the machine is
switched on. To switch off the washing machine during the
wash cycle, press and hold the button for approximately 3
seconds; if the button is pressed briefly or accidentally the
machine will not switch off.
If the machine is switched off during a wash cycle, this
wash cycle will be cancelled.
WASH CYCLE SELECTOR KNOB: used to set the
desired wash cycle (see “Table of programmes and wash
cycles”).
OPTION buttons and indicator lights: press to select the
available options. The indicator light corresponding to the
selected option will remain lit.
SPIN
button: press to reduce or completely exclude
the spin cycle; the value appears on the display.
TEMPERATURE
button: press to reduce or
completely exclude the temperature; the value appears on
the display.
DELAYED START
button: press to set a delayed start
for the selected wash cycle; the delay period appears on
the display.
START/PAUSE
button and indicator light: when the
blue indicator light flashes slowly, press the button to start
a wash cycle. Once the cycle has begun the indicator light
will remain lit in a fixed manner. To pause the wash cycle,
press the button again; the indicator light will flash in an
amber colour. If the
symbol is not illuminated, the door
may be opened. To start the wash cycle from the point at
which it was interrupted, press the button again.
DOOR LOCKED
indicator light:
The lit symbol indicates that the door is locked. To prevent
any damage, wait until the symbol turns off before opening
the door.
To open the door while a cycle is in progress, press the
START/PAUSE button; if the DOOR LOCKED
symbol is
switched off the door may be opened.
Standby mode
This washing machine, in compliance with new energy
saving regulations, is fitted with an automatic standby
system which is enabled after about 30 minutes if no
activity is detected. Press the ON-OFF button briefly and
wait for the machine to start up again.

5
GB
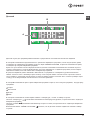
Display
B
C
A
The display is useful when programming the machine and provides a great deal of information.
The duration of the available wash cycles and the remaining time of a running cycle appear in section A; if the DELAYED
START option has been set, the countdown to the start of the selected wash cycle will appear.
Pressing the corresponding button allows you to view the maximum spin speed and temperature values attained by the
machine during the set wash cycle, or the values selected most recently, if these are compatible with the set wash cycle.
The hour-glass flashes while the machine is processing data, depending on the wash cycle and Smart level selected.
After a maximum of 10 minutes, the “hour-glass” icon remains lit in a fixed manner and the final amount of time remaining
is displayed. The hour-glass icon will then switch off approximately 1 minute after the final amount of time remaining has
appeared.
The “wash cycle phases” corresponding to the selected wash cycle and the “wash cycle phase” of the running wash cycle
appear in section B:
Main wash
Rinse
Spin
Drain
The icons corresponding to “temperature”, “spin” and “delayed start” (working from the left) are displayed in section C.
The “temperature” bars
indicate the maximum temperature level which may be selected for the set cycle.
The “spin” bars
indicate the maximum spin level which may be selected for the set cycle.
The “delay” symbol
, when lit, indicates that the set “delayed start” value has appeared on the display.

6
GB
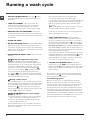
Running a wash cycle
1. SWITCH THE MACHINE ON. Press the button;
the START/PAUSE indicator light will flash slowly in a
blue colour.
2. LOAD THE LAUNDRY. Open the porthole door.
Load the laundry, making sure you do not exceed
the maximum load value indicated in the table of
programmes and wash cycles on the following page.
3. MEASURE OUT THE DETERGENT. Pull out the
detergent dispenser drawer and pour the detergent into
the relevant compartments as described in “Detergents
and laundry”.
4. CLOSE THE DOOR.
5. SELECT THE WASH CYCLE. Use the WASH CYCLE
SELECTOR knob to select the desired wash cycle. A
temperature and spin speed is set for each wash cycle;
these values may be adjusted. The duration of the cycle
will appear on the display.
6. CUSTOMISE THE WASH CYCLE. Use the relevant
buttons:
Modify the temperature and/or spin
speed. The machine automatically displays the
maximum temperature and spin speed values set for
the selected cycle, or the most recently-used settings
if they are compatible with the selected cycle. The
temperature can be decreased by pressing the
button, until the cold wash “OFF” setting is reached.
The spin speed may be progressively reduced by
pressing the
button, until it is completely excluded
(the “OFF” setting). If these buttons are pressed again,
the maximum values are restored.
Setting a delayed start.
To set a delayed start for the selected cycle, press the
corresponding button repeatedly until the required delay
period has been reached. When this option has been
activated, the
symbol lights up on the display. To
remove the delayed start setting, press the button until
the text “OFF” appears on the display.
Modify the cycle settings.
• Pressthebuttontoenabletheoption;theindicator
light corresponding to the button will switch on.
• Pressthebuttonagaintodisabletheoption;the
indicator light will switch off.
! If the selected option is not compatible with the set
wash cycle, the indicator light will flash and the option
will not be activated.
! If the selected option is not compatible with
a previously selected one, the indicator light
corresponding to the first function selected will flash and
only the second option will be activated; the indicator
light for the option which has been activated will be
illuminated.
Note: if the SMART option has been selected, none of
the incompatible options may be activated.
! The options may affect the recommended load value
and/or the duration of the cycle.
7. START THE WASH CYCLE. Press the START/
PAUSE button. The corresponding indicator light will
turn blue, remaining lit in a fixed manner, and the door
will be locked (the DOOR LOCKED
symbol will be lit).
To change a wash cycle while it is in progress, pause
the washing machine using the START/PAUSE button
(the START/PAUSE indicator light will flash slowly in an
amber colour); then select the desired cycle and press
the START/PAUSE button again.
To open the door while a cycle is in progress, press the
START/PAUSE button; if the DOOR LOCKED
symbol
is switched off the door may be opened. Press the
START/PAUSE button again to restart the wash cycle
from the point at which it was interrupted.
8. THE END OF THE WASH CYCLE. This will be
indicated by the text “END” on the display; when the
DOOR LOCKED
symbol switches off the door may be
opened. Open the door, unload the laundry and switch
off the machine.
! If you wish to cancel a cycle which has already begun,
press and hold the
button. The cycle will be stopped
and the machine will switch off.
Load balancing system
Before every spin cycle, to avoid excessive vibrations
before every spin and to distribute the load in a uniform
manner, the drum rotates continuously at a speed which
is slightly greater than the washing rotation speed. If,
after several attempts, the load is not balanced correctly,
the machine spins at a reduced spin speed. If the load is
excessively unbalanced, the washing machine performs
the distribution process instead of spinning. To encourage
improved load distribution and balance, we recommend
small and large garments are mixed in the load.

7
GB
Wash cycles and options
Wash options
The option optimises washing to suit the quantity
of laundry loaded into the machine, thereby reducing the
overall wash cycle duration while minimising water and energy
consumption. Press the
button to select the type of
wash cycle desired:
Intensive: vigorous wash cycle for garments with a heavy soil
level.
4 You: standard wash cycle for garments with a normal soil level.
Fast: quick wash cycle for garments with a light soil level.
! This may only be used in conjunction with wash cycles 1, 2,
3, 4, 5, 6 (all three levels) and 7, 8, 9 (4 You and Fast levels).
Extra Rinse
By selecting this option, the efficiency of the rinse is increased
and optimal detergent removal is guaranteed. It is particularly
useful for sensitive skin.
! It cannot be used in conjunction with wash cycles 9,
, .
Easy iron
By selecting this function, the wash and spin cycles will be
modified in order to reduce the formation of creases. At the end
of the cycle the washing machine will perform slow rotations of
the drum, while the EASY IRON and START/PAUSE indicator
lights will flash (blue and orange respectively).
To end the cycle,
press the START/PAUSE button or the EASY IRON button.
For wash cycles number 11-13, the machine will end the
cycle while the laundry is soaking; the EASY IRON and
START/PAUSE indicator lights will flash.
To drain the water so that the laundry may be removed,
press the START/PAUSE button or the EASY IRON button.
! It cannot be used in conjunction with wash cycles 9, 10,
12,
, .
Stain removal
This function is particularly
useful for the removal of
stubborn stains. Insert extra
compartment 4 (supplied
with the appliance) into
compartment 1. When pouring
in the bleach, be careful not to
exceed the “max” level marked
on the central pivot (see figure).
To bleach laundry with no
other washing action, pour the
bleach into extra compartment 4, select the “Rinse” cycle
and activate the “Stain removal” option
. To bleach during
a wash cycle, pour in the detergent and any fabric softener
you wish to use, select the desired wash cycle and enable the
“Stain removal”
option. The use of extra compartment 4
excludes the pre-wash function.
! It cannot be used in conjunction with wash cycles 1, 7, 9,
10, 11, 12, 13,
, .
For all Test Institutes:
1) Test wash cycle in compliance with regulation EN 60456: select wash cycle 2 with a temperature of 60°C.
2) Long wash cycle for cottons: select wash cycle 2 with a temperature of 40.
3) Short wash cycle for cottons: select wash cycle 4 with a temperature of 40.
Table of programmes and wash cycles
4
2
3
1
4
2
1
3
Wash cycles
Description of the wash cycle
Max.
temp.
(°C)
Max.
speed
(rpm)
Detergents
Max.
load (kg)
Cycle
duration
Pre-wash Main wash Bleach
Fabric
softener
Smart cycles
The duration of the wash cycles can be checked on the display.
1
Cottons with Pre-wash: extremely soiled whites. 90° 1000
-
6
2
White Cottons: extremely soiled whites. 90° 1000 -
6
2
White Cottons (1): heavily soiled whites and resistant colours. 60° 1000 -
6
2
White Cottons (2): heavily soiled whites and delicate colours. 40° 1000 -
6
3
Cottons: heavily soiled whites and resistant colours. 60° 1000 -
6
4
Coloured Cottons(3): lightly soiled whites and delicate colours. 40° 1000 -
6
5
Synthetics: heavily soiled resistant colours. 60° 800 -
2,5
6
Synthetics: lightly soiled resistant colours. 40° 800 -
2,5
7 Jeans
40° 800 -
-
2,5
8 Shirts
40° 600 -
2
9
Mix-Cool 30’: to refresh lightly soiled garments quickly (not sui-
table for wool, silk and clothes which require washing by hand).
Cold
water
800 -
-
3
Special cycles
10
Wool: for wool, cashmere, etc. 40° 600 -
-
1
11
Silk/Curtains: for garments in silk and viscose, lingerie. 30° 0 -
-
1
12 Sport Shoes
30° 600 -
-
Max.2
paires
13 Outwear
30° 400 -
- - 1,5
Partial cycles
Rinse - 1000 - -
6
Spin - 1000 - - - - 6
Drain - 0 - - - - 6

8
GB
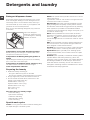
Detergents and laundry
Detergent dispenser drawer
Successful washing results also depend on the correct
dose of detergent: adding too much detergent will not
necessarily result in a more efficient wash, and may in
fact cause build up on the inside of your appliance and
contribute to environmental pollution.
! Do not use hand washing detergents; they create too
much foam.
Open the detergent
dispenser drawer and pour
in the detergent or washing
additive, as follows.
Compartment 1: Pre-wash detergent (powder)
Before pouring in the detergent, make sure that extra
compartment 4 has been removed.
Compartment 2: Washing detergent (powder or
liquid)
Liquid detergent should only be poured in immediately
prior to the start of the wash cycle.
Compartment 3: Additives (fabric softeners, etc.)
The fabric softener should not overflow the grid.
extra compartment 4: Bleach
Preparing the laundry
• Dividethelaundryaccordingto:
- the type of fabric/the symbol on the label
- the colours: separate coloured garments from whites.
• Emptyallgarmentpocketsandcheckthebuttons.
• Donotexceedthelistedvalues,whichrefertothe
weight of the laundry when dry:
Durable fabrics: max. 6 kg
Synthetic fabrics: max. 2,5 kg
Delicate fabrics: max. 2 kg
Wool: max. 1,5 kg
Silk: max. 1 kg
How much does your laundry weigh?
1 sheet 400-500 g
1 pillow case 150-200 g
1 tablecloth 400-500 g
1 bathrobe 900-1.200 g
1 towel 150-250 g
Special wash cycles
Jeans: turn the garments inside out before washing and
use liquid detergent. Use wash cycle 7.
4
2
3
1
4
2
1
3
Shirts: use special wash cycle 8 to wash shirts in various
fabrics and colours.
It guarantees maximum care is taken of the garments and
minimises the formation of creases.
Mix-Cool 30’:
this wash cycle was designed to wash
lightly soiled garments quickly: it lasts just 30 minutes
and therefore saves both energy and time. By selecting
wash cycle 9, it is possible to wash different fabrics
(except for wool and silk items) using a cold cycle, up to
a maximum load of 3 kg.
Wool: wash cycle 10 can be used to wash all woollen
garments in the machine, even those carrying the “hand
wash only”
label. To achieve the best results, use a
special detergent and do not exceed the maximum load of
1,5 kg.
Silk: use special wash cycle 11 to wash all silk garments.
We recommend the use of special detergent which has
been designed to wash delicate clothes.
Curtains: we recommend you fold the curtains and place
them in a pillow case or mesh bag. Use wash cycle 11.
Sport Shoes (
wash cycle
12): is for washing sports
shoes; for best results, do not wash more than 2 pairs
simultaneously.
Outwear (
wash cycle
13): is studied for washing water-
repellent fabrics and winter jackets (e.g. Gore-Tex,
polyester, nylon); for best results, use a liquid detergent
and dosage suitable for a half-load; pre-treat necks,
cuffs and stains if necessary; do not use softeners or
detergents containing softeners. Stuffed duvets cannot
be washed with this programme.

9
GB
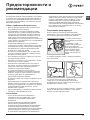
Precautions and tips
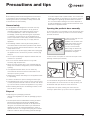
Opening the porthole door manually
In the event that it is not possible to open the porthole door
due to a powercut, and if you wish to remove the laundry,
proceed as follows:
1. Remove the plug from the
electrical socket..
2. Make sure the water level
inside the machine is lower
than the door opening; if
it is not, remove excess
water using the drain hose,
collecting it in a bucket as
indicated in the figure.
3. Remove the cover panel on the lower front part of the
washing machine (see overleaf).
4. Pull outwards using the tab as indicated in the figure,
until the plastic tie-rod is freed from its stop position; pull
downwards and open the door at the same time.
5. Reposition the panel, making sure the hooks are
securely in place before you push it onto the appliance.
! This washing machine was designed and constructed
in accordance with international safety regulations. The
following information is provided for safety reasons and
must therefore be read carefully.
General safety
• Thisappliancewasdesignedfordomesticuseonly.
• Thisapplianceisnotintendedforusebypersons
(including children) with reduced physical, sensory
or mental capabilities, or lack of experience and
knowledge, unless they have been given supervision
or instruction concerning use of the appliance by a
person responsible for their safety. Children should be
supervised to ensure that they do not play with the
appliance.
• Thewashingmachinemustonlybeusedbyadults,in
accordance with the instructions provided in this manual.
• Donottouchthemachinewhenbarefootorwithwetor
damp hands or feet.
• Donotpullonthepowersupplycablewhenunplugging
the appliance from the electricity socket. Hold the plug
and pull.
• Donotopenthedetergentdispenserdrawerwhilethe
machine is in operation.
• Donottouchthedrainedwaterasitmayreach
extremely high temperatures.
• Neverforcetheportholedoor.Thiscoulddamagethe
safety lock mechanism designed to prevent accidental
opening.
• Iftheappliancebreaksdown,donotunderany
circumstances access the internal mechanisms in an
attempt to repair it yourself.
• Alwayskeepchildrenwellawayfromtheappliancewhile
it is operating.
• Thedoorcanbecomequitehotduringthewashcycle.
• Iftheappliancehastobemoved,workinagroupoftwo
or three people and handle it with the utmost care. Never
try to do this alone, because the appliance is very heavy.
• Beforeloadinglaundryintothewashingmachine,make
sure the drum is empty.
Disposal
•Disposingofthepackagingmaterials:
observe local regulations so that the packaging may be
re-used.
•TheEuropeanDirective2002/96/ECrelatingtoWaste
Electrical and Electronic Equipment (WEEE) states
that household appliances should not be disposed of
using the normal solid urban waste cycle. Exhausted
appliances should be collected separately in order to
optimise the cost of re-using and recycling the materials
inside the machine, while preventing potential damage
to the atmosphere and to public health. The crossed-out
dustbin is marked on all products to remind the owner of
their obligations regarding separated waste collection.
For more information relating to the correct disposal of
household appliances, owners should contact their local
authorities or appliance dealer.

10
GB
Care and maintenance
Cutting off the water and electricity
supplies
• Turnoffthewatertapaftereverywashcycle.Thiswill
limit wear on the hydraulic system inside the washing
machine and help to prevent leaks.
• Unplugthewashingmachinewhencleaningitand
during all maintenance work.
Cleaning the washing machine
The outer parts and rubber components of the appliance
can be cleaned using a soft cloth soaked in lukewarm
soapy water. Do not use solvents or abrasives.
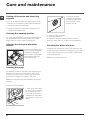
Cleaning the detergent dispenser
drawer
To remove the drawer, press
lever (1) and pull the drawer
outwards (2) (see figure).
Wash it under running water;
this procedure should be
repeated frequently.
Cleaning the pump
The washing machine is fitted with a self-cleaning pump
which does not require any maintenance. Sometimes,
small items (such as coins or buttons) may fall into the
protective pre-chamber at the base of the pump.
! Make sure the wash cycle has finished and unplug the
appliance.
To access the pre-chamber:
1. Take off the cover panel
on the front of the machine
by first pressing it in the
centre and then pushing
downwards on both sides
until you can remove it (see
figures).
2
1
1
2
3
2. Unscrew the lid by
rotating it anti-clockwise
(see figure): a little water
may trickle out. This is
perfectly normal.
3. Clean the inside thoroughly.
4. Screw the lid back on.
5. Reposition the panel, making sure the hooks are
securely in place before you push it onto the appliance.
Checking the water inlet hose
Check the inlet hose at least once a year. If there are any
cracks, it should be replaced immediately: during the wash
cycles, water pressure is very strong and a cracked hose
could easily split open.
! Never use second-hand hoses.

11
GB
Troubleshooting
Your washing machine could occasionally fail to work. Before contacting the Technical Assistance Service (see “ Service”),
make sure that the problem cannot be not solved easily using the following list.
Problem:
The washing machine does not
switch on.
The wash cycle does not start.
The washing machine does not fill
with water (the text “H2O” flashes
on the display).
The washing machine
continuously takes in and drains
water.
The washing machine does not
drain or spin.
The washing machine vibrates a
lot during the spin cycle.
The washing machine leaks.
The “option” and START/PAUSE
indicator lights flash rapidly and an
error code appears on the display
(e.g.: F-01, F-..).
There is too much foam.
Possible causes / Solutions:
• Theapplianceisnotpluggedintothesocketfully,ornotenoughtomake
contact.
• Thereisnopowerinthehouse.
• Thewashingmachinedoorisnotclosedproperly.
• TheON/OFFbuttonhasnotbeenpressed.
• TheSTART/PAUSEbuttonhasnotbeenpressed.
• Thewatertaphasnotbeenopened.
• Adelayedstarthasbeenset.
• Thewaterinlethoseisnotconnectedtothetap.
• Thehoseisbent.
• Thewatertaphasnotbeenopened.
• Thereisnowatersupplyinthehouse.
• Thepressureistoolow.
• TheSTART/PAUSEbuttonhasnotbeenpressed.
• Thedrainhoseisnotfittedataheightbetween65and100cmfromthefloor
(see “Installation”).
• Thefreeendofthehoseisunderwater(see “Installation”).
• Thewalldrainagesystemisnotfittedwithabreatherpipe.
If the problem persists even after these checks, turn off the water tap, switch the
appliance off and contact the Technical Assistance Service. If the dwelling is on one
of the upper floors of a building, there may be problems relating to water drainage,
causing the washing machine to fill with water and drain continuously. Special anti-
draining valves are available in shops and help to prevent this inconvenience.
• Thewashcycledoesnotincludedraining:somecyclesrequirethedraining
process to be enabled manually.
• TheEASYIRONoptionisenabled:Tocompletethewashcycle,pressthe
START/PAUSE button (see “Wash cycles and options”).
• Thedrainhoseisbent(see “Installation”).
• Thedrainageductisclogged.
• Thedrumwasnotunlockedcorrectlyduringinstallation(see “Installation”).
• Thewashingmachineisnotlevel(see “Installation”).
• Thewashingmachineistrappedbetweencabinetsandwalls(see “Installation”).
• Thewaterinlethoseisnotscrewedonproperly(see “Installation”).
• Thedetergentdispenserdrawerisblocked(forcleaninginstructions,see “Care
and maintenance”).
• Thedrainhoseisnotfixedproperly(see “Installation”).
• Switchoffthemachineandunplugit,waitforapproximately1minuteandthen
switch it back on again.
If the problem persists, contact the Technical Assistance Service.
• Thedetergentisnotsuitableformachinewashing(itshoulddisplaythetext“for
washing machines” or “hand and machine wash”, or the like).
• Toomuchdetergentwasused.

12
GB
Service
Before contacting the Technical Assistance Service:
• Checkwhetheryoucansolvetheproblemalone(see“Troubleshooting”).
• Restartthewashcycletocheckwhethertheproblemhasbeensolved.
• Ifthisisnotthecase,contactanauthorisedTechnicalAssistanceCentre.
! Always request the assistance of authorised technicians.
Have the following information to hand:
• thetypeofproblem;
• theappliancemodel(Mod.);
• theserialnumber(S/N).
This information can be found on the data plate applied to the rear of the washing machine, and can also be found on the
front of the appliance by opening the door.

13
CIS
Русский
CIS
СТИРАЛЬНАЯ МАШИНА
Содержание
Монтаж, 14-15
Распаковка и выравнивание
Водопроводное и электрическое подсоединение
Первый цикл стирки
Технические данные
Описание стиральной машины, 16-17
Консоль управления
Дисплей
Цикл стирки, 18
Программы и дополнительные функции, 19
Таблица программ
Дополнительные функции мойки
Стиральные порошки и белье, 20
Ячейка для стирального порошка
Подготовка белья
Специальные программы
Предосторожности и рекомендации, 21
Общие требования по безопасности
Утилизация
Открывание люка вручную
Техническое обслуживание и уход, 22
Отключение воды и электрического тока
Порядок чистки стиральной машины
Чистка ячейки для стирального порошка
Порядок чистки насоса
Проверка шланга подачи воды
Неисправности и методы их устранения, 23
Сервисное обслуживание, 24
PWSE 6108 S
Руководство по эксплуатации

14
CIS
Установка
! Важно сохранить данное руководство для его
последующих консультаций. В случае продажи,
передачи или переезда на новую квартиру
необходимо проверить, чтобы руководство
оставалось вместе со стиральной машиной, чтобы
ее новый владелец мог ознакомиться с порядком
ее функционирования и соответствующими
предупреждениями.
! Внимательно прочитайте инструкции: в них
содержатся важные сведения о монтаже изделия, его
эксплуатации и безопасности.
Распаковка и выравнивание
Снятие упаковки
1. Распаковать стиральную машину.
2. Проверить, чтобы стиральная машина не была
повреждена в процессе перевозки. При обнаружении
повреждений не выполнять ее подсоединений, а
обратиться к продавцу.
3. Снимите 4 винта,
предохраняющие машину
в процессе перевозки,
и резиновую заглушку
с соответствующей
распорной шайбой,
расположенные в задней
части стиральной
машины (см. схему).
4. Закройте отверстия прилагающимися резиновыми
заглушками.
5. Сохраните все детали: они должны быть
установлены на стиральную машину в случае ее
повторно й перевозки.
! Не разрешайте детям играть с упаковочными
материалами.
Нивелировка
1. Установите стиральную машину на плоском и
прочном полу, не прислоняя ее к стенам, мебели и
прочим предметам.
2. Если пол не
является идеально
горизонтальным,
необходимо
компенсировать
неровность,
отрегулировав по
высоте передние ножки
(см. схему). Уклон,
измеренный при помощи
уровня, установленного
на поверхность машины, не должен превышать 2°.
Точное выравнивание обеспечивает стабильность
стиральной машины, помогает избежать ее вибраций
и смещений в процессе функционирования. В
случае установки машины на ковер или ковровое
покрытие отрегулировать ножки таким образом,
чтобы под стиральной машиной оставался
достаточный зазор для вентиляции.
Водопроводное и электрическое
подсоединение
Порядок подсоединения водопроводного шланга
1. Прикрутите шланг
подачи к водопроводному
крану холодной воды с
резьбовым отверстием
3/4 газ, (см. схему).
Перед подсоединением
откройте водопроводный
кран до тех пор, пока из
него не потечет чистая
вода.
2. Подсоедините
водопроводный шланг
к машине, привинтив
его к специальному
водопроводному крану,
расположенному в
задней верхней части
справа (см. схему).
3. Проверьте, чтобы водопроводный шланг не был
заломлен или сжат.
! Водопроводное давление в кране должно быть в
пределах значений, указанных в таблице Технические
данные (см. страницу рядом).
! Если длина водопроводного шланга
будет недостаточной, следует обратиться в
специализированный магазин или к уполномоченному
сантехнику.
! Никогда не пользуйтесь б/у шлангами.
! Используйте шланги, прилагающиеся к машине.

15
CIS
Присоединение сливного шланга
Подсоедините сливной
шланг, не сгибая его, к
сливному трубопроводу
или к настенному сливу,
расположенному на
высоте 65 – 100 см от
пола.
или поместите конец
шланга в раковину или
в ванну, прикрепив
прилагающуюся
направляющую к крану
(см. схему). Свободный
конец сливного шланга
не должен быть
погружен в воду.
! Не рекомендуется использовать удлинительные
шланги. При необходимости удлинение должно иметь
такой же диаметр, что и оригинальный шланг, и его
длина не должна превышать 150 см.
Электрическое подключение
Перед подсоединением штепсельной вилки изделия к
сетевой розетке необходимо проверить следующее:
• сетевая розетка должна быть заземлена и
соответствовать нормативам;
• сетевая розетка должна быть расчитана на
максимальную мощность стиральной машины,
указанную в таблице Технические данные (см.
таблицу сбоку);
• напряжение электропитания должно
соответствовать значениям, указанным в таблице
Технические данные (см. таблицу сбоку);
• сетевая розетка должна быть совместимой со
штепсельной вилкой стиральной машины. В
противном случае необходимо заменить сетевую
розетку или штепсельную вилку.
! Запрещается устанавливать стиральную машину на
улице, даже под навесом, так как является опасным
подвергать ее воздействию дождя и грозы.
! Стиральная машина должна быть расположена
таким образом, чтобы доступ к сетевой розетке
оставался свободным.
! Не используйте удлинители и тройники.
! Сетевой кабель изделия не должен быть согнут или
сжат.
! Замена сетевого кабеля может осуществляться
только уполномоченными техниками.
Внимание! Компания-производитель снимает с себя
всякую ответственность в случае несоблюдения
вышеописанных правил.
65 - 100 cm
Первый цикл стирки
По завершении установки, перед началом
эксплуатации необходимо произвести один цикл
стирки со стиральным веществом, но без белья, по
программе 2.
Технические данные
Модель PWSE 6018 S
Страна-
изготовитель
Италия
Габаритные
размеры
ширина 59,5 см.
высота 85 см.
глубина 44,5 см.
Вместимость от 1 до 6 кг
Номинальное
значение
напряжения
электропитания
или диапазон
напряжения
220-240 V ~
Условное
обозначение рода
электрического тока
или номинальная
частота
переменного тока
50 Hz
Класс зашиты
от поражения
электрическим
током
Класс защиты I
Водопроводное
подсоединение
максимальное давление 1 МПа (10 бар)
минимальное давление 0,05 МПа (0,5 бар)
емкость барабана 40 литра
Скорость отжима до 1000 оборотов в минуту
Программы
управления в
соответствии с
Директивой
EN 60456
программа 2; температура 60°C;
загрузка 6 кг белья.
Данное изделие соответствует
следующим Директивам Европейского
Сообщества:
- 2004/108/СЕ (Электромагнитная
совместимость);
- 2006/95/CE (Низкое напряжение)
- 2002/96/CE
В случае необходимости получения
информации по сертификатам
соответствия или получения копий
сертификатов соответствия на данную
технику, Вы можете отправить запрос
по электронному адресу cert.rus@
indesit.com.
Дату производства
данной техники
можно получить из
серийного номера,
расположенного
под штрих-кодом
(S/N XXXXXXXXX),
следующим
образом
- 1-ая цифра в S/N соответствует
последней цифре года,
- 2-ая и 3-я цифры в S/N -
порядковому номеру месяца года,
- 4-ая и 5-ая цифры в S/N - день
Степень защиты от попадания твердых частиц и влаги,
обеспечиваемая защитной оболочкой, за исключением
низковольтного оборудования, не имеющего защиты от влаги: IPX04
Класс
энергопотребления
A

16
CIS
Описание стиральной машины
Консоль управления
Кнопка
ТЕМПЕРАТУРА
РУКОЯТКА
ВЫБОРА
ПРОГРАММ
Ячейка для стирального вещества
Кнопка ON/OFF
Кнопка ОТЖИМ
Кнопка с индикатором
START/PAUSE
ДИСПЛЕЙ
Кнопка ТАЙМЕР
ОТСРОЧКИ
Кнопки с индикаторами
ФУНКЦИИ
Индикатор ЛЮК
ЗАБЛОКИРОВАН
Ячейки для стирального вещества: для загрузки
стиральных веществ и добавок (см. “Стиральные
вещества и типы белья”).
Кнопка ON/OFF
: быстро нажмите эту кнопку для
включения или выключения машины. Индикатор
START/PAUSE, редко мигающий синим цветом,
означает, что машина включена. Для выключения
стиральной машины в процессе стирки необходимо
держать нажатой кнопку, примерно 3 секунды.
Короткое или случайное нажатие не приведет к
отключению машины.
В случае выключения машины в процессе стирки
текущий цикл отменяется.
РУКОЯТКА ВЫБОРА ПРОГРАММ: служат для
выбора нужной программы (см. “Таблица программ”).
Кнопки и индикаторы ДОПОЛНИТЕЛЬНЫЕ
ФУНКЦИИ: служат для выбора имеющихся
дополнительных функций. Индикатор,
соответствующий выбранной функции , останется
включенным.
Кнопка ОТЖИМ
: нажмите эту кнопку для
сокращения скорости или полного исключения
отжима – значение показывается на дисплее.
Кнопка ТЕМПЕРАТУРА
: нажмите эту кнопку для
сокращения температуры или полного исключения
нагрева – значение показывается на дисплее.
Кнопка ТАЙМЕР ОТСРОЧКИ
: нажмите эту кнопку
для программирования задержки запуска выбранной
программы; время задержки показывается на
дисплее.
Кнопка и индикатор START/PAUSE
: когда
синий индикатор редко мигает, нажмите кнопку для
запуска цикла стирки. После пуска цикла индикатор
перестает мигать. Для прерывания стирки вновь
нажмите эту кнопку; индикатор замигает оранжевым
цветом. Если символ
не горит, можно открыть люк
машины. Для возобновления стирки с момента, когда
она была прервана, вновь нажмите эту кнопку.
Индикатор ЛЮК ЗАБЛОКИРОВАН
Включенный символ означает, что люк заблокирован.
Во избежание повреждений, перед тем как открыть
люк, необходимо дождаться, пока погаснет этот
символ.
Если требуется открыть люк после запуска цикла,
нажмите кнопку START/PAUSE. Когда погаснет индикатор
ЛЮК ЗАБЛОКИРОВАН
, можно открыть люк.
Режим ожидания
Настоящая стиральная машина отвечает требованиям
новых нормативов по экономии электроэнергии,
укомплектована системой автоматического отключения
(режим сохранения энергии), включающейся через 30
минут простоя машины. Нажмите один раз кнопку ON/
OFF и подождите, пока машина вновь включится.

17
CIS
Дисплей
B
C
A
Дисплей служит для программирования машины и предоставляет пользователю множество сведений.
В секторе A показывается продолжительность различных имеющихся программ и, после запуска цикла, время,
остающееся до завершения программы. Если был задан ТАЙМЕР ОТСРОЧКИ, на дисплее показывается время,
остающееся до запуска выбранной программы.
Кроме того при нажатии соответствующей кнопки на дисплее показываются максимальные значения скорости
отжима и температуры, которые машина может достичь в зависимости от заданной программы, или последние
заданные значения, если они совместимы с выбранной программой.
В процессе обработки данных машиной в зависимости от программы и от выбранного уровня Smart мигает
символ “песочные часы”. Максимум через 10 минут после запуска символ “песочные часы” перестает мигать и
горит стабильно, показывая окончательное остаточное время. Символ “песочные часы” погаснет примерно через
1 минуту после визуализации окончательного остаточного времения.
В секторе B показываются фазы стирки выбранной программы стирки и, после запуска программы, текущую фазу
программы:
Стирка
Полоскание
Отжим
Слив
В секторе C показываются слева направо символы “температура”, “отжим” и “таймер отсрочки”.
Полоски “температуры”
показывают максимальный температурный уровень, который может быть задан для
выбранной программы.
Полоски “отжима”
показывают максимальную скорость отжима, которая может быть задана для выбранной
программы.
Включенный символ “ТАЙМЕР ОТСРОЧКИ”
означает, что на дисплее показано заданнное значение “таймер
отсрочки”.

18
CIS
Порядок выполнения цикла стирки
1. ПОРЯДОК ВКЛЮЧЕНИЯ МАШИНЫ. Нажмите
кнопку
; индикатор START/PAUSE редко мигает
синим цветом.
2. ЗАГРУЗКА БЕЛЬЯ. Откройте люк машины.
Загрузите в барабан белье, не превышая
максимальный допустимый вес, указанный в
таблице программ на следующей странице.
3. ДОЗИРОВКА СТИРАЛЬНОГО ВЕЩЕСТВА
Выньте дозатор и поместите стиральное вещество
в специальные ячейки, как описано в разделе
“Стиральные вещества и типы белья”.
4. ЗАКРОЙТЕ ЛЮК.
5. ВЫБОР ПРОГРАММЫ. При помощи рукоятки
выбора ПРОГРАММ выберите нужную программу;
в данной программе задана температура и
скорость отжима, которые можно изменить. На
дисплее показывается продолжительность данного
цикла.
6. ПЕРСОНАЛИЗИРОВАННЫЕ ЦИКЛЫ СТИРКИ.
Нажмите соответствующие кнопки:
Измените температуру и/или скорость
отжима. Машина автоматически показывает на
дисплее максимальные температуру и скорость
отжима, предусмотренные для выбранной
программы, или последние выбранные значения,
если они совместимы с выбранной программой.
При помощи кнопки
можно постепенно
уменьшить температуру вплоть до стирки в
холодной воде “OFF”. При помощи кнопки
можно постепенно уменьшить скорость отжима
вплоть до его исключения “OFF”. При еще одном
нажатии этих кнопок вернутся максимальные
допустимые значения.
Программирование таймера отсрочки
Для программирования пуска выбранной
программы с задержкой нажмите соответствующую
кнопку вплоть до получения нужного времени
задержки. Когда данная дополнительная функция
активирована, на дисплее загорается символ
. Для отмены запуска с задержкой нажмите кнопку
несколько раз до тех пор, пока на дисплее не
появится “OFF”.
Измените параметры цикла.
• Нажмите кнопку для активации дополнительной
функции; индикатор соответствующей кнопки
загорится.
• Вновь нажмите кнопку для отключения
дополнительной функции, индикатор погаснет.
! Если выбранная дополнительная функция
является несовместимой с заданной программой,
индикатор будет мигать, и такая функция не будет
активирована.
! Если выбраная дополнительная функция
несовместима с ранее активированной
функцией, индикатор соответствующий первой
активированной функции функции замигает,
и будет активирована только вторая функция,
индикатор активированнойфункциизагорится .
Примечание: если активирована дополнительная
функция SMART, никакая другая дополнительная
функция не может быть активирована.
! Дополнительные функции могут изменить
рекомендуемую загрузку машины и/или
продолжительность цикла.
7. ЗАПУСК ПРОГРАММЫ Нажмите кнопку START/
PAUSE. Соответствующий индикатор загорится
синим светом, и люк заблокируется (символ ЛЮК
ЗАБЛОКИРОВАН
загорится). Для изменения
программы в процессе выполнения цикла
переключите машину в режим паузы при помощи
кнопки START/PAUSE (индикатор START/PAUSE
редко мигает оранжевым цветом). Затем выберите
новый цикл и вновь нажмите кнопку START/PAUSE.
Если требуется открыть люк после пуска цикла,
нажмите кнопку START/PAUSE. Когда погаснет
индикатор ЛЮК ЗАБЛОКИРОВАН
, можно
открыть люк. Вновь нажмите кнопку START/PAUSE
для возобновления программы с момента, в
который она была прервана.
8. ЗАВЕРШЕНИЕ ПРОГРАММЫ. Показывается
сообщением “на дисплее “END”. После того, как
погаснет символ ЛЮК ЗАБЛОКИРОВАН
, можно
будет открыть люк. Откройте люк, выгрузите белье
и выключите машину.
! Если требуется отменить текущий цикл стирки,
держите нажатой кнопку
несколько секунд. Цикл
прервется, и машина выключится.
Система балансировки белья
Перед каждым отжимом во избежание чрезмерных
вибраций и для равномерного распределения
белья в барабане машина производит вращения
со скоростью, слегка превышающей скорость
стирки. Если после нескольких попыток белье
не будет правильно сбалансировано, машина
произведет отжим на меньшей скорости по
сравнению с предусмотренной. В случае чрезмерной
разбалансировки машина выполнит распределение
белья вместо отжима. Для оптимизации
распределения белья и его правильной балансировки
рекомендуется перемешать мелкое белье с крупным.

19
CIS
Дополнительные функции стирки
Дополнительная функция позволяет оптимизировать
результат стирки в зависимости от объема белья, загруженного
в машину, сокращая продолжительность стирки, а также расход
воды и электроэнергии. Кроме того при помощи кнопки
можно выбрать нужный Вам режим стирки.
Intensive: интенсивный режим стирки для белья с сильным
загрязнением.
4 You: стандартный режим стирки для белья с обычным
загрязнением.
Fast: короткий режим стирки для белья с незначительным
загрязнением.
! Эта функция может быть активирована только для
программ 1, 2, 3, 4, 5, 6 (для всех трех уровней) и 7, 8, 9
(уровни 4 You и Fast).
Дополнительное полоскание
При выборе этой функции повышается эффективность
ополаскивания, обеспечивая максимальное удаление
стирального вещества. Эта функция особенно удобна для
людей с кожей, чувствительной к стиральным веществам.
! Не может быть активирована в программах 9,
, .
Легкая глажка
При выборе этой функции циклы стирки и отжима изменяются
таким образом, чтобы сократить сминаемость белья. По
завершении цикла машина производит медленное вращение
барабана. Индикатор функции РАЗГЛАЖИВАНИЕ и индикатор
START/PAUSE мигают (первый синим, второй оранжевым цветом).
Для завершения цикла нажмите кнопку START/PAUSE или
кнопку РАЗГЛАЖИВАНИЕ. При выборе программы 11-13
машина завершает цикл без слива воды, и индикатор
фукции РАЗГЛАЖИВАНИЕ и индикатор START/PAUSE
мигают. Для слива воды и выгрузки белья необходимо
нажать кнопку START/PAUSE или кнопку РАЗГЛАЖИВАНИЕ.
! Не может быть активирована в программах 9, 10, 12
, .
Функция пятновыведения
Эта функция служит для
удаления наиболее трудных
пятен. Вставьте дополнительный
прилагающийся дозатор 4
в дозатор 1.
При заливе
отбеливателя не превышайте
“макс.” уровень, указанный
на стержне в центре (см.
схему). Для выполнения
только отбеливания
залейте отбеливатель в
дополнительный дозатор
4, выберите программу “Ополаскивание”
и включите
дополнительную функцию “Пятновыведение”
.
Для
отбеливания в процессе стирки поместите стиральное вещество
и добавки, выберите нужную программу и активируйте
дополнительную функцию “Пятновыведение”
.
Если
используется дополнительный дозатор 4, функция
предварительная стирка исключается.
! Не может быть активирована в программах 1, 7, 9, 10, 11,
12, 13, , .
Для всех институтов тестирования:
1) Программы управления в соответствии с Директивой EN 60456: задайте программу 2 с температурой 60°C.
2) Длинная программа для х/б белья: задайте программу 2 с температурой 40°C.
3) Короткая программа для х/б белья: задайте программу 4 с температурой 40°C.
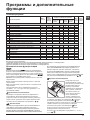
Таблица программ
4
2
3
1
4
2
1
3
Описание программы
Макс.
темп. (°C)
Макс.
скорость
(оборотов
в минуту)
Стиральные вещества и добавки
Макс.
загру-
зка (кг)
Прод-
олжитть
цикла
Предв-
арительная
мойка
Стирка
Отбели-
ватель
Ополаски-
ватель
Smart
Продолжительность программ стирки можно проверять по дисплею.
1 Хлопок: с замачиванием
90° 1000
-
6
2 Хлопок: интенсивная
90° 1000 -
6
2 Хлопок: интенсивная (1)
60° 1000 -
6
2 Хлопок: интенсивная (2)
40° 1000 -
6
3 Хлопок: Очень грязное белое и прочное цветное белье.
60° 1000 -
6
4 Хлопок: бережная (3)
40° 1000 -
6
5 Синтетика: интенсивная
60° 800 -
2,5
6 Синтетика: бережная
40° 800 -
2,5
7 Джинсы
40° 800 -
-
2,5
8 Рубашки
40° 600 -
2
9
MixCool 30': Для быстрого освежения малогрязного белья
(не для шерсти, шелка и изделия ручной стирки).
холодная
вода
800 -
-
3
Специальные
10 Шерсть: шерсть, кашемир и т.д.
40° 600 -
-
1
11 Шелк: изделия из шелка, вискозы и нижнее белье.
30° 0 -
-
1
12 Спортивная обувь
30° 600 -
-
(ìàêñ. 2
ïàðû.)
13
30° 400 -
- - 1,5
Дополнителые
Полоскание
- 1000 - -
6
Отжим
- 1000 - - - - 6
Слив без отжима
- 0 - - - - 6
Программы
Программы и дополнительные
функции

20
CIS
Стиральные вещества и
типы белья
Ячейка для стирального вещества
Хороший результат стирки зависит также от
правильной дозировки стирального вещества:
избыток стирального вещества не гарантирует
более эффективную стирку, напротив, способствует
образованию налетов внутри стиральной машины и
загрязнению окружающей среды.
! Не используйте
стиральные вещества для
ручной стирки, так как они
образуют слишком много
пены.
Выньте ячейку и поместите
в нее стиральное вещество
или добавку в следующем
порядке.
Ячейка 1: Стиральное ввещество для
предварительной стирки (порошок)
Перед засыпкой стирального порошка необходимо
проверить, чтобы не был установлен дополнительный
дозатор 4.
Ячейка 2: Стиральное вещество для стирки
(порошок или жидкий)
Жидкое средство для стирки заливается
непосредственно перед запуском машины.
Ячейка 3: Добавки (ополаскиватель и т.д.)
Не наливайте ополаскиватель выше решетки
дозатора.
дополнительный дозатор 4: Отбеливатель
Подготовка белья
• Разделите белье по следующим признакам:
- тип ткани / обозначения на этикетке
- цвету: отделите цветное белье от белого.
• Выньте из карманов все предметы и проверьте
пуговицы.
• Не превышайте максимальную загрузку барабана,
указанную для сухого белья:
Прочные ткани: макс. 6 кг
Синтетические ткани: макс. 2,5 кг
Деликатные ткани: макс. 2 кг
Шерсть: макс. 1,5 кг
Шелк: макс. 1 кг
Сколько весит белье?
1 простыня 400-500 гр.
1 наволочка 150-200 гр.
1 скатерть 400-500 гр.
1 халат 900-1200 гр.
1 полотенце 150-250 гр.
4
2
3
1
4
2
1
3
Специальные программы
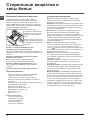
Джинсы: выверните наизнанку изделия перед
стиркой и используйте жидкое моющее средство.
Используйте программу 7.
Рубашки: используйте специальную программу 8 для
стирки рубашек из разных тканей и разных расцветок.
Это обеспечит максимальную сохранность вещей и
сократит их сминаемость.
Mix-Cool 30’: эта программа предназначена для
быстрой стирки малозагрязненных вещей: цикл
длится всего 30 минут, что позволяет сэкономить
время и электроэнергию. По этой программе 9 можно
стирать в холодной воде белье из разных тканей
(за исключением шерсти и шелка) с максимальной
загрузкой барабана 3 кг.
Шерсть: программа 10 позволяет стирать в
стиральной машине любые шерстяные вещи, даже
те, на этикетках которых указан символ “ручная
стирка”
. Для получения оптимального результата
используйте специальный стиральный порошок и не
превышать вес загрузки 1,5 кг.
Шелк: используйте специальную программу 11
для стирки всех шелковых вещей. Рекомендуется
использовать специальное стиральное вещество для
деликатных тканей.
Занавески: сверните занавески и положите их в
наволочку или в сетчатый мешочек. Используйте
программу 11.
Спортивная обувь (программа 12): разработана для
стирки спортивной обуви; для достижения лучших
результатов не рекомендуем стирать более 2 пар
обуви за один раз.
Верхняя одежда (программа 13) разработана для
стирки водоотталкивающих тканей и ветровок (напр.,
goretex, полиэстер, нейлон); для достижения лучших
результатов используйте жидкие моющие средства
в соответствующей дозировке для полузагрузки;
обработайте предварительно манжеты, воротники и
участки с пятнами; не используйте смягчитель или
моющие средства со смягчителем. Эта программа
не предназначена для стирки пуховиков.
Страница загружается ...
Страница загружается ...
Страница загружается ...
Страница загружается ...
-
 1
1
-
 2
2
-
 3
3
-
 4
4
-
 5
5
-
 6
6
-
 7
7
-
 8
8
-
 9
9
-
 10
10
-
 11
11
-
 12
12
-
 13
13
-
 14
14
-
 15
15
-
 16
16
-
 17
17
-
 18
18
-
 19
19
-
 20
20
-
 21
21
-
 22
22
-
 23
23
-
 24
24


Indesit PWSE 6108 S (EU) Руководство пользователя
- Категория
- Стиральные машины
- Тип
- Руководство пользователя
Задайте вопрос, и я найду ответ в документе
Поиск информации в документе стал проще с помощью ИИ
на других языках
- English: Indesit PWSE 6108 S (EU) User guide
Похожие модели бренда
Модели других брендов
-
Hotpoint AQ9D 49 X (EU) /VB Руководство пользователя
-
Whirlpool ARTXL 109 (EU) Руководство пользователя
-
HOTPOINT/ARISTON AQ113D 697 EU/B Руководство пользователя
-
-
-
-
-
-
-