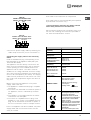
Indesit KN6E11A(W)/GR Руководство пользователя
- Категория
- Печи
- Тип
- Руководство пользователя

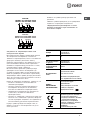
ЕЛЕКТРИЧЕСКА ПЕЧКА И ФУРНА
Резюме
Инсталиране, 2-3
Позициониране и нивелиране
Електрически свързвания
Технически данни
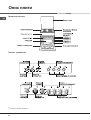
Описание на уреда, 4
Общ преглед
Управляващ панел
Пуск и експлоатация, 5-7
Използване на фурната
Програми
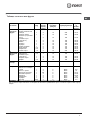
Таблица за печене във фурната
Използване на стъклокерамичния
готварски плот, 8
Включване и изключване на зоните за готвене
Зони за готвене
Предпазни мерки и препоръки, 9
Общи правила за безопасност
Преработване на отпадъци
Пестене и опазване на околната среда
Поддръжка и почистване, 10
Изключване на електрическия ток
Почистване на уреда
Подмяна на лампичката за осветяване на фурната
Почистване на стъклокерамичния готварски плот
Техническо обслужване
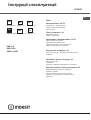
Инструкции за употреба
BG
BG
GB
K6E11/R
K6E11/GR
KN6E11A/GR
English, 11
Русский, 21
RS
ÅëëçíéêÜ,41
GR
UA
Украінська,31
Български, 1
Romвnг, 51
RO

2
BG
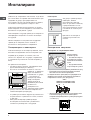
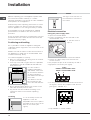
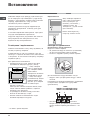
Инсталиране
HOOD
420
Min.
min.
650
mm. with hood
min.
700
mm. without hood
mm.
600
Min. mm.
420
Min. mm.
! Важно е да съхранявате тази книжка, за да може
да я използвате за справка във всеки момент. При
продажба на уреда, при прекратяване на
използването му или при преместване се уверете,
че книжката с инструкциите е заедно с него.
! Прочетете внимателно инструкциите: в тях има
важни сведения за инсталирането, използването и
безопасността при работа с уреда.
! Инсталирането на уреда трябва да се извърши от
квалифициран специалист съгласно настоящите
инструкции.
! Всяка операция по настроика или поддръжка
трябва да се извършва, когато печката е
изключена от електрическото захранване.
Позициониране и нивелиране
! Печката може да се инсталира до мебели, чиято
височина не надвишава тази на готварския плот.
! Трябва да се уверите, че стената, която е в
контакт със задната част на уреда, е изработена
от незапалим и устоичив на топлина материал (T
90°C).
За правилно инсталиране:
• поставете уреда в кухнята, трапезарията или в
едностаино
жилище (не в банята);
• ако плотът на печката е по-висок от плота на
мебелите, те трябва да
бъдат поставени на
поне 200 mm от уреда;
• ако печката се
монтира под окачен
шкаф, последният
трябва да бъде на
минимално разстояние
от 420 mm от
готварския плот.
Това разстояние трябва
да бъде 700 mm, ако окачените шкафове са от
запалим материал (виж
фигура);
• не трябва да поставяте пердета зад печката или
на разстояние от страничните и стени, по-малко
от 200 mm;
• евентуални аспиратори трябва да бъдат
инсталирани в съответствие с указанията от
съответното ръководство с инструкции.
Нивелиране
Ако уредът трябва да бъде
нивелиран, завиите
регулационните крачета,
които се доставят в комплект,
в предназначените за тях
легла,
разположени в ъглите
в основата на печката (виж
фигура).
Крачетата* се монтират в
сглобка под основата на
печката.
Електрическо свързване
Монтиране на захранващия кабел
За да отворите
клемната кутия:
• Поставете отвертка
в страничните отвори
на капака на клемната
кутия.
• Издърпайте капака,
за да отворите кутията
.
За да поставите кабела, следвайте указанията по-долу:
• Разхлабете винта на придържащата скоба и
винтовете на контактния проводник.
! Съединителните проводници са предварително
фабрично настроени за монофазно свързване с
напрежение от 230 V (вж. фигурата).
• За да извършите електрическото свързване, както
е показано на фигурите, използвайте двата
съединителни проводника от кутията (вж. фигурата
– с етикет „P“).
NL
230V ~
H05RR-F 3x4 CEI-UNEL 35363
1
3
2
4
5
H05VV-F 3x4 CEI-UNEL 35746
N
L2
L1
L3
P

BG
3
Т
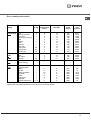
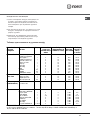
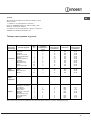
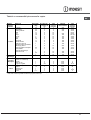
АБЛИЦА С ХАРАКТЕРИСТИКИ
Р
азмери
дължина 43,5 cm
височина 32 cm
дълбочина 43 cm
О
бем
60 l
М
аксимална
к
онсумирана мощност
н
а фурната:
дължина 42 cm
височина 8,5 cm
дълбочина 46 cm
Н
апрежение и честота
н
а електрическото
з
ахранване:
2250 W
Е
л. нагревателни
п
лочи
Бърза Ш 180 мм: 2000 W
Бърза Ш 145 мм: 1000 W
Бърза Ш 220 мм: 2000 W
Максимално консумирана мощност
на ел. нагревателните плочи: 7000 W
Е
ТИКЕТ –
Е
ЛЕКТРИЧЕСКИ
Х
АРАКТЕРИСТИКИ
Директива 2002/40/CE върху етикета
на електрически фурни.
Норма EN 50304
Разход на енергия с естествена
конвекция за загряване:
Традиционен-Статична
Този уред съответства на следните
Европейски директиви: 2006/95/EC от
12.12.06 (Ниско напрежение) и
последващите изменения - 04/108/E
C
от 15/12/04 (Електромагнитна
съвместимост) и последващите
изменения - 93/68/EEC от 22/07/93 и
последващите изменения.
2002/96/EEC
1275/2008 Stand-by/ Off mode
Свързване на захранващия кабел към
електрическата мрежа
Монтираите върху кабела нормализиран щепсел
за електрическо натоварване, посочено на
табелката с характеристики, която е поставена на
уреда (виж таблица „Технически данни”).
Свържете уреда директно към мрежата, като за
целта използваите многополюсен прекъсвач с
минимално отваряне между контактите от 3 mm,
поставен между уреда и мрежата.
Многополюсният прекъсвач трябва
да бъде
оразмерен за посоченото натоварване и да
отговаря на нормите NFC 15-100 (заземителният
кабел не трябва да се изключва от прекъсвача).
Захранващият кабел трябва да бъде разположен
така, че в нито една точка да не влиза в контакт с
температура, по-висока от 50°C.
Преди да извършите свързването, уверете се, че:
• контактът е заземен
и е в съответствие със
законовите разпоредби;
• контактът може да издържи максималното
натоварване на мощността на машината,
означено на табелката с характеристиките;
• захранващото напрежение е в границите на
стоиностите, означени на табелката с
характеристиките;
• контактът е съвместим с щепсела на уреда. Ако
контактът не е съвместим с щепсела, обърнете
се към оторизиран
специалист за подмяната му.
Не използваите удължители и разклонители.
! Уредът трябва да бъде инсталиран така, че
кабелът и контактът за електрически ток да са
лесно достъпни.
! Кабелът не трябва да бъде прегъван или
притискан.
! Кабелът трябва периодично да се проверява и
подменя от оторизирани специалисти.
! Предприятието-производител не носи
никаква
отговорност при неспазване на
посочените норми.
NL3L1L2
400V 3N~
H05RR-F 5x2.5 CEI-UNEL 35363
H05VV-F 5x2.5 CEI-UNEL 35746
1
3
2
4
5
NL2L1
400V 2N~
H05RR-F 4x4 CEI-UNEL 35363
H05VV-F 4x4 CEI-UNEL 35746
1
3
2
4
5

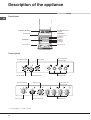
4
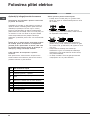
BG
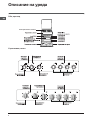
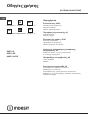
Описание на уреда
Общ преглед
Управляващ панел
електрическите плочи

BG
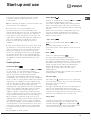
5
Пуск и експлоатация
Използване на фурната
! При първото включване на фурната тя трябва да
поработи празна за наи-малко половин час при
термостат на максимум и затворена врата. След
това я изключете, отворете вратата и проветрете
помещението. Миризмата, която се усеща, се
дължи на използваните за защита на фурната
вещества.
! Преди употреба трябва да отстраните изцяло
пластмасовото покритие,
поставено на
страничните стени на уреда.
! Никога не поставяите предмети направо на
дъното на фурната, защото има риск да се
повреди емаилът.
1. Изберете желаната програма за готвене чрез
завъртане на превключвателя ПРОГРАМИ.
2. Изберете препоръчаната за програмата
температура или температурата по желание чрез
завъртане на превключвателя ТЕРМОСТАТ.
В специалната таблица може да направите
справка за списъка с програмите за печене и
съответните им препоръчани температури (виж
Таблица за печене във фурната).
По време на печенето винаги е възможно:
• да промените програмата за печене чрез
завъртане на превключвателя ПРОГРАМИ;
• да промените температурата чрез
превключвателя ТЕРМОСТАТ;
• да прекъснете печенето чрез поставяне на
превключвателя ПРОГРАМИ на положение 0;
!
Винаги поставяите съдовете върху решетката,
доставена в комплекта.
Светлинен индикатор ТЕРМОСТАТ
Включването му показва, че фурната работи.
Изгасва, когато вътре във фурната се достигне
избраната температура. При това положение
светлинният индикатор светва и изгасва поред,
показваики че термостатът работи и поддържа
температурата постоянна.
Осветление на фурната
Осветлението се включва със завъртане на
превключвателя
ПРОГРАМИ в положение,
различно от “0”. То остава включено, докато
фурната работи. С избирането на
88
88
8 чрез
превключвателя, осветлението се включва, без да
се задеиства никакъв загряващ елемент.
Таимер
За да задеиствате Таимера (Брояча на минути),
направете следното:
1. Завъртете превключвателят ТАИМЕР по посока
на часовата стрелка 4 на почти пълен оборот, за
да се зареди звуковият сигнал;
2. Завъртете превключвателят ТАИМЕР в посока,
обратна на часовата стрелка 5, като зададете
желаното време.

6
BG
Статична фурна
Положение на терморегулатора: по избор между
50°C и Max
Включват се осветлението на фурната и горният и
долният нагревател (електрически съпротивления).
Печката автоматично достига зададената
посредством терморегулатора температура и я
поддържа посредством контролния прибор
(термостат). Тази функция позволява печенето на
всякакъв вид ястия благодарение на отличното ниво
на разпределение на температурата.
Долен нагревател
Положение на терморегулатора: по избор между
50°C и Max
Включват се осветлението на фурната и долният
нагревател. Печката автоматично достига и поддържа
температурата, зададена посредством
терморегулатора. Тази позиция се препоръчва за
допичане на ястия (в тавичка), които вече са добре
изпечени отвън, но отвътре все още са лeко сурови,
или за
сладкиши, покрити с плодове или мармалад,
които изискват умерена повърхностна температура.
Имайте предвид, че тази функция не позволява
достигането на максималната температура във
вътрешността на фурната (250°C) и следователно не
е за препоръчване печенето на ястията да става
винаги по този начин, освен ако не се касае за торти,
които изискват температури по-ниски
или равни на
180°C.
Горен нагревател
- Положение на терморегулатора: по избор между
50°C и Max
Включват се осветлението на фурната и грилът с
инфрачервени лъчи. Задейства се и моторчето на
въртящия се шиш. Доста високата и директна
температура на грила позволява незабавното
повърхностно зачервяване на месата,
възпрепятствайки отделянето на течност, поради което
те остават по-крехки отвътре.
грил
-Положение на терморегулатора по избор между
50°C и Max
Включват се осветлението на фурната и двата
нагревателя на грила. Задейства се и моторчето на
въртящия се
шиш. Грил с размери по-големи от
обичайните, с напълно нова концепция: 50 % по-
голяма ефективност на печене. Двойният грил
премахва ъгловите зони, където липсва топлина.
Важно: оставете ястието да се пече при затворена
врата на фурната, за да постигнете възможно най-
добри резултати и едновременно с това
чувствителна икономия на енергия (около
10 %).
При използване на функцията грил, поставете скарата
на последните нива отдолу нагоре (виж таблицата
относно печенето), след което, за да съберете
мазнината и да избегнете образуването на дим,
поставете тавичка на първото ниво отдолу нагоре.
Долно чекмедже
! Вътрешната повърхност на чекмеджето (ако
такова е налице) може да се нагорещи.
!Никога не използваите долния шкаф за съхраняване
на запалим материал.
Индикаторна лампа на терморегулатора на
фурната
Тази лампа указва фазата на загряване на същия, а
угасването й – постигането във вътрешността на
фурната на зададената температура. На този етап
редуващото се запалване и угасване на
индикаторната лампа показва, че терморегулаторът
работи правилно за поддържането на постоянна
температура във фурната.

BG
7
Таблица за печене във фурна
Позиция
на ключа
Ястия за готвене
Тегло
(Kg)
Ниво на
печене
отдолу
нагоре
Предварително
загряване
(минути)
Позиция на
терморегулатора
Време
за
печене
(минути)
1
Статична
фурна
Патица
Печено телешко или
говеждо
Свинско печено
Бисквити (от ронливо
тесто)
Ронлива торта
(„Кростата”)
Лазаня
Агнешко
Скумрия
Сливов сладкиш
Бине-печиво
Пандишпан
Солени торти
1
1
1
-
1
1
1
1
1
0.3
0.5
1.5
3
3
3
3
3
3
2
2
2
3
3
3
15
15
15
15
15
10
10
10
10
10
10
15
200
200
200
180
180
190
180
180
170
180
170
200
65-75
70-75
70-80
15-20
30-35
35-40
50-60
30-35
40-50
30-35
20-25
30-35
2
Деликатна
фурна
Сладкиши с
набухватели
Ронлива торта
(„Кростата”)
Плодова торта
К
ифли
0,5
1
1
0,5
3
3
3
3
15
15
15
15
160
180
180
160
30-40
35-40
50-60
25-30
3 Печене
отгоре
Допичане
- 3/4 15 220 -
4 Грил
Морски език и сепия
Шишчета от калмари
и раци
Филе от треска
Зеленчуци на скара
Телешки пържоли
Шницели
Хамбургери
Скумрия
Тостове
1
1
1
1
1
1
1
1
4 бр.
4
4
4
3/4
4
4
4
4
4
5
5
5
5
5
5
5
5
5
Макс.
Макс.
Макс.
Макс.
Макс.
Макс.
Макс.
Макс.
Макс.
8-10
6-8
10
10-15
15-20
15-20
7-10
15-20
2-3
БЕЛЕЖКА: Времето за печене е препоръчително и може да се променя съобразно личния вкус.
При печене на скара тавичката за събиране на мазнината трябва винаги да се поставя на първото ниво отдолу
нагоре.

8
BG
Използване на
стъклокерамичния готварски плот
Включване и изключване на зоните за
готвене
За да включите зона за печене, завъртете
съответния превключвател по посока на часовата
стрелка.
За да я изключите, трябва да завъртите
превключвателя в посока, обратна на часовата
стрелка, до достигане на положение “0”.
Запалването на следящия светлинен индикатор за
работа на ЕЛЕКТРИЧЕСКИТЕ ПЛОЧИ показва, че
поне една от плочите за готвене е включена.
Превключватели за
управление на
електрическите плочи на готварския плот
Готварските печки могат да бъдат окомплектовани
с обикновени и бързи ел. нагревателни плочи
(бързите плочи се отличават от останалите по
червения кръг в средата). За избягване на загуби
на топлина и щети на плочите добре е да
използвате съдове с плоско дъно и диаметър, не
по-малък
от този на плочата. В таблицата са
указани съответствията между положенията,
отбелязани на превключвателя, и употребата, за
която се препоръчват нагревателните плочи.
Преди да ги използвате за първи път, е
необходимо да загреете плочите до максимална
температура за около 4 мин, без тенджера. По
време на тази начална фаза защитното покритие
се втвърдява и
достига максимална устоичивост
(здравина).
Светодиод за включени ел. нагревателни
плочи
Запалва се, когато е включена някоя от ел.
нагревателните плочи.
Ïîçèöèÿ Íîðìàëåí èëè áúðç êîòëîí
0 çàãàñåí
1 Âàðåíå íà çàëåí÷óöè, ðèáà
2
Âàðåíå íà êàðòîôè(íà ïàðà), ñóïè, ãðàõ,
ôàñóë.
3 ãîòâåíå, çàäóøàâàíå- ñëàáî è ïî-ñèëíî
4 Çà ïå÷åíå- óìåðåíî
5 Çà ïå÷åíå- ïî-ñèëíî
6 Çà áúðçî ñâàðÿâàíå
Практически съвети за използване на плота за
готвене
• Използваите тенджери с равно дъно и по-дебели
стени, за да сте сигурни, че прилепват идеално
към нагряващата зона;
• използваите тенджери с достатъчно голям
диаметър, покриващ изцяло нагряващата зона,
за да се гарантира пълно използване на
топлината;
• проверяваите винаги дъното на тенджерите да
бъде идеално сухо и чисто: по този начин
прилепването към нагряващите зони ще бъде
оптимално; така и тенджерите, и плотът за
готвене ще имат по-голяма дълготраиност;
• избягваите употребата на тенджери, използвани
за готвене с газови котлони: концентрацията на
топлина от газовите горелки може да деформира
дъното
на тенджерата, която ще загуби
способността си да прилепва плътно;
• никога не оставяите зоната за готвене включена,
без да има съд върху нея, тъи като тя може да
се повреди.

BG
9
Предпазни мерки
и препоръки
! Този уред е произведен в съответствие с
международните норми за безопасност при работа.
Тези предупреждения са дадени от съображения за
безопасност и трябва да бъдат прочетени
внимателно.
Общи правила за безопасност
• Готварският плот от стъклокерамика е устоичив на
температурни колебания и на удари. Все пак,
трябва да се има предвид, че остриета или
заточени кухненски прибори могат да счупят
готварския плот. Ако това се случи, незабавно
изключете щепсела на печката от мрежата и се
обърнете само към оторизиран технически
сервиз, като изискате използването на
оригинални
резервни части. Неспазването на гореизложеното
може да се отрази на безопасността на уреда.
• Уредът е разработен за непрофесионална
употреба в жилищни сгради.
• Уредът не трябва да се инсталира на открито,
дори когато е на защитено място. Много е опасно
уредът да се оставя изложен на въздеиствие на
дъжд и буря.
• Уредът
не трябва да се докосва, когато сте с боси
крака или пък с мокри или влажни ръце и крака.
• Уредът трябва да се използва за приготвяне
на ястия само от възрастни и съгласно
инструкциите, приведени в тази книжка.
Всяка друга употреба (например за
отопление на помещения) се счита за
неподходяща и следователно
за опасна.
Производителят не носи отговорност за
възможни щети, произтичащи от
неподходяща, неправилна и неразумна
употреба.
• Тази инструкция се отнася за уреди от клас 1
(монтирани самостоятелно) или от клас 2 -
подклас 1 (вградени между два мебела).
• Децата да се държат настрана от уреда.
• Да се внимава горещите части на уреда да не
влизат
в контакт със захранващите кабели на
други електродомакински уреди.
• Не запушваите отворите за вентилация и
отвеждане на топлината.
• Винаги използваите ръкавици за фурна при
поставяне или отстраняване на съдове.
• Не използваите запалителни течности (алкохол,
бензин и т.н.) в близост до работещия уред.
• Не поставяите запалим материал в долното
отделение
или във фурната: ако уредът
неочаквано заработи, може да се запали.
• Когато уредът не се използва, винаги
проверяваите превключвателите да бъдат в
положение
•.
• Не изваждаите щепсела от контакта за
електрически ток, като дърпате кабела; вместо
това хванете самия щепсел.
• Не извършваите операции по почистване или
поддръжка, без преди това да сте изключили
щепсела от електрическата мрежа.
• Ако уредът се повреди, никога не се опитваите да
го поправите сами. Ремонтът, извършен от
неквалифицирани лица, може да
причини повреди
или последваща неправилна работа на уреда.
Свържете се със Сервиза за техническо
обслужване и ремонт.
• Не опираите тежки предмети на отворената врата
на фурната.
• Не позволяваите деца или неопитни лица да
използват печката без наблюдение.
Преработване на отпадъци
• Преработване за отпадъци на опаковъчния
материал: придържаите се към местните норми,
по този начин опаковките ще могат да се
използват повторно.
• Европеиската директива 2002/96/ЕО относно
отпадъци от електрическо и електронно
оборудване (ОЕЕО) предвижда, че
електродомакинските уреди не трябва да се
преработват с обикновения поток твърди
отпадъци. Извадените от употреба уреди трябва
да бъдат събирани
отделно, за да се оптимизира
делът на повторна употреба и рециклиране на
съставящите ги материали и да се предотвратят
потенциалните щети на здравето на хората и
околната среда. Всички уреди са означени със
знак задраскан контеинер за боклук, които
напомня задължението за разделно събиране на
отпадъците.
Извадените от употреба електродомакински уреди
могат да се
предадат на обществена служба за
събиране на отпадъците, могат да се занесат в
специално предназначените за това от общината
зони, или ако това е предвидено от закона на
съответната държава, да се върнат на
дистрибуторите, закупуваики същевременно ново
изделие от същия вид.
Всички основни производители на
електродомакински уреди работят активно по
създаването и управлението на
системи за
събиране и преработване на извадените от
употреба уреди.
Пестене и опазване на околната среда
• Когато използвате фурната в интервалите от време
от късния следобед до ранните сутрешни часове,
съдеиствате за намаляване на натоварването на
потребление на електрическите компании.
• Препоръчва се печенето на програма ГРИЛ да се
извършва винаги при затворена врата на фурната:
както за постигане на възможно наи-добри
резултати, така и за чувствителна икономия
на
енергия (около 10 %).
• Уплътненията трябва да се поддържат винаги
ефикасно деистващи и чисти, за да прилепват
плътно към вратата и да не водят до загуба на
топлина.

10
BG
Поддръжка и почистване
Изключете уреда
Преди да извършите операции по уреда, тои
трябва да бъде изключен от мрежата за
електрическо захранване.
Почистване на фурната
! Не използваите парна струя за почистване.
• Вътрешните емаилирани или изработени от
неръждаема стомана части и гумените
уплътнения могат да се почистват с гъба,
напоена с хладка вода и неутрален сапун. Ако
петната са трудно отстраними, използваите
специфични продукти за почистване. Препоръчва
се обилно изплакване и подсушаване след
почистване. Не използваите абразивни прахове
или
корозиращи съставки.
• Препоръчително е да почиствате фурната
отвътре след всяко използване, докато е още
леко топла. Използваите топла вода и
почистващ препарат, изплакнете и изсушете с
влажно парче плат. Избягваите използването на
абразивни вещества.
• Стъклото на вратата на фурната се почиства с
неабразивна гъба и препарати и се изсушава с
меко парче плат.
Не използваите груби
абразивни материали или заточени метални
приспособления за изстъргване, защото те
могат да издраскат повърхността и да нарушат
целостта на стъклото.
• Аксесоарите могат да се мият като обикновени
съдове, дори и в миялна машина.
• Панелът за управление се почиства от
нечистотиите и мазнините с неабразивна гъба
или с меко парче плат.
Проверка на уплътненията на фурната
Проверяваите периодично състоянието на
уплътнението около вратата на фурната. В случаи,
че то се окаже повредено, обърнете се към
Сервиза за техническо обслужване и ремонт.
Препоръчва се фурната да не се използва, докато
не бъде ремонтирана.
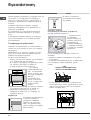
Подмяна на лампичката за осветяване
на фурната
1. След като изключите фурната от
електрическата мрежа, свалете
стъкленото капаче от фасунгата
(виж фигура).
2. Извадете лампичката и
подменете с аналогична:
напрежение 230V, мощност 25 W,
свързване E 14.
3. Поставете отново капачето и свържете фурната
към електрическата мрежа.
Почистване на неръждаемата стомана
Неръждаемата стомана може да стане на петна,
ако продължително време е в контакт със силно
варовита
вода или с препарати за почистване,
съдържащи фосфор. Препоръчва се да се
изплаква обилно и внимателно да се изсушава.
Техническо обслужване
Съобщете:
• Модела на машината (Mod.)
• Серииния номер (S/N)
Тези последни сведения се намират в табелката с
характеристиките, поставена върху уреда и/или
върху опаковката.

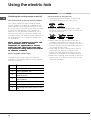
Contents
Installation, 12-13
Positioning and levelling
Electrical connection
Table of characteristics
Description of the appliance, 14
Overall view
Control panel
Start-up and use, 15-17
Starting the oven
Cooking modes
Oven cooking advice table
Using the electric hob, 18
Switching the cooking zones on and off
Cooking zones
Precautions and tips, 19
General safety
Disposal
Respecting and conserving the environment
Care and maintenance, 20
Switching the appliance off
Cleaning the appliance
Replacing the oven light bulb
Cleaning the hob
Assistance
Operating Instructions
COOKER AND OVEN
GB
GBBG
K6E11/R
K6E11/GR
KN6E11A/GR
English, 11English, 11
English, 11English, 11
English, 11
Русский, 21
RS
ÅëëçíéêÜ,41
GR
UA
Украінська,31
Български, 1
Românã, 51
RO

12
GB
! Before operating your new appliance please read
this instruction booklet carefully. It contains
important information concerning the safe installation
and operation of the appliance.
! Please keep these operating instructions for future
reference. Make sure that the instructions are kept
with the appliance if it is sold, given away or moved.
! The appliance must be installed by a qualified
professional in accordance with the instructions
provided.
! Any necessary adjustment or maintenance must be
performed after the cooker has been disconnected
from the electricity supply.
Positioning and levelling
! It is possible to install the appliance alongside
cupboards whose height does not exceed that of the
hob surface.
! Make sure that the wall in contact with the back of
the appliance is made from a non-flammable, heat-
resistant material (T 90°C).
To install the appliance correctly:
• Place it in the kitchen, the dining room or the bed-
sit (not in the bathroom).
• If the top of the hob is higher than the cupboards,
the appliance must be installed at least 600 mm
away from them.
• If the cooker is
installed underneath a
wall cabinet, there must
be a minimum distance
of 420 mm between
this cabinet and the top
of the hob.
This distance should
be increased to 700
mm if the wall cabinets
are flammable (
see figure
).
• Do not position blinds behind the cooker or less
than 200 mm away from its sides.
• Any hoods must be installed according to the
instructions listed in the relevant operating
manual.
Levelling
If it is necessary to level the
appliance, screw the
adjustable feet into the places
provided on each corner of the
base of the cooker (
see
figure
).
The legs* fit into the slots on
the underside of the base of
the cooker.
Electrical connection
Fitting the power supply cable
To open the terminal board:
• Insert a screwdriver into the side tabs of the
terminal board cover.
• Pull the cover to
open it.
To install the cable, follow the instructions below:
• Loosen the cable clamp screw and the wire
contact screws.
! The jumpers are pre-set at the Factory for 230 V
single-phase connection (
see figure
).
• To carry out the electrical connections as shown in
the figures, use the two jumpers inside the box
(
see figure
- labelled “P”).
Installation
HOOD
420
Min.
min. 650 mm. with hood
min.
700 mm. without hood
mm.
600
Min. mm.
420
Min. mm.
*
Only available in certain models.
N
L2
L1
L3
P
NL
230V ~
H05RR-F 3x4 CEI-UNEL 35363
1
3
2
4
5
H05VV-F 3x4 CEI-UNEL 35746

GB
13
NL3L1L2
400V 3N~
H05RR-F 5x2.5 CEI-UNEL 35363
H05VV-F 5x2.5 CEI-UNEL 35746
1
3
2
4
5
NL2L1
400V 2N~
H05RR-F 4x4 CEI-UNEL 35363
H05VV-F 4x4 CEI-UNEL 35746
1
3
2
4
5
• Secure the power supply cable by fastening the
cable clamp screw then put the cover back on.
Connecting the supply cable to the electricity
mains
Install a standardised plug corresponding to the
load indicated on the appliance data plate (
see
Technical data table
).
The appliance must be directly connected to the
mains using an omnipolar switch with a minimum
contact opening of 3 mm installed between the
appliance and the mains. The switch must be
suitable for the charge indicated and must comply
with current electrical regulations (the earthing wire
must not be interrupted by the switch). The supply
cable must be positioned so that it does not come
into contact with temperatures higher than 50°C at
any point.
Before connecting the appliance to the power
supply, make sure that:
• The appliance is earthed and the plug is compliant
with the law.
• The socket can withstand the maximum power of
the appliance, which is indicated by the data
plate.
• The voltage is in the range between the values
indicated on the data plate.
• The socket is compatible with the plug of the
appliance. If the socket is incompatible with the
plug, ask an authorised technician to replace it.
Do not use extension cords or multiple sockets.
! Once the appliance has been installed, the power
supply cable and the electrical socket must be
easily accessible.
! The cable must not be bent or compressed.
! The cable must be checked regularly and replaced
by authorised technicians only.
! The manufacturer declines any liability should
these safety measures not be observed.
We recommend cleaning the oven before using it for
the first time, following the instructions provided in
the "Care and maintenance" section.
TABLE OF CHARACTERISTICS
Oven dimensions
(HxWxD)
32x43.5x43 cm
Volume
60 l
Max. Oven Power
Absorption:
2250 W
Useful
measurements
relating to the oven
compartment
width 46 cm
depth 42 cm
height 8.5 cm
Voltage and
frequency
see data plate
Ceramic hob
Rapid Ø 180 mm
Normal Ø 145 mm:
Normal Ø 220 mm:
Max. ceramic hob
consumption
2000W
1000W
2000W
7000 W
ENERGY LABEL
Directive 2002/40/EC on the
label of electric ovens.
Standard EN 50304
Natural convection energy
consumption
heating mode:
Convection
This appliance conforms to the
following European Economic
Community directives:
2006/95/EC dated 12/12/06
(Low Voltage) and subsequent
amendments - 2004/108/EC
dated 15/12/04
(Electromagnetic Compatibility)
and subsequent amendments -
93/68/EEC dated 22/07/93 and
subsequent amendments.
2002/96/EC
1275/2008 (Stand-by/Off mode)

14
GB
Description of the appliance
Overall view
Control panel
Control panel
ELECTRIC HOTPLATE
DRIPPING pan
GUIDE RAILS
for the sliding racks
position 3
position 2
position 1
Containment surface
for spills
Adjustable foot
Adjustable foot
position 5
position 4
Electric hotplate
indicator light
Selector Knob
Thermostat Knob
Timer Knob
Electric hotplate
control knobs
Thermostat Light
*
Only available in certain models.
Electric hotplate
indicator light
Selector Knob
Thermostat Knob
Timer Knob
Electric hotplate
control knobs
Thermostat Light

GB
15
Start-up and use
*
Only available in certain models.
The various functions featured with the oven are
controlled using the knobs and buttons on the
control panel.
!!
!!
!Before operating the product, remove all plastic film
from the sides of the appliance.
! !
! !
! The first time you use your appliance, we
recommend that you set the thermostat to the
highest setting and leave the oven on for about half
an hour with nothing in it, with the oven door shut.
Then, open the oven door and let the room air. The
odour that is often detected during this initial use is
due to the evaporation of substances used to
protect the oven during storage and until it is
installed.
! !
! !
! Only use the bottom shelf of the oven when using
the rotisserie to cook (where present). For all other
types of cooking, never use the bottom shelf and
never place anything on the bottom of the oven
when it is in operation because this could damage
the enamel. Always place your cookware (dishes,
aluminium foil, etc. etc.) on the grate provided with
the appliance inserted especially along the oven
guides.
Cooking Modes
Convection Mode
Position of thermostat knob between
6060
6060
60°C and
MaxMax
MaxMax
Max.
On this setting, the top and bottom heating
elements come on. This is the classic, traditional
type of oven which has been perfected, with
exceptional heat distribution and reduced energy
consumption. The convection oven is still unequalled
when it comes to cooking dishes made up of several
ingredients, e.g. cabbage with ribs, Spanish style
cod, Ancona style stockfish, tender veal strips with
rice, etc. Excellent results are achieved when
preparing veal or beef-based dishes as well (braised
meats, stew, goulash, wild game, ham etc.) which
need to cook slowly and require basting or the
addition of liquid. It nonetheless remains the best
system for baking cakes as well as fruit and cooking
using covered casserole dishes for oven baking.
When cooking in convection mode, only use one
dripping pan or cooking rack at a time, otherwise the
heat distribution will be uneven. Using the different
rack heights available, you can balance the amount
of heat between the top and the bottom of the oven.
Select from among the various rack heights based
on whether the dish needs more or less heat from
the top.
Pastry Mode
Position of thermostat kno: Between
6060
6060
60°C and
MaxMax
MaxMax
Max.
The bottom heating element comes on.
This mode is ideal for baking and cooking delicate
foods - especially cakes that need to rise because
the heat coming from the bottom helps the leavening
process.
Please note that it takes a considerable amount of
time for the higher temperatures to be reached,
therefore we recommend you use the “Convection
Mode” in these cases.
“Top” Oven
Position of thermostat knob: Between
6060
6060
60°C and
MaxMax
MaxMax
Max.
The top heating element comes on.
This mode can be used to brown food at the end of
cooking.
Grill
Position of thermostat knob:
MaxMax
MaxMax
Max
The top central heating element comes on.
The extremely high and direct temperature of the
grill makes it possible to brown the surface of meats
and roasts while locking in the juices to keep them
tender. The grill is also highly recommended for
dishes that require a high temperature on the
surface: beef steaks, veal, rib steak, filets,
hamburgers etc...
Some grilling examples are included in the “Practical
Cooking Advice” paragraph.
The oven light
Set knob to the
symbol to turn it on. It lights the
oven and stays on when any of the electrical heating
elements in the oven come on.
Thermostat Light
This light indicates that the oven is heating. When it
turns off, the temperature inside the oven has
reached the setting made with the thermostat knob.
At this point, the light will turn on and off as the oven
maintains the temperature at a constant level.
Timer Knob
In order to use the timer, it must be wound by
turning the knob almost one complete turn in the
clockwise direction
. Then, turning it back ,
set the desired time by lining up the number for the
minutes with the mark on the control panel.

16
GB
Practical Cooking Advice
When cooking in the oven, use only one dripping
pan or rack at a time. Select from among the top or
bottom rack heights based on whether the dish
needs more or less heat from the top.
Preheating
II
II
If the oven must be preheated (this is generally the
case when cooking leavened foods), we recommend
you use the “convection mode” to reach the desired
temperature as quickly as possible. When
preheating is over, which is indicated by the red
light “E” going out, select the required cooking
mode.
Cooking Fish and Meat
When cooking white meat, fowl and fish, use
temperature settings from 180 °C to 200 °C.
For red meat that should be well done on the outside
while tender and juicy in the inside, it is a good idea
to start with a high temperature setting (200°C-
220°C) for a short time, then turn the oven down
afterwards.
In general, the larger the roast, the lower the
temperature setting. Place the meat on the centre of
the grid and place the dripping pan beneath it to
catch the fat.
Make sure that the grid is inserted so that it is in the
centre of the oven. If you would like to increase the
amount of heat from below, use the low rack heights.
For savoury roasts (especially duck and wild game),
dress the meat with lard or bacon on the top.
Baking Cakes
When baking cakes, always preheat the oven and
do not open the oven door during baking to prevent
the cake from dropping.
Using the Grill
Use the
“
grillgrill
grillgrill
grill” mode, placing the food under
the centre of the grill (situated on the 3rd or 4th rack
form the bottom) because only the central part of the
top heating element is turned on.
Use the bottom rack (1st from the bottom), placing
the dripping pan provided to collect any sauce and/
or grease and prevent the same from dripping onto
the oven bottom.
When using this mode, we recommend you set the
thermostat to the highest setting. However, this
does not mean you cannot use lower temperatures,
simply by adjusting the thermostat knob to the
desired temperature.
In models fitted with a rotisserie
, you can use
the spit kit provided when using the “
grillgrill
grillgrill
grill” mode. In
this case, cook with the oven door shut, placing the
spit kit on the third oven rack from the bottom and
the dripping pan on the bottom rack to collect any
sauce and /or dripping fat.
! Always use the grill with the oven door! Always use the grill with the oven door
! Always use the grill with the oven door! Always use the grill with the oven door
! Always use the grill with the oven door
shut.shut.
shut.shut.
shut. This will allow you both to obtain excellent
results and to save on energy (approximately 10%).
Therefore the best results when using the grill
modes are obtained by placing the grid on the lower
racks (see cooking table) then, to prevent fat and
grease from dripping onto the bottom of the oven
and smoke from forming, place a dripping-pan on
the 1st oven rack from the bottom.
Cooling ventilation
In order to cool down the exterior of the appliance,
some models are equipped with a cooling fan which
comes on automatically when the oven is hot.
When the fan is on, a normal flow of air can be heard
exiting between the oven door and the control panel.
Note: When cooking is done, the fan stays on until
the oven cools down sufficiently.

GB
17
Oven cooking advice table
Selector knob
setting
Food to be cooked Weight
(in kg)
Cooking rack
position from
bottom
Preheating time
(minutes)
Thermostat
knob
setting
Cooking
time
(minutes)
1 Convection
Duck
Roast veal or beef
Pork roast
Biscuits (short pastry)
Tarts
Lasagne
Lamb
Mackerel
Plum-cake
Cream puffs
Sponge-cake
Savoury pies
1
1
1
-
1
1
1
1
1
0.3
0.5
1.5
3
3
3
3
3
3
2
2
2
3
3
3
15
15
15
15
15
10
10
10
10
10
10
15
200
200
200
180
180
190
180
180
170
180
170
200
65-75
70-75
70-80
15-20
30-35
35-40
50-60
30-35
40-50
30-35
20-25
30-35
2 Pastry
Mode
Raised Cakes
Tarts
Fruit cakes
Brioches
0,5
1
1
0,5
3
3
3
3
15
15
15
15
160
180
180
160
30-40
35-40
50-60
25-30
3 Top Oven
Browning food to
perfect cooking
- 3/4 15 220 -
4 Grill
Soles and cuttlefish
Squid and prawn
kebabs
Cod filet
Grilled vegetables
Veal steak
Cutlets
Hamburgers
Mackerels
Toasted sandwiches
1
1
1
1
1
1
1
1
n.° 4
4
4
4
3/4
4
4
4
4
4
5
5
5
5
5
5
5
5
5
Max
Max
Max
Max
Max
Max
Max
Max
Max
8-10
6-8
10
10-15
15-20
15-20
7-10
15-20
2-3
NB: cooking times are approximate and may vary according to personal taste. When cooking using the grill, the
dripping pan must always be placed on the 1st oven rack from the bottom.

18
GB
Using the electric hob
Practical advice on using the hob
• Use pans with a thick, flat base to ensure that
they adhere perfectly to the cooking zone.
• Always use pans with a diameter that is large
enough to cover the hotplate fully, in order to use
all the heat produced.
• Always make sure that the base of the pan is
completely clean and dry: this ensures that the
pans adhere perfectly to the cooking zones and
that both the pans and the hob remain effective
for a longer period of time.
• Avoid using the same cookware that is used on
gas burners: the heat concentration on gas
burners may have warped the base of the pan,
causing it not to adhere to the surface correctly.
• Never leave a cooking zone switched on without a
pan on top of it, as doing so may cause the zone
to become damaged.
Setti ng Normal or Fast Plate
0
Off
1
Cooking vegetables, fish
2
Cooking potatoes (using steam) soups,
chic kpeas, beans.
3
Continuing the cooking of large quantities of
f ood, minestrone
4 For roasting (aver age)
5
For roasting (abo ve average)
6
For browning and reaching a boil in a short
time.
Switching the cooking zones on and off
The control knobs for the hob electric hotplates
The cookers can be fitted with normal and rapid
electric hotplates in a variety of combinations (the
rapid hotplates can be distinguished from the rest
by the red boss in the centre of the same). To avoid
any heat loss and damage to the hotplates, we
advise you to use pans with a flat bottom, with a
diameter which matches that of the hotplate itself.
The table contains the different settings indicated on
the knobs and the use for which the hotplates are
recommended.
Before using the hotplates for the first time,Before using the hotplates for the first time,
Before using the hotplates for the first time,Before using the hotplates for the first time,
Before using the hotplates for the first time,
you should heat them at maximumyou should heat them at maximum
you should heat them at maximumyou should heat them at maximum
you should heat them at maximum
temperature for approximately 4 minutes,temperature for approximately 4 minutes,
temperature for approximately 4 minutes,temperature for approximately 4 minutes,
temperature for approximately 4 minutes,
without any pans. During this initial stage,without any pans. During this initial stage,
without any pans. During this initial stage,without any pans. During this initial stage,
without any pans. During this initial stage,
their protective coating hardens and reachestheir protective coating hardens and reaches
their protective coating hardens and reachestheir protective coating hardens and reaches
their protective coating hardens and reaches
its maximum resistance.its maximum resistance.
its maximum resistance.its maximum resistance.
its maximum resistance.
Electric hotplate indicator light
This light comes on when any of the electrical
hotplates on a hob which features electric hotplates
have been turned on.

GB
19
Precautions and tips
! This appliance has been designed and manufactured in compliance with
international safety standards.
The following warnings are provided for safety reasons and must be read
carefully.
General safety
•
These instructions are only valid for the countriesThese instructions are only valid for the countries
These instructions are only valid for the countriesThese instructions are only valid for the countries
These instructions are only valid for the countries
whose symbols appear in the manual and on thewhose symbols appear in the manual and on the
whose symbols appear in the manual and on thewhose symbols appear in the manual and on the
whose symbols appear in the manual and on the
serial number plate located on the appliance.serial number plate located on the appliance.
serial number plate located on the appliance.serial number plate located on the appliance.
serial number plate located on the appliance.
• The appliance was designed for domestic use inside the home
and is not intended for commercial or industrial use.
• The appliance must not be installed outdoors, even in covered
areas. It is extremely dangerous to leave the appliance
exposed to rain and storms.
• Do not touch the appliance with bare feet or with wet or damp
hands and feet.
• The appliance must be used by adults only for
the preparation of food, in accordance with the
instructions outlined in this booklet. Any other
use of the appliance (e.g. for heating the room)
constitutes improper use and is dangerous.
The manufacturer may not be held liable for
any damage resulting from improper, incorrect
and unreasonable use of the appliance.
• The instruction booklet accompanies a class 1 (insulated) or
class 2 - subclass 1 (recessed between 2 cupboards)
appliance.
• Do not touch the heating elements or certain parts of the oven
door when the appliance is in use; these parts become
extremely hot. Keep children well away from the appliance.
• Make sure that the power supply cables of other electrical
appliances do not come into contact with the hot parts of the
oven.
• The openings used for the ventilation and dispersion of heat
must never be covered.
• Do not use unstable or misshapen pans on the cooking zones;
this will help to avoid accidental spills. Make sure pan handles
are turned towards the centre of the hob in order to avoid
accidental burns.
• Always use oven gloves when placing cookware in the oven or
when removing it.
• Do not use flammable liquids (alcohol, petrol, etc...) near the
appliance while it is in use.
• Do not place flammable material in the lower storage
compartment or in the oven itself. If the appliance is switched
on accidentally, it could catch fire.
• Always make sure the knobs are in the • position when the
appliance is not in use.
• When unplugging the appliance, always pull the plug from the
mains socket; do not pull on the cable.
• Never perform any cleaning or maintenance work without
having disconnected the appliance from the electricity mains.
• If the appliance breaks down, under no circumstances should
you attempt to perform the repairs yourself. Repairs carried out
by inexperienced persons may cause injury or further
malfunctioning of the appliance. Contact Assistance.
• Do not rest heavy objects on the open oven door.
• The internal surfaces of the compartment (where present) may
become hot.
• The glass ceramic hob is resistant to mechanical shocks, but it
may crack (or even break) if hit with a sharp object such as a
tool. If this happens, disconnect the appliance from the
electricity mains immediately and contact a Service Centre.
• If the surface of the hob is cracked, switch off the appliance
to prevent electric shocks from occurring.
• Remember that the cooking zones remain relatively hot for at
least thirty minutes after they have been switched off.
• Keep any object which could melt away from the hob, for
example plastic and aluminium objects, or products with a high
sugar content. Be especially careful when using plastic film
and aluminium foil or packaging: if placed on surfaces that are
still hot, they may cause serious damage to the hob.
• Do not place metal objects (knives, spoons, pan lids, etc.) on
the hob as they may become hot.
• The appliance should not be operated by people (including
children) with reduced physical, sensory or mental capacities,
by inexperienced individuals or by anyone who is not familiar
with the product. These individuals should, at the very least,
be supervised by someone who assumes responsibility for their
safety or receive preliminary instructions relating to the
operation of the appliance.
• Do not let children play with the appliance.
Disposal
• When disposing of packaging material: observe local
legislation so that the packaging may be reused.
• The European Directive 2002/96/EC relating to Waste
Electrical and Electronic Equipment (WEEE) states that
household appliances should not be disposed of using the
normal solid urban waste cycle. Exhausted appliances should
be collected separately in order to optimise the cost of re-
using and recycling the materials inside the machine, while
preventing potential damage to the atmosphere and to public
health. The crossed-out dustbin is marked on all products to
remind the owner of their obligations regarding separated
waste collection.
For further information relating to the correct disposal of
exhausted household appliances, owners may contact the
public service provided or their local dealer.
Respecting and conserving the
environment
• You can help to reduce the peak load of the electricity supply
network companies by using the oven in the hours between
late afternoon and the early hours of the morning.
• Always keep the oven door closed when using the TOP OVEN,
GRILL and GRATIN modes: This will achieve improved results
while saving energy (approximately 10%).
• Check the door seals regularly and wipe them clean to ensure
they are free of debris so that they adhere properly to the
door, thus avoiding heat dispersion.

20
GB
Switching the appliance off
Disconnect your appliance from the electricity supply
before carrying out any work on it.
Cleaning the oven
! Never use steam cleaners or pressure cleaners on
the appliance.
• Clean the glass part of the oven door using a
sponge and a non-abrasive cleaning product,
then dry thoroughly with a soft cloth. Do not use
rough abrasive material or sharp metal scrapers
as these could scratch the surface and cause the
glass to crack.
• The stainless steel or enamel-coated external parts
and the rubber seals may be cleaned using a sponge
which has been soaked in lukewarm water and
neutral soap. Use specialised products for the
removal of stubborn stains. After cleaning, rinse and
dry thoroughly. Do not use abrasive powders or
corrosive substances.
• The inside of the oven should ideally be cleaned after
each use, while it is still lukewarm. Use hot water and
detergent, then rinse well and dry with a soft cloth. Do
not use abrasive products.
• The accessories can be washed like everyday
crockery, and are even dishwasher safe.
• Dirt and grease should be removed from the control
panel using a non-abrasive sponge or a soft cloth.
•
Stainless steel can be marked by hard water that
has been left on the surface for a long time, or by
aggressive detergents that contain phosphorus.
We recommend that the steel surfaces are rinsed
well then dried thoroughly.
Inspecting the oven seals
Check the door seals around the oven regularly. If the
seals are damaged, please contact your nearest After-
sales Service Centre. We recommend that the oven is
not used until the seals have been replaced.
Replacing the oven light bulb
1. After disconnecting the oven
from the electricity mains,
remove the glass lid covering
the lamp socket (
see figure
).
2. Unscrew the light bulb and
replace it with a similar one:
voltage 230 V, wattage 25 W,
cap E 14.
3. Replace the lid and
reconnect the oven to the electricity supply.
Assistance
! Never use the services of an unauthorised
technician.
Please have the following information to hand:
• The type of problem encountered.
• The appliance model (Mod.).
• The serial number (S/N).
The latter two pieces of information can be found on
the data plate located on the appliance.
Care and maintenance
Страница загружается ...
Страница загружается ...
Страница загружается ...
Страница загружается ...
Страница загружается ...
Страница загружается ...
Страница загружается ...
Страница загружается ...
Страница загружается ...
Страница загружается ...
Страница загружается ...
Страница загружается ...
Страница загружается ...
Страница загружается ...
Страница загружается ...
Страница загружается ...
Страница загружается ...
Страница загружается ...
Страница загружается ...
Страница загружается ...
Страница загружается ...
Страница загружается ...
Страница загружается ...
Страница загружается ...
Страница загружается ...
Страница загружается ...
Страница загружается ...
Страница загружается ...
Страница загружается ...
Страница загружается ...
Страница загружается ...
Страница загружается ...
Страница загружается ...
Страница загружается ...
Страница загружается ...
Страница загружается ...
Страница загружается ...
Страница загружается ...
Страница загружается ...
Страница загружается ...
Страница загружается ...
Страница загружается ...
Страница загружается ...
Страница загружается ...
-
 1
1
-
 2
2
-
 3
3
-
 4
4
-
 5
5
-
 6
6
-
 7
7
-
 8
8
-
 9
9
-
 10
10
-
 11
11
-
 12
12
-
 13
13
-
 14
14
-
 15
15
-
 16
16
-
 17
17
-
 18
18
-
 19
19
-
 20
20
-
 21
21
-
 22
22
-
 23
23
-
 24
24
-
 25
25
-
 26
26
-
 27
27
-
 28
28
-
 29
29
-
 30
30
-
 31
31
-
 32
32
-
 33
33
-
 34
34
-
 35
35
-
 36
36
-
 37
37
-
 38
38
-
 39
39
-
 40
40
-
 41
41
-
 42
42
-
 43
43
-
 44
44
-
 45
45
-
 46
46
-
 47
47
-
 48
48
-
 49
49
-
 50
50
-
 51
51
-
 52
52
-
 53
53
-
 54
54
-
 55
55
-
 56
56
-
 57
57
-
 58
58
-
 59
59
-
 60
60
-
 61
61
-
 62
62
-
 63
63
-
 64
64


Indesit KN6E11A(W)/GR Руководство пользователя
- Категория
- Печи
- Тип
- Руководство пользователя
Задайте вопрос, и я найду ответ в документе
Поиск информации в документе стал проще с помощью ИИ
на других языках
Похожие модели бренда
-
Indesit KN3E11A(W)/EU Руководство пользователя
-
-
-
-
-
-
-
Indesit KN3G1(X)/UA Руководство пользователя
-
-
Модели других брендов
-
Whirlpool KN6C11(W)/EX S Руководство пользователя
-
HOTPOINT/ARISTON H6VMH6A.B(X)/GR Руководство пользователя
-
Zanussi ZDG326X Руководство пользователя
-
-
-
-
Gorenje 4364.2G41CB Руководство пользователя
-