Korting KWM 42ID1460 Руководство пользователя
- Категория
- Стиральные машины
- Тип
- Руководство пользователя

СТИРАЛЬНАЯ МАШИНА
KWM 42 D 1460
KWM 42 ID 1460

2
Поздравляем Вас с приобретением продукции KÖRTING!
Перед использованием новой техники внимательно изучите Руководство Пользователя. Соблюдение
правил безопасности, эксплуатации и профилактики, обеспечит длительный срок использования
прибора, а также позволит сэкономить Ваше время и деньги.
Пожалуйста, сохраните данное Руководство Пользователя, и используйте в течение всего срока
службы.
Нам очень важно Ваше мнение о нашем продукте.
Мы будем признательны, если Вы пришлете свои наблюдения по работе, качеству исполнения и
удобству пользования купленного Вами товара на адрес: info@korting.ru
ВНИМАНИЕ! ДАННЫЙ ПРИБОР ПРЕДНАЗНАЧЕН ТОЛЬКО ДЛЯ ИСПОЛЬЗОВАНИЯ В
ДОМАШНИХ УСЛОВИЯХ И НЕ ПРЕДНАЗНАЧЕН ДЛЯ ИСПОЛЬЗОВАНИЯ В ИНЫХ, В ТОМ
ЧИСЛЕ, КОММЕРЧЕСКИХ ЦЕЛЯХ И ПУБЛИЧНЫХ МЕСТАХ. ГАРАНТИЯ СОХРАНЯЕТСЯ
ТОЛЬКО ПРИ СЛЕДОВАНИИ ЭТИМ УСЛОВИЯМ.
ВНИМАТЕЛЬНО ОЗНАКОМЬТЕСЬ С ДАННЫМ РУКОВОДСТВОМ ПО ЭКСПЛУАТАЦИИ,
ПРЕЖДЕ ЧЕМ ПРИСТУПИТЬ К ИСПОЛЬЗОВАНИЮ ДАННОГО ПРИБОРА. В ДАННОМ
РУКОВОДСТВЕ СОДЕРЖИТСЯ ВАЖНАЯ ИНФОРМАЦИЯ О ТЕХНИКЕ БЕЗОПАСНОСТИ
ВО ВРЕМЯ УСТАНОВКИ, ЭКСПЛУАТАЦИИ, РЕМОНТА, УХОДА, А ТАКЖЕ ПЕРЕМЕЩЕНИЯ
ДАННОГО ПРИБОРА.
ИНФОРМАЦИЯ О ПРИБОРЕ
ВНИМАНИЕ! НА СТИРАЛЬНОЙ МАШИНЕ ИМЕЕТСЯ СЕРВИСНАЯ ТАБЛИЧКА,
ИНФОРМАЦИЯ ИЗ КОТОРОЙ МОЖЕТ ПОНАДОБИТЬСЯ ПРИ СЕРВИСНОМ
ОБРАЩЕНИИ. НЕ ОТРЫВАЙТЕ ЕЁ.
Сервисная линия KÖRTING может уточнить у вас информацию:
Название модели
Серийный номер прибора
Артикульный номер прибора

3
ОБЩИЕ РЕКОМЕНДАЦИИ
Символ перечеркнутого контейнера для отходов на изделии означает, что после
истечения его срока службы утилизация осуществляется отдельно от бытовых от-
ходов; изделие необходимо сдать в специализированный пункт сбора электриче-
ских и электронных приборов с истекшим сроком службы или передать дилеру во
время приобретения нового аналогичного прибора.
Во время утилизации пользователь несет ответственность за сдачу устройства на
соответствующий пункт сбора. Невыполнение этого условия повлечет санкции,
предусмотренные действующим законодательством по утилизации отходов. Раз-
дельная утилизация необходима для того, чтобы вышедший из строя или
устаревший прибор можно было передать для экологически безопасной пе-
реработки, обработки и разборки, во избежание возможного отрицательного воздействия на
окружающую среду или угрозы здоровью, а также для повторного использования составляющих
материалов.
Более подробную информацию об имеющихся системах сбора можно получить в местных службах
по утилизации или в торговой точке, где прибор был приобретен.
ВНИМАНИЕ! ПРОИЗВОДИТЕЛЬ НЕ НЕСЕТ ГРАЖДАНСКОЙ ИЛИ УГОЛОВНОЙ
ОТВЕТСТВЕННОСТИ В СЛУЧАЕ НЕКАЧЕСТВЕННОЙ ИЛИ НЕПРАВИЛЬНОЙ
УСТАНОВКИ ПРИБОРА.ПРОИЗВОДИТЕЛЬ ОСТАВЛЯЕТ ЗА СОБОЙ ПРАВО НА
ВНЕСЕНИЕ ВСЕХ НЕОБХОДИМЫХ И ПОЛЕЗНЫХ ИЗМЕНЕНИЙ В СВОИ ИЗДЕЛИЯ БЕЗ
ПРЕДВАРИТЕЛЬНОГО УВЕДОМЛЕНИЯ.
Упаковочные материалы утилизируются в соответствии с действующими местными стандартами.
Перед установкой или эксплуатацией прибора следует внимательно ознакомиться с данной ин-
струкцией для получения всей необходимой информации по установке, техническому обслужива-
нию и эксплуатации.
Данную инструкцию следует хранить вместе с прибором в течение всего срока его службы, а также
на случай передачи прибора другим пользователям.
Данный прибор предназначен только для бытового использования. Прочее применение, отличное
от указанного в данном руководстве, считается некорректным и – как следствие – опасным.
Данное бытовое устройство соответствует положениям Директивы EU 2012/19/EU.

4
ОБЩИЕ ПРАВИЛА БЕЗОПАСНОСТИ
ВНИМАНИЕ! ДАННЫМ ПРИБОРОМ НЕЛЬЗЯ ПОЛЬЗОВАТЬСЯ ЛЮДЯМ
(
ДЕТЯМ
МЛАДШЕ 8 ЛЕТ
)
, С ОГРАНИЧЕННЫМИ ФИЗИЧЕСКИМИ И МЕНТАЛЬНЫМИ ВОЗ-
МОЖНОСТЯМИ ИЛИ ЛЮДЯМ, НЕ ИМЕЮЩИМ ДОСТАТОЧНОГО ОПЫТА И ЗНАНИЙ,
ЕСЛИ ОНИ НЕ НАХОДЯТСЯ ПОД ПРИСМОТРОМ ЛЮДЕЙ, ДАВШИХ ИМ НЕОБХО-
ДИМЫЕ ИНСТРУКЦИИ ПО ИСПОЛЬЗОВАНИЮ ИЗДЕЛИЯ И ОТВЕЧАЮЩИХ ЗА ИХ
БЕЗОПАСНОСТЬ.
Перед загрузкой вещей в стиральную машину, удалите из карманов личные вещи,
легковоспламеняющиеся предметы (спички, зажигалки и т.д).
ТЕХНИКА БЕЗОПАСНОСТИ
ВНИМАНИЕ! В СЛУЧАЕ ПОВРЕЖДЕНИЯ ПРИБОРА ПУТЕМ МЕХАНИЧЕСКОГО,
ЭЛЕКТРИЧЕСКОГО ВОЗДЕЙСТВИЯ ИЛИ В ПРОЦЕССЕ УСТАНОВКИ, ГАРАНТИЯ
МОЖЕТ БЫТЬ ОТОЗВАНА.
Не пользуйтесь сетевыми тройниками, переходниками и удлинителями.
Стиральная машина оснащена электрическим кабелем с заземлением. Убедитесь в том, что
Ваша электросеть имеет заземление. В случае его отсутствия, обратитесь к квалифицированным
специалистам.
ВНИМАНИЕ! В СЛУЧАЕ ПОВРЕЖДЕНИЯ ИЛИ НЕОБХОДИМОСТИ ЗАМЕНЫ ЭЛЕК-
ТРОКАБЕЛЯ, ОБРАТИТЕСЬ В АВТОРИЗОВАННЫЙ СЕРВИСНЫЙ ЦЕНТР. ЭКСПЛУА-
ТАЦИЯ ПРИБОРА БЕЗ ПОДКЛЮЧЕНИЯ ЗАЗЕМЛЕНИЯ ЗАПРЕЩЕНА!
При отключения от электросети стиральной машины не тяните за провод электропитания.
ВНИМАНИЕ! В СЛУЧАЕ НЕИСПРАВНОСТИ СТИРАЛЬНОЙ МАШИНЫ, ОТКЛЮЧИТЕ
ЕЕ ОТ ЭЛЕКТРОСЕТИ, ЗАКРОЙТЕ КРАН ПОДАЧИ ВОДЫ. НЕ ПЫТАЙТЕСЬ ПОЛЬ-
ЗОВАТЬСЯ ПРИБОРОМ! ОБРАТИТЕСЬ В АВТОРИЗОВАННЫЙ СЕРВИСНЫЙ ЦЕНТР.
Не подвергайте прибор воздействию дождя, прямых солнечных лучей и прочих погодных влияний.
Не подвергайте прибор замораживанию.
При транспортировке не держите прибор за ручки управления, отсек диспенсера и загрузочный
люк. Перемещайте прибор вдвоем.
Прежде чем открыть дверцу загрузочного люка, убедитесь в отсутствии воды в барабане стиральной
машины.
ВНИМАНИЕ! ВОДА В СТИРАЛЬНОЙ МАШИНЕ МОЖЕТ ДОСТИГАТЬ ВЫСОКИХ ТЕМ-
ПЕРАТУР!

5
ОПИСАНИЕ ПРИБОРА
КОМПЛЕКТУЮЩИЕ
ВНИМАНИЕ! ПРОИЗВОДИТЕЛЬ ОСТАВЛЯЕТ ЗА СОБОЙ ПРАВО НА ИЗМЕНЕНИЕ
КОМПЛЕКТАЦИИ ПРИБОРА.
11
Распределитель
моющего средства
Дверца
Сервисная панель
Сливной шланг
Штепсельная
вилка питающего
кабеля
Панель управления
Распределитель
моющего средства
Akcesoria
Заглушка для
транспортировочного
отверстия
Заглушка для
отверстия
(дополнительно)
Водопроводная
труба C
Водопроводная
труба H
(дополнительно)
Колено для
сливного
шланга
(дополнительно)
Аксессуары
ОПИСАНИЕ СТИРАЛЬНОЙ МАШИНЫ
Заглушки
транспортировочных
отверстий
Заливной шланг для
холодной воды
Держатель сливного
шланга
(в комплект не входит)
Руководство по
эксплуатации
УСТАНОВКА
ОПИСАНИЕ ПРИБОРА
Комплектующие
Заглушки
транспортиро-
вочных
отверстий
Шланг подачи
холодной воды
Шланг подачи
горячей воды
(опция)
Держатель
шланга (опция)
Руководство по
эксплуатации
УСТАНОВКА
Место установки
Перед установкой стиральной машины нужно выбрать место ее установки, которое должно
соответствовать следующим условиями:
• Твердая, сухая и ровная поверхность;
• Избегайте установки в местах попадания прямых солнечных лучей;
• Выбирайте помещение с достаточной вентиляцией;
• Температура в помещении должна быть выше 0°С;
• Стиральная машина должна устанавливаться на удалении от источников
6
УСТАНОВКА
ОПИСАНИЕ ПРИБОРА
Комплектующие
Заглушки
транспортиро-
вочных
отверстий
Шланг подачи
холодной воды
Шланг подачи
горячей воды
(опция)
Держатель
шланга (опция)
Руководство по
эксплуатации
УСТАНОВКА
Место установки
Перед установкой стиральной машины нужно выбрать место ее установки, которое должно
соответствовать следующим условиями:
• Твердая, сухая и ровная поверхность;
• Избегайте установки в местах попадания прямых солнечных лучей;
• Выбирайте помещение с достаточной вентиляцией;
• Температура в помещении должна быть выше 0°С;
• Стиральная машина должна устанавливаться на удалении от источников
6
Диспенсер для
моющих средств
Диспенсер для
моющих средств
Вилка и провод
электропитания
Крышка сливного фильтра
(Изображение имеет справочный характер и может отличаться от реального прибора.)

6
УСТАНОВКА
Перед установкой убедитесь, что в помещение подведены вода и электроэнергия. Убедитесь в
целостности шлангов и электрокабеля. Температура в помещении не должна опускаться ниже 3°C.
Разместите стиральную машину вблизи места ее использования удалив упаковочный материал.
Открутите 4 болта на задней стенке и извлеките 4 транспортировочные втулки. Закройте 4 отвер-
стия специальными заглушками из комплекта стиральной машины.
ВНИМАНИЕ! ПЕРЕД ЗАПУСКОМ ДОЛЖНЫ БЫТЬ УДАЛЕНЫ ВСЕ ТРАНСПОРТИ-
РОВОЧНЫЕ БОЛТЫ. СОХРАНИТЕ ТРАНСПОРТИРОВОЧНЫЕ БОЛТЫ НА СЛУЧАЙ
ПЕРЕМЕЩЕНИЯ И ПЕРЕВОЗКИ СТИРАЛЬНОЙ МАШИНЫ.
УСТАНОВКА И РЕГУЛИРОВКА НОЖЕК
После того как прибор будет установлен на место предполагаемого
использования, отрегулируйте его по уровню с помощью инструмента, затем
зафиксируйте положение ножек с помощью контргайки. Стиральную машину
следует устанавливать на твердой и ровной поверхности.
ВНИМАНИЕ! ПОСЛЕ УСТАНОВКИ СТИРАЛЬНОЙ МАШИНЫ НЕОБХОДИМО ПРО-
ВЕРИТЬ РОВНОСТЬ ЕЕ ПОЛОЖЕНИЯ И УСТОЙЧИВОСТЬ. ДЛЯ ЭТОГО НУЖНО НА-
ДАВИТЬ НА КАЖДЫЙ УГОЛ МАШИНЫ И УБЕДИТЬСЯ, ЧТО ОНА НИ НА ОДНОМ ИЗ
УГЛОВ НЕ КАЧАЕТСЯ.
ВНИМАНИЕ! НЕ УСТАНАВЛИВАЙТЕ СТИРАЛЬНУЮ МАШИНУ НА КОВЕР И ПОДОБ-
НЫЕ ПОКРЫТИЯ, ТАК ЖЕ НА НЕРОВНЫЕ ПОВЕРХНОСТИ.
ВНИМАНИЕ! ПОСЛЕ УСТАНОВКИ И ПОДКЛЮЧЕНИЯ СТИРАЛЬНАЯ МАШИНА
ДОЛЖНА БЫТЬ РАСПОЛОЖЕНА ТАКИМ ОБРАЗОМ, ЧТОБЫ РОЗЕТКА БЫЛА ЛЕГКО-
ДОСТУПНОЙ.
УСТАНОВКА ПОД СТОЛЕШНИЦЕЙ
Расположить прибор под столешницей можно при при
условии соблюдения размеров, указанных на рисунке
слева.
Верхняя крышка стиральной машины не снимается по
соображениям электрической и механической безопас-
ности.
8
УСТАНОВКА СТИРАЛЬНОЙ МАШИНЫ
I. Удаление транспортировочных болтов и приспособлений,
предохраняющих машину на время транспортировки (сохраните их на
случай переезда или перевозки стиральной машины).
lОтвинтите при помощи ключа 4 транспортировочных
болта.
lВыньте резиново-пластиковые транспортировочные
распорки вместе с прокладками и болтами.
Перед запуском машины должны быть удалены все
транспортировочные болты и приспособления !
lЗакройте отверстия
заглушками, которые
прилагаются в комплекте с
машиной.
- Не ставьте машину на ковер или подобные покрытия!
- Пол не должен быть вогнутым или иметь наклон!
- Необходимо обращать внимание на ровность поверхности пола, чтобы
стиральная машина всем своим весом твердо опиралась на ножки (не на
корпус)!
II. Установка и регулировка положения стиральной машины
l Стиральную машину нужно установить на твёрдой и ровной поверхности.
l Ослабить пластиковую гайку (1)
l Заблокировать гайками (1)
l Отрегулировать положение машины путем отвинчивания/завинчивания ножек (2)
После установки стиральной машины необходимо
обязательно проверить ровность ее положения и
устойчивость. Для этого нужно надавить на каждый угол
машины и убедиться, что она ни на одном из углов не
качается!
3 см
8 см 8 см

7
ПОДКЛЮЧЕНИЕ К ЭЛЕКТРОСЕТИ
ВНИМАНИЕ! УБЕДИТЕСЬ, ЧТО ПАРАМЕТРЫ ЭЛЕКТРОСЕТИ СООТВЕТСТВУЮТ ПА-
РАМЕТРАМ ВАШЕЙ ЭЛЕКТРОСЕТИ.
Прибор должен быть заземлен. Включайте прибор только в установленную надлежащим обра-
зом электророзетку с защитным контактом. Убедитесь, что указанные на табличке с техническими
данными параметры электропитания соответствуют параметрам электросети. В противном случае
обратитесь к электрику. Не используйте тройники и удлинители. Позаботьтесь о том, чтобы не по-
вредить вилку и сетевой кабель. В случае необходимости замены сетевого шнура она должна быть
выполнена авторизованным сервисным центром. Вставляйте вилку сетевого кабеля в розетку толь-
ко по окончании установки прибора. Убедитесь, что после установки прибора к вилке электропита-
ния имеется свободный доступ. Не беритесь за кабель электропитания или за его вилку мокрыми
руками. Для отключения прибора от электросети не тяните за кабель электропитания. Всегда бери-
тесь за саму вилку.
ПОДКЛЮЧЕНИЕ ВОДОСНАБЖЕНИЯ
Если водопровод не использовался длительный период времени, перед подключением заливного
шланга откройте кран и пропустите некоторое количество воды. Это позволить предотвратить по-
падания частиц песка и ржавчины.
Затем подсоедините заливной шланг к водопроводному крану и заливному клапану прибора.
ВНИМАНИЕ! ИСПОЛЬЗУЙТЕ НОВЫЙ ЗАЛИВНОЙ ШЛАНГ ПОСТАВЛЯЕМЫЙ В
КОМПЛЕКТЕ. ПОВТОРНОЕ ИСПОЛЬЗОВАНИЕ СТАРОГО ЗАЛИВНОГО ШЛАНГА НЕ
ДОПУСКАЕТСЯ.
ВНИМАНИЕ! СТИРАЛЬНАЯ МАШИНА С ОДНИМ ВПУСКНЫМ ЗАЛИВНЫМ КЛАПА-
НОМ ДОЛЖНА БЫТЬ ПОДКЛЮЧЕНА К ТРУБОПРОВОДУ ХОЛОДНОЙ ВОДЫ. СТИ-
РАЛЬНАЯ МАШИНА С ДВУМЯ ВПУСКНЫМИ КЛАПАНАМИ МОЖЕТ БЫТЬ ПОДКЛЮ-
ЧЕНА К ТРУБОПРОВОДАМ КАК ГОРЯЧЕЙ, ТАК И ХОЛОДНОЙ ВОДЫ.

8
Стиральная машина должна быть установлена таким образом, чтобы заливные и сливные шланги
не были зажаты и не имели перегибов. Не опускайте конец сливного шланга слишком глубоко в
водосток.
Подсоединение сливного шланга
Внимание!
Подсоедините сливной шланг правильно, в противном случае, может произойти утечка воды.
Существует два способа подключения сливного шланга.
1. Подсоедините сливной шланг к желобу для
отвода воды.
2. Подсоедините сливной шланг к сливному
патрубку.
Примечание!
Если стиральная машина имеет держатель для сливного шланга, подключите его, как указано
ниже.
Внимание!
• При установке сливного шланга закрепите его должным образом.
• Если сливной шланг слишком длинный, не пытайтесь вставить оставшийся конец в стиральную
машину, это приведет к постороннему шуму.
9
Гофрированный сливной шланг должен быть подключен к сливу на высоте 60-100 см от пола.
При подключении слива стиральной машины непосредственно в канализацию, выход должен быть
снабжён гидрозатвором для предотвращения самослива!
Подсоединение сливного шланга
Внимание!
Подсоедините сливной шланг правильно, в противном случае, может произойти утечка воды.
Существует два способа подключения сливного шланга.
1. Подсоедините сливной шланг к желобу для
отвода воды.
2. Подсоедините сливной шланг к сливному
патрубку.
Примечание!
Если стиральная машина имеет держатель для сливного шланга, подключите его, как указано
ниже.
Внимание!
• При установке сливного шланга закрепите его должным образом.
• Если сливной шланг слишком длинный, не пытайтесь вставить оставшийся конец в стиральную
машину, это приведет к постороннему шуму.
9
Если в качестве слива используется раковина,
гофрированный сливной шланг должен быть
расположен над отверстием перелива для
предотвращения скопления воды. Для более
надежного крепления на борту раковины используйте
изогнутый держатель.
канализационный
водосток

9
ЭКСПЛУАТАЦИЯ И УХОД
Перед каждым циклом стирки произведите следующие действия:
Сливные и заливные шланги подключены.
Сливной шланг расположен правильно, и водопроводный кран открыт.
Отсортируйте белье согласно цвету, ткани и способу стирки (см. бирку на одежде).
Убедитесь, что в карманах одежды нет предметов.
Не превышайте допустимый вес белья, указанный в таблице программ стирки.
ДИСПЕНСЕР ДЛЯ МОЮЩИХ СРЕДСТВ
I) Отделение для предварительной стирки.
II) Отделение для основной стирки (стиральный порошок/
жидкие средства для стирки).
III) Отделение для жидких добавок: смягчители,
ополаскиватели, жидкий крахмал, ароматизаторы и т.д.
Добавки используются при последнем полоскании.
В случае, когда используется жидкое моющее средство,
установите и опустите вниз разделитель. Затем, залейте
жидкое средство для стирки по уровню в отделение
обозначенное символом II. При использовании стирального
порошка поднимите разделитель вверх.
ВНИМАНИЕ! ВО ВРЕМЯ РАБОТЫ ПРИБОРА
ДИСПЕНСЕР ВСЕГДА ДОЛЖЕН НАХОДИТЬСЯ В
ЗАКРЫТОМ ВИДЕ.
ВНИМАНИЕ! ИСПОЛЬЗУЙТЕ СПЕЦИАЛЬНЫЕ ДОБАВКИ ТОЛЬКО В ЖИДКОМ
ВИДЕ. СЛЕДУЙТЕ ИНСТРУКЦИЯМ НА УПАКОВКАХ МОЮЩИХ СРЕДСТВ.
ВНИМАНИЕ! БОЛЬШОЕ КОЛИЧЕСТВО МОЮЩЕГО СРЕДСТВА МОЖЕТ ПРИВЕСТИ
К ОБИЛЬНОМУ ПЕНООБРАЗОВАНИЮ И НЕГАТИВНО СКАЗАТЬСЯ НА КАЧЕСТВЕ
СТИРКИ. СЛИШКОМ МАЛЕНЬКОЕ КОЛИЧЕСТВО МОЮЩЕГО СРЕДСТВА ТАКЖЕ
МОЖЕТ НЕГАТИВНО СКАЗАТЬСЯ НА КАЧЕСТВЕ СТИРКИ.
ВНИМАНИЕ! ПРИ ЗАПОЛНЕНИИ ОТСЕКОВ ДИСПЕНСЕРА НЕ ДОПУСКАЙТЕ СМЕ-
ШИВАНИЯ МОЮЩИХ СРЕДСТВ В РАЗЛИЧНЫХ ОТСЕКАХ ДИСПЕНСЕРА.
ПЕРВАЯ СТИРКА
Перед первой стиркой необходимо выполнить один цикл при высокой температуре без загрузки
следующим образом:
Подключить стиральную машину к электросети.
Открыть водопроводный кран заливного шланга.
Выберите программу с подходящей температурой стирки.
Добавьте моющее средство и нажмите кнопку «Старт/Пауза».

10
ТИПЫ ЗАГРЯЗНЕНИЙ И СПОСОБЫ ИХ УСТРАНЕНИЯ
Воск: Удалите воск, используя закругленный
предмет, чтобы не испортить ткань. Затем
положите ткань между двумя слоями
абсорбирующей бумаги (напр. салфетки)
и горячим утюгом прогладьте по месту
загрязнения.
Краска: Необходимо обработать как
можно быстрее, не дав краске засохнуть.
Обработайте место загрязнения растворителем
(трихлорэтилен, скипидар или другой
рекомендованный производителем краски).
Помойте с мылом и прополощите.
Шариковая ручка и фломастеры: Используйте
мягкую ткань, смоченную этиловым спиртом.
Губная помада: Пятна на шерсти или хлопке
могут быть устранены с помощью ткани,
смоченной в эфире. Пятна на шелковой ткани
требуют использования трихлорэтилена.
Плесень: Если ткань допускает использование
отбеливателя, запустите цикл стирки с его
использованием. Также можно замочить
загрязненный участок ткани в перекиси
водорода на 10-15 минут.
Лак для ногтей: Поместите лист абсорбирующей
бумаги (напр. салфетки) на место загрязнения,
затем смочите обратную сторону ткани
ацетоном, при этом несколько раз меняя
бумагу. Продолжайте процедуру до полного
удаления загрязнения.
Следы после глажки: См. пункт «Плесень» Смола: Размажьте кусочек сливочного масла
по месту загрязнения, оставьте на некоторое
время и затем промойте скипидаром.
Ржавчина: Используйте специальные средства
от ржавчины, при этом следуя инструкциям на
упаковке.
Трава: Аккуратно намыльте место загрязнения,
примените разбавленный растворитель. Для
загрязнений на шерстяных вещах используйте
90% - спирт.
Жевательная резинка: Потрите кусочком
льда место загрязнения, затем обработайте
кусочком хлопковой ткани, предварительно
смоченной в ацетоне.
Кровь: Замочите место загрязнения, в холодной
воде, добавив при этом соль, затем смойте при
помощи хозяйственного мыла.
УХОД
Перед тем как выполнять любые операции по уходу за прибором, убедитесь в том, что
электропитание отключено и подача воды перекрыта.
Внешние корпусные элементы прибора и пластиковые части следует очищать мягкой и влажной
тканью.
ВНИМАНИЕ! НЕ ИСПОЛЬЗУЙТЕ ХИМИЧЕСКИ АГРЕССИВНЫЕ, АБРАЗИВНЫЕ
ВЕЩЕСТВА, А ТАКЖЕ СПИРТ, МЫЛО, БЕНЗИН И ДРУГИЕ РАСТВОРИТЕЛИ ДЛЯ
УХОДА ЗА ПРИБОРОМ. ЭТО МОЖЕТ ПРИВЕСТИ К ВЫХОДУ ПРИБОРА ИЗ СТРОЯ И
НАРУШЕНИЮ ВНЕШНЕГО ВИДА ПРИБОРА.
После каждого цикла стирки на некоторое время оставляйте открытым загрузочный люк для
того, чтобы резиновые части прибора могли просохнуть.
Протирайте стекло дверцы после каждой стирки, чтобы удалить ворс и остатки влаги.
Проверяйте барабан на наличие посторонних предметов.

11
ОЧИСТКА ДИСПЕНСЕРА
Откройте диспенсер, нажмите на кнопку фиксатора и снимите его.
После снятия диспенсера уберите пластину вентиляции пара.
Промойте диспенсер под струей воды.
Осторожно промойте место диспенсера щеткой с мягкой щетиной.
Установите диспенсер обратно.
ОЧИСТКА СЛИВНОГО ФИЛЬТРА
ВНИМАНИЕ! ПЕРЕД ВЫПОЛНЕНИЕМ ОПЕРАЦИЙ, ОПИСАННЫХ НИЖЕ, УБЕДИ-
ТЕСЬ В ТОМ, ЧТО ПРИБОР НЕ ЗАГРУЖЕН. НЕ ИЗВЛЕКАЙТЕ ФИЛЬТР В ПРОЦЕССЕ
РАБОТЫ ПРИБОРА ИЛИ ЕСЛИ В ПРИБОРЕ НАХОДИТСЯ ВОДА!
ВНИМАНИЕ! РЕКОМЕНДУЕТСЯ ПЕРИОДИЧЕСКИ ОЧИЩАТЬ ФИЛЬТР. НЕСВОЕВРЕ-
МЕННАЯ ОЧИСТКА ФИЛЬТРА ПРИВОДИТ К ЗАСОРЕНИЮ ФИЛЬТРА И ЗАТРУДНЯ-
ЕТ СЛИВ ВОДЫ ИЗ МАШИНЫ!
Включите программу «Слив», что бы удалить остатки воды.
Откройте крышку фильтра, используйте подходящую емкость для воды, поместив ее под фильтр.
Поверните фильтр против часовой стрелки и аккуратно потяните на себя.
Извлеченный фильтр промойте под проточной водой удалив при этом все загрязнения.
Установите фильтр обратно, не прилагая чрезмерных усилий закрутите его по часовой стрелке,
закройте крышку.
26
CABINET
It is recommended to clean the cabinet of the
appliance with lukewarm water thus preserving
its original brightness for a long time.
DETERGENT DRAWER
To remove detergent deposits, it is
recommended to pull out the detergent drawer
by pressing the rounded area as shown in
gure 14.
Figure 14
CLEANING DETERGENT DRAWER
Once pulled the drawer out, remove the steam
absorber divider as shown in the picture
below.
Figure 15
MAINTENANCE
Figure 16
In case the draining hole of the drawer is
obstructed by detergent deposits or foreign
objects, it is recommended to remove the
obstacle making sure not to push it to the
bottom because it may clog up the internal
circuit. We remind you that the detergent can
be easily removed with hot water.
DRAIN PUMP FILTER CLEANING
It is recommended to periodically clean the
drain pump lter. To clean the lter, follow
instructions below:
• Drain out the remaining water by
selecting the “Drain” programme;
• Turn off the washing machine;
• Get a coin.
Insert the coin into the slot on the side in order
to open the cover
Figure 17
N.B If the drain circuit is clogged,
there could be consistent quantity of
water in the appliance (max. 25l).
27
EN
CABINET
It is recommended to clean the cabinet of the
appliance with lukewarm water thus preserving
its original brightness for a long time.
DETERGENT DRAWER
To remove detergent deposits, it is
recommended to pull out the detergent drawer
by pressing the rounded area as shown in
gure 14.
Figure 14
CLEANING DETERGENT DRAWER
Once pulled the drawer out, remove the steam
absorber divider as shown in the picture
below.
Figure 15
MAINTENANCE
Figure 16
In case the draining hole of the drawer is
obstructed by detergent deposits or foreign
objects, it is recommended to remove the
obstacle making sure not to push it to the
bottom because it may clog up the internal
circuit. We remind you that the detergent can
be easily removed with hot water.
DRAIN PUMP FILTER CLEANING
It is recommended to periodically clean the
drain pump lter. To clean the lter, follow
instructions below:
• Drain out the remaining water by
selecting the “Drain” programme;
• Turn off the washing machine;
• Get a coin.
Insert the coin into the slot on the side in order
to open the cover
Figure 17
N.B If the drain circuit is clogged,
there could be consistent quantity of
water in the appliance (max. 25l).
!
Warning! After a wash cycle
with high temperature, wait until it is
cooled down. Danger of burning.
EMPTYING PROCEDURE
1) Place a tray between the cabinet and the
end of the lter.
Figure 18
2) Loosen the lter using the appropriate
holder in order to let the water ow.
Figure 19
When there is no more water coming out,
unscrew the lter completely and clean it
carefully. Remove any foreign objects from the
lter.
Figure 20
Reinsert the drain lter and tighten it rmly
until it locks.
CLEANING OF ELECTRO-VALVE AND
WATER SUPPLY HOSE FILTERS
To clean the lters follow the instructions
below:
• Turn off the washing machine and
disconnect the power cable.
• Close the water and disconnect the
water supply inlet hose from the water
tap and from the washing machine.
• Get pair of tweezers and a tooth brush.
• Remove the lters from their place
( gure 21)
• Clean the lters with running water
making use of the tooth brush.
WATER LOADING TEST
1. Get a stopwatch;
2. Turn the programme knob to drain and
let it run for about two minutes;
3. Turn the programme knob to cotton
programme simultaneously start the
programme and the stopwatch;
4. From the moment the washing machine
!
Warning! If you do not rein-
sert the fi lter or you do not screw it
until it is blocked, the water will come
out of the machine.
ОЧИСТКА ФИЛЬТРА ЗАЛИВНОГО КЛАПАНА
28
Figure 21
drum starts turning, make sure the
stopwatch does not exceed 80-90
seconds;
5. If that value exceeds, it is necessary
to ensure the right grid pressure and
check that the water supply hose lter
and/or solenoid valve hose lter are not
obstructed.
Filtro tubo
carico
Filtro tubo
elettrovalvola
Water inlet
hose lter
Electro-valve
lter
Отключите стиральную машину от электросети.
Перекройте воду и отсоедините заливной шланг.
Для снятие фильтров используйте инструмент, к примеру,
пассатижи или пинцет.
Снимите фильтры, промойте их под проточной водой
используя при этом щетку.
Установите фильтры обратно.
Фильтр заливного
клапана
Фильтр
заливного
шлага

12
ПАНЕЛЬ УПРАВЛЕНИЯ
important characteristic
PROPRIETA' DELLA ITWASH SRL - SENZA AUTORIZZA_
ZIONE SCRITTA DELLA STESSA IL PRESENTE DISEGNO
NON POTRA' ESSERE UTILIZZATO PER LA COSTRUZIONE
DELL' OGGETTO RAPPRESENTATO NE VENIRE COMUNI_
CATO A TERZI O RIPR ODOTTO. LA SOCIETA' TUTELA
I PROPI DIRITTI A RIGORE DI LEGGE.
IT WASH srl
TOLLERANZE GENERALI IT12
PROGETTISTA
VISTO
SOSTITUISCE
TYPE
CODICE
FINITURA
MODIFICHE
PESO
DATA
SCALA
DENOMINAZIONE PEZZO
NOME
Richedente
DATA
FOGLIO N.
IND
E
F
G
H
10 11 12
G
H
6
7
8
9
2
3
4
5
B
A
C
D
21
3
4
5
6
7
8
9 10 11 12
A
B
C
D
Pantone
Black C
Pantone
Cyan C
11/04/2016
Mascherina F4
Primo rilascio
Omeliko Mike 08/01/2020 00
1 :1
Email del 16/01/2020
da Alexey
F614CD
EAN: ***********
90
40
30
20
50
60
Safety
ECO
Опции
A
++ +
°C
Шерсть
Пуховики
Слив/Отжим
Гипоаллер-
генная
Полоскание
Шторы
Спортивная
одежда
Деликатная
Хлопок
Синтетика
Интенсивная
Моя
программа
Eco 20°C
Джинсы/Цветные изд.
Быстрая 30’
Made in ItalyMade in Italy
6kg6kg
1400rpm1400rpm
C
l
a
s
s
INVERTER TECHNOLOGY
KWM 1460 W
important characteristic
PROPRIETA' DELLA ITWASH SRL - SENZA AUTORIZZA_
ZIONE SCRITTA DELLA STESSA IL PRESENTE DISEGNO
NON POTRA' ESSERE UTILIZZATO PER LA COSTRUZIONE
DELL' OGGETTO RAPPRESENTATO NE VENIRE COMUNI_
CATO A TERZI O RIPRODOTTO. LA SOCIETA' TUTELA
I PROPI DIRITTI A RIGORE DI LEGGE.
IT WASH srl
TOLLERANZE GENERALI IT12
PROGETTISTA
VISTO
SOSTITUISCE
TYPE
CODICE
FINITURA
MODIFICHE
PESO
DATA
SCALA
DENOMINAZIONE PEZZO
NOME
Richedente
DATA
FOGLIO N.
IND
E
F
G
H
10 11 12
G
H
6
7
8
9
2
3
4
5
B
A
C
D
21
3
4
5
6
7
8
9 10 11 12
A
B
C
D
Pantone
Black C
Pantone
Cyan C
11/04/2016
Mascherina F4
Primo rilascio
Omeliko Mike 08/01/2020 00
1 :1
Email del 16/01/2020
da Alexey
F614CD
EAN: ***********
90
40
30
20
50
60
Safety
ECO
Опции
A++ +
°C
Шерсть
Пуховики
Слив/Отжим
Гипоаллер-
генная
Полоскание
Шторы
Спортивная
одежда
Деликатная
Хлопок
Синтетика
Интенсивная
Моя
программа
Eco 20°C
Джинсы/Цветные изд.
Быстрая 30’
Made in ItalyMade in Italy
6kg6kg
1400rpm1400rpm
C
l
a
s
s
INVERTER TECHNOLOGY
KWM 1460 W
ВНИМАНИЕ! СИМВОЛЫ И ОБОЗНАЧЕНИЯ НА КОНТРОЛЬНОЙ ПАНЕЛИ ПРИВЕДЕ-
НЫ В КАЧЕСТВЕ ПРИМЕРА И МОГУТ РАЗЛИЧАТЬСЯВ ЗАВИСИМОСТИ ОТ МОДЕЛИ
СТИРАЛЬНОЙ МАШИНЫ. РУКОВОДСТВУЙТЕСЬ ИНФОРМАЦИЕЙ, УКАЗАННОЙ НА
САМОМ ИЗДЕЛИИ.
1. Программатор
Программатор позволяет выбрать программу стирки в зависимости от степени загрязнения, типа
тканей и количества загруженных вещей, что обеспечивает высокое качество стирки и более
эффективную работу устройства.
2. Дисплей
Во время работы стиральной машины дисплей показывает ориентировочное время, оставшееся
до окончания стирки, выбранную скорость вращения барабана и соответствующий символ цикла
стирки.
- Циклы стирки: Предварительная стирка / Стирка / Полоскание / Отжим
17
EN
F4 Advance/Star Model F4 LED Model
OPTIONS
- PRE-WASH
The pre-wash function is used to make a low
temperature wash before the main wash with
the aim of removing stains.
- EXTRA RINSE
The extra rinse function adds 1 or 2 rinses
to the standards wash cycle with the aim of
removing any possible residual detergents on
garments.
- SOAK
The soak function allows to keep the laundry
in water for 30 or 60 minutes before the main
wash phase with the purpose of removing the
most stubborn stains.
- RINSE HOLD
This function allows to stop the washing ma-
chine with water in drum without draining and
spinning.
To start draining and spinning, it is necessary
to push button 8 START/PAUSE.
- ECO
The function Eco allows to reduce the energy
consumption of the appliance ensuring the
same washing performance.
- CHILD SAFETY
To set child safety, once the wash cycle com-
mences, keep pushing buttons 6 and 7 at the
same time until the icon starts to ash. To
deactivate this function, hold pressed buttons
6 and 7 until the icon switches off.
- LOCKED DOOR
When this icon is on steady, it means that the
door is locked and can be opened only after
the icon light is off.
OPTION
- PRE-WASH
The pre-wash function is used to make a low
temperature wash before the main wash with
the aim of removing stains.
-
+
EXTRA RINSE
The extra rinse function adds a rinse standard
wash cycle to remove detergent residue from
the laundry.
- RINSE HOLD
This function allows to stop the washing
machine with water in drum without draining
and spinning.
To start draining and spinning, it is necessary
to push button 8 START/PAUSE.
- LOCKED DOOR AND
CHILD SAFETY
When this icon is on steady, it means that the
door is locked and can be opened only after
the icon light is off.
To set child safety, once the wash cycle is
started, hold pressed buttons 6 and 7 at the
same time until the icon starts to ash. To
deactivate this function, hold pressed buttons
6 and 7 until the icon switches off.
ECO
+
- Эко
17
EN
F4 Advance/Star Model F4 LED Model
OPTIONS
- PRE-WASH
The pre-wash function is used to make a low
temperature wash before the main wash with
the aim of removing stains.
- EXTRA RINSE
The extra rinse function adds 1 or 2 rinses
to the standards wash cycle with the aim of
removing any possible residual detergents on
garments.
- SOAK
The soak function allows to keep the laundry
in water for 30 or 60 minutes before the main
wash phase with the purpose of removing the
most stubborn stains.
- RINSE HOLD
This function allows to stop the washing ma-
chine with water in drum without draining and
spinning.
To start draining and spinning, it is necessary
to push button 8 START/PAUSE.
- ECO
The function Eco allows to reduce the energy
consumption of the appliance ensuring the
same washing performance.
- CHILD SAFETY
To set child safety, once the wash cycle com-
mences, keep pushing buttons 6 and 7 at the
same time until the icon starts to ash. To
deactivate this function, hold pressed buttons
6 and 7 until the icon switches off.
- LOCKED DOOR
When this icon is on steady, it means that the
door is locked and can be opened only after
the icon light is off.
OPTION
- PRE-WASH
The pre-wash function is used to make a low
temperature wash before the main wash with
the aim of removing stains.
-
+
EXTRA RINSE
The extra rinse function adds a rinse standard
wash cycle to remove detergent residue from
the laundry.
- RINSE HOLD
This function allows to stop the washing
machine with water in drum without draining
and spinning.
To start draining and spinning, it is necessary
to push button 8 START/PAUSE.
- LOCKED DOOR AND
CHILD SAFETY
When this icon is on steady, it means that the
door is locked and can be opened only after
the icon light is off.
To set child safety, once the wash cycle is
started, hold pressed buttons 6 and 7 at the
same time until the icon starts to ash. To
deactivate this function, hold pressed buttons
6 and 7 until the icon switches off.
ECO
+
- Остановка с водой в баке
17
EN
F4 Advance/Star Model F4 LED Model
OPTIONS
- PRE-WASH
The pre-wash function is used to make a low
temperature wash before the main wash with
the aim of removing stains.
- EXTRA RINSE
The extra rinse function adds 1 or 2 rinses
to the standards wash cycle with the aim of
removing any possible residual detergents on
garments.
- SOAK
The soak function allows to keep the laundry
in water for 30 or 60 minutes before the main
wash phase with the purpose of removing the
most stubborn stains.
- RINSE HOLD
This function allows to stop the washing ma-
chine with water in drum without draining and
spinning.
To start draining and spinning, it is necessary
to push button 8 START/PAUSE.
- ECO
The function Eco allows to reduce the energy
consumption of the appliance ensuring the
same washing performance.
- CHILD SAFETY
To set child safety, once the wash cycle com-
mences, keep pushing buttons 6 and 7 at the
same time until the icon starts to ash. To
deactivate this function, hold pressed buttons
6 and 7 until the icon switches off.
- LOCKED DOOR
When this icon is on steady, it means that the
door is locked and can be opened only after
the icon light is off.
OPTION
- PRE-WASH
The pre-wash function is used to make a low
temperature wash before the main wash with
the aim of removing stains.
-
+
EXTRA RINSE
The extra rinse function adds a rinse standard
wash cycle to remove detergent residue from
the laundry.
- RINSE HOLD
This function allows to stop the washing
machine with water in drum without draining
and spinning.
To start draining and spinning, it is necessary
to push button 8 START/PAUSE.
- LOCKED DOOR AND
CHILD SAFETY
When this icon is on steady, it means that the
door is locked and can be opened only after
the icon light is off.
To set child safety, once the wash cycle is
started, hold pressed buttons 6 and 7 at the
same time until the icon starts to ash. To
deactivate this function, hold pressed buttons
6 and 7 until the icon switches off.
ECO
+
- Замачивание
17
EN
F4 Advance/Star Model F4 LED Model
OPTIONS
- PRE-WASH
The pre-wash function is used to make a low
temperature wash before the main wash with
the aim of removing stains.
- EXTRA RINSE
The extra rinse function adds 1 or 2 rinses
to the standards wash cycle with the aim of
removing any possible residual detergents on
garments.
- SOAK
The soak function allows to keep the laundry
in water for 30 or 60 minutes before the main
wash phase with the purpose of removing the
most stubborn stains.
- RINSE HOLD
This function allows to stop the washing ma-
chine with water in drum without draining and
spinning.
To start draining and spinning, it is necessary
to push button 8 START/PAUSE.
- ECO
The function Eco allows to reduce the energy
consumption of the appliance ensuring the
same washing performance.
- CHILD SAFETY
To set child safety, once the wash cycle com-
mences, keep pushing buttons 6 and 7 at the
same time until the icon starts to ash. To
deactivate this function, hold pressed buttons
6 and 7 until the icon switches off.
- LOCKED DOOR
When this icon is on steady, it means that the
door is locked and can be opened only after
the icon light is off.
OPTION
- PRE-WASH
The pre-wash function is used to make a low
temperature wash before the main wash with
the aim of removing stains.
-
+
EXTRA RINSE
The extra rinse function adds a rinse standard
wash cycle to remove detergent residue from
the laundry.
- RINSE HOLD
This function allows to stop the washing
machine with water in drum without draining
and spinning.
To start draining and spinning, it is necessary
to push button 8 START/PAUSE.
- LOCKED DOOR AND
CHILD SAFETY
When this icon is on steady, it means that the
door is locked and can be opened only after
the icon light is off.
To set child safety, once the wash cycle is
started, hold pressed buttons 6 and 7 at the
same time until the icon starts to ash. To
deactivate this function, hold pressed buttons
6 and 7 until the icon switches off.
ECO
+
- Дополнительное полоскание
17
EN
F4 Advance/Star Model F4 LED Model
OPTIONS
- PRE-WASH
The pre-wash function is used to make a low
temperature wash before the main wash with
the aim of removing stains.
- EXTRA RINSE
The extra rinse function adds 1 or 2 rinses
to the standards wash cycle with the aim of
removing any possible residual detergents on
garments.
- SOAK
The soak function allows to keep the laundry
in water for 30 or 60 minutes before the main
wash phase with the purpose of removing the
most stubborn stains.
- RINSE HOLD
This function allows to stop the washing ma-
chine with water in drum without draining and
spinning.
To start draining and spinning, it is necessary
to push button 8 START/PAUSE.
- ECO
The function Eco allows to reduce the energy
consumption of the appliance ensuring the
same washing performance.
- CHILD SAFETY
To set child safety, once the wash cycle com-
mences, keep pushing buttons 6 and 7 at the
same time until the icon starts to ash. To
deactivate this function, hold pressed buttons
6 and 7 until the icon switches off.
- LOCKED DOOR
When this icon is on steady, it means that the
door is locked and can be opened only after
the icon light is off.
OPTION
- PRE-WASH
The pre-wash function is used to make a low
temperature wash before the main wash with
the aim of removing stains.
-
+
EXTRA RINSE
The extra rinse function adds a rinse standard
wash cycle to remove detergent residue from
the laundry.
- RINSE HOLD
This function allows to stop the washing
machine with water in drum without draining
and spinning.
To start draining and spinning, it is necessary
to push button 8 START/PAUSE.
- LOCKED DOOR AND
CHILD SAFETY
When this icon is on steady, it means that the
door is locked and can be opened only after
the icon light is off.
To set child safety, once the wash cycle is
started, hold pressed buttons 6 and 7 at the
same time until the icon starts to ash. To
deactivate this function, hold pressed buttons
6 and 7 until the icon switches off.
ECO
+
- Предварительная стирка
- Отсутствие подачи воды
17
EN
F4 Advance/Star Model F4 LED Model
OPTIONS
- PRE-WASH
The pre-wash function is used to make a low
temperature wash before the main wash with
the aim of removing stains.
- EXTRA RINSE
The extra rinse function adds 1 or 2 rinses
to the standards wash cycle with the aim of
removing any possible residual detergents on
garments.
- SOAK
The soak function allows to keep the laundry
in water for 30 or 60 minutes before the main
wash phase with the purpose of removing the
most stubborn stains.
- RINSE HOLD
This function allows to stop the washing ma-
chine with water in drum without draining and
spinning.
To start draining and spinning, it is necessary
to push button 8 START/PAUSE.
- ECO
The function Eco allows to reduce the energy
consumption of the appliance ensuring the
same washing performance.
- CHILD SAFETY
To set child safety, once the wash cycle com-
mences, keep pushing buttons 6 and 7 at the
same time until the icon starts to ash. To
deactivate this function, hold pressed buttons
6 and 7 until the icon switches off.
- LOCKED DOOR
When this icon is on steady, it means that the
door is locked and can be opened only after
the icon light is off.
OPTION
- PRE-WASH
The pre-wash function is used to make a low
temperature wash before the main wash with
the aim of removing stains.
-
+
EXTRA RINSE
The extra rinse function adds a rinse standard
wash cycle to remove detergent residue from
the laundry.
- RINSE HOLD
This function allows to stop the washing
machine with water in drum without draining
and spinning.
To start draining and spinning, it is necessary
to push button 8 START/PAUSE.
- LOCKED DOOR AND
CHILD SAFETY
When this icon is on steady, it means that the
door is locked and can be opened only after
the icon light is off.
To set child safety, once the wash cycle is
started, hold pressed buttons 6 and 7 at the
same time until the icon starts to ash. To
deactivate this function, hold pressed buttons
6 and 7 until the icon switches off.
ECO
+
- Блокировка двери
17
EN
F4 Advance/Star Model F4 LED Model
OPTIONS
- PRE-WASH
The pre-wash function is used to make a low
temperature wash before the main wash with
the aim of removing stains.
- EXTRA RINSE
The extra rinse function adds 1 or 2 rinses
to the standards wash cycle with the aim of
removing any possible residual detergents on
garments.
- SOAK
The soak function allows to keep the laundry
in water for 30 or 60 minutes before the main
wash phase with the purpose of removing the
most stubborn stains.
- RINSE HOLD
This function allows to stop the washing ma-
chine with water in drum without draining and
spinning.
To start draining and spinning, it is necessary
to push button 8 START/PAUSE.
- ECO
The function Eco allows to reduce the energy
consumption of the appliance ensuring the
same washing performance.
- CHILD SAFETY
To set child safety, once the wash cycle com-
mences, keep pushing buttons 6 and 7 at the
same time until the icon starts to ash. To
deactivate this function, hold pressed buttons
6 and 7 until the icon switches off.
- LOCKED DOOR
When this icon is on steady, it means that the
door is locked and can be opened only after
the icon light is off.
OPTION
- PRE-WASH
The pre-wash function is used to make a low
temperature wash before the main wash with
the aim of removing stains.
-
+
EXTRA RINSE
The extra rinse function adds a rinse standard
wash cycle to remove detergent residue from
the laundry.
- RINSE HOLD
This function allows to stop the washing
machine with water in drum without draining
and spinning.
To start draining and spinning, it is necessary
to push button 8 START/PAUSE.
- LOCKED DOOR AND
CHILD SAFETY
When this icon is on steady, it means that the
door is locked and can be opened only after
the icon light is off.
To set child safety, once the wash cycle is
started, hold pressed buttons 6 and 7 at the
same time until the icon starts to ash. To
deactivate this function, hold pressed buttons
6 and 7 until the icon switches off.
ECO
+
- Блокировка (Защита от детей)
ВНИМАНИЕ! УКАЗАННОЕ ВРЕМЯ ПРОДОЛЖИТЕЛЬНОСТИ СТИРКИ ЯВЛЯЕТСЯ
ОРИЕНТИРОВОЧНЫМ В ЗАВИСИМОСТИ ОТ ТЕМПЕРАТУРЫ И НАПОРА ВОДЫ,
ОБЪЕМА ЗАГРУЖЕННЫХ В БАРАБАН ВЕЩЕЙ, КОЛИЧЕСТВА СРЕДСТВА ДЛЯ СТИР-
КИ И ДРУГИХ ФАКТОРОВ. ВРЕМЯ СТИРКИ МОЖЕТ НАСТРАИВАЕТСЯ АВТОМАТИ-
ЧЕСКИ В ПРОЦЕССЕ СТИРКИ.
1 Программатор 6 Скорость отжима
2 Дисплей 7 Отложенный старт
3
Кнопка «Подтверждения»
8 Уровень загрязнения
4 Кнопка «Старт/Пауза» 9 Опции
5 Температура 9+3 Блокировка
5
3 4
6 7
8
9
1
2

13
3.Кнопка подтверждения
Кнопка подтверждения выбора дополнительной функции.
4. Кнопка «Старт/Пауза»
Кнопка «Старт/Пауза» служит для запуска цикла стирки и дает пользователю возможность временно
приостановить выполнение программы в любой момент. Во время работы стиральной машины
светиться соответствующий символ цикла стирки, показывая конкретную фазу программы стирки.
В режиме «Пауза» символы не мигают, а светятся непрерывно.
5. Кнопка «Температура»
Максимальная устанавливаемая температура зависит от выбранной программы. После нажатия на
данную кнопку на дисплее последовательно высвечиваются доступные показатели температуры
воды для выбранной программы стирки.
6. Кнопка «Скорость отжима»
Выбор скорости отжима для каждой отдельной программы. В зависимости от программы, возможно,
выбрать опцию без отжима, для этого нужно нажимать до момента пока скорость отжима не будет
равна нулевому значению.
7. Кнопка «Отложенный старт»
Выбор времени отсрочки запуска стирки. Можно выбрать отсрочку старта в диапазоне от 1 до 24
часов.
1. Выберите программу стирки.
2. Нажмите кнопку «Отложенный старт», выберите время от 1 до 24 часов.
3. Нажмите кнопку «Старт/Пауза», произойдет активация функции.
8. Кнопка «Уровень загрязнения»
Выбор уровня загрязнения белья для достижения максимальной эффективности стирки.
16
DESCRIPTION OF CONTROLS
1. Programme Knob
The Programme selector Knob allows you to
select the required programme and turn off the
appliance by setting it to OFF. It can be turned
clockwise and counterclockwise to have an
easy and quick programme selection.
2. Temperature Regulation
This button allows to regulate the temperature.
To modify the set value, press the button
repeatedly until it reaches the required
temperature.
3. Spin Regulation
This button allows to regulate the spin speed.
To modify the set value, press the button
repeatedly until it reaches the value required.
4. Delayed Start
This button allows to programme the end of
the wash cycle; by selecting a delayed start.
The remaining time to the end of the wash
cycle is expressed in hours (h).
On Display models from 0 to 24h.
On Led models from 0 to 9h.
5. Stain Level
Only on F4 Display model
This button allows to optimise the washing
performance by adapting it to the dirty intensity
of the laundry.
Mild
Normal
Intense
6. Options
This button allows to scroll through the
different washing options. Push the button
repeatedly to visualise the desired option. The
selected option starts to ash and to conrm
press the button 7 “Conrm option”. The
activation of the option is marked by a steady
illumination of the corresponding icon.
7. Option Conrmation
This button allows to conrm the selected
options.
8. Start/Pause
Push the Start/Pause button to start the wash
cycle (led on) or to pause it (ashing led).
- Высокий уровень загрязнения
16
DESCRIPTION OF CONTROLS
1. Programme Knob
The Programme selector Knob allows you to
select the required programme and turn off the
appliance by setting it to OFF. It can be turned
clockwise and counterclockwise to have an
easy and quick programme selection.
2. Temperature Regulation
This button allows to regulate the temperature.
To modify the set value, press the button
repeatedly until it reaches the required
temperature.
3. Spin Regulation
This button allows to regulate the spin speed.
To modify the set value, press the button
repeatedly until it reaches the value required.
4. Delayed Start
This button allows to programme the end of
the wash cycle; by selecting a delayed start.
The remaining time to the end of the wash
cycle is expressed in hours (h).
On Display models from 0 to 24h.
On Led models from 0 to 9h.
5. Stain Level
Only on F4 Display model
This button allows to optimise the washing
performance by adapting it to the dirty intensity
of the laundry.
Mild
Normal
Intense
6. Options
This button allows to scroll through the
different washing options. Push the button
repeatedly to visualise the desired option. The
selected option starts to ash and to conrm
press the button 7 “Conrm option”. The
activation of the option is marked by a steady
illumination of the corresponding icon.
7. Option Conrmation
This button allows to conrm the selected
options.
8. Start/Pause
Push the Start/Pause button to start the wash
cycle (led on) or to pause it (ashing led).
- Средний уровень загрязнения
16
DESCRIPTION OF CONTROLS
1. Programme Knob
The Programme selector Knob allows you to
select the required programme and turn off the
appliance by setting it to OFF. It can be turned
clockwise and counterclockwise to have an
easy and quick programme selection.
2. Temperature Regulation
This button allows to regulate the temperature.
To modify the set value, press the button
repeatedly until it reaches the required
temperature.
3. Spin Regulation
This button allows to regulate the spin speed.
To modify the set value, press the button
repeatedly until it reaches the value required.
4. Delayed Start
This button allows to programme the end of
the wash cycle; by selecting a delayed start.
The remaining time to the end of the wash
cycle is expressed in hours (h).
On Display models from 0 to 24h.
On Led models from 0 to 9h.
5. Stain Level
Only on F4 Display model
This button allows to optimise the washing
performance by adapting it to the dirty intensity
of the laundry.
Mild
Normal
Intense
6. Options
This button allows to scroll through the
different washing options. Push the button
repeatedly to visualise the desired option. The
selected option starts to ash and to conrm
press the button 7 “Conrm option”. The
activation of the option is marked by a steady
illumination of the corresponding icon.
7. Option Conrmation
This button allows to conrm the selected
options.
8. Start/Pause
Push the Start/Pause button to start the wash
cycle (led on) or to pause it (ashing led).
- Легкий уровень загрязнения
9. Кнопка «Опции»
Выбор дополнительной опции во время стирки. Символ выбранной опции начнет мигать.
Подтвердить выбор опции можно нажатием кнопки «Подтверждения»(3). Светящийся символ
дополнительной опции свидетельствует о том, что данная опция активна.
9+3. Блокировка (Защита от детей)
Данная функция позволяет включить специальную блокировку, предохраняющую от случайного
изменения функций программы. Для активации функции нужно одновременно нажать и удерживать
кнопки «Опции» и «Подтверждения» до момента пока символ
17
EN
F4 Advance/Star Model F4 LED Model
OPTIONS
- PRE-WASH
The pre-wash function is used to make a low
temperature wash before the main wash with
the aim of removing stains.
- EXTRA RINSE
The extra rinse function adds 1 or 2 rinses
to the standards wash cycle with the aim of
removing any possible residual detergents on
garments.
- SOAK
The soak function allows to keep the laundry
in water for 30 or 60 minutes before the main
wash phase with the purpose of removing the
most stubborn stains.
- RINSE HOLD
This function allows to stop the washing ma-
chine with water in drum without draining and
spinning.
To start draining and spinning, it is necessary
to push button 8 START/PAUSE.
- ECO
The function Eco allows to reduce the energy
consumption of the appliance ensuring the
same washing performance.
- CHILD SAFETY
To set child safety, once the wash cycle com-
mences, keep pushing buttons 6 and 7 at the
same time until the icon starts to ash. To
deactivate this function, hold pressed buttons
6 and 7 until the icon switches off.
- LOCKED DOOR
When this icon is on steady, it means that the
door is locked and can be opened only after
the icon light is off.
OPTION
- PRE-WASH
The pre-wash function is used to make a low
temperature wash before the main wash with
the aim of removing stains.
-
+
EXTRA RINSE
The extra rinse function adds a rinse standard
wash cycle to remove detergent residue from
the laundry.
- RINSE HOLD
This function allows to stop the washing
machine with water in drum without draining
and spinning.
To start draining and spinning, it is necessary
to push button 8 START/PAUSE.
- LOCKED DOOR AND
CHILD SAFETY
When this icon is on steady, it means that the
door is locked and can be opened only after
the icon light is off.
To set child safety, once the wash cycle is
started, hold pressed buttons 6 and 7 at the
same time until the icon starts to ash. To
deactivate this function, hold pressed buttons
6 and 7 until the icon switches off.
ECO
+
станет активным.
Для отключения блокировки повторно проделайте данные действия, символ
17
EN
F4 Advance/Star Model F4 LED Model
OPTIONS
- PRE-WASH
The pre-wash function is used to make a low
temperature wash before the main wash with
the aim of removing stains.
- EXTRA RINSE
The extra rinse function adds 1 or 2 rinses
to the standards wash cycle with the aim of
removing any possible residual detergents on
garments.
- SOAK
The soak function allows to keep the laundry
in water for 30 or 60 minutes before the main
wash phase with the purpose of removing the
most stubborn stains.
- RINSE HOLD
This function allows to stop the washing ma-
chine with water in drum without draining and
spinning.
To start draining and spinning, it is necessary
to push button 8 START/PAUSE.
- ECO
The function Eco allows to reduce the energy
consumption of the appliance ensuring the
same washing performance.
- CHILD SAFETY
To set child safety, once the wash cycle com-
mences, keep pushing buttons 6 and 7 at the
same time until the icon starts to ash. To
deactivate this function, hold pressed buttons
6 and 7 until the icon switches off.
- LOCKED DOOR
When this icon is on steady, it means that the
door is locked and can be opened only after
the icon light is off.
OPTION
- PRE-WASH
The pre-wash function is used to make a low
temperature wash before the main wash with
the aim of removing stains.
-
+
EXTRA RINSE
The extra rinse function adds a rinse standard
wash cycle to remove detergent residue from
the laundry.
- RINSE HOLD
This function allows to stop the washing
machine with water in drum without draining
and spinning.
To start draining and spinning, it is necessary
to push button 8 START/PAUSE.
- LOCKED DOOR AND
CHILD SAFETY
When this icon is on steady, it means that the
door is locked and can be opened only after
the icon light is off.
To set child safety, once the wash cycle is
started, hold pressed buttons 6 and 7 at the
same time until the icon starts to ash. To
deactivate this function, hold pressed buttons
6 and 7 until the icon switches off.
ECO
+
погаснет.
- Отсутствие подачи воды
Если данный индикатор светится, это означает, что отсутствует подача вода.
17
EN
F4 Advance/Star Model F4 LED Model
OPTIONS
- PRE-WASH
The pre-wash function is used to make a low
temperature wash before the main wash with
the aim of removing stains.
- EXTRA RINSE
The extra rinse function adds 1 or 2 rinses
to the standards wash cycle with the aim of
removing any possible residual detergents on
garments.
- SOAK
The soak function allows to keep the laundry
in water for 30 or 60 minutes before the main
wash phase with the purpose of removing the
most stubborn stains.
- RINSE HOLD
This function allows to stop the washing ma-
chine with water in drum without draining and
spinning.
To start draining and spinning, it is necessary
to push button 8 START/PAUSE.
- ECO
The function Eco allows to reduce the energy
consumption of the appliance ensuring the
same washing performance.
- CHILD SAFETY
To set child safety, once the wash cycle com-
mences, keep pushing buttons 6 and 7 at the
same time until the icon starts to ash. To
deactivate this function, hold pressed buttons
6 and 7 until the icon switches off.
- LOCKED DOOR
When this icon is on steady, it means that the
door is locked and can be opened only after
the icon light is off.
OPTION
- PRE-WASH
The pre-wash function is used to make a low
temperature wash before the main wash with
the aim of removing stains.
-
+
EXTRA RINSE
The extra rinse function adds a rinse standard
wash cycle to remove detergent residue from
the laundry.
- RINSE HOLD
This function allows to stop the washing
machine with water in drum without draining
and spinning.
To start draining and spinning, it is necessary
to push button 8 START/PAUSE.
- LOCKED DOOR AND
CHILD SAFETY
When this icon is on steady, it means that the
door is locked and can be opened only after
the icon light is off.
To set child safety, once the wash cycle is
started, hold pressed buttons 6 and 7 at the
same time until the icon starts to ash. To
deactivate this function, hold pressed buttons
6 and 7 until the icon switches off.
ECO
+
Блокировка двери
Активный символ блокировки двери означает, что дверь заблокирована и откроется только
после того, как символ погаснет. При окончании стирки дверь не разблокируется, если включена
блокировка от детей.
17
EN
F4 Advance/Star Model F4 LED Model
OPTIONS
- PRE-WASH
The pre-wash function is used to make a low
temperature wash before the main wash with
the aim of removing stains.
- EXTRA RINSE
The extra rinse function adds 1 or 2 rinses
to the standards wash cycle with the aim of
removing any possible residual detergents on
garments.
- SOAK
The soak function allows to keep the laundry
in water for 30 or 60 minutes before the main
wash phase with the purpose of removing the
most stubborn stains.
- RINSE HOLD
This function allows to stop the washing ma-
chine with water in drum without draining and
spinning.
To start draining and spinning, it is necessary
to push button 8 START/PAUSE.
- ECO
The function Eco allows to reduce the energy
consumption of the appliance ensuring the
same washing performance.
- CHILD SAFETY
To set child safety, once the wash cycle com-
mences, keep pushing buttons 6 and 7 at the
same time until the icon starts to ash. To
deactivate this function, hold pressed buttons
6 and 7 until the icon switches off.
- LOCKED DOOR
When this icon is on steady, it means that the
door is locked and can be opened only after
the icon light is off.
OPTION
- PRE-WASH
The pre-wash function is used to make a low
temperature wash before the main wash with
the aim of removing stains.
-
+
EXTRA RINSE
The extra rinse function adds a rinse standard
wash cycle to remove detergent residue from
the laundry.
- RINSE HOLD
This function allows to stop the washing
machine with water in drum without draining
and spinning.
To start draining and spinning, it is necessary
to push button 8 START/PAUSE.
- LOCKED DOOR AND
CHILD SAFETY
When this icon is on steady, it means that the
door is locked and can be opened only after
the icon light is off.
To set child safety, once the wash cycle is
started, hold pressed buttons 6 and 7 at the
same time until the icon starts to ash. To
deactivate this function, hold pressed buttons
6 and 7 until the icon switches off.
ECO
+
«Эко» (доп. функция)
Данная функция позволяет уменьшить расход энергии без ущерба для качества стирки.

14
17
EN
F4 Advance/Star Model F4 LED Model
OPTIONS
- PRE-WASH
The pre-wash function is used to make a low
temperature wash before the main wash with
the aim of removing stains.
- EXTRA RINSE
The extra rinse function adds 1 or 2 rinses
to the standards wash cycle with the aim of
removing any possible residual detergents on
garments.
- SOAK
The soak function allows to keep the laundry
in water for 30 or 60 minutes before the main
wash phase with the purpose of removing the
most stubborn stains.
- RINSE HOLD
This function allows to stop the washing ma-
chine with water in drum without draining and
spinning.
To start draining and spinning, it is necessary
to push button 8 START/PAUSE.
- ECO
The function Eco allows to reduce the energy
consumption of the appliance ensuring the
same washing performance.
- CHILD SAFETY
To set child safety, once the wash cycle com-
mences, keep pushing buttons 6 and 7 at the
same time until the icon starts to ash. To
deactivate this function, hold pressed buttons
6 and 7 until the icon switches off.
- LOCKED DOOR
When this icon is on steady, it means that the
door is locked and can be opened only after
the icon light is off.
OPTION
- PRE-WASH
The pre-wash function is used to make a low
temperature wash before the main wash with
the aim of removing stains.
-
+
EXTRA RINSE
The extra rinse function adds a rinse standard
wash cycle to remove detergent residue from
the laundry.
- RINSE HOLD
This function allows to stop the washing
machine with water in drum without draining
and spinning.
To start draining and spinning, it is necessary
to push button 8 START/PAUSE.
- LOCKED DOOR AND
CHILD SAFETY
When this icon is on steady, it means that the
door is locked and can be opened only after
the icon light is off.
To set child safety, once the wash cycle is
started, hold pressed buttons 6 and 7 at the
same time until the icon starts to ash. To
deactivate this function, hold pressed buttons
6 and 7 until the icon switches off.
ECO
+
«Остановка с водой в баке» (доп. функция)
Данная функция позволяет остановить процесс полоскания непосредственно перед последним
отжимом. В барабане останется вода, что будет препятствовать сминанию белья. Индикаторы
«Полоскания» и «Остановка с водой в баке» начнут мигать. Чтобы активировать слив и отжим,
необходимо отключить данную функцию. Для этого выберите программу «Слив/Отжим» и нажмите
кнопку «Подтверждения» или кнопку «Старт/Пауза», после чего начнется заключительный этап
стирки. Индикаторы «Полоскания» и «Остановка с водой в баке» погаснут.
17
EN
F4 Advance/Star Model F4 LED Model
OPTIONS
- PRE-WASH
The pre-wash function is used to make a low
temperature wash before the main wash with
the aim of removing stains.
- EXTRA RINSE
The extra rinse function adds 1 or 2 rinses
to the standards wash cycle with the aim of
removing any possible residual detergents on
garments.
- SOAK
The soak function allows to keep the laundry
in water for 30 or 60 minutes before the main
wash phase with the purpose of removing the
most stubborn stains.
- RINSE HOLD
This function allows to stop the washing ma-
chine with water in drum without draining and
spinning.
To start draining and spinning, it is necessary
to push button 8 START/PAUSE.
- ECO
The function Eco allows to reduce the energy
consumption of the appliance ensuring the
same washing performance.
- CHILD SAFETY
To set child safety, once the wash cycle com-
mences, keep pushing buttons 6 and 7 at the
same time until the icon starts to ash. To
deactivate this function, hold pressed buttons
6 and 7 until the icon switches off.
- LOCKED DOOR
When this icon is on steady, it means that the
door is locked and can be opened only after
the icon light is off.
OPTION
- PRE-WASH
The pre-wash function is used to make a low
temperature wash before the main wash with
the aim of removing stains.
-
+
EXTRA RINSE
The extra rinse function adds a rinse standard
wash cycle to remove detergent residue from
the laundry.
- RINSE HOLD
This function allows to stop the washing
machine with water in drum without draining
and spinning.
To start draining and spinning, it is necessary
to push button 8 START/PAUSE.
- LOCKED DOOR AND
CHILD SAFETY
When this icon is on steady, it means that the
door is locked and can be opened only after
the icon light is off.
To set child safety, once the wash cycle is
started, hold pressed buttons 6 and 7 at the
same time until the icon starts to ash. To
deactivate this function, hold pressed buttons
6 and 7 until the icon switches off.
ECO
+
«Замачивание» (доп. функция)
Данная функция позволяет замочить белье для удаления сложных загрязнений в течение 30 - 60
минут перед основным процессом стирки.
17
EN
F4 Advance/Star Model F4 LED Model
OPTIONS
- PRE-WASH
The pre-wash function is used to make a low
temperature wash before the main wash with
the aim of removing stains.
- EXTRA RINSE
The extra rinse function adds 1 or 2 rinses
to the standards wash cycle with the aim of
removing any possible residual detergents on
garments.
- SOAK
The soak function allows to keep the laundry
in water for 30 or 60 minutes before the main
wash phase with the purpose of removing the
most stubborn stains.
- RINSE HOLD
This function allows to stop the washing ma-
chine with water in drum without draining and
spinning.
To start draining and spinning, it is necessary
to push button 8 START/PAUSE.
- ECO
The function Eco allows to reduce the energy
consumption of the appliance ensuring the
same washing performance.
- CHILD SAFETY
To set child safety, once the wash cycle com-
mences, keep pushing buttons 6 and 7 at the
same time until the icon starts to ash. To
deactivate this function, hold pressed buttons
6 and 7 until the icon switches off.
- LOCKED DOOR
When this icon is on steady, it means that the
door is locked and can be opened only after
the icon light is off.
OPTION
- PRE-WASH
The pre-wash function is used to make a low
temperature wash before the main wash with
the aim of removing stains.
-
+
EXTRA RINSE
The extra rinse function adds a rinse standard
wash cycle to remove detergent residue from
the laundry.
- RINSE HOLD
This function allows to stop the washing
machine with water in drum without draining
and spinning.
To start draining and spinning, it is necessary
to push button 8 START/PAUSE.
- LOCKED DOOR AND
CHILD SAFETY
When this icon is on steady, it means that the
door is locked and can be opened only after
the icon light is off.
To set child safety, once the wash cycle is
started, hold pressed buttons 6 and 7 at the
same time until the icon starts to ash. To
deactivate this function, hold pressed buttons
6 and 7 until the icon switches off.
ECO
+
«Дополнительное полоскание» (доп. функция)
Данная функция обеспечивает дополнительный цикл ополаскивания. Рекомендуется при стирке
белья, а также стирке одежды, предназначенной для людей с чувствительной кожей. Увеличивает
время выполнения программы стирки.
17
EN
F4 Advance/Star Model F4 LED Model
OPTIONS
- PRE-WASH
The pre-wash function is used to make a low
temperature wash before the main wash with
the aim of removing stains.
- EXTRA RINSE
The extra rinse function adds 1 or 2 rinses
to the standards wash cycle with the aim of
removing any possible residual detergents on
garments.
- SOAK
The soak function allows to keep the laundry
in water for 30 or 60 minutes before the main
wash phase with the purpose of removing the
most stubborn stains.
- RINSE HOLD
This function allows to stop the washing ma-
chine with water in drum without draining and
spinning.
To start draining and spinning, it is necessary
to push button 8 START/PAUSE.
- ECO
The function Eco allows to reduce the energy
consumption of the appliance ensuring the
same washing performance.
- CHILD SAFETY
To set child safety, once the wash cycle com-
mences, keep pushing buttons 6 and 7 at the
same time until the icon starts to ash. To
deactivate this function, hold pressed buttons
6 and 7 until the icon switches off.
- LOCKED DOOR
When this icon is on steady, it means that the
door is locked and can be opened only after
the icon light is off.
OPTION
- PRE-WASH
The pre-wash function is used to make a low
temperature wash before the main wash with
the aim of removing stains.
-
+
EXTRA RINSE
The extra rinse function adds a rinse standard
wash cycle to remove detergent residue from
the laundry.
- RINSE HOLD
This function allows to stop the washing
machine with water in drum without draining
and spinning.
To start draining and spinning, it is necessary
to push button 8 START/PAUSE.
- LOCKED DOOR AND
CHILD SAFETY
When this icon is on steady, it means that the
door is locked and can be opened only after
the icon light is off.
To set child safety, once the wash cycle is
started, hold pressed buttons 6 and 7 at the
same time until the icon starts to ash. To
deactivate this function, hold pressed buttons
6 and 7 until the icon switches off.
ECO
+
«Предварительная стирка» (доп. функция)
Данная функция увеличивает продолжительность стирки. Предварительная стирка является
начальным этапом основной программы. Предварительная стирка рекомендуется, когда одежда
сильно загрязнена. Предварительная стирка выполняется при низкой температуре.
ВНИМАНИЕ!
«
ПРЕДВАРИТЕЛЬНАЯ СТИРКА
»
ДОСТУПНА НЕ ДЛЯ ВСЕХ ПРОГРАММ
СТИРКИ
(
СМ. ТАБЛИЦУ ПРОГРАММ
)
.
ВНИМАНИЕ! ПРЕЖДЕ ЧЕМ ВКЛЮЧИТЬ ФУНКЦИЮ
«
ПРЕДВАРИТЕЛЬНАЯ СТИР-
КА
»
, В ОТСЕК ДИСПЕНСЕРА, ИМЕЮЩИЙ СИМВОЛ
«
I
»
, НЕОБХОДИМО ДОБАВИТЬ
СРЕДСТВО ДЛЯ СТИРКИ.
ПРОГРАММЫ СТИРКИ
ВНИМАНИЕ! ОЗНАКОМЬТЕСЬ С СИМВОЛАМИ НА БИРКАХ ИЗДЕЛИЙ ПЕРЕД НА-
ЧАЛОМ СТИРКИ!
20
SM3130
EN
USING THE WASHING MACHINE
Stains exist that cannot be removed by machine washing alone. Before trying to remove any type of
stain by hand, first try the removal procedure on a small area of hidden fabric. Start from the edge of
the stain and working inwards, this will prevent a dark ring from forming around the site of the stain. A
few methods to adopt for removing stains are reported below.
▼
Wax: Scrape the wax using a rounded point
in order not to damage the fabric. Then, with
the fabric placed between two pieces of ab
-
sorbent paper, run a hot iron over the stain.
▼
Ball Point Pens and felt-tiP Pens: clean using
a soft cloth soaked in ethyl alcohol. Take care
not to spread the stain.
▼
damP and moUld: if the fabric supports the
use of bleach, carry out a wash cycle adding
bleach. Otherwise, soak the soiled part in
hydrogen peroxide (10 volumes) and leave
for 10 to 15 minutes.
▼
light sCorCh marks left By ironing: follow the
instructions for mould and damp.
▼
rUst: use products specially designed for rust
stains, following the manufacturer’s instruc-
tions written on the packet.
▼
CheWing gUm: rub ice over the fabric, scrape
away as much chewing gum as possible
and then rub with a piece of cotton soaked
in acetone.
INTERNATIONAL CLOTHING CARE SYMBOLS
Before placing the clothes in the washing machine and selecting the wash programme, examine the
symbols on the manufacturer’s label. The table reported below will provide a useful guide to reading
the symbols.
▼
Paint: do not allow the paint to dry. Rub the
area with the solvent recommended by the
paint manufacturer (e.g. water, turps, trichlo
-
roethylene), soap and then rinse.
▼
liPstiCk: stains on cotton or wool can be elimi-
nated using a cloth soaked in ether. Stains
on silk require the use of trichloroethylene.
▼
nail Varnish: place a sheet of absorbent
paper on the stained material, then dampen
the back of the fabric with acetone, frequently
changing the absorbent paper placed over
the stain. Continue in this manner until the
stain has disappeared.
▼
tar or dirt: spread a little fresh butter over
the stain, allow to stand and then wash with
oil of turpentine.
▼
grass: delicately soap the stain, use diluted
bleach. Good results can be obtained on
woollen fabrics using 90% alcohol.
▼
Blood: put into soak in cold water with added
salt, then wash with washing soap.
HOW TO REMOVE SOME STAINS
Макс. температура 95°C
Макс. температура 60°C
Макс. температура 40°C
Макс. температура 30°C
Глажка до 200°
Глажка до 150°
Глажка до 100°
Не гладить
Сухая чистка с растворителем
Сухая чистка с бензином,
с этиловым спиртом, либо R113
Сухая чистка с этиловым
перхлоратом, бензином,
этиловым спиртом, R113, R111
Не подвергать сухой чистке
Сушить горизонтально
Сушить вертикально
Сушить на вешалке
Сушить в стиральной машине
при нормальной температуре
Сушить в стиральной машине
при низкой температуре
Не сушить в стиральной
машине
Обычная стирка
Деликатная стирка
Ручная стирка
Только сухая чистка
Отбеливать в холодной
воде
Не отбеливать

15
•
возможно применить средство для стирки (стиральный порошок / жидкие средства для стирки) без которого стирка будет неэффективна.
○ возможно применить дополнительные средства для стирки (смягчители, ополаскиватели, жидкий крахмал, ароматизаторы и т.д.) по необходимости.
x невозможно применять средства для стирки, дополнительные средства для стирки.
Программа стирки «Интенсивная» при температурах 60°C и 40°C - это программа для оценки энергоэффективности. Данная программа является наиболее эффективной при потреблении
электроэнергии и воды, подходит для белья с средним уровнем загрязнения.
ВНИМАНИЕ! УКАЗАННОЕ ВРЕМЯ ПРОДОЛЖИТЕЛЬНОСТИ СТИРКИ ЯВЛЯЕТСЯ ОРИЕНТИРОВОЧНЫМ В ЗАВИСИМОСТИ ОТ ТЕМПЕРАТУРЫ И НАПОРА ВОДЫ, ОБЪЕМА
ЗАГРУЖЕННЫХ В БАРАБАН ВЕЩЕЙ, КОЛИЧЕСТВА СРЕДСТВА ДЛЯ СТИРКИ И ДРУГИХ ФАКТОРОВ. ВРЕМЯ СТИРКИ МОЖЕТ НАСТРАИВАЕТСЯ АВТОМАТИЧЕСКИ В ПРО-
ЦЕССЕ СТИРКИ.
Программа
Загрузка
(кг)
Отсеки
диспенсера
Температура
по
умолчанию
(°C)
Температура
(°C)
Время
стирки
по
умолч.
(мин)
Эко
Остановка
с водой
в баке
Замач.
Доп.
полоск.
Предв.
стирка
Уровень
загряз.
Скорость
отжима (об/
мин)
I II III 1400
Хлопок
6
• • ○ 60 хол. - 90
130
◘ ◘ ◘ ◘ ◘ ◘ 0 - 1400
Интенсивная
6
• • ○ 60 хол. - 90
173
◘ ◘ ◘ ◘ ◘ ◘ 0 - 1400
Синтетика
3
• • ○ 30 хол. - 60
91
◘ ◘ ◘ ◘ ◘ ◘ 0 - 800
Быстрая 30'
3
x • ○ 20 хол. - 30
30
◘ - - ◘ - - 0 - 1400
Моя программа
2.5
• • ○ 50 хол. - 90
117
◘ ◘ ◘ ◘ ◘ ◘ 0 - 1400
Eco 20°C
3
x • ○ 20 хол. - 60
93
- ◘ ◘ ◘ - ◘ 0 - 1400
Джинсы/Цветные изд.
2.5
• • ○ 40 хол. - 60
124
◘ ◘ ◘ ◘ ◘ ◘ 0 - 1400
Пуховики
2
x • ○ 30 хол. - 60
89
◘ ◘ ◘ ◘ - ◘ 0 - 800
Деликатная
0.5
• • ○ 30 хол. - 40
104
◘ ◘ ◘ ◘ ◘ ◘ 0 - 600
Спортивная одежда
1.5
• • ○ 40 хол. - 40
88
◘ ◘ ◘ ◘ ◘ ◘ 0 - 600
Шторы
1.5
x • ○ 20 хол. - 40
66
◘ ◘ - ◘ - ◘ 0 - 600
Шерсть
1.5
x • ○ 20 хол. - 40
55
◘ ◘ - ◘ - ◘ 0 - 1000
Гипоаллергенная
6
• • ○ 40 хол. - 40
121
◘ ◘ ◘ ◘ ◘ ◘ 0 - 1000
Полоскание
1.5
x x x - -
22
- - - - - - -
Слив/Отжим
6
x x x - -
10
- - - - - - -

16
ХЛОПОК
Программа для стирки постельного белья, наволочек, вещей из хлопка, льняных скатертей.
ИНТЕНСИВНАЯ
Программа для стирки постельного белья, наволочек, вещей из хлопка, льняных скатертей.
СИНТЕТИКА
Программа для стирки изделия из синтетических тканей, акрила, полиэстера и микрофибры.
БЫСТРАЯ 30'
Быстрый цикл стирки подходит для слегка загрязнённого белья из хлопка и синтетики.
МОЯ ПРОГРАММА
Стиральная машина запоминает последнюю выбранную пользователем программу и опции.
Eco 20°C
Программа для любых типов тканей, подходит для стирки белья средней загрязненности и является
наиболее эффективной с точки зрения общего потребления воды и электроэнергии.
ДЖИНСЫ/ЦВЕТНЫЕ ИЗД.
Специальная программа для плотных хлопчатобумажных и цветных тканей.
ПУХОВКИ
Специальная программа для пуховиков, пуховых одеял, подушек с наполнителем перо.
ДЕЛИКАТНАЯ
Стирка деликатных вещей из любых типов тканей. Интенсивность стирки слабее. Рекомендуется для
вещей, которые требуют бережной стирки.
СПОРТИВНАЯ ОДЕЖДА
Для спортивной и повседневной одежды из хлопка, лайкры и тд.
ШТОРЫ
Специальная программа для штор из хлопка или полиэстера.
ШЕРСТЬ
Программа для стирки шерсти позволяет стирать деликатные шерстяные изделия, подлежащие
машинной стирке. Бережно сохраняет цвет и форму ткани.
ГИПОАЛЛЕРГЕННАЯ
За счет увеличения числа полосканий и их продолжительности гипоаллергенная программа
максимально эффективно вымывает остатки моющего средства и предотвращает появление
нежелательных реакций у людей с предрасположенностью к аллергии.
РУЧНАЯ СТИРКА
Программа деликатной стирки позволяет бережно стирать ткани, подлежащие ручной стирке.
ПОЛОСКАНИЕ
Эта программа предназначена для полоскания одежды, постиранной вручную, а также приведения
в порядок вещей, хранившихся длительное время.
СЛИВ/ОТЖИМ
Слив воды из барабана стиральной машины. Скорость отжима настраивается под любой тип тканей.

17
УСТРАНЕНИЕ НЕИСПРАВНОСТЕЙ
Проблема Возможные решения
Стиральная
машина не
работает.
Вилка питания прибора включена в рабочую розетку.
Электроэнергия включена.
Проверить водопроводный кран.
Не правильно закрыта дверь: откройте и снова закройте ее.
Проверьте, правильно ли выбрана программа и нажата кнопка «Старт/
Пауза»
Сильные
вибрации / шумы
при отжиме
Стиральная машина не выравнена: при необходимости отрегулируйте
ножки, как указано в соответствующем разделе.
Убедитесь, что транспортировочные винты, резиновые заглушки, втулки,
удалены.
Убедитесь в отсутствии посторонних предметов внутри барабана.
Люк стиральной
машины не
открывается
Убедитесь, что цикл стирки завершен.
Белье после
стирки становится
перекрученным
Убедитесь, что белье равномерно распределено внутри барабана.
Убедитесь, что выбрана подходящая скорость отжима.
Стиральная
машина
останавливается
во время стирки
Убедитесь, что не происходит перебоев в электропитании.
После стирки
в диспенсере
остается порошок
Убедитесь, что водопроводный кран открыт.
Убедитесь, что фильтр заливного шланга клапана не засорен.
ВНИМАНИЕ! ГАРАНТИЯ ПРОИЗВОДИТЕЛЯ РАСПРОСТРАНЯЕТСЯ НА НЕДОСТАТКИ,
ВЫЗВАННЫЕ ЭЛЕКТРИЧЕСКИМИ ИЛИ МЕХАНИЧЕСКИМИ НЕИСПРАВНОСТЯМИ В
ПРОДУКЦИИ В РЕЗУЛЬТАТЕ ДЕЙСТВИЯ ИЛИ УПУЩЕНИЯ ПРОИЗВОДИТЕЛЯ.
ЕСЛИ НЕИСПРАВНОСТИ БЫЛИ ВЫЗВАНЫ ФАКТОРАМИ, НАХОДЯЩИМИСЯ
ВНЕ ПОСТАВЛЯЕМОЙ ПРОДУКЦИИ, ПРИ НЕПРАВИЛЬНОМ ИСПОЛЬЗОВАНИИ
ИЛИ В РЕЗУЛЬТАТЕ НАРУШЕНИЯ ПРАВИЛ ПО ЭКСПЛУАТАЦИИ, ГАРАНТИЙНЫЕ
ОБЯЗАТЕЛЬСТВА МОГУТ БЫТЬ АННУЛИРОВАНЫ.

18
Проблема Возможные решения
F01
Стиральная машина
не запускается на
программе
• Снова откройте дверь и закройте слегка подтолкнув ее.
F02
Стиральная машина не
набирает воду
• Убедитесь, что водопроводный кран открыт и в нем есть вода.
• Убедитесь, что заливной шланг не перекручен.
F03
Стиральная машина не
нагревает воду
• Выключите стиральную машину и перезапустите программу
стирки.
F04
Стиральная машина не
сливает воду
• Поместите конец сливного шланга в ведро, либо в другую
емкость. Выберите программу «Слив».
• Убедитесь, что фильтр сливного насоса не загрязнен.
• Убедитесь, что сливной шланг не пережат и не имеет перегибов.
F05 • Включите и выключите стиральную машину.
F09 • Включите и выключите стиральную машину.
Стиральная машина не
запускается
• Проверьте, вставлена ли вилка в розетку.
• Проверьте, приходит ли электропитание к розетке.
• Убедитесь, что переключатель не установлен на позиции «Выкл».
Дверь не открывается
• Убедитесь, что символ выключен.
• Убедитесь, что не включена функция «Остановка с водой в баке»,
полоскания или дополнительная функция.
• Слегка надавите на люк в районе замка, одновременно с этим
попытайтесь открыть дверь.
На полу появилась вода
• Убедитесь, что заливной и сливной шланги не повреждены.
Проверьте прибор на наличие утечек воды.
• Убедитесь, в отсутствии пены, воды, выходящей из отсека
диспенсера.
• Уменьшите количество моющего средства.
Стиральная машина
беспрерывно
набирает воду (даже в
выключенном состоянии)
• По окончанию цикла стирки перекройте кран с водой.
• Уменьшите давление воды или проверьте кран.
Контроль пенообразования
Лишняя пена может возникнуть при большом количестве средств для стирки, что влияет на
результат стирки и полоскания. Контроль осуществляется автоматически, при обнаружении лишней
пены последует процесс ее удаления.
ВНИМАНИЕ! ДАННАЯ СТИРАЛЬНАЯ МАШИНА ОБОРУДОВАНА СПЕЦИАЛЬНОЙ
СИСТЕМОЙ ЭЛЕКТРОННОГО УПРАВЛЕНИЯ ДЛЯ ПРАВИЛЬНОЙ БАЛАНСИРОВ-
КИ ЗАГРУЗКИ. ЕСЛИ БЕЛЬЕ РАСПРЕДЕЛЯЕТСЯ НЕРАВНОМЕРНО, ТО СКОРОСТЬ
КОНЕЧНОГО ОТЖИМА, ПО СООБРАЖЕНИЯМ БЕЗОПАСНОСТИ, УМЕНЬШАЕТСЯ. В
СЛУЧАЕ СИЛЬНОГО ДИСБАЛАНСА РАЗМЕЩЕНИЯ, ОТЖИМ ВОВСЕ ОТКЛЮЧИТСЯ.

19
Использование экологически безвредных моющих средств, без фосфатов, может привести к
следующему:
Вода, выходящая из сливного шланга машины, при ополаскивании может быть мутной: этот
эффект может быть связан с веществами, которые не влияют на эффективность ополаскивания.
Белый порошок на белье в конце стирки: это нормально, порошок не поглощается тканью и не
меняет цвет ткани, чтобы удалить излишки порошка, запустите полоскание еще раз. В будущем
используйте меньшее количество порошка.
Пена в воде при последнем ополаскивании: используйте меньшее количество порошка.
Обильное пенообразование: чаще всего это происходит из-за анионных ПАВ, находящихся в
составе средств для стирки. В этом случае не пытайтесь повторно запускать полоскание, это не
приведет к желаемому результату. Мы рекомендуем провести техническую промывку, исполь-
зуя специализированное чистящее средство.
ВНИМАНИЕ! ЕСЛИ ПРОБЛЕМА НЕ РЕШЕНА ИЛИ ВЫ ЗАМЕТИЛИ НЕИСПРАВНОСТЬ,
ОБРАТИТЕСЬ В АВТОРИЗОВАННЫЙ СЕРВИСНЫЙ ЦЕНТР.
ТЕХНИЧЕСКИЕ ПАРАМЕТРЫ
Основные характеристики KWM 42 D 1460 KWM 42 ID 1460
Цвет корпуса Белый Белый
Вес загрузки, кг 6 6
Оборотов в минуту 1400 1400
Тип управления Электронный Электронный
LED-индикаторы Да Да
Цифровой дисплей Да Да
Количество программ 15 15
Класс энергопотребления A+++ A+++
Класс стирки A A
Класс отжима B B
Уровень шума, стирка / отжим, дБ 57 / 79 57 / 79
Потребляема энергия, кВт / вода, л
(хлопок 60ºС полная загрузка)
0.8 / 41.5 0.8 / 41.5
Потребляема энергия, кВт / вода, л
(хлопок 60ºC не полная загрузка)
0.8 / 31 0.8 / 31
Потребляема энергия, кВт / вода, л
(хлопок 40ºC не полная загрузка)
0.4 / 28.7 0.4 / 28.7
Размеры, ВхШхГ, мм 850x595x460 850x595x460
Вес нетто, кг 65 65
Мощность подключения, Вт 2200 2200
Напряжение, В / частота, Гц 220-240 / 50 220-240 / 50
Давление воды мин. / макс., МПа 0.8 / 0.05 0.8 / 0.05
Длина шнура электропитания, м 1.5 1.5
Длина заливного шланга, м 1.5 1.5
Длина сливного шланга, м 1.2 1.2
ВНИМАНИЕ! ДАННЫЕ ПО УРОВНЮ ШУМА, РАСХОДУ ЭЛЕКТРОЭНЕРГИИ, ПОТРЕ-
БЛЕНИЮ ВОДЫ МОГУТ ОТЛИЧАТЬСЯ ОТ РЕАЛЬНЫХ В ЗАВИСИМОСТИ ОТ РАС-
ПОЛОЖЕНИЯ ПРИБОРА, ИСПОЛЬЗУЕМОЙ ВОДЫ, КОЛИЧЕСТВА ЗАГРУЖЕННЫХ В
БАРАБАН ВЕЩЕЙ, КОЛИЧЕСТВА СРЕДСТВА ДЛЯ СТИРКИ И ДРУГИХ ФАКТОРОВ.

20
ИНФОРМАЦИЯ ОТ ПРОИЗВОДИТЕЛЯ
Изготовитель KÖRTING®
Тип продукции Стиральная машина
Тип изделия KWM
Модель
KWM 42 D 1460
KWM 42 ID 1460
Производитель (Фабрика)
IT WASH S.R.L. Zona Industriale ASI, Loc. Pantano,
80011 Acerra – Napoli, Италия
Поставщик на территории РФ,
уполномоченный на принятие претензий
ООО «Кёртинг РУС», 125252, г. Москва, ул.
Гризодубовой, д. 4, к. 3, этаж 1, пом. 1, комн. 2.
тел. +7 (495) 150-64-14
www.korting.ru
Импортер
ООО «Кёртинг РУС», 125252, г. Москва, ул.
Гризодубовой, д. 4, к. 3, этаж 1, пом. 1, комн. 2.
Гарантийный срок 2 года
Срок службы 10 лет
Серийный номер:
Серийный номер указан на стикере
стиральной машины.
Серийный номер состоит из:
С/Н: АААА-BB-CCCCC
(А) - год производства
(В) - неделя
(С) - производственный номер
UM KWM 42D/ID1460 Ver.2
Страница загружается ...
Страница загружается ...
Страница загружается ...
Страница загружается ...
-
 1
1
-
 2
2
-
 3
3
-
 4
4
-
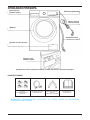 5
5
-
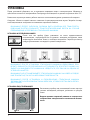 6
6
-
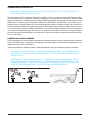 7
7
-
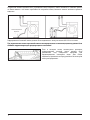 8
8
-
 9
9
-
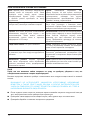 10
10
-
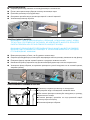 11
11
-
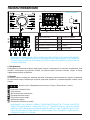 12
12
-
 13
13
-
 14
14
-
 15
15
-
 16
16
-
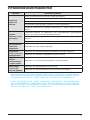 17
17
-
 18
18
-
 19
19
-
 20
20
-
 21
21
-
 22
22
-
 23
23
-
 24
24


Korting KWM 42ID1460 Руководство пользователя
- Категория
- Стиральные машины
- Тип
- Руководство пользователя
Задайте вопрос, и я найду ответ в документе
Поиск информации в документе стал проще с помощью ИИ
на других языках
- English: Korting KWM 42ID1460 User manual
Похожие модели бренда
-
Korting KWMT 1275 Руководство пользователя
-
-
-
-
-
-
-
-
-