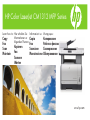
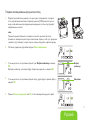
HP Color LaserJet CM1312 Multifunction Printer series Инструкция по началу работы
- Категория
- Многофункциональные устройства
- Тип
- Инструкция по началу работы

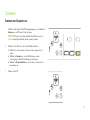
+LHUHUKDOWHQ6LH
,QIRUPDWLRQHQ]X
IROJHQGHQ7KHPHQ
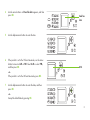
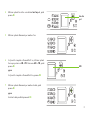
.RSLHUHQ
)D[
6FDQQHQ
:DUWHQ
,QIRUPD]LRQLVX
&RSLD
)D[
6FDQVLRQH
0DQXWHQ]LRQH
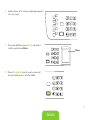
/HDUQKRZWR
&RS\
)D[
6FDQ
0DLQWDLQ
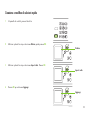
ƿDZǵǶǴǷǮǺǬǬ
ǁDzdzǬǴDzǥǣDZǬǨ
LJǣǤDzǶǣǵǸǣǮǵDzǰ
LjǮǣDZǬǴDzǥǣDZǬǨ
DžǤǵǯǷǪǬǥǣDZǬǨ
www.hp.com
HP Color LaserJet CM1312 MFP Series

Quick Reference Guide
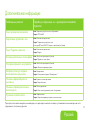
Table of Contents
Make my copy look better .....................................................................................................................................................1
Print on both sides (duplex) ....................................................................................................................................................2
Scan from the PC .................................................................................................................................................................4
Send my scan to a folder ......................................................................................................................................................5
Make my scan look better .....................................................................................................................................................6
Schedule a fax ....................................................................................................................................................................7
Create and edit speed dials ................................................................................................................................................10
Delete faxes from memory ...................................................................................................................................................12
Print individual photos from memory card .............................................................................................................................13
Adjust color settings ...........................................................................................................................................................15
Clean the paper path .........................................................................................................................................................17
www.hp.com

English
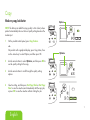
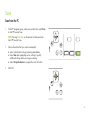
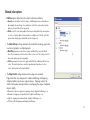
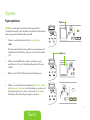
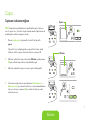
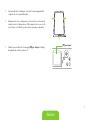
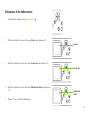
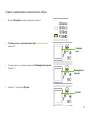
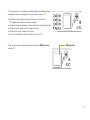
Copy
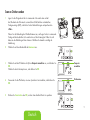
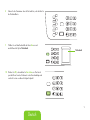
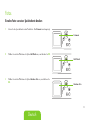
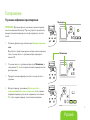
Make my copy look better
NOTE: The factory-set default for copy quality is Auto Select, where
product automatically chooses the best quality setting based on the
media input.
?
1
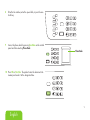
On the product control panel, press Copy Features.
-or-
On products with a graphical display, press Copy Menu, then
use the arrow keys to select Options, and then press OK.
2
Use the arrow buttons to select Optimize, and then press OK to
see the quality setting for the copy.
3
Use the arrow buttons to scroll through the quality setting
options.
4
Select a setting, and then press Start Copy Black or Start Copy
Color to save the selection and immediately start the copy job,
or press OK to save the selection without starting the job.
?
Optimize
Options
?

Print
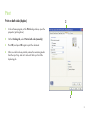
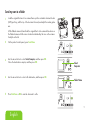
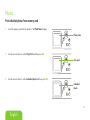
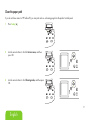
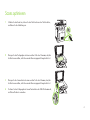
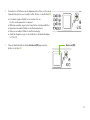
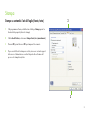
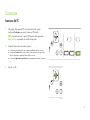
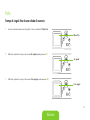
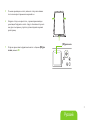
Print on both sides (duplex)
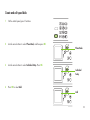
1
In the software program, at the Print dialog window, open the
properties (printing driver).
2
On the Finishing tab, select Print on both sides (manually).
3
Press OK, and press OK again to print the document.
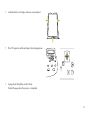
4
After one side has been printed, remove the remaining media
from the input tray, and set it aside until after you nish the
duplexing job.
2
3

English
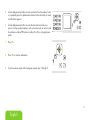
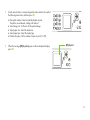
5
Without changing the orientation, remove the printed stack
from the output bin, and then straighten the stack.
6
Maintaining the same orientation, place the stack of media in
the input tray again. The printed side should be facing down
with the top edge feeding into the product rst.
7
When the message [OK] to print appears on the control-panel
display, press OK.
?
[OK] to print

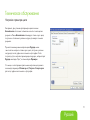
Scan
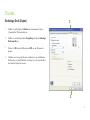
Scan from the PC
1
In the HP program group, select your product, then select Scan
to start HP LaserJet Scan.
NOTE: Pressing Start Scan on the product control panel also
starts HP LaserJet Scan.
?
2
Choose the action that you want to accomplish.
● Select a destination to begin scanning immediately.
● Select Scan after prompting me for settings to specify
additional settings before you begin scanning.
● Select Set up the device to program the Scan To button.
3
Click OK.
?

English
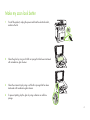
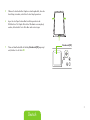
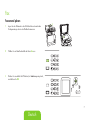
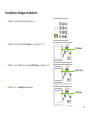
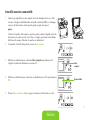
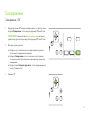
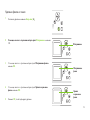
Send my scan to a folder
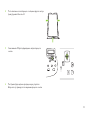
1
Load the originals that are to be scanned face-up in the automatic document feeder
(ADF) input tray, with the top of the document forward, and adjust the media guides.
-or-
Lift the atbed scanner lid and load the original that is to be scanned face-down on
the atbed scanner with the corner located as indicated by the icon on the scanner.
Gently close the lid.
2
On the product control panel, press Scan Menu.
?
3
Use the arrow buttons to select Select Computer, and then press OK.
Chose the destination computer, and then press OK.
?
4
Use the arrow buttons to select a le destination, and then press OK.
?
5
Press Start Scan or OK to scan the document to a le.
?
Select
Computer
Folder Name

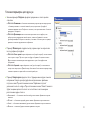
Make my scan look better
1
Turn off the product, unplug the power cord from the electrical socket,
and raise the lid.
2
Clean the glass by using a soft cloth or sponge that has been moistened
with nonabrasive glass cleaner.
3
Clean the scanner strip by using a soft cloth or sponge that has been
moistened with nonabrasive glass cleaner.
4
To prevent spotting, dry the glass by using a chamois or cellulose
sponge.

English
Fax
Schedule a fax
1
Load the document into the automatic document feeder
(ADF) input tray or onto the atbed scanner.
2
On the control panel, press Fax Menu.
.
.
3
Use the arrow buttons until Send appears, and then press
OK.
?
.
.

4
Use the arrow buttons until Send fax later appears, and then
press OK.
?
.
.
5
Use the alphanumeric buttons to enter the time.
?
.
.
6
If the product is set to the -hour time mode, use the arrow
buttons to move to A.M. or P.M. Select A.M. or select P.M.,
and then press OK.
-or-
If the product is set to the -hour time mode, press OK.
?
7
Use the alphanumeric buttons to enter the date, and then
press OK.
-or-
Accept the default date by pressing OK.
?
.
.
Send fax
later
A.M.

English
8
Enter the fax number, enter the speed dial, or press the one-
touch key.
.
.
9
Access the phone book by pressing Fax Menu on the control
panel and then selecting Phone Book.
.
.
10
Press OK or Start Fax. The product scans the document into
memory and sends it at the designated time.
.
.
Phone Book

0
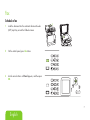
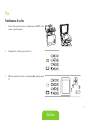
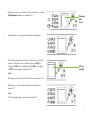
Create and edit speed dials
1
On the control panel, press Fax Menu.
.
.
2
Use the arrow buttons to select Phone Book, and then press OK.
?
3
Use the arrow buttons to select Individual Setup. Press OK.
?
4
Press OK to select Add.
?
Phone Book
Individual
Setup
Add

English
5
Use the alphanumeric buttons to enter a name for the fax number. To do
so, repeatedly press the alphanumeric button for the letter that you need
until the letter appears.
?
.
.
6
Use the alphanumeric buttons to enter the fax number. Include any
pauses or other needed numbers, such as an area code, an access code
for numbers outside a PBX system (usually a or 0), or a long distance
prex.
7
Press OK.
?
8
Press OK to save the information.
9
If you have more speed dials to program, repeat steps through .

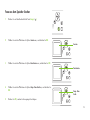
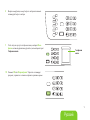
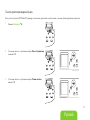
Delete faxes from memory
?
1
On the control panel press Setup ( ).
2
Use the arrow buttons to select Service, and then press OK.
?
3
Use the arrow buttons to select Fax Service, and then press OK.
?
4
Use the arrow buttons to select Clear saved faxes, and then press OK.
?
5
Press OK to conrm the deletion.
Service
Clear saved
faxes
Fax Service

English
Photos
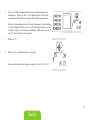
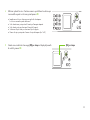
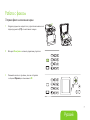
Print individual photos from memory card
1
Insert the memory card into the product. The Photo Menu displays.
?
2
Use the arrow buttons to select Easy Print and then press OK.
?
3
Use the arrow buttons to select Individual photo and then press OK.
?
Photo menu
Individual
photo
Easy print

4
Use the arrow buttons or numeric keypad to make selections for each of
the following menu items, and then press OK.
● Enter photo number: Select an individual photo to print.
The photos are numbered, starting with number .
● Select image size: Set the size for the printed image.
● Select paper size: Select the media size.
● Select paper type: Select the media type.
● Number of copies: Set the number of copies to print ( to ).
?
.
.
5
When the message [OK] to print appears on the control-panel display,
press OK.
?
[OK] to print

English
Maintain
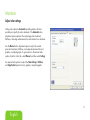
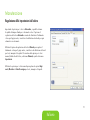
Adjust color settings
Setting color options to Automatic typically produces the best
possible print quality for color documents. The Automatic color
adjustment option optimizes the neutral-gray color treatment,
halftones, and edge enhancements for each element in a document.
Use the Manual color adjustment option to adjust the neutral-
gray color treatment, halftones, and edge enhancements for text,
graphics, and photographs. To gain access to the manual color
options, from the Color tab, select Manual, and then select Settings.
Use manual color options to adjust the Neutral Grays, Halftone,
and Edge Control options for text, graphics, and photographs.

Manual color options
●
Halftone options affect the color output resolution and clarity.
● Smooth provides better results for large, solid-lled print areas and enhances
photographs by smoothing color gradations. Select this option when uniform
and smooth area lls are the top priority.
● Detail is useful for text and graphics that require sharp distinctions among lines
or colors, or images that contain a pattern or a high level of detail. Select this
option when sharp edges and details are the top priority.
●
The Neutral Grays setting determines the method for creating gray colors
used in text, graphics, and photographs.
● Black Only generates neutral colors (grays and black) by using only black
toner. This guarantees neutral colors without a color cast. This setting is best for
documents and grayscale viewgraphs.
● 4-Color generates neutral colors (grays and black) by combining all four toner
colors. This method produces smoother gradients and transitions to other
colors, and it produces the darkest black.
●
The Edge Control setting determines how edges are rendered.
Edge control has two components: adaptive halftoning and trapping.
Adaptive halftoning increases edge sharpness. Trapping reduces the
effect of color-plane misregistration by overlapping the edges of adjacent
objects slightly.
● Maximum is the most aggressive trapping setting. Adaptive halftoning is on.
● Normal sets trapping at a medium level. Adaptive halftoning is on.
● Light sets trapping at a minimal level, Adaptive halftoning is on.
● Off turns off both trapping and adaptive halftoning.

English
Clean the paper path
If you do not have access to HP ToolboxFX, you can print and use a cleaning page from the product control panel.
1
Press Setup ( ).
2
Use the arrow buttons to nd the Service menu, and then
press OK.
?
3
Use the arrow buttons to nd Cleaning mode, and then press
OK.
?

4
Load plain letter or A paper when you are prompted.
5
Press OK again to conrm and begin the cleaning process.
?
6
A page feeds through the product slowly.
Discard the page when the process is completed.
Страница загружается ...
Страница загружается ...
Страница загружается ...
Страница загружается ...
Страница загружается ...
Страница загружается ...
Страница загружается ...
Страница загружается ...
Страница загружается ...
Страница загружается ...
Страница загружается ...
Страница загружается ...
Страница загружается ...
Страница загружается ...
Страница загружается ...
Страница загружается ...
Страница загружается ...
Страница загружается ...
Страница загружается ...
Страница загружается ...
Страница загружается ...
Страница загружается ...
Страница загружается ...
Страница загружается ...
Страница загружается ...
Страница загружается ...
Страница загружается ...
Страница загружается ...
Страница загружается ...
Страница загружается ...
Страница загружается ...
Страница загружается ...
Страница загружается ...
Страница загружается ...
Страница загружается ...
Страница загружается ...
Страница загружается ...
Страница загружается ...
Страница загружается ...
Страница загружается ...
Страница загружается ...
Страница загружается ...
Страница загружается ...
Страница загружается ...
Страница загружается ...
Страница загружается ...
Страница загружается ...
Страница загружается ...
Страница загружается ...
Страница загружается ...
Страница загружается ...
Страница загружается ...
Страница загружается ...
Страница загружается ...
Страница загружается ...
Страница загружается ...
Страница загружается ...
Страница загружается ...
Страница загружается ...
Страница загружается ...
Страница загружается ...
Страница загружается ...
Страница загружается ...
Страница загружается ...
-
 1
1
-
 2
2
-
 3
3
-
 4
4
-
 5
5
-
 6
6
-
 7
7
-
 8
8
-
 9
9
-
 10
10
-
 11
11
-
 12
12
-
 13
13
-
 14
14
-
 15
15
-
 16
16
-
 17
17
-
 18
18
-
 19
19
-
 20
20
-
 21
21
-
 22
22
-
 23
23
-
 24
24
-
 25
25
-
 26
26
-
 27
27
-
 28
28
-
 29
29
-
 30
30
-
 31
31
-
 32
32
-
 33
33
-
 34
34
-
 35
35
-
 36
36
-
 37
37
-
 38
38
-
 39
39
-
 40
40
-
 41
41
-
 42
42
-
 43
43
-
 44
44
-
 45
45
-
 46
46
-
 47
47
-
 48
48
-
 49
49
-
 50
50
-
 51
51
-
 52
52
-
 53
53
-
 54
54
-
 55
55
-
 56
56
-
 57
57
-
 58
58
-
 59
59
-
 60
60
-
 61
61
-
 62
62
-
 63
63
-
 64
64
-
 65
65
-
 66
66
-
 67
67
-
 68
68
-
 69
69
-
 70
70
-
 71
71
-
 72
72
-
 73
73
-
 74
74
-
 75
75
-
 76
76
-
 77
77
-
 78
78
-
 79
79
-
 80
80
-
 81
81
-
 82
82
-
 83
83
-
 84
84


HP Color LaserJet CM1312 Multifunction Printer series Инструкция по началу работы
- Категория
- Многофункциональные устройства
- Тип
- Инструкция по началу работы
Задайте вопрос, и я найду ответ в документе
Поиск информации в документе стал проще с помощью ИИ
на других языках
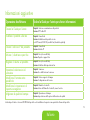
Похожие модели бренда
Модели других брендов
-
AgfaPhoto AS 1150 Руководство пользователя
-
AGFA AS1111 Руководство пользователя
-
Eneo DLR5-16 Quick Installation Manual
-
Olympus C520 Инструкция по применению
-
Olympus X-865 Руководство пользователя
-
-
Olympus X-830 Руководство пользователя
-
Olympus FE-250 Руководство пользователя
-
Olympus X-835 Спецификация
-
Xoro HSD 202P Руководство пользователя