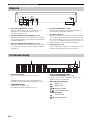
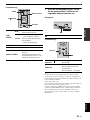
Yamaha CD-N301 Silver Руководство пользователя
- Категория
- Плееры CD
- Тип
- Руководство пользователя

Printed in Malaysia ZN17930© 2014 Yamaha Corporation
G
Network CD Player
Lecteur CD Réseau
OWNER’S MANUAL
MODE D’EMPLOI
BEDIENUNGSANLEITUNG
BRUKSANVISNING
MANUALE DI ISTRUZIONI
MANUAL DE INSTRUCCIONES
GEBRNUIKSAANWIJZIG
ИНСТРУКЦИЯ ПО ЭКСПЛУАТАЦИИ
CD-N301_OM_G_cv1_4.fm Page 1 Monday, June 23, 2014 7:49 PM
Страница загружается ...

1 En
English
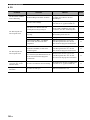
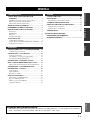
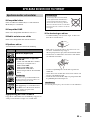
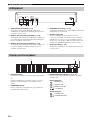
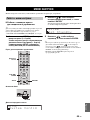
PREPARATION OPERATIONS OTHERS
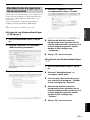
WHAT YOU CAN DO WITH THIS UNIT ................. 2
Sources that can be played back on this unit ..................... 2
Devices that can control this unit....................................... 3
Operations from your mobile device ................................. 3
SUPPLIED ACCESSORIES ......................................... 4
REMOTE CONTROL PREPARATION..................... 4
CONTROLS AND FUNCTIONS ................................. 5
Front panel ......................................................................... 5
Remote control................................................................... 6
Rear panel .......................................................................... 8
Front panel display............................................................. 8
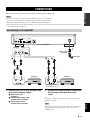
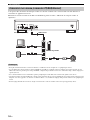
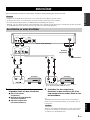
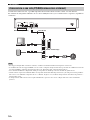
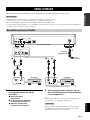
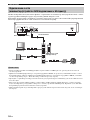
CONNECTIONS ............................................................ 9
Connecting to an amplifier................................................. 9
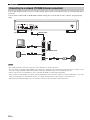
Connecting to a network
(PC/NAS/Internet connection)..................................... 10
Turning on this unit.......................................................... 11
SETUP OF YOUR NETWORK DEVICES............... 12
Sharing music files stored on your PC............................. 13
PLAYBACK OF CDS .................................................. 14
Playing back a CD ........................................................... 14
Using A-B repeat playback.............................................. 16
Using program playback mode ........................................ 16
PLAYBACK OF SPOTIFY SERVICE ...................... 17
PLAYBACK OF MUSIC FILES ON YOUR
PC/NAS...................................................................... 18
Operations from the main unit or remote control ............ 18
PLAYBACK OF INTERNET RADIO....................... 20
PLAYBACK OF AirPlay............................................. 22
Playing iPod ..................................................................... 22
Playing iTunes ................................................................. 22
Clearing AirPlay .............................................................. 22
SETUP MENU .............................................................. 23
Setup menu operations..................................................... 23
Setup menu items............................................................. 24
Advanced setup menu ...................................................... 24
Updating the firmware ..................................................... 25
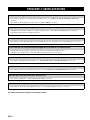
FREQUENTLY ASKED QUESTIONS......................26
TROUBLESHOOTING ...............................................27
Front panel display messages........................................... 31
ADDITIONAL INFORMATION................................32
PLAYABLE DISCS AND FILE FORMATS .............33
Playable media and devices ............................................. 33
Playable discs and file formats ........................................ 34
SPECIFICATIONS.......................................................35
(at the end of this manual)
Information about third party software
licenses ..........................................................i
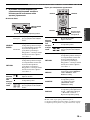
CONTENTS
PREPARATION
OPERATIONS
OTHERS
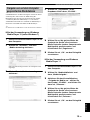
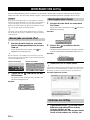
About this manual
• Notes contain important information about safety and operating instructions. y indicates a tip for your operation.
• “iPod” described in this manual may also refer to “iPhone” or “iPad”.
Страница загружается ...
Страница загружается ...

4 En
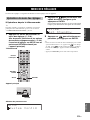
PREPARATION
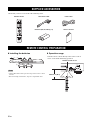
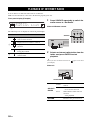
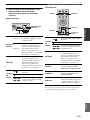
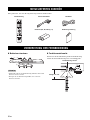
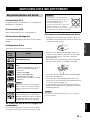
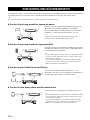
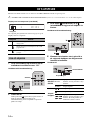
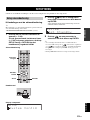
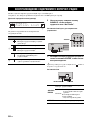
Check that you have received all of the following items.
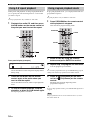
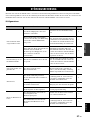
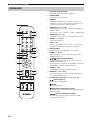
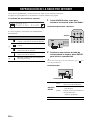
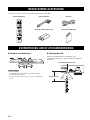
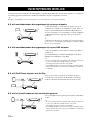
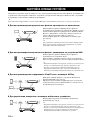
❚ Installing the batteries
• Change all batteries if the operation range of the remote control
narrows.
• Before inserting new batteries, wipe the compartment clean.
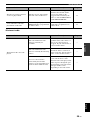
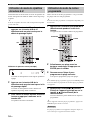
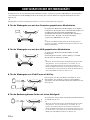
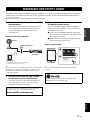
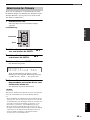
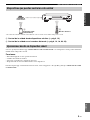
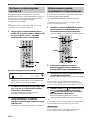
❚ Operation range
Aim the remote control directly at the remote control
sensor on the main unit during operation.
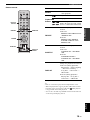
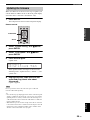
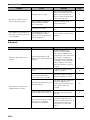
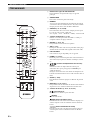
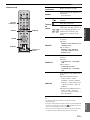
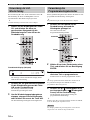
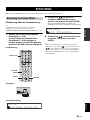
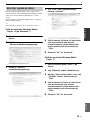
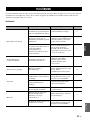
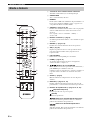
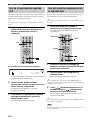
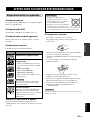
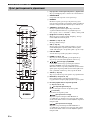
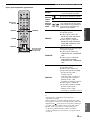
SUPPLIED ACCESSORIES
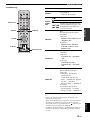
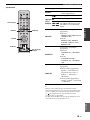
REMOTE CONTROL PREPARATION
AMP
DISPLAY
SETUP
POP-UP MENU
REPEAT
4
123
56
7
0
89
A/B
SHUFFLE
PROGRAM
SOURCE
OPEN/CLOSE DIMMER
PURE DIRECT
CLEAR
HOME
NOW PLAYING
OPTION
RETURN
ENTER
INPUT VOLUME
MUTE
Remote control RCA stereo cable Power cable
Batteries (AA, R6, UM-3) (× 2) Owner’s manual
Notes
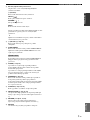
2
13
SELECT
PUSH
ENTER
RETURN
30 30
AMP
DISPLAY
SETUP
POP-UP MENU
REPEAT
4
123
56
7
0
89
A/B
SHUFFLE
PROGRAM
SOURCE
OPEN/CLOSE DIMMER
PURE DIRECT
CLEAR
HOME
NOW PLAYING
OPTION
RETURN
ENTER
INPUT VOLUME
MUTE
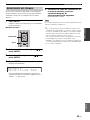
Remote control sensor
Within 6 m (20 ft)
Страница загружается ...
Страница загружается ...
Страница загружается ...
Страница загружается ...
Страница загружается ...
Страница загружается ...
Страница загружается ...
Страница загружается ...
Страница загружается ...

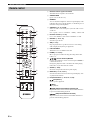
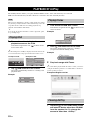
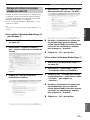
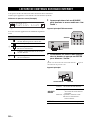
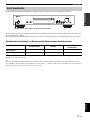
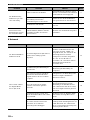
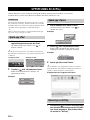
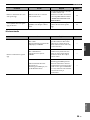
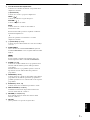
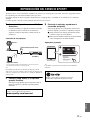
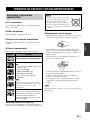
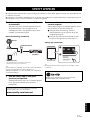
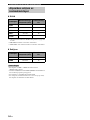
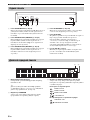
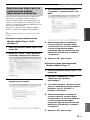
14 En
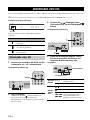
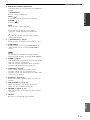
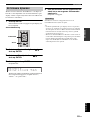
This unit allows playback of audio CDs and data CDs in which the MP3/WMA files are recorded.
y
For details on playable CDs, see “PLAYABLE DISCS AND FILE FORMATS” (☞ P.33).
Front panel display (example)
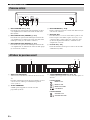
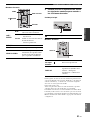
The following icons are shown on the front panel display.
1 Press SOURCE repeatedly to switch the
audio source to “CD”.
Main unit/Remote control
2 Set the CD.
Press the (open/close) button on this unit, or press
the OPEN/CLOSE button on the remote control to
open the disc tray, and load a disc.
3 Press / (main unit) or (remote
control) to start playback.
Main unit/Remote control
4 When playback starts, use the following
controls to operate desired functions.
Main unit
PLAYBACK OF CDS
Icon Content
Displayed while a CD is being played back.
Displayed while a CD is paused.
Displayed when a CD is stopped.
Playing back a CD
¡¡¡¡ 1¡¡¡ 0:01
CD
Icon
PURE DIRECTSOURCE
4
123
56
SOURCE
OPEN/CLOSE DIMMER
PURE DIRECT
SOURCE
SOURCE
SELECT/
ENTER
Rotate
Skips to the next track, or back to
the previous track.
Press Plays/Pauses.
Playback
buttons
/
Plays/Pauses.
Stops playback.
/
/
Press to skip to the next track, or
back to the previous track, or
hold down to search backward/
forward.
SELECT
PUSH
ENTER
RETURN
DISPLAY
SETUP
OPTION
RETURN
ENTER
SELECT
PUSH
ENTER
RETURN
SELECT/ENTER
Playback buttons
Страница загружается ...
Страница загружается ...

17 En
English
OPERATIONS
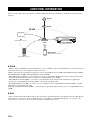
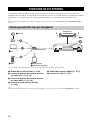
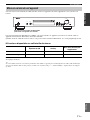
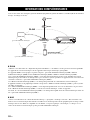
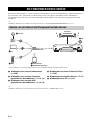
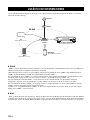
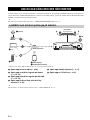
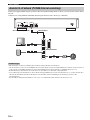
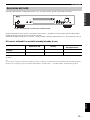
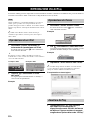
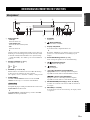
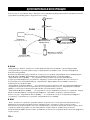
Spotify gives you instant access to millions of songs on your mobile devices. Just hit play to stream anything you like.
The Spotify Connect feature lets you choose music on your Spotify app and listen on your Yamaha home entertainment
system.
See Spotify.com for service area information.
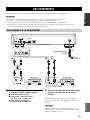
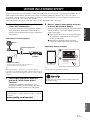
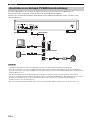
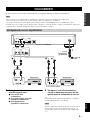
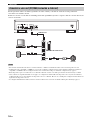
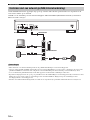
1 Connect your device to your home Wi-Fi
network.
Connect the unit and your mobile device to your
home Wi-Fi network as shown in the illustration
below. All devices need to be on the same network.
Network connection (example)
* iOS/Android™ apps are available as of July 2014.
For more details, visit Spotify.com
y
To use this function, this unit and your mobile device must be
connected to the Internet. For detail on connections and network
settings, refer to “Owner’s Manual”.
2 Get Spotify app and premium free trial.
Download the Spotify app for your mobile device
from your app store, and take the Premium free trial.
3 Turn on the unit and playback of Spotify
contents.
Start Spotify app on your mobile device, log in to
Spotify and start playing a track.
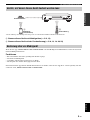
1 Tap on the Now Playing bar to reveal extra
controls and tap the Speaker icon.
2 Select the unit (network name of the unit) as the
audio output device.
Spotify app (example)
y
The playback screen is displayed on the front display.
PLAYBACK OF SPOTIFY SERVICE
The Spotify app and Premium account are required. Visit
spotify.com for details.
www.spotify.com/connect
Internet
Broadband router
This unit (CD-N301)
Mobile device*
Modem
Spotify and Spotify logo are registered trademarks of
the Spotify Group.
1
2
Страница загружается ...
Страница загружается ...
Страница загружается ...

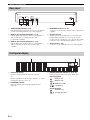
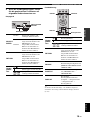
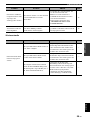
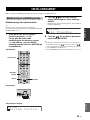
PLAYBACK OF INTERNET RADIO
21 En
English
OPERATIONS
Remote control
3 When playback starts, use the following
controls to operate desired functions.
Main unit
Remote control
y
You can register your favorite Internet radio stations to the
“Bookmarks” folder by selecting “Net Radio” as the source on
the unit and then accessing the following website with the web
browser on your PC.
http://yradio.vtuner.com/
Before registering an Internet radio station, play any Internet
radio station with this unit.
To use this feature, you need the vTuner ID of the unit and your
e-mail address to create your personal account.You can check the
vTuner ID (MAC address of the unit) in “Network Info”
(☞ P.24) in the Setup menu.
//
ENTER
/
Selects a folder or Internet radio
station.
ENTER
When a folder is selected:
moves down one level.
When a Internet radio station is
selected:
starts playback.
RETURN Returns to the previous level.
HOME Moves to the top level.
NOW PLAYING
Stops browsing and displays
playback information for the
Internet radio station currently
being played.
DISPLAY
SETUP
POP-UP MENU
REPEAT
A/B
SHUFFLE
HOME
NOW PLAYING
OPTION
RETURN
ENTER
RETURN
//ENTER
HOME
NOW PLAYING
Stops playback.
Playback
buttons
Stops playback.
DISPLAY
Changes the playback
information (Station name →
Playing time → Song title).
SELECT
PUSH
ENTER
RETURN
DISPLAY
SETUP
OPTION
RETURN
ENTER
DISPLAY
Страница загружается ...

23 En
English
OPERATIONS
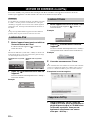
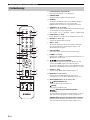
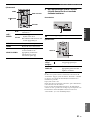
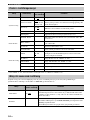
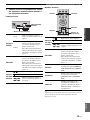
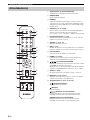
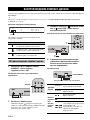
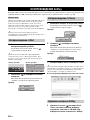
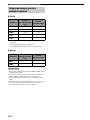
You can configure the various settings of this unit using the setup menu.
❚ Operations from the remote control
y
For details on the controls on the main unit or remote control, see
“CONTROLS AND FUNCTIONS” (☞ P.5).
1 Press SETUP to enter the setup menu
(☞ P.24).
To make the advanced setup menu
items (☞ P.24) selectable, press SETUP
while holding down RETURN (on the
main unit).
Remote control
Main unit
Front panel display
2 Press / to select a menu item to
configure, then press ENTER.
For some menu items, repeat step 2 to select a
submenu item.
3 Press / to select a parameter, then
press ENTER.
y
• You need to enter a numerical address for some menu items. In
this case, press / to move the target and / to select a
number, or use the numeric buttons. Then press ENTER to
confirm it.
• Press the RETURN button to return to the previous level.
SETUP MENU
Setup menu operations
DISPLAY
SETUP
POP-UP MENU
REPEAT
4
123
56
7
0
89
A/B
SHUFFLE
PROGRAM
SOURCE
PURE DIRECT
CLEAR
HOME
NOW PLAYING
OPTION
RETURN
ENTER
RETURN
Numeric
buttons
////
ENTER
SETUP
SELECT
PUSH
ENTER
RETURN
RETURN
¡System¡Config
SETUP
¡Net¡Standby
System
Страница загружается ...
Страница загружается ...
Страница загружается ...
Страница загружается ...
Страница загружается ...
Страница загружается ...
Страница загружается ...

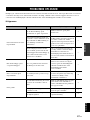
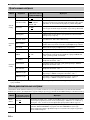
TROUBLESHOOTING
31 En
English
OTHERS
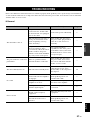
Front panel display messages
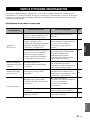
Message Status
Access error There is a problem with the signal path from the network to the unit.
Connected Connected to the network.
Initializing Initializing the network settings.
List updated The content list of the media server has been updated.
LOADING The specified content is being loaded.
No content This unit cannot find any content.
NO DISC A CD is not inserted in the disc tray.
Not available The operation you have performed is not available.
Not Connected Cannot connect to the network.
OPEN The CD tray is open.
Program Clear The programmed track has been cleared.
Searching… This unit is searching for content.
Unknown DISC An unsupported disc has been inserted.
Unsupported Cannot play the specified contents.
Страница загружается ...
Страница загружается ...

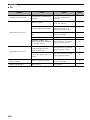
PLAYABLE DISCS AND FILE FORMATS
34 En
❚ DLNA
*1 Only Linear PCM format files are playable.
*2 MP3 PRO files are not supported.
*3 WMA PRO and Lossless files are not supported.
❚ Discs
• Playback for MP3 or WMA files starts in alphanumeric order.
• Copyright-protected WMA (DRM) files cannot be played back
by this unit.
• The disc must be ISO 9660 compatible.
• Elapsed time may not be displayed correctly while playing back
variable bitrate contents.
Playable discs and file formats
Formats
Sampling
frequency (kHz)
Quontization bit
WAV
*1
8 to 192 16/24
MP3
*2
8 to 48 16
WMA
*3
8 to 48 16
AAC
8 to 48 16
FLAC
8 to 192 16/24
Formats
Sampling
frequency (kHz)
Quontization bit
MP3
8 to 48 16
WMA
16 to 48 16
Notes
Страница загружается ...
Страница загружается ...

1 Fr
Français
PRÉPARATION OPÉRATIONS AUTRES
FONCTIONS DE CET APPAREIL ............................. 2
Sources pouvant êtres lues par cet appareil ....................... 2
Périphériques pouvant commander cet appareil ................ 3
Opérations depuis votre périphérique mobile.................... 3
ACCESSOIRES FOURNIS........................................... 4
PRÉPARATION DE LA TÉLÉCOMMANDE ........... 4
COMMANDES ET FONCTIONS................................ 5
Panneau avant .................................................................... 5
Télécommande................................................................... 6
Panneau arrière................................................................... 8
Afficheur du panneau avant ............................................... 8
RACCORDEMENTS..................................................... 9
Raccordement à un amplificateur ...................................... 9
Connexion à un réseau (connexion PC/NAS/Internet) .... 10
Mise en service de cet appareil ........................................ 11
CONFIGURATION DE VOS PÉRIPHÉRIQUES
RÉSEAU.................................................................... 12
Partage de fichiers de musique stockés sur votre PC....... 13
LECTURE DE CD ....................................................... 14
Lecture d’un CD .............................................................. 14
Utilisation du mode de répétition de lecture A-B ............ 16
Utilisation du mode de lecture programmée.................... 16
LECTURE VIA LE SERVICE SPOTIFY ................. 17
LECTURE DE FICHIERS DE MUSIQUE SUR
VOTRE PC/NAS ...................................................... 18
Opérations depuis l’appareil principal ou la
télécommande .............................................................. 18
LECTURE DE CONTENUS SUR RADIO
INTERNET ............................................................... 20
LECTURE DE CONTENUS via AirPlay................... 22
Lecture des iPod............................................................... 22
Lecture d’iTunes .............................................................. 22
Supprimer AirPlay ........................................................... 22
MENU DES RÉGLAGES............................................ 23
Opérations du menu des réglages .................................... 23
Options du menu des réglages ......................................... 24
Menu des réglages avancés.............................................. 24
Mise à jour du microprogramme...................................... 25
FOIRE AUX QUESTIONS ..........................................26
GUIDE DE DÉPANNAGE...........................................27
Messages à l’afficheur du panneau avant ........................ 31
INFORMATIONS COMPLÉMENTAIRES..............32
FORMATS DE DISQUE ET FICHIER
LISIBLES...................................................................33
Supports et appareils lisibles............................................ 33
Formats de disque et fichier lisibles................................. 34
CARACTÉRISTIQUES TECHNIQUES....................35
(à la fin de ce manuel)
Informations à propos des licences de
logiciels tiers .................................................i
TABLE DES MATIERES
PRÉPARATION
OPÉRATIONS
AUTRES
Quelques mots sur ce mode d’emploi
• Les remarques contiennent des informations importantes au sujet de la sécurité et de l’utilisation de l’appareil. y
indique une astuce d’utilisation.
• L’« iPod », décrit dans ce manuel peut également faire référence à un « iPhone » ou à un « iPad ».
Страница загружается ...
Страница загружается ...

4 Fr
PRÉPARATION
Veuillez vous assurer que vous êtes bien en possession des éléments suivants.
❚ Mise en place des piles
• Changez chacune des piles lorsque la portée de la
télécommande commence à se réduire.
• Avant de mettre la nouvelle pile en place, essuyez
soigneusement le compartiment.
❚ Portée de la télécommande
Pointez la télécommande directement sur le capteur de
télécommande de l’appareil principal pendant le
fonctionnement.
ACCESSOIRES FOURNIS
PRÉPARATION DE LA TÉLÉCOMMANDE
AMP
DISPLAY
SETUP
POP-UP MENU
REPEAT
4
123
56
7
0
89
A/B
SHUFFLE
PROGRAM
SOURCE
OPEN/CLOSE DIMMER
PURE DIRECT
CLEAR
HOME
NOW PLAYING
OPTION
RETURN
ENTER
INPUT VOLUME
MUTE
Télécommande Câble stéréo RCA Câble d’alimentation
Piles (AA, R6, UM-3) (× 2) Manuel d’utilisation
Remarques
2
13
SELECT
PUSH
ENTER
RETURN
30 30
AMP
DISPLAY
SETUP
POP-UP MENU
REPEAT
4
123
56
7
0
89
A/B
SHUFFLE
PROGRAM
SOURCE
OPEN/CLOSE DIMMER
PURE DIRECT
CLEAR
HOME
NOW PLAYING
OPTION
RETURN
ENTER
INPUT VOLUME
MUTE
Capteur de télécommande
Moins de 6 m
Страница загружается ...
Страница загружается ...
Страница загружается ...
Страница загружается ...
Страница загружается ...
Страница загружается ...
Страница загружается ...
Страница загружается ...
Страница загружается ...
Страница загружается ...
Страница загружается ...
Страница загружается ...
Страница загружается ...
Страница загружается ...
Страница загружается ...

20 Fr
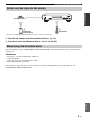
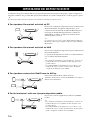
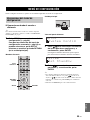
Vous pouvez écouter les stations de radio du monde entier via Internet.
Vérifiez que l’appareil est correctement connecté à Internet (☞ P.10).
Afficheur du panneau avant (Exemple)
Les icônes suivantes apparaissent sur l’afficheur du panneau
avant.
1 Appuyez plusieurs fois sur SOURCE
pour permuter la source audio sur « Net
Radio ».
Appareil principal/Télécommande
2 Sélectionnez une station radio Internet
dans le dossier et appuyez sur ENTER
pour démarrer l’écoute.
y
Quand vous sélectionnez une station radio Internet, apparaît
sur l’afficheur du panneau avant.
Appareil principal
LECTURE DE CONTENUS SUR RADIO INTERNET
Icône Contenu
1
S’affiche quand un dossier ou une station
de radio Internet peut être sélectionné.
S’affiche quand un dossier est sélectionné.
S’affiche quand une station de radio
Internet est sélectionnée.
S’affiche pendant la lecture d’une station
de radio Internet.
2
S’affiche quand le dossier actuel contient
un niveau inférieur.
¡¡Station¡List
NetRadio
12
SELECT/
ENTER
Tourner
Pour sélectionner un dossier ou
une station de radio Internet.
Enfoncer
Quand un dossier est sélectionné :
descend d’un niveau dans la
hiérarchie.
Quand une station de radio
Internet est sélectionnée :
lance la lecture.
RETURN
Pour retourner au niveau précédent.
PURE DIRECTSOURCE
4
123
56
SOURCE
OPEN/CLOSE DIMMER
PURE DIRECT
SOURCE
SOURCE
SELECT
PUSH
ENTER
RETURN
RETURNSELECT/ENTER
Страница загружается ...
Страница загружается ...
Страница загружается ...
Страница загружается ...
Страница загружается ...
Страница загружается ...
Страница загружается ...
Страница загружается ...
Страница загружается ...
Страница загружается ...
Страница загружается ...
Страница загружается ...
Страница загружается ...

FORMATS DE DISQUE ET FICHIER LISIBLES
34 Fr
❚ DLNA
*1 Seuls les fichiers au format PCM sont lisibles.
*2 Les fichiers MP3 PRO ne sont pas pris en charge.
*3 Les fichiers WMA PRO et Lossless ne sont pas pris en
charge.
❚ Disques
• La lecture des fichiers MP3 ou WMA commence par ordre
alphanumérique.
• Cet appareil ne peut pas lire les fichiers WMA (DRM) protégés
par les droits d’auteur.
• Le disque doit être compatible ISO 9660.
• Il se peut que le temps écoulé ne s’affiche pas correctement lors
de la lecture de contenus de débits binaires variables.
Formats de disque et fichier
lisibles
Formats
Réponse en
fréquence (kHz)
Quantification
en bits
WAV
*1
8 à 192 16/24
MP3
*2
8 à 48 16
WMA
*3
8 à 48 16
AAC
8 à 48 16
FLAC
8 à 192 16/24
Formats
Réponse en
fréquence (kHz)
Quantification
en bits
MP3
8 à 48 16
WMA
16 à 48 16
Remarques

35 Fr
Français
AUTRES
ENTRÉE/SORTIE
• NETWORK
Connexion Ethernet .................................10Base-T/100Base-TX
Radio Internet ...................... Service vTuner pour pris en charge
Fonction PC client ...............DLNA Version1.5 (fonction DMR)
AirPlay................................................. Compatible avec AirPlay
• ANALOG OUT ...................................................... 2 canaux (L/R)
• DIGITAL OUT
Optique 1
Coaxial 1
•DC OUT 1
SECTION AUDIO
• Niveau de sortie
1 kHz, 0 dB, fs 44,1 kHz ............................................2,0 ± 0,3 V
• Rapport signal/bruit (réseau IHF-A)
1 kHz, 0 dB, fs 44,1 kHz ................................. 110 dB minimum
• Dynamique
1 kHz, 0 dB, fs 44,1 kHz ................................. 100 dB minimum
• Distorsion harmonique
1 kHz, 0 dB, fs 44,1 kHz ............................... 0,003 % maximum
• Réponse en fréquence
CD..............................................................2 Hz à 20 kHz, –3 dB
NETWORK
fs 48 kHz....................................................2 Hz à 24 kHz, –3 dB
fs 96 kHz....................................................2 Hz à 48 kHz, –3 dB
fs 192 kHz..................................................2 Hz à 96 kHz, –3 dB
GÉNÉRALITÉS
• Alimentation ........................................................230 V CA, 50 Hz
• Consommation........................................................................10 W
• Consommation en veille
Veille du réseau activée......................................................2,5 W
Veille du réseau désactivée.................................................0,4 W
• Dimensions (l h p)..................................... 435 86 260 mm
• Poids ......................................................................................3,2 kg
* Notez que toutes les caractéristiques techniques sont susceptibles
d’être modifiées sans avis préalable.
CARACTÉRISTIQUES TECHNIQUES
AirPlay fonctionne avec l’iPhone, l’iPad et l’iPod
touch avec iOS 4.3.3 ou une version ultérieure, Mac
avec OS X Mountain Lion, et Mac et PC avec
iTunes 10.2.2 ou une version ultérieure.
AirPlay, iPad, iPhone, iPod touch, iTunes et Retina
sont des marques commerciales d’Apple Inc., déposées
aux États-Unis et dans d’autres pays.
iPad Air et iPad mini sont des marques commerciales
d’Apple Inc.
Windows™
Windows est une marque déposée de Microsoft
Corporation aux États-Unis et dans les autres pays.
Internet Explorer, Windows Media Audio et Windows
Media Player sont des marques commerciales ou des
marques déposées de Microsoft Corporation aux États-
Unis et/ou dans d’autres pays.
Android™
Android et Google Play sont des marques de commerce
de Google, Inc.
Cet appareil prend en charge les connexions réseau.
DLNA™ et DLNA CERTIFIED™ sont des marques
commerciales ou des marques déposées de Digital
Living Network Alliance. Tous droits réservés. Toute
utilisation non autorisée est strictement interdite.
Technologie d’encodage audio MPEG Layer-3 sous
licence de Fraunhofer IIS et Thomson.
Страница загружается ...
Страница загружается ...
Страница загружается ...
Страница загружается ...

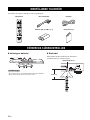
4 De
VORBEREITUNG
Bitte prüfen Sie, dass Sie alle folgenden Gegenstände erhalten haben:
❚ Batterien einsetzen
• Falls die Reichweite der Fernbedienung abnimmt, müssen alle
Batterien erneuert werden.
• Reinigen Sie das Batteriefach gründlich, bevor Sie neue
Batterien einsetzen.
❚ Funktionsreichweite
Richten Sie die Fernbedienung während der Bedienung
direkt auf den Fernbedienungssensor des Hauptgeräts.
MITGELIEFERTES ZUBEHÖR
VORBEREITUNG DER FERNBEDIENUNG
AMP
DISPLAY
SETUP
POP-UP MENU
REPEAT
4
123
56
7
0
89
A/B
SHUFFLE
PROGRAM
SOURCE
OPEN/CLOSE DIMMER
PURE DIRECT
CLEAR
HOME
NOW PLAYING
OPTION
RETURN
ENTER
INPUT VOLUME
MUTE
Fernbedienung Stereo-Cinchkabel Netzkabel
Batterien (AA, R6, UM-3) (× 2) Bedienungsanleitung
Hinweise
2
13
SELECT
PUSH
ENTER
RETURN
30 30
AMP
DISPLAY
SETUP
POP-UP MENU
REPEAT
4
123
56
7
0
89
A/B
SHUFFLE
PROGRAM
SOURCE
OPEN/CLOSE DIMMER
PURE DIRECT
CLEAR
HOME
NOW PLAYING
OPTION
RETURN
ENTER
INPUT VOLUME
MUTE
Fernbedienungssensor
Weniger als 6 m
Страница загружается ...
Страница загружается ...
Страница загружается ...
Страница загружается ...
Страница загружается ...
Страница загружается ...
Страница загружается ...
Страница загружается ...
Страница загружается ...
Страница загружается ...
Страница загружается ...
Страница загружается ...
Страница загружается ...
Страница загружается ...
Страница загружается ...
Страница загружается ...
Страница загружается ...
Страница загружается ...
Страница загружается ...
Страница загружается ...
Страница загружается ...
Страница загружается ...
Страница загружается ...
Страница загружается ...
Страница загружается ...
Страница загружается ...
Страница загружается ...
Страница загружается ...
Страница загружается ...

ABSPIELBARE DISCS UND DATEIFORMATE
34 De
❚ DLNA
*1 Nur Linear PCM-Dateiformate können wiedergegeben
werden.
*2 MP3 PRO-Dateien werden nicht unterstützt.
*3 WMA PRO- und Lossless-Dateien werden nicht unterstützt.
❚ Discs
• Die Wiedergabe von MP3- oder WMA-Dateien startet in
alphanumerischer Reihenfolge.
• Urheberrechtlich geschützte WMA (DRM)-Dateien können mit
diesem Gerät nicht wiedergegeben werden.
• Die Disc muss mit ISO 9660 kompatibel sein.
• Die verstrichene Spieldauer wird möglicherweise nicht korrekt
angezeigt, wenn Inhalte mit variablen Bitraten wiedergegeben
werden.
Abspielbare Discs und
Dateiformate
Formate
Abtastfrequenz
(kHz)
Quantisierungsbit
WAV
*1
8 bis 192 16/24
MP3
*2
8 bis 48 16
WMA
*3
8 bis 48 16
AAC
8 bis 48 16
FLAC
8 bis 192 16/24
Formate
Abtastfrequenz
(kHz)
Quantisierungsbit
MP3
8 bis 48 16
WMA
16 bis 48 16
Hinweise
Страница загружается ...
Страница загружается ...

1 Sv
Svenska
FÖRBEREDELSE ÅTGÄRDER ÖVRIGA
VAD DU KAN GÖRA MED DEN HÄR
ENHETEN................................................................... 2
Ljudkällor som inte kan spelas upp på enheten. ................ 2
Enheter som kan styra den här enheten.............................. 3
Manövrering från din mobila enhet ................................... 3
MEDFÖLJANDE TILLBEHÖR .................................. 4
FÖRBEREDA FJÄRRKONTROLLEN ...................... 4
KONTROLLER OCH FUNKTIONER ....................... 5
Frontpanel .......................................................................... 5
Fjärrkontroll ....................................................................... 6
Bakpanel ............................................................................ 8
Frontpanelens display ........................................................ 8
ANSLUTNINGAR.......................................................... 9
Ansluta till en förstärkare................................................... 9
Ansluta till ett nätverk (PC/NAS/Internet-anslutning) .... 10
Påslagning av receivern ................................................... 11
KONFIGURERA DINA NÄTVERKSENHETER.... 12
Dela filer lagrade på datorn.............................................. 13
UPPSPELNING AV CD-SKIVOR ............................. 14
Spela upp en CD-skiva..................................................... 14
Användning av A-B repeterad uppspelning..................... 16
Använda programuppspelningsläge................................. 16
UPPSPELNING AV SPOTIFY TJÄNST .................. 17
SPELA UPP MUSIKFILER PÅ DIN PC/NAS.......... 18
Manövrering från huvudenheten eller fjärrkontrollen ..... 18
UPPSPELNING AV INTERNET RADIO................. 20
UPPSPELNING AV AirPlay....................................... 22
Spela upp iPod ................................................................. 22
Spela upp iTunes.............................................................. 22
Rensning av AirPlay ........................................................ 22
INSTÄLLNINGSMENY.............................................. 23
Manövrering av inställningsmeny.................................... 23
Poster i inställningsmenyn ............................................... 24
Meny för avancerad inställning ....................................... 24
Uppdatera firmware ......................................................... 25
VANLIGA FRÅGOR....................................................26
FELSÖKNING ..............................................................27
Meddelanden på frontpanelens display............................ 31
YTTERLIGARE INFORMATION ............................32
SPELBARA SKIVOR OCH FILFORMAT ...............33
Spelbara medier och enheter............................................ 33
Spelbara skivor och filformat........................................... 34
TEKNISK DATA ..........................................................35
(i slutet av denna manual)
Information om tredjeparts
programvarulicens i ......................................i
INNEHÅLL
FÖRBEREDELSE
ÅTGÄRDER
ÖVRIGA
Angående denna bruksanvisning
• Anteckningar innehåller viktig information om säkerhet och driftinstruktioner. y visar på tips för användningen.
• ”iPod” som beskrivs i denna manual kan också hänvisas till ”iPhone” eller ”iPad”.
Страница загружается ...
Страница загружается ...

4 Sv
FÖRBEREDELSE
Kontrollera att följande delar finns med i förpackningen.
❚ Isättning av batterier
• Byt ut alla batterier om fjärrkontrollens räckvidd har minskat.
• Rengör batterifacket innan nya batterier sätts i.
❚ Räckvidd
Rikta fjärrkontrollen direkt mot huvudenhetens
fjärrkontrollsensor vid manövrering.
MEDFÖLJANDE TILLBEHÖR
FÖRBEREDA FJÄRRKONTROLLEN
AMP
DISPLAY
SETUP
POP-UP MENU
REPEAT
4
123
56
7
0
89
A/B
SHUFFLE
PROGRAM
SOURCE
OPEN/CLOSE DIMMER
PURE DIRECT
CLEAR
HOME
NOW PLAYING
OPTION
RETURN
ENTER
INPUT VOLUME
MUTE
Fjärrkontroll RCA-stereokabel Nätkabel
Batterier (AA, R6, UM-3) (× 2) Bruksanvisning
Anmärkningar
2
13
SELECT
PUSH
ENTER
RETURN
30 30
AMP
DISPLAY
SETUP
POP-UP MENU
REPEAT
4
123
56
7
0
89
A/B
SHUFFLE
PROGRAM
SOURCE
OPEN/CLOSE DIMMER
PURE DIRECT
CLEAR
HOME
NOW PLAYING
OPTION
RETURN
ENTER
INPUT VOLUME
MUTE
Fjärrkontrollsensor
Inom 6 m
Страница загружается ...
Страница загружается ...
Страница загружается ...
Страница загружается ...
Страница загружается ...
Страница загружается ...

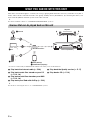
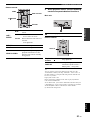
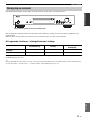
ANSLUTNINGAR
11 Sv
Svenska
FÖRBEREDELSE
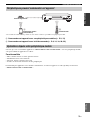
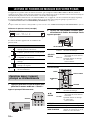
När alla kabelanslutningar är utförda kan du slå på enheten och alla andra systemkomponenter.
När strömbrytaren är påslagen kan du slå på enheten eller ställa den i viloläge genom att trycka på strömbrytaren på
fjärrkontrollen
När nätverket i viloläge aktiveras, kan du också styra strömmen på/av etc. från en nätverksenhet.
❚ Fungerande funktioner i viloläge/nätverket i viloläge
För att aktivera funktionen nätverk i viloläge, ställ in ”System Config” → ”Network Standby” till ”On” från
inställningsmenyn (☞ s.23).
y
Om inga driftfunktioner utförs under en viss tid, växlar enheten automatiskt till viloläge (automatiskt viloläge). Du kan ställa in tiden för
att växla till viloläge i ”System Config” → ”AutoPowerStdby” från inställningsmenyn (☞ s.23).
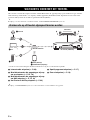
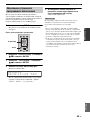
Påslagning av receivern
CD-utmatning AirPlay
Ström påslag av
tillämpning
Standby
Driftläge — —
Network Standby
Driftläge Driftläge Driftläge
SELECT
PUSH
PURE DIRECTSOURCE
ENTER
RETURN
Slå på enheten genom att trycka på strömbrytaren.
Страница загружается ...

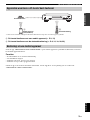
KONFIGURERA DINA NÄTVERKSENHETER
13 Sv
Svenska
ÅTGÄRDER
Om du vill spela upp musikfiler i datorn med den här
enheten måste du göra mediadelningsinställningen mellan
enheten och datorn (Windows Media Player 11 eller
senare).
För information om Windows Media Player, se hjälp för
Windows Media Player.
y
Du kan ansluta upp till 16-mediaservrar till den här enheten.
❚ När du använder Windows Media
Player 12 (på Windows 7)
1 Starta Windows Media Player 12 på
datorn.
2 Välj ”Direktuppspelning”, sedan
”Aktivera mediedirektuppspelning”.
Kontrollpanelen på datorn visas.
3 Klicka på ”Aktivera
mediedirektuppspelning”.
4 Välj ”Tillåt” från rullgardinsmenyn
bredvid ”CD-N301”.
5 Välj på samma vis ikoner för de enheter
som ska användas som externa
mediestyrenheter (andra datorer eller
mobila enheter) och klicka sedan på
”Tillåt”.
6 Klicka på ”OK” för att avsluta.
❚ När du använder Windows Media
Player 11
1 Starta Windows Media Player 11 på
datorn.
2 Välj ”Bibliotek” sedan ”Mediedelning”.
3 Markera ”Dela ut mina media” rutan, välj
”CD-N301” ikonen, klicka sedan på
”Tillåt”.
4 Välj på samma vis ikoner för de enheter
som ska användas som externa
mediestyrenheter (andra datorer eller
mobila enheter) och klicka sedan på
”Tillåt”.
5 Klicka på ”OK” för att avsluta.
Dela filer lagrade på datorn
Страница загружается ...
Страница загружается ...
Страница загружается ...
Страница загружается ...
Страница загружается ...
Страница загружается ...
Страница загружается ...
Страница загружается ...
Страница загружается ...
Страница загружается ...
Страница загружается ...
Страница загружается ...
Страница загружается ...
Страница загружается ...
Страница загружается ...
Страница загружается ...
Страница загружается ...
Страница загружается ...
Страница загружается ...
Страница загружается ...
Страница загружается ...
Страница загружается ...
Страница загружается ...
Страница загружается ...
Страница загружается ...
Страница загружается ...
Страница загружается ...
Страница загружается ...
Страница загружается ...
Страница загружается ...
Страница загружается ...
Страница загружается ...
Страница загружается ...
Страница загружается ...
Страница загружается ...
Страница загружается ...
Страница загружается ...
Страница загружается ...
Страница загружается ...
Страница загружается ...
Страница загружается ...
Страница загружается ...
Страница загружается ...
Страница загружается ...
Страница загружается ...
Страница загружается ...
Страница загружается ...
Страница загружается ...
Страница загружается ...
Страница загружается ...
Страница загружается ...
Страница загружается ...
Страница загружается ...
Страница загружается ...
Страница загружается ...
Страница загружается ...
Страница загружается ...
Страница загружается ...
Страница загружается ...
Страница загружается ...
Страница загружается ...
Страница загружается ...
Страница загружается ...
Страница загружается ...
Страница загружается ...
Страница загружается ...
Страница загружается ...
Страница загружается ...
Страница загружается ...
Страница загружается ...
Страница загружается ...
Страница загружается ...
Страница загружается ...
Страница загружается ...
Страница загружается ...
Страница загружается ...
Страница загружается ...
Страница загружается ...
Страница загружается ...
Страница загружается ...
Страница загружается ...
Страница загружается ...
Страница загружается ...
Страница загружается ...
Страница загружается ...
Страница загружается ...
Страница загружается ...
Страница загружается ...
Страница загружается ...
Страница загружается ...
Страница загружается ...
Страница загружается ...
Страница загружается ...
Страница загружается ...
Страница загружается ...
Страница загружается ...
Страница загружается ...
Страница загружается ...
Страница загружается ...
Страница загружается ...
Страница загружается ...
Страница загружается ...
Страница загружается ...
Страница загружается ...
Страница загружается ...
Страница загружается ...
Страница загружается ...
Страница загружается ...
Страница загружается ...
Страница загружается ...
Страница загружается ...
Страница загружается ...
Страница загружается ...
Страница загружается ...
Страница загружается ...
Страница загружается ...
Страница загружается ...
Страница загружается ...
Страница загружается ...
Страница загружается ...
Страница загружается ...
Страница загружается ...
Страница загружается ...
Страница загружается ...
Страница загружается ...
Страница загружается ...
Страница загружается ...
Страница загружается ...
Страница загружается ...
Страница загружается ...
Страница загружается ...
Страница загружается ...
Страница загружается ...
Страница загружается ...
Страница загружается ...
Страница загружается ...
Страница загружается ...
Страница загружается ...
Страница загружается ...
Страница загружается ...
Страница загружается ...
Страница загружается ...
Страница загружается ...
Страница загружается ...
Страница загружается ...
Страница загружается ...
Страница загружается ...
Страница загружается ...
Страница загружается ...
Страница загружается ...
Страница загружается ...
Страница загружается ...
Страница загружается ...
Страница загружается ...
Страница загружается ...
Страница загружается ...
Страница загружается ...
Страница загружается ...
Страница загружается ...
Страница загружается ...
Страница загружается ...
Страница загружается ...
Страница загружается ...
Страница загружается ...
Страница загружается ...
Страница загружается ...
Страница загружается ...
Страница загружается ...
Страница загружается ...
Страница загружается ...
Страница загружается ...
Страница загружается ...
Страница загружается ...
Страница загружается ...
Страница загружается ...
Страница загружается ...
Страница загружается ...
Страница загружается ...
Страница загружается ...
-
 1
1
-
 2
2
-
 3
3
-
 4
4
-
 5
5
-
 6
6
-
 7
7
-
 8
8
-
 9
9
-
 10
10
-
 11
11
-
 12
12
-
 13
13
-
 14
14
-
 15
15
-
 16
16
-
 17
17
-
 18
18
-
 19
19
-
 20
20
-
 21
21
-
 22
22
-
 23
23
-
 24
24
-
 25
25
-
 26
26
-
 27
27
-
 28
28
-
 29
29
-
 30
30
-
 31
31
-
 32
32
-
 33
33
-
 34
34
-
 35
35
-
 36
36
-
 37
37
-
 38
38
-
 39
39
-
 40
40
-
 41
41
-
 42
42
-
 43
43
-
 44
44
-
 45
45
-
 46
46
-
 47
47
-
 48
48
-
 49
49
-
 50
50
-
 51
51
-
 52
52
-
 53
53
-
 54
54
-
 55
55
-
 56
56
-
 57
57
-
 58
58
-
 59
59
-
 60
60
-
 61
61
-
 62
62
-
 63
63
-
 64
64
-
 65
65
-
 66
66
-
 67
67
-
 68
68
-
 69
69
-
 70
70
-
 71
71
-
 72
72
-
 73
73
-
 74
74
-
 75
75
-
 76
76
-
 77
77
-
 78
78
-
 79
79
-
 80
80
-
 81
81
-
 82
82
-
 83
83
-
 84
84
-
 85
85
-
 86
86
-
 87
87
-
 88
88
-
 89
89
-
 90
90
-
 91
91
-
 92
92
-
 93
93
-
 94
94
-
 95
95
-
 96
96
-
 97
97
-
 98
98
-
 99
99
-
 100
100
-
 101
101
-
 102
102
-
 103
103
-
 104
104
-
 105
105
-
 106
106
-
 107
107
-
 108
108
-
 109
109
-
 110
110
-
 111
111
-
 112
112
-
 113
113
-
 114
114
-
 115
115
-
 116
116
-
 117
117
-
 118
118
-
 119
119
-
 120
120
-
 121
121
-
 122
122
-
 123
123
-
 124
124
-
 125
125
-
 126
126
-
 127
127
-
 128
128
-
 129
129
-
 130
130
-
 131
131
-
 132
132
-
 133
133
-
 134
134
-
 135
135
-
 136
136
-
 137
137
-
 138
138
-
 139
139
-
 140
140
-
 141
141
-
 142
142
-
 143
143
-
 144
144
-
 145
145
-
 146
146
-
 147
147
-
 148
148
-
 149
149
-
 150
150
-
 151
151
-
 152
152
-
 153
153
-
 154
154
-
 155
155
-
 156
156
-
 157
157
-
 158
158
-
 159
159
-
 160
160
-
 161
161
-
 162
162
-
 163
163
-
 164
164
-
 165
165
-
 166
166
-
 167
167
-
 168
168
-
 169
169
-
 170
170
-
 171
171
-
 172
172
-
 173
173
-
 174
174
-
 175
175
-
 176
176
-
 177
177
-
 178
178
-
 179
179
-
 180
180
-
 181
181
-
 182
182
-
 183
183
-
 184
184
-
 185
185
-
 186
186
-
 187
187
-
 188
188
-
 189
189
-
 190
190
-
 191
191
-
 192
192
-
 193
193
-
 194
194
-
 195
195
-
 196
196
-
 197
197
-
 198
198
-
 199
199
-
 200
200
-
 201
201
-
 202
202
-
 203
203
-
 204
204
-
 205
205
-
 206
206
-
 207
207
-
 208
208
-
 209
209
-
 210
210
-
 211
211
-
 212
212
-
 213
213
-
 214
214
-
 215
215
-
 216
216
-
 217
217
-
 218
218
-
 219
219
-
 220
220
-
 221
221
-
 222
222
-
 223
223
-
 224
224
-
 225
225
-
 226
226
-
 227
227
-
 228
228
-
 229
229
-
 230
230
-
 231
231
-
 232
232
-
 233
233
-
 234
234
-
 235
235
-
 236
236
-
 237
237
-
 238
238
-
 239
239
-
 240
240
-
 241
241
-
 242
242
-
 243
243
-
 244
244
-
 245
245
-
 246
246
-
 247
247
-
 248
248
-
 249
249
-
 250
250
-
 251
251
-
 252
252
-
 253
253
-
 254
254
-
 255
255
-
 256
256
-
 257
257
-
 258
258
-
 259
259
-
 260
260
-
 261
261
-
 262
262
-
 263
263
-
 264
264
-
 265
265
-
 266
266
-
 267
267
-
 268
268
-
 269
269
-
 270
270
-
 271
271
-
 272
272
-
 273
273
-
 274
274
-
 275
275
-
 276
276
-
 277
277
-
 278
278
-
 279
279
-
 280
280
-
 281
281
-
 282
282
-
 283
283
-
 284
284
-
 285
285
-
 286
286
-
 287
287
-
 288
288
-
 289
289
-
 290
290
-
 291
291
-
 292
292
-
 293
293
-
 294
294
-
 295
295
-
 296
296
-
 297
297
-
 298
298
-
 299
299
-
 300
300
-
 301
301
-
 302
302


Yamaha CD-N301 Silver Руководство пользователя
- Категория
- Плееры CD
- Тип
- Руководство пользователя
Задайте вопрос, и я найду ответ в документе
Поиск информации в документе стал проще с помощью ИИ
на других языках
- English: Yamaha CD-N301 Silver User manual
- français: Yamaha CD-N301 Silver Manuel utilisateur
- italiano: Yamaha CD-N301 Silver Manuale utente
- español: Yamaha CD-N301 Silver Manual de usuario
- Deutsch: Yamaha CD-N301 Silver Benutzerhandbuch
- Nederlands: Yamaha CD-N301 Silver Handleiding
- svenska: Yamaha CD-N301 Silver Användarmanual
Похожие модели бренда
-
Yamaha R-N803D Инструкция по применению
-
-
-
Yamaha CX-A5100 Инструкция по применению
-
Yamaha RX-A1080 Инструкция по применению
-
Yamaha RX-V781 Инструкция по применению
-
-
-
Yamaha RX-V779 Инструкция по применению
-

