Zanussi ZWQ71235SI Руководство пользователя
- Категория
- Стиральные машины
- Тип
- Руководство пользователя


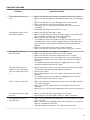
SAFETY INFORMATION
Before the installation and use of the appliance, carefully read the
supplied instructions. The manufacturer is not responsible for any
injuries or damages that are the result of incorrect installation or
usage. Always keep the instructions in a safe and accessible
location for future reference.
CHILDREN AND VULNERABLE PEOPLE SAFETY
• This appliance can be used by children aged from 8 years and
above and persons with reduced physical, sensory or mental
capabilities or lack of experience and knowledge if they have
been given supervision or instruction concerning the use of the
appliance in a safe way and understand the hazards involved.
• Do not let children play with the appliance.
• Children aged 3 years and under must be kept away from this
appliance when it is in operation at all times.
• Keep all packaging away from children and dispose of it
appropriately.
• Keep detergents away from children.
• Keep children and pets away from the appliance door when it is
open.
• Children shall not carry out cleaning and user maintenance of
the appliance without supervision.
GENERAL SAFETY
• Do not change the specification of this appliance.
• Do not exceed the maximum load of 7 kg (refer to the
"Programme chart" chapter).
• The operating water pressure at the water entry point from the
outlet connection must be between 0.5 bar (0.05 MPa) and 8
bar (0.8 MPa).
• The ventilation opening in the base (if applicable) must not be
covered by a carpet, mat, or any floor covering.
• The appliance must be connected to the water mains using the
new supplied hose sets, or other new hose sets supplied by
the Authorised Service Centre.
2

• Old hose sets must not be reused.
• If the mains power supply cable is damaged, it must be
replaced by the manufacturer, its Authorised Service Centre or
similarly qualified persons to avoid an electrical hazard.
• Before any maintenance operation, deactivate the appliance
and disconnect the mains plug from the socket.
• Do not use high pressure water sprays and/or steam to clean
the appliance.
• Clean the appliance with a moist cloth. Use only neutral
detergents. Do not use abrasive products, abrasive cleaning
pads, solvents or metal objects.
SAFETY INSTRUCTIONS
INSTALLATION
• Remove all the packaging and the transit bolts.
• Keep the transit bolts in a safe place. If the
appliance is to be moved in future they must be
reattached to lock the drum to prevent internal
damage.
• Always take care when moving the appliance as
it is heavy. Always use safety gloves and
enclosed footwear.
• Do not install or use a damaged appliance.
• Follow the installation instruction supplied with
the appliance.
• Do not install or use the appliance where the
temperature can be less than 0°C or where it is
exposed to the weather.
• The floor area where the appliance is to be
installed must be flat, stable, heat resistant and
clean.
• Make sure that there is air circulation between
the appliance and the floor.
• Adjust the feet to have the necessary space
between the appliance and the flooring.
• Do not install the appliance where the appliance
lid cannot be fully opened.
• Do not put a container to collect possible water
leakage under the appliance. Contact the
Authorised Service Centre to ensure which
accessories can be used.
ELECTRICAL CONNECTION
• The appliance must be earthed.
• Always use a correctly installed shockproof
socket.
• Make sure that the parameters on the rating
plate are compatible with the electrical ratings
of the mains power supply.
• Do not use multi-plug adapters and extension
cables.
• Make sure not to cause damage to the mains
plug and to the mains cable. Should the mains
cable need to be replaced, this must be carried
out by our Authorised Service Centre.
• Connect the mains plug to the mains socket
only at the end of the installation. Make sure that
there is access to the mains plug after the
installation.
• Do not touch the mains cable or the mains plug
with wet hands.
• Do not pull the mains cable to disconnect the
appliance. Always pull the mains plug.
• This appliance complies with the E.E.C.
Directives.
WATER CONNECTION
• Do not cause damage to the water hoses.
• Before connection to new pipes, pipes not used
for a long time, where repair work has been
carried out or new devices fitted (water meters,
etc.), let the water flow until it is clean and clear.
• Ensure that there are no visible water leaks
during and after the first use of the appliance.
USE
WARNING! Risk of injury, electrical
shock, fire, burns or damage to the
appliance.
• This appliance is for household use only.
• Follow the safety instructions on the detergent
packaging.
3

• Do not put flammable products or items that are
wet with flammable products in, near or on the
appliance.
• Make sure that all metal objects are removed
from the laundry.
• Do not wash fabrics which are heavily soiled
with oil, grease or other greasy substances. It
can damage rubber parts of the washing
machine. Prewash such fabrics by hand before
loading them into the washing machine.
SERVICE
• To repair the appliance contact an Authorised
Service Centre.
• Use original spare parts only.
DISPOSAL
WARNING! Risk of injury or
suffocation.
• Disconnect the appliance from the mains
electrical and water supplies.
• Cut off the mains electrical cable close to the
appliance and dispose of it.
• Remove the door catch to prevent children or
pets from becoming trapped in the drum.
• Dispose of the appliance in accordance with
local requirements for the disposal of Waste
Electrical and Electronic Equipment (WEEE).
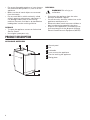
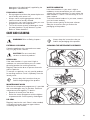
PRODUCT DESCRIPTION
APPLIANCE OVERVIEW
3
4
1
5
6
2
1
Control panel
2
Lid
3
Lid handle
4
Lever to move the appliance
5
Feet for levelling the appliance
6
Rating plate
4

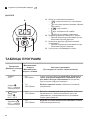
CONTROL PANEL
CONTROL PANEL DESCRIPTION
1200
1000
800
90°
60°
40°
30°
20°
987621 3 4 5
1
On/Off button (On/Off)
2
Programme selection touchpad
3
Temperature selection touchpad
4
Spin selection touchpad
5
Options selection touchpad
6
Start/Pause touchpad
7
Finish in touchpad (Finish In)
8
Display
9
Door locked indicator
DISPLAY
A
D
B C
A. The time area:
• : the programme duration
• : the "finish in" time
• : the alarm codes
• : the message of error
• : the programme is completed.
B. The child lock indicator:
• The indicator comes on when you activate
this device.
C. The extra rinse indicator:
• The indicator comes on when you activate
this option.
D. The Finish In touchpad.
5

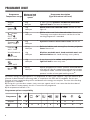
PROGRAMME CHART
Programme
Temperature range
Maximum load
Maximum spin
speed
Programme description
(Type of load and soil level)
30'@30°
30°C
2 kg
800 rpm
A short cycle for synthetic and delicate items with
light soil level or for items to freshen up.
Cottons
90°C - Cold
7 kg
1200 rpm
White cotton and coloured cotton. Normal soil and
light soil.
Cotton
ECO
1)
60°C - 40°C
7 kg
1200 rpm
White cotton and fast-coloured cotton. Normal soil.
The energy consumption decreases and the time of the
washing programme is extended.
Synthetics
60°C - Cold
3 kg
1200 rpm
Synthetic items or mixed fabric items. Normal soil.
Delicates
40°C - Cold
2,5 kg
1200 rpm
Delicate fabrics such as acrylics, viscose, polyester
items. Normal soil.
Wool/Handwash
40°C - Cold
1 kg
1200 rpm
Machine washable wool, hand washable wool and
delicate fabrics with «hand washing» care symbol.
2)
Refresh 20 min
40°C - 30°C
1 kg
1200 rpm
A very short cycle for cotton and synthetic items with
light soil level or worn only once.
Mix 20°
20°C
2,5 kg
1200 rpm
Special programme for cotton, synthetic and mixed fabrics
with light soil. Set this programme to decrease the energy
consumption. Make sure that the detergent is for low tem-
perature in order to have good washing results
3)
.
1) Cottons energy saving programme. This programme at a 60ºC with a load of 7 kg is the reference pro-
gramme for data entered in the energy label, in compliance with EEC 92/75 standards. Set this pro-
gramme to have a good washing results and decrease the energy consumption. The time of the washing
programme is extended.
2) During this cycle the drum rotates slowly to ensure a gentle wash. It can seem that the drum doesn't
rotate or doesn't rotate properly, but this is normal for this programme.
3) No temperature indicator is on .
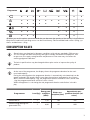
Programme options compatibility
Programme
1)
30'@30° ■ ■ ■ ■
■ ■ ■ ■ ■ ■ ■ ■ ■ ■
6

Programme
1)
■ ■ ■ ■ ■ ■ ■ ■ ■
■ ■ ■ ■ ■ ■ ■ ■ ■ ■
■ ■ ■ ■ ■ ■ ■ ■ ■
■ ■ ■ ■ ■ ■
■ ■ ■ ■ ■ ■
■ ■ ■ ■ ■ ■
1) When you set this option, we recommend that you decrease the quantity of the laundry. It is possible to
keep the full load but the washing results can be unsatisfactory. Recommended load: cotton: 3,5 kg, syn-
thetics and delicates: 1,5 kg.
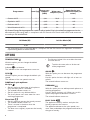
CONSUMPTION VALUES
Stated values are obtained in laboratory conditions with relevant standards. Different cau-
ses can change the data: the quantity and type of laundry and ambient temperature. Wa-
ter pressure, the supply voltage and the temperature of inlet water may also affect the
washing programme duration.
Technical specifications may be changed without prior notice to improve the quality of
product.
At the start of the programme, the display shows the programme duration for the maxi-
mum load capacity.
During the washing phase the programme duration is automatically calculated and can be
greatly reduced if the laundry load is lower than the maximum load capacity (e.g. Cotton
60°C, maximum load capacity 7 kg, the programme duration exceeds 2 hours; actual load
1 kg, the programme duration will be less than 1 hour).
When the appliance is calculating the real programme duration a dot flashes in the dis-
play.
Programmes Load (kg)
Energy con-
sumption
(kWh)
Water con-
sumption (litre)
Approximate pro-
gramme duration (mi-
nutes)
Cottons 60°C 7 1,16 58 197
Cotton Energy Saving Pro-
gramme 60°C
1)
7 0,95 47 255
7

Programmes Load (kg)
Energy con-
sumption
(kWh)
Water con-
sumption (litre)
Approximate pro-
gramme duration (mi-
nutes)
Cottons 40°C
7 0,61 56,2 192
Synthetics 40°C 3 0,45 46 105
Delicates 40°C 2,5 0,55 46 90
Wool/Handwash 30°C 1 0,35 50 65
1) «Cotton Energy Saving programme » at 60°C with a load of 7 kg is the reference programme for the
data entered in the energy label, in compliance with EU Commission Directive 95/12/EC and measured
according to EN 60456/2005.
Off Mode (W) Left On Mode (W)
0,48 0,48
The information given in the chart above is compliant with the EU Commission regulation 1015/2010
implementing directive 2009/125/EC
OPTIONS
TEMPERATURE
With this option you can change the default
temperature.
Indicator
= cold water.
The indicator of the set temperature comes on.
SPIN
With this option you can change the default spin
speed.
The indicator of the set speed comes on.
Additional spin options:
No Spin
• Set this option to deactivate all spin phases.
Only the drain phase is available.
• The related indicator comes on.
• Set this option for very delicate fabrics.
• The rinses phase uses more water for some
washing programmes.
Rinse Hold
• Set this option to prevent the laundry creases.
• The related indicator comes on.
• There is a water in the drum when the
programme is completed.
• The drum turns regularly to prevent the laundry
creases.
• The lid stays locked. You must drain the water
to unlock the lid.
To drain the water refer to ‘At the end
of the programme’.
QUICK
With this option you can decrease the programme
duration.
Use this option for items with light soil or items to
refresh.
The related indicator comes on.
PREWASH
With this option you can add a prewash phase to a
washing programme.
Use this option for heavy soil. When you set this
option the programme duration increases.
The related indicator comes on.
EASY IRON
The appliance carefully washes and spins the
laundry to prevent the creases.
The appliance decreases the spin speed, uses
more water and adapts the programme duration to
the type of laundry.
8

The related indicator comes on.
RINSE
With this option you can perform only a last rinse of
a selected washing programme.
If you set also the Extra Rinse function (
) the
appliance adds two or more rinses.
The related indicator comes on.
DRAIN AND SPIN
With this option you can perform the spin and drain
cycle.
This spin phase is suitable to the washing
programme you set.
If you set also the No Spin ( )
option, the appliance only drains.
FINISH IN
With this option you can set the number of hours in
which you would like your washing programme to
be completed.
You can set from minimum 3 hours to maximum 20
hours.
The display shows the number of hours and the
indicator above the button is on.
EXTRA RINSE
With this option you can add some rinses to a
washing programme.
Use this option for persons allergic to detergents
and in areas where the water is soft.
The related indicator comes on.
1)
SETTINGS
PERMANENT EXTRA RINSE
With this option you can permanently have an extra
rinse when you set a new programme.
• To activate/deactivate this option touch the
buttons and at the same time until the
indicator comes on/goes off.
CHILD LOCK
With this option you can prevent that the children
play with the control panel.
• To activate/deactivate this option, touch the
buttons and at the same time until the
indicator comes on/goes off.
Activate this option after you touch the button :
the buttons are locked (except for the button ) .
This option stays active even when you
switch off the appliance.
ACOUSTIC SIGNALS
The acoustic signals operate when:
• The programme is completed.
• The appliance has a malfunction.
To deactivate/activate the acoustic signals,
touch the buttons
and at the same time for 4
seconds.
If you deactivate the acoustic signals,
they continue operate when the
appliance has a malfunction.
BEFORE FIRST USE
1. Put a small quantity of detergent in the
compartment for washing phase.
2. Set and start a programme for cotton at the
highest temperature without laundry.
This removes all possible dirt from the drum and the
tub.
1) See in "Settings" how to activate this option.
9

DAILY USE
WARNING! Refer to Safety chapters.
LOADING THE LAUNDRY
1. Open the appliance lid.
2. Push the button A.
The drum opens automatically.
3. Put the laundry in the drum, one item at a time.
4. Shake the items before you put them in the
appliance.
Make sure not to put too much laundry in the drum.
5. Close the drum and the lid.
A
CAUTION! Before you close the lid of
your appliance, make sure that you
close the drum correctly.
USING DETERGENT AND ADDITIVES
1. Measure out the detergent and the fabric
conditioner.
2. Put the detergent and the fabric conditioner
into the compartments.
DETERGENT COMPARTMENTS
Detergent compartment for pre-
wash phase.
Detergent compartment for wash-
ing phase.
Compartment for liquid additives
(fabric conditioner, starch).
CAUTION! Do not
exceed the
M
level.
ACTIVATING THE APPLIANCE
Press and hold for a couple of seconds the On/Off
button to activate or deactivate the appliance.
A tune sounds when the appliance is activated.
The display shows the word On.
SETTING A PROGRAMME
1. Touch the programme button and set the
programme:
• The indicator of the button flashes.
• The display shows the programme duration.
2. If necessary, change the temperature and the
spin speed or add available options. When you
activate an option, the indicator of the set
option comes on.
If you set something incorrect, the
display shows the message .
STARTING A PROGRAMME WITHOUT THE
FINISH IN OPTION
Touch the button .
• The indicator of the button stops to
flash and stays on.
• The programme starts, the lid locks, the
indicator is on.
• The drain pump can operate for a short time
at the beginning of the washing cycle.
After approximately 15 minutes from
the start of the programme:
• The appliance adjusts automatically
the programme duration agree with
the laundry load.
• The display shows the new value.
10

STARTING A PROGRAMME WITH THE
FINISH IN OPTION
1. Touch the button again and again to
choose the number of hours in which you want
the washing cycle to be finished.
The display shows the number of hours you set
(e.g. ) and the indicator above the button is
on to show that his option is active.
2. Touch the button :
• The door is locked.
• The appliance starts the countdown.
• When the countdown is completed, the
programme starts automatically.
You can cancel or change the set of
the Finish In option before you touch
the button . After touching the
button you can only cancel the
Finish In option.
To cancel the the Finish In option:
a. Touch the button to set the appliance
to pause. The indicator of button
flashes.
b. Touch the button until the indicator
above this button goes off.
Touch the button again to start the
programme immediately.
When using liquid detergents in
combination with the Finish In option,
add the liquid detergents with a
dosing ball (supplied by the
detergent's manufacturer).
INTERRUPTING A PROGRAMME AND
CHANGING THE OPTIONS
You can change only some options before they
operate.
1. Touch .
The indicator of this button flashes.
2. Change the options. If you change any option
the Finish In option (if set) will be disabled.
3. Touch again.
The programme continues.
CANCELLING A PROGRAMME
1. Press the button On/Off for some seconds to
cancel the programme and to deactivate the
appliance.
2. Press the same button again to activate the
appliance. Now, you can set a new washing
programme.
Before starting the new programme
the appliance could drain the water. In
this case, make sure that the detergent
is still in the detergent compartment, if
not fill the detergent again.
OPENING THE LID
While a programme (or the ) operates, the
appliance lid is locked. The indicator is on.
CAUTION! If the temperature and
level of the water in the drum are too
high, you cannot open the lid.
To open the lid during the first minutes of the
cycle (or when the operates) :
1. Touch the button to pause the appliance.
2. Wait a couple of minutes until the indicator
goes off.
3. You can open the lid.
4. Close the lid and touch the button again.
The programme (or the ) continues.
AT THE END OF THE PROGRAMME
• The appliance stops automatically.
• The acoustic signal operates (if it is activated).
• In the display comes on.
• The indicator of the button goes off.
• The lid lock indicator blinks (when the lid is
unlocking) and then goes off.
• You can open the lid.
• Remove the laundry from the appliance. Make
sure that the drum is empty.
• Press the button for some seconds to
deactivate the appliance.
• Close the water tap.
• Keep the lid ajar, to prevent the mildew and
odours.
The washing programme is completed, but
there is water in the drum:
• The drum turns regularly to prevent the creases
in the laundry.
• The indicator flashes to remind you to drain
the water.
• The lid lock indicator is on. The indicator of
button flashes. The lid stays locked.
11

• You must drain the water to open the lid.
Draining the water:
1. To drain the water.
• Touch the button
. The appliance
drains the water and spins with the
maximum spin speed for selected washing
programme.
• Alternatively, touch the button to change
the spin speed and then touch the button
. The appliance drains the water and
spins. If you set , the appliance only
drains.
2. When the programme is completed and after a
couple of minutes the lid lock indicator
goes off, you can open the lid.
3. Press the button for some seconds to
deactivate the appliance.
The appliance drains and spins
automatically after approximately 18
hours (except for Wool programme).
AUTO-OFF OPTION
The AUTO-OFF stand-by option automatically
deactivates the appliance to decrease the energy
consumption. All the indicators and the display go
off when :
• You do not use the appliance for 5 minutes
before you touch .
Press the button to activate the appliance
again.
• After 5 minutes from the end of the washing
programme.
Press the button to activate the appliance
again.
The display shows the end of the last set
programme.
Touch the button if you want to set a new
cycle.
HINTS AND TIPS
THE LAUNDRY LOAD
• Divide the laundry in: white, coloured,
synthetics, delicates and wool.
• Obey the washing instructions that are on the
laundry care labels.
• Do not wash white and coloured items together.
• Some coloured items can discolour with the first
wash. We recommend that you wash them
separately for the first times.
• Button up pillowcases, close zippers, hooks and
poppers. Tie up belts.
• Empty the pockets and unfold the items.
• Turn multilayered fabrics, wool and items with
painted illustrations inside out.
• Remove hard stains with a special detergent.
• Wash and pre-treat heavy soil stains before
putting items in drum
• Be careful with the curtains. Remove the hooks
and put the curtains in a washing bag or
pillowcase.
• Do not wash laundry without hems or with cuts.
Use a washing bag to wash small and/or
delicate items (e.g. underwired bras, belts,
tights, etc. ).
• A very small load can cause balance problems
with the spin phase. If this occurs, adjust
manually the items in the tub and start the spin
phase again.
STUBBORN STAINS
For some stains, water and detergent is not
sufficient.
We recommend that you pre-treat these stains
before you put the items in the appliance.
Special stain removers are available. Use the
special stain remover that is applicable to the type
of stain and fabric.
DETERGENTS AND ADDITIVES
• Only use detergents and additives specially
made for washing machines:
– powder detergents for all types of fabric,
– powder detergents for delicate fabrics (40
°C max) and woollens,
– liquid detergents, preferably for low
temperature wash programmes (60 °C max)
for all types of fabric, or special for woollens
only.
• Do not mix different types of detergents.
• To help the environment, do not use more than
the correct quantity of detergent.
• Obey the instructions that you find on the on
packaging of these products.
• Use the correct products for the type and colour
of the fabric, the programme temperature and
the level of soil.
• If your appliance does not have the detergent
dispenser with the flap device, add the liquid
12

detergents with a dosing ball (supplied by the
detergent's manufacturer).
ECOLOGICAL HINTS
• Set a programme without the prewash phase to
wash laundry with normal soil.
• Always start a washing programme with the
maximum load of laundry allowed.
• If necessary, use a stain remover when you set a
programme with a low temperature.
• To use the correct quantity of detergent, check
the water hardness of your domestic system.
Refer to "Water hardness".
WATER HARDNESS
If the water hardness in your area is high or
moderate, we recommend that you use a water
softener for washing machines. In areas where the
water hardness is soft it is not necessary to use a
water softener.
To know the water hardness in your area, contact
your local water authority.
Use the correct quantity of the water softener.
Obey the instructions that you find on the
packaging of the product.
CARE AND CLEANING
WARNING! Refer to Safety chapters.
EXTERNAL CLEANING
Clean the appliance with soap and warm water
only. Fully dry all the surfaces.
CAUTION! Do not use alcohol,
solvents or chemical products.
DESCALING
If the water hardness in your area is high or
moderate, we recommend that you use a water
descaling product for washing machines.
Regularly examine the drum to prevent limescale
and rust particles.
To remove rust particles use only special products
for washing machines. Do this separately from the
laundry wash.
Always obey the instructions that you
find on the packaging of the product.
MAINTENANCE WASH
With the low temperature programmes it is possible
that some detergent stays in the drum. Perform a
maintenance wash regularly. To do this:
• Remove all laundry from the drum.
• Select the cotton programme with the highest
temperature with a small quantity of detergent.
LID SEAL
Regularly examine the seal. Clean it when needed,
using ammonia cream cleanser agent without
scratching the seal surface,
Always obey the instructions that you
find on the packaging of the product.
CLEANING THE DETERGENT DISPENSER
1.
2.
3.
13

CLEANING THE INLET HOSE AND THE VALVE FILTER
1
2
3
1 2 3
90˚
4
FROST PRECAUTIONS
If the appliance is installed in an area where the
temperature can be less than 0 °C, remove the
remaining water from the inlet hose and the drain
pump.
Do this procedure also when you want
to do the emergency drain.
1. Disconnect the mains plug from the mains
socket.
2. Remove the water inlet hose.
3. Remove the drain hose from the rear support
and unhook it from sink or spigot.
4. Put the ends of the drain and inlet hose in a
container. Let the water flow out of the hoses.
5. Set any selected programme with option Drain
& Spin and let it operate until the end of the
cycle.
6. When no more water flows, install the inlet
hose and the drain hose again.
7. Press the On/Off button to deactivate the
appliance.
WARNING! Make sure that the
temperature is more than 0°C before
you use the appliance again. The
manufacturer is not responsible for
damages caused by low temperatures.
TROUBLESHOOTING
WARNING! Refer to Safety chapters.
INTRODUCTION
The appliance does not start or it stops during
operation.
First try to find a solution to the problem (refer to
the table). If the problem persists, contact the
Authorised Service Centre.
With some problems, the acoustic signals
operate and the display shows an alarm
code:
•
- The appliance does not fill with water
properly. Start the appliance again by pressing
button. After 10 seconds the door will be
unlocked.
• - The appliance does not drain the water.
• - The appliance lid or drum doors are
open or not closed correctly. Please check
both!
• - The mains supply is unstable. Wait until
the mains supply is stable.
• - No communication between electronic
elements of the appliance. Switch off and
switch on again. The programme was not
finished properly or the appliance stopped too
early. If the alarm code appears again, contact
the Authorised Service Centre.
WARNING! Deactivate the appliance
before you do the checks.
14

POSSIBLE FAILURES
Problem Possible solution
The programme does not
start.
• Make sure that the mains plug is connected to the mains socket.
• Make sure that the appliance lid and drum doors are closed proper-
ly.
• Make sure that there is not a damaged fuse in the fuse box.
• Make sure that the Start/Pause has been pressed.
• If the delay start is set, cancel the setting or wait for the end of
countdown.
• Deactivate the Child Lock function if it is on.
The appliance does not fill
with water properly.
• Make sure that the water tap is open.
• Make sure that the pressure of the water supply is not too low. For
this information, contact your local water authority.
• Make sure that the water tap is not clogged.
• This problem may be caused by the filter of the inlet hose or the
valve drain filter which may be clogged. Refer to “Care and clean-
ing”. If problem remains please contact the Authorised Service
Centre.
• Make sure that the inlet hose has no kinks or bends.
• Make sure that the connection of the water inlet hose is correct.
The appliance does not
drain the water.
• Make sure that the sink spigot is not clogged.
• Make sure that the drain hose has no kinks or bends.
• Make sure that the connection of the drain hose is correct.
• Set the drain option if you set a programme without drain phase.
• Set the drain option if you set an option which ends with water in
the drum.
• This problem may be caused by the clogged drain filter. Please
contact the Authorised Service Centre.
The spin phase does not
operate or the washing cy-
cle lasts longer than usual-
ly.
• Adjust manually the items in the tub and start the spin phase again.
This problem may be caused by balance problems.
• Set the spin option.
• Set the drain option if you set an option which ends with water in
the drum.
• This problem may be caused by the clogged drain filter. Please
contact the Authorised Service Centre.
There is water on the floor. • Make sure that the couplings of the water hoses are tight and there
is not water leakages.
• Make sure that the water inlet hose and the drain hose have no
damages.
• Make sure you use the correct detergent and the correct quantity of
it.
You cannot open the appli-
ance lid.
• Make sure that the washing programme is finished.
• Set the drain or the spin option if there is water in the drum.
The appliance makes an
unusual noise.
• Make sure the levelling of the appliance is correct. Refer to 'Installa-
tion instruction'.
• Make sure that the packaging and/or the transit bolts are removed.
Refer to 'Installation instruction'.
• Add more laundry in the drum. The load may be too small.
15

Problem Possible solution
The appliance fills with wa-
ter and drain immediately.
• Make sure that the drain hose is in the correct position. The end of
the hose may be too low. Refer to 'Installation instruction'.
The cycle is shorter than
the time displayed.
• The appliance calculates a new time according to the laundry load.
See the ‘Consumption Values’ chapter.
The cycle is longer than
the time displayed.
• An unbalanced laundry load increases the duration time. This is a
normal behaviour of the appliance.
The washing results are
not satisfactory.
• Increase the detergent quantity or use a different detergent.
• Use special products to remove the stubborn stains before you
wash the laundry.
• Make sure that you set the correct temperature.
• Decrease the laundry load.
You cannot set an option. • Make sure that you press only the wanted touch button(s).
After the check, activate the appliance. The
programme continues from the point of interruption.
If the problem occurs again, contact the Authorised
Service Centre.
If the display shows other alarm codes. Deactivate
and activate the appliance. If the problem
continues, contact the Authorised Service Centre.
SERVICE
We recommend the use of original spare parts.
When contacting the Authorised Service Centre,
make sure that these data are available. You can
find the information on the rating plate: model, PNC
and Serial Number. (Mod., Prod. No., Ser. No.)
TECHNICAL DATA
Dimension Width/ Height/ Depth/ To-
tal depth
400 mm/ 890 mm/ 600 mm/ 600 mm
Electrical connection Voltage
Overall power
Fuse
Frequency
230 V
2200 W
10 A
50 Hz
Level of protection against ingress of solid particles and
moisture ensured by the protective cover, except where
the low voltage equipment has no protection against
moisture
IPX4
Water supply pressure Minimum
Maximum
0,5 bar (0,05 MPa)
8 bar (0,8 MPa)
Water supply
1) Cold water
Maximum Load Cotton 7 kg
Energy Efficiency Class A+++
Spin Speed Maximum 1200 rpm
1) Connect the water inlet hose to a water tap with a 3/4'' thread.
16

ENVIRONMENTAL CONCERNS
Recycle materials with the symbol . Put the
packaging in relevant containers to recycle it. Help
protect the environment and human health by
recycling waste of electrical and electronic
appliances. Do not dispose of appliances marked
with the symbol with the household waste.
Return the product to your local recycling facility or
contact your municipal office.
17

СВЕДЕНИЯ ПО ТЕХНИКЕ БЕЗОПАСНОСТИ
Перед установкой и эксплуатацией прибора внимательно
ознакомьтесь с приложенным руководством.
Производитель не несет ответственности за какие-либо
травмы или ущерб, возникший вследствие неправильной
установки или эксплуатации. Всегда храните данное
руководство под рукой в надежном месте для
последующего использования.
БЕЗОПАСНОСТЬ ДЕТЕЙ И ЛИЦ С
ОГРАНИЧЕННЫМИ ВОЗМОЖНОСТЯМИ
• Данный прибор может эксплуатироваться детьми старше
8 лет и лицами с ограниченными физическими,
сенсорными или умственными способностями и с
недостаточным опытом или знаниями только при
условии нахождения под присмотром лица, отвечающего
за их безопасность, или после получения
соответствующих инструкций, позволяющих им
безопасно эксплуатировать электроприбор и дающих им
представление об опасности, сопряженной с его
эксплуатацией.
• Не позволяйте детям играть с прибором.
• Детям младше 3 лет категорически запрещается
находиться рядом с прибором во время его работы.
• Храните все упаковочные материалы вне досягаемости
детей и утилизируйте материалы надлежащим образом.
• Храните моющие средства вне досягаемости детей.
• Не подпускайте детей и домашних животных к прибору,
когда его дверца открыта.
• Очистка и доступное пользователю техническое
обслуживание прибора не должно производиться детьми
без присмотра.
ОБЩИЕ ПРАВИЛА ТЕХНИКИ БЕЗОПАСНОСТИ
• Не вносите изменения в параметры данного прибора.
18

• Не превышайте максимально допустимую загрузку в 7 кг
(см. Главу «Таблица программ»).
• Рабочее давление воды в точке ее поступления из
водопроводной сети должно находиться в пределах 0,5
бар (0,05 МПа) и 8 бар (0,8 МПа).
• Вентиляционное отверстие в днище (если
предусмотрено конструкцией) не должно перекрываться
ковровым покрытием, ковриком, подставкой или любым
иным напольным покрытием.
• При подключении прибора к водопроводу должны
использоваться новые поставляемые с ним комплекты
шлангов или другие новые комплекты шлангов,
поставленные авторизованным сервисным центром.
• Использовать старые комплекты шлангов нельзя.
• В случае повреждения кабеля электропитания во
избежание поражения электрическим током он должен
быть заменен изготовителем, авторизованным
сервисным центром или специалистом с аналогичной
квалификацией.
• Перед выполнением любых операций по чистке и уходу
выключите прибор и извлеките вилку сетевого шнура из
розетки.
• Не используйте для чистки прибора
водоразбрызгиватели высокого давления или пар.
• Протрите прибор влажной тряпкой. Используйте только
нейтральные моющие средства. Не используйте
абразивные средства, абразивные губки, растворители
или металлические предметы.
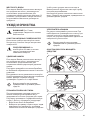
УКАЗАНИЯ ПО БЕЗОПАСНОСТИ
УСТАНОВКА
• Удалите всю упаковку и вывинтите
транспортировочные болты.
• Сохраните транспортировочные болты в
надежном месте. Если в будущем прибор
понадобится перевезти на другое место, их
следует установить на место, чтобы
заблокировать барабан во избежание
внутренних повреждений прибора.
• Никогда не забывайте о мерах
предосторожности при его перемещении:
прибор имеет большой вес. Всегда
используйте защитные перчатки и
закрытую обувь.
• Не устанавливайте и не подключайте
прибор, имеющий повреждения.
• Следуйте приложенным к прибору
инструкциям по его установке.
19

• Не устанавливайте и не эксплуатируйте
прибор в помещениях, где температура
может упасть ниже 0°C или там, где он
может оказаться под действием
атмосферных условий.
• Пол на месте установки прибора должен
быть ровным, прочным, чистым и не
бояться нагрева.
• Убедитесь, что между днищем прибора и
полом имеется достаточная вентиляция.
• Для обеспечения необходимого
пространства между прибором и
напольным покрытием отрегулируйте
высоту ножек прибора.
• Не устанавливайте прибор там, где его
крышку будет невозможно полностью
открыть.
• Не помещайте под прибор контейнер для
сбора воды на случай возможной ее
протечки. Чтобы узнать, какие
дополнительные принадлежности могут
использоваться с Вашим прибором,
обратитесь в авторизованный сервисный
центр.
ПОДКЛЮЧЕНИЕ К ЭЛЕКТРОСЕТИ
• Прибор должен быть заземлен.
• Включайте прибор только в установленную
надлежащим образом электророзетку с
защитным контактом.
• Убедитесь, что параметры, указанные на
табличке с техническими данными,
соответствуют характеристикам
электросети.
• Не используйте тройники и удлинители.
• Позаботьтесь о том, чтобы не повредить
вилку и сетевой кабель. В случае
необходимости замены сетевого шнура она
должна быть выполнена нашим
авторизованным сервисным центром.
• Вставляйте вилку сетевого кабеля в
розетку только по окончании установки
прибора. Убедитесь, что после установки
прибора к вилке электропитания имеется
свободный доступ.
• Не беритесь за кабель электропитания или
за его вилку мокрыми руками.
• Для отключения прибора от электросети не
тяните за кабель электропитания. Всегда
беритесь за саму вилку.
• Данный прибор соответствует директивам
E.E.C.
ПОДКЛЮЧЕНИЕ К ВОДОПРОВОДУ
• Не повреждайте шланги для воды.
• Перед подключением к новым или давно
не использовавшимся трубам, а также в
случае, если производились ремонтные
работы или устанавливались новые
устройства (счетчики воды и т.д.) дайте
воде стечь, пока она не станет прозрачной
и чистой.
• В ходе и по окончании первого
использования прибора убедитесь в
отсутствии видимых утечек воды.
ЭКСПЛУАТАЦИЯ
ВНИМАНИЕ! Существует риск
травмы, поражения электрическим
током, пожара, получения ожогов
или повреждения прибора.
• Данный прибор предназначен только для
бытового применения.
• Следуйте правилам по безопасному
обращению, приведенным на упаковке
моющего средства.
• Не помещайте на прибор, рядом с ним или
внутрь него легковоспламеняющиеся
вещества или изделия, пропитанные
легковоспламеняющимися веществами.
• Удостоверьтесь, что из белья извлечены
все металлические предметы.
• Не стирайте вещи, сильно загрязненные
маслом, жиром или другими веществами,
содержащими жиры. Это может привести к
повреждению резиновых деталей
стиральной машины. Перед загрузкой
таких изделий в стиральную машину
необходимо произвести их
предварительную стирку вручную.
СЕРВИС
• Для ремонта прибора обратитесь в
авторизованный сервисный центр.
• Применяйте только оригинальные
запасные части.
УТИЛИЗАЦИЯ
ВНИМАНИЕ! Существует
опасность травмы или удушья.
• Отключите прибор от электросети и
водопроводной сети.
• Обрежьте кабель электропитания как
можно ближе к прибору и утилизируйте его.
• Удалите защелку дверцы, чтобы дети или
домашние животные не оказались
заблокированными в барабане.
• Утилизируйте прибор в соответствии с
местными требованиями к утилизации
отработанного электрического и
электронного оборудования (WEEE).
20
Страница загружается ...
Страница загружается ...
Страница загружается ...
Страница загружается ...
Страница загружается ...
Страница загружается ...
Страница загружается ...
Страница загружается ...
Страница загружается ...
Страница загружается ...
Страница загружается ...
Страница загружается ...
Страница загружается ...
Страница загружается ...
Страница загружается ...
Страница загружается ...
-
 1
1
-
 2
2
-
 3
3
-
 4
4
-
 5
5
-
 6
6
-
 7
7
-
 8
8
-
 9
9
-
 10
10
-
 11
11
-
 12
12
-
 13
13
-
 14
14
-
 15
15
-
 16
16
-
 17
17
-
 18
18
-
 19
19
-
 20
20
-
 21
21
-
 22
22
-
 23
23
-
 24
24
-
 25
25
-
 26
26
-
 27
27
-
 28
28
-
 29
29
-
 30
30
-
 31
31
-
 32
32
-
 33
33
-
 34
34
-
 35
35
-
 36
36


Zanussi ZWQ71235SI Руководство пользователя
- Категория
- Стиральные машины
- Тип
- Руководство пользователя
Задайте вопрос, и я найду ответ в документе
Поиск информации в документе стал проще с помощью ИИ
на других языках
- English: Zanussi ZWQ71235SI User manual
Похожие модели бренда
-
Zanussi ZWQ61025WI Руководство пользователя
-
Zanussi ZWQ61226SI Руководство пользователя
-
-
-
-
-
-
Zanussi ZWY51004WA Руководство пользователя
-
-