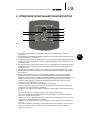
Hyundai H-AP2-07C-UI002 Руководство пользователя
- Категория
- Сплит-системы кондиционирования
- Тип
- Руководство пользователя
Это руководство также подходит для

RU
Электрический кондиционер
воздуха мобильного типа
Руководство по эксплуатации.
Гарантийный талон.
Electric air conditioner
portable type
Instruction manual.
Warranty card.
EN
Модели / Models
H-AP2-07C-UI002
H-AP2-09C-UI003
www.hyundai-hvac.com

2.
EN
Electric air conditioner
portable type
CONTENTS
1.Important information
2.Precautions
3.Technical characteristics
4.Description of portable air conditioner
5.Control panel air conditioner
6.Maintenance
7.Service life
8.Rules of disposal
9.Helpful advice
10.Troubleshooting
3
3
4
6
7
9
10
10
10
12

3.
EN
Electric air conditioner
portable type
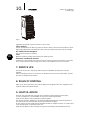
Dear Customer!
Thank you for a shrewd choice and purchase of Hyundai portable electric air conditioner.
It will serve you for a long time.
1. IMPORTANT INFORMATION
1. Please read this instruction manual carefully prior to installation and operation of a portable
air conditioner.
2. To avoid damage to the air conditioner and voiding your guarantee, before start using the
air conditioner put the device in a vertical position (as shown on the cover of this instruction
manual) for at least 2 hours prior to operation.
3. There may be misprints in the text and digital symbols in this manual.
4. If aer reading the manual you would still have questions regarding functioning and opera-
tion of the device, please contact the seller or a specialized service center for clarications.
5. The device has a tag indicating all necessary technical data and other useful information
about the device.
6. Use the device only as designated by this manual.
7. Prior to installation of the portable air conditioner, not connecting it to the mains, check and
make sure that the mains socket for the air conditioner has a grounding pin and is properly
grounded.
8. In case there is no grounding pin in your mains, operation of the portable air conditioner is
life-threatening.
9. Do not use adapters and extension cords to connect your portable air conditioner.
10. Improper installation and use of this air conditioner may lead to severe injuries or damage to
your property.
11. Any maintenance must be performed by a specialized company and qualied specialists.
2. PRECAUTIONS
1. Do not block vents!
2. Make sure the inlet and outlet vent is not blocked.
3. Do not insert foreign objects into the air diuser of the air conditioner. It is very dangerous
since the fan rotates at high speed.
4. Install the device only on a horizontal surface to prevent condensed water leakage.
5. Do not install the oor-mounted air conditioner in the following places:
- in places exposed to direct sunlight;
- in the vicinity of open re sources;
- in the vicinity of other operating heating devices;
- in places where water or steam splashes can contact the device;
- in rooms with increased humidity;
- close to swimming pools, bathrooms and shower rooms.
6. Do not use the device in an explosive or corrosive environment. Do not store gasoline and
other volatile ammable liquids near the air conditioner – it is very dangerous!
7. Use the device to cool down air at ambient temperature 17-32°C.
8. Regularly clean lters to ensure ecient operation of the device.
9. To ensure reliable operation of the compressor, do not tilt the air conditioner.
10. If the device is disconnected, restarting must be performed not sooner than in 3.5 minutes to
prevent the compressor failure.
11. At least 10 A current is required for the compressor to operate. To avoid overheating and
re risk, as well as damage to the inner electrical circuit, do not connect the device through
extension cords.
12. The device is designed to cool and dry air only in residential conditions and cannot be used
for industrial purposes.

4.
EN
Electric air conditioner
portable type
13. To avoid electric shock, a damaged power cord must be replaced only by an authorized
service center and qualied specialists.
14. Prior to disposal of the device, it is necessary to remove batteries from it, aer that they can
be safely disposed.
15. Connect the air conditioner only to 220-240 V 50 Hz mains. If necessary, ask your power
suppliers to give characteristics of your mains.
16. The appliance is not intended for use by children and persons with reduced physical, sensory
or mental capabilities, or a lack of experience and knowledge, unless they have been given
supervision or instruction concerning use of the appliance by an individual responsible for
their safety. Children should be supervised to ensure that they do not play with the appliance.
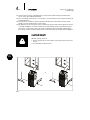
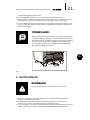
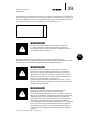
IMPORTANT!
Ecient cooling require to:
1. Ensure at least 30 cm of free space on the ltering side of the unit
(Fig. 1).
2. It is forbidden to fold the hose!
Fig. 1
or

5.
EN
Electric air conditioner
portable type
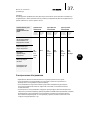
3.TECHNICAL CHARACTERISTICS
Tab.1
Scope of delivery
1. Household air conditioner 1 pc.
2. Remote control* (batteries are not supplied, 1,5V UM4 AAA CR03 batteries are required) 1pc.
3. The adapter for air duct 1 pc.
4. Air outlet hose 1 pc.
5. Removable grille 1 pc.
Capacity (cooling) kW
Rated input (cooling) W
Voltage V/Hz
Rated current (cooling) A
Air circulation m3/h
Capacity of draining (L/h)
Noise level dB(A)
Refrigerant
Energy class (cooling)
Electrical protection class
Degree of protection against moisture
Net weight (kg)
Gross weight (kg)
Net dimensions (mm)
Packing dimensions (mm)
2,05
810
220~240/50
3.5
370/320
0.8
55/52
R410A
A
I
IPX0
22.5
25
349x381x749
392x542x780
2,71
1030
220~240/50
4.7
370/320
1
55/52
R410A
A
I
IPX0
24.5
28
349x381x749
392x542x780
Model H-AP2-07C-UI002 H-AP2-09C-UI003
NOTE:
The manufacturer reserves the right to make changes in the design,
scope of delivery, product manufacturing technology, as well as
change its technical characteristics to improve its consumer and
technical properties without prior notice.

6.
EN
Electric air conditioner
portable type
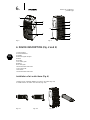
4. DEVICE DESCRIPTION (Fig. 2 and 3)
1. Control panel
2. Horizontal louver
3. Handle
4. Remote signal receptor
5. Panel
6. Air lter
7. Air outlet grille
8. Rollers
9. Air inlet grille
10. Condensation drain hole
11. Air inlet grille
12. Air lter
13. Condensation drain hole
Installation of air outlet hose (Fig. 4)
1. Before using install the adapter on hose for air outlet (Fig. 4-2)
2. Install hose for air outlet into the hole ( Fig. 4-3).
Fig. 2
Fig. 4-2Fig. 4-1 Fig. 4-3
Fig. 3
3 6
9
13
7
12
11
4
5
1
2
10
8

7.
EN
Electric air conditioner
portable type
5. CONTROL OF PORTABLE AIR CONDITIONER
Control panel
1. POWER button. Press this button to switch on or o the unit.
2. MODE button. Press this button to select the mode of dehumidication or cooling.
3. TEMP up button. In the cooling mode each press of this button raises, cooling and fan the set
temperature by 1°C up to maximum 30°C.
4. TEMP down button. In the cooling mode each press of this button lowers the set temperature
by 1°C up to minimum 17°C.
5. LED display. The appliance displays the set temperature and setting of the automatic timer.
During operation in the drying/fan mode, the appliance displays the current indoor tempera-
ture.
6. FAN speed button. Press this button to select low, high or automatic fan speed button. When
the automatic speed is selected (in the cooling mode), high, medium or low speeds are select-
ed automatically depending on the dierence between the set temperature and the room
temperature. In the automatic speed mode, all rotation speed indicators are extinguished.
7. Programmable timer on/o button.
ON timer. The ON timer is used to automatically switch on the unit upon expiration of the set
time.
Press the timer button when the unit is not operating to set the desired time (buttons 3 and
4).
The unit will be automatically switched on when the set time expires.
Press POWER button before the set time expires. Time setting will be canceled and the unit
will be switched on.
OFF timer. The OFF timer is used to automatically switch o the unit upon expiration of the
set time.
Press the timer button when the unit is operating to set the desired time (buttons 3 and 4).
The unit will be automatically switched o when the set time expires.
Press ON/OFF button before the set time expires. Time setting will be canceled and the unit
will be switched o.
8. SLEEP button. Press this button to increase (during cooling) or decrease (during heating) the
set temperature by 1°C in 30 min aer activation of this function. Temperature is increased
(during cooling) or decreased (during heating) by 1°C in another 30 min. In 7 hours, the air
conditioner will be automatically switched to the previous mode.
Fig. 5
1
78
4
5
3
6
2

8.
EN
Electric air conditioner
portable type
Indicators for operating mode:
Cool - cooling mode indicator
Dry - dry mode indicator
Fan - fan mode indicator
Auto - auto mode indicator
Hight - hight speed fan indicator
Low - low speed fan indicator
REMOTE CONTROL
1. Button «ON/OFF». Using this button, you may
turn the conditioner on or o.
2. Button
«TEMP» (increase) for setting of the
required air temperature from 17°С to 30°С.
Using this button, you may set the required
air temperature indoors.
3. Button «MEMORY». Using this button you
may restore the current settings or resume
previous setting. Hold the button to save
current settings. Press the button to load
stored settings.
4. Select-mode button
«MODE». Using this but-
ton, you may select a required mode: Auto,
Cool, Dry, Fan.
5.
Button «SLEEP». Press this button to
activate the sleep
6. Button «SWING». Using this button, you may
regulate position of air-relief blinds and
forward treated air to various directions.
7. Button
«DISPLAY». Using this button you
can may to clear the display on the indoor
unit. Press it again to light the display of air
conditioner.
8.
Button «TIMER OFF». Press this button to
initiate the o-delay timer.
9. Button «TIMER ON». Press this button to
initiate the on-delay timer.
10. Button «FAN». Using this button, you may select
rotation speed of the indoor unit fan: «Auto»,
«High», «Low».
11. Button «TEMP» (decrease) for setting of the
required air temperature from 17°С to 30°С.
Using this
button, you may set the required air tem-
perature indoors.
11
10
9
8
2
4
6
5
3
1
7
Fig. 6
Note
This function is not accessible in the fan/drying modes.
When power supply is turned o, the sleep mode is automatically
switched o.
When the unit is turned o, settings of the sleep mode are automati-
cally turned o.

9.
EN
Electric air conditioner
portable type
NOTE:
In dehumidication mode, remove the rubber plug of the drainage
hose, install the respective drainage hose (not in the set).
Disconnect the air outlet hose, connect the drainage hose to the
drainage hole and drain water from the unit to ensure maximum
dehumidication eciency.
To resume the operation, remove the rubber plug of the drainage
hose to drain water at rst. Aer water is drained, turn the unit on,
the unit will resume operation
Fig. 7
6. MAINTENANCE
1. When cleaning the air conditioner, do not use gasoline, solvents and other chemically active
substances.
2. To avoid electric shock and damage to electrical components, do not pour water on the air
conditioner from a tap or a hose.
3. Do not use the air conditioner if the power cord is damaged. On the subject of replacing a
damaged power cord, contact an authorized service center.
Air lter
Air lter clogging with dust particles impairs the air conditioner operation eciency, therefore
clean the lter no less than once in two weeks.
Filter removal/installation
Remove the air lter in the direction, indicated by the arrow. Slightly push it and then take it out
from the device for cleaning. (See Fig. 8).
IMPORTANT!
Disconnect the unit from the mains prior to cleaning.

10.
EN
Electric air conditioner
portable type
Fig. 8
Installation of the lter is performed in the reverse order.
Filter cleaning
At rst, carefully clean the lters by means of vacuum cleaners. Then immerse the lter in warm
water (about 40°C) with a so detergent, wash it and dry it without exposure to direct sunlight.
Air intakes (heat exchangers)
Use a vacuum cleaner for cleaning.
Case
Wipe the surface by a damp cloth and dry it by a so dry cloth.
Automatic condensate removal
Condensate is automatically removed from the unit. Moisture inside the unit starts to evaporate
and is removed from the unit through an air duct (or an air diuser) in the form of steam.
7. SERVICE LIFE
Service life of the unit is 10 years provided respective installation and operation rules are
followed.
Date of manufacture of the air conditioner is indicated on the unit in the serial number. Contact
the seller for additional information.
8. RULES OF DISPOSAL
Aer service life is expired, the unit must be disposed in compliance with rules, regulations and
methods eective at disposal stations.
9. HELPFUL ADVICE
Since the unit may heat when operated, do not install it in places with limited free space.
In case of a dangerous current leakage, do not use the unit at high humidity.
Keep the unit away from direct sunlight: its paint may fade.
The unit has a function allowing it to be switched o automatically at a certain temperature, in
this case let the unit cool down, aer that it can be switched on again.
Do not position the unit nearby objects that block air ow, for example, furniture or curtains since
it has a great impact on operation of the unit.
Keep the unit away from direct sunlight: it may cause overheating and shutdown of the unit.

11.
EN
Electric air conditioner
portable type
IMPORTANT!
At high humidity additional condensate removal will be required (P1
symbol will be shown on the display). In this case a condensate collec-
tion tank at the device’s base is used.
In this case follow the instructions given below.
When the condensate collection tank is lled up, water needs to be
drained, otherwise the unit will not operate. Condensate should be
drained by opening the lower plug at the device’s base (Fig. 9).
But air conditioners are also designed to remove condensate continu-
ously without a need for a regular moisture removal from the device.
To do so it is necessary to use the drainage hose (not in the set) and
perform the following procedure:
1. Prepare the drainage hose for condensate removal;
2. Remove the plug from the back side of the device;
3. Insert the drainage hose into the condensate drainage hole;
4. Take the hose out to the drainage system to remove condensate;
A hole designed for continuous condensate removal in the center of
the device (Fig. 9) can be used for continuous condensate removal
under conditions of increased humidity inside a room.
To do so it is also necessary to perform the abovementioned proce-
dure.
ELECTRIC POWER SUPPLY
Make sure characteristics of the mains correspond to characteristics of the unit.
Insert the plug in the socket securely to avoid overheating and risk of re.
Do not pull the power cord with excessive force: it may damage it.
Fig. 9

12.
EN
Electric air conditioner
portable type
10. TROUBLESHOOTING
The air conditioner is not
switched on when Power
button is pressed
Loud noise or strong vibra-
tion
A noise, resembling a gurgle
of water
The tank ll-up indicator
is ashing, the condensate
collection tray is lled up
The air conditioner is
installed on an inclined or
unsmooth surface
Noise emerges due to
refrigerant ow in pipes
Drain water from the tray
Install the air conditioner on a
smooth horizontal surface
It is normal
Trouble Cause Troubleshooting method
Error codes for LED-display model
E1
E2
E3
P1
Room temperature sensor
error
Evaporator temperature
sensor error
Display panel communica-
tion error
Bottom tray is full
Unplug the unitand plug it
back in. If error repeats, call
for service
Unplug the unitand plug it
back in.
If error repeats, call for
service
Unplug the unitand plug it
back in.
If error repeats, call for
service
Connect the drain hose and
drain the collected water
away. If error repeats, call for
service
Error codes for LED-display model
NOTE:
When more than one codes occur, the priority of the code display
order is: E4-E2-E1-P1.

13.
EN
Electric air conditioner
portable type
Such marking indicates that disposal of this product along with other
domestic waste is forbidden in the EU. To prevent environmental or
health damage as a result of uncontrolled waste disposal, please hand
this product for recycling to enable rational use of material resources.
To return the device you used, please use the collection and return
system or contact the point of sale, where the device was purchased.
They can take it for an environmentally safe disposal.

14.
Электрический кондиционер воздуха мобильного типа
RU
Содержание
1. Важная информация
2. Меры предосторожности
3. Технические характеристики
4. Описание мобильного кондиционера
5. Управление мобильным кондиционером
6. Обслуживание
7. Срок эксплуатации
8. Правила утилизации
9. Полезные советы
10. Устранение неисправностей
11. Сертификация
14
15
17
18
19
21
22
22
22
24
26

15.
Электрический кондиционер воздуха мобильного типа
RU
Уважаемый покупатель!
Благодарим Вас за удачный выбор и приобретение электрического мобильного
кондиционера воздуха Hyundai. Он прослужит Вам долго.
1. ВАЖНАЯ ИНФОРМАЦИЯ
1. Просим внимательно ознакомиться с инструкцией по эксплуатации перед установкой и
использованием мобильного кондиционера воздуха.
2. Во избежание повреждений кондиционера и аннулирования Вашей гарантии перед
началом работы поставьте прибор в вертикальное положение (как изображено на
обложке инструкции) минимум на 2 часа до эксплуатации.
3. В тексте и цифровых обозначениях данной инструкции могут быть допущены опечатки.
4. Если после прочтения инструкции у Вас останутся вопросы по работе и эксплуатации
прибора, обратитесь к продавцу или в специализированный сервисный центр для
получения разъяснений.
5. На изделии присутствует этикетка, на которой указаны все необходимые технические
данные и другая полезная информация о приборе.
6. Используйте прибор только по назначению, указанному в данной инструкции.
7. Перед установкой мобильного кондиционера, не подключая его к электросети,
проверьте и убедитесь, что сетевая розетка для кондиционера имеет контакт
заземления и правильно заземлена.
8. При отсутствии заземляющего контура в вашей электросети эксплуатация мобильного
кондиционера опасна для жизни.
9. Не используйте переходники и удлинители для подключения вашего мобильного
кондиционера.
10. Неправильная установка и использование настоящего кондиционера может привести к
серьезным травмам или ущербу для вашего имущества.
11. Любые сервисные работы должны производиться специализированной организацией,
квалифицированными специалистами.
2. МЕРЫ ПРЕДОСТОРОЖНОСТИ
1. Не закрывайте вентиляционные отверстия!
2. Убедитесь, что входное и выходное вентиляционное отверстие свободно.
3. Не засовывайте посторонние предметы в воздуховыпускные решетки кондиционера.
Это очень опасно, т.к. вентилятор вращается с высокой скоростью.
4. Устанавливайте устройство на горизонтальную поверхность во избежание утечки
конденсата (воды).
5. Не устанавливайте напольный кондиционер в следующих местах:
- в местах воздействия прямых солнечных лучей;
- вблизи источников открытого пламени;
- вблизи других работающих нагревательных приборов;
- в местах, где возможно попадание брызг воды или пара на прибор;
- в помещениях с повышенной влажностью;
- вблизи бассейнов, ванных и душевых комнат.
6. Не используйте устройство во взрывоопасной или коррозионной среде. Не храните
рядом с кондиционером бензин и другие летучие легковоспламеняющиеся жидкости –
это очень опасно!
7. Используйте устройство в режиме охлаждения для поддержания температуры в
помещении 17-32°С.
8. Периодически очищайте фильтры для обеспечения эффективной работы устройства.
9. Для обеспечения надежной работы компрессора не наклоняйте кондиционер.
10. Если устройство отключено, повторное включение должно осуществляться не ранее чем
через 3,5 минуты во избежание выхода из строя компрессора.

16.
Электрический кондиционер воздуха мобильного типа
RU
11. Для работы компрессора необходим ток силой как минимум 10А. Во избежание
перегрева и риска возникновения пожара, а также повреждения внутренней
электрической сети, не включайте устройство в удлинители.
12. Устройство предназначено для охлаждения и осушения воздуха только в домашних
условиях и не может применяться в промышленных целях.
13. Во избежание опасности поражения электрическим током, поврежденный силовой
шнур должен заменяться только авторизованным сервисным центром изготовителя,
квалифицированными специалистами.
14. Перед утилизацией устройства необходимо извлечь батареи из пульта управления,
после чего они подлежат безопасной утилизации.
15. Подключайте кондиционер только к сети 220-240 В 50 Гц. При необходимости выясните
характеристики своей сети у поставщиков электроэнергии.
16. Устройство не предназначено для использования лицами (включая детей) с
ограниченными физическими, сенсорными или умственными возможностями,
обладающими недостаточным опытом и знаниями, если они не находятся под
наблюдением и не получили инструкций по использованию устройства от лица,
ответственного за их безопасность. Необходимо следить, чтобы дети не играли с
устройством.
Воздуховод может быть собран или удлинен согласно требованию по установке, но
рекомендуется, чтобы воздуховод был собран до минимальной длины.
ВНИМАНИЕ!
Для эффективного охлаждения необходимо:
1. Обеспечить свободное пространство не менее 30 см с
фильтрующей стороны устройства. (рис.1).
2. Запрещается перегибать шланг!
или
Рис. 1

17.
Электрический кондиционер воздуха мобильного типа
RU
3.ТЕХНИЧЕСКИЕ ХАРАКТЕРИСТИКИ
Таблица 1
Комплектация
1. Кондиционер бытовой 1 шт.
2. Пульт дистанционного управления (батарейки не прилагаются* требуются батарейки
1,5 вольт UM4 AAA CR03) 1 шт.
3. Переходник воздуховода 1 шт.
4. Воздуховод 1 шт.
5. Съемная решетка 1 шт.
* Зависит от комплектации
Мощность (охлаждение) кВт
Потребляемая мощность (охлаждение) Вт
Напряжение питания В/Гц
Сила тока (охлаждение) А
Расход воздуха м3/ч
Производительность по осушению(л/ч)
Уровень шума Дб (А)
Тип фреона
Класс энергоэффективности (охлаждение)
Класс электрозащиты
Степень защиты от влаги
Вес нетто (кг)
Вес брутто (кг)
Размеры прибора (мм)
Размеры в упаковке (мм)
2,05
810
220~240/50
3.5
370/320
0.8
55/52
R410А
A
I
IPX0
22.5
25
349x381x749
392x542x780
2,71
1030
220~240/50
4.7
370/320
1
55/52
R410А
A
I
IPX0
24.5
28
349x381x749
392x542x780
Модель H-AP2-07C-UI002 H-AP2-09C-UI003
ПРИМЕЧАНИЕ:
Изготовитель оставляет за собой право без предварительного
уведомления покупателей вносить изменения в конструкцию,
комплектацию, технологию изготовления изделия, а также
менять его технические характеристики с целью улучшения его
потребительских и технических свойств.

18.
Электрический кондиционер воздуха мобильного типа
RU
4. ОПИСАНИЕ МОБИЛЬНОГО КОНДИЦИОНЕРА
(рис.2 и 3)
1. Панель управления
2. Горизонтальные жалюзи
3. Ручка для переноски
4. Приемник сигнала с пульта управления
5. Панель
6. Фильтр для очистки воздуха
7. Воздуховыпускная решетка
8. Ролики для перемещения
9. Воздухозаборная решетка
10. Отверстие для слива конденсата
11. Воздухозаборная решетка
12. Фильтр для очистки воздуха
13. Отверстие для слива конденсата
Установка шланга для выброса воздуха (рис. 4)
1. Перед эксплуатацией прибора установите адаптер на шланг для вывода воздуха (рис.4-2).
2. Установите шланг для вывода воздуха в отверстие ( рис. 4-3).
3 6
9
13
7
12
11
4
5
1
2
10
8
Рис. 2
Рис. 4-2Рис. 4-1 Рис. 4-3
Рис. 3

19.
Электрический кондиционер воздуха мобильного типа
RU
5. УПРАВЛЕНИЕ МОБИЛЬНЫМ КОНДИЦИОНЕРОМ
1. Кнопка включения-выключения (POWER). Нажать для включения или отключения
устройства.
2. Кнопка выбора режима работы (MODE). Нажмите эту кнопку для выбора режима осуше-
ния, вентиляции или охлаждения.
3. Кнопка установки желаемой температуры в сторону увеличения (вверх TEMP). В режиме
охлаждения каждое нажатие этой кнопки повышает установленную температуру на 1°С
до максимум 30°С.
4. Кнопка установки желаемой температуры в сторону уменьшения (вниз TEMP). В режиме
охлаждения каждое нажатие этой кнопки понижает установленную температуру на 1°С
до минимум 17°С.
5. LED дисплей отображает установленную температуру и время автоматического тайме-
ра. При работе в режиме осушения или вентилятора отображает текущую температуру
в помещении.
6. Выбор скорости вращения вентилятора (SPEED). Нажимайте эту кнопку для выбора
низкой, высокой или автоматической скорости вращения вентилятора. При выборе
автоматической скорости (в режиме охлаждения) высокая, средняя или низкая скорость
выбираются автоматически в зависимости от разницы между установленной темпе-
ратурой и температурой в помещении. В режиме автоматической скорости ни один
индикатор скорости вращения не светится.
7. Кнопка включения/выключения программируемого таймера.
Таймер включения. Таймер включения используется для автоматического включения
устройства по истечении заданного времени.
Нажмите кнопку таймер когда прибор не работает, чтобы задать нужное время (кнопки
3 и 4).
По истечении заданного времени устройство автоматически включится.
До истечения заданного времени нажмите кнопку (POWER). Установка времени будет
отменена, и устройство включится.
Таймер отключения. Таймер отключения используется для автоматического отключения
устройства по истечении заданного времени.
Нажмите кнопку таймер в процессе работы прибора, чтобы задать нужное время (кноп-
ки 3 и 4).
По истечении заданного времени устройство автоматически отключится. До истечения
заданного времени нажмите кнопку ON/OFF. Установка времени будет отменена, и
устройство отключится.
1
78
4
5
3
6
2
Рис. 5

20.
Электрический кондиционер воздуха мобильного типа
RU
8. Кнопка режима ночной (SLEEP): при нажатии этой кнопки установленная температура
увеличивается (при охлаждении) или уменьшается (при обогреве) на 1 градус через 30
минут после включения этой функции. Температура увеличивается (при охлаждении)
или уменьшается (при обогреве) на 1 градус еще через 30 минут. Через 7 часов конди-
ционер автоматически перейдет в прежний режим работы.
Примечание: функция не доступна в режимах вентилятора и
осушения.
При отключении электроэнергии режим сна автоматически отключается.
При отключении устройства установки режима сна автоматически отключаются.
Мобильный кондиционер снабжен защитной цепью 3-минутной задержки включения
компрессора. Это означает, что для запуска компрессора требуется 3,5 минуты после вклю-
чения устройства или переключения с режима осушения на любой другой режим.
Индикаторы на панели управления:
Cool - индикатор работы в режиме охлаждения
Dry - индикатор работы в режиме осушения
Fan - индикатор работы в режиме вентиляции
Auto - индикатор работы в автоматическом режиме
High - индикатор высокой скорости работы вентилятора
Low - индикатор низкой скорости работы вентилятора
ПУЛЬТ ДИСТАНЦИОННОГО УПРАВЛЕНИЯ
Рис. 6
1. Кнопка «ON/OFF». С помощью данной
кнопки можно включить или выключить
кондиционер.
2. Кнопки «TEMP» (уменьшение) для уста-
новки необходимой температуры воздуха
от 17°С до 30°С. С помощью данной кноп-
ки задается необходимая пользователю
температура воздуха в помещении.
3. Кнопка «MEMORY». С помощью данной
кнопки можно записать текущие
настройки или восстановить прежние.
Удерживайте клавишу для записи те-
кущих настроек. Нажмите клавишу для
вызова записанных настроек.
4. Кнопка выбора режимов работы «MODE».
С помощью данной кнопки можно
выбрать необходимый режим работы:
Автоматический, Охлаждение, Осуше-
ние, Вентиляция.
5. Кнопка «SLEEP». Нажмите для активации
ночного режима.
6. Кнопка «SWING». С помощью данной
кнопки можно регулировать положение
воздуховыпускных заслонок и направ-
лять обработанный воздух в различные
стороны.
7. Кнопка «DISPLAY». С помощью данной
кнопки можно отключить подсветку
дисплея кондиционера. С помощью
повторного нажатия кнопки можно
включить подсветку дисплея.
8. Кнопка «TIMER OFF». Нажмите эту кнопку
11
10
9
8
2
4
6
5
3
1
7
Страница загружается ...
Страница загружается ...
Страница загружается ...
Страница загружается ...
Страница загружается ...
Страница загружается ...
Страница загружается ...
Страница загружается ...
Страница загружается ...
Страница загружается ...
Страница загружается ...
Страница загружается ...
Страница загружается ...
Страница загружается ...
Страница загружается ...
Страница загружается ...
Страница загружается ...
Страница загружается ...
Страница загружается ...
Страница загружается ...
Страница загружается ...
Страница загружается ...
Страница загружается ...
Страница загружается ...
Страница загружается ...
Страница загружается ...
Страница загружается ...
Страница загружается ...
Страница загружается ...
Страница загружается ...
Страница загружается ...
Страница загружается ...
-
 1
1
-
 2
2
-
 3
3
-
 4
4
-
 5
5
-
 6
6
-
 7
7
-
 8
8
-
 9
9
-
 10
10
-
 11
11
-
 12
12
-
 13
13
-
 14
14
-
 15
15
-
 16
16
-
 17
17
-
 18
18
-
 19
19
-
 20
20
-
 21
21
-
 22
22
-
 23
23
-
 24
24
-
 25
25
-
 26
26
-
 27
27
-
 28
28
-
 29
29
-
 30
30
-
 31
31
-
 32
32
-
 33
33
-
 34
34
-
 35
35
-
 36
36
-
 37
37
-
 38
38
-
 39
39
-
 40
40
-
 41
41
-
 42
42
-
 43
43
-
 44
44
-
 45
45
-
 46
46
-
 47
47
-
 48
48
-
 49
49
-
 50
50
-
 51
51
-
 52
52


Hyundai H-AP2-07C-UI002 Руководство пользователя
- Категория
- Сплит-системы кондиционирования
- Тип
- Руководство пользователя
- Это руководство также подходит для
Задайте вопрос, и я найду ответ в документе
Поиск информации в документе стал проще с помощью ИИ
Похожие модели бренда
Модели других брендов
-
Timberk T-AC12-S28 Руководство пользователя
-
Whirlpool AMD 343 Руководство пользователя
-
-
-
LG P08AH.NF1R0 Инструкция по применению
-
Hoover H-Purifier 700 Руководство пользователя
-
Kraft KF-FS55-16BLTR Инструкция по эксплуатации
-
Tripp Lite Air Conditioner SRCOOL12K Руководство пользователя
-
-