Indesit 7OOS 997D P IX RU/HA Руководство пользователя
- Категория
- Печи
- Тип
- Руководство пользователя

7OOS 997D P RU/HA
7OOS 997D P IX RU/HA
Contents
Installation, 2-3
Positioning
Electrical connection
Technical data
Description of the appliance, 4
Overall view
Control panel
Display
Oven structure, 5
Start-up and use, 6-12
Setting the clock
Setting the timer
ExtraLarge Space
Small Space
Main Space
Using the Small Space and Main Space at the same
time
Programming cooking
Practical cooking advice
Cooking advice table for ovens with the ExtraLarge
Space feature
Cooking advice table for the Small Space feature
Cooking advice table for the Main Space feature
Cooking advice table for using the Small Space and
Main Space at the same time
Precautions and tips, 13
General safety
Disposal
Respecting and conserving the environment
Care and maintenance, 14-15
Switching the appliance off
Cleaning the appliance
Cleaning the oven door
Replacing the light bulb
Automatic cleaning with the FAST CLEAN function
Assistance, 16
Operating Instructions
OVEN
GB
Русский, 17English,1
GB
RS

2
GB
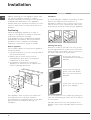
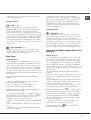
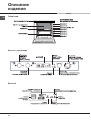
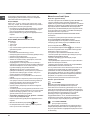
Ventilation
To ensure adequate ventilation is provided, the back
panel of the cabinet must be removed. It is
advisable to install the oven so that it rests on two
strips of wood, or on a completely flat surface with
an opening of at least 45 x 560 mm (
see diagrams
).
Centring and fixing
Position the 4 tabs on the side of the oven so that
they are aligned with the 4 holes on the outer frame.
Adjust the tabs in accordance with the thickness of
the cabinet side panel, as shown below:
20 mm thick: take off the
removable part of the tab (
see
diagram
).
18 mm thick: use the first
groove, which has already
been set in the factory (
see
diagram
).
16 mm thick: use the second
groove (
see diagram
).
Secure the appliance to the cabinet by opening the
oven door and inserting 4 screws into the 4 holes on
the outer frame.
! All parts which ensure the safe operation of the
appliance must not be removable without the aid of
a tool.
! Before operating your new appliance please read
this instruction booklet carefully. It contains
important information concerning the safe operation,
installation and maintenance of the appliance.
! Please keep these operating instructions for future
reference. Pass them on to any new owners of the
appliance.
Positioning
! Keep all packaging material out of reach of
children. It may present a choking or suffocation
hazard (
see Precautions and tips
).
! The appliance must be installed by a qualified
professional in accordance with the instructions
provided. Incorrect installation may damage
property or cause harm to people or animals.
Built-in appliance
Use a suitable cabinet to ensure that the appliance
functions properly.
• The panels adjacent to the oven must be made of
heat-resistant material.
• Cabinets with a veneer exterior must be
assembled with glues which can withstand
temperatures of up to 100°C.
• To install the oven under the counter (
see
diagram
) or in a kitchen unit, the cabinet must
have the following dimensions:
! The appliance must not come into contact with
electrical parts once it has been installed.
The indications for consumption given on the data
plate have been calculated for this type of
installation.
595 mm.
595 mm.
24 mm.
545 mm.
5 mm.
576 mm.
23 mm.
593 mm.
45 mm.
558 mm.
547 mm. m
in.
Installation
560 mm.
45 mm.

3
GB
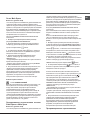
Electrical connection
! Ovens equipped with a three-pole power supply
cable are designed to operate with alternating
current at the voltage and frequency indicated on
the data plate located on the appliance (
see below
).
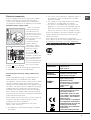
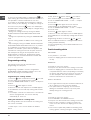
Fitting the power supply cable
1. Open the terminal
board by inserting a
screwdriver into the
side tabs of the cover.
Use the screwdriver as
a lever by pushing it
down to open the cover
(
see diagram
).
2. Install the power
supply cable by
loosening the cable
clamp screw and the
three wire contact
screws L-N-
.
Connect the wires to
the corresponding
terminals: the Blue wire
to the terminal marked
(N), the Brown wire to
the terminal marked (L)
and the Yellow/Green
wire to the terminal
marked
(
see diagram
).
3. Secure the cable by fastening the clamp screw.
4. Close the cover of the terminal board.
Connecting the electricity supply cable to the
mains
Install a standardised plug corresponding to the
load indicated on the data plate (
see table
).
The appliance must be directly connected to the mains
using an omnipolar switch with a minimum contact
opening of 3 mm installed between the appliance and
the mains. The switch must be suitable for the charge
indicated and must comply with current electrical
regulations (the earthing wire must not be interrupted
by the switch). The supply cable must be positioned
so that it does not come into contact with temperatures
higher than 50°C at any point.
! The installer must ensure that the correct electrical
connection has been made and that it is fully
compliant with safety regulations.
Before connecting the appliance to the power
supply, make sure that:
• The appliance is earthed and the plug is compliant
with the law.
• The socket can withstand the maximum power of
the appliance, which is indicated on the data
plate (
see below
).
• The voltage is in the range between the values
indicated on the data plate (
see below
).
• The socket is compatible with the plug of the
appliance. If the socket is incompatible with the
plug, ask an authorised technician to replace it.
Do not use extension cords or multiple sockets.
! Once the appliance has been installed, the power
supply cable and the electrical socket must be
easily accessible.
! The cable must not be bent or compressed.
! The cable must be checked regularly and replaced
by authorised technicians only (
see Assistance
).
!
The manufacturer declines any liability shouldThe manufacturer declines any liability should
The manufacturer declines any liability shouldThe manufacturer declines any liability should
The manufacturer declines any liability should
these safety measures not be observed.these safety measures not be observed.
these safety measures not be observed.these safety measures not be observed.
these safety measures not be observed.
N
L
APPLIAN CE SPECI FI CATIONS
Dimensions
widt h 43.4 cm
height 39.5 cm
depth 40.8 cm
Vol ume 70 l
El ect ric al
connec ti ons
voltage: 220 - 240 V~ 50Hz
maximum power absorbed
3400 W (see data plate)
ENERGY
LABEL
Directive 2002/40/EC on the
label of electric ovens.
Standard EN 50304
Declared energy consumption
for Forced convection Class –
heating mode:
Gratin.
This appliance conforms to the
following European Economic
Community directives:
2006/ 95/ EEC da ted 12/12/06
(Low Volt age) and subsequent
amendments – 2004/ 108/EEC
dated 15/12/04
(Electromagnetic Compatibility)
and subsequent amendments -
93/68/EEC dated 22/07/93 and
subsequent amendments.
2002/ 96/ EEC an d subsequent
amendments.
1275/ 2008 stand -by/off mode.

4
GB
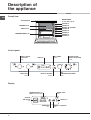
Control panel
RACK shelf
DRIPPING PAN shelf
GUIDE RAILS
for the sliding racks
position 5
position 4
position 3
position 7
position 6
Divider "D" position
position 2
position 1
DIVIDER shelf
Description of
the appliance
Overall view
Control panel
Display
EXTRALARGE
SPACE FUNCTION
knob
SET
TEMPERATURE/TIMER
knob
DISPLAY
SET TIMER
button
SELECT RECESS
button
MAIN SPACE
FUNCTION
knob
SMALL SPACE
FUNCTION
knob
¡•OC
•• ••
:
¡•OC
•• ••
:
TEMPERATURE and
TIME numerical digits
END OF COOKING
icon
DURATION
icon
TIMER icon
RECESS
SELECTED
icon
DOOR LOCK
icon

5
GB
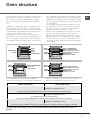
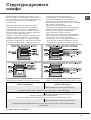
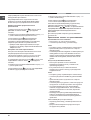
The Openspace oven has a capacity of 70 litres and
offers users the option of cooking on 4 shelves at
the same time or cooking large quantities, which
would not necessarily be possible in a traditional
oven.
Thanks to the ExtraLarge Space, Openspace offers
10 cooking functions, 6 of which are universal and
suitable for any type of cooking, while the remaining
4 are automatic programmes which can be used to
achieve perfect results for any recipe.
Openspace also offers maximum comfort for all
requirements, with 4 different operating options: the
oven is one large compartment but can be divided
into separate spaces of various sizes, each with its
Oven structure
own independent temperature and duration controls.
This is made possible thanks to the heat-insulating
DIVIDER, which divides the whole ExtraLarge Space
into two different-sized spaces: the Main Space and
the Small Space.
The two Main and Small Space compartments may
be used at the same time to cook different dishes
more quickly, or they may be used separately so
that only the space necessary is used.
When the two compartments are used at the same
time, the cooking temperature of each may be
adjusted to a value between 50° and 250°. There
may be a difference in temperature of 100° between
the two zones, which means it is possible to cook
very different dishes without any flavours or aromas
intermingling.
RACK
DRIPPING PAN
RACK
RACK
EXTRALARGE
SPACE
ExtraLarge Space: cooking on 4 shelf levels
RACK or DRIPPING PAN
DRIPPING PAN
(cooking on 3 shelves)
Divider "D" (fixed position)
RACK (cooking on 3 shelves)
RACK (cooking on 3 shelves)
SMALL
SPACE
MAIN
SPACE
DRIPPING PAN
(cooking on 3 shelves)
Divider "D" (fixed position)
RACK (cooking on 3 shelves)
RACK (cooking on 3 shelves)
SMALL
SPACE
MAIN
SPACE
Main and Small Space: simultaneous operation
RACK or DRIPPING PAN
Divider "D"
(fixed position)
SMALL
SPACE
MAIN
SPACE
Cooking using the Small Space only
Cooking using the Main Space only: cooking on 3 shelf levels
The table below lists the possible temperature
values which may be set. The intelligent display will
guide you through the correct procedure used to
adjust the temperature of the two recesses.
To cancel any of the settings, simply turn the Small Space or Main Space function knob to the "0"
position.
Temperature in the first cavity
(Main or Small Space)
Temperature in the second cavity
(Small or Main Space)
Between 40°C and 150°C The temperature difference in relation to the first recess
selected is no greater than 50°C
For example: if you set one recess to 90°C,
you may set a value of between 40°C (90°C-50°C) and 140°C (90°C+50°C) for the other.
Between 155°C and 200°C The temperature difference in relation to the first recess
selected is no greater than 70°C
For example: if you set one recess to 180°C,
you may set a value of between 110°C (180°C-70°C) and 250°C (180°C+70°C) for the other.
Between 205°C and 250°C The temperature difference in relation to the first recess
selected is no greater than 100°C
For example: if you set one recess to 210°C,
you may set a value of between 110°C (210°C-100°C) and 250°C (maximum temperature setting) for the other.

6
GB
! The first time you use your appliance, heat the empty
oven with its door closed at its maximum temperature for
at least half an hour. Make sure that the room is well
ventilated before switching the oven off and opening the
oven door. The appliance may emit a slightly unpleasant
odour caused by protective substances used during the
manufacturing process burning away.
! Never put objects directly on the bottom of the oven; this
will prevent the enamel coating from being damaged.
! Always place cookware on the racks provided.
! During use, we suggest removing any crockery or
delicate foodstuffs from the recesses not in function.
! We suggest not opening the door when cooking
foodstuffs which require leavening, so as to not
compromise cooking results.
! If the door is subject to repeated jerking, the divider may
come out of its housing. If this happens, the time will
appear on the display. Make sure that the divider is
correctly installed then re-start cooking.
Cooling ventilation
In order to cool down the external temperature of the oven,
a cooling fan blows a stream of air between the control
panel and the oven door.
! Once cooking is completed, the cooling fan activates
and deactivates automatically until the oven has cooled
down sufficiently.
Setting the clock
! This may only be set while the oven is switched off.
1. Press the
button until the first numerical digit flashes
on the display and the
, and icons are switched
off.
2. Turn the TIMER KNOB towards “+” and “-” to adjust
the hour value.
3. Press the
button again so that the other two
numerical digits on the DISPLAY begin to flash.
4. Turn the TIMER KNOB towards “+” and “-” to adjust
the minute value.
5. Press the
button again to confirm.
Setting the timer
! This function does not interrupt cooking and does not
affect the oven; it is simply used to activate the buzzer
when the set amount of time has elapsed.
1. Press the
button until the icon and the three
digits on the DISPLAY begin to flash.
2. Turn the TIMER KNOB towards “+” and “-” to adjust
the minute value.
3. Press the
button again to confirm.
The display will then show the time as it counts down.
When this period of time has elapsed the buzzer will be
activated.
ExtraLarge Space
Starting the oven
1. Select the desired cooking function by turning the
EXTRALARGE SPACE FUNCTION knob. If the
icon
on the display is lit, this indicates that the ExtraLarge
Space has been selected and therefore that only the
settings corresponding to the ExtraLarge Space may be
used.
2. The oven will begin its preheating stage. The
temperature may be changed by turning the
TEMPERATURE knob. The
indicator light flashes
during the pre-heating stage.
3. Once the pre-heating stage is completed, the
icon
stops flashing (becomes fixed) and a buzzer sounds. It is
now possible to introduce foodstuffs into the oven.
4. During cooking it is always possible to:
- Change the cooking function by turning the
EXTRALARGE SPACE FUNCTION knob.
- Adjust the temperature using the TEMPERATURE knob
(for the universal cooking functions only).
- Set a duration (for universal cooking functions only) and
the cooking end time.
- Stop cooking by turning the EXTRALARGE SPACE
FUNCTION knob to the “0” position.
5. If a blackout occurs while the oven is already in
operation, an automatic system within the appliance will
reactivate the cooking function from the point at which it
was interrupted, as long as the temperature has not
dropped below a certain level. Programmed cooking
modes which have not started will not be restored and
must be reprogrammed.
!!
!!
! When using the oven in its ExtraLarge configuration, it
will not be possible to use the Main and Small Space
features: the SMALL SPACE and MAIN SPACE
FUNCTION knobs will be disabled.
Universal cooking functions
! All functions have a default cooking temperature which
may be adjusted manually to a value between 40°C and
250°C as desired.
For the BARBECUE function, the default power level value
is indicated as a percentage (%) and may also be
adjusted manually.
Start-up and use

7
GB
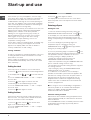
2. Place the rotisserie
support in position 3 and
insert the spit in the hole
provided on the back
panel of the oven.
3. Begin spit roast
operation by selecting the
or functions.
Automatic cooking functions
! The
temperaturetemperature
temperaturetemperature
temperature and cooking duration are
pre-setpre-set
pre-setpre-set
pre-set
values, guaranteeing a perfect result every time -
automatically. These values are set using the
C.O.P.®C.O.P.®
C.O.P.®C.O.P.®
C.O.P.®
(
Programmed Optimal CookingProgrammed Optimal Cooking
Programmed Optimal CookingProgrammed Optimal Cooking
Programmed Optimal Cooking) system. The cooking
cycle stops automatically and the oven indicates when
the dish is cooked. The cooking duration may be modified
by a period of several minutes, as specified in the
description of the individual functions below.
ROAST function
Use this function to cook veal, pork, lamb and beef. Place
the food inside the oven while it is still cold. The dish may
also be placed in a preheated oven. It will only be
possible to adjust the duration by -10/+10 minutes.
BAKED CAKES function
This function is ideal for baking cakes. Place the food
inside the oven while it is still cold. The dish may also be
placed in a preheated oven. It will only be possible to
adjust the duration by -10/+15 minutes.
BREAD function
Use this function to make bread. Please see the following
chapter for the recipe and further details.
To achieve the best possible results, we recommend that
you carefully observe the instructions below:
• Follow the recipe.
• Remember to pour 150 g (150 ml) of cold water into
the baking tray, which should be placed in position
7.
Place the food inside the oven while it is still cold. If you
wish to place the food in the oven after it has been
preheated, immediately following a high-temperature
cooking programme, the text “Hot” will appear on the
display until the temperature of the oven has fallen to 40°.
At this point it will be possible to place the bread in the
oven.
PIZZA function
Use this function to make pizza. Please see the following
chapter for further details. It will only be possible to adjust
MULTILEVEL function
All heating elements and the fan are activated. Since the heat
remains constant throughout the oven, the air cooks and
browns food in a uniform manner. A maximum of four racks
may be used at the same time. If you are using several
racks at the same time, we recommend you place the
dripping pan on the lower rack. If you are cooking on 4 levels
at the same time, we recommend you place the shelves on
racks 3, 5 and 6 and the dripping pan on rack 1.
GRATIN function
The top heating element and the rotisserie spit (where
present) are activated and the fan begins to operate.
During part of the cycle the circular heating element is
also activated. This combination of features increases the
effectiveness of the unidirectional thermal radiation
provided by the heating elements through the forced
circulation of the air throughout the oven.
This helps prevent food from burning on the surface and
allows the heat to penetrate right into the food. Always
cook in this mode with the oven door closed.
BARBECUE function
The top heating element and the rotisserie spit (where
present) are activated. By turning the TEMPERATURE
knob, the different power levels which may be set will
appear on the display; these range between 5% and
100%. The high and direct temperature of the grill is
recommended for food which requires a high surface
temperature. Always cook in this mode with the oven door
closed.
LOW TEMPERATURE function
This type of cooking can be used for proving, defrosting,
preparing yoghurt, heating dishes at the required speed
and slow cooking at low temperatures. The temperature
options are: 40, 65 and 90 °C.
FAST CLEAN mode
This mode cleans the oven automatically and thoroughly
by pyrolysis (
see Maintenance and care
).
! The default setting is 90 minutes.
Spit roast (only available in certain models)
To operate the spit roast function (
see diagram
) proceed as
follows:
1. Place the dripping pan in position 1.

8
GB
the duration by -5/+12 minutes.
To achieve the best possible results, we recommend that
you carefully observe the instructions below:
• Follow the recipe.
• The weight of the dough should be between 350 g and
500 g.
• Lightly grease the dripping pan and the baking trays.
Place the food inside the oven while it is still cold. If you
wish to place the food in the oven after it has been
preheated, immediately following a high-temperature
cooking programme, the text “Hot” will appear on the
display until the temperature of the oven has fallen to
120°. At this point it will be possible to place the pizza in
the oven.
Recipe for PIZZA:
Makes 3 or 4 pizzas: 1000 g flour, 500 ml water, 20 g salt,
20 g sugar, 100 ml olive oil, 20 g fresh yeast (or 2 sachets
of powder yeast)
• Leavening at room temperature: 1 hour, or LOW
TEMPERATURE manual function set to 40°. Leave to
rise for approximately 30-45 minutes.
• Place the food inside the oven while it is still cold.
• Start the
PIZZA cooking mode.
Recipe for BREAD (maximum amount of dough):
Ingredients:
• 1.3 kg flour
• 700 g water
• 25 g salt
• 50 g fresh baker’s yeast or 4 sachets dried yeast
powder.
Method:
• Mix the flour and salt in a large bowl.
• Dilute the yeast in lukewarm water (approximately 35
degrees).
• Make a small well in the mound of flour.
• Pour in the water and yeast mixture.
• Knead the dough by stretching and folding it over itself
with the palm of your hand for 10 minutes, until it has a
uniform consistency and is not too sticky.
• Form the dough into a ball shape, place it in a large
bowl and cover it with transparent plastic wrap to
prevent the surface of the dough from drying out. Place
the bowl in the oven, set to 40° using the LOW
TEMPERATURE manual function, and leave to rise for
approximately 30–45 minutes. Alternatively, leave at
room temperature for approximately 1 hour (until the
dough has doubled in volume).
• Break up the dough, kneading gently, and divide it to
create several loaves.
• Place them on a sheet of baking paper (cut to the same
size as the inside of the dripping pan) on top of the
rack (or on 2 or 3 racks if you wish to cook the loaves
on different shelves) and dust them lightly with flour.
• Make a few incisions in the top using a sharp blade.
• Place the rack in the oven, on shelf level 2 if using only
one level, or place two racks on shelf levels 1 and 4 if
using two levels, or place three racks on shelf levels 1,
3 and 5 if using three levels.
• Place the dripping pan on shelf level 7 and pour in
150 g cold water.
• Place the food inside the oven while it is still cold.
• Start the automatic function
BREAD.
• When the cooking process has finished, leave the
loaves to rest on the rack until they have completely
cooled.
Small Space
Starting the oven
1. Fit the DIVIDER to the DIVIDER shelf “D” using the pin,
with the arrows turned towards the rear part of the oven.
After it has been fitted correctly, you will be able to read
the text “OPENSPACE” on the front part of the DIVIDER
frame. A buzzer will sound to confirm that the DIVIDER
has been fitted correctly; it will then be possible to use the
two Main and Small space compartments separately or at
the same time.
! The EXTRALARGE SPACE FUNCTION knob will be
disabled.
2. Select the desired cooking function by turning the
SMALL SPACE FUNCTION knob.
3. The oven will begin its preheating stage. The
temperature may be changed by turning the
TEMPERATURE knob. The
indicator light flashes
during the pre-heating stage.
4. Once the pre-heating stage is completed, the
icon
stops flashing (becomes fixed) and a buzzer sounds. It is
now possible to introduce foodstuffs into the oven.
5. During cooking it is always possible to:
- Change the cooking function by turning the SMALL
SPACE FUNCTION knob.
- Change the temperature by turning the TEMPERATURE
knob.
- Set the cooking duration in addition to the cooking end
time.
- Stop cooking by turning the SMALL SPACE FUNCTION
knob to the “0” position.
6. If a blackout occurs while the oven is already in
operation, an automatic system within the appliance will
reactivate the cooking function from the point at which it
was interrupted, as long as the temperature has not
dropped below a certain level. Programmed cooking

9
GB
modes which have not started will not be restored and
must be reprogrammed.
Cooking functions
GRILL function
The top heating element is activated. By turning the
TEMPERATURE knob, the different power levels which
may be set will appear on the display; these range
between 5% and 100%. The high and direct temperature
of the grill is recommended for food which requires a high
surface temperature. This function is particularly suitable
for browning food, cooking gratins, colouring meringues,
making toasted sandwiches and grilling small quantities
of thin, lean meat. Always cook in this mode with the oven
door closed.
FAST COOKING function
This function requires the oven to be preheated. This
function is particularly suitable for cooking pre-packed
food quickly (frozen or pre-cooked).
Main Space
Starting the oven
1. Fit the DIVIDER to the DIVIDER shelf “D” using the pin,
with the arrows turned towards the rear part of the oven.
After it has been fitted correctly, you will be able to read
the text “OPENSPACE” on the front part of the DIVIDER
frame. A buzzer will sound to confirm that the DIVIDER
has been fitted correctly; it will then be possible to use the
two Main and Small space compartments separately or at
the same time.
! The EXTRALARGE SPACE FUNCTION knob will be
disabled.
2. Select the desired cooking function by turning the
MAIN SPACE FUNCTION knob.
3. The oven will begin its preheating stage. The
temperature may be changed by turning the
TEMPERATURE knob. The
indicator light flashes
during the pre-heating stage.
4. Once the pre-heating stage is completed, the
icon
stops flashing (becomes fixed) and a buzzer sounds. It is
now possible to introduce foodstuffs into the oven.
5. During cooking it is always possible to:
- Change the temperature by turning the TEMPERATURE
knob.
- Set the cooking duration in addition to the cooking end
time.
- Stop cooking by turning the MAIN SPACE FUNCTION
knob to the “0” position.
6. If a blackout occurs while the oven is already in
operation, an automatic system within the appliance will
reactivate the cooking function from the point at which it
was interrupted, as long as the temperature has not
dropped below a certain level. Programmed cooking
modes which have not started will not be restored and
must be reprogrammed.
Cooking functions
UNIVERSAL function
All heating elements and the fan are activated. Since the
heat remains constant throughout the oven, the air cooks
and browns food in a uniform manner. A maximum of
three racks may be used at the same time. If you are using
several racks at the same time, we recommend you place
the dripping pan on shelf level 1. If you are cooking on 3
levels at the same time, we recommend you place the
shelves on racks 3 and 5, and the dripping pan on rack 1.
Using the Small Space and Main Space at the
same time
Starting the oven
1. Fit the DIVIDER to the DIVIDER shelf “D” using the pin,
with the arrows turned towards the rear part of the oven.
After it has been fitted correctly, you will be able to read
the text “OPENSPACE” on the front part of the DIVIDER
frame. A buzzer will sound to confirm that the DIVIDER
has been fitted correctly; it will then be possible to use the
two Main and Small space compartments separately or at
the same time.
! The EXTRALARGE SPACE FUNCTION knob will be
disabled.
! In order to improve the oven’s energy efficiency, the pre-
heating time of the SMALL SPACE cavity lasts about 15
minutes.
! If the MAIN SPACE is set at a temperature below 150°C,
in order to safeguard the cooking results, the grill function
will not start: the display will visualise “OFF.”
2. Select the desired cooking function for each recess by
turning the SMALL SPACE FUNCTION and/or MAIN
SPACE FUNCTION knobs. The
icon indicates that the
Small Space has been selected and that it is therefore
possible to adjust the Small Space settings; the
icon
lit up on the display indicates that the Main Space has
been selected and that it is therefore possible to adjust
the Main Space settings.
3. Both ovens will begin the preheating stage. The
temperature may be changed by turning the
TEMPERATURE knob. The
indicator light flashes
during the pre-heating stage.

10
GB
2. Next, press the button until the icon and the
three numerical digits on the DISPLAY begin to flash.
3. Turn the TIMER KNOB towards “+” and “-” to adjust
the hour value.
4. Press the
button again so that the other two
numerical digits on the DISPLAY begin to flash.
5. Turn the TIMER KNOB towards “+” and “-” to adjust
the minute value.
6. Press the
button again to confirm.
7. When the set time has elapsed, the text END appears
on the DISPLAY, the oven will stop cooking and a buzzer
sounds.
Programming has been set when the
and icons
flash. The DISPLAY shows the cooking end time and the
cooking duration alternately.
To cancel programming, turn the FUNCTION knob to the
“0” position.
Practical cooking advice
MULTILEVEL
• Use positions 1, 3, 5 and 6.
• Place the dripping pan at the bottom and the rack at
the top.
BARBECUE
• Preheat the oven for 5 minutes.
• Keep the oven door closed when cooking in this mode.
• Place the dripping pan on shelf level 3. Place the rack
in a position between 4 and 7, depending on how bulky
the food is, and make sure the food is in the centre of
the rack. Examples: beef ribs should be cooked on
shelf level 4 and bacon on shelf level 6 or 7.
PIZZA or FOCACCIA
• Use a light aluminium tray with a maximum diameter of
30 cm, placing it on top of the rack supplied.
• If the pizza has a lot of toppings, we recommend
adding the mozzarella cheese on top of the pizza
halfway through the cooking process.
GRILL
• Preheat the oven for 5 minutes.
• Fit the DIVIDER to the DIVIDER rack “D”.
• Keep the oven door closed when cooking in this mode.
• Place the rack in position 7. Position the food in the
centre of the rack. Position the dripping pan on shelf
level 6.
• This function is particularly suitable for browning food,
cooking gratins, colouring meringues, making toasted
4. Once the pre-heating stage is completed, the
icon
stops flashing (becomes fixed) and a buzzer sounds. It is
now possible to introduce foodstuffs into the oven.
5. The digits on the display become brighter to indicate
which recess you are adjusting. To modify the settings for
the other recess, press the
button. The Small Space
and Main Space settings may actually be changed during
simultaneous cooking:
- Change the cooking function by turning the SMALL
SPACE FUNCTION and/or MAIN SPACE FUNCTION
knob.
- Change the temperature by turning the TEMPERATURE
knob.
- Set the cooking duration in addition to the cooking end
time.
- Stop cooking by turning the SMALL SPACE FUNCTION
and/or MAIN SPACE FUNCTION knob to the “0” position.
6. If a blackout occurs while the oven is already in
operation, an automatic system within the appliance will
reactivate the cooking function from the point at which it
was interrupted, as long as the temperature has not
dropped below a certain level. Programmed cooking
modes which have not started will not be restored and
must be reprogrammed.
Programming cooking
! A cooking function must be selected before
programming can take place.
Programming is possible in all oven configurations:
EXTRALARGE, MAIN and SMALL SPACE, even if the
latter two are being used simultaneously.
Programming the cooking duration
1. Press the
button several times until the icon and
the three digits on the DISPLAY begin to flash.
2. Turn the TIMER KNOB towards “+” and “-” to adjust the
duration.
3. Press the
button again to confirm.
4. When the set time has elapsed, the text END appears
on the DISPLAY, the oven will stop cooking and a buzzer
sounds.
• For example: it is 9:00 a.m. and a time of 1 hour and 15
minutes is programmed. The function will stop
automatically at 10:15 a.m.
Setting the end time for a cooking mode
! A cooking duration must be set before the cooking end
time can be scheduled.
1. Follow steps 1 to 3 to set the duration as detailed
above.

11
GB
sandwiches and grilling small quantities of thin, lean
meat.
• We recommend that the power level is set to
maximum. The top heating element is regulated by a
thermostat and may not always operate constantly.
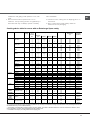
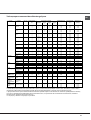
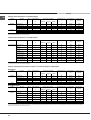
Cooking advice table for ovens with an ExtraLarge Space cavity
Cook on
no. of
shelves
Rack position
Function
Foods
Weight
(in kg)
No.
Dripping
pan
Rack 1
Rack 2
Rack 3
Preheating
Recommended
temperature
(°C)
Cooking
duration
(minutes)
Pies / Tarts
1
2
3
4
2 or 3
1 to 2
1
1
3 to 5
3
3
5
5
6
Yes
Yes
Yes
Yes
180
180
180
180
30-40
35-45
40-50
45-55
Cream puffs
1
2
3
4
2 or 3
1 to 2
1
1
3 to 5
3
3
5
5
6
Yes
Yes
Yes
Yes
190
190
190
190
25-35
25-35
30-40
30-40
Pizza
1
2
3
4
2 or 3
1 to 2
1
1
3 to 5
3
3
5
5
6
Yes
Yes
Yes
Yes
220
220
220
220
15-25
20-30
25-35
30-40
Biscuits
1
2
3
4
2 or 3
1 to 2
1
1
3 to 5
3
3
5
5
6
Yes
Yes
Yes
Yes
180
180
180
180
15-25
15-25
20-30
20-30
Pastries
1
2
3
2 or 3
2
1
5
4
6
Yes
Yes
Yes
200
200
200
30-40
35-45
40-50
Crème caramel
(bain-marie)
1
2
3
2 or 3
2
1
5
4
6
Yes
Yes
Yes
170
170
170
35-45
35-45
40-50
Panettone 1 1 or 2 Yes 160 45-60
Sponge cake made
with yoghurt
1
2
2 or 3
1
4 or 5
Yes
Yes
160
160
60-75
60-75
Sponge cake
1
2
3
2 or 3
2
1
5
4
6
Yes
Yes
Yes
190
190
190
30-35
35-40
40-45
Multilevel*
Large cut of meat 1 1 2 Yes 160 90-240
Rotisserie 1 2 3 No 200 35-75
Gratin 1 3 or 4 No 190 40-60
Large roast 1 1 2 No 200 90-120
Gratin*
Large roast game 1 1 2 No 200 90-120
Beef ribs 1 3 4 or 5 Yes 100% 20-30
Sausages 1 3 5 to 7 Yes 100% 10-20
Pork ribs 1 3 5 to 7 Yes 100% 15-25
Barbecue*
Bacon 1 3 5 to 7 Yes 100% 3-6
Proving / Defrosting
1 2 No 40
White meringues 4 1 3 5 6 No 65 8-12 hours**
Low
temperature
Meat / Fish 3 1 3 5 No 90 90-180**
Automatic
bread
Bread (see recipe)
2
2
2
1
2
3
7***
7***
7***
2
1
1
4
3
5
No
No
No
Automatic
roast
Roasts
1 2 3 No 60-90**
Automatic
baked
cakes
Desserts
1
2
2
2
5
No
No
35-60**
35-60**
Automatic
pizza
Pizza (see recipe)
1
2
3
4
2
2
1
1
5
3
3
5
5
6
No
No
No
No
23-30**
25-35**
30-35**
35-40**
* The cooking times listed above are intended as guidelines only and may be modified according to personal tastes. Oven preheating times are set
as standard and may not be modified manually.
** The duration of the automatic cooking functions are set by default. The values in the table refer to the minimum and maximum duration, which
may be modified by the user, taking the default value as a starting point.
*** As stated in the recipe, pour 150 g water into the dripping pan.
FAST COOKING
• Preheat the oven, making sure the dripping pan is on
shelf level 6.
• When cooking frozen foods, always follow the
instructions on the packaging.

12
GB
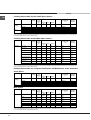
Cooking advice table for the Small Space feature
Function Foods Weight
(in kg)
Cook on
no. of
shelves
Rack position Preheating Recommended
temperature
(°C)
Cooking
duration
(minutes)
No. Dripping
pan
Rack 1 Divider
Fast
cooking*
Fish fillets 1 6 D Yes 180-200 20-30
Meat fillets 1 6 D Yes 180-200 30-40
Frozen pizza 1 6 D Yes
Frozen prepared foods 1 6 D Yes
Grill
Toast 1 - 6-7 D Yes 100% 3-5
Bacon 1 6 7 D Yes 100% 3-6
Pork steaks 1 6 7 D Yes 100% 15-25
* The cooking times listed above are intended as guidelines only and may be modified in accordance with personal tastes. Oven preheating times
are set as standard and may not be modified manually.
Cooking advice table for the Main Space feature
Function Foods Weight
(in kg)
Cook on
no. of
shelves
Rack position Preheating Recommended
temperature
(°C)
Cooking
duration
(minutes)
No. Dripping
pan
Rack 1 Divider
Universal*
Pies / Tarts 1
2
2
1
3
D
D
Yes
Yes
200
200
30-40
35-45
Cream puffs 1
2
2
1
3
D
D
Yes
Yes
190
190
25-35
25-35
Pizza 1
2
2
1
3
D
D
Yes
Yes
220
220
15-25
20-30
Biscuits 1
2
2
1
3
D
D
Yes
Yes
180
180
15-25
15-25
Pastries 1
2
2
1
3
D
D
Yes
Yes
200
200
30-40
35-45
Crème caramel (bain-
marie)
1 2 D Yes 170 35-45
Sponge cake made
with yoghurt
1 2 D Yes 160 60-75
Sponge cake 1
2
2
1
3
D
D
Yes
Yes
190
190
30-35
35-40
Small roasting joints 1 2 3 D Yes 210 30-60
* The cooking times listed above are intended as guidelines only and may be modified in accordance with personal tastes. Oven preheating times
are set as standard and may not be modified manually.
Cooking advice table for using the Small Space and Main Space at the same time
Small Space
Function Foods Weight
(in kg)
Cook on
no. of
shelves
Rack position Preheating Recommended
temperature
(°C)
Cooking
duration
(minutes)
No. Dripping
pan
Rack 1 Divider
Fast
cooking*
Fish fillets 1 6 D Yes 200-220 20-30
Meat fillets 1 6 D Yes 200-220 30-40
Frozen pizza 1 6-7 D Yes
Frozen prepared foods 1 6-7 D Yes
“Pilaf” rice 1 6 D Yes 180-200 30-45
Grill
Browning 1 6-7 D Yes 100% 3-6
Main Space
Function Foods Weight
(in kg)
Cook on
no. of
shelves
Rack position Preheating Recommended
temperature
(°C)
Cooking
duration
(minutes)
No. Dripping
pan
Rack 1 Divider
Universal*
Cakes, pies / tarts 1
2
2
1 and 2
3 to 5
D
D
Yes
Yes
200
200
30-40
35-45
Biscuits 1
2
2
1 and 2
3 to 5
D
D
Yes
Yes
180
180
15-25
15-25
Crème caramel (bain-
marie)
1 2 D Yes 160 45
Pizza 1
2
2
1 and 2
3 to 5
D
D
Yes
Yes
220
220
15-25
20-30
Potato gratin 1 2 D Yes 200 60
Roasting joint 1 2 D Yes 200 60-90
Dishes with pastry
crust
1 2 D Yes 200 35-45
* The cooking times listed above are intended as guidelines only and may be modified in accordance with personal tastes. Oven preheating times
are set as standard and ma
y
not be modified manuall
y
.

13
GB
Precautions and tips
! This appliance has been designed and
manufactured in compliance with international safety
standards. The following warnings are provided for
safety reasons and must be read carefully.
General safety
• The appliance was designed for domestic use
inside the home and is not intended for
commercial or industrial use.
• The appliance must not be installed outdoors, even
in covered areas. It is extremely dangerous to
leave the appliance exposed to rain and storms.
• When moving or positioning the appliance, always
use the handles provided on the sides of the
oven.
• Do not touch the appliance with bare feet or with
wet or damp hands and feet.
• The appliance must be used by adults only for the
preparation of food, in accordance with the
instructions provided in this booklet.
• Do not touch the heating elements or certain parts of
the oven door when the appliance is in use; these
parts become extremely hot. Keep children well
away from it and do not touch the hot parts yourself.
• Make sure that the power supply cables of other
electrical appliances do not come into contact
with the hot parts of the oven.
• The openings used for the ventilation and
dispersion of heat must never be covered.
• Always grip the oven door handle in the centre:
the ends may be hot.
• Always use oven gloves when placing cookware
in the oven or when removing it.
• Do not use aluminium foil to line the bottom of the
oven.
• Do not place flammable materials in the oven: If
the appliance is switched on accidentally, the
materials could catch fire.
• Always make sure the knobs are in the “z”/“
{”
position when the appliance is not in use.
• When unplugging the appliance, always pull the
plug from the mains socket; do not pull on the
cable.
• Never perform any cleaning or maintenance work
without having disconnected the appliance from
the electricity mains.
• If the appliance breaks down, under no
circumstances should you attempt to perform the
repairs yourself. Repairs carried out by
inexperienced individuals may cause injury or
further malfunctioning of the appliance. Contact a
Service Centre (
see Assistance
).
• Do not rest heavy objects on the open oven door.
• The appliance should not be operated by people
(including children) with reduced physical, sensory
or mental capacities, by inexperienced individuals
or by anyone who is not familiar with the product.
These individuals should, at the very least, be
supervised by someone who assumes responsibility
for their safety or receive preliminary instructions
relating to the operation of the appliance.
• Do not let children play with the appliance.
Disposal
• When disposing of packaging material: observe
local legislation so that the packaging may be
reused.
• The European Directive 2002/96/EC relating to
Waste Electrical and Electronic Equipment
(WEEE) states that household appliances should
not be disposed of using the normal solid urban
waste cycle. Exhausted appliances should be
collected separately in order to optimise the cost
of re-using and recycling the materials inside the
machine, while preventing potential damage to
the atmosphere and to public health. The
crossed-out dustbin is marked on all products to
remind the owner of their obligations regarding
separated waste collection. For further information
relating to the correct disposal of exhausted
household appliances, owners may contact the
relevant public service or their local dealer.
Respecting and conserving the
environment
• You can help to reduce the peak load of the
electricity supply network companies by using the
oven in the hours between late afternoon and the
early hours of the morning. The cooking mode
programming options, the “delayed cooking”
mode (
see Cooking modes
) and “delayed
automatic cleaning” mode (
see Care and
Maintenance
) in particular, enable the user to
organise their time efficiently.
• Always keep the oven door closed when using the
BARBECUE and GRATIN modes: this will achieve
improved results while saving energy
(approximately 10%).
• Check the door seals regularly and wipe them
clean to ensure they are free of debris so that
they adhere properly to the door, thus avoiding
heat dispersion.
! This product complies with the requirements of the
latest European Directive on the limitation of power
consumption of the standby mode.
If no operations are carried out for a period of 2
minutes, the appliance automatically switches to the
standby mode. The standby mode is visualised by
the high luminosity "Watch Icon". As soon as
interaction with the machine resumes, the system's
operating mode is restored.

14
GB
Care and maintenance
Switching the appliance off
Disconnect your appliance from the electricity
supply before carrying out any work on it.
Cleaning the appliance
• The stainless steel or enamel-coated external
parts and the rubber seals may be cleaned using
a sponge that has been soaked in lukewarm water
and neutral soap. Use specialised products for
the removal of stubborn stains. After cleaning,
rinse and dry thoroughly. Do not use abrasive
powders or corrosive substances.
• The inside of the oven should ideally be cleaned
after each use, while it is still lukewarm. Use hot
water and detergent, then rinse well and dry with
a soft cloth. Do not use abrasive products.
• All accessories can be washed like everyday
crockery, and are even dishwasher safe.
! Never use steam cleaners or pressure cleaners on
the appliance.
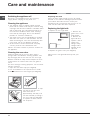
Cleaning the oven door
Clean the glass part of the oven door using a
sponge and a non-abrasive cleaning product, then
dry thoroughly with a soft cloth. Do not use rough
abrasive material or sharp metal scrapers as these
could scratch the surface and cause the glass to
crack.
For more thorough cleaning purposes, the oven door
may be removed:
1. Open the oven door fully (
see diagram
).
2. Use a screwdriver to lift up and turn the small
levers
F F
F F
F located on the two hinges (
see diagram
).
3. Grip
the door on the two outer
sides and close it
approximately half way. Pull
the door towards you lifting it
out of its seat (
see diagram
).
To replace the door, reverse
this sequence.
Inspecting the seals
Check the door seals around the oven at regular
intervals. If the seals are damaged, please contact
your nearest After-sales Service Centre (
see
Assistance
). We recommend that the oven is not
used until the seals have been replaced.
Replacing the light bulb
To replace the oven light bulb:
1. Remove the
glass cover of the
lamp-holder.
2. Remove the
light bulb and
replace it with a
similar one:
halogen lamp
voltage 230 V,
wattage 25 W,
cap G 9.
3. Replace the glass cover (
see diagram
).
! Do not touch the light bulb directly with your
hands.
F
Glass cover
Lamp
Lamp Holder
compartment

15
GB
Automatic cleaning with the FAST
CLEAN function
With the FAST CLEAN mode, the internal
temperature of the oven reaches 500°C. The
pyrolytic cycle is activated, burning away food and
grime residues. Dirt is literally incinerated.
Keep children away from the appliance during the
automatic cleaning cycle as surfaces may become
very hot. Particles may ignite inside the oven due to
the combustion process. There is no cause for
concern: this process is both normal and hazard-
free.
Before initiating the FAST CLEAN mode:
• Remove large or coarse food residues from the
inside of the oven using a damp sponge. Do not use
detergents.
• Remove all accessories.
• Remove the DIVIDER.
• Do not place tea towels or pot holders over the
oven handle.
! If the oven is too hot, the pyrolytic cycle may not
start. Wait for the oven to cool down.
! The programme may only be started once the oven
door has been closed.
To enable the FAST CLEAN cycle, turn the
EXTRALARGE SPACE FUNCTION knob to
.
Press the
button. The TIMER KNOB may be
used to select the desired cleaning level; there are
three default time settings which cannot be
modified.
1. Economy (ECO): turn the knob towards “-”.
Duration 1 hour.
2. Normal (NOR): initial level. Duration 1 hour and 30
minutes.
3. Intensive (INT): turn the knob towards “+”.
Duration 2 hours.
4. Press the
button to confirm.
An end time for the FAST CLEAN cycle (as for a
normal cooking cycle) may be programmed (see
Programming the automatic cleaning end time
).
Safety devices
• The
icon on the display, when lit, indicates
that the oven door was automatically locked as soon
as the temperature reached a high value.
• If a malfunction occurs, the heating elements will
be switched off.
• Once the oven door has been locked, you cannot
change the duration and cycle end time settings.
Programming the automatic cleaning end time
1. Press the
button until the icon and the two
digits on the DISPLAY begin to flash.
2. Turn the TIMER KNOB towards “+” and “-” to
adjust the hour value.
3. Press the
button again until the other two
digits on the DISPLAY begin to flash.
4. Turn the TIMER KNOB towards “+” and “-” to
adjust the minute value.
5. Press the
button again to confirm.
6. When the set time has elapsed, the text END
appears on the display and a buzzer sounds.
• For example: it is 9:00 a.m. and the Economy
(ECO) FAST CLEAN level has been selected, with
the default duration of 1 hour. 12:30 is scheduled as
the end time. The programme will start automatically
at 11:30 a.m.
Programming has been set when the
and
buttons are illuminated. The display shows the FAST
CLEAN end time and duration alternately.
Once the automatic cleaning cycle is over
You will have to wait until the temperature inside the
oven has cooled down sufficiently before you can
open the oven door. You will notice some white dust
deposits on the bottom and the sides of your oven;
remove these deposits with a damp sponge once
the oven has cooled down completely. Alternatively,
you can make use of the already heated oven, in
which case it is not necessary to remove the
deposits, they are completely harmless and will not
affect your food in any way.

16
GB
Warning:
The appliance is fitted with an automatic diagnostic system which detects any malfunctions. Malfunctions are
displayed by messages of the following type: “F”, followed by numbers.
Call for technical assistance should a malfunction occur.
! Never use the services of an unauthorised technician.
Please have the following information to hand:
• The type of problem encountered.
• The appliance model (Mod.).
• The serial number (S/N).
The latter two pieces of information can be found on the data plate located on the appliance.
Assistance

7OOS 997D P RU/HA
7OOS 997D P IX RU/HA
Содержание
Установка, 18-19
Расположение
Электрическое подключение
Технические данные
Описание изделия, 20
Общий вид
Консоль управления
Дисплей
Структура духового шкафа, 21
Включение и эксплуатация, 22-28
Настройка часов
Настройка таймера
Большой отсек ExtraLarge Space
Малый отсек Small Space
Основной отсек Main Space
Одновременное использование отсеков Small Space
и Main Space
Программирование приготовления
Практические советы по приготовлению
Таблица приготовления в ExtraLarge Space
Таблица приготовления в Small Space
Таблица приготовления в Main Space
Таблица одновременного приготовления в отсеках
Small Space и Main Space
Предосторожности и рекомендации, 29
Общие требования по безопасности
Утилизация
Экономия электроэнергии и охрана окружающей
среды
Техническое обслуживание и уход, 30-
31
Обесточивание изделия
Чистка изделия
Чистка дверцы
Замена лампочки
Автоматическая пиролитическая чистка в режиме
FAST CLEAN
Сервисное обслуживание, 32
Инструкции по
эксплуатации
ДУХОВОЙ ШКАФ
RS
English, 1 Русский, 17
GB
RS

18
RS
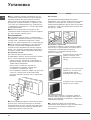
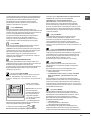
Вентиляция
Для обеспечения надлежащей вентиляции
необходимо снять заднюю панель ниши кухонного
элемента. Рекомендуется установить духовой
шкаф на два деревянных бруска или на сплошное
основание с отверстием диаметром не менее 45 х
560 мм (см. схемы).
Центровка и крепление
4 крепежных элемента с боков духового шкафа
должны быть отрегулированы в соответствии с 4
отверстиями в периметральной раме в
зависимости от толщины боковой панели
кухонного элемента:
толщина 20 мм: полностью
удалите съемную часть
крепежного элемента (см.
схему);
толщина 18 мм: используйте
первый паз, согласно уже
готовой конфигурации
производителя (см. схему);
толщина 16 мм: используйте
второй паз (см. схему).
Для крепления изделия к кухонному элементу:
откройте дверцу духового шкафа и завинтите 4
шурупа для деревянных панелей в 4 отверстия в
периметральной раме.
!!
!!
! Все защитные элементы должны быть
закреплены таким образом, чтобы их можно было
снять только при помощи специального
инструмента.
!!
!!
! Важно сохранить данное руководство для его
последующих консультаций. В случае продажи,
передачи изделия или при переезде на новое
место жительства необходимо проверить, чтобы
руководство оставалось вместе с изделием, для
того чтобы его новый владелец мог ознакомиться
с правилами эксплуатации и с соответствующими
предупреждениями.
!!
!!
! Внимательно прочитайте инструкции: в них
содержатся важные сведения о монтаже изделия,
его эксплуатации и безопасности.
Расположение
!!
!!
! Не разрешайте детям играть с упаковочными
материалами. Упаковка должна быть уничтожена в
соответствии с правилами раздельного сбора
мусора (см. Предосторожности и рекомендации).
!!
!!
! Монтаж изделия производится в соответствии с
данными инструкциями квалифицированными
специалистами. Неправильный монтаж изделия
может стать причиной повреждения имущества и
причинить ущерб людям и домашним животным.
Встроенный монтаж
Для обеспечения исправной работы
встраиваемого изделия кухонный модуль должен
иметь соответствующие характеристики:
• панели кухонных элементов, прилегающих к
духовому шкафу, должны быть выполнены из
термостойкого материала;
• клей кухонных элементов элементов,
шпонированных деревом, должен быть
устойчивым к температуре 100°C.
• для встраивания духового шкафа под кухонным
топом (см. схему) или в шкаф-пенал ниша
кухонного элемента должна иметь следующие
размеры:
!!
!!
! После встраивания изделия в кухонный элемент
должна быть исключена возможность касания к
электрическими частями. Расход электроэнергии,
указанный на паспортной табличке изделия, был
замерян для данного типа монтажа.
595 mm.
595 mm.
24 mm.
545 mm.
5 mm.
576 mm.
23 mm.
593 mm.
45 mm.
558 mm.
547 mm. min.
Установка
560 mm.
45 mm.

19
RS
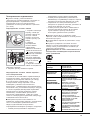
Электрическое подключение
!!
!!
! Духовые шкафы, укомплектованные
трехполюсным сетевым кабелем, расчитаны на
функционирование с переменным током с
напряжением и частотой электропитания,
указанными на паспортной табличке с данными
(см. ниже).
Подсоединение сетевого кабеля
1. Откройте зажимную
коробку, нажав при
помощи отвертки на
выступы с боков
крышки: потяните и
откройте крышку (см.
схему).
2. Порядок
подсоединения
сетевого кабеля:
отвинтите винт
кабельного сальника и
три винта контактов L-N-
и затем прикрепите
провода под головками
винтов, соблюдая
цветовую маркировку
Синий (N) Коричневый
(L) Желто-зеленый
(см. схему).
3. Закрепите сетевой
кабель в специальном
кабельном сальнике.
4. Закройте крышку зажимной коробки.
Подсоединение сетевого кабеля изделия к
сети электропитания
Установите на сетевой кабель нормализованную
штепсельную вилку, расчитанную на нагрузку,
указанную на паспортной табличке (см. сбоку).
В случае прямого подключения к сети
электропитания между изделием и сетью
необходимо установить многополюсный
выключатель с минимальным расстоянием между
контактами 3 мм, расчитанный на данную нагрузку
и соответствующий действующим нормативам
(выключатель не должен размыкать провод
заземления). Сетевой кабель должен быть
расположен таким образом, чтобы ни в одной
точке его температура не превышала температуру
помещения более чем на 50°C.
!!
!!
! Электромонтер несет ответственность за
правильное подключение изделия к электрической
сети и за соблюдение правил безопасности.
Перед осуществлением электрического
подсоединения необходимо проверить следующее:
• сетевая розетка должна быть соединена с
заземлением и соответствовать нормативам;
• сетевая розетка должна быть рассчитана на
максимальную потребляемую мощность изделия,
указанную на паспортной табличке (см. ниже);
• напряжение сети электропитания должно
находиться в пределах значений, указанных на
паспортной табличке (см. ниже);
• сетевая розетка должна быть совместима со
штепсельной вилкой изделия. В противном
случае замените розетку или вилку; не
используйте удлинители или тройники.
!!
!!
! Изделие должно быть установлено таким
образом, чтобы сетевой кабель и сетевая розетка
были легко доступны.
!!
!!
! Сетевой кабель изделия не должен быть согнут
или сжат.
!!
!!
! Регулярно проверяйте состояние сетевого
кабеля и в случае необходимости поручите его
замену только уполномоченным техникам (см.
Сервисное обслуживание).
!!
!!
! Производитель не несет ответственности за
последствия несоблюдения перечисленных
выше требований.
N
L
ПАСПОРТНАЯ ТАБЛИЧК
А
Габаритные
размеры
ширина 43,4 см.
высота 39,5 см.
глубина 40, 8 см.
Объем
л
7
0
Электрическое
подключение
напряжение 220-240 В ~ 50 Гц,
ма ксимальн ая поглощаемая
мо щно с ть 3400 Вт (см.
паспортную табличку)
МАРКИРОВ КА
ПОТРЕБЛЕНИЯ
ЭЛЕКТРОЭНЕРГИИ
Ди ректива 2002/40/ СЕ об
эти кетка х электрических
духовых шкафов. Норматив EN
50304
Заявление о расходе
электроэнергии класса
принудительной конвекции -
функция нагревания:
Запеканка.
Да нно е изделие со ответ ствует
следующим Директивам
Евр опей ского Сообщества:
2006/95/CEE от 12.12.06
(Низкое напряжение) с
последующими изменениями –
2004/108/СЕЕ от 15/12/04
(Электромагнитная
совмести мость) с
последующими изменениями –
93/ 68/СЕЕ от 22/07/93 с
последующими изменениями.
2002/96/CE с последующими
изменениями.
1275/2008 stand-by/off mode.

20
RS
Описание
изделия
Общий вид
Консоль управления
Дисплей
Страница загружается ...
Страница загружается ...
Страница загружается ...
Страница загружается ...
Страница загружается ...
Страница загружается ...
Страница загружается ...
Страница загружается ...
Страница загружается ...
Страница загружается ...
Страница загружается ...
Страница загружается ...
-
 1
1
-
 2
2
-
 3
3
-
 4
4
-
 5
5
-
 6
6
-
 7
7
-
 8
8
-
 9
9
-
 10
10
-
 11
11
-
 12
12
-
 13
13
-
 14
14
-
 15
15
-
 16
16
-
 17
17
-
 18
18
-
 19
19
-
 20
20
-
 21
21
-
 22
22
-
 23
23
-
 24
24
-
 25
25
-
 26
26
-
 27
27
-
 28
28
-
 29
29
-
 30
30
-
 31
31
-
 32
32


Indesit 7OOS 997D P IX RU/HA Руководство пользователя
- Категория
- Печи
- Тип
- Руководство пользователя
Задайте вопрос, и я найду ответ в документе
Поиск информации в документе стал проще с помощью ИИ
на других языках
Похожие модели бренда
Модели других брендов
-
Hotpoint Ariston 7OOK 998ED X RU/HA Operating Instructions Manual
-
Monsher MOER 6091 C Руководство пользователя
-
Samsung BQ1D4T093 Инструкция по применению
-
HOTPOINT/ARISTON 7OFKQ 897EC(K)RU/HA Инструкция по эксплуатации
-
-
Hotpoint-Ariston 7OOS 997D C IX RU/HA Руководство пользователя
-
Whirlpool OS 997D C IX /HA Руководство пользователя