Whirlpool AQS73D 09 EU/B Руководство пользователя
- Категория
- Стиральные машины
- Тип
- Руководство пользователя

EN
1
Contents
Installation, 2-3
Unpacking and levelling
Connecting the electricity and water supplies
Technical data
Care and maintenance, 4
Cutting off the water and electricity supplies
Cleaning the machine
Cleaning the detergent dispenser drawer
Caring for your appliance drum
Cleaning the pump
Checking the water inlet hose
Precautions and tips, 5
General safety
Disposal
Opening the porthole door manually
Description of the machine, 6-7
Touch control panel
Running a wash cycle, 8
Wash cycles and options, 9
Table of wash cycles
Wash options
Detergents and laundry, 10
Detergent
Preparing the laundry
Washing recommendations
Load balancing system
Trouble shooting, 11
Assistance, 12
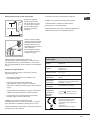
WASHING MACHINE
AQUALTIS
AQS73D 09
Instructions for
installation and use
English,1
EN
UK
Українська,13

EN
2
Installation
! This instruction manual should be kept in a
safe place for future reference. If the washing
machine is sold, given away or moved, please
ensure the manual is kept with the machine,
so that the new owner may benefit from the
advice contained within it.
! Read these instructions carefully: they
contain vital information relating to the safe
installation and operation of the appliance.
! Inside the pack containing this manual, you
will also find the guarantee and all the details
necessary for installation.
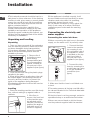
Unpacking and levelling
Unpacking
1. Once you have removed all the packaging
from the washing machine, make sure it has
not been damaged during transportation.
If it has been damaged, contact the retailer
and do not proceed any further with the
installation process.
2. Remove the 4
protective screws
(used during
transportation) and
the corresponding
spacer, located on
the rear part of the
appliance (see figure).
3. Close off the holes using the plastic plugs
supplied in the pack.
4. Keep all the parts in a safe place; they will
be needed again if the washing machine is
moved to another location, to prevent the
inside of the appliance being damaged.
! Packaging materials should not be used as
toys for children.
Levelling
1. Place the washing machine on a flat sturdy
floor, without resting it up against walls or
cabinets.
2. If the floor is
uneven, the front feet
of the machine may
be adjusted until it
reaches a horizontal
position (the angle of
inclination must not
exceed 2 degrees).
! If the appliance is levelled correctly, it will
be more stable and much less likely to cause
vibrations and noise while it is operating,
particularly during the spin cycle.
! If it is placed on carpet or a rug, adjust the
feet in such a way as to allow a sufficient
ventilation space underneath the washing
machine.
Connecting the electricity and
water supplies
Connecting the water inlet hose
! Before connecting the inlet hose to the water
supply, run the water until it is perfectly clear.
1. Connect the inlet
hose to the machine
by screwing it onto
the cold water inlet of
the appliance, which
is situated on the top
right-hand side of
the rear part of the
appliance (see figure).
2. Connect the inlet
hose by screwing it to
a cold water tap using
a 3/4 gas threaded
connection (see
figure).
3. Make sure that the hose is not folded over
or bent.
! The water pressure at the tap must fall within
the values indicated in the Technical data table
(see next page).
! If the inlet hose is not long enough, contact a
specialised shop or an authorised technician.
! Never use second-hand or old inlet hoses;
use the products supplied with the machine.

EN
3
Technical data
Model
AQS73D 09
Dimensions
width 59.5 cm
height 85 cm
depth 44,5 cm
Capacity
from 1 to 7 kg
Electrical
connections
please refer to the technical
data plate fixed to the ma-
chine
Water con-
nections
maximum pressure
1 MPa (10 bar)
minimum pressure
0.05 MPa (0.5 bar)
drum capacity 48 litres
Spin speed
up to 1000 rotations per
minute
Test wash
cycles in
accordan-
ce with
directives
1061/2010
and
1015/2010
programme
;
temperature 60°C;
programme
;
temperature 40°C;
This appliance conforms to
the following EC Directives:
- 2004/108/EC (Electroma-
gnetic Compatibility)
- 2006/95/EC (Low Voltage)
- 2012/19/EU
Connecting the drain hose
Connect the drain
hose to drain duct
piping or a wall drain
located between 65
and 100 cm above
the floor, making sure
it is not bent at all.
Alternatively, rest the
drain hose on the
side of a washbasin
or bathtub, fastening
the duct supplied to
the tap (see figure).
The free end of the
hose should not be
underwater.
! We advise against the use of hose
extensions; if it is absolutely necessary, the
extension must have the same diameter as the
original hose and must not exceed 150 cm in
length.
Electrical connections
Before plugging the appliance into the
electricity socket, make sure that:
• the socket is earthed and complies with all
applicable laws;
• the socket is able to withstand the maximum
power load of the appliance as indicated in
the Technical data table (see opposite);
• the power supply voltage falls within the
values indicated in the Technical data table
(see opposite);
• the socket is compatible with the plug of the
appliance. If this is not the case, have the
socket or the plug replaced.
! The machine must not be installed outdoors,
even in covered areas. It is extremely
dangerous to leave the appliance exposed to
rain, storms and other weather conditions.
! The mains socket must remain within easy
reach after the washing machine has been
installed.
! Do not use extension cords or multiple
sockets.
! The cable should not be bent or compressed.
! The power supply cable and plug must only
be replaced by authorised technicians.
Warning! The company shall not be held
responsible in the event that these regulations
are not respected.
65 - 100 cm

EN
4
Care and maintenance
Cutting off the water and
electricity supplies
• Turn off the water tap after every wash cycle.
This will limit wear on the hydraulic system in
the machine and help to prevent leaks.
• Unplug the appliance when cleaning it and
during all maintenance work.
Cleaning the machine
The outer parts and rubber components of the
appliance can be cleaned using a soft cloth
soaked in lukewarm soapy water. Do not use
solvents or abrasives.
Cleaning the detergent dispenser
drawer
To remove the drawer,
press lever (1) and pull
the drawer outwards (2)
(see figure).
Wash it under running
water; this procedure
should be repeated
frequently.
Caring for your appliance drum
• Always leave the door ajar to prevent
unpleasant odours from forming.
Cleaning the pump
The washing machine is fitted with a self-
cleaning pump which does not require any
maintenance. Sometimes, small items (such
as coins or buttons) may fall into the protective
pre-chamber at the base of the pump.
! Make sure the wash cycle has finished and
unplug the appliance.
To access the pre-chamber:
1. take off the cover panel on the front of the
machine by first pressing it in the centre and
then pushing downwards on both sides until
you can remove it (see figures);
2. position a container
so that it will collect the
water which flows out
(approximately 1.5 l)
(see figure);
3. unscrew the lid by
rotating it in an anti-
clockwise direction (see
figure);
4. clean the inside thoroughly;
5. screw the lid back on;
6. reposition the panel, making sure the hooks
are securely in place before you push it onto
the appliance.
Checking the water inlet hose
Check the inlet hose at least once a year. If
there are any cracks, it should be replaced
immediately: during the wash cycles, water
pressure is very strong and a cracked hose
could easily split open.
1
2
1
2
1
2

EN
5
Precautions and tips
! The machine was designed and constructed in
accordance with international safety regulations. The
following information is provided for safety reasons and
must therefore be read carefully.
General safety
• This appliance was designed for domestic use only.
• This appliance can be used by children
aged from 8 years and above and
persons with reduced physical, sensory or
mental capabilities or lack of experience
and knowledge if they have been given
supervision or instruction concerning use of
the appliance in a safe way and understand
the hazards involved. Children shall not
play with the appliance. Cleaning and user
maintenance shall not be made by children
without supervision.
• Do not touch the machine when barefoot or with wet or
damp hands or feet.
• Do not pull on the power supply cable when unplugging
the appliance from the electricity socket. Hold the plug
and pull.
• Do not touch the drained water as it may reach
extremely high temperatures.
• Never force the porthole door. This could damage the
safety lock mechanism designed to prevent accidental
opening.
• If the appliance breaks down, do not under any
circumstances access the internal mechanisms in an
attempt to repair it yourself.
• Always keep children well away from the appliance while
it is operating.
• If it must be moved, proceed with the help of two or
three people and handle it with the utmost care. Never
try to do this alone, because the appliance is very heavy.
• Before loading laundry into the washing machine, make
sure the drum is empty.
Disposal
• Disposing of the packaging materials: observe local
regulations so that the packaging may be re-used.
• The European Directive 2012/19/EU relating to Waste
Electrical and Electronic Equipment (WEEE) states
that household appliances should not be disposed of
using the normal solid urban waste cycle. Exhausted
appliances should be collected separately in order to
optimise the cost of re-using and recycling the materials
inside the machine, while preventing potential damage
to the atmosphere and to public health.
The crossed-out dustbin is marked on all products
to remind the owner of their obligations regarding
separated waste collection.
For more information relating to the correct disposal of
household appliances, owners should contact their local
authorities or appliance dealer.
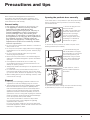
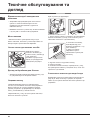
Opening the porthole door manually
In the event that it is not possible to open the porthole door
due to a powercut, and if you wish to remove the laundry,
proceed as follows:
1. remove the plug from the
electrical socket.
2. make sure the water level
inside the machine is lower
than the door opening; if
it is not, remove excess
water using the drain hose,
collecting it in a bucket as
indicated in the figure.
3. remove the cover panel on the lower front part of the
washing machine (see overleaf).
4. pull outwards using the
tab as indicated in the figure,
until the plastic tie-rod is freed
from its stop position; pull
downwards until you hear a
“click”, which indicates that
the door is now unlocked.
5. open the door; if this is
still not possible repeat the
procedure.
6. reposition the panel, making sure the hooks are securely
in place before you push it onto the appliance.

EN
6
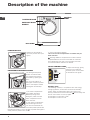
3. extra compartment: Bleach
! The use of extra compartment 3 excludes the pre-
wash function.
washing additives compartment: for fabric softener
or liquid additives. We recommend that the maximum
level indicated by the grille is not exceeded, and that
concentrated fabric softeners are diluted.
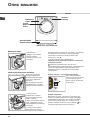
TOUCH CONTROL PANEL
To adjust the settings, gently
press the icon inside the
sensitive (touch control) area
as illustrated in the figure.
Standby mode
This washing machine, in compliance with new energy
saving regulations, is fitted with an automatic standby
system which is enabled after about 30 minutes if no
activity is detected. Press the ON-OFF button briefly and
wait for the machine to start up again.
Consumption in off-mode: 0,5 W
Consumption in Left-on: 8 W
PORTHOLE DOOR
Always use the handle to
open the porthole door (see
figure).
DETERGENT DISPENSER DRAWER
The detergent dispenser
drawer is located inside
the machine and can be
accessed by opening the
door.
For more information on
detergent measures, please
refer to the chapter entitled
“Detergents and laundry”.
1. pre-wash compartment:
use powder detergent.
! Before pouring in the
detergent, make sure that
extra compartment 3 has
been removed.
2. main wash compartment:
If liquid detergent is used,
it is recommended that the
removable plastic partition A
(supplied) be used for proper dosage.If powder detergent is
used, place the partition into slot B.
3
1
2
1
8
0
2
1
0
1
5
0
1
2
0
9
0
6
0
B
A
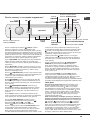
Description of the machine
CONTROL
PANEL
PORTHOLE DOOR
PORTHOLE DOOR
HANDLE
KICK STRIP

EN
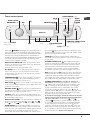
77
WASH CYCLE
SELECTOR knob
Button with ON/OFF
indicator light
Touch control panel
Button with ON/OFF indicator light: press this briefly to switch
the machine on or off. The green indicator light indicates that the
machine is switched on. To switch off the washing machine during
the wash cycle, press and hold the button for approximately 3
seconds; if the button is pressed briefly or accidentally the machine
will not switch off. If the machine is switched off during a wash
cycle, this wash cycle will be cancelled.
WASH CYCLE SELECTOR knob: may be turned in either
direction. To select the most suitable wash cycle, please refer
to the “Table of wash cycles”.
The knob will not move during the wash cycle.
M1-M2-M3 buttons: press and hold one of the buttons to
store a cycle with your own set preferences in the memory
of the machine. To recall a previously-stored cycle, press the
corresponding button.
TEMPERATURE button: press to modify or exclude the
temperature setting; the value selected will appear on the
display above (see “Running a wash cycle”).
SPIN CYCLE button: press to modify or exclude the spin
cycle; the value selected will appear on the display above (see
“Running a wash cycle”).
DELAYED START button: press to set a delayed start for
the selected wash cycle; the set delay time will appear on the
display above (see “Running a wash cycle”).
OPTION buttons: press to select the available options. The
indicator light corresponding to the selected option will remain
lit (see “Running a wash cycle”).
WASH CYCLE PHASE icons: these illuminate to indicate the
progress of the wash cycle (Wash – Rinse – Spin –
Drain ). The text lights up when the cycle is complete.
START/PAUSE button with indicator light: when the green
indicator light flashes slowly, press the button to start a wash
cycle. Once the cycle has begun the indicator light will remain
lit in a fixed manner. To pause the wash cycle, press the
button again; the indicator light will flash in an orange colour. If
the “LOCK” indicator light is switched off, the door may be
opened. To start the wash cycle from the point at which it was
interrupted, press the button again.
LOCK indicator light: indicates that the porthole door is
locked. To open the door, pause the wash cycle (see “Running
a wash cycle”).
CONTROL PANEL LOCK button with indicator light: to
activate or deactivate the control panel lock, press and hold
the button for approximately 2 seconds. when the indicator
light is illuminated, the control panel is locked. This means
it is possible to prevent wash cycles from being modified
accidentally, especially where there are children in the home.
ECO indicator light: the icon lights up when, after altering the
washing parameters, an energy saving of at least 10% is made.
Furthermore, before the machine enters “Standby” mode, the
icon will light up for a few seconds; when the machine is switched
off the estimated energy saving will be around the 80% mark.
CHANGE LANGUAGEsThe first time the machine is
switched on, the first language will flash on the display. The
“ “, “OK” and “V” symbols will appear on the display, in line
with the 3 buttons on the right-hand side. The languages
change automatically every 3”; alternatively, they can be
changed by pressing the buttons next to the “ “ and “V”
symbols. Use the “OK” button to confirm the language, which
will be set after 2”. If no buttons are pressed, the automatic
language change will begin again after 30”.
To change the language, switch the machine on and off
again; in the 30” time period after it has been switched
off, press and hold the temperature +spin
+delayed start buttons simultaneously for 5’’. A short
sound alert will be emitted and the set language will flash
on the display. Press the buttons next to the “ “ and “V”
symbols to change the language. Use the button next to the
“OK” symbol to confirm the language, which will be set after
2”. If no buttons are pressed, the language set previously will
be displayed after 30”. Switch on the machine.
TEMPERATURE
button
OPTION
buttons
SPIN
button
DISPLAY
M1
M3
ECO
indicator light
DELAYED START
button
START/PAUSE button
with indicator light
LOCK indicator light
WASH
CYCLE
PHASE
icons
CONTROL PANEL LOCK
button with indicator light
M2

EN
8
WARNING: before you use the washing machine for the
first time, run a wash cycle with detergent and no laundry,
using the 90° cottons cycle without pre-wash.
1. SWITCH THE MACHINE ON. Press the button. All
the indicator lights will illuminate for 1 second and the
text AQUALTIS will appear on the display; the indicator
light corresponding to the button will then remain lit in
a constant manner and the START/PAUSE indicator light
will flash.
2. SELECT THE PROGRAMME. Turn the PROGRAMME
KNOB left or right, until the required programme has
been selected; the name of the programme will appear
on the display. A temperature and spin speed is set for
each programme; these may be adjusted. The cycle
duration will also appear on the display.
3. LOAD THE LAUNDRY. Open the porthole door.
Load the laundry, making sure you do not exceed the
maximum load value indicated in the table of wash
cycles on the following page.
4. MEASURE OUT THE DETERGENT. Pull out the
detergent dispenser drawer and pour the detergent into
the relevant compartments as described in “Description
of the machine”.
5. CLOSE THE PORTHOLE DOOR.
6. CUSTOMISE THE WASH CYCLE. Use the relevant
buttons on the control panel:
Modify the temperature and/or spin
speed.
The machine automatically displays the maximum
temperature and spin speed values set for the selected
cycle, or the most recently-used settings if they are
compatible with the selected cycle. The temperature can
be decreased by pressing the button, until the cold
wash “OFF” setting is reached. The spin speed may be
progressively reduced by pressing the button, until
it is completely excluded “OFF”. If these buttons are
pressed again, the maximum values are restored.
! Exception: if the programme is selected, the
temperature can be increased up to a value of 90°C.
Setting a delayed start.
To set a delayed start for the selected cycle, press the
corresponding button repeatedly until the required delay
period has been reached. During the setting procedure,
the delay period and the text “Starts in:” will be
displayed, along with the flashing symbol. After the
delayed start has been set, the symbol will remain
fixed on the display, which will also indicate the duration
of the selected cycle with the text “Ends in:” and the
cycle duration. Press the DELAYED START button just
once to display the delay time set previously.
After the countdown has begun, the display will show
the text “Starts in:” and the delay period. Once the
set delay time has elapsed, the machine will begin its
cycle and the display will show “Ends in:” and the time
remaining until the end of the cycle.
To remove the delayed start option, press the button
until the display shows the text OFF; the symbol will
disappear.
Modify the cycle settings.
• Press the button to activate the option; the name
of the option will then appear on the display and
the corresponding indicator light will illuminate.
• Press the button again to deactivate the option; the
name of the option will then appear on the display
followed by the text OFF, and the corresponding
indicator light will switch off.
! If the selected option is not compatible with the
selected wash cycle, this incompatibility will be signalled
by the flashing of the indicator light and a sound alert
(3 beeps); the option will not be activated.
! If the selected option is not compatible with another
option that has been selected previously, the indicator
light corresponding to the first option selected will
flash and only the second option will be activated; the
indicator light corresponding to the button will remain lit
in a constant manner.
! The options may affect the recommended load value and/
or the duration of the cycle.
7. START THE PROGRAMME. Press the START/PAUSE
button. The corresponding indicator light remains lit in a
fixed manner and the porthole door locks (the LOCK
indicator light illuminates). The icons corresponding to
the wash cycle phases will light up during the cycle to
indicate which phase is currently in progress.
To change a wash cycle once it has already started,
pause the washing machine by pressing the START/
PAUSE button; then select the desired cycle and press
the START/PAUSE button again.
To open the door during a wash cycle, press the START/
PAUSE button; if the LOCK indicator light is switched
off you may open the door. Press the START/PAUSE
button again to restart the wash cycle from the point at
which it was interrupted.
8. THE END OF THE WASH CYCLE. This is indicated
by the illuminated text END. The porthole door may be
opened immediately. If the START/PAUSE indicator light
is flashing, press the button to end the cycle. Open the
door, unload the laundry and switch off the machine.
! If you wish to cancel a cycle which has already begun,
press and hold the button until the cycle stops and the
machine switches off.
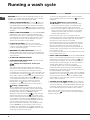
Running a wash cycle

EN
99
Wash options
Super Wash
This option offers a high-
performance wash due to
the greater quantity of water
used in the initial phase
of the cycle, and due to
the increased wash cycle
duration, is particularly useful
for the removal of stubborn
stains. It can be used with
or without bleach. If you
desire bleaching, insert the
extra tray compartment (3)
into compartment 1. When
pouring in the bleach, be
careful not to exceed the “max” level marked on the central
pivot (see figure). To bleach laundry without carrying
out a full wash cycle, pour the bleach into the extra
compartment 3, select the “Rinse” cycle and activate
the “Super Wash” option .
! It cannot be used in conjunction with , , , , , ,
, , .
Extra rinse
By selecting this option, the efficiency of the rinse is
increased and optimal residual detergent removal is
guaranteed. It is particularly useful for skin which is
sensitive to detergents. We recommend this option is used
with a full load of washing, or when a large amount of
detergent is required.
! It cannot be used in conjunction with , , , , .
Easy Iron
By selecting this option, the wash and spin cycles will be
modified in order to reduce the formation of creases.
At the end of the cycle the washing machine drum will
rotate slowly; the “Easy Iron” and START/PAUSE indicator
lights will flash. To end the cycle press the START/PAUSE
button or the “Easy Iron” button.
! It cannot be used in conjunction with , , , , .
Time Saver
If you select this option, the wash cycle duration will be
reduced by up to 50%, depending on the selected cycle,
thereby guaranteeing simultaneous water and energy
saving. Use this cycle for lightly soiled garments.
! It cannot be used in conjunction with , , , ,
, , , , .
3
1
2
(*) Note: 10 minutes after the START, the machine will recalculate the time remaining until the end of the wash cycle on the basis of the load inside it; this value will then be shown on the display.
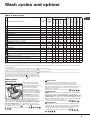
Wash cycles and options
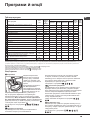
Table of wash cycles
For all Test Institutes:
1) Test wash cycle in compliance with directive 1061/2010: set wash cycle with a temperature of 60°C.
This cycle is designed for cotton loads with a normal soil level and is the most efficient in terms of both electricity and water consumption; it should be used for garments which can be
washed at 60°C. The actual washing temperature may differ from the indicated value.
2) Test wash cycle in compliance with directive 1061/2010: set wash cycle with a temperature of 40°C.
This cycle is designed for cotton loads with a normal soil level and is the most efficient in terms of both electricity and water consumption; it should be used for garments which can be
washed at 40°C. The actual washing temperature may differ from the indicated value.
3) Long wash cycle for cottons: set wash cycle with a temperature of 40°C.
4) Short wash cycle for cottons: set wash cycle with a temperature of 40°C.
5) Long wash cycle for synthetics: set wash cycle with a temperature of 40°C.
The length of cycle shown on the display or in this booklet is an estimation only and is calculated assuming standard working conditions. The actual duration can vary according to factors such as
water temperature and pressure, the amount of detergent used, the amount and type of load inserted, load balancing and any wash options selected.
Icon
Description of the wash cycle
Max. temp.
(°C)
Max.
speed
(rpm)
Detergent and additives
Max. load (kg)
Residual dam-
pness %
Energy con-
sumption kWh
Total water lt
Cycle duration
Prewash
Wash
Bleach
Fabric
softener
Cotton Coloureds (2-3): lightly soiled whites and delicate colours. 40° 1000 -
7 62 0,94 72 170’
Synthetics Resistant 60° 800 -
3 49 0,87 42 90’
Synthetics Resistant (5) 40° 800 -
3 49 0,56 42 80’
Whites
60° 1000 -
-
4 - - - 190’
Coloureds (4)
40° 1000 -
4 62 0,90 73 95’
Darks
30° 800 -
-
4 - - - 80’
Shirts
40° 600 -
2 - - - 85’
Quilted Jacket: to wash clothes padded with goose down
(such as puffa jackets) or cushions.
30° 1000 -
-
1,5 - - - 130’
Bed&Bath for bedlinen and towels. 60° 1000 -
7 - - - 135’
Rinse
- 1000 - -
7 - - - 49’
Spin and Pump out - 1000 - - - - 7 - - - 16’
Anti Allergy
60° 1000 -
-
4 - - - 200’
Ultradelicates
30° 0 -
-
1 - - - 75’
Wool Platinum Care: for wool, cashmere, etc. 40° 800 -
-
1,5 - - - 80’
Mix 30': to refresh lightly soiled garments quickly (not suita-
ble for wool, silk and clothes which require washing by hand).
30° 800 -
-
3 71 0,19 39 30’
Cotton Hygiene Prewash
(Add detergent to the relevant compartment).
90° 1000
-
7 62 2,47 97 185’
Cotton Whites (1): heavily soiled whites and resistant colours. 60° 1000 -
7 62 1,00 52,5 185’
Cotton Whites: heavily soiled whites and resistant colours. 90° 1000 -
7 62 2,53 88 170’

EN
10
Detergents and laundry
Quilted Jacket: to wash quilted jacket, cushions or
clothes padded with goose down (the weight of which
should not exceed 1,5 kg), use the special wash cycle.
Bedlinen and towels: use programme to wash bed
linen and towels in one single cycle: it optimises softener
performance and helps you save time and energy. We
recommend the use of powder detergent
Anti Allergy: use programme to remove major allergens
such as pollen, mites, cat’s and dog’s hair.
Ultradelicates: use programme to wash very delicate
garments having strasses or sequins.
We recommend turning the garments inside out before
washing and placing small items into the special bag
for washing delicates. Use liquid detergent on delicate
garments for best results.
To wash Silk garments and Curtains select cycle and
then option (in this case it will also be possible to
enable the “Extra Rinse” option); the machine will end the
cycle while the laundry is soaking and the indicator
light will flash. To drain the water so that the laundry may
be removed, press the START/PAUSE button or the
button.
Wool: the wool wash cycle on this Hotpoint-Ariston
machine has been tested and approved by The Woolmark
Company for washing wool garments labelled as hand
washable provided that the garments are washed
according to the instructions on the garment label
and those issued by the manufacturer of this washing
machine. Hotpoint-Ariston is the first washing machine
brand to be approved by The Woolmark Company for
Apparel Care- Platinum for its washing performance and
consumption of energy and water.
Stubborn stains: it is wise to treat stubborn stains with
solid soap before washing, and to use the Cottons with
pre-wash cycle.
Load balancing system
Before every spin cycle, to avoid excessive vibrations
before every spin and to distribute the load in a uniform
manner, the drum rotates continuously at a speed which
is slightly greater than the washing rotation speed. If,
after several attempts, the load is not balanced correctly,
the machine spins at a reduced spin speed. If the load is
excessively unbalanced, the washing machine performs
the distribution process instead of spinning. To encourage
improved load distribution and balance, we recommend
small and large garments are mixed in the load.
Detergent
The type and quantity of detergent required depend on
the type of fabric you are washing (cotton, wool, silk,
etc.), as well as its colour, the washing temperature, the
level of soiling and the hardness of the water in the area.
Measuring out the detergent carefully will avoid wastage
and help to protect the environment: although they are
biodegradable, detergents still contain ingredients which
alter the balance of nature.
We recommend the following:
• use powder detergents for white cotton garments and
pre-washing.
• use liquid detergents for delicate cotton garments and
for all low-temperature wash cycles.
• use gentle liquid detergents for wool and silk
garments.
The detergent should be poured into the relevant
compartment - or the dispenser placed directly inside the
drum - before the wash cycle begins. In the latter case, it will
not be possible to select the Cottons with pre-wash cycle.
! Use powder detergent for white cotton garments, for
pre-washing, and for washing at temperatures over 60°C
! Follow the instructions given on the detergent packaging.
! Do not use hand washing detergents because these
create too much foam.
Preparing the laundry
• Shake out the garments before loading them into the
machine.
• Divide the laundry according fabric type (symbol on the
washing instruction label) and colour, making sure you
separate the coloured garments from the white ones;
• Empty all pockets and check the buttons;
• Do not exceed the values listed in the “Table of wash cycles”,
which refer to the weight of the laundry when dry.
How much does your laundry weigh?
1 sheet 400-500 g
1 pillowcase 150-200 g
1 tablecloth 400-500 g
1 bathrobe 900-1200 g
1 towel 150-250 g
1 pair of jeans 400-500 g
1 shirt 150-200 g
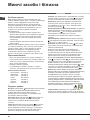
Washing recommendations
Whites: use this cycle to wash white clothes. The
programme is designed to maintain the brightness of
white clothes over time.
Coloureds: use this cycle to wash bright coloured
clothes. The programme is designed to maintain bright
colours over time.
Darks: Use cycle to wash dark-coloured garments.
This programme is designed to maintain dark colours
over time. We recommend using a liquid detergent for the
best results when washing dark-coloured garments.
Shirts: use the special wash cycle to wash shirts in
different fabrics and colours to guarantee they receive the
best possible care.

EN
11
Trouble shooting
Your washing machine could occasionally fail to work. Before contacting the Technical Assistance Centre (see “Assistance”),
make sure that the problem cannot be solved easily using the following list.
Problem:
The washing machine does not
switch on.
The wash cycle does not start.
The washing machine does not fill
with water.
The washing machine door
remains locked.
The machine continuously fills
with water and drains.
The washing machine does not
drain or spin.
The machine vibrates a lot during
the spin cycle.
The washing machine leaks.
The icons corresponding to the
“Phase in progress” flash rapidly
at the same time as the ON/OFF
indicator light.
There is too much foam.
The washing machine door
remains locked.
Possible causes / Solutions:
• The appliance is not plugged into the socket fully, or not enough to make
contact.
• There is no power in the house.
• The door is not closed properly.
• The START/PAUSE button has not been pressed.
• The water tap has not been opened.
• A delayed start has been set.
• The water inlet hose is not connected to the tap.
• The hose is bent.
• The water tap has not been opened.
• There is no water supply in the house.
• The pressure is too low.
• The START/PAUSE button has not been pressed.
• If you have selected the function, at the end of the cycle the washing
machine drum will rotate slowly; to end the cycle press the START/PAUSE
button or the button.
• The drain hose is not fitted at a height between 65 and 100 cm from the floor
(see “Installation”).
• The free end of the hose is under water (see “Installation”).
• If the dwelling is on one of the upper floors of a building, there may be
problems relating to water drainage, causing the washing machine to fill with
water and drain continuously. Special anti-draining valves are available in shops
and help to prevent this inconvenience.
• The wall drainage system is not fitted with a breather pipe.
• The wash cycle does not include draining: Some wash cycles require the drain
phase to be started manually (see “Wash cycles and options”).
• The “Easy iron” option is enabled: to complete the wash cycle, press the
START/PAUSE button (“Wash cycles and options”).
• The drain hose is bent (see Installation).
• The drainage duct is clogged.
• The drum was not unlocked correctly during installation (see “Installation”).
• The machine is not level (see “Installation” ).
• The machine is trapped between cabinets and walls (see “Installation”).
• The load is unbalanced (see “Detergents and laundry”).
• The water inlet hose is not screwed on properly (see “Installation”).
• The detergent dispenser is blocked (to clean it, see “Care and maintenance”).
• The drain hose is not fixed in place properly (see “Installation”).
• Switch off the machine and unplug it, wait for approximately 1 minute and
then switch it back on again. If the problem persists, contact the Technical
Assistance Service.
• The detergent is not suitable for machine washing (it should display the text
“for washing machines” or “hand and machine wash”, or the like).
• Too much detergent was used.
• Perform the manual unlocking procedure (see “Precautions and tips”).
! Note: to exit “Demo mode”, switch machine off, press and hold the two “START/PAUSE” and “ON/OFF” buttons
simultaneously for 3 seconds.

EN
12
Before calling for Assistance:
• Check whether you can solve the problem by yourself (see “Trouble shooting”);
• Restart the wash cycle to check whether the problem has been solved;
• If it has not, contact the Authorised Technical Assistance Service.
! If the washing machine has been installed or used incorrectly, you will have to pay for the call-out service.
! Always request the assistance of authorised technicians.
Please have the following information to hand:
• the type of problem;
• the appliance model (Mod.);
• the serial number (S/N).
The above information can be found on the data plate located on the appliance itself.
Assistance

13
UK
Українська
Зміст
Встановлення, 14-15
Розпакування і вирівнювання
Підключення води й електроенергії
Технiчнi данi
Опис машини, 16-17
Панель команд “з сенсорним керуванням”
Як здійснювати цикл прання, 18
Програми й опції, 19
Таблиця програм
Опції прання
Пральні засоби і білизна, 20
Засіб для прання
Підготовка білизни
Поради з прання
Запобіжні заходи та поради, 21
Загальна безпека
Система балансування завантаження
Утилізація
Ручне відкривання дверцят люку
Технічне обслуговування та догляд, 22
Відключення води й електричного живлення
Миття машини
Чистка касети для миючих засобів
Догляд за барабаном для білизни
Чищення насосу
Стеження за шлангом для подачі води
Несправності та засоби їх усунення, 23
Допомога, 24
UK
ПРАЛЬНА МАШИНА
AQUALTIS
AQS73D 09
Інструкція з монтажу та
експлуатації

UK
14
! Необхідно зберігати дану брошуру, щоб мати
можливість проконсультуватися з нею у будь-який
момент. У випадку продажу, передачі або переїзду,
переконайтеся у тому, що вона залишається разом із
пральною машиною
! Уважно вивчіть інструкцію: в ній міститься важлива
інформація про встановлення, використання та
безпеку.
! У пакеті з інструкцією ви знайдете, окрім гарантії,
докладну інформацію для встановлення.
Розпакування і вирівнювання
Розпакування
1. Розпакувавши пральну машину, перевірте її на
наявність пошкоджень під час транспортування.
Якщо такі є, не виконуйте нiяких пiдключень та
негайно зверніться до постачальника.
2. Видаліть 4
запобіжних гвинти
для транспортування
і відповідну розпірну
деталь, розташовану
ззаду ( див. малюнок).
3. Закрийте отвір пробками з пластмаси, що містяться
у пакеті.
4. Зберігайте всі деталі; якщо пральна машина має
перевозиться, вони знову можуть бути потрібними,
щоб уникнути внутрішніх пошкоджень.
! Забороняйте дiтям гратися з упаковками.
Вирівнювання
1. Встановіть пральну машину на плоскій та твердій
підлозі, не притуляючи її до стін або меблів.
2. Компенсуйте
нерівності, відкручуючи
або вкручуючи ніжки,
доки машина не стане
горизонтально (вона не
повинна відхилятися
більш ніж на 2 градуси).
! Правильне вирівнювання надасть стабільність
й усуне вібрацію, а також знизить рівень шуму,
особливо під час роботи центрифуги.
! У випадку встановлення машини на килимовому
покритті або килимах, ніжки необхідно відрегулювати
таким чином, щоб гарантувати під пральною машиною
необхідний простір для вентиляції.
Підключення води й електроенергії
Контроль шланга для подачі води
! До підключення шланга подачі води до водопроводу,
злийте деяку кількість води, доки вона не йтиме
чистою.
1. Підключіть шланг
подачі води до машини,
під’єднавши його до
виходу на задньому
боці угорі праворуч (див.
малюнок).
2. Підключити
живлячий трубопровід,
прикрутивши його до
крану холодної води за
допомогою штуцеру з
газовою різьбою 3/4 (див.
малюнок).
Перед пiдключенням
спустiть воду, доки вона
не стане прозорою.
3. Зверніть увагу, щоб шланг не мав згинів та утисків.
! Тиск води в крані має відповідати значенням у
таблиці Технічних даних (див. сторінку поруч).
! Якщо довжини шланга для води не вистачає,
зверніться у спеціалізовану крамницю або до
уповноваженого фахівця.
! Ніколи не використовуйте уживані або старі
шланги для роботи під тиском, а тільки шланги, що
поставляються разом із машиною.
Встановлення

15
UK
Підключення шланга для зливу води
Підключіть зливний
шланг до каналізації
або до зливного отвору
у стіні на висоті від 65
до 100 см від підлоги,
не допускаючи його
згинання.
Або ж встановіть вихід
зливного шланга на край
рукомийника або ванни,
використавши дугу, що
спрямовує кінець шланга
(див. малюнок).
Не залишайте вільний
кінець зливного шланга
зануреним у воду.
! Використання подовжувача шланга не
рекомендоване. В разi необхiдностi використання
подовжувача шланга, переконайтеся у тому, що він
має той самий діаметр та його довжина не перевищує
150 см.
Електричні підключення
Перш нiж увiмкнути вилку в електричну розетку,
переконайтеся, що:
• розетка має заземлення у відповідності до
встановлених норм;
• розетка розрахована на максимальне
навантаження у межах потужності машини,
зазначене у таблиці Технічних даних (див. малюнок
поруч);
• напруга живлення перебуває у межах, зазначених у
таблиці Технічних даних (див. малюнок поруч);
• розетка підходить до вилки машини. В іншому
випадку замініть розетку або вилку.
! Машину не можна встановлювати поза
приміщенням, навіть, під час його ремонту, тому що
дуже небезпечно піддавати її впливу дощу і грози.
! Коли машина вже встановлена, має забезпечуватися
вільний доступ до її розетки.
65 - 100 cm
! Не використовуйте подовжувачі й трійники.
! Кабель не повинен мати згинів або утисків.
! Заміна кабелю живлення й вилки мають
виконуватися тільки фахівцями.
Увага! Підприємство знімає з себе відповідальність,
якщо вказані норми не дотримуватимуться.
Технiчнi данi
Модель AQS73D 09
Розмiри
ширина 59,5 см
висота 85 см
глибина 44,5 см
Кiлькiсть бiлизни вiд 1 до 7 кг
Електричні
підключення
див. шильдік з технiчними даними на
машинi
Водопровднi
пiдключення
максимальний тиск 1 мПа (10 бар)
мiнiмальний тиск 0,05 мПа (0,5 бар)
об’єм баку – 48 лiтри
Швидкiсть
центрифуги
до 1000 обертiв на хвилину
Програма
випробувань
відповідно до
Директиви
EN 60456
програма
; температура 60°C;
виконується з завантаженням 7 кг.
Цей прилад вiдповiдає таким
європейським директивам:
- 2004/108/CE (Електромагнітна
сумiснiсть)
- 2012/19/EU
- 2006/95/CE (Низька напруга)

UK
16
ДВЕРЦЯТА ЛЮКУ
Для відкриття
дверцят люку завжди
використовуйте
спеціальну ручку (див.
малюнок).
КАСЕТА ДЛЯ ПРАЛЬНИХ ЗАСОБIВ
Касета для пральних
засобiв знаходиться
всередині машини; щоб
її дiстатися, відкрийте
дверцята.
Про дозування пральних
засобів йдеться у розділі
“Пральні засоби і білизна”.
1. ванночка для
попереднього прання:
використовуйте миючий
засіб у порошку.
! Перш нiж додати миючии
засіб, перевірте, щоб не
була вставлена додаткова
ванночка 3.
2. ванночка для прання:
Якщо використовується
рідкий пральний засіб, рекомендується застосовувати
вимірювальний компонент A з комплекту постачання
для правильного дозування. При використанні
порошкового прального засобу вставьте цей
компонент у нішу B.
3. додаткова ванночка: Відбілювач
! Використання додатковоі ванночки 3 виключає
попереднє прання.
ванночка для додаткових засобів: для
пом’якшувачів або додаткових рідин. Рекомендується
ніколи не перевищувати максимальний рівень,
відмічений сіткою, і розбавляти концентровані
пом’якшувачі.
Панель команд “з сенсорним керуванням”
Для змiни параметрiв
злегка натиснiть на значок
на сенсорному екранi
(touch control), як вказано
на малюнку.
Режим очiкування
Вiдповiдно до норм, пов’язаних з заощадження
енергiї, цю пральну машину оснащено системою
автовимкнення (stand by), яка активується через
декiлька (30) секунд вiдсутностi роботи з боку
машини. Швидко натиснiть кнопку ON/OFF та
зачекайте вiдновлення роботи машини.
ПАНЕЛЬ
КОМАНД
Опис машини
ДВЕРЦЯТА
ЛЮКУ
РУЧКА
ДВЕРЦЯТ
ЛЮКУ
НІЖКИ, ЩО РЕГУЛЮЮТЬСЯ
ДЕКОРАТИВНА
НИЖНЯ ПАНЕЛЬ
3
1
2
1
8
0
2
1
0
1
5
0
1
2
0
9
0
6
0
B
A

17
UK
Панель команд “з сенсорним керуванням”
Кнопка з індикаторною лампою ON/OFF: швидко
натисніть і відпустіть кнопку для вмикання або
вимикання машини. Зелена індикаторна лампа означає,
що машина ввімкнена. Для вимикання пральної машини
під час прання необхідно утримувати кнопку натиснутою
приблизно більш ніж 3 сек.; короткочасне або випадкове
натискання не дозволить вимкнути машину. Вимикання
машини під час циклу прання вiдмiнює це прання.
Ручка ПРОГРАМИ: може обертатися в обох напрямках.
Щоб встановити найбільш придатну програму див.
“Таблицю програм”. Під час прання ручка залишається
нерухомою.
Кнопки M1-M2-M3: тримайте натиснутою одну з кнопок,
щоб запам’ятати цикл і відповідні персоналізовані опції.
Для виклику попередньо внесеного у пам’ять циклу
натисніть відповідну кнопку.
Кнопка ТЕМПЕРАТУРА: натисніть для внесення змін
або виключення температури; значення відображається
на дисплеї, який знаходиться вище (див. “Як
здійснювати цикл прання”).
Кнопка ВIДЖИМУ: натисніть для внесення змін або
виключення центрифуги; значення відображається на
дисплеї, який знаходиться вище (див. “Як здійснювати
цикл прання”).
Кнопка ВIДКЛАДЕНЕ ПРАННЯ: натиснiть для
використання машини в режимі відкладеного прання;
значення часу затримки відображається на дисплеї,
який знаходиться вище (див. “Як здійснювати цикл
прання”).
Кнопки ОПЦІЇ: натиснiть для вибору наявних опцій.
Горить індикаторна лампа, що відноситься до вибраної
опції прання (див. “Як здійснювати цикл прання”).
Піктограми ФАЗИ ПРАННЯ: загораються при
проходженні відповідних фаз циклу (Прання -
Полоскання - Віджим – Злив ).
Надпис спалахує після закінчення циклу.
Кнопка з індикаторною лампою START/PAUSE: коли
зелена індикаторна лампа блимає з повільними
інтервалами, натисніть на кнопку для запуску прання.
Якщо цикл розпочався, індикаторна лампа горить
постійно. Щоб війти в режим паузи під час прання, знову
натисніть на кнопку; індикаторна лампа почне горіти
оранжевим кольором. Якщо індикаторна лампа “LOCK”
погасне, можна відкривати люк для завантаження
білизни. Щоб продовжити прання з місця, де воно було
перервано, знову натисніть на кнопку.
Iндикаторна лампа LOCK: показує, що люк для
завантаження заблокований. Щоб вiдкрити дверцята,
встановiть цикл у режим паузи (див. “Як здійснювати
цикл прання”).
Кнопка з індикаторною лампою БЛОКУВАННЯ
КОМАНД: щоб активувати або дезактивувати
блок панелі команд, натисніть і утримуйте кнопку
приблизно 2 секунди. Увімкнена індикаторна лампа
вказує, що панелькоманд заблоковано. У цей спосіб
перешкоджають випадковій зміні програм, передусім,
якщо у домі є діти.
Індикаторна лампа ЕКО: Пiктограма спалахує,
якщо пiд час змiни параметрiв миття, вiдбувається
заожадження енергiї не менше за 10%. Крiм того, перш
нiж машина увiйде у режим очiкування “Stand by”,
позначка спалахне на декiлька секунд; у вимкненiй машинi
оцiнюване енергозбереження складатиме приблизно 80%.
ЗМIНА МОВИ
При першому увiмкненнi машини на екранi почне
блимати перша мова. Навпроти 3 кнопок праворуч
екрану з’являться позначки “ ”, “OK” та “V”. Змiна
мов вiдбувається автоматично кожнi 3 секунди. Або ж
можна натиснути кнопки поруз з позначками “ “ та “V”.
Через 2 секунди можна обрати мову та пiдтвердити
її за допомогою кнопки “OK”. Якщо не натиснути нi на
яку кнопку, через 30 секунд мови знову розпочнуть
змiнюватися автоматично.
Щоб змінити мову, необхідно увімкнути і вимкнути
машину, потім протягом 30 секунд після вимкнення
машини одночасно натиснути на кнопки температури
+віджиму +відстроченого пуску і утримати
їх 5 секунд. На дисплеї почне блимати нова обрана
мова, про що сповіщає короткочасний звуковий сигнал.
При натисканнi на кнопки поруч з позначками “ “ та
“V” вiдбувається змiна мови. Через 2 секунди можна
обрати мову та пiдтвердити її за допомогою кнопки
поруч з “OK”. Якщо не натиснути нi на яку кнопку, через
30 секунд з’явиться остання задана мова.
Ручка
ПРОГРАМИ
Кнопка з індикаторною
лампою ON/OFF
ДИСПЛЕЙ
M1
Кнопки
ОПЦІЇ
Кнопка
ТЕМПЕРАТУРА
Кнопка
ВІДЖИМ
Кнопка
ВIДКЛАДЕНЕ
ПРАННЯ
Кнопка з індикаторною
лампою START/PAUSE
Піктограми
ФАЗИ
ПРАННЯ
Індикаторна
лампа EКO
Iндикаторна лампа LOCK
Кнопка з індикаторною лампою
БЛОКУВАННЯ КОМАНД
M2
M3
17

UK
18
ПРИМІТКА: при першому використанні пральної
машини, здійсніть цикл прання без білизни, але з
миючим засобом, в режимі прання бавовняних виробів
при температурі 90 градусів без попереднього прання.
1. УВІМКНЕННЯ МАШИНИ. Натисніть кнопку . Всі
індикаторні лампи загоряться на 1 секунду і на
дисплеї з’явиться напис AQUALTIS; залишиться
горіти індикаторна лампа кнопки , а індикаторна
лампа START/PAUSE блиматиме.
2. ВИБІР ПРОГРАМИ. Обертайте РУЧКУ ПРОГРАМ
ліворуч або праворуч, щоб вибрати бажану
програму; назва програми відобразиться
на дисплеї; кожна програма має відповідну
температуру та швидкість віджиму, які можуть бути
змінені. На дисплеї з’явиться тривалiсть циклу.
3. ЗАВАНТАЖЕННЯ БІЛИЗНИ. Відкрийте дверцята
люку. Завантажте білизну, звертаючи увагу, щоб не
перевищити кількість білизни, зазначену в таблиці
програм на наступній сторінці або вказану на екранi.
4. додавання засобу для прання. Витягніть касету
і додайте миючий засіб у відповідні ванночки як
вказано в “Описі машини”.
5. ЗАКРИЙТЕ ЛЮК.
6. ПЕРСОНАЛИЗАЦІЯ ЦИКЛУ ПРАННЯ.
Використовуйте спеціальні кнопки на панелі команд:
Зміна температури та/або швидкостi
віджиму.
На дисплеї автоматично вiдображається
максимальна температура i швидкiсть центрифуги,
передбаченi для заданої програми. Або останнi
заданi параметри, якщо вони є сумiсними з
вибраною програмою. Натискаючи на кнопку
, зменшують температуру прання до прання у
холодній воді “OFF”. Натискаючи на кнопку
, поступово зменшують швидкість віджиму, аж
до його відключення взагалi “OFF”. Наступне
натискання на кнопки призводить до повернення у
верхню позицію – до максимальних значень.
! Виключення: при виборі програми , температура
може збільшитися до 90 градусів.
Задати вiдстрочене прання.
Для встановлення вiдстроченого прання обраної
програми натискайте на вiдповiдну кнопку, доки
не з’явиться необхiдний час вiдстрочення. Пiд
час встановлення з’являється час вiдстрочення
разом з написом “Starts in:” (Початок через) та
блимаючою позначкою . Пiсля встановлення
вiдстроченого прання позначка на дисплеї
горiтиме постiйним свiтлом та з’явиться
тривалiсть заданного циклу з написом “Ends
in:” (Завершення через). При одноразовому
натисканнi на кнопку ВIДСТРОЧЕНОГО ПРАННЯ
з’явиться попередньо заданий час вiдстрочення.
Пiсля пуску на дисплеї з’явиться напис “Starts
in:” (Початок через) та час вiдстрочення. Пiсля
вичерпання заданого часу вiдстрочення машина
розпочне роботу, та на дисплеї з’явиться напис
“Ends in:” (Завершення через) та час, якого
бракує до кiнця циклу. Щоб скасувати вiдстрочене
прання, натискайте на кнопку, доки на дисплеї не
з’явиться напис OFF; позначка згасне.
Модифiкацiя характеристик циклу.
• Натисніть кнопку, щоб активувати опцію; на
дисплеї відобразиться назва опції і загориться
індикаторна лампа, що відповідає кнопці.
• Знову натисніть на кнопку, щоб дезактивувати
дану опцію; на дисплеї з’явиться назва опції
плюс OFF, а індикаторна лампа згасне.
! Якщо вибрано опцiю, несумiсною з заданою
програмою, надається сигнализацiя через
блимання iндикаторної лампи та звуковий сигнал
(тричi); опцiя не активується.
! Якщо вибрана опція несумісна з іншою раніше
вибраною, індикаторна лампа, що відповідає
первинній опції почне блимати, при цьому буде
активована тільки друга опція, індикаторна лампа
кнопки горітиме постійно.
! За допомогою опцiй можна змiнювати
рекомендоване завантаження та/або тривалiсть
циклу.
7. ЗАПУСК ПРОГРАМИ. Натисніть кнопку START/
PAUSE. Загориться відповідна індикаторна лампа,
і люк заблокується (ввімкнена індикаторна лампа
LOCK ). Піктограми, що відносяться до фаз прання,
загоряться під час циклу, показуючи зміну фаз. Для
зміни програми, під час виконання циклу, переведіть
пральну машину в режим паузи, натиснувши на
кнопку START/PAUSE; виберіть бажаний цикл і
знову натисніть кнопку START/PAUSE. Щоб вiдкрити
дверцята пiд час циклу, натиснiть кнопку START/
PAUSE; згасла iндикаторна лампа LOCK дозволяє
вiдкрити люк. Знову натисніть на кнопку START/
PAUSE, щоб запустити програму з того моменту, на
якому вона була перервана.
8. ЗАВЕРШЕННЯ ПРОГРАМИ. Відображається
вмиканням надпису END. Дверцята люку можна
відкрити відразу. Якщо індикаторна лампа START/
PAUSE блимає, натисніть на кнопку, щоб завершити
цикл. Відкрийте дверцята люку, витягніть білизну й
вимкнiть машину.
! Для вiдмiни вже працюючого циклу натиснiть
кнопку , утримуючи її, й цикл буде перервано,
пiсля чого машина вимкнеться.
Як здійснювати цикл прання

19
UK
Опції прання
Super Wash
Завдяки використанню
більшої кількості води на
початку циклу та бiльшiй
тривалостi програми, така
опція гарантує високоякісне
прання.
Може використовуватися з
або без відбілювача.
При необхiдностi виконати
також відбілювання вставте
додаткову ванночку 3, що
входить до комплекту постачання, у ванночку 1.
Пiд час дозування вiдбiлювача не перевищуйте
максимальний рiвень “max” на центральному стрижнi
(див.малюнок). Якщо ви бажаєте тільки відбілювати
без виконання повного прання, заповнiть вiдбiлювачем
додаткову ванночку 3, задайте програму “Полоскання”
та активуйте опцiю “Super Wash” .
! Не активується на програмах , , , , , , ,
, .
Додаткове полоскання
При виборі даної опції збільшується ефективність
полоскання й гарантується максимальне
видаленняпральногозасобу. Він зручний для людей
зі шкірою, особливо чутливою до миючих засобів.
Рекомендується її використання із пральною машиною
при повному завантаженні або з використанням
підвищених доз пральних засобів.
! Не працює з програмами , , , , .
Полегшене прасування
При виборі даної опції, режими прання і віджиму будуть
відповідно змінені для зменшення утворення складок.
Після закінчення циклу пральна машина почне виконувати
повільне обертання барабана; індикаторні лампи “
Полегшене прасування” і START/PAUSE блимають. Щоб
закінчити цикл, натисніть на кнопку START/PAUSE або
кнопку “Подовжений цикл”.
! Цикл неможливо активувати на програмах , , ,
, .
Заощадження часу
Завдяки цiєї опцiї тривалiсть програми зменшується до
50% залежно вiд вибраного циклу, заощаджуючи воду та
електричну енергiю. Цей цикл призначений для не дуже
забруднених речей.
! Не активується у програмах , , , , , ,
, , .
(*) Примiтка: приблизно за 10 хвилин пiсля пуску (START) машина розрахує та вiдобразить час, який залишився до завершення програми, який залежитиме вiд завантаження.
Програми й опції
Таблиця програм
Для всiх Установ з проведення випробувань:
1) Програма керування згiдно до норми EN 60456: встановiть програму з температурою 60°C
.
2) Довга програма бавовна: встановiть програму з температурою 40°C.
3) Коротка програма бавовна: встановiть програму з температурою 40°C.
4) Довга програма
Синтетичнi
: встановiть програму з температурою 40°C.
Тривалість циклу, вказана на дисплеї або в керівництві, разрахована на основі стандартних умов роботи. Фактичний час може залежати від чисельних факторів, таких як температура і
тиск подаваної води, температура у приміщенні, кількість миючого засобу, кількість і тип завантаженої білизни, зрівноваження завантаженої білизни, додаткові обрані опції.
19
3
1
2
Опис програми
Макс.
темп.
(°C)
Макс.
швидкiсть
(обертiв
за
хвилину)
Пральнi засоби та додатковi засоби
Макс.
завант-
аження
(кг)
Трива-
лiсть
циклу
Попереднiм
пранням
Прання Відбілювач
Пом’
якшувач
Бавовна (2): дуже забрудненi делiкатнi бiлi та
кольоровi тканини.
40° 1000 -
7
Синтетичнi мiцнi тканини
60° 800 -
3
Синтетичнi мiцнi тканини (4)
40° 800 -
3
Білі речі
60° 1000 -
-
4
Кольорові речі (3)
40° 1000 -
4
Темні речі
30° 800 -
-
4
Сорочки
40° 600 -
2
Пухові речі
30° 1000 -
-
1,5
Бiлизна “7 днiв”: для постільної білизни і банного
приладдя.
60° 1000 -
7
Полоскання
- 1000 - -
7
Вiджим і Злив
- 1000 - - - - 7
Протиалергійне прання
60° 1000 -
-
4
Делікатне
30° 0 -
-
1
Вовна: для речей з вовни, кашемiру, тощо.
40° 800 -
-
1,5
Mix 30’: Для швидого освiження злегка забруднених
речей (не рекомендоване для вовняних, шовкових
речей або речей для ручного прання)
30° 800 -
-
3
Бавовна з попереднiм пранням: вкрай забруднен
бiл. (Додати миючого засобу в відсі).
90° 1000
-
7
Бiла бавовна (1): дуже забрудненi стiйкi бiлi та
кольоровi тканини.
60°
(Max. 90°C)
1000 -
7
Програми
(*) Тривалiсть програм вiдображується на дисплеї.

UK
20
Сорочки: для забезпечення максимального догляду
використовуйте спецiальну програму для прання
сорочок з рiзноманiтних тканин та рiзних кольорiв.
Пухові речі: Для прання виробів із наповненням
гусячим пухом, таких як подушки, легкi куртки (які
не перевищують за вагою 1,5 кг), використовуйте
спеціальну програму .
Білизна для ванної і постільна білизна: ця пральна
машина дозволяє випрати білизну з усього дому за
один єдиний цикл , що оптимізує використання
пом’якшувача й заощаджує час і енергію.
Рекомендується використання миючих засобів у
порошку.
Протиалергійне прання: використовуйте програму
для видалення основних алергенів, таких як пилок,
кліщі, котяча і собача шерсть.
Делікатне: використовуйте програму для прання
дуже делікатних речей, наприклад, зі стразами або
іншими оздобленнями.
Перш ніж запускати прання, рекомендується
вивернути речі навиворіт і вкласти дрібні речі в
спеціальний мішечок для прання делікатних речей.
Кращі результати досягаються при використанні
рідкого прального засобу для делікатних речей
Для прання шовкових речей або портьєр виберіть
цикл і активуйте опцію (В цьому випадку можна
буде активувати також опцію “Додаткове полоскання”);
машина закінчить цикл із замоченою білизною й
блиманням відповідної індикаторної лампи . Щоб
злити воду й отримати можливість витягнути білизну,
натисніть на кнопку START/PAUSE або кнопку .
Вовна: Цикл прання “Вовна” цієї пральної машини
Hotpoint-Ariston протестований і затверджений компанією
Woolmark у відношенні до прання вовняних речей,
класифікованих як для “ручного прання”, за умови
виконання прання згідно до інструкцій, наведених на
етикетці виробу, і вказівок виробника електропобутового
приладу. Hotpoint-Ariston - перша марка пральних машин,
яка отримала від компанії Woolmark сертифікацію
Woolmark Apparel Care - Platinum за власні показники
прання і витрати води й електроенергії.
Стійки плями: рекомендується обробити стійки
плями за допомогою твердого мила ще до прання й
використати програму Бавовна з попереднім пранням.
Миючі засоби і білизна
Засіб для прання
Вибір і кількість миючого засобу залежать від типу
тканини (бавовна, вовна, шовк...), кольорів, температури
прання, ступеню забруднення і жорсткості води.
Правильне дозування миючих засобів дозволяє
уникнути зайвих витрат й захищає довкілля: миючі
засоби, які здатні біологічно руйнуватися, містять
елементи, що змінюють рівновагу навкiлля.
Рекомендується:
• використовувати миючі засоби в порошку для
білизни з білої бавовни і для попереднього прання.
• використовувати рідкі миючі засоби для тонких
речей з бавовни і для всіх програм при низькій
температурі.
• використовувати рідкі делікатні миючі засоби для
вовни і шовку.
Миючий засіб необхідно додати ще до початку прання
у спеціальну ванночку, або у дозатор, який потрібно
покласти прямо у бак. У цьому випадку не можна
вибирати цикл Бавовна з попереднім пранням.
! Не використовуйте миючі засоби для ручного
прання, тому що вони утворюють надто багато піни.
Підготовка білизни
• Перш нiж завантажувати речi, добре розкрийте їх.
• Розсортуйте білизну згідно типу тканини (символ на
етикетці) і кольору, звернувши увагу на розділення
білої і кольорової білизни;
• Перевірте кишені й ґудзики;
• Не перевищуйте значення, вказані у “Таблиці
програм” , що відносяться до ваги сухої білизни.
Скільки важить білизна?
1 простирадло 400-500 гр.
1 наволочка 150-200 гр.
1 скатертина 400-500 гр.
1 халат 900-1200 гр.
1 рушник 150-250 гр.
1 джинси 400-500 гр.
1 сорочка 150-200 гр.
Поради з прання
Білі речі: цей програму використовується для прання
білих речей. Завдяки цій програмі забезпечується
тривале зберігання сяючого білого кольору.
Кращі результати отримуються при використанні
порошкового миючого засобу.
Кольорові речі: цей програму використовується
для прання світлих речей. Завдяки цій програмі
забезпечується тривале зберігання насичених
кольорів.
Темні речі: використовуйте програму для прання
речей темного кольору. программа розроблена з
метою збереження темного кольору з часом. Кращі
результати досягаються при використанні рідкого
прального засобу для речей темного кольору.
Страница загружается ...
Страница загружается ...
Страница загружается ...
Страница загружается ...
-
 1
1
-
 2
2
-
 3
3
-
 4
4
-
 5
5
-
 6
6
-
 7
7
-
 8
8
-
 9
9
-
 10
10
-
 11
11
-
 12
12
-
 13
13
-
 14
14
-
 15
15
-
 16
16
-
 17
17
-
 18
18
-
 19
19
-
 20
20
-
 21
21
-
 22
22
-
 23
23
-
 24
24


Whirlpool AQS73D 09 EU/B Руководство пользователя
- Категория
- Стиральные машины
- Тип
- Руководство пользователя
Задайте вопрос, и я найду ответ в документе
Поиск информации в документе стал проще с помощью ИИ
на других языках
- English: Whirlpool AQS73D 09 EU/B User guide
Похожие модели бренда
-
Whirlpool HASD 723 UA Руководство пользователя
-
-
Indesit PWSE 6108 S (EU) Руководство пользователя
-
-
-
Модели других брендов
-
Indesit PWE 81472 S Инструкция по применению
-
Indesit PWE 81472 S (EU) Руководство пользователя
-
-
-
-
Hotpoint AQ7D 29 U (EU) /1B Руководство пользователя
-
-
-
-