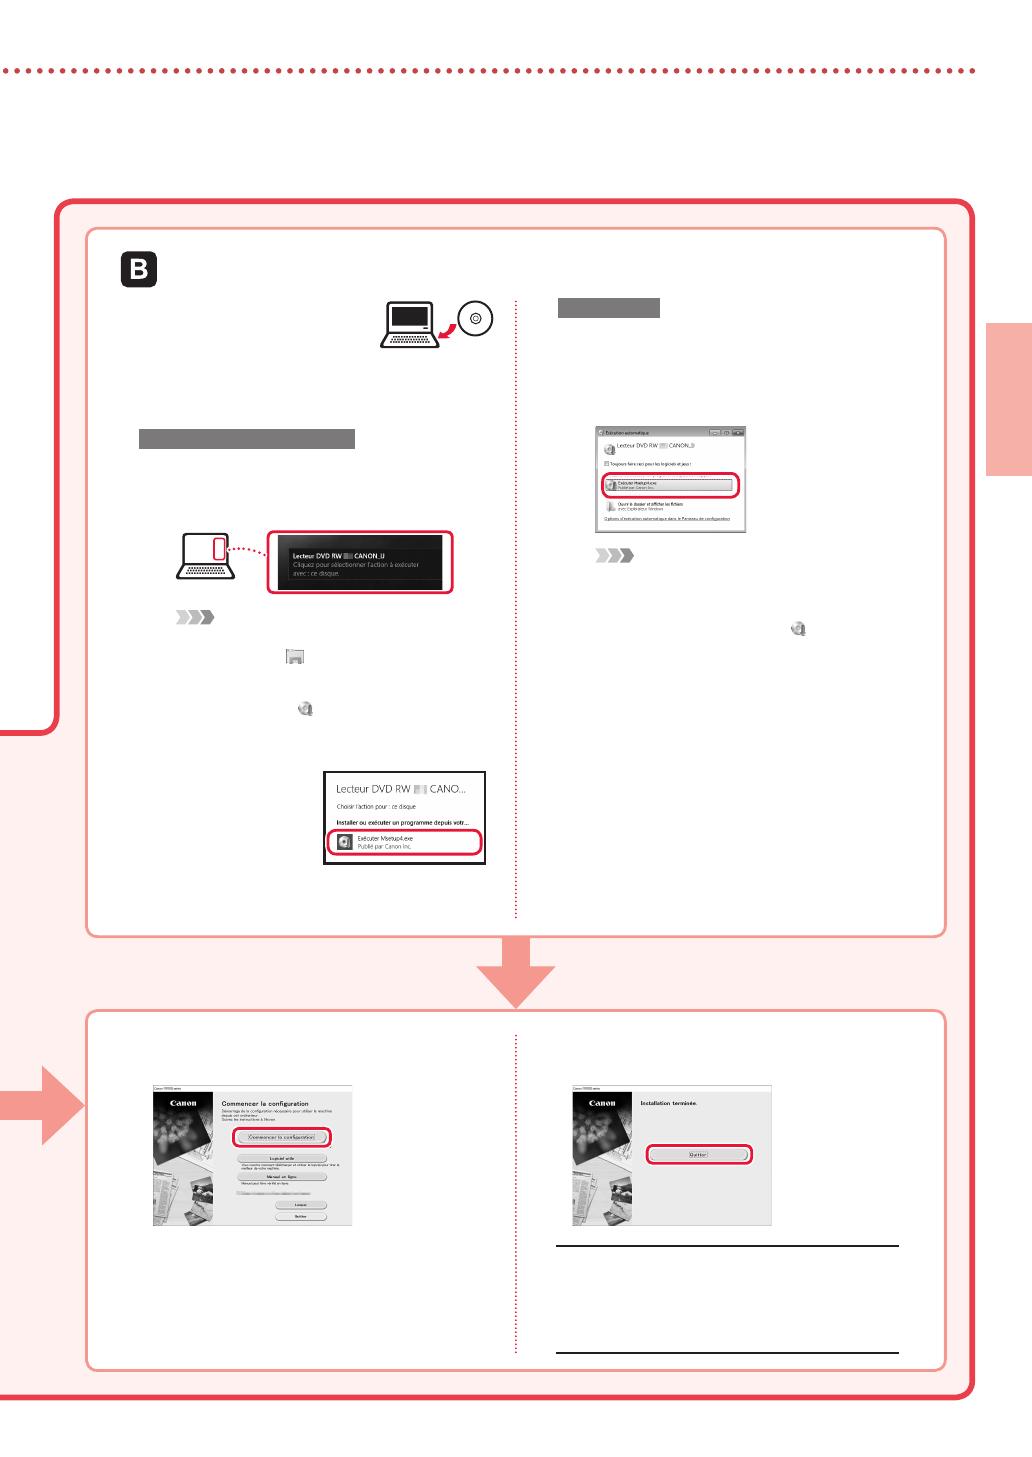
Canon PIXMA TS6240 Руководство пользователя

Тип
Руководство пользователя


Посібник для початку
роботи
Спершу прочитайте документ Інформація щодо
безпеки й важливі відомості (додаток).
Руководство по началу
работы
В первую очередь прочтите документ Информация
о безопасности и важные сведения (приложение).
Démarrage
Commencez par lire Sécurité et informations
importantes (addendum).
Getting Started
Read Safety and Important Information
(addendum) rst.
Go


4  ......................................................................
1  .....................................................................................................................................
Установлення принтера........................................................................................................стор. 1
Підключення до комп’ютера та смартфона або планшета...........................стор. 4
Відеоінструкції
Як тримати принтер
Установка принтера ....................................................................................................................стр. 1
Подключение к компьютеру и смартфону или планшету ...............................стр. 4
Видеоинструкции
Как держать принтер
Installation de l'imprimante ..................................................................................................page 1
Connexion avec un ordinateur et un smartphone ou une tablette ............page 4
Instructions vidéo
Manipulation de l'imprimante
Installing the Printer ...................................................................................................................page 1
Connecting with Computer and Smartphone/Tablet ......................................... page 4
How to Hold Printer
Instructional Videos
1
ENGLISH
1. Box Contents
Power cord
Ink tanks for setup
Safety and Important Information
Getting Started (this manual)
Setup CD-ROM
2. Removing Packing Materials
1
Remove and dispose of the packing materials
from the device.
Operating the printer while the orange tape and
protective lm are still on it causes malfunctions. Be
sure to remove them.
2
Open the scanning unit / cover and remove the
orange tape.
b
a
3
Close the scanning unit / cover.
Lift up the scanning unit / cover briey, and then
close it.
Caution
Watch your ngers.
a
b
3. Turning on the Printer
1
Connect the power cord.
Back
Important
At this time, do not connect any other cables.
2
Open the operation panel and press the ON
button.
a
b
3
Scroll and tap to select your language, and then
tap OK.
4. Installing the Ink Tanks
1
Open the scanning unit / cover.
Caution
Do not touch the print head holder until it stops moving.
2
Remove the tape and lm on the ink tanks.
b
a
Check that no tape is left over.
Setting up the printer
Web Setup
2
Setting up the printer
3
Slowly remove the orange cap.
Important
Do not push both sides of the ink tank
with the Y-shape air hole blocked.
Do not touch the red areas shown in the
gure.
4
Install the ink tanks.
Insert the ink tank into the print head and press it
from above until it clicks.
5
Make sure that the color of the ink tank you
installed appears on the screen.
Important
If the color is not displayed on the screen even though you
have installed the ink tank, the color of the ink tank may be
wrong or you may have installed an ink tank, such as one
with a dierent model number, that is not supported by this
printer. Either install an ink tank for the correct color or use the
provided ink tank for setup.
6
Repeat steps 2 through 5 to install all the ink
tanks.
Make sure that all the colors appear.
7
Close the scanning unit / cover.
When you close the scanning unit / cover, the
internal operations start.
Caution
Watch your ngers.
a
b
5. Loading Paper / Aligning
Print Head
1
Tap OK.
2
Pull the cassette out of the device.
3
Remove the cassette cover and slide apart the
paper guides.
Slide the right paper guide to the right edge. Align
the front paper guide with the LTR or A4 mark.
4
Load paper.
Load plain LTR or A4 size paper with the print side
facing down.
3
ENGLISH
Place the paper against the front paper guide, and
align the right paper guide to the width of the paper.
a
b
5
Load the cassette.
Attach the cassette cover and put the cassette back
in.
a
b
Look at it from the side to conrm it looks like the
diagram.
6
Pull out the paper output tray.
b
a
7
Tap OK.
The Print Head Alignment pattern starts printing.
8
Make sure that the pattern is printed.
Printing nishes in about 2 minutes.
Printed Print Head Alignment pattern
9
Place the pattern on the Platen.
Open the document cover and place the print side
facing down.
Align the arrow mark
engraved on the device
and the
on the
pattern
10
Close the document cover and tap OK.
11
When the following screen appears, tap OK.
12
Tap Next.
Next, follow the onscreen instructions to continue
operations. During these operations, you will need
to make selections related to sending information.
Read "Sending Information To Canon" in Safety and
Important Information.
13
Tap Next.
6-a
6-b
page 6
4
Setting up the printer
Press the Stop button,
and then select Do not
connect > Yes , in this
order.
Computer Computer and
smartphone
Smartphone
No device
Connecting to a Computer
If you are using multiple computers, perform these steps on each computer. There are
two methods, " Online Setup" and " Using the Setup CD-ROM (Windows Only)
Provided".
1
Access the Canon website from a
computer.
2
Select Set Up.
3
Enter your printer's model name and
click Go.
4
Click Start.
5
Click If you have already prepared
your printer, go to Connect.
Note
When you are using a computer with Windows
(except for Windows 10 S) or macOS, proceed to
the next step. When you are using a computer with
another OS, continue the setup by following the on-
screen instructions.
6
Click Download.
The setup le is downloaded to your
computer.
7
Run the downloaded le.
8
Proceed to step 9 on page 5.
Online Setup
What device are you connecting?
Select a device and follow the relevant section.
5
ENGLISH
1
Insert the Setup CD-ROM
into your computer.
2
Follow the instructions for your version
of Windows.
Windows 10/Windows 8.1
aClick on the following message when it
appears on the right-hand side of your
computer screen.
Note
If the message does not appear (or is no longer
visible), click the
File Explorer icon in the
taskbar. On the left-hand side of the window, click
This PC. Double click the CD icon that is
displayed on the right-hand side (when the
content of the CD is displayed, and then double
click Msetup4.exe). Proceed to c.
bClick Run
Msetup4.exe.
cIf the User Account Control dialog box
appears, click Yes .
Windows 7
aClick Run Msetup4.exe.
When the AutoPlay screen appears, click
Run Msetup4.exe.
Note
If the AutoPlay screen does not appear, in the
Start menu, click Computer. On the right-hand
side of the window, double click the
CD icon
(when the content of the CD is displayed, double
click Msetup4.exe).
bIf the User Account Control dialog box
appears, click Continue.
3
Proceed to step 9 below.
Using the Setup CD-ROM (Windows Only) Provided
9
Click Start Setup.
10
Follow the on-screen instructions.
These operations may take some time.
11
When the following screen appears, click Exit.
Your printer is now connected to your computer.
To connect a smartphone as well, see
"6-b.
Connecting to a Smartphone" on page 6.
6-b
6
Setting up the printer
1
Install the "Canon PRINT Inkjet/SELPHY" app on your smartphone.
Note
You can also access the Canon website by scanning the QR code shown on the right to
download the app.
Search for "Canon PRINT" in the App Store.
Search for "Canon PRINT" in Google Play.
2
Check the printer's screen as you proceed through the steps.
"Ready to connect."
If appears,
If does not appear,
Note
The printer's screen turns o when the printer is idle for 10 minutes. Press one of the buttons on the operation panel (except
for the ON button) to turn on the screen.
If appears, The printer cannot communicate by Wi-Fi connection. For details, see "Frequently Asked Questions" at
"http://ij.start.canon".
Connecting to a Smartphone
If you are using multiple smartphones, perform these steps on each smartphone.
Prepare the following before starting.
a Enable the Wi-Fi setting on your smartphone*.
b Connect your smartphone to the wireless router* (if you have a wireless router).
* See your smartphone and wireless router manuals regarding these procedures for more details.
3
Open the installed app.
4
Follow the on-screen instructions to add
your printer.
5
Check that the following screen appears.
Your printer is now connected to your
smartphone. To print photos, see "Loading
Photo Paper" on page 8.
7
ENGLISH
3
Tap Settings on your smartphone's
home screen, and tap Canon_ij_XXXX
in the Wi-Fi settings.
Note
If Canon_ij_XXXX does not appear, follow the
procedure in
, and then search for Canon_ij_
XXXX again.
4
Open the installed app.
The printer is registered with the
most appropriate connection
method for the environment
you are using.
5
Check that the following screen appears.
3
Open the installed app.
The printer is registered with the
most appropriate connection
method for the environment
you are using.
Note
If a message saying "No printer has been added.
Perform printer setup?" does not readily appear
after starting the application, follow the procedure in
, and then return to smartphone operations.
4
Check that the following screen appears.
Procedures vary for iOS and Android. Follow the instructions for your operating system.
3
Press the HOME button on the printer.
4
Press and hold the on the HOME
screen for about 3 seconds.
5
When "Follow the instructions on
the computer or smartphone, etc.
to perform the operation." appears,
proceed to .
Your printer is now connected to your smartphone. To print photos, see "Loading Photo Paper" on page 8.
8
Loading Photo Paper
1
Open the rear tray cover and extend the paper
support.
2
Open the feed slot cover and slide the right-
hand side paper guide to the far right.
3
Load several sheets of photo paper with the
print side facing up and slide the side paper
guide against the edge of the paper stack.
a
b
4
Close the feed slot cover.
Follow the on-screen instructions to set information
for the loaded paper.
5
Open the operation panel and pull out the
paper output tray.
a
b
c
1
Turn on the printer.
2
Load several sheets of photo paper.
3
Tap Copy on the HOME screen.
4
Scroll and tap Photo copy.
5
Read the messages and tap OK.
6
Follow the on-screen instructions to load the
printed photo on the Platen, and then tap OK.
7
Specify print settings.
8
Press the Color button to start color copying.
Or, press the Black button to start black & white
copying.
Copying Photos
You can scan a printed photo and print it. You can also scan and print several photos at once.
Photo paper can only be loaded in the rear tray.
1
FRANÇAIS
1. Contenu de la boîte
Cordon d'alimentation
C
artouches d'encre pour laconguration
Sécurité et informations importantes
Démarrage (ce manuel)
CD-ROM d'installation
2. Retrait des matériaux
d'emballage
1
Retirez et jetez les matériaux d'emballage
dupériphérique.
Faire fonctionner l'imprimante lorsque la bande
orange et le lm protecteur sont encore en place peut
entraîner des dysfonctionnements. Veillez àlesretirer.
2
Ouvrez l'unité de numérisation / capot et retirez
la bande orange.
b
a
3
Fermez l'unité de numérisation / capot.
Soulevez brièvement l'unité de numérisation / capot,
puis fermez-la.
Attention
Surveillez vos doigts.
a
b
3. Mise sous tension
del'imprimante
1
Branchez le cordon d'alimentation.
Arrière
Important
À ce stade, ne branchez aucun autre câble.
2
Ouvrez le panneau de contrôle et appuyez sur
lebouton MARCHE (ON).
a
b
3
Faites glisser et touchez pour sélectionner
votrelangue, puis touchez OK.
4. Installation des cartouches
d'encre
1
Ouvrez l'unité de numérisation / capot.
Attention
Évitez tout contact avec le support de tête d'impression
tant que celui-ci n'est pas arrêté.
2
Retirez la bande et le lm sur les cartouches d'encre.
b
a
Vériez qu'il ne reste aucune bande.
Conguration de l'imprimante
Conguration Web
2
Conguration de l'imprimante
3
Retirez doucement le capuchon orange.
Important
Ne poussez pas sur les deux côtés de
la cartouche d'encre alors que le trou
d'aération en forme de Y est bloqué.
Ne touchez pas les zones rouges
présentées dans la gure.
4
Installez les cartouches d'encre.
I
nsérez la cartouche d'encre dans le support de tête d'impression
et appuyez dessus jusqu'à ce qu'un clic se produise.
5
Vériez que la couleur de la cartouche d'encre
que vous avez installée s'ache à l'écran.
Important
S
i la couleur ne s'ache pas à l'écran alors que vous avez installé la
cartouche d'encre, la couleur de la cartouche d'encre est peut-être fausse,
ou vous avez peut-être installé une cartouche d'encre non prise en charge
par l'imprimante, par exemple une cartouche avec un numéro de modèle
diérent. Installez une cartouche d'encre de la bonne couleur ou utilisez la
cartouche d'encre fournie pour la conguration.
6
Répétez les étapes2 à5 pour installer toutes
lescartouches d'encre.
Assurez-vous que toutes les couleurs s'achent.
7
Fermez l'unité de numérisation / capot.
Lorsque vous fermez l'unité de numérisation / capot,
les opérations internes commencent.
Attention
Surveillez vos doigts.
a
b
5. Chargement du papier /
Alignement de la tête d'impression
1
Touchez OK.
2
Tirez la cassette hors du périphérique.
3
Retirez le couvercle de la cassette et faites
glisser séparément les guides papier.
Faites glisser le guide papier droit vers le bord droit.
Alignez le guide papier avant sur la marque LTR ou A4.
4
Chargez du papier.
Chargez du papier ordinaire au format LTR ou A4 face
à imprimer vers le bas.
3
FRANÇAIS
Placez le papier contre le guide papier avant et
alignez le guide papier droit sur la largeur du papier.
a
b
5
Chargez la cassette.
Attachez le couvercle de la cassette et remettez
lacassette en place.
a
b
Observez-la depuis le côté pour conrmer qu'elle
seprésente comme dans le diagramme.
6
Retirez le bac de sortie papier.
b
a
7
Touchez OK.
Le motif Alignement tête d'impression
commenceàs'imprimer.
8
Assurez-vous que le motif est imprimé.
L'impression nécessite environ 2 minutes.
Motif Alignement tête d'impression imprimé
9
Placez le motif sur la vitre d'exposition.
Ouvrez le capot du scanner et placez
l'impressionface vers le bas.
Alignez la marque en
forme de èche gravée
sur le périphérique et le
sur le motif
10
Fermez le capot du scanner et touchez OK.
11
Lorsque l'écran suivant s'ache, touchez OK.
12
Touchez Suivant.
Ensuite, suivez les instructions à l'écran pour poursuivre
les opérations. Au cours de ces opérations, vous
devrez procéder à des sélections relatives à l'envoi
d'informations. Lisez «Envoi d'informations à Canon»
dans Sécurité et informations importantes.
13
Touchez Suivant.
6-a
6-b
page 6
4
Conguration de l'imprimante
Appuyez sur le bouton
Arrêt (Stop), puis
sélectionnez Ne pas
connecter > Oui,
danscet ordre.
Ordinateur Ordinateur et
smartphone
Smartphone
Aucun périphérique
Connexion à un ordinateur
Si vous utilisez plusieurs ordinateurs, eectuez ces étapes sur chaque ordinateur. Deux
méthodes sont possibles: « Conguration en ligne» et « Utilisation du CD-ROM
d'installation (Windows uniquement) fourni».
1
Accès au site Web Canon à partir d'un
ordinateur.
2
Sélectionnez Conguration.
3
Entrez le nom de modèle de votre
imprimante et cliquez sur Accéder.
4
Cliquez sur Démarrer.
5
Cliquez sur Si vous avez déjà préparé
votre imprimante, allez à Connecter.
Remarque
Lorsque vous utilisez un ordinateur équipé de
Windows (à l'exception de Windows 10 S) ou de
macOS, passez à l'étape suivante. Lorsque vous
utilisez un ordinateur équipé d'un autre système
d'exploitation, poursuivez la conguration en
fonction des instructions qui s'achent à l'écran.
6
Cliquez sur Télécharger.
Le chier de conguration est téléchar
survotre ordinateur.
7
Exécutez le chier téléchargé.
8
Passez à l'étape9, page 5.
Conguration en ligne
Quel périphérique connectez-vous?
Sélectionnez un périphérique et reportez-vous à la section appropriée.
5
FRANÇAIS
1
Insérez le CD-ROM
d'installation dans
l'ordinateur.
2
Suivez les instructions correspondant
àvotre version de Windows.
Windows 10/Windows 8.1
aCliquez sur le message suivant lorsqu'il
apparaît sur la droite de l'écran de
l'ordinateur.
Remarque
Si le message n'apparaît pas (ou n'est plus visible),
cliquez sur l'icône
Explorateur de chiers dans
labarre des tâches. Dans la partie gauche de la
fenêtre, cliquez sur Ce PC. Double-cliquez sur l'icône
représentant un CD
qui apparaît dans la partie
droite (lorsque le contenu du CD s'ache, double-
cliquez surMsetup4.exe). Passez à l'étape
c.
bCliquez sur
Exécuter
Msetup4.exe.
cSi la boîte de dialogue Contrôle de compte
d'utilisateur apparaît, cliquez surOui.
Windows 7
aCliquez sur Exécuter Msetup4.exe.
Lorsque l'écran Lecture automatique
apparaît, cliquez sur Exécuter
Msetup4.exe.
Remarque
Si l'écran Lecture automatique n'apparaît pas,
cliquez sur Ordinateur dans le menu Démarrer.
Dans la partie droite de la fenêtre, double-cliquez
sur l'icône représentant un CD
(lorsque le
contenu du CD s'ache, double-cliquez sur
Msetup4.exe).
bSi la boîte de dialogue Contrôle de
compte d'utilisateur apparaît, cliquez
surContinuer.
3
Passez à l'étape9 ci-dessous.
Utilisation du CD-ROM d'installation (Windows uniquement) fourni
9
Cliquez sur Commencer la
conguration.
10
Suivez les instructions à l'écran.
Ces opérations peuvent prendre du temps.
11
Lorsque l'écran suivant s'ache, cliquez
surQuitter.
Votre imprimante est désormais connectée
à votre ordinateur. Pour connecter aussi
unsmartphone, reportez-vous à la section
« 6-b. Connexion à un smartphone » à la page 6.
6-b
6
Conguration de l'imprimante
1
Installez l'application «Canon PRINT Inkjet/SELPHY» sur votre smartphone.
Remarque
Vous pouvez également accéder au site Web Canon en numérisant le code QR sur la droite
pour télécharger l'application.
Recherchez «Canon PRINT» dans l'App Store.
Recherchez «Canon PRINT» dans Google Play.
2
Vériez l'écran de l'imprimante à mesure que vous eectuez ces étapes.
« Prêt pour la connexion. »
Si s'ache,
Si ne s'ache pas,
Remarque
L'écran de l'imprimante s'éteint si celle-ci est inactive pendant 10minutes. Appuyez sur un des boutons du panneau
decontrôle (sauf sur le bouton MARCHE (ON)) pour allumer l'écran.
Si apparaît, l'imprimante ne peut pas communiquer via une connexion Wi-Fi. Pour plus de détails, reportez-vous
àlasection «Foire aux questions» sur «http://ij.start.canon».
Connexion à un smartphone
Si vous utilisez plusieurs smartphones, eectuez ces étapes sur chaque smartphone.
Préparez les éléments suivants avant de démarrer.
a Activez le paramètre Wi-Fi sur votre smartphone*.
b Connectez votre smartphone au routeur sans l* (si vous disposez d'un routeur sans l).
* Pour plus de détails sur ces procédures, reportez-vous aux manuels de votre smartphone et de votre
routeur sans l.
3
Ouvrez l'application installée.
4
Suivez les instructions à l'écran pour
ajouter votre imprimante.
5
Assurez-vous que l'écran suivant s'ache.
Votre imprimante est désormais connectée
àvotre smartphone. Pour imprimer des photos,
reportez-vous à la section «Chargement de
papier photo» à la page 8.
7
FRANÇAIS
3
Touchez Réglages sur l'écran
d'accueil du smartphone, puis touchez
Canon_ij_XXXX dans les réglages Wi-Fi.
Remarque
Si Canon_ij_XXXX n'apparaît pas, suivez
laprocédure de
, puis recherchez
Canon_ij_XXXX de nouveau.
4
Ouvrez l'application installée.
L'imprimante est enregistrée avec
la méthode de connexion la plus
appropriée à l'environnement
que vous utilisez.
5
Assurez-vous que l'écran suivant s'ache.
3
Ouvrez l'application installée.
L'imprimante est enregistrée
avec la méthode de
connexion la plus appropriée
à l'environnement que vous
utilisez.
Remarque
Si le message «Aucune imprimante n'a été
ajoutée. Congurer l'imprimante ?» ne s'ache
pas après le démarrage de l'application, suivez
la procédure décrite dans
, puis revenez aux
opérations sur le smartphone.
4
Assurez-vous que l'écran suivant
s'ache.
Les procédures varient pour iOS et Android. Suivez les instructions correspondant à votre système d'exploitation.
3
A
ppuyez sur le bouton ACCUEIL (HOME) de l'imprimante.
4
A
ppuyez sur
à
partir de l'écran ACCUEIL et
maintenez-le enfoncé pendant environ 3secondes.
5
Lorsque « Suivez les instructions sur
l’ordinateur, le smartphone, etc.
pour eectuer l’opération. » s’ache,
passez à .
Votre imprimante est désormais connectée à votre smartphone. Pour imprimer des photos, reportez-vous
àlasection «Chargement de papier photo» à la page 8.
8
Chargement de papier photo
1
Ouvrez le couvercle du réceptacle arrière
etdéployez le support papier.
2
Ouvrez le couvercle de la fente d'alimentation
etfaites glisser le guide papier droit vers
l'extrême droite.
3
Chargez plusieurs feuilles de papier photo face
à imprimer vers le haut et faites glisser le guide
papier latéral contre le bord de la pile de papier.
a
b
4
Fermez le couvercle de la fente d'alimentation.
Suivez les instructions à l'écran pour dénir
lesinformations sur le papier chargé.
5
Ouvrez le panneau de contrôle et retirez le bac
de sortie papier.
a
b
c
1
Mettez l'imprimante sous tension.
2
Chargez plusieurs feuilles de papier photo.
3
Touchez Copie sur l'écran ACCUEIL.
4
Faites déler et touchez Copie photo.
5
Lisez les messages et touchez OK.
6
Suivez les instructions qui apparaissent sur
l'écran pour charger la photo imprimée sur
lavitre d'exposition, puis touchez OK.
7
Spéciez les paramètres d'impression.
8
Appuyez sur le bouton Couleur (Color)
pourlancer la copie couleur. Vous pouvez
également appuyer sur lebouton Noir (Black)
pour lancer la copie ennoir et blanc.
Copie de photos
V
ous pouvez numériser une photo imprimée et l'imprimer. Vous pouvez également numériser et imprimer plusieurs photos en même temps.
Le papier photo peut être chargé uniquement dans le réceptacle arrière.
1
РУССКИЙ
1. Содержимое коробки
Кабель питания
Ч
ернильные контейнеры для настройки
Информация о безопасности
иважные сведения
Руководство по началу работы
(это руководство)
Установочный компакт-диск
2. Удаление упаковочных
материалов
1
Снимите и утилизируйте упаковочные
материалы с устройства.
Использование принтера с оранжевой лентой и
защитной пленкой, которые не были удалены, может
привести к неисправности. Обязательно удалите их.
2
Откройте модуль сканирования / крышку
иудалите оранжевую ленту.
b
a
3
Закройте модуль сканирования / крышку.
Приподнимите немного модуль сканирования /
крышку, а затем закройте.
Осторожно!
Берегите пальцы.
a
b
3. Включение принтера
1
Подключите кабель питания.
Сзади
Внимание!
На этом этапе не подключайте никаких других кабелей.
2
Откройте панель управления и нажмите
кнопку ВКЛ (ON).
a
b
3
Прокрутите список и коснитесь нужного языка,
чтобы выбрать его, а затем коснитесь кнопки OK.
4. Установка чернильных
контейнеров
1
Откройте модуль сканирования / крышку.
Осторожно!
Не прикасайтесь к держателю печатающей головки
доего полной остановки.
2
У
далите ленту и пленку с чернильных контейнеров.
b
a
Убедитесь, что лента полностью удалена.
Настройка принтера
Веб-настройка
2
Настройка принтера
3
Аккуратно снимите оранжевый колпачок.
Внимание!
Не сдавливайте чернильный контейнер
с заблокированным вентиляционным
отверстием Y-образной формы.
Не касайтесь областей, показанных на
рисунке красным.
4
Установите чернильные контейнеры.
В
ставьте чернильный контейнер в печатающую головку
и нажимайте на него сверху, пока не услышите щелчок.
5
У
бедитесь, что цвет установленного чернильного
контейнера отображается наэкране.
Внимание!
Если цвет не отображается на экране, хотя чернильный контейнер
установлен, возможно, цвет чернильного контейнера является
неправильным или был установлен чернильный контейнер с другим
номером модели, который не поддерживается этим принтером.
Установите чернильный контейнер правильного цвета или используйте
для настройки чернильный контейнер из комплекта поставки.
6
Повторите действия 2–5, чтобы установить
все чернильные контейнеры.
Убедитесь, что на экране отображаются все цвета.
7
Закройте модуль сканирования / крышку.
Когда вы закроете модуль сканирования / крышку,
запустятся внутренние операции.
Осторожно!
Берегите пальцы.
a
b
5.
Загрузка
бумаги и выравнивание
печатающей головки
1
Коснитесь OK.
2
Извлеките кассету из устройства.
3
Снимите крышку кассеты и раздвиньте
направляющие бумаги.
Сдвиньте правую направляющую бумаги к правому
краю. Совместите переднюю направляющую
бумаги с меткой LTR или A4.
4
Загрузите бумагу.
Загрузите обычную бумагу формата LTR или A4
лицевой стороной вниз.
  • Page 1 1
  • Page 2 2
  • Page 3 3
  • Page 4 4
  • Page 5 5
  • Page 6 6
  • Page 7 7
  • Page 8 8
  • Page 9 9
  • Page 10 10
  • Page 11 11
  • Page 12 12
  • Page 13 13
  • Page 14 14
  • Page 15 15
  • Page 16 16
  • Page 17 17
  • Page 18 18
  • Page 19 19
  • Page 20 20
  • Page 21 21
  • Page 22 22
  • Page 23 23
  • Page 24 24
  • Page 25 25
  • Page 26 26
  • Page 27 27
  • Page 28 28
  • Page 29 29
  • Page 30 30
  • Page 31 31
  • Page 32 32
  • Page 33 33
  • Page 34 34
  • Page 35 35
  • Page 36 36
  • Page 37 37
  • Page 38 38
  • Page 39 39
  • Page 40 40
  • Page 41 41
  • Page 42 42
  • Page 43 43
  • Page 44 44

Canon PIXMA TS6240 Руководство пользователя

Тип
Руководство пользователя

Задайте вопрос, и я найду ответ в документе

Поиск информации в документе стал проще с помощью ИИ

на других языках

Модели других брендов