Indesit PWE 91273 S (EU) Руководство пользователя
- Категория
- Стиральные машины
- Тип
- Руководство пользователя

1
GB
English,1
GB
WASHING MACHINE
Contents
Installation, 2-3
Unpacking and levelling
Connecting the electricity and water supplies
The first wash cycle
Technical data
Description of the washing machine, 4-5
Control panel
Display
Running a wash cycle, 6
Wash cycles and options, 7
Table of programmes and wash cycles
Wash options
Detergents and laundry, 8
Detergent dispenser drawer
Preparing the laundry
Special wash cycles
Precautions and advice, 9
General safety
Disposal
Care and maintenance, 10
Cutting off the water and electricity supplies
Cleaning the washing machine
Cleaning the detergent dispenser drawer
Caring for the door and drum of your appliance
Cleaning the pump
Checking the water inlet hose
Troubleshooting, 11
Service, 12
PWE 91273 S
Instructions for use
Türkçe,13
TR
CZ
Česky,25
CIS
Русский,37

2
GB
Installation
! This instruction manual should be kept in a safe place for
future reference. If the washing machine is sold, transferred
or moved, make sure that the instruction manual remains
with the machine so that the new owner is able to
familiarise himself/herself with its operation and features.
! Read these instructions carefully: they contain vital
information relating to the safe installation and operation of
the appliance.
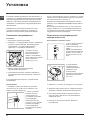
Unpacking and levelling
Unpacking
1. Remove the washing machine from its packaging.
2. Make sure that the washing machine has not been
damaged during the transportation process. If it has been
damaged, contact the retailer and do not proceed any
further with the installation process.
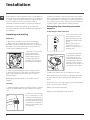
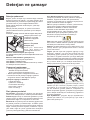
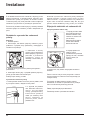
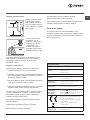
3. Remove the 4 protective
screws (used during
transportation) and the
rubber washer with the
corresponding spacer,
located on the rear part of
the appliance (see figure).
4. Close off the holes using the plastic plugs provided.
5. Keep all the parts in a safe place: you will need them
again if the washing machine needs to be moved to
another location.
! Packaging materials should not be used as toys for
children.
Levelling
1. Install the washing machine on a flat sturdy floor, without
resting it up against walls, furniture cabinets or anything
else.
2. If the floor is not perfectly
level, compensate for any
unevenness by tightening or
loosening the adjustable front
feet (see figure); the angle
of inclination, measured in
relation to the worktop, must
not exceed 2°.
Levelling the machine correctly will provide it with stability,
help to avoid vibrations and excessive noise and prevent it
from shifting while it is operating. If it is placed on carpet or
a rug, adjust the feet in such a way as to allow a sufficient
ventilation space underneath the washing machine.
Connecting the electricity and water
supplies
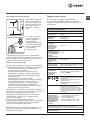
Connecting the water inlet hose
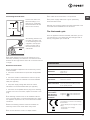
1. Connect the inlet hose
by screwing it to a cold
water tap using a 3/4 gas
threaded connection (see
figure).
Before performing the
connection, allow the
water to run freely until it is
perfectly clear.
2. Connect the inlet hose
to the washing machine
by screwing it onto the
corresponding water inlet
of the appliance, which is
situated on the top right-
hand side of the rear part of
the appliance (see figure).
3. Make sure that the hose is not folded over or bent.
! The water pressure at the tap must fall within the range
of values indicated in the Technical data table (see next
page).
! If the inlet hose is not long enough, contact a specialised
shop or an authorised technician.
! Never use second-hand hoses.
! Use the ones supplied with the machine.

3
GB
Connecting the drain hose
Connect the drain hose,
without bending it, to a
drain duct or a wall drain
situated between 65 and
100 cm from the floor;
alternatively, placed it over
the edge of a basin, sink
or tub, fastening the duct
supplied to the tap (see
figure). The free end of
the hose should not be
underwater.
! We advise against the use of hose extensions; if it is
absolutely necessary, the extension must have the same
diameter as the original hose and must not exceed 150 cm
in length.
Electrical connections
Before plugging the appliance into the electricity socket,
make sure that:
• the socket is earthed and complies with all applicable
laws;
• the socket is able to withstand the maximum power
load of the appliance as indicated in the Technical data
table (see opposite);
• the power supply voltage falls within the values
indicated in the Technical data table (see opposite);
• the socket is compatible with the plug of the washing
machine. If this is not the case, replace the socket or the
plug.
! The washing machine must not be installed outdoors,
even in covered areas. It is extremely dangerous to leave
the appliance exposed to rain, storms and other weather
conditions.
! When the washing machine has been installed, the
electricity socket must remain within easy reach.
! Do not use extension cords or multiple sockets.
65 - 100 cm
! The cable should not be bent or compressed.
! The power supply cable must only be replaced by
authorised technicians.
Warning! The company shall not be held responsible in the
event that these standards are not observed.
The first wash cycle
Once the appliance has been installed, and before you use
it for the first time, run a wash cycle with detergent and no
laundry, using wash cycle number 2.
Technical data
Model
PWE 91273 S
Dimensions
width 59.5 cm
height 85 cm
depth 60 cm
Capacity
from 1 to 9 kg
Electrical
connections
please refer to the technical data plate
fixed to the machine
Water connections
maximum pressure 1 MPa (10 bar)
minimum pressure 0.05 MPa (0.5 bar)
drum capacity 62 litres
Spin speed
up to 1200 rotations per minute
Test wash cycles
in accordance
with directives
1061/2010 and
1015/2010.
Programme
: Cotton Standard 60°;
Programme
: Cotton Standard 40°.
This appliance conforms to the following
EC Directives:
- 2004/108/EC (Electromagnetic Compa-
tibility)
- 2006/95/EC (Low Voltage)
- 2002/96/EC

4
GB
Description of the washing
machine
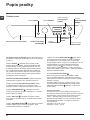
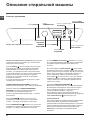
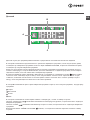
Control panel
TEMPERATURE
button
WASH
CYCLE
SELECTOR
KNOB
Detergent dispenser drawer
ON/OFF
button
SPIN
button
START/PAUSE
button and indicator
light
DISPLAY
DELAYED
START
button
OPTION
buttons and
indicator lights
DOOR
LOCKED
indicator light
Detergent dispenser drawer: used to dispense
detergents and washing additives (see “Detergents and
laundry”).
ON/OFF button: press this briefly to switch the
machine on or off. The START/PAUSE indicator light which
flashes slowly in a blue colour shows that the machine is
switched on. To switch off the washing machine during the
wash cycle, press and hold the button for approximately 3
seconds; if the button is pressed briefly or accidentally the
machine will not switch off.
If the machine is switched off during a wash cycle, this
wash cycle will be cancelled.
WASH CYCLE SELECTOR KNOB: used to set the
desired wash cycle (see “Table of programmes and wash
cycles”).
OPTION buttons and indicator lights: press to select the
available options. The indicator light corresponding to the
selected option will remain lit.
SPIN button: press to reduce or completely exclude
the spin cycle; the value appears on the display.
TEMPERATURE button: press to reduce or
completely exclude the temperature; the value appears on
the display.
DELAYED START button: press to set a delayed start
for the selected wash cycle; the delay period appears on
the display.
START/PAUSE button and indicator light: when the
blue indicator light flashes slowly, press the button to start
a wash cycle. Once the cycle has begun the indicator light
will remain lit in a fixed manner. To pause the wash cycle,
press the button again; the indicator light will flash in an
amber colour. If the symbol is not illuminated, the door
may be opened (wait approximately 3 minutes). To start
the wash cycle from the point at which it was interrupted,
press the button again.
DOOR LOCKED indicator light:
The lit symbol indicates that the door is locked. To prevent
any damage, wait until the symbol turns off before opening
the door (wait approximately 3 minutes).
To open the door while a cycle is in progress, press the
START/PAUSE button; if the DOOR LOCKED symbol is
switched off the door may be opened.
Standby mode
This washing machine, in compliance with new energy
saving regulations, is fitted with an automatic standby
system which is enabled after about 30 minutes if no
activity is detected. Press the ON-OFF button briefly and
wait for the machine to start up again.
Consumption in off-mode: 0,5 W
Consumption in Left-on: 0,5 W

5
GB
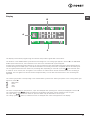
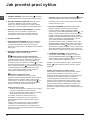
Display
B
C
A
The display is useful when programming the machine and provides a great deal of information.
The duration of the available wash cycles and the remaining time of a running cycle appear in section A; if the DELAYED
START option has been set, the countdown to the start of the selected wash cycle will appear.
Pressing the corresponding button allows you to view the maximum spin speed and temperature values attained by the
machine during the set wash cycle, or the values selected most recently, if these are compatible with the set wash cycle.
The hour-glass flashes while the machine is processing data, depending on the wash cycle and level selected. After
a maximum of 10 minutes, the “hour-glass” icon remains lit in a fixed manner and the final amount of time remaining is
displayed. The hour-glass icon will then switch off approximately 1 minute after the final amount of time remaining has
appeared.
The “wash cycle phases” corresponding to the selected wash cycle and the “wash cycle phase” of the running wash cycle
appear in section B:
Main wash
Rinse
Spin
Drain
The icons corresponding to “temperature”, “spin” and “delayed start” (working from the left) are displayed in section C.
The “temperature” bars indicate the maximum temperature level which may be selected for the set cycle.
The “spin” bars indicate the maximum spin level which may be selected for the set cycle.
The “delay” symbol , when lit, indicates that the set “delayed start” value has appeared on the display.

6
GB
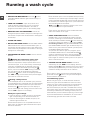
Running a wash cycle
1. SWITCH THE MACHINE ON. Press the button;
the START/PAUSE indicator light will flash slowly in a
blue colour.
2. LOAD THE LAUNDRY. Open the porthole door.
Load the laundry, making sure you do not exceed
the maximum load value indicated in the table of
programmes and wash cycles on the following page.
3. MEASURE OUT THE DETERGENT. Pull out the
detergent dispenser drawer and pour the detergent into
the relevant compartments as described in “Detergents
and laundry”.
4. CLOSE THE DOOR.
5. SELECT THE WASH CYCLE. Use the WASH CYCLE
SELECTOR knob to select the desired wash cycle. A
temperature and spin speed is set for each wash cycle;
these values may be adjusted. The duration of the cycle
will appear on the display.
6. CUSTOMISE THE WASH CYCLE. Use the relevant
buttons:
Modify the temperature and/or spin
speed. The machine automatically displays the
maximum temperature and spin speed values set for
the selected cycle, or the most recently-used settings
if they are compatible with the selected cycle. The
temperature can be decreased by pressing the
button, until the cold wash “OFF” setting is reached.
The spin speed may be progressively reduced by
pressing the button, until it is completely excluded
(the “OFF” setting). If these buttons are pressed again,
the maximum values are restored.
Setting a delayed start.
To set a delayed start for the selected cycle, press the
corresponding button repeatedly until the required delay
period has been reached. When this option has been
activated, the symbol lights up on the display. To
remove the delayed start setting, press the button until
the text “OFF” appears on the display.
Modify the cycle settings.
• Press the button to enable the option; the indicator
light corresponding to the button will switch on.
• Press the button again to disable the option; the
indicator light will switch off.
! If the selected option is not compatible with the set
wash cycle, the indicator light will flash and the option
will not be activated.
! If the selected option is not compatible with a previously
selected one, the indicator light corresponding to the first
function selected will flash and only the second option will
be activated; the indicator light for the option which has
been activated will be illuminated.
Note: if the option has been selected, none of the
incompatible options may be activated.
! The options may affect the recommended load value
and/or the duration of the cycle.
7. START THE WASH CYCLE. Press the START/
PAUSE button. The corresponding indicator light will
turn blue, remaining lit in a fixed manner, and the door
will be locked (the DOOR LOCKED symbol will be lit).
To change a wash cycle while it is in progress, pause
the washing machine using the START/PAUSE button
(the START/PAUSE indicator light will flash slowly in an
amber colour); then select the desired cycle and press
the START/PAUSE button again.
To open the door while a cycle is in progress, press
the START/PAUSE button; if the DOOR LOCKED
symbol is switched off the door may be opened (wait
approximately 3 minutes). Press the START/PAUSE
button again to restart the wash cycle from the point at
which it was interrupted.
8. THE END OF THE WASH CYCLE. This will be
indicated by the text “END” on the display; when the
DOOR LOCKED symbol switches off the door may be
opened (wait approximately 3 minutes). Open the door,
unload the laundry and switch off the machine.
! If you wish to cancel a cycle which has already begun,
press and hold the button. The cycle will be stopped
and the machine will switch off.
Load balancing system
Before every spin cycle, to avoid excessive vibrations
before every spin and to distribute the load in a uniform
manner, the drum rotates continuously at a speed which
is slightly greater than the washing rotation speed. If,
after several attempts, the load is not balanced correctly,
the machine spins at a reduced spin speed. If the load is
excessively unbalanced, the washing machine performs
the distribution process instead of spinning. To encourage
improved load distribution and balance, we recommend
small and large garments are mixed in the load.

7
GB
Wash cycles and options
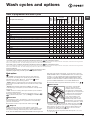
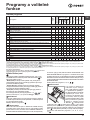
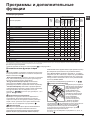
Table of programmes and wash cycles
Wash options
The “PRIME” technology optimises energy, water and time
consumption according to the quantity of garments actually
inserted in the machine. Moreover, pressing the button
allows for selecting the following options:
- Water: allows for reducing water consumption without having
to renounce impeccable results (recommended for heavily soiled
garments).
- Energy: automatically selected by “PRIME”, this option
reduces energy consumption (recommended for normally soiled
garments).
- Time: allows for reducing wash cycle duration (recommended
for lightly soiled garments).
! This may only be used in conjunction with wash cycles 1, 2,
,
, 5 (all three levels) and 6, 7, 8, 9 (- Energy and - Time levels).
Extra Rinse
By selecting this option, the efficiency of the rinse is increased
and optimal detergent removal is guaranteed. It is particularly
useful for sensitive skin.
! It cannot be used in conjunction with wash cycles 8,
.
Easy iron
By selecting this function, the wash and spin cycles will be
modified in order to reduce the formation of creases. At the end of
the cycle the washing machine will perform slow rotations of the
drum, while the EASY IRON and START/PAUSE indicator lights will
flash (blue and orange respectively). To end the cycle, press the
START/PAUSE button or the EASY IRON button. For wash cycles
number 11-13, the machine will end the cycle while the laundry
is soaking; the EASY IRON and START/PAUSE indicator lights
will flash. To drain the water so that the laundry may be removed,
press the START/PAUSE button or the EASY IRON button.
! It cannot be used in conjunction with wash cycles 8, 10, 14,
, .
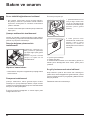
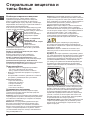
Stain removal
This function is particularly
useful for the removal of
stubborn stains. Insert extra
compartment 4 (supplied with
the appliance) into compartment
1. When pouring in the bleach,
be careful not to exceed the
“max” level marked on the
central pivot (see figure). To
bleach laundry with no other
washing action, pour the bleach
into extra compartment 4, select
the “Rinse” cycle and activate the “Stain removal” option
. To bleach during a wash cycle, pour in the detergent and any
fabric softener you wish to use, select the desired wash cycle
and enable the “Stain removal” option. The use of extra
compartment 4 excludes the pre-wash.
! It cannot be used in conjunction with wash cycles 1, 6, 8, 10,
11, 12, 13, 14,
.
4
2
3
1
4
2
1
3
The length of cycle shown on the display or in this booklet is an estimation only and is calculated assuming standard working conditions. The actual duration can vary according to factors such as
water temperature and pressure, the amount of detergent used, the amount and type of load inserted, load balancing and any wash options selected.
Wash cycles
Description of the wash cycle
Max.
temp.
(°C)
Max.
speed
(rpm)
Detergents
Max. load (kg)
Residual
dampness %
Energy
consumption
kWh
Total water lt
Cycle duration
Prewash
Wash
Bleach
Fabric
softener
Daily Programs
1
Cottons with Pre-wash: extremely soiled whites. 90° 1200
-
9 53 2,86 98 195’
2
White Cottons: extremely soiled whites. 90° 1200 -
9 53 2,54 85 180’
Standard Cotton 60° (1): heavily soiled whites and resistant colours. 60° 1200 -
9 53 1,37 76 185’
Standard Cotton 40° (2): heavily soiled whites and delicate colours. 40° 1200 -
9 53 1,09 92 180’
5
Synthetics: heavily soiled resistant colours. 60° 800 -
4 46 1,03 60 115’
5
Synthetics (3): lightly soiled resistant colours. 40° 800 -
4 46 0,56 60 100’
6 Jeans
40° 800 -
-
4 - - - 80’
7 Shirts
40° 600 -
2 - - - 70’
8
Mix-Cool 30’: to refresh lightly soiled garments quickly (not suitable for wool, silk and
clothes which require washing by hand).
Cold
water
800 -
-
3 71 0,10 36 30’
9
Standard Cotton 20°: heavily soiled whites and delicate colours. 20° 1200 -
9 - - - 175’
Special
10
Wool: for wool, cashmere, etc. 40° 800 -
-
2 - - - 90’
11
Silk/Curtains: for garments in silk and viscose, lingerie. 30° 0 -
-
2 - - - 65’
12 Duvets
30° 1000 -
-
3,5 - 120’
13 Outwear
30° 400 -
- - 2,5 - - - 60’
14 Sport Shoes
30° 600 -
-
Max.2
paires
- - - 60’
Partials
Rinse - 1200 - -
9 - - - 36’
Spin + Drain - 1200 - - - - 9 - - - 16’
1) Test wash cycle in compliance with directive 1061/2010: set wash cycle
with a temperature of 60°C.
This cycle is designed for cotton loads with a normal soil level and is the most efficient in terms of both electricity and water consumption; it should be used for garments
which can be washed at 60°C. The actual washing temperature may differ from the indicated value.
2) Test wash cycle in compliance with directive 1061/2010: set wash cycle
with a temperature of 40°C.
This cycle is designed for cotton loads with a normal soil level and is the most efficient in terms of both electricity and water consumption; it should be used for garments
which can be washed at 40°C. The actual washing temperature may differ from the indicated value.
For all Test Institutes:
2) Long wash cycle for cottons: set wash cycle
with a temperature of 40°C.
3) Synthetic program along: set wash cycle 5 with a temperature of 40°C.

8
GB
Detergents and laundry
Detergent dispenser drawer
Successful washing results also depend on the correct
dose of detergent: adding too much detergent will not
necessarily result in a more efficient wash, and may in
fact cause build up on the inside of your appliance and
contribute to environmental pollution.
! Do not use hand washing detergents because these
create too much foam.
! Use powder detergent for white cotton garments, for pre-
washing, and for washing at temperatures over 60°C.
! Follow the instructions given on the detergent packaging.
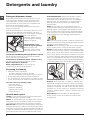
Open the detergent
dispenser drawer and pour
in the detergent or washing
additive, as follows.
Compartment 1: Pre-
wash detergent (powder)
Before pouring in the
detergent, make sure that
extra compartment 4 has
been removed.
Compartment 2: Washing detergent (powder or liquid)
Liquid detergent should only be poured in immediately
prior to the start of the wash cycle.
Compartment 3: Additives (fabric softeners, etc.)
The fabric softener should not overflow the grid.
Extra compartment 4: Bleach
Extra compartment 5: we recommend this
compartment is used for liquid detergent.
Preparing the laundry
• Divide the laundry according to:
- the type of fabric/the symbol on the label
- the colours: separate coloured garments from whites.
• Empty all garment pockets and check the buttons.
• Do not exceed the values listed in the “Table of wash
cycles”, which refer to the weight of the laundry when dry.
How much does your laundry weigh?
1 sheet 400-500 g
1 pillow case 150-200 g
1 tablecloth 400-500 g
1 bathrobe 900-1,200 g
1 towel 150-250 g
Special wash cycles
Jeans: turn the garments inside out before washing and
use liquid detergent. Use wash cycle 6.
Shirts: use special wash cycle 7 to wash shirts in various
fabrics and colours. It guarantees maximum care is taken
of the garments and minimises the formation of creases.
Mix-Cool 30’: this wash cycle was designed to wash lightly
soiled garments quickly: it lasts just 30 minutes and therefore
saves both energy and time. By selecting wash cycle 8, it is
possible to wash different fabrics (except for wool and silk
items) using a cold cycle, up to a maximum load of 3 kg.
1
2
3
5
4
Cotton Standard 20° (wash cycle 9) ideal for heavily
soiled cotton loads. The effective performance levels
achieved at cold temperatures, which are comparable to
washing at 40°, are guaranteed by a mechanical action
which operates at varying speed, with repeated and
frequent peaks.
Wool:the wool wash cycle of this machine has been
tested and approved by The Woolmark Company for the
washing of wool containing garments labelled as “hand
wash” provided that the garments are washed according
to the instructions on the garment label and those issued
by the manufacturer of this washing machine. (M1127)
Silk: use special wash cycle 11 to wash all silk garments.
We recommend the use of special detergent which has been
designed to wash delicate clothes.
Curtains: we recommend you fold the curtains and place
them in a pillow case or mesh bag. Use wash cycle 11.
Duvets: to wash double or single duvets (the weight of which
should not exceed 3,5 kg), cushions or clothes padded with
goose down such as puffa jackets, use the special wash
cycle number 12. We recommend that duvets are placed
in the drum with their edges folded inwards (see figure) and
that no more than ¾ of the total volume of the drum is used.
To achieve the best results, we recommend that a liquid detergent
is used and placed inside the detergent dispenser drawer.
Outwear (wash cycle 13): is studied for washing water-
repellent fabrics and winter jackets (e.g. Gore-Tex, polyester,
nylon); for best results, use a liquid detergent and dosage
suitable for a half-load; pre-treat necks, cuffs and stains if
necessary; do not use softeners or detergents containing
softeners. Stuffed duvets cannot be washed with this
programme.
Sport Shoes (wash cycle 14): is for washing sports
shoes; for best results, do not wash more than 2 pairs
simultaneously.

9
GB
Precautions and tips
! This washing machine was designed and constructed
in accordance with international safety regulations. The
following information is provided for safety reasons and must
therefore be read carefully.
General safety
• This appliance was designed for domestic use only.
• This appliance is not intended for use by persons (including
children) with reduced physical, sensory or mental
capabilities, or lack of experience and knowledge, unless
they have been given supervision or instruction concerning
use of the appliance by a person responsible for their safety.
Children should be supervised to ensure that they do not
play with the appliance.
• Do not touch the machine when barefoot or with wet or
damp hands or feet.
• Do not pull on the power supply cable when unplugging the
appliance from the electricity socket. Hold the plug and pull.
• Do not open the detergent dispenser drawer while the
machine is in operation.
• Do not touch the drained water as it may reach
extremely high temperatures.
• Never force the porthole door. This could damage the safety
lock mechanism designed to prevent accidental opening.
• If the appliance breaks down, do not under any
circumstances access the internal mechanisms in an
attempt to repair it yourself.
• Always keep children well away from the appliance while
it is operating.
• The door can become quite hot during the wash cycle.
• If the appliance has to be moved, work in a group of two
or three people and handle it with the utmost care. Never
try to do this alone, because the appliance is very heavy.
• Before loading laundry into the washing machine, make
sure the drum is empty.
Disposal
• Disposing of the packaging materials:
observe local regulations so that the packaging may be
re-used.
• The European Directive 2002/96/EC relating to Waste
Electrical and Electronic Equipment (WEEE) states that
household appliances should not be disposed of using
the normal solid urban waste cycle. Exhausted appliances
should be collected separately in order to optimise the cost
of re-using and recycling the materials inside the machine,
while preventing potential damage to the atmosphere and
to public health. The crossed-out dustbin is marked on all
products to remind the owner of their obligations regarding
separated waste collection. For more information relating
to the correct disposal of household appliances, owners
should contact their local authorities or appliance dealer.

10
GB
Care and maintenance
Cutting off the water and electricity
supplies
• Turn off the water tap after every wash cycle. This will
limit wear on the hydraulic system inside the washing
machine and help to prevent leaks.
• Unplug the washing machine when cleaning it and
during all maintenance work.
Cleaning the washing machine
The outer parts and rubber components of the appliance
can be cleaned using a soft cloth soaked in lukewarm
soapy water. Do not use solvents or abrasives.
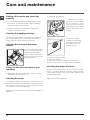
Cleaning the detergent dispenser
drawer
To remove the drawer, press
lever (1) and pull the drawer
outwards (2) (see figure).
Wash it under running water;
this procedure should be
repeated frequently.
Caring for the door and drum of your
appliance
• Always leave the porthole door ajar in order to prevent
unpleasant odours from forming.
Cleaning the pump
The washing machine is fitted with a self-cleaning pump
which does not require any maintenance. Sometimes, small
items (such as coins or buttons) may fall into the protective
pre-chamber at the base of the pump.
! Make sure the wash cycle has finished and unplug the
appliance.
2
1
1
2
3
To access the pre-chamber:
1. Take off the cover panel
on the front of the machine
by first pressing it in the
centre and then pushing
downwards on both sides
until you can remove it (see
figures).
2. Unscrew the lid by
rotating it anti-clockwise
(see figure): a little water
may trickle out. This is
perfectly normal.
3. Clean the inside thoroughly.
4. Screw the lid back on.
5. Reposition the panel, making sure the hooks are
securely in place before you push it onto the appliance.
Checking the water inlet hose
Check the inlet hose at least once a year. If there are any
cracks, it should be replaced immediately: during the wash
cycles, water pressure is very strong and a cracked hose
could easily split open.
! Never use second-hand hoses.

11
GB
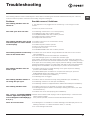
Troubleshooting
Your washing machine could occasionally fail to work. Before contacting the Technical Assistance Service (see “ Service”),
make sure that the problem cannot be solved easily using the following list.
Problem:
The washing machine does not
switch on.
The wash cycle does not start.
The washing machine does not fill
with water (the text “H2O” flashes
on the display).
The washing machine continuously
takes in and drains water.
The washing machine does not
drain or spin.
The washing machine vibrates a
lot during the spin cycle.
The washing machine leaks.
The “option” and START/PAUSE
indicator lights flash rapidly and an
error code appears on the display (e.g.:
F-01, F-..).
There is too much foam.
Possible causes / Solutions:
• The appliance is not plugged into the socket fully, or not enough to make
contact.
• There is no power in the house.
• The washing machine door is not closed properly.
• The ON/OFF button has not been pressed.
• The START/PAUSE button has not been pressed.
• The water tap has not been opened.
• A delayed start has been set.
• The water inlet hose is not connected to the tap.
• The hose is bent.
• The water tap has not been opened.
• There is no water supply in the house.
• The pressure is too low.
• The START/PAUSE button has not been pressed.
• The drain hose is not fitted at a height between 65 and 100 cm from the floor
(see “Installation”).
• The free end of the hose is under water (see “Installation”).
• The wall drainage system is not fitted with a breather pipe.
If the problem persists even after these checks, turn off the water tap, switch the
appliance off and contact the Technical Assistance Service. If the dwelling is on one
of the upper floors of a building, there may be problems relating to water drainage,
causing the washing machine to fill with water and drain continuously. Special anti-
draining valves are available in shops and help to prevent this inconvenience.
• The wash cycle does not include draining: some cycles require the draining
process to be enabled manually.
• The EASY IRON option is enabled: To complete the wash cycle, press the
START/PAUSE button (see “Wash cycles and options”).
• The drain hose is bent (see “Installation”).
• The drainage duct is clogged.
• The drum was not unlocked correctly during installation (see “Installation”).
• The washing machine is not level (see “Installation”).
• The washing machine is trapped between cabinets and walls (see “Installation”).
• The water inlet hose is not screwed on properly (see “Installation”).
• The detergent dispenser drawer is blocked (for cleaning instructions, see “Care
and maintenance”).
• The drain hose is not fixed properly (see “Installation”).
• Switch off the machine and unplug it, wait for approximately 1 minute and then
switch it back on again.
If the problem persists, contact the Technical Assistance Service.
• The detergent is not suitable for machine washing (it should display the text “for
washing machines” or “hand and machine wash”, or the like).
• Too much detergent was used.

12
GB
Service
Before contacting the Technical Assistance Service:
• Check whether you can solve the problem alone (see “Troubleshooting”).
• Restart the wash cycle to check whether the problem has been solved.
• If this is not the case, contact an authorised Technical Assistance Centre.
! Always request the assistance of authorised technicians.
Have the following information to hand:
• the type of problem;
• the appliance model (Mod.);
• the serial number (S/N).
This information can be found on the data plate applied to the rear of the washing machine, and can also be found on the
front of the appliance by opening the door.

TR
13
Türkçe
TR
ÇAMAŞIR MAKİNESİ
İçindekiler
Montaj, 14-15
Ambalajdan çıkarma ve yerin tesviye
Elektrik ve su baglantılarının yapılması
İlk yıkama
Teknik veriler
Çamaşır makinesinin tanıtımı, 16-17
Kumanda paneli
Ekran
Bir çamaşır çevriminin çalıştırılması, 18
Yıkama çevrim ve seçenekleri, 19
Program ve yıkama çevrimi tablosu
Yıkama seçenekleri
Deterjan ve çamaşır, 20
Deterjan dağıtma çekmecesi
Çamaşırın hazırlanması
Özel yıkama çevrimleri
Önlem ve öneriler, 21
Genel güvenlik
Atma
Bakım ve onarım, 22
Su ve elektrik bağlantılarının kesilmesi
Çamaşır makinesinin temizlenmesi
Deterjan dağıtma çekmecesinin temizlenmesi
Kapak ve hazne bakımı
Pompanın temizlenmesi
Su giriş hortumunun kontrol edilmesi
Sorun giderme, 23
Teknik Servis, 24
PWE 91273 S
Kullanma talimatları

14
TR
Montaj
! Bu montaj kılavuzunu gelecekte referans olarak kullanmak
için güvenli bir yerde tutun. Çamasır makinesi satılırsa,
baskasına verilir veya tasınırsa, yeni sahibinin kullanmayı
ve özelliklerini ögrenebilmesi için kılavuzun makine ile
birlikte bulundugundan emin olun.
! Aşağıdaki talimatları dikkatli bir şekilde okuyun: cihazın
güvenli şekilde montajı ve kullanılması ile ilgili hayati
bilgileri içermektedir.
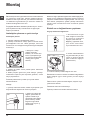
Ambalajdan çıkarma ve yerin tesviye
Ambalajdan çıkarma
1. Çamasır makinesini ambalajından çıkarın.
2. Çamaşır makinesinin nakliye işlemi sırasında hasar
görmediğinden emin olun. Hasar görmüşse, satıcınızla
temas kurun ve montaj işlemi ile ilgili herhangi bir faaliyette
bulunmayın.
3. Koruyucu 4 vidayı
(nakliye sırasında
kullanılır) ve cihazın arka
kısmına yerleştirilen ilgili
ara parça ile birlikte lastik
contayı çıkarın (şekle
bakınız).
4. Makine ile birlikte verilen plastik tıpaları kullanarak
delikleri kapatın.
5. Bütün parçaları güvenli bir yerde saklayın: Çamaşır
makinesinin başka bir yere taşınması gerekirse, onlara
ihtiyaç duyacaksınız.
! Ambalaj malzemeleri çocuklar için oyuncak olarak
kullanılmamalıdır.
Tesviye
1. Çamaşır makinesini duvara, dolaba veya başka bir yere
dayamadan düz dayanıklı bir zemine yerleştirin.
2. Zemin tam olarak düz
degilse, ayarlanabilir ön
ayakları sıkarak veya
gevseterek egimi giderin
(sekle bakınız); mutfak
tezgahı ile ilgili olarak
ölçülen egim açısı 2°’yi
asmamalıdır.
Makinenin doğru şekilde dengelenmesi sabitlik sağlayacak,
titreşim ve aşırı gürültünün önlenmesine yardımcı olacak ve
çalışırken hareket etmesini engelleyecektir. Bir halı veya
kilim üzerine yerleştirilirse, ayakları çamaşır makinesinin
altında yeterli havalandırma alanı bırakacak şekilde
ayarlayın.
Elektrik ve su bağlantılarının yapılması
Su giriş hortumunun bağlanması
1. Giris hortumunu 3/4 gaz
vidalı baglantı kullanarak
bir soguk su musluguna
baglayın (sekle bakınız).
Baglantıyı yapmadan önce,
iyice temiz olana kadar
suyun akmasına izin verin.
2. Cihazın arka bölümünün
sag üst tarafından yer alan
soguk su girisine takarak
giris hortumunu baglayın
(sekle bakınız).
3. Hortumun katlanıp bükülmedigine emin olun.
! Musluktaki su basıncının teknik veri tablosunda gösterilen
değer aralığına uygun olması gerekir (sonraki sayfaya
bakınız).
! Giris hortumu yeterli uzunlukta degilse, bayinize veya
yetkili servise danisin.
! Kesinlikle eski hortum kullanmayın.
! Çamaşır makinesi ile birlikte verilenleri kullanın.

TR
15
Tahliye hortumunun bağlanması
Tahliye hortumunu
bükmeden zeminden 65
ila 100 cm yukarıda yer
alan pis su borusuna
veya duvar tahliyesine
bağlayın;
Buna alternatif olarak,
makine ile birlikte
verilen pis su borusunu
musluğa (şekle bakınız)
bağlayarak lavabo
veya küvetin kenarına
yerleştirin. Hortumun
serbest kalan ucu suya
daldırılmamalıdır.
! Hortum eklerinin kullanımı önermiyoruz; kesinlikle
gerekliyse ek hortum orijinal hortum ile aynı çapta olmalı
ve uzunluğu 150 cm. aşmamalıdır.
Elektrik bağlantıları
Cihazı elektrik prizine takmadan önce, aşağıdakilerden
emin olun:
• Prizin topraklandıgından ve ilgili mevzuata uygun
oldugundan;
• Prizin teknik veri tablosunda gösterilmekte olan maksimum
cihaz elektrik yüküne dayanıp dayanamayacagından
(teknik veri tablosuna bakiniz);
• Güç kaynagı voltajının teknik veri tablosunda gösterilen
degerlere uygun olup olmadigindan (teknik veri tablosuna
bakiniz);
• Elektrik prizinin çamaşır makinesinin şi ile uyumlu olup
olmadığından emin olun. Muhafazalı değilse, priz veya
şi değiştirin.
! Çamaşır makinesi kapalı alan olsa bile, evin dışına
yerleştirilmemelidir. Cihazın yağmur, fırtına ve diğer hava
koşullarına maruz bırakılması son derece tehlikelidir.
! Çamaşır makinesi yerleştirildiğinde, elektrik prizi kolay
ulaşılabilir bir durumda olmalıdır.
! Uzatma kablosu veya çoklu priz kullanmayın.
65 - 100 cm
! Kablo bükülmemeli veya sıkıştırılmamalıdır.
! Güç kablosu ve si sadece yetkili teknisyenler
tarafından degistirilmelidir.
Uyarı! Bu standartlara uyulmaması durumunda sirket
sorumlu tutulamaz.
İlk yıkama
Ilk kullanimdan önce programlar tablosundaki 2. Programi
kullanarak çamasir olmadan deterjanla bir yikama yapin.
Teknik bilgiler
Model PWE 91273 S
Ölçüler
geniþlik 59,5 cm
yükseklik 85 cm
derinlik 60 cm
Kapasite 1 - 9 kg
Elektrik baðlantýlarý
makine üstünde takýlý olan teknik veriler
plakasýna bakýnýz.
Su baðlantýlarý
max. su basýncý 1 MPa (10 bar) min. su
basýncý 0,05 MPa (0,5 bar)
tambur kapasitesi 62 litre
Sýkma hýzý maksimum dakikada 1200 devire kadar
1061/2010 ve
1015/2010 sayýlý
direktiflere göre
kontrol programlarý
program
; 60°C Standart Pamuklu.
program
; 40°C Standart Pamuklu.
Bu makina aþaðýda belirtilen AB normlarýna
uygundur:
- 2004/108/CE (Elektromanyetik Uyum)
- 2002/96/CE
- 2006/95/CE (Alçak gerilim)

16
TR
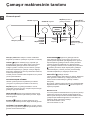
Çamaşır makinesinin tanıtımı
Kumanda paneli
SICAKLIK dügmesi
YIKAMA
ÇEVRİMİ
SEÇİCİ DÖNER
DÜĞME
Deterjan çekmecesi
ON/OFF dügmesi
SİKMA
HIZI
düğmesi
START/PAUSE
düğmesi ve gösterge
lambası
EKRAN
Gecikmeli
başlatma
düğmesi
SEÇİM düğmeleri ve
gösterge lambaları
KAPI KİLİTLİ
gösterge lambası
Deterjan çekmecesi: deterjan ve katkı maddelerini
dagıtmak için kullanılır (“Deterjan ve çamasır”’a bakınız).
ON/OFF düğmesi: Makineyi açıp, kapamak için
bu düğmeye bir süre basın. Mavi renkte yanıp sönen
START/PAUSE gösterge lambası makinenin açık
olduğunu gösterir. Yıkama çevrimi sırasında, çamaşır
makinesini kapatmak için, yaklaşık 3 saniye düğmeyi
basılı tutun, düğmeye bir süre veya istemeden basılırsa,
makine kapanmayacaktır.
Yıkama çevrimi sırasında makine kapatılırsa, bu yıkama
çevrimi iptal edilecektir.
PROGRAM SEÇME DÜGMESI
Istenilen yıkama çevrimini ayarlamak için kullanılır
(“Program ve yıkama çevrimi tablosu”’na bakınız).
SEÇİM düğmeleri ve gösterge lambaları: mevcut
seçenekleri seçmek için basın. Seçilen seçenek ile ilgili
gösterge ışığı açık kalacaktır.
DEVIR HIZI dügmesi: Devir dügmesi: Sikma hizini
düsürmek veya tamamen iptal etmek için basin; deger
ekranda görünür.
SICAKLIK düğmesi: sıcaklığı düsürmek veya
tamamen iptal etmek için basın; değer ekranda görünür.
GECİKMELİ ÇALIŞTIRMA düğmesi: seçilen yıkama
çevrimi için bir gecikmeli çalıştırma ayarlamak için basın:
gecikme süresi ekranda belirir.
START/PAUSE düğmesi ve gösterge lambası:
mavi gösterge lambası yavaş yavaş yanıp söner, bir
yıkama çevrimi başlatmak için düğmeye basın. Çevrim
başlar başlamaz, gösterge lambası sürekli yanacaktır.
Yıkama çevrimini duraklatmak için, düğmeye tekrar
basın, gösterge lambası turuncu renkte yanıp sönecektir
sembolü yanmazsa, kapak açılmayabilir (yaklaşık 3
dakika bekleyiniz). Yıkama çevrimini yarıda kesildiği
noktadan başlatmak için, düğmeye tekrar basın.
KAPI KİLİTLİ gösterge lambası:
Yanan sembol kapagın kilitli oldugunu gösterir. Makinenin
hasar görmesini önlemek için, kapagı açmadan önce
sembol sönene kadar bekleyin (yaklaşık 3 dakika
bekleyiniz).
Bir program çalisirken kapagi açmak için, START/PAUSE
düğmesine basın, KAPAK KİLİTLİ sembolü kapalı ise,
kapak açılmayabilir.
Bekleme modu
Yeni enerji tasarrufu düzenlemeleri ile uyumlu bu çamaşır
makinesine herhangi bir faaliyet algılanmadığında 30
dakika içinde devreye sokulan otomatik bekleme sistemi
yerleştirilmiştir ON/OFF düğmesine bir süre basın ve
makinenin tekrar çalışmasını bekleyin.
Off-mode’da tüketim: 0,5 W
Left-on’da tüketim: 0,5 W

TR
17
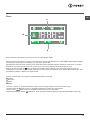
Ekran
B
C
A
Ekran makineyi programlarken çok yardımcı olur ve faydalı bilgiler sağlar.
Mevcut yıkama çevrimlerinin ve çalışan çevriminin kalan süresi bölüm A’da görünür; GECİKMELİ BAŞLATMA seçeneği
ayarlanmışsa, seçili programın başlangıcı için geri sayım görünecektir.
Ilgili dügmeye basılması ayarlı yıkama çevrimi sırasında makine tarafından ulasılan maksimum sıkma hızını ve sıcaklık
degerlerini veya ayarlı yıkama çevrimi ile uyumlu ise en son seçilen degerleri görüntülemenize izin verir.
Seçilen yıkama çevrimine ve seviyeye bağlı olarak makine verileri işlerken kum saati yanıp söner. En fazla 10
dakika sonra, “kum saati” simgesi sürekli yanık kalır ve kalan toplam süre gösterilir. Kum saati simgesi kalan toplam süre
göründükten yaklaşık 1 dakika sonra kapanacaktır.
Seçilen ve çalismakta olan programin asamalari bölüm B’de ekrana gelir:
Yıkama
Durulama
Sıkma
Tahliye
“Sıcaklık”, “Sıkma” ve “gecikmeli baslatma” (soldan çalısır) ile ilgili simgeler C bölümünde ekrana gelir.
“Sıcaklık” barları ayarlı çevrim için seçilebilen maksimum sıcaklık seviyesini gösterir.
“Sıkma” barları ayarlı çevrim için seçilebilen maksimum sıkma hızını gösterir.
“Gecikmeli baslatma” sembolü yandıgında, ayarlı “gecikmeli baslatma”degerinin ekranda gösterildigine isaret eder.

18
TR
Bir yıkama çevriminin çalıştırılması
1. MAKİNEYİ AÇIN. düğmesine basın, START/
PAUSE gösterge lambası mavi renkte yavaş yavaş
yanıp sönecektir.
2. ÇAMAŞIRI YERLEŞTİRİN. Yan kapağı açın.
Aşağıdaki sayfada yer alan program ve yıkama
çevrimi tablosunda gösterilen maksimum yük değerini
aşmamaya dikkat ederek, çamaşırı yerleştirin.
3. DETERJANI ÖLÇÜP AYIRIN. Deterjan çekmecesini
çekip çıkarın ve deterjanı “Deterjan ve çamasır”’da
tanımlandıgı gibi ilgili bölmelere dökün.
4. KAPAĞI KAPATIN.
5. YIKAMA ÇEVRIMINI SEÇIN. Istenilen yıkama
çevrimini seçmek için YIKAMA ÇEVRIMI SEÇICI
döner dügmeyi kullanın. Sıcaklık ve s hızı her yıkama
çevrimi için ayrı ayrı ayarlıdır, bu degerlerde degisiklik
yapılabilir. Çevrim süresi ekranda gösterilecektir.
6. YIKAMA ÇEVRİMİNİ ÖZELLEŞTİRİN. İlgili düğmeleri
kullanın:
Sıcaklık ve/veya dönüş hızını değiştirin.
Makine, seçilen çevrimle uyumlu ise maksimum
sıcaklığı, seçilen çevrim için ayarlı dönüş hızı
değerlerini veya en son kullanılan ayarları otomatik
olarak görüntüler. Sıcaklık, soğuk Yıkama “OFF”
ayarına ulaşana kadar düğmesine basılarak
düşürülebilir. Dönüş hızı, tamamen devre dışı
bırakılana kadar düğmesine basılarak kademe
kademe azaltılabilir “OFF”. Bu düğmelere tekrar
basılırsa, maksimum değerler sıfırlanır.
Gecikmeli çalıştırmanın ayarlanması.
Seçilen çevrim için gecikmeli başlatmayı ayarlamak
amacıyla, gerekli gecikme süresine ulaşana kadar
ilgili düğmeye tekrar tekrar basın. Bu seçenek
etkinleştirildiğinde, sembolü ekranda yanacaktır.
Gecikmeli başlatma ayarını kaldırmak için “OFF”
yazısı ekranda görünene kadar düğmeye basın.
Çevrim ayarlarını değiştirin.
• Seçimi etkinleştirmek için düğmeye basın, düğmeyle
ilgili gösterge lambası yanacaktır.
• Seçimi devre dışı bırakmak için düğmeye tekrar
basın, gösterge lambası kapanacaktır.
! Seçilen seçenek ayarlı yıkama çevirimi ile uyumlu
degilse, gösterge lambası yanıp sönecek ve seçenek
etkinlestirilmeyecektir.
! Seçilen seçenek önceki seçilenle uyumlu degilse,
seçilen ilk fonksiyonla ilgili gösterge lambası yanıp
sönecek ve sadece ikinci seçenek etkinlestirilecektir,
etkinlestirilen seçenegin gösterge lambası
aydınlatılacaktır.
Not: seçeneği seçilmişse, uyumlu olmayan
seçeneklerden biri etkinleştirilebilir.
! Seçenekler önerilen yük değerini ve/veya çevrim
süresini etkileyebilir.
7. YIKAMA ÇEVRİMİNİ BAŞLATIN. START/PAUSE
düğmesine basın. İlgili gösterge lambası sürekli
yanık kalacak şekilde maviye dönecek ve kapak
kilitlenecektir (KAPAK KİLİTLİ sembolü yanacaktır).
Bir yıkama çevrimini yürütüldüğü sırada değiştirmek
için, START/PAUSE düğmesini kullanarak çamaşır
makinesini duraklatın (START/PAUSE gösterge
lambası yavaş yavaş turuncu renkte yanıp sönecektir)
ve sonra istediğiniz çevrimi seçin ve START/PAUSE
düğmesine tekrar basın.
Bir çevrim yürütülürken kapağı açmak için, START/
PAUSE düğmesine basın, KAPAK KİLİTLİ sembolü
kapalı ise, kapak açılmayabilir (yaklaşık 3 dakika
bekleyiniz). Yıkama çevrimini yarıda kesildiği noktadan
başlatmak için, START/PAUSE düğmesine tekrar
basın.
8. YIKAMA ÇEVRİMİNİN SONA ERMESİ. Bu durum
“END” yazısı ekranda gösterilecektir, KAPAK KİLİTLİ
sembolü kapandığında, kapak açılabilir (yaklaşık 3
dakika bekleyiniz). Kapağı açın, çamaşırı boşaltın ve
makineyi kapatın.
! Başlamış olan bir yıkama çevrimini iptal etmek
istiyorsanız, düğmesini basılı tutun. Çevrim
durdurulacak ve makine kapanacaktır.
Yük dengeleme sistemi
Her dönüş çevriminden önce aşırı titreşimi önlemek
ve yükü tek bir yönde dağıtmak için, tambur yıkama
dönüş hızından biraz daha fazla olan bir hızda sürekli
döner. Birkaç denemeden sonra, yük doğru şekilde
dengelenmezse, makine düşük bir dönüş hızında döner.
Yük çok dengesizse, çamaşır makinesi döndürme yerine
dağıtma işlemini uygular. Gelişmiş yük dağılımı ve
dengeyi desteklemek için, küçük ve büyük giysilerin yük
içerisinde karıştırılmasını öneririz.

TR
19
Yıkama çevrim ve
seçenekleri
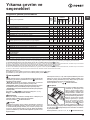
Program ve yıkama çevrimi tablosu
Yıkama seçenekleri
“PRIME” teknolojisi, enerji, su ve zaman tüketimini makinenin içine konulan
çamaşırlara uygun olarak en iyi şekilde kullanır. Ayrıca tuşuna basınca,
aşağıdaki opsiyonlar seçilebilir:
- Water (Su): mükemmel sonuçlardan vazgeçmeden su tüketimini
azaltmamıza olanak tanır (çok kirli çamaşırlar için tavsiye edilir).
- Enegy (Enerji): “PRIME” tarafından otomatik olarak ayarlanan bu opsiyon,
enerji tüketimini azaltır (normal kirlilikteki çamaşırlar için tavsiye edilir).
- Time (Zaman): yıkama süresini kısaltmamıza olanak tanır(az kirli çamaşırlar
için tavsiye edilir).
! Bu sadece 1, 2, ,
, 5 (üç seviyenin her biriyle) ve 6, 7, 8, 9 (-
Enegy ve - Time seviyeleri) ile birlikte kullanılabilir.
Ilave Durulama
Bu seçenek seçilerek, durulamanın verimliliği arttırılır ve deterjanın iyice
çıkarılması sağlanır. Özellikle hassas ciltler için faydalıdır.
! Yıkama çevrimleri 8, ile birlikte kullanılamaz.
Kolay ütü
Bu fonksiyonun seçilmesi, yıkama ve dönüş çevrimlerinde iz oluşumunun
azaltılması için değişiklik yapacaktır. Çevrimin sonunda, KOLAY ÜTÜ
ve START/PAUSE gösterge lambaları yanıp sönerken (sırasıyla mavi
ve turuncu), çamaşır makinesi tamburu yavaş bir şekilde döndürecektir.
Çevrimi sona erdirmek için, START/PAUSE düğmesine veya KOLAY ÜTÜ
düğmesine basın.
Yıkama çevrimi numara 11-13 için, makine çamaşır ıslatılırken çevrimi sona
erdirecek ve KOLAY ÜTÜ ve START/PAUSE gösterge lambaları yanıp
sönecektir. Çamaşır çıkarılmadan önce suyu tahliye etmek için, START/
PAUSE düğmesine veya KOLAY ÜTÜ düğmesine basın.
! Yıkama çevrimleri 8, 10, 14,
,
ile birlikte kullanılamaz.
Leke çıkarma
Bu fonksiyon özellikle inatçı lekelerin
çıkarılması için kullanışlıdır. İlave
bölme 4 (cihazla birlikte verilen)
bölmeye yerleştirin 1. Çamaşır suyunu
bölmeye dökerken, ortadaki milde
işaretli “max”(maksimum) seviyesini
aşmamaya dikkat edin (şekile bakınız).
Başka bir yıkama işlemi olmadan
çamaşırı ağartmak için, çamaşır
suyunu ilave bölme 4’e dökün,
“Durulama” çevrimi ’i seçin ve
“Leke çıkarma” seçeneği ’i devreye
sokun. Bir yıkama çevrimi sırasında çamaşırı ağartmak için, deterjanı ve
kullanmak istediğiniz yumuşatıcıyı dökün, istediğiniz yıkama çevrimini seçin
ve “Leke çıkarma” seçeneğini devreye sokun. İlave bölme 4’ün kullanımı
ön yıkama işlevini önler.
! Yıkama çevrimleri 1, 6, 8, 10, 11, 12, 13, 14, ile birlikte kullanılamaz.
4
2
3
1
4
2
1
3
1) 1061/2010 düzenlemesine uygun test yıkama çevrimi: 60°C sıcaklıkta yıkama çevrimi ’yi seçin.
Bu devre, orta kirlilikteki pamuklu çamaşırları temizlemek için uygundur ve 60°C’de yıkanabilir çamaşırlar üzerinde kullanılacak, kombine enerji ve su tüketimi
açısından en etkili devredir. Geçerli olan yıkama sıcaklık derecesi, belirtilen sıcaklık derecesinden farklı olabilir.
2) 1061/2010 düzenlemesine uygun test yıkama çevrimi: 40°C sıcaklıkta yıkama çevrimi ’yi seçin.
Bu devre, orta kirlilikteki pamuklu çamaşırları temizlemek için uygundur ve 40°C’de yıkanabilir çamaşırlar üzerinde kullanılacak, kombine enerji ve su tüketimi
açısından en etkili devredir. Geçerli olan yıkama sıcaklık derecesi, belirtilen sıcaklık derecesinden farklı olabilir.
Bütün Test merkezleri için:
2) Pamuklular için uzun yıkama çevrimi: 40°C sıcaklıkta yıkama çevrimi ’ü seçin.
3) Sentetikler için uzun yıkama çevrimi: 40°C sıcaklıkta yıkama çevrimi 5’ü seçin.
Ekran veya kitapçık üzerinde gösterilen devre süresi, standart şartlara göre hesaplanmış tahmini bir süredir. Geçerli olan süre, girişteki sıcaklık derecesi ve suyun
basıncı, ortam sıcaklığı, deterjan miktarı, yük miktarı ve tipi, yükün dengesi, seçilen ilave seçenekler gibi sayısız faktörlere göre değişiklik gösterebilmektedir.
Yıkama
çevrimleri
Yıkama çevrimi açıklaması
Maks.
Sıcak
(°C)
Maks. Hız
(dev/dak.)
Deterjan ve katkı
maddeleri
Maks. yük
(kg)
Kalan nem %
Enerji tüketimi
kWh
Toplam su lt
Çevrim süresi
Ön
yıkama
Ana
Yıkama
Çamaşır
suyu
Yumu-
şatıcı
Günlük çevrimler
1
Ön yıkamalı pamuklular: aşırı kirli beyazlar.
90° 1200
-
9 53 2,86 98 195’
2
Beyaz pamuklular: aşırı kirli beyazlar.
90° 1200 -
9 53 2,54 85 180’
60°C Standart pamuklu (1): çok kirli beyazlar ve dayanıklı renkliler.
60° 1200 -
9 53 1,37 76 185’
40°C Standart pamuklu (2): az kirli beyazlar ve hassas renkliler.
40° 1200 -
9 53 1,09 92 180’
5
Sentetikler: çok kirlenmiş dayanıklı renkliler.
60° 800 -
4 46 1,03 60 115’
5
Sentetikler (3): az kirlenmiş dayanıklı renkliler.
40° 800 -
4 46 0,56 60 100’
6
Kot pantalon
40° 800 -
-
4 - - - 80’
7
Gömlek
40° 600 -
2 - - - 70’
8
Mix-Cool 30’: az kirlenmiş giysileri hemen temizlemek için (elle
yıkamayı gerektiren yün, ipek ve elbiseler için uygun değildir).
Soğuk
su
800 -
-
3 71 0,10 36 30’
9
20°C Standart pamuklu: az kirli beyazlar ve hassas renkliler.
20° 1200 -
9 - - - 175’
Özel çevrimler
10
Yün: yün, kaşmir vs.
40° 800 -
-
2 - - - 90’
11
İpek/Perde: ipek ve sentetik giysiler, iç çamaşırları için.
30° 0 -
-
2 - - - 65’
12
Yorgan: doldurulmuş giysiler için.
30° 1000 -
-
3,5 - 120’
13
Eskitme
30° 400 -
- - 2,5 - - - 60’
14
Spor Ayakkabıları
30° 600 -
-
En fazla
2 çift
- - - 60’
Kısmi çevrimler
Durulama
- 1200 - -
9 - - - 36’
Sıkma
+
Su boþaltma
- 1200 - - - - 9 - - - 16’

20
TR
20°C Standart pamuklu (program 9): kirli pamuklu
çamaşırlar için idealdir. 40°’de bir yıkama ile mukayese
edilebilen, soğuk suda da etkili olan performanslar,
yinelenen ve karşılaştırılan en yüksek hız varyasyonu ile
çalışan mekanik bir hareket ile sağlanır.
Yün: Bu çamaşır makinesinin “Yünlüler” yıkama devresi,
yıkama işlemi giysilerin etiketi üzerinde aktarılan
talimatlara ve elektrikli ev aletinin üretici rması
tarafından verilen talimatlara riayet ederek
gerçekleştirildiği sürece, “elde yıkanabilir” olarak
sınıandırılan yünlü çamaşırların yıkanması için
Woolmark Company tarafından test edilmiş ve
onaylanmıştır. (M1127)
İpek: bütün ipek giysileri yıkamak için özel yıkama çevrimi
11’yi kullanın. Hassas elbiseleri yıkamak için tasarlanan
özel deterjanın kullanılmasını tavsiye ederiz.
Perdeler: perdeleri katlamanızı ve bir yastık kılıfının veya
çamaşır lesinin içine yerleştirmenizi öneririz. Yıkama
çevrimi 11’i kullanın.
Yorgan: Çift katlı veya tekli yorganları (ağırlığı 3,5 kg’ı
aşmayan), yastıkları, puf mont gibi içerisine kaz tüyü
yerleştirilmiş giysileri yıkamak için, özel yıkama çevrimi
12’ı kullanın. Yorganları kenarlarını içeri doğru katlayarak
tambura yerleştirmenizi (şekile bakınız) ve tamburun toplam
hacminin ¾’ünden fazlasını kullanmamanızı tavsiye ederiz.
En iyi sonucu almak için, sıvı deterjan kullanmanızı ve
deterjan çekmecesine yerlestirmenizi tavsiye ederiz.
Eskitme: (program 13) su geçirmez kumaşlar ve kış
ceketleri için (örn. Gore-Tex, polyester, naylon) yıkama
için kullanılır; en iyi sonuçlar için, sıvı deterjan ve yarım
yük doz kullanınız; gömlek yakalarını, manşetlerini ve
lekeleri ön işlemden geçiriniz; yumuşatıcı veya yumuşatıcı
içeren deterjan kullanmayınız. Doldurulmuş yorganlar bu
programla yıkanamaz.
Spor Ayakkabıları: (program 14) spor ayakkabılarını
yıkamak için kullanılır; en iyi sonuçlar için, aynı anda 2
çiftten fazla yıkamayınız.
Deterjan ve çamaşır
Deterjan çekmecesi
Başarılı yıkama sonuçları aynı zamanda doğru miktarda
deterjan kullanımına bağlıdır: çok fazla deterjan ilave
edilmesi daha iyi bir yıkama ile sonuçlanmadığı gibi, cihazın
içerisinde birikir ve çevre kirliliğine katkıda bulunur.
! Elde yıkama deterjanları kullanmayınız, çünkü aşırı
köpük yaparlar.
! Beyaz pamuklu çamaşırlar, ön yıkama ve 60°C’den
yüksek sıcaklık derecesi ile yıkamalar için toz deterjan
kullanınız.
! Deterjan ambalajı üzerinde aktarılan bilgileri takip ediniz.
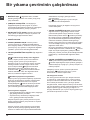
Deterjan çekmecesini açın
ve deterjan veya katkı
maddelerini aşağıdaki
şekilde dökün.
Bölüm 1: Ön yıkama
deterjanı (toz)
D e t e r j a n ı d ö k m e d e n
önce, ilave bölme 4’ün
çıkarıldığından emin olun.
Bölüm 2: Yıkama deterjanı (toz veya sıvı)
Sıvı deterjan sadece yıkama çevrimine başlamadan hemen önce
dökülmelidir.
Bölüm 3: Katkı maddeleri (yumuşatıcı vs.)
Yumuşatıcı ızgaranın dışına taşmamalıdır.
ilave bölme 4: Çamaşır suyu
ilave bölme 5: Yıkamanın kalitesini arttırmak için sadece
sıvı deterjan bölmesini kullanın.
Çamaşırın hazırlanması
• Çamaşırı aşağıdakilere göre ayırın:
- etiketteki kumaş türü/sembole
- renge: renkli giysileri beyazlardan ayırın.
• Bütün cepleri boşaltın ve düğmeleri kontrol edin.
• Kurulama sırasında çamaşırın ağırlığını gösteren
“Programlar Tablosu” daki değerleri aşmayın.
Çamaşırınız ağırlığı ne kadardır ?
1 çarşaf 400-500 gr
1 yastık kılıfı 150-200 gr
1 masa örtüsü 400-500 gr
1 bornoz 900-1.200 gr
1 havlu 150-250 gr
Özel yıkama çevrimleri
Kot pantalon: yıkamadan önce giysilerin içini dışa doğru
çevirin ve sıvı deterjan kullanın. Yıkama çevrimi 6’i kullanın.
Gömlek:değişik kumaş ve renklerdeki gömlekler için özel
çamaşır çevrimi 7’u kullanın. Bu giysilere maksimum özen
gösterilmesini sağlar ve iz oluşumunu en aza indirir.
Mix-Cool 30’: bu yıkama çevrimi az kirlenmiş giysileri hızlı
bir şekilde yıkamak için tasarlanmıştır: 30 dakika içinde
sona erer ve böylece hem enerji hem de zaman tasarrufu
sağlar. Yıkama çevrimi 8’i seçerken, maksimum 3 kg.’lık
yüke kadar, soğuk bir çevrim yaparak farklı kumaşların
(yünlü ve ipekli eşyalar hariç) yıkanması mümkündür.
1
2
3
5
4
Страница загружается ...
Страница загружается ...
Страница загружается ...
Страница загружается ...
Страница загружается ...
Страница загружается ...
Страница загружается ...
Страница загружается ...
Страница загружается ...
Страница загружается ...
Страница загружается ...
Страница загружается ...
Страница загружается ...
Страница загружается ...
Страница загружается ...
Страница загружается ...
Страница загружается ...
Страница загружается ...
Страница загружается ...
Страница загружается ...
Страница загружается ...
Страница загружается ...
Страница загружается ...
Страница загружается ...
Страница загружается ...
Страница загружается ...
Страница загружается ...
Страница загружается ...
-
 1
1
-
 2
2
-
 3
3
-
 4
4
-
 5
5
-
 6
6
-
 7
7
-
 8
8
-
 9
9
-
 10
10
-
 11
11
-
 12
12
-
 13
13
-
 14
14
-
 15
15
-
 16
16
-
 17
17
-
 18
18
-
 19
19
-
 20
20
-
 21
21
-
 22
22
-
 23
23
-
 24
24
-
 25
25
-
 26
26
-
 27
27
-
 28
28
-
 29
29
-
 30
30
-
 31
31
-
 32
32
-
 33
33
-
 34
34
-
 35
35
-
 36
36
-
 37
37
-
 38
38
-
 39
39
-
 40
40
-
 41
41
-
 42
42
-
 43
43
-
 44
44
-
 45
45
-
 46
46
-
 47
47
-
 48
48


Indesit PWE 91273 S (EU) Руководство пользователя
- Категория
- Стиральные машины
- Тип
- Руководство пользователя
Задайте вопрос, и я найду ответ в документе
Поиск информации в документе стал проще с помощью ИИ
на других языках
Похожие модели бренда
Модели других брендов
-
Whirlpool AQ9D 292 I (EU)/VB Руководство пользователя
-
Hotpoint AQS73D 29 SS EU/B Руководство пользователя
-
-
-
-
-
-
Bauknecht FBWF71253BW IL Руководство пользователя