Kuppersberg SB 691 W Руководство пользователя
- Категория
- Печи
- Тип
- Руководство пользователя

ELECTRIC OVENS
ЭЛЕКТРИЧЕСКИЕ ДУХОВЫЕ ШКАФЫ
TECHNICAL PASSPORT
ПАСПОРТ ТЕХНИЧЕСКОГО ИЗДЕЛИЯ
SB 691, HZ 690, HZ 691, HFZ 690, HFZ 691

2
ENGLISH
Electric oven
TECHNICAL PASSPORT
BEFORE USING YOUR APPLIANCE FOR THE FIRST TIME ............................3
ECOLOGICAL PACKAGING .......................................................................................3
IMPORTANT SAFETY INSTRUCTIONS ................................................................3
OVENS WITH 5 COOKING MODES. .......................................................................12
OVENS WITH 9 COOKING MODES. .......................................................................12
COOKING TABLES .....................................................................................................13
CLEANING AND MAINTENANCE ...........................................................................17
TROUBLE SHOOTING ..............................................................................................20
TECHNICAL INFORMATION ...................................................................................21
INSTALLATION ..........................................................................................................21

3
ENGLISH
Electric oven
TECHNICAL PASSPORT
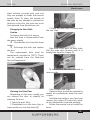
BEFORE USING YOUR APPLIANCE
FOR THE FIRST TIME
Carefully read this Instruction
Manual to achieve the best results
from your oven.
Due to the manufacturing process
there may be residues of grease and
other substances. To eliminate these,
proceed as follows:
 Remove all the packaging
material, including the protective
plastic, if included.
 Select the or function
at 200°C for one hour. To do so, consult
the feature list provided with this
manual.
 To cool the oven open the door to
allow ventilation and odours to escape
from inside.
 After cooling, clean the oven and
the accessories.
During the rst use, fumes and
odours may occur and the kitchen
should therefore be well ventilated.
ECOLOGICAL PACKAGING
The packaging materials are
completely recyclable and can be used
again. Check with your local authority
on the regulations for disposing of this
material.
CAUTION
The symbol on the product
or on its packaging indicates that
this product may not be treated as
household waste. lnstead it shall be
handed over to the applicable collection
point for the recycling of electrical and
electronic equipment. By ensuring this
product is disposed of correctly, you
will help prevent potential negative
consequences for the environment and
human health, wich could otherwise be
caused by inappropriate waste handling
of this product. Please contact your
local city ofce, your household waste
disposal service or the shop where you
purchased the product
IMPORTANT SAFETY
INSTRUCTIONS
Electrical Safety
 Any repairs must be carried out
by an authorised Service Agent, using
original spare parts. Repairs carried out
by other people, may cause damage
or malfunction to the equipment and
endanger your safety.
 Disconnect your oven if it breaks
down.
Safety for Children
 Do not allow children to
approach the oven while it is in use, as
high temperatures can be reached.
 During the catalytic selfcleaning
process, which is carried out at a high
temperature, the outer surfaces may
become hotter than normal and children
should be kept away from the oven.
 Most models have a door
temperature of below 60°С. If your
oven has a higher temperature, you can
obtain a special door from the Technical
Service Department that will stabilise
the door temperature. Refer to the
features list.

4
ENGLISH
Electric oven
TECHNICAL PASSPORT
Oven Safety in Use
 The manufacturer will not be
held responsible if this oven is used for
anything other than domestic purposes.
 Only use the oven when it is
installed within kitchen units.
 Do not store oils, fats or
inammable materials inside the oven,
as it could be dangerous if the oven is
switched on.
 Do not lean or sit on the open
door of the oven as it could damage the
door and be dangerous for you.
 Do not cover the bottom of the
oven with aluminium foil, as it could
affect cooking and damage the interior
enamelling of the oven.
 To use the oven, insert the tray
or rack supplied onto the side guides
inside the oven. The trays and racks are
tted with a system to facilitate partial
extraction and make handling easier.
 Do not put containers or food
on the oor of the oven. Always use the
trays and grids.
 Do not spill water on the oor
of the oven while it is working as this
could damage the enamel.
 While using the oven, open the
door as little as possible to reduce
electricity consumption.
 Use protective gloves if you need
to work inside the hot oven.
 To cool the oven, open the door
to allow ventilation and odours to
escape from inside.
 In recipes with a high liquid
content, it is normal for condensation to
form on the oven door.
WARNING:
Device and its accessible parts are
hot during operation.
Touching the heating elements
should be avoided.
Children under 8 years of age
should be kept away, if they cannot be
monitored continuously.
This device can be used by children
over 8 years of age, people with physical,
hearing or mental challenges or people
with lack of experience or knowledge; as
long as control is ensured or information
is provided regarding the dangers.
Children should not tamper with the
device. Cleaning and user maintenance
should not be carried out by children
without supervision.
The device is hot during use.
Touching the heating elements
inside the oven should be avoided.
WARNING
The accessible parts may be hot
during use.
Small children should be kept away.
Hard and abrasive cleaners or hard
metal scrapers should not be used to
clean the oven glass door, as these can
scratch the surface and cause breaking.
It should contain the details on
correct placement of the trays:
WARNING
To avoid electric shock, ensure
that the device circuit is open before
changing the lamp.

5
ENGLISH
Electric oven
TECHNICAL PASSPORT
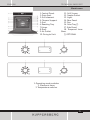
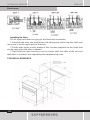
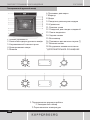
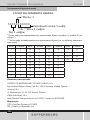
1. Control Panel.
2. Oven Seal.
3. Grill element.
4. Chrome Support.
5. Grid.
6. Roasting Tray.
7. Hinge.
8. Door.
9. Air Outlet.
10. Fixing to Unit.
11. Grill Screen.
12. Smoke Outlet.
13. Light.
14. Rear Panel.
15. Fan.
16. Cake Tray (*).
17. Side Panel.
18. Tempered Inner
Glass.
(*) OPTIONAL
1. Operating mode switcher
2. Electronic timer
3. Temperature switcher

6
ENGLISH
Electric oven
TECHNICAL PASSPORT
EPT1 Oven Control Manual 1
Technical Data
1.1 Display
1.2 Constants and Setting Ranges
[a] Automatic Program:
Setting range duration 0h:01min
to 10h:00min, end time = actual
time+23:59, accuracy 1 minute.
[b] Buzzer
Signal tone frequency: 2,2 kHz / 2,7 kHz
/ 3,2 kHz / 3,4 kHz = default = loudest
tone
Tone setting menu: Press MINUS key for
3 sec while no program is active
Key press answering signal: 60ms
Clear function conrm signal: 255ms
[br] Power Fail bridge time
Times and programs are restored after
power fail when it’s duration is not
longer than approx. 2 min
[c] Clock
Setting range 0h:00m to 23h:59m with
minutes to hour overow.
[c] Display
setting time window: 5 sec after
choosing program or last value setting.
[m] Minute Minder
Setting range 0h:01m to 10h:00m,
accuracy 1 second.
Minute minder end state, automatically
timeout: 5 min
[t] Test Mode
Selecting possibility after power on: 15
sec.
Timeout unless key pressed: 60 sec.
2 Start of Operation
2.1 Power On
At power on (after Reset), relay outputs
are open.
Touch sensitivity coding jumper
Touch key sensitivity is selected by a
jumper on the backside of EPT printed
circuit board. It’s position is checked
once after power on, i.e. after Reset.
The display shows for 3sec according to
jumper position:
“META” = standard Housing - Jumper
set “GLAS” = Housing plus additional
Glass front -Jumper not set The “Glass”
position makes the touch keys more
sensitive.
Daytime ashing
After jumper position display, daytime
ashes, starting from 12:00. The Clock
symbol also ashes.

7
ENGLISH
Electric oven
TECHNICAL PASSPORT
Mains frequency detection
At power on, mains frequency is checked.
If 60Hz mains frequency is detected,
the dot between hours and minutes is
illuminated statically, i.e. it remains on
during time ashing. At 50Hz it ashes
together with hours and minutes.
2.2 Power Fail bridging
This feature bridges a short power fail
time. This means when the power comes
back after a short time of power fail,
there is no power on daytime ashing
as after a Reset, but the control returns
with normal operation and times as
before power fail event.
Functional Principle
At normal operation, a backup capacitor
is loaded. When power fail is detected,
daytime and all program parameters are
stored to non-volatile EEPROM.
During power fail, the capacitor is
discharged slowly.
When power returns, rst the voltage of
the capacitor is measured. The voltage
level gives information about the
duration of power fail.
When power fail duration is below the
time mentioned in chapter 1.5 [br], the
control is restored by EEPROM
parameters as if no power fail has
happened, i.e. daytime is not ashing
and all programs proceed like before.
So max. loss of daytime is the specied
bridge time.
If power loss lasts longer, the control
restarts with ashing daytime as
described in chapter 2.1.
2.3 Setting Time of Day
At power on, if PLUS/MINUS is pressed,
daytime setting mode is entered and
time is changed immediately. If MODE
is pressed, actual displayed daytime is
overtaken wthout change and EPT turns
to normal operation.
Daytime setting mode is entered by
(successive) pressing mode button. It is
indicated by quickly ashing Clock
symbol. If an automatic program is set,
daytime cannot be changed. If minute
minder is already set, the Minute Minder
symbol is illuminated statically.
Time setting steps and ranges are
described in chapter 1.5 [c] and 4.2. The
minutes change with hour carry-over.
3 Programs
3.1 Program selection
Select programs to set by successive
pressing MODE button. Following
display symbols below hh:mm represent
the selected setting mode: Duration –
End – Bell – Clock - Lock.
- Program time setting modes are:
Daytime, Minute minder, Auto program
duration and end time. 1)Daytime
display
If no program is active, no symbols are
illuminated. Only in this case Operation
Lock
setting is available. If any program is
active
during daytime display, the Clock symbol
ashes slowly.
1) Daytime display
If no program is active, no symbols are
illuminated. Only in this case Operation

8
ENGLISH
Electric oven
TECHNICAL PASSPORT
Lock setting is available. If any program
is active during daytime display, the
Clock symbol ashes slowly.
- Duration setting End time
settingMinute Minder setting
Daytime setting Operation Lock
setting
2) Minute Minder is set
Standard display is Minute Minder. The
Bell symbol is ashing slowly.
-Minute Minder setting Daytime
setting Key Lock setting Duration
setting End time setting
3) Semi Auto Duration is set
Standard display is Duration. The
Duration symbol is ashing slowly
-Duration setting End time setting
Minute
Minder setting Daytime display
Key Lock setting
4) Semi Auto End time or Fully Auto is
set
Standard display is End time. The End
symbol is ashing slowly.
At fully Auto, Duration symbol is
illuminated statically while End time
symbol ashing slowly. When start time
is reached, the display turns to semi
Auto duration.
-End time setting Minute Minder
setting Daytime display Key
Lock setting Duration setting
5) Operation Lock is set
Only daytime display is available. The
Lock symbol is illuminated. All relays
are off.
- Operation Lock setting Daytime
display
6) Key Lock is set
As long as Key Lock is set, only Key Lock
is available as setting mode, all other
modes are locked as display modes, i.e.
their values can
not be changed by PLUS/MINUS. Only
active programs can be selected, so for
example if only Auto duration is set the
reduced sequence is
-DurationDaytimeKey Lock setting
If all possible program times are set, the
maximum sequence is (at fully auto, end
time is standard display)
-End time Minute Minder Daytime
Key Lock setting Duration
3.2 Program setting
In program time or temperature setting
modes, settings are done by +/- key or by
the PV +/- knob. By PV +/- knob, the oven
temperature can be set directly, if no
other setting mode is selected.
In setting modes, the symbol of the
selected program ashes quickly.
Setting of daytime, minute minder,
duration and end time happens in 3
different step sizes: First min 10/max 19
steps of 1min, then min 5 / max 10 steps
of 10min, then steps of 30min. Setting
speed is 0,5s/0,5s/1s.

9
ENGLISH
Electric oven
TECHNICAL PASSPORT
Ex.start 0.00:0.01/0.02/0.03/0.04/0.05/
0.06/0.07 /0.08/0.09/0.10/0.20/0.30/0.4
0/0.50/1.00/1.30/2 .00/2.30/…
Ex.start 1.23:1.24/1.25/1.26/1.27/1.28/
1.29/1.30 /1.31…/1.39/1.40/1.50/2.00/2
.10/2.20…/2.30/3. 00/3.30/…
3.3 Minute Minder
Function
Minute minder program only lets the
buzzer sound when alarm time has
nished. No relays are switched. Time
setting steps and ranges are described
in chapter 1.5 [m] and 4.2. The minute
minder runs independently of other
programs.
Setting alarm time
Select minute minder function by
successive pressing MODE button.
In alarm time setting mode, alarm
time stops running down and the Bell
symbol ashes quickly. The symbols of
other active programs are illuminated
statically.
Program run
The display shows the expiring alarm
time while the Bell symbol is ashing
slowly. If alarm time is <60s, the display
reads the alarm time in seconds 0:ss,
else in hours and minutes hh:mm.
Minute minder end
If alarm time has run down, the display
reads 0:00, an acoustic interval signal
sounds and the Bell
symbol ashes quickly. Program end
is cleared by pressing any key or
automatically after timeout.
3.4 Semi Automatic Program with
Duration or End Time
Function
The relay is switching dependent on
set duration or end time. Automatic
program time is running down in steps
of 1 minute. Time setting steps and
ranges are described in chapter 1.5 [a]
and 4.2. Note: At EPT1, only one relay
(relay 1) is used. Else both relays (relay
1&2) are switched together at automatic
program, but only if the oven is on. If the
oven is off, an automatic program runs
down just like a timer without any effect
to the relays.
Setting Program Time
Select either duration or end time
setting mode by successive pressing
MODE button. Duration or end time
symbol is ashing quickly. The symbols
of other active programs are illuminated
statically. End time and duration are
linked by: End time = Actual time +
Duration. If a program duration is set,
the end time cannot be reduced. Neither
can the program duration be extended,
when an end time is set.
Program run
While semi automatic program is
running, the relay contact is closed.
Duration or End time symbol is ashing
slowly while the display reads duration
or end time.

10
ENGLISH
Electric oven
TECHNICAL PASSPORT
Automatic Program End
1) When duration has run down
respective time of day reaches end time,
the relay contact opens and the buzzer
sounds. The expired duration “0:00” and
also the Duration symbol is ashing
quickly. After a while, the buzzer signal
will stop automatically.
2) By pressing any key, the buzzer signal
stops and “0:00” ashes slowly, but open
relay state remains.
3) By pressing MODE key, auto end state
is cleared and the relay contact closes
again. “0:00” is no more ashing but
duration setting mode is entered. Now a
new duration can be set, else the display
returns to daytime (EPT1) respective
oven temperature (not EPT1). Note (not
EPT1): If the oven is on, both relays
close again, i.e. the oven continues to
work after automatic program is cleared.
3.5 Fully Automatic Program with
Duration and End Time
Setting is as described for the semi
automatic program, but both duration
and end time must be set.
End time and duration dene program
start time according to: Start time = End
time - Duration. Before fully automatic
start time is reached, the
relay contact is opened. Program starts
when time of day is equal to start time
and works now as described for semi
automatic program.
Limit of duration and end time
adjustments:
If the calculated start time is one minute
after the current time, the duration
cannot be extended and the end time
cannot be extended and the end time
cannot be reduced. This prevents the
start time getting before the current
time.
3.6 Key Lock (KL)
Effect
When KL is set, the previous set
programs are locked. The times of the
set programs can just be shown on
display, any setting modes cannot be
entered. Not EPT1: If TMP key is pressed
or PV is moved while KL is set, display
turns to oven temp. display only, but not
to target temperature setting mode.
Setting KL mode
KL mode can only be set if the mode
selector is not set to ‘Off’ or a program
is active. Then press successive MODE
button to enter KL setting mode. When
entered, the Lock symbol ashes quickly.
The display reads “On” for active KL and
“Off“ for inactive KL. Change KL state by
PLUS or MINUS key. Conrm the set KL
state by MODE key, else it is not taken
over An active KL is indicated by the
illuminated Lock symbol, it is the same
symbol as for OL state. If Off mode is
selected and KL is set, KL is cleared.
Program end in Lock Mode
If a program has come to it’s end, pressing
any key clears the buzzer. But end state
with ashing 0:00 and ashing symbol
remains. The display returns to program
end display whenever display timer has
run down. If program end state shall be
quit or any new settings are desired,
rst KL has to be cleared! Clearing KL at
program end has the same
action/state Auto end & KL MM end & KL
1) press any key
Buzzer off, Auto end
remains
Buzzer off, MM
end remains
2) clear KL 0:00 ashing slowly clear MM
3) press Mode
clear Auto, duration
setting mode, Rel. on

11
ENGLISH
Electric oven
TECHNICAL PASSPORT
4 Outputs
4.1 Relays
EPT1: relay 1 only
-Relay 1 is ‘normally closed’ type
-Relay 1 is open: After Power On Reset,
OL set, fully automatic start, automatic
program end.
4.2 Buzzer
Buzzer signals
- alarm signal when minute minder has
reached the end time
- alarm signal when automatic program
has reached the end time
- short ‘bip’ signal when a key press is
detected
The different signal types are described
in chapter 1.5 [b]. The alarm signal is
switched off by pressing any key or by
passing the max. signal number.
Changing the buzzer tone
Signal tones can be changed. For that,
enter tone setting menu by holding
MINUS key pressed for some seconds,
while the display reads time of day and
no program and no lock mode is set.
When tone setting mode is entered,
the display reads “oooo” for highest
frequency = loudest tone = default,
respective “ooo”, “oo” and “o” for lowest
frequency. The tone can be changed by
pressing MINUS in 4 circular steps. Tone
setting menu is quit by pressing any
other key than MINUS or automatically
by timeout.

12
ENGLISH
Electric oven
TECHNICAL PASSPORT
OVENS WITH 5 COOKING MODES.
Grill – is used for cooking with
crispy crust. It is perfect for steaks, sh,
rib roast or toasts.
Base heating – heating is only by
the lower heating element. This mode
can be used for different dishes as well
as bakery.
Grill and base heating – base
heating allows quickly nish the cooking,
as well as grill guarantees crispy crust.
It is perfect for making a roast or can
be used for oven preheating to needed
temperature.
Defrosting - mode suitable for
cautious thawing of cold or frozen
products
Maxi-grill with fan – allows to roast
evenly big pieces of meat from within
and at the same time with crispy crust. If
you put a grill grid on a baking tray and
then a piece of meat on the grill grid –
meat grease and juice will be going to
the baking tray.
OVENS WITH 9 COOKING MODES.
Regular heating - is used for making
cakes, biscuits and other bakery.
Regular heating with fan – is used
to make a roast and cakes. The fan
spreads the heating evenly inside the
oven..
Grill and base heating – base
eating allows quickly nish the cooking,
as well as grill guarantees crispy crust. It
is perfect for making a roast or can
be used for oven preheating to needed
temperature.
Maxi-grill – all the grill heating
elements are used. High power capacity
reduces the time of cooking.
Maxi-grill with fan – allows to roast
evenly big pieces of meat from ithin and
at the same time with crispy crust. If you
put a grill grid on a baking tray and then
a piece of meat on the grill grid – meat
grease and juice will be going to the
baking tray.
Turbo mode – due to fan the
heating from circular rear element is
spread evenly inside the oven. It allows
to cook several dishes at the same time
at different levels in the oven. Besides
this mode can be used for defrosting
(meat, for example). For this function
turn the temperature knob to the “0”
position (zero position)
Base heating – heating is only by
the lower heating element. This mode
can be used for different dishes as well
as bakery.
Base heating with fan – heating
by the lower heating element is spread
evenly inside the oven. That is why this
mode is perfect for cakes with jam or
with other fruit llings. NB – warm up
the oven before cooking.
Grill – is used for cooking with
crispy crust. It is perfect for steaks, sh,
rib roast or toasts.
While using one of the oven cooking
modes the indicator light will be on.

13
ENGLISH
Electric oven
TECHNICAL PASSPORT
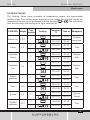
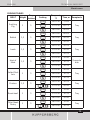
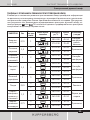
COOKING TABLES
The Cooking Tables show examples of temperature ranges and approximate
cooking times. The cooking mode depends on the model. For the best results we
recommend the oven to be preheated with the function or . The preheating
time nishes when the heating pilot light switches off.
STARTERS Weight
Tray
Position
Cooking
Temperat.,
°С
Time, m Receptacle
Baked rice 0,35 1 1
180-200 45-50
Shallow
oven dish
170-190 35-40
Pasty 1,5
3 170-190 45-50
Tray
2
160-180 30-35
Vegetable
Pastry
1 2
190-210 35-40
Shallow
dish
170-190 30-35
Vegetable
Pie
1,5 2
190-210 55-60
Shallow
dish
170-190 45-50
170-190 50-55
Baked
potatoes
1 3
180-200 60-65
Tray
180-200 50-55
Pizza 0,65
3 190-210 20-25
Grid
2
170-190 15-20
Quiche 1,5 2
180-200 45-50
Quiche
Mould
160-180 45-50
Stuffed
tomatoes
0,75
3 170-190 10-15
Tray
2
160-180 10-15

14
ENGLISH
Electric oven
TECHNICAL PASSPORT
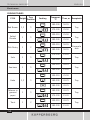
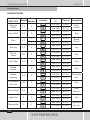
COOKING TABLES
FISH Weight
Tray
Position
Cooking
Temperat.,
°С
Time, m Receptacle
Red Bream 1,5 3
180-200 30-35
Tray
170-190 25-30
Salted
Dorado
1 3
190-210 25-30
Tray
180-200 25-30
Fish Pastry 1 2
190-210 30-35
Casserole
dish
180-200 30-35
Sole 1 3
170-190 15-20
Tray
160-180 10-15
Sea-bass 1 3
190-210 20-25
Tray
180-200 15-20
Hake 1,5 3
190-210 25-30
Tray180-200 20-25
180-200 20-25
Salmon in
greased
paper
1 3
180-200 20-25
Tray
170-190 15-20
Trout 1 2
190-210 20-25
Tray
180-200 15-20

15
ENGLISH
Electric oven
TECHNICAL PASSPORT
COOKING TABLES
MEAT Weight
Tray
Position
Cooking
Temperat.,
°С
Time, m Receptacle
Suckling
Pig
2 3
190-210 75-85
Tray
170-190 65-75
180-200 80-85
Rabbit 1,5 3
180-200 60-65
Tray
160-180 45-50
170-190 45-50
Lamb 1,5 3
190-210 50-55
Tray
170-190 45-50
180-200 50-55
Joint of
Meat
1,5 3
170-190 35-40
Casserole
dish
160-180 30-35
170-190 30-35
Salted Pork
Loin
1 3
170-190 40-45
Tray
160-180 30-35
170-190 30-35
Chicken 1,5 3
190-210 50-55
Tray
170-190 45-50
Roast-beef 1 3
190-210 35-40
Tray
170-190 30-35
180-200 35-40
Fillet Steak
Pastry
1 3
180-200 35-40
Tray
160-180 30-35

16
ENGLISH
Electric oven
TECHNICAL PASSPORT
COOKING TABLES
CAKES AND
DESSERTS
Weight
Tray
Position
Cooking
Temperat.,
°С
Time, m Receptacle
Sponge
Cake
0,5 2
170-190 35-40
Cake
Mould
160-180 30-35
Swiss Roll 0,3 3
170-190 10-15
Tray
160-180 10-15
Flan 0,5
1 160-170 60-65
Bread
Mould
2 160-170 55-60
Biscuits 0,5 3
160-180 20-25
Tray
150-170 15-20
Vol-au-
vents
0,25 2
170-190 15-20
Tray
170-180 15-20
Cup Cakes 0,5 3
160-180 25-30
Tray
150-170 25-30
Baked
Apples
1 3
180-200 35-40
Tray
170-190 30-35
Baked
bananas
0,5 3
170-190 15-20
Casserole
dish
170-190 10-15
Puff-pastry
biscuits
0,25 2
180-200 20-25
Tray
170-190 20-25
Plum-Cake 0,5 2
170-190 60-65
Cake
Mould
160-180 50-55
Apple Pie 1 2
170-190 50-55
Tray
160-180 45-50
Cheesecake 1 2
180-200 45-50
Cheescake
Mould
170-190 35-40

17
ENGLISH
Electric oven
TECHNICAL PASSPORT
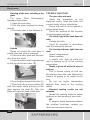
CLEANING AND MAINTENANCE
Caution
Before carrying out any work, the
appliance must be disconnected from
the mains electricity supply.
Cleaning the Inside of the
Oven
 The inside of the oven should
be cleaned to remove food and grease
deposits, which can give off smoke or
odours and cause stains to appear.
 With the oven cold and for
enamelled surfaces (e.g. the oor of
the oven) use a nylon brushe or sponge
with warm soapy water. If using special
oven cleaning products, use only on
enamelled surfaces and follow the
manufacturer’s instructions.
Caution
Do not clean the inside of your oven with
a steam or pressurised water jet. Do not
use either metallic scouring pads or any
material that could scratch the enamel.
 Most models have a catalytic
cleaning system (self-cleaning). This
system eliminates small grease residues
during cooking at high temperatures.
 If grease residues remain after
cooking, these can be eliminated by
operating the oven empty at 200°C for
one hour.
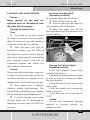
Use of the Fold-down Grill
(Depending on Model)
To clean the upper part of the oven,
 Wait until the oven is cold.
 Turn the screw (A) and lower the
grill element as far as possible.
 Clean the upper part of the
oven and return the grill element to its
original position.
Cleaning the Catalytic Panels
Depending on Model
If any food deposits remain after
normal cleaning then:
1 Remove the panels and leave them
to soak as long as necessary to soften
the food deposits.
2 Wipe the panels with a sponge and
clean water.
3 Dry the panels and re-assemble
them in the oven.
4 Turn the oven on for one hour at
200°C.
Caution
Do not use commercial cleaning
products or abrasive powders on
catalytic panels.

18
ENGLISH
Electric oven
TECHNICAL PASSPORT
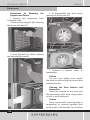
Instructions for Removing the
Supports and Panels.
1 Remove the accessories from
inside the oven.
2 Ease out the supports (B), releasing
them from the bolt (C)
3 Undo the bolt (C), which releases
the at catalytic panels.
4 To disassemble the back panel,
remove the Flat screw (D).
5 Proceed in reverse order to
reassemble.
Caution
For your own safety, never switch
the oven on without the back panel that
protects the fan.
Cleaning the Oven Exterior and
Accessories
Clean the outside of the oven and
the accessories with warm soapy water
or with a mild detergent.
Caution
Never use metallic scouring pads or
commercial or scouring powders that
could scratch the enamel. For stainless

19
ENGLISH
Electric oven
TECHNICAL PASSPORT
steel surfaces, proceed with care and
only use sponges or cloths that cannot
scratch them. To clean the outside of
the oven do not attempt to remove the
controls, as for this, the oven has to be
rst removed from the kitchen unit.
Changing the Oven Bulb
Caution
To change the bulb, rst ensure
that the oven is disconnected from
the power supply.
 Unscrew the lens from the lamp
holder.
 Exchange the bulb and replace
the lens.
The replacement bulb must be
temperature resistant to 300°C. These
can be ordered from the Technical
Service Department.
Cleaning the Oven Door
Depending on the oven model, you
can remove the door to simplify its
cleaning. To do so:
1 Open the door fully.
2 Completely turn the two clips or
insert small pins into the holes (E)
3 Close the door until it inserts into
the two clips.
Take hold of the door on both sides.
Pull the oven door forward until it is
totally free from the hinges (F).
To re-assemble the door, proceed in
reverse order.
4 For hinges with clips;
Open the clips as wide as possible by
means of a screwdriver, when the oven
is open.
Hold the clips aside in your hand and
remove the hinges (F) from their seats,
as the mechanism is opened partially.
Follow the reverse row to install the
cover.

20
ENGLISH
Electric oven
TECHNICAL PASSPORT
Cleaning of the door including a big
glass
The Inner Glass Disassembly/
Assembly Instructions
1. Open the oven door.
2. Pull the glass, holding the lower
part (A).
3. The inner glass is free. Remove it.
Caution
Please be careful the oven door is
closed when the glass is removed.
4. Clean the inner glass and the oven
door from the inside.
5. Insert the glass into the guideways
on the top of the oven door. (B).
6. Turn the glass towards the door (С).
7. Press both of the inner holders (D)
with two hands while pushing on the
glass towards the door (Е). Thus, the
glass will again be xed in the door.
TROUBLE SHOOTING
The oven does not work
Check the connection to the
electrical circuit. Check the fuses and
current limiter of your installation.
Ensure the clock is in the manual or
programmed mode.
Check the position of the function
and temperature selectors
The inside light of the oven does not
work
Change the bulb.
Check its assembly in accordance
with the instruction manual.
The heating indicator light does not
work
Select a temperature.
Select a setting.
It should only light up while the
oven is heating up to its set working
temperature.
Smoke is given off while the oven is
working
This is normal during its rst use.
Periodically clean the oven. Reduce the
amount of grease or oil added to the
tray.
Do not use higher temperature
settings than those in the cooking
tables.
Expected cooking results are not
achieved
Review the cooking tables to obtain
guidance on the working of your oven.
NB
If, despite these recommendations,
the problem continues, contact our
Technical Assistance Service.
Страница загружается ...
Страница загружается ...
Страница загружается ...
Страница загружается ...
Страница загружается ...
Страница загружается ...
Страница загружается ...
Страница загружается ...
Страница загружается ...
Страница загружается ...
Страница загружается ...
Страница загружается ...
Страница загружается ...
Страница загружается ...
Страница загружается ...
Страница загружается ...
Страница загружается ...
Страница загружается ...
Страница загружается ...
Страница загружается ...
Страница загружается ...
Страница загружается ...
Страница загружается ...
Страница загружается ...
Страница загружается ...
Страница загружается ...
Страница загружается ...
Страница загружается ...
Страница загружается ...
Страница загружается ...
Страница загружается ...
Страница загружается ...
Страница загружается ...
Страница загружается ...
Страница загружается ...
Страница загружается ...
-
 1
1
-
 2
2
-
 3
3
-
 4
4
-
 5
5
-
 6
6
-
 7
7
-
 8
8
-
 9
9
-
 10
10
-
 11
11
-
 12
12
-
 13
13
-
 14
14
-
 15
15
-
 16
16
-
 17
17
-
 18
18
-
 19
19
-
 20
20
-
 21
21
-
 22
22
-
 23
23
-
 24
24
-
 25
25
-
 26
26
-
 27
27
-
 28
28
-
 29
29
-
 30
30
-
 31
31
-
 32
32
-
 33
33
-
 34
34
-
 35
35
-
 36
36
-
 37
37
-
 38
38
-
 39
39
-
 40
40
-
 41
41
-
 42
42
-
 43
43
-
 44
44
-
 45
45
-
 46
46
-
 47
47
-
 48
48
-
 49
49
-
 50
50
-
 51
51
-
 52
52
-
 53
53
-
 54
54
-
 55
55
-
 56
56


Kuppersberg SB 691 W Руководство пользователя
- Категория
- Печи
- Тип
- Руководство пользователя
Задайте вопрос, и я найду ответ в документе
Поиск информации в документе стал проще с помощью ИИ
на других языках
- English: Kuppersberg SB 691 W User manual