Kuppersberg FA6VS01 Руководство пользователя
- Категория
- Кухонные плиты (варочные панели)
- Тип
- Руководство пользователя

TECHNICAL PASSPORT
ПАСПОРТ ТЕХНИЧЕСКОГО ИЗДЕЛИЯ
FA6VS01
FA6VS02
ELECTRIC COOKING SURFACES
ЭЛЕКТРИЧЕСКИЕ ВАРОЧНЫЕ ПОВЕРХНОСТИ

2
TECHNICAL PASSPORT ENGLISH
Electric Hob
DEAR USER,
We are sincerely grateful to you for purchasing one of our products.
We are sure that this modern, functional and easy to use appliance, manufactured
with the top-quality materials and components will satisfy all your needs.
We ask you to read carefully the instructions of this manual.
The appliance must be installed only by a quali ed electrician in compliance
with the instructions provided. The manufacturer declines all responsability for
improper installation.
The manufacturer is not responsible for any transcription errors or misprints
contained in this handbook and, furthermore, reserves the right to make any
modi cation on the products, which might be deemed necessary or usefull, this
being in the user’s interest, without altering their basic operating or safety features.

3
ENGLISH TECHNICAL PASSPORT
Electric Hob
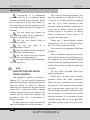
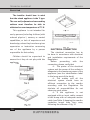
DESCRIPTION OF THE HOB
FA6VS01
FA6VS02
FA6VS***
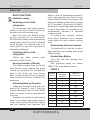
Guide to Using the
Instructions Booklet
You should keep the Guarantee
Certi cate or, where relevant, the
technical datasheet, together with the
Instruction Manual for the duration
of the useful life of the appliance. It
has important technical information
about the appliance.
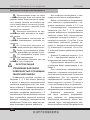
Safety instructions
Before rst use, you should carefully
read the installation and connection
instructions.
These hob models may be installed
in the same kitchen furniture units as
company brand ovens. For your safety,
installation should be carried out by
an authorised technician and should
comply with existing installation
standards. Likewise, any internal work
on the hob should only be done by
company technical staff, including the
change of the exible supply cable of
the appliance.
Safety warnings:
If the ceramic glass breaksor
cracks, immediately unplug the
appliance to avoid electric shocks.
This appliance is not designed to
work with an external timer (not built
into the appliance) or a separate remote
control system.
Do not steam clean this
appliance.
The appliance and its accessible
parts may heat up during operation.
Avoid touchingtheheating elements.
Children younger than 8 years old must
stay away from the appliance unless
they are permanently supervised.
Children who are 8 years
old or older, people with impaired
physical, sensory or mental abilities,
or those who are lack of experience
and knowledge may use this appliance.
ONLY whentheyare supervised or if they
have beengivenadequate instruction
on the use of the appliance and
understand thedangersitsuse involves.
User cleaning and maintenance may not
be done by unsupervised children.
Children must not play with the
appliance.

4
TECHNICAL PASSPORT ENGLISH
Electric Hob
Precaution. It is dangerous
to cook with fat or oil without being
present, as these may catch re. Never
try to extinguish a re with water! In
this case disconnect the appliance and
cover the ames with a lid, a plate or a
blanket.
Do not store any object on
the cooking areas of the appliance .
Preventa possible re hazard.
Do not use plastic pots or
alliminium sheets
Do not use hob as a
supplamentary surface
Dry the bottom of the pot before
put in on the cooking zones
Do not scrape the pot against
the glass to avoid damaging it
Use pots with the same diameter
of cooking zones
USE
COOKTOP CONTROLLED BY
TOUCH CONTROL
The graphical display is shown in
gures 1,2,3 . As you see, the diameters
and thus the powers of heating elements
vary as shown in Table 1. Heating
elements are controlled by this control
unit with 9 positions. When supply
voltage is applied the hob control unit
carries out an automatic calibrat ion
procedure. The hob is thereafter in
stand-by mode.
All the heat zones are switched off
and t he display are not illum inated.
The desired heating element can
now be selected by using the 4,5,6 or
7 sensors for related heating elements
(see g. 1,2,3). Heat settings of the
selected heating element adjusted by
using the (-) sensor which is shown
as»3»in Figure 1 to reduce, (+) sensor
which is shown as «2»in F igure 1 to
increase the heat level.
There are 9 heat setting modes
starting from 1 to 9. «1» is the minimum
and «9» is the maximum mode.
You can see the suggested cookings
in Table 2.
When a heating element has been
switch off by means of on/off sensor, an
«H» appears on the illustrated display
to show that the heating element is still
hot for 30 minutes in order to avoid any
accident.
For the hobs included dual zone
heating elements.
Outer part of dual zone heating
element could not work separately.
There are two possibility, one is using
inner part of the heating and the other
one is using both. Inner part of it can
be activated by pushing related control
unit however to activate the whole
heating element, it is needed to push
related control unit for inner part rst
and then related control unit of outer
part.

5
ENGLISH TECHNICAL PASSPORT
Electric Hob
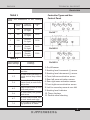
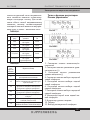
Power and dimensions of the cooking
zones
Diameter
(mm)
Heating
elements
Power
W
1 140
Radiant
"Hi-light"
1200
2 180
Radiant
"Hi-light"
1800
3 210
Radiant
"Hi-light"
2100
4 270/210
Radiant
Double
"Hi-light"
2400
5 210/175
Radiant
Double
"Hi-light"
2000
TABLE 2
TABLE 1
Touch control
Heat settings
Possible
cookings
1
To melt butter, chocolate
and else.
1-3
To heat small quantities of
liquid and to keep dishes
warm.
3-4
To heat foods. Thaw deep-
frozen foods, to cook fruits
and pulses.
4-5
Deep-frozen foods, to cook
fruits and pulses.
5-6
To cook meat, sh, pulses
with sauce.
6-7
To cook roast of meat, sh;
to cook steaks and eggs.
7-9
To fry with oil and to heat
big quantities of water.
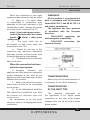
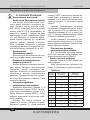
Controller Types and Use
Control Panel
FA6VS***
FA6VS02
FA6VS01
1. On/off sensor
2. Heating level increment (+) sensor
3. Heating level decrement (-) sensor
4. Front left zone activation sensor
5. Rear left zone activation sensor
6. Rear right zone activation sensor
7. Front right zone activation sensor
8. Led for secondary zone at rear left
9. Heating level indicator
10. Timer displays
11. Double zone selecting

6
TECHNICAL PASSPORT ENGLISH
Electric Hob
BASIC FUNCTIONS
Children’s safety
Switching on the child
safety locks
To activate the child safety feature;
switch on the Touch Control. Press and
hold the front left cooking zone.
After this press the MINUS button
(3) for 2 seconds. An «L» standing for
LOCKED (child safety feature preventing
unintended switch on) will be indicated
on all displays. If a cooking zone is in
«hot» mode, «L» and «H» is going to be
alternately displayed.
Switching off the child
safety locks
Follow the same process with
activation off child lock.
Heat-up Function (A Mode)
This feature enables you to set the
start time for rapid cooking. The touch
control pre-programs the selected hot
plate to full power you have chosen
after a certain length of time. Length of
time as second is shown in Table 3 for
each zone.
Activating Heat-up Function
Select the heating Level 9 and then
press PLUS button. A and 9 ash on
display alternately. Now use the MINUS
button to select constant cooking level
you want.
Example: You want to cook at heating
Level 6 and begin with rapid heating.
Select Level 9, press PLUS button again
and the heating level indicator will
ash on and off, alternating between 9
and A, then decrease it to Level 6 using
sensor MINUS button. The system will
keep the hotplate at Level 9 (full power)
for 2,5 minutes ( 150 seconds in Table3),
ashing on and off alternately between
6 and A, then (after 2,5 minutes) it will
automatically decrease to constant
cooking level 6.
To change the constant cooking
level, While ashing A and constant
Level, Select the new constant cooking
level.
Deactivating Heat-up Function
To deactivate the heat up function,
after selecting the heating zone press
MINUS button.
Double Zone Button
Press the left rear heating zone
button twice.
Max operating times are shown
TABLE 3 for every heating levels.
Heating
level
Max.
operating
time (h)
Heat up
function (sec)
0 0 0
U 2 0
1 6 60
2 6 180
3 5 288
4 5 390
5 4 510
6 1,5 150
7 1,5 210
8 1,5 270
9 1,5 15
TABLE 3

7
ENGLISH TECHNICAL PASSPORT
Electric Hob
Keep Warm Function – U Mode
Keep warm function is located
between level 0 and level 1. It is Shown
by «U». To enable this function, set the
heating level to 1 and press MINUS
button.
Fast Switch Off
The cooking zone button and
«MINUS» button are pressed at the
same time.
Timer Function With Switch Off
Activate the cooking zone that you
want to set time. Press «+» and «-»
buttons at the same time. «00» will
appear on the timer display. Time (in
minutes) is adjusted by pressing «+»
button to increase or «-» button to
decrease. To cancel the timer, select
related cooking zone and activating the
timer by pressing «+» and «-» buttons of
the same time. Later press and hold the
«-» button untill you see the «00» on
timer displays.
Timer function without
switch off
After switching on the touch control,
before selecting any cooking zone, press
«+» and «-» buttons at the same time.
«00» will ash on timer displays. Adjust
the timer (in minutes) by pressing «+»
or «-» buttons. When the countdown
reaches «00», you will the hear the
alarm. None of the heating elements
are switched off.
FA6VS01 - FA6VS02- FA6VS***
Fast Switch off Function
When cooking zone is active, ‘’+’’ and
‘’-’’ buttons are pressed at the same time.
Cooking zone heating level is going to
be ‘’0’’
Child Lock
To activate the child lock, pres the ‘’-’’
and front left cooking zone buttons at
the same time. After beep sound press
the front left cooking zone button, ‘’L’’ is
shown all displays.
To cancel the this function, press the
‘’-’’ and front left cooking zone button. So,
You temprorarily disabled the child lock.
This means when the hob re opened,
the child lock is re activated.
To cancel this function permanently,
press ‘’-’’ and front left cooking zone
button. After beep sound press the
MINUS button again. TC switch off
automatically. When the hob is re
pened,.the child lock is inactive.
Double zone selecting
(only for FA6VS02- FA6VS***)
After adjusting the heating element
to desire cooking level, press the double
zone button to activate or de activate.
Max operating times are shown
TABLE 4 for every heating levels.

8
TECHNICAL PASSPORT ENGLISH
Electric Hob
Power
level
Max. operating time (h)
0 0
1 6
2 6
3 5
4 5
5 4
6 1.5
7 1,5
8 1,5
9 1.5
TABLE 4
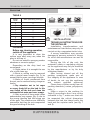
CLEANING
Before any cleaning operation,
switch off the appliance.
It is very important to clean the
surface soon after every use, when the
glass is still tep id.
Do not use metallic sponges, powder
abrasives or corrosive sprays.
Depending on the dirty level we
recommend:
Slight stains: it is enought the use
of a m oist clean rag.
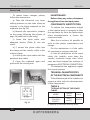
Burnt or soiling may be removed
with a special razor scraper ( g. 5); be
aware that the razor can cause wounds.
Marks of liquid, over owed from
the pot, can be removed using vinegar or
lemon.
Pay attention not to let sugar
or sugary foods fall on the hob. In this
case switch off the hob and clean the
surfacewith hot water and razor scraper.
After a period of time, metal re ex
andscratches may appear { g. 6) due to
the wrong cleaning and the wrong use
of the pots. The scratches are dif cultly
removable, but they do not compromise
the good working of the hob.
INSTALLATION
TECHNICAL INSTRUCTIONS FOR
THE INSTALLER
Installation, transformations and
maintenances listed below, may only be
carried out by a competent techn ician.
A wrong installation may provoke
damages to persons, animals or things,
for which the manufacturer can not be
responsible.
During the life of the unit, the
automatic safety or regulating devices
on the appliance may only be modi ed
by the manufacturer or by his duly
authorized dealer.
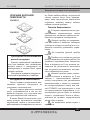
After having cleared out all the
packing components, make sure of
the integrity of the appliance. In case
of doubt, do not use the appliance
and contact quali ed personnel.
Please keep children away from all
packing elements ( carton, polystyrene,
nails,..).
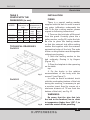
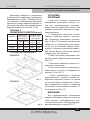
Make a cutout in the worktop (in
Table 5), according to the d i m e n sions
indicated in g. 7; make sure that will
be respected the critical dimensions
between the hob, the lateral walls, the
back and the superior walls (see g. 7
and 8).

9
ENGLISH TECHNICAL PASSPORT
Electric Hob
TABLE 5
COMPLY WITH THE
DIMENSIONS (in mm)
MODEL
Overall
dimensions of
hob
Cut out
dimensions of
kitchen unit
A in
mm
B in
mm
С in
mm
(±2 )
D in
mm (
±2 )
F6VS01 510 600 490 560
F6VS02 510 600 490 560
F6VS*** 510 600 490 560
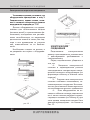
INSTALLATION
FIXING
There is a special sealing washer
supplied with the hob. In order to avoid
any water inltration underneath the
hob. To x the s ealing washer, please
respect to following instructions:
1. Turnover the hob, take off the seal
from the guard. Correctly place the s
ealing washer «e»(g 10) under the hob.
Be sure to place the sealing washer
so that the external side ofthe sealing
washer ts together with the external
perimetrical edge of the hob. The ends
of the s e aling washer must t together
without overla pping.
2. Stick the sealing washer to the
hob uniformly. Presing it by ngers.
(Figure 10)
3. Place the hotplate in the openning
on the table
top.
4. Fix the hooks in the relative
accomodations of the body with the
screws F. (see Figure 9)
In order to avoid accidental touch
with the overheating bottom of the hob
during the working, is necessary to put
a wooden insert, xed by screws, at a
minimum distance of 70 mm from the
bottom of the hob ( see Fig. 12
WARNINGS:
Be aware that the glue that join
the hob to the furniture, has to resist
to temperature higher than 150° C, to
avoid the unstuck of the panelling.
TECHNICAL DRAWINGS
Fig. 7
Fig. 8
FA6VS01
FA6VS02

10
TECHNICAL PASSPORT ENGLISH
Electric Hob
The installer should bear in mind
that the mixed appliance is the Y type.
The rear wall, adjacent and surrounding
surfaces must therefore be able to
withstand an over temperature of 75 K.
This appliance is not intended for
use by persons (including children) with
reduced physica l, sensory or mental
capabilities, or lack of experience and
knowledge, unless they have been given
supervision or instruction concerning
use of the appliance by a person
responsible for their safety.
Children should be supervised to
ensure tha t they do not play with the
appliance.
appliance.
ELECTRICAL CONNECTION
The electrical connection has to
be done in accordance with electrical
and installation requirements of the
Regulation.
Before proceeding with the
connection, please, verify that
The power of the electrical
system and the power of the outlets is
adequate to the maximum power of the
appliance (see the identi cation label
in the lower part of the body).
The outlets and all the
electrical system should have an
ef cient connection to the «earth»
according with the Regulation. We
disclaim all responsibilities for not
observing such points.
If the appliance is not
equipped with an input cable, connect
to the dump with an adequate section
cable (see Table 6) keeping the «earth»
conductor longer than ‘live» ones,
following the scheme o f g. 13

11
ENGLISH TECHNICAL PASSPORT
Electric Hob
When the connection to the input
system has been done through an outlet
Apply to t he input cable,
rf unprovided, a normalized plug
adequate to the load indicated in the
identi cation label. Connect the cables
according to the scheme of Fig. 13.
Letter L (live)=cable brown colour;
Letter N (Neutral)=cable blue colour,
Symbol
(Earth) = cable green
-yellow colour.
The input cable has to
be located so that never reach the
temperature over 75 K.
Please do not use in the
connection any reduction, adaptation
that may provoke a false contact with
following dangerous overheatings.
The outlet must be accessible
after the built-in.
When the connection has been
done the input system:
Interpose between the
appliance and the system an omnipolar
switch, adequate to the load of the
appliance, with a minimum gap of 3mm
between the contacts.
Keep in mind that the «earth»
cable does not have to be interrupted
by the switch.
In an alternative solution
the electrical connection can also
be
protected by a differential switch with
high sensitivity.
We recommend to x the earth
coloured cable to an appropriate earth
installation.
WARNINGS:
All our products a re projected and
built in accordance with the European
Norms EN 60 335-1 and EN 60 335-2-6
and relative amendments.
The appliance has been produced
in accordance with the European
Directives:
- 2004/108/EC concerning the
electromagnetic compatibility.
- 2006/95/EC concerning the
electrical security.
TRANSFORMATIONS
Before any kind of transformation, it
is necessary to cut off the electricity.
TRANSFORMATION
OF THE INPUT TYPE
The standard equipment of
the appliances is for single phase
connection. In any case, under proper
changes, they can be fed with a three
phase system.

12
TECHNICAL PASSPORT ENGLISH
Electric Hob
To obtain these changes, please,
follow the instructions:
a) Take the therminal box cover
making pressure on the sides clamp as
indicate in the gure stamped on the
cupboard (see g. 14).
b) Remove the connection jumpers
on the clamp following the scheme of
page 16 (attached on the body).
c) Insert the input cable with
adequate section (Table 6) into the
chock.
d) C onnect the phase cable into
the clamp and the «earth» cable in the
relative clamp.
e) H old up the input cable with the
pertinent stop cable.
f) Close the cupboard again and
press until the closing turn.
MAINTENANCE
Before doing any action, disconnect
the appliance from the input power.
COMPONENTS SUBSTITUTION
To replace the components lodged
in the internal part, is necessary to take
the appliance up from the fauwrnaiytu
trhee, obvoettrotumrn. it, loosen the
screws and take
After the se actions, it’s possible to
work on the plates, commutators and
clamps.
For the maintenanc e of the cable
it’s necessary to overturn the hob.
In case of substitution of the input
cable, the installer must keep the
«earth» conductor longer than «live»
ones, and must respect the cautions in
paragraph «ELECTRICAL CONNECTION».
To reassemble the appliance repeat
the inverse process.
TECHNICAL CHARACTERISTICS
OF THE ELECTRICAL COMPONENTS
To facilitate the job of the installer we
present a table with the characteristics
of the components.
TABLE 6
TYPE AND SECTION OF THE POWER
CABLES
MODEL
Single
Phase
Cable
FA6VS01
- FA6VS02 -
FA6VS***
3X2.5
mm
2(*)
H05SS-F
(*) keeping in mind the diversity factor

13
ENGLISH TECHNICAL PASSPORT
Electric Hob
TECHNICAL ASSISTANCE
AND SPARE PARTS
This appliance, before leaving the
factory, has been carefully tested and
regulated by expert and specialized
personnel in order to guarantee the
best performances.
Any repairs or adjustments which
may be subsequently required may
only be carried out by qualified
personnel with the utmost care and
attention.
For this reason, always contact
your Dealer or your nearest After
Sales Centre whenever repairs or
adjustments are required, specifying
the type of fault and the model of
appliance in your possession.
Please also note that genuine
spare parts are only available from
our After Sales Service Centres and
authorized retail o utlets.
The above data are printed on the
data label, put on the inferior part
of the appliance and on the packing
label.
The above informations give to the
technical assistant the possibility to
get fit spare parts and a intervention.
We suggest to fill the table below.

14
ПАСПОРТ ТЕХНИЧЕСКОГО ИЗДЕЛИЯ РУССКИЙ
Электрическая варочная поверхность
Мы искренне благодарим Вас за приобретение нашей продукции.
Мы уверены, что Вы будете удовлетворены современной конструкцией, вы-
полненной из лучших материалов и компонентов, а также функциональностью и
удобством эксплуатации.
Просим Вас внимательно ознакомиться с инструкциями, приведенными в
этом руководстве.
Оборудование должно устанавливаться только квалифицированным элек-
триком в соответствии с представленными инструкциями. Изготовитель не не-
сет никакой ответственности за любые последствия неправильно проведенной
установки.
Изготовитель не несет ответственность за какие-либо ошибки или опечатки,
допущенные в тексте данного руководства. Кроме того, изготовитель оставля-
ет за собой право на внесение необходимых или полезных для пользователя
изменений в продукцию, которые не затрагивают основных эксплуатационных
характеристик и уровня безопасности оборудования.

15
РУССКИЙ ПАСПОРТ ТЕХНИЧЕСКОГО ИЗДЕЛИЯ
Электрическая варочная поверхность
FA6VS01
FA6VS02
FA6VS***
Храните гарантийный сертификат
или, при наличии, лист технических
данных вместе с инструкцией по
эксплуатации в течение всего срока
службы прибора.
Инструкция содержит важную тех-
ническую информацию о приборе.
Перед первым применением вни-
мательно прочтите инструкции по
установке и подключению.
Данные модели варочных панелей
могут устанавливаться в тех же ме-
бельных модулях, что и духовые шка-
фы производства этой компании.
В целях Вашей безопасности уста-
новку должен производить квалифи-
цированный техник в соответствии с
действующими стандартами по монта-
жу. Также любые работы с внутренней
частью панели могут быть произве-
дены лишь техническим персоналом
компании, включая замену гибкого
кабеля питания прибора.
В случае повреждения или рас-
трескивания керамического стекла
немедленно отключите прибор во из-
бежание поражения электротоком.
Данный прибор не предназна-
чен для работы с внешним таймером
(таймер не встроен в прибор) или с от-
дельной системой удаленного управ-
ления.
Не очищайте данный прибор
паром.
Прибор и его открытые участки
могут нагреваться во время работы. Не
касайтесь нагревательных элементов.
Дети в возрасте до 8 лет должны на-
ходиться на достаточном расстоянии
при отсутствии возможности постоян-
ного наблюдения за ними.
Данный прибор может исполь-
зоваться детьми в возрасте от 8 лет,
лицами с ограниченными физиче-
скими, сенсорными или умственными
возможностями, а также не имеющи-
ми соответствующего опыта или зна-
ний, ТОЛЬКО под присмотром, и если
им предоставлена информация о су-
ществующих рисках. Дети не должны
играть с устройством. Чистка и обслу-
живание не должны осуществляться
детьми без надзора.
Не позволяйте детям играть с
прибором.

16
ПАСПОРТ ТЕХНИЧЕСКОГО ИЗДЕЛИЯ РУССКИЙ
Электрическая варочная поверхность
Приготовление пищи на плите
с использованием жира или масла без
надзора может быть опасным и приве-
сти к пожару. Никогда не пытайтесь по-
гасить пламя водой, отключите устрой-
ство от сети питания и накройте огонь
крышкой или одеялом.
Опасность возгорания: не хра-
ните какие-либо предметы на вароч-
ной панели.
Использовать пластиковую по-
суду или алюминиевые противни за-
прещено.
Не используйте варочную па-
нель как дополнительную поверхность.
Перед использованием убеди-
тесь, что дно выбранной посуды сухое.
Не поцарапайте стекло дном
посуды при перемещении.
Используйте кастрюли того же
диаметра, что и конфорка.
Графический дисплей показан на
Рисунках 1, 2, 3. Как видно, диаметр,
а значит и мощность нагревательных
элементов варьируются так, как пока-
зано в таблице 1. Управление нагрева-
тельными элементами производится с
помощью элементов управления с 9
положениями. При включении питания
блок управления варочной панелью
проводит процедуру автоматической
калибровки. После этого варочная па-
нель переходит в режим ожидания.
Все конфорки отключаются, и зна-
чения на дисплее не отображаются.
Выбор необходимого нагреватель-
ного элемента осуществляется с по-
мощью сенсорных кнопок 4, 5, 6 или
7 соответствующих нагревательных
элементов (см. Рис. 1, 2, 3). Уровень
нагрева выбранного нагревательного
элемента может быть отрегулирован
с помощью сенсорной кнопки (- ), по-
казанной в позиции «3» на Рис. 1, если
необходимо уменьшить уровень на-
грева, и с помощью сенсорной кнопки
(+), показанной в позиции «2» на Рис.
1, если необходимо увеличить уровень
нагрева.
Имеется 9 режимов нагрева, с 1 по
9. «1» — минимальный режим, и «9» —
максимальный режим нагрева.
Предлагаемая мощность для при-
готовления блюд представлена в та-
блице 2.
При отключении нагревательного
элемента с помощью сенсорной кноп-
ки включения/отключения на дисплее
отображается «H», что означает, что
нагревательный элемент будет оста-
ваться горячим в течение 30 минут, и
с ним необходимо быть осторожным.
Для варочных панелей с двойными
нагревательными элементами
Отдельное включение внеш-
ней части двойного нагреватель-
ного элемента не предусмотрено.
Допускается включение только вну-
тренней части нагревательного эле-
мента или обеих частей. Для включения

17
РУССКИЙ ПАСПОРТ ТЕХНИЧЕСКОГО ИЗДЕЛИЯ
Электрическая варочная поверхность
только внутренней части нагреватель-
ного элемента нажмите соответству-
ющую сенсорную кнопку. Для вклю-
чения обеих частей нагревательного
элемента сначала соответствующей
сенсорной кнопкой включите внутрен-
нюю часть, а затем – внешнюю часть.
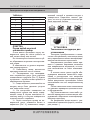
Мощность и размеры конфорок
Диаметр
(мм)
Нагревательный
элемент
Мощность
Вт
1 140
Светится
«Hi-light»
1200
2 180
Светится
«Hi-light»
1800
3 210
Светится
«Hi-light»
2100
4 270/210
Светится
«Hi-light»
с расширением
2400
5 210/175
Светится
«Hi-light»
с расширением
2000
Режим
сен-
сорной
панели
Варианты блюд
1
Растапливание сливочного масла,
растапливание шоколада.
1-3
Нагрев небольших количеств жид-
кости, поддержание температуры
горячих блюд.
3-4
Нагрев пищи. Приготовление
фруктов и бобовых. Разморозка
продуктов глубокой заморозки.
4-5
Варка овощей, бобов. Разморозка
продуктов глубокой заморозки.
5-6
Приготовление мяса, рыбы, бобов
в соусе..
6-7
Приготовление жаркого, рыбы,
стейков, блюд из яиц.
7-9
Жарка во фритюре, доведение до
кипения большого количества воды.
FA6VS***
FA6VS02
FA6VS01
1. Сенсорная кнопка включения/от-
ключения
2. Сенсорная кнопка увеличения уров-
ня мощности (+)
3. Сенсорная кнопка уменьшения
уровня мощности (-)
4. Сенсорная кнопка выбора передней
левой конфорки
5. Сенсорная кнопка выбора задней
левой конфорки
6. Сенсорная кнопка выбора задней
правой конфорки
7. Сенсорная кнопка выбора передней
правой конфорки
8. Индикатор второй зоны задней ле-
вой конфорки
9. Индикатор уровня нагрева
10. Таймер
11. Выбор расширенной конфорки

18
ПАСПОРТ ТЕХНИЧЕСКОГО ИЗДЕЛИЯ РУССКИЙ
Электрическая варочная поверхность
Для запуска функции защиты от до-
ступа детей включите сенсорную па-
нель, нажмите кнопку выбора перед-
ней левой конфорки, затем нажмите
кнопку МИНУС (3), и удерживайте ее
нажатой в течение 2 секунд. На всех
индикаторах будет отображена буква
«L», что означает, что функция блоки-
ровки кнопок (защиты от случайного
нажатия кнопок детьми) включена.
Если конфорка находится в режиме
нагрева, на дисплее попеременно бу-
дут отображаться символы «L» и «H».
Выполните те же действия для сня-
тия блокировки панели управления.
Данная функция позволяет вам за-
дать время быстрого приготовления.
Сенсорная панель прогревает вы-
бранную конфорку на максимальной
мощности в течение определенного
времени. Продолжительность време-
ни в секундах указана в таблице 3 для
каждой конфорки.
Выберите мощность нагрева 9, а
затем нажмите кнопку ПЛЮС. На дис-
плее будут попеременно мигать А и 9.
Затем нажмите кнопку МИНУС, чтобы
выбрать желаемую постоянную мощ-
ность нагрева.
Пример: Вы хотите готовить на
уровне 6, и начать с быстрого нагрева.
Выберите уровень 9, снова нажмите
кнопку ПЛЮС, и индикатор уровня на-
грева будет попеременно мигать, по-
казывая 9 и А, затем уменьшите мощ-
ность до уровня 9 с помощью кнопки
МИНУС.
Система поддерживает конфорку
на уровне 9 (полная мощность) в тече-
ние 2,5 минут (150 с в таблице 3), по-
переменно выводя 6 и А, а затем (че-
рез 2,5 минуты) автоматически снизит
мощность нагрева до уровня 6.
Чтобы изменить постоянный уро-
вень нагрева, когда мигает А и посто-
янный уровень выберите новый посто-
янный уровень нагрева.
Для отключения функции автома-
тического нагрева после выбора кон-
форки нажмите кнопку МИНУС.
Дважды нажмите кнопку левой зад-
ней конфорки.
Макс. время работы показано в та-
блице 3 для каждого уровня нагрева.
Уровень
нагрева
Макс. время
работы(ч)
Функция
нагрева(с)
0 0 0
U 2 0
1 6 60
2 6 180
3 5 288
4 5 390
5 4 510
6 1,5 150
7 1,5 210
8 1,5 270
9 1,5 15

19
РУССКИЙ ПАСПОРТ ТЕХНИЧЕСКОГО ИЗДЕЛИЯ
Электрическая варочная поверхность
Функция поддержания темпера-
туры находится между уровнем 0 и
уровнем 1. Обозначена символом «U».
Для активации этой функции выбери-
те уровень нагрева 1 и нажмите кноп-
ку МИНУС.
Одновременно нажмите кнопку
конфорки и кнопку МИНУС.
Активируйте конфорку, для кото-
рой вы хотите задать время. Одновре-
менно нажмите кнопки «+» и «-». На
дисплее таймера появится «00». Для
выставления времени (в минутах) на-
жмите кнопку «+» для увеличения и
«-» для уменьшения. Чтобы отменить
таймер, выберите соответствующую
конфорку и активируйте таймер одно-
временным нажатием «+» и «-». Затем
нажмите и удерживайте кнопку «-»,
пока на дисплее таймера не отобра-
зится «00».
Включив сенсорную панель, пре-
жде чем выбрать конфорку, нажмите
одновременно клавиши «+» и «-». На
дисплее таймера начнет мигать зна-
чение «00». Выставьте время (в мину-
тах) кнопками «+» или «-». Как только
таймер достигнет «00», раздастся зву-
ковой сигнал. Ни один из нагреватель-
ных элементов не будет отключен.
FA6VS01 - FA6VS02- FA6VS***
Когда конфорка активирована,
одновременно нажмите кнопки «+» и
«-». Уровень нагрева конфорки пере-
ключится на «0».
Для активации блокировки одно-
временно нажмите кнопку «-» и кноп-
ку передней левой конфорки. Как
только прозвучит сигнал, нажмите
кнопку передней левой конфорки – на
всех дисплеях появится символ «L».
Для отмены этой функции нажмите
кнопку «-» и кнопку передней левой
конфорки. Блокировка будет времен-
но снята. Это означает, что при повтор-
ном открытии варочной панели бло-
кировка будет снова активирована.
Чтобы полностью отменить эту
функцию, нажмите кнопку «-» и кнопку
передней левой конфорки. Как толь-
ко прозвучит сигнал, снова нажмите
кнопку МИНУС. Блокировка автомати-
чески отключится. При повторном от-
крытии варочной панели блокировка
будет отключена.
FA6VS***)
Установив нагревательный элемент
на нужный уровень нагрева, нажмите
кнопку двойной зоны для активации
или отключения.
Макс. время работы показано в та-
блице 4 для каждого уровня нагрева.

20
ПАСПОРТ ТЕХНИЧЕСКОГО ИЗДЕЛИЯ РУССКИЙ
Электрическая варочная поверхность
рис. 4
рис. 5 рис. 6
Мощность Макс. время работы (ч)
0 0
1 6
2 6
3 5
4 5
5 4
6 1.5
7 1,5
8 1,5
9 1.5
Очень важно проводить чистку по-
верхности сразу же после работы на
ней, когда стекло еще теплое.
Не используйте металлические губ-
ки, абразивные порошки или агрессив-
ные спреи.
В зависимости от уровня загрязне-
ния, рекомендуется:
Небольшие пятна: достаточно
протереть влажной чистой тканью.
Подгоревшие или затвердев-
шие загрязнения могут быть удалены
специальным скребком (Рис. 5); будьте
осторожны – скребок может привести к
образованию царапин.
Следы жидкости, вылившейся из
посуды, могут быть удалены уксусом
или лимонным соком.
Не допускайте попадания на
поверхность сахара или пищи, содер-
жащей сахар. В случае попадания от-
ключите плиту и очистите поверхность
горячей водой и скребком.
Через некоторое время на по-
верхности могут появиться блики и
царапины (Рис. 6), вызванные непра-
вильной чисткой и трением посуды о
поверхность. Царапины сложно уда-
лить, но они не ухудшают качество ра-
боты варочной панели.
Установка, преобразование и техни-
ческое обслуживание, описанные далее,
могут проводиться только квалифициро-
ванным техническим персоналом.
Неправильная установка может при-
вести к травмам персонала, животных
или повреждению имущества, за кото-
рые изготовитель не несет ответствен-
ность.
В течение всего срока службы обо-
рудования внесение каких-либо изме-
нений в конструкцию или настройки
устройств безопасности и средств управ-
ления допускается производить только
изготовителю или его авторизованному
дилеру.
После извлечения всех компонентов
из упаковки проверьте целостность все-
го оборудования.
При возникновении каких-либо со-
мнений прекратите использование обо-
рудования и обратитесь к квалифициро-
ванному персоналу.
Не разрешайте детям играть с упа-
ковочными элементам (картон, полисти-
рол, гвозди...).
Страница загружается ...
Страница загружается ...
Страница загружается ...
Страница загружается ...
Страница загружается ...
Страница загружается ...
Страница загружается ...
Страница загружается ...
-
 1
1
-
 2
2
-
 3
3
-
 4
4
-
 5
5
-
 6
6
-
 7
7
-
 8
8
-
 9
9
-
 10
10
-
 11
11
-
 12
12
-
 13
13
-
 14
14
-
 15
15
-
 16
16
-
 17
17
-
 18
18
-
 19
19
-
 20
20
-
 21
21
-
 22
22
-
 23
23
-
 24
24
-
 25
25
-
 26
26
-
 27
27
-
 28
28


Kuppersberg FA6VS01 Руководство пользователя
- Категория
- Кухонные плиты (варочные панели)
- Тип
- Руководство пользователя
Задайте вопрос, и я найду ответ в документе
Поиск информации в документе стал проще с помощью ИИ
на других языках
- English: Kuppersberg FA6VS01 User manual
Похожие модели бренда
-
Kuppersberg FA6VI01M Руководство пользователя
-
-
-
-
-
-
-