DeLonghi DINAMICA ECAM353.75B Инструкция по применению
- Категория
- Кофеварки
- Тип
- Инструкция по применению
Это руководство также подходит для

NESPRESSO LATTISSIMA TOUCH COFFEE MACHINE, USER MANUAL
*
* Ma machine
My
Machine
UM_LATTISSIMA_TOUCH_Z2A.indb 1 25.04.17 15:45

EN - FR 4-31
DE - IT 32-59
NL - GR 60-87
ES - PT 88-115
PL - RU 116-143
CZ - HU 144-170
SK 171-194
* Ma machine
UM_LATTISSIMA_TOUCH_Z2A.indb 2 25.04.17 15:45

4
3
A
B C
23
26
30
31
29
32
33
22
11 12
10
9
1
2
8
7
5
6
4
3
24
25
23
27
28
26
22
13
15 19
20
21
16
17
18
14
EN
FR
UM_LATTISSIMA_TOUCH_Z2A.indb 3 25.04.17 15:45

/
Touches tactiles de sélection boisson
/
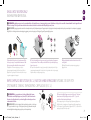
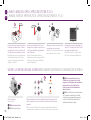
Rapid Cappuccino System (R.C.S.)
/
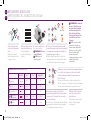
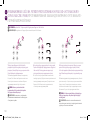
Vue d’ensemble de la machine
Alert/Alerte
/
Machine sans le Rapid Cappuccino System
/
Machine avec le Rapid Cappuccino System
(pour les Cappuccinos)
/
Machine avec le Rapid Cappuccino System
(pour les Latte Macchiato)
/Levier
/Interrupteur général (ON/OFF) /Bouton de déclipage du couvercle
/
“Descaling”
: alerte détartrage
(se réferer au paragraphe “détartrage”)
/Compartiment à capsule
/Lungo 110 ml /Couvercle du réservoir à lait
/Réservoir d’eau (0.9 L)
/Espresso 40 ml /Indicateur de mousse min.
/
“Clean”
: nettoyage du système Cappuccino
(se référer au paragraphe “préparer un Cappuccino”)
/Sortie Café
/Ristretto 25 ml /
Position du bouton de réglage de la mousse de lait
(insérer/sortir)
/Bac à capsules usagées
/Latte Macchiato
/
Bouton de réglage de la mousse de lait
/
Bac d’égouttage (pousser vers l’intérieur pour
les verres à Latte Macchiato)
/Cappuccino
/Mousse de lait chaude
/Grille gauche
/Grille droite
/
Compartiment pour l’embout de détartrage (tirer pour ouvrir)
/Embout de détartrage
/Volet du connecteur vapeur
/Connecteur vapeur
/VUE D’ENSEMBLE
/
CLEAN
: Bouton de rinçage
/Indicateur de mousse max.
/
Connecteur du Rapid Capuccino System
/Buse à lait
/Levier de la buse à lait
/Tube d’aspiration du lait
/Réservoir à lait (0.35 L)
4
A
B
C
1
13 22
14
2
15 23
3
16 24
18
4
17 25
5
19
26
6
20
21
7
8
9
10
11
12
27
28
29
30
31
32
33
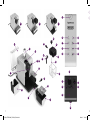
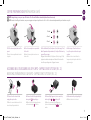
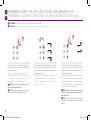
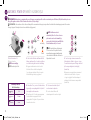
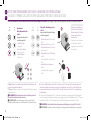
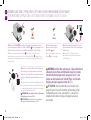
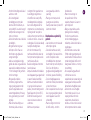
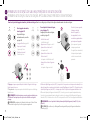
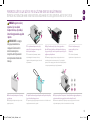
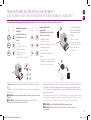
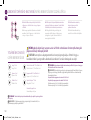
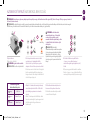
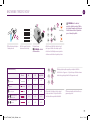
OVERVIEW
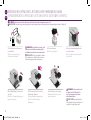
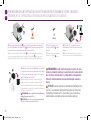
Overview of machine
Machine without Rapid Cappuccino System
Machine with Rapid Cappuccino System (for Cappuccino)
Machine with Rapid Cappuccino System (for Latte Macchiato)
Lever
Capsule compartment
Water tank (0.9 L)
Coee outlet
Used capsule container
Drip tray (push inside for Latte Macchiato glass)
Left grid
Right grid
Descaling pipe storage door (pull to open)
Descaling pipe
Steam connector door
Steam connector
Tactile beverage buttons
ON/OFF button
Lungo 110 ml
Espresso 40 ml
Ristretto 25 ml
Latte Macchiato
Cappuccino
Warm milk froth
Alert
“Descaling” : descaling alert refer to section “Descaling”
“Clean”
: milk system cleaning alert refer to section
“Preparing Cappuccino”
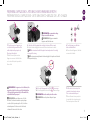
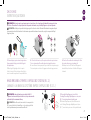
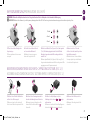
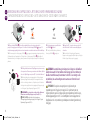
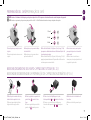
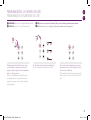
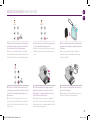
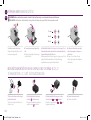
Rapid Cappuccino System (R.C.S.)
Lid detach button
Milk container Lid
Milk froth density: MIN
Position for milk froth regulator knob (insertion/removal)
Milk froth regulator knob
CLEAN
: Rinsing button
Milk froth density: MAX
Rapid Cappuccino System connector
Milk spout
Milk Spout Lever
Milk aspiration tube
Milk container (0.35 L)
EN
FR
UM_LATTISSIMA_TOUCH_Z2A.indb 4 25.04.17 15:45

EN
FR
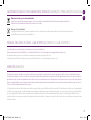
Nespresso, an exclusive system creating the perfect Espresso, time after time. All machines are equipped with a unique extraction system that guarantees up to 19 Bar pressure. Each parameter has been calculated with
great precision to ensure that all the aromas can be extracted, to give the coee body and create an exceptionally thick and smooth crema.
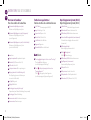
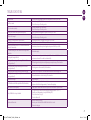
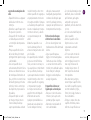
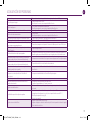
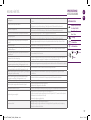
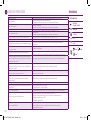
CONTENT
CAUTION: when you see this sign, please refer to the safety precautions to avoid possible harm and damage.
INFORMATION: when you see this sign, please take note of the advice for the correct and safe usage of your coee machine.
OVERVIEW 4
SAFETY PRECAUTIONS 6
PACKAGING CONTENT 12
FIRST USE OR AFTER A LONG PERIOD OF NONUSE
13
COFFEE PREPARATION 15
ASSEMBLING DISASSEMBLING OF RAPID CAPPUCCINO SYSTEM R.C.S.
15
PREPARING CAPPUCCINOLATTE MACCHIATOWARM MILK FROTH
16
PROGRAMMING COFFEE QUANTITY
19
PROGRAMMING QUANTITY FOR CAPPUCCINOLATTE MACCHIATO
WARM MILK FROTH
20
DAILY CARE 21
HAND WASHING OF RAPID CAPPUCCINO SYSTEM R.C.S.
21
RESTORING QUANTITY TO FACTORY SETTINGS 22
FACTORY SETTINGS 23
DESCALING 24
WATER HARDNESS SETTING 26
EMPTYING THE SYSTEM BEFORE A PERIOD OF NONUSE, FOR FROST PROTECTION
OR BEFORE A REPAIR
27
AUTOMATIC POWER OFF 28
TROUBLESHOOTING 29
SPECIFICATIONS 30
DISPOSAL AND ECOLOGICAL CONCERNS
31
CONTACT THE NESPRESSO CLUB 31
WARRANTY 31
EN
FR
5
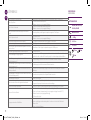
/CONTENT
AVERTISSEMENT: lorsque ce symbole apparait, veuillez consulter les consignes de sécurité pour éviter d'éventuels dangers et dommages.
INFORMATION: lorsque ce symbole apparait, veuillez prendre connaissance du conseil pour une utilisation sûre et conforme de votre appareil.
Nespresso un système exclusif pour reproduire à l’inni un Espresso parfait. Toutes les machines Nespresso sont équipées d’un système d’extraction unique à très haute pression (jusqu’à 19 bars). Chaque paramètre est
calculé avec précision pour révéler la totalité des arômes de café, lui donner du corps et lui orir une crema* d’une densité et d’une onctuosité incomparables. *mousse de café
/ RÉTABLIR LES RÉGLAGES USINE
/ RÉGLAGES USINE
/ DÉTARTRAGE
/ RÉGLAGE DE LA DURETÉ D'EAU
/ VIDANGE DE LA MACHINE AVANT UN TEMPS SANS
UTILISATION, POUR LA PROTECTION CONTRE LE GEL OU AVANT UNE
RÉPARATION ARRÊT AUTOMATIQUE
/ ARRÊT AUTOMATIQUE
/ DÉPANNAGE
/ SPÉCIFICATIONS
/ MISE AU REBUT ET PROTECTION DE
L'ENVIRONNEMENT
/ CONTACTEZ LE CLUB NESPRESSO
/ GARANTIE
/ VUE D'ENSEMBLE
/ CONSIGNES DE SECURITE
/ CONTENU DE L‘EMBALLAGE
/ PREMIÈRE UTILISATION
OU APRÈS UNE LONGUE PÉRIODE DE NONUTILISATIONPRÉPARATION CAFÉ
/ PRÉPARATION CAFÉ
/
MONTAGE/DÉMONTAGE DU RAPID CAPPUCCINO SYSTEM R.C.S.
/
PRÉPARATION DU CAPPUCCINOLATTE MACCHIATOMOUSSE DE LAIT CHAUDE
/
PROGRAMMER LA QUANTITÉ DE CAFÉ
/ PROGRAMMER LA QUANTITÉ DE CAPPUCCINOLATTE
MACCHIATO MOUSSE DE LAIT CHAUDE
/ ENTRETIEN QUOTIDIEN
/
LAVAGE À LA MAIN DU SYSTÈME RAPIDE CAPPUCCINO R.C.S.
UM_LATTISSIMA_TOUCH_Z2A.indb 5 25.04.17 15:45
Страница загружается ...
Страница загружается ...
Страница загружается ...
Страница загружается ...
Страница загружается ...

FR
11
CONSERVEZ LES
INSTRUCTIONS
SUIVANTES
Transmettez-les aux
utilisateurs ultérieurs.
• Ce manuel d’instruction
est également disponible
en version PDF sur
nespresso.com
UM_LATTISSIMA_TOUCH_Z2A.indb 11 25.04.17 15:45

4°
4°
1
2
3
4
EN
PTIT HU
FR
CZESDE
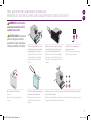
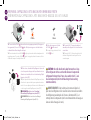
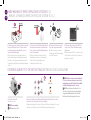
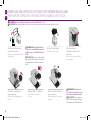
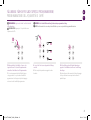
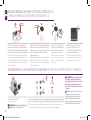
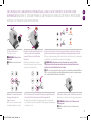
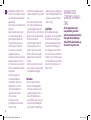
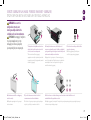
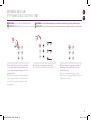
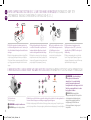
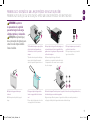
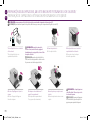
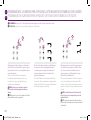
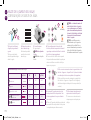
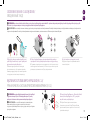
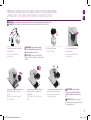
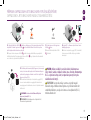
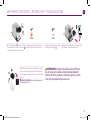
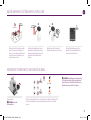
Special care for your rapid
cappuccino SyStem (r.c.S.)
important
:
refer
to User manual for
complete instructions.
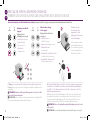
1- For a perfect milk froth, use skimmed
or semi-skimmed milk at refrigerator
temperature (about 4° C).
2- Rinse after each milk based preparation.
Place a recipient under milk outlet, press
and hold the «CLEAN»
button until
machine stops pumping automatically
(approx. 15 sec.).
Machine starts rinsing, stops automatically
( ~15sec .) .
3- Place the milk container in the fridge
immediately.
4- Every two days, disassemble the
Rapid Cappuccino System and clean
all components in the upper level of a
dishwasher.
Special care for your rapid
cappuccino SyStem (r.c.S.)
important
:
refer
to User manual for
complete instructions.
1- For a perfect milk froth, use skimmed
or semi-skimmed milk at refrigerator
temperature (about 4° C).
2- Rinse after each milk based preparation.
Place a recipient under milk outlet, press
and hold the «CLEAN»
button until
machine stops pumping automatically
(approx. 15 sec.).
Machine starts rinsing, stops automatically
( ~15sec .) .
3- Place the milk container in the fridge
immediately.
4- Every two days, disassemble the
Rapid Cappuccino System and clean
all components in the upper level of a
dishwasher.
Welcome
EN
FR
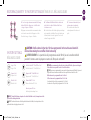
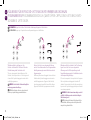
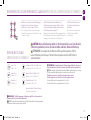
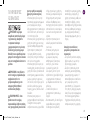
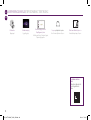
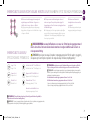
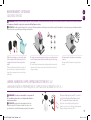
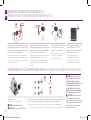
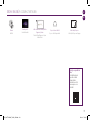
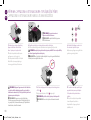
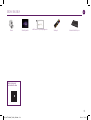
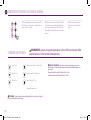
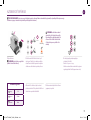
PACKAGING CONTENT
Coee machine User manual Care of Rapid Cappuccino System leaet Nespresso capsule tasting gift "Welcome to Nespresso folder"
You can refer to the online
assistance video
EN
FR
12
Coret de dégustation
de capsules Nespresso
/
Vous pouvez vous référer aux
vidéos Assistance Nespresso
Machine à café Pochette de bienvenue NespressoMode d’emploi
/CONTENU DE L‘EMBALLAGE
Instruction pour l'entretien du
Rapid Cappuccino System
UM_LATTISSIMA_TOUCH_Z2A.indb 12 25.04.17 15:45

EN
FR
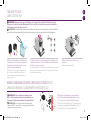
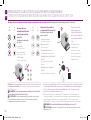
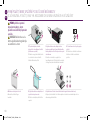
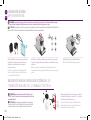
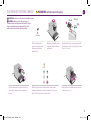
FIRST USE OR AFTER A LONG PERIOD OF NONUSE
CAUTION: rst read the safety
precautions to avoid risks of fatal
electrical shock and re.
1. When unpacking the machine, remove
the plastic lm and dispose from both left
grid and right grid, and machine panels.
2. Remove the water tank, drip tray, and capsule
container. Adjust the cable length and store the
excess in the cable guide under the machine.
3. Put the machine in upright position,
plug machine into mains.
4. The water tank can be carried by
its cover.
5. Rinse the water tank before lling with
potable water up to maximum level.
6. Switch the machine on. For the rst 2 seconds, the automatic power o and water hardness setting
are indicated with steady light.
EN
FR
13
PREMIÈRE UTILISATION OU APRÈS UNE LONGUE PÉRIODE DE NONUTILISATION
AVERTISSEMENT: commencez
par lire les consignes de sécurité
pour éviter les risques de décharges
électriques mortelles et d‘incendie.
1. Quand vous déballez la machine, retirer
le lm plastique des grilles d'égouttage
gauche et droite et des panneaux de la
machine.
6. Allumez la machine. Pendant les 2 premières secondes les touches lumineuses indiquent les règlages
enregistrés pour l'arrêt automatique et la dureté d'eau.
3. Placez la machine en position verticale,
branchez-la à la prise électrique.
2. Retirez le reservoir d'eau, le bac d'égouttage et
le bac à capsules usagées. Réglez la longueur du
câble en utilisant le logement prévu à cet eet sous
la machine.
4. Le réservoir d'eau peut être porté par son
couvercle.
5. Rincez le réservoir d'eau avant de le
remplir d'eau potable jusqu'au niveau
maximum.
UM_LATTISSIMA_TOUCH_Z2A.indb 13 25.04.17 15:45

25 sec.
x3
Descaling
Clean
Descaling
Clean
Descaling
Clean
Descaling
Clean
EN
FR
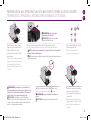
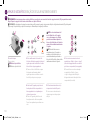
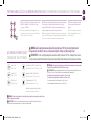
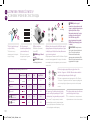
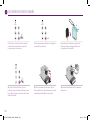
FIRST USE OR AFTER A LONG PERIOD OF NONUSE
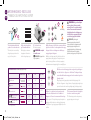
How to read automatic power o and water hardness settings:/
Automatic power o, refer
to page 28
– Lungo for 8 h
– Espresso for 30 min
– Ristretto 9 min
Water hardness settings,
refer to page 26
– Latte Macchiato: level 0
– Cappuccino: level 1
– Warm milk froth: level 2
– Warm milk froth + Latte Macchiato: level 3
– Warm milk froth + Cappuccino: level 4
After the rst 2 seconds,
the machine heats up for
approximately 25 seconds
(blinking lights). Machine ready is
indicated by steady lights.
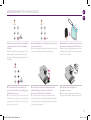
7. Rinsing: place a container under coee outlet and press the lungo button. Repeat three times.
INFORMATION: machines are fully tested after being produced. Some traces of coee
powder could be found in rinsing water.
8. Disassemble the Rapid Cappuccino System (R.C.S.) and clean all 6 components in the upper level of
your dishwasher. In case a dishwater is not available, refer to the "Hand Washing of Rapid Cappuccino
System (R.C.S.)" section. After reassemble and re-attach the R.C.S. to the machine, use the "Clean"
button before preparing milk beverage.
INFORMATION: refer to "Assembling/Disassembling of Rapid Cappuccino System" section
(refer to page 15).
EN
FR
14
PREMIÈRE UTILISATION OU APRÈS UNE LONGUE PÉRIODE DE NONUTILISATION
8. Démonter les 6 pièces du Système Rapide Cappuccino (R.C.S.) et placer tous les éléments dans le
tiroir supérieur du lave-vaisselle. Si vous ne disposez pas d'un lave-vaisselle, se référer à la section
lavage à la main du Système Rapide Cappuccino (R.C.S.). Après avoir remonté le R.C.S. et l'avoir
reconnecté à la machine, utilisez le bouton "Clean" avant toute préparation à base de lait.
INFORMATION:voir section Montage/Démontage du Système Rapide Cappuccino, à la page 15.
7. Rinçage: placez un récipient sous la sortie café et appuyez sur la touche Lungo. Répétez trois fois
cette opération.
INFORMATION:toutes nos machines sont entièrement testées après avoir été fabriquées. Des
traces de poudre de café peuvent être visibles dans l'eau de rinçage.
Réglage de l'arrêt
automatique, voir page 28
/Lungo pour 8 h
/
Espresso pour 30 min
/
Ristretto pour 9 min
Comment connaître les réglages enregistés pour l'arrêt automatique et la dureté d'eau:
Réglage de la dureté de l'eau,
voir page 26
Latte Macchiato: niveau 0
/Cappuccino: niveau 1
/
Lait chaud: niveau 2
/
Lait chaud + Latte Macchiato: niveau 3
/
Lait chaud + Cappuccino: niveau 4
Après les 2 premières secondes, la
machine chaue pendant environ
25 secondes (touches clignotantes).
La machine est prête lorsque la
lumière des touches est xe.
UM_LATTISSIMA_TOUCH_Z2A.indb 14 25.04.17 15:45

110 ml
40 ml
25 ml
EN
FR
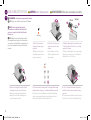
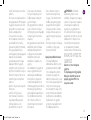
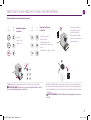
COFFEE PREPARATION
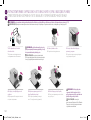
NOTE: during heat up, you can press any coee buttons. The coee will then ow automatically when the machine is ready.
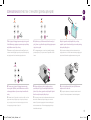
1. Lift the lever completely and insert the
capsule.
2. Close the lever and place a cup under the
coee outlet.
3. Press the Ristretto (25 ml), the Espresso (40 ml) or the Lungo (110 ml)
button. Preparation will stop automatically. To stop the coee ow or top
up your coee, press again.
4. Take the cup. Lift and close the lever
to eject the capsule into the used capsule
container.
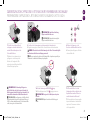
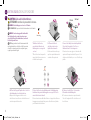
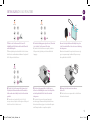
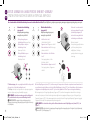
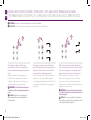
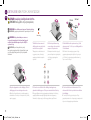
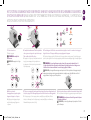
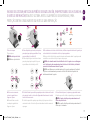
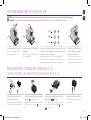
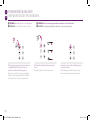
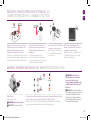
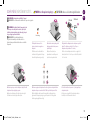
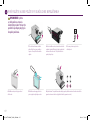
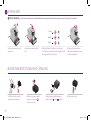
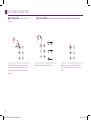
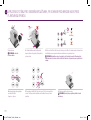
ASSEMBLING DISASSEMBLING OF RAPID CAPPUCCINO SYSTEM R.C.S.
1. Remove the milk container lid and
unplug milk aspiration tube.
2. Remove the milk froth regulator knob by
turning it until
and pulling it up.
3. Remove Rapid Cappuccino System connector by
unlocking it from
to and pulling it o.
4. Remove the milk spout by pulling it o.
EN
FR
15
/PRÉPARATION CAFÉ
MONTAGE/DÉMONTAGE DU RAPID CAPPUCCINO SYSTEM R.C.S.
1. Levez le levier complètement et insérez
la capsule.
2. Fermez le levier et placez une tasse sous
la sortie café.
3. Appuyez la touche Ristretto (25 ml), Espresso (40 ml) ou Lungo (110 ml).
La préparation s'arrêtera automatiquement. Pour arrêter l'écoulement de
votre café ou pour rallonger votre café, appuyez à nouveau.
4. Prenez la tasse. Levez et fermez le
levier pour éjecter la capsule dans le bac à
capsules usagées.
1. Retirez le couvercle du réservoir à lait et
retirez le tuyau d'aspiration de lait.
4. Retirez la buse à lait en la tirant.
2. Retirez le bouton de réglage de mousse
en le tournant jusqu'à
et tirez-le.
3. Retirez le connecteur du Rapid Cappuccino
System en le déverrouillant de
à et le tirant
ensuite.
NOTE: durant le chauage de la machine, vous pouvez appuyer sur n'importe quelle touche café. Le café s'écoulera automatiquement dès que la machine sera prête.
Comment connaître les réglages enregistés pour l'arrêt automatique et la dureté d'eau:
UM_LATTISSIMA_TOUCH_Z2A.indb 15 25.04.17 15:45

4 ° C
15 sec.
EN
FR
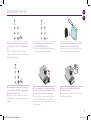
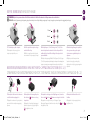
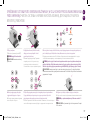
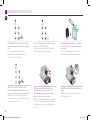
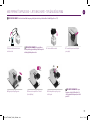
PREPARING CAPPUCCINOLATTE MACCHIATOWARM MILK FROTH
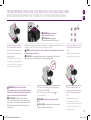
INFORMATION: for a perfect milk froth, use skimmed or semi-skimmed milk at refrigerator temperature (about 4° C).
1. Fill the milk container with desired
quantity of milk.
INFORMATION: when the milk container is
empty, before relling, thoroughly rinse it and the
milk aspiration tube with potable water.
2. Close the milk container. 3. Open the steam connector door by
sliding it to the right.
4. Connect the Rapid Cappuccino System
to the machine.
5. Machine heats up for approximately
15 seconds (blinking lights).
6. Lift the lever completely and insert the
capsule.
INFORMATION: only for Cappuccino
or Latte Macchiato. Skip this step when
preparing a Warm milk froth only.
EN
FR
16
PRÉPARATION DU CAPPUCCINOLATTE MACCHIATOMOUSSE DE LAIT CHAUDE
1. Remplissez le réservoir à lait avec la
quantité de lait souhaité.
2. Fermez le réservoir à lait.
3. Ouvrez le volet du connecteur vapeur en
le faisant coulisser vers la droite.
4. Connectez le Rapid Cappuccino System
à la machine.
5. La machine chaue pendant
approximativement 15 sec. (les touches
lumineuses clignotent).
6. Levez le levier complètement et insérez
la capsule.
INFORMATION: pour une mousse parfaite, utilisez du lait écrémé ou demi-écrémé à température du réfrigérateur (environ 4° C).
INFORMATION: lorsque le réservoir de lait est vide,
avant de le remplir, rincez le abondamment avec de
l'eau potable ainsi que le tuyau d'aspiration de lait.
INFORMATION: seulement en cas
de préparation de Cappuccino ou Latte
Macchiato. Ignorez cette étape en cas de
préparation de mousse de lait chaude.
UM_LATTISSIMA_TOUCH_Z2A.indb 16 25.04.17 15:45

+
Clean
EN
FR
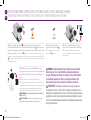
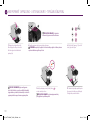
PREPARING CAPPUCCINOLATTE MACCHIATOWARM MILK FROTH
7. Close the lever, place a Cappuccino cup
or a Latte Macchiato glass under the coee
outlet and adjust milk spout position by
lifting it up to the right level.
INFORMATION: recommended settings:
Cappuccino min/Macchiato max.
8. Adjust the milk froth regulator knob according to the volume of froth you want.
NOTE: do not overturn the milk froth regulator. Overturned position is for inserting/
removing dial for cleaning.
9. Press the Cappuccino or Macchiato
button or Warm milk froth.
INFORMATION: for cappuccino or Latte Macchiato, the
preparation starts after a few seconds (rst milk and then
coee) and will stop automatically. For Warm milk froth,
only milk froth will be prepared.
10. At the end of the preparation, the "CLEAN" shines orange.
INFORMATION: rinse the milk system after each use.
11. Lift and close the lever to eject the
capsule into the used capsule container.
Place a container under milk spout.
EN
FR
17
PRÉPARATION DU CAPPUCCINOLATTE MACCHIATOMOUSSE DE LAIT CHAUDE
INFORMATION: rincez le système à lait après chaque
utilisation.
INFORMATION: Réglages recommandés:
Cappuccino min./Macchiato max.
10. A la n de la préparation la touche Clean
s'illumine en orange.
11. Levez et fermez le levier pour éjecter
la capsule dans le bac à capsules usagées.
Placez un récipient sous la buse à lait.
7. Fermez le levier et placez une tasse
Cappuccino ou un verre à Latte Macchiato
sous la sortie café et ajuster la position de
la buse de lait.
8. Ajustez le bouton de réglage de la mousse de lait au volume de mousse souhaité.
NOTE: ne tournez pas complètement le bouton de réglage. Cette position sert à retirer le
bouton pour le nettoyage.
9. Presser la touche Cappuccino, Macchiato
ou mousse de lait chaude.
INFORMATION: pour le Cappuccino et le Latte
Macchiato, l'écoulement commence après quelques
secondes (le lait en premier, puis le café) et s'arrêtera
automatiquement. Pour la mousse de lait chaude,
seulement de la mousse de lait coulera.
UM_LATTISSIMA_TOUCH_Z2A.indb 17 25.04.17 15:45

16 sec.
4° C
Clean Clean
EN
FR
PREPARING CAPPUCCINOLATTE MACCHIATOWARM MILK FROTH
12. Press and hold the "CLEAN" button until machine stops pumping automatically. Rinsing process
lasts approximately 16 seconds. "CLEAN"
blinks. Milk system rinsing process starts and hot water
combined with steam ows through the milk spout.
13. When the rinsing process is nished,
the "CLEAN"
alert is resumed.
14. Disconnect the R.C.S. from machine and place it
immediately in the refrigerator. Close the machine steam
connector door.
15. After each use, disassemble the Rapid Cappuccino System, and
clean all components in the upper side of your dishwasher. In case a
dishwasher is not available, refer to section Hand washing of Rapid
Cappuccino System (R.C.S.).
INFORMATION: refer to section "Assembling/
Disassembling of Rapid Cappuccino system (R.C.S.)".
CAUTION: this milk should not be kept for more than 2 days
in the refrigerator. In the case the milk container is kept outside
refrigerator for longer than 2 hours, disassemble the R.C.S. and
clean all components (refer to dishwashing or hand washing
recommendations).
EN
FR
18
12. Pressez et maintenez la touche «CLEAN» jusqu'à ce que la machine s'arrête automatiquement. Le
rinçage dure environ 16 secondes. «CLEAN»
clignote. Le rinçage du système lait commence, de l'eau
chaude et de la vapeur s'écoulent par la buse à lait.
PRÉPARATION DU CAPPUCCINOLATTE MACCHIATOMOUSSE DE LAIT CHAUDE
13. Lorsque le rinçage est terminé, l'alerte
«CLEAN»
s'éteint.
14. Déconnectez le R.C.S. de la machine et placez-le de
suite dans le réfrigérateur. Fermez la porte d'accès au
connecteur vapeur.
INFORMATION: référez-vous à la section «Montage/
Démontage du Rapid Cappuccino System (R.C.S.)».
AVERTISSEMENT: le lait ne doit pas être conservé plus de 2
jours dans le réfrigérateur. Si le réservoir à lait est conservé en dehors
du réfrigérateur pendant plus de 2 heures, démontez le R.C.S. et
nettoyez tous les composants (voir les recommandations de lavage au
lave-vaisselle et lavage à la main).
15. Après chaque utilisation, démontez le Rapid Capuccino System,
et lavez tous les composants dans le panier supérieur de votre lave-
vaisselle. Si vous ne disposez pas d'un lave-vaisselle, référez-vous à la
section Lavage à la main du Rapid Capuccino System (R.C.S.).
UM_LATTISSIMA_TOUCH_Z2A.indb 18 25.04.17 15:45

3 sec.
EN
FR
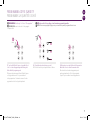
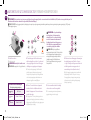
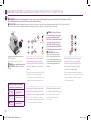
PROGRAMMING COFFEE QUANTITY
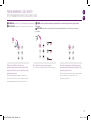
INFORMATION: follow the step 1-2 of section "coee preparation". NOTE: please refer to factory settings section for min/max programmable quantities.
1. Touch and hold Ristretto, Espresso or Lungo button for at
least 3 sec to enter the programming mode. Brewing starts.
Button blinks fast: programming mode.
2. Release button when desired volume is reached.
3. Water volume is now stored for the next coee preparations.
Button blinks 3 times to conrm the new water volume.
EN
FR
19
PROGRAMMER LA QUANTITÉ DE CAFÉ
INFORMATION: suivre les instructions 1-2 du paragraphe
«Préparer un café».
NOTE: référez-vous au paragraphe «Réglages usine» pour connaître les quantités programmables min. et max.
1. Appuyez et maintenez appuyé la touche Ristretto, Espresso
ou Lungo pendant au moins 3 sec. pour entrer dans le
mode programmation. L'écoulement commence. En mode
programmation les touches clignotent rapidement.
2. Relâchez la touche lorsque la quantité désirée est obtenue.
3. Le volume d'eau est maintenant programmé pour les
prochaines préparations de café. La touche programmée
clignote 3 fois pour conrmer la nouvelle programmation.
UM_LATTISSIMA_TOUCH_Z2A.indb 19 25.04.17 15:45

3 sec.
3 sec.
EN
FR
PROGRAMMING QUANTITY FOR CAPPUCCINOLATTE MACCHIATOWARM MILK FROTH
INFORMATION: follow the steps 1-8 of section "Preparing Cappuccino and Latte Macchiato".
1. Touch and hold Cappuccino/ Latte Macchiato/ Warm milk
froth button for at least 3 sec. Milk frothing starts. Button blinks
fast: programming mode.
2. Release button when desired milk froth volume is reached.
Button still blinks fast: programming mode. (Cappuccino/Latte
Macchiato). When programming the Warm milk froth beverage,
the programming ends here.
3. Touch and hold the same button. Brewing starts. Release
button when desired coee volume is reached. Recipe volume
is now stored for the next preparations. Button blinks 3 times to
conrm the new water volume.
NOTE: please refer to "Factory settings" section for
min/max programmable quantities.
NOTE: the milk froth volume depends on the kind of
milk that is used, its temperature and the position of the
milk regulator knob.
EN
FR
20
INFORMATION: suivez les instructions 1 à 8 du paragraphe «Préparer un cappuccino et un Latte Macchiato».
1. Appuyez et maintenez appuyé la touche Cappuccino/
Latte Macchiato/Mousse de lait chaude pendant au moins 3
sec. La préparation de mousse de lait commence. En mode
programmation les touches clignotent rapidement.
PROGRAMMER LA QUANTITÉ DE CAPPUCCINOLATTE MACCHIATOMOUSSE DE LAIT CHAUDE
3. Appuyez et maintenez appuyé la même touche. L'écoulement
café commence. Relâcher le bouton lorsque la quantité de café est
atteinte. La quantité de la recette est maintenant programmée
pour les prochaines préparations. La touche programmée clignote
3 fois pour conrmer la nouvelle programmation.
2. Relâchez la touche lorsque la quantité de mousse de lait
désirée est obtenue, les touches clignotent (Cappuccino/Latte
Macchiato). Si vous programmez la touche Mousse de Lait le
réglage est terminé.
NOTE: référez-vous paragraphe «Réglages usine» pour
connaître les quantités programmables min. et max.
NOTE: le volume de mousse de lait dépend de la qualité
de lait choisie, de sa température et de la position du sélecteur
de mousse.
UM_LATTISSIMA_TOUCH_Z2A.indb 20 25.04.17 15:45

EN
FR
DAILY CARE
INFORMATION: do not use any strong cleaning agent or solvent cleaner. Use a clean damp cloth and mild cleaning agent to clean
the surface of the machine. Do not put any machine components in dishwasher, except the Rapid Cappuccino System components.
1. Remove drip tray, capsule container. Empty and rinse.
Remove water tank. Empty, rinse it before lling with
fresh potable water.
2. Lift and close the lever to eject the capsule into the used capsule container.
Place a container under coee outlet and press the Lungo button to rinse.
3. Clean the coee outlet with a clean damp cloth. Clean
the machine surface using a clean damp cloth.
HAND WASHING OF RAPID CAPPUCCINO SYSTEM R.C.S.
INFORMATION: when a dishwasher is not available, the R.C.S.
components can be washed by hand. In that case, the procedure must be
performed daily for a maximum eciency.
1. Disassemble the Rapid Cappuccino System. Refer to
"Assembling/Disassembling of Rapid Cappuccino section system
(R.C.S.)", rinse all parts with warm/hot potable water.
EN
FR
21
2. Levez et fermez le levier pour éjecter la capsule dans le bac à capsules usagées.
Placez un récipient sous la sortie café, appuyez sur la touche Lungo pour rincer.
3. Nettoyer la sortie café à l'aide d'un chion propre et
humide. Nettoyez la machine à l'aide d'un chion propre
et humide.
ENTRETIEN QUOTIDIEN
INFORMATION: n’utilisez pas des produits de nettoyage agressifs ou à base de solvants. Utilisez un chion humide et un agent nettoyant
doux pour nettoyer la surface de la machine. Ne lavez aucun composant de la machine au lave-vaisselle, excepté les composants du Rapid
Cappuccino System.
1. Retirez la grille d'égouttage et le bac à capsules.
Videz-le et rincez-le. Retirez le réservoir d'eau. Videz-le,
rincez-le avant de le remplir avec de l'eau potable fraiche.
1. Démontez le Rapid Capuccino System. Référez-vous à la
section "Montage/Démontage du Rapid Capuccino System
(R.C.S.)", rincez toutes les pièces avec de l'eau potable chaude.
LAVAGE À LA MAIN DU SYSTÈME RAPIDE CAPPUCCINO R.C.S.
INFORMATION: en l'absence de lave-vaisselle, les composants du
R.C.S. peuvent être lavés à la main. Dans ce cas, le nettoyage doit être
réalisé quotidiennement pour une meilleure ecacité.
UM_LATTISSIMA_TOUCH_Z2A.indb 21 25.04.17 15:45

3 sec.
Clean
30 minutes
Descaling
EN
FR
HAND WASHING OF RAPID CAPPUCCINO SYSTEM R.C.S.
2. Soak all components in warm/hot potable water together
with mild/soft detergent for at least 30 minutes
and rinse
thoroughly with warm/hot potable water. Do not use
strong odor mild/soft detergents.
3. Clean the interior of the Milk tank with mild/soft
detergent and rinse with warm/ hot potable water.
Do not use abrasive material that might damage the
surface of the equipment.
4. Dry all parts with a fresh and clean
towel, cloth or paper and reassemble.
5. After reassemble and re-attach the RCS to the
machine, use the “Clean” button before preparing
milk beverage.
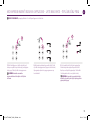
RESTORING QUANTITY TO FACTORY SETTINGS
1. Switch the machine ON.
NOTE: remove milk jug.
2. Press the Latte Macchiato and Warm milk froth buttons simultaneously for 3 seconds to
enter Menu mode: descaling and clean alerts start blinking.
NOTE: the Menu mode exits automatically after
30 sec if no actions are performed or can be exited
manually by pressing the Latte Macchiatto and Milk
froth buttons simultaneously for 3 seconds.
30 minutes
EN
FR
22
2. Appuyez simultanément les touches Latte Macchiato et Mousse de lait pendant 3 sec. pour
entrer dans le mode Menu: les touches d'alerte détartrage et nettoyage clignotent.
1. Allumez la machine.
LAVAGE À LA MAIN DU RAPID CAPPUCCINO SYSTEM R.C.S.
/RÉTABLIR LES RÉGLAGES USINE
NOTE: enlevez le pot à lait.
NOTE: le mode Menu se désactive après 30 sec
sans action, il est possible d'en sortir manuellement
en appuyant simultanément sur les touches Latte
Macchiato et Mousse de lait pendant 3 secondes.
2. Laissez tremper tous les composants dans de l'eau
potable chaude mélangée à un détergent doux pendant
minimum 30 minutes puis rincez abondamment avec de
l'eau potable chaude. N'utilisez pas de détergent fortement
odorant.
3. Nettoyez l'intérieur du réservoir à lait avec du
détergent doux puis rincez avec de l'eau potable
chaude. N'utilisez pas d'abrasif qui pourrait
endommager la surface de la pièce.
4. Séchez toutes les pièces avec une
serviette propre, un chion ou du papier
et remontez l'ensemble.
5. Après avoir remonté le R.C.S. et l'avoir reconnecté
à la machine, utilisez le bouton "Clean" avant toute
préparation à base de lait.
UM_LATTISSIMA_TOUCH_Z2A.indb 22 25.04.17 15:45

EN
FR
RESTORING QUANTITY TO FACTORY SETTINGS
3. Touch in a single continuous movement the following
buttons: Milk Froth ->Cappuccino ->Latte Macchiato
->Lungo ->Espresso ->Ristretto.
4. The Warm milk froth button blinks to indicate reset
mode. Press it to conrm. All buttons blink 3 times:
all volumes are reset.
5. The menu exits automatically and
machine returns to ready mode.
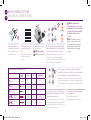
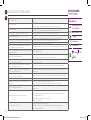
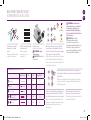
FACTORY SETTINGS
CAUTION: if coee volumes higher than 150 ml are programmed: let the machine cool down for 5
minutes before making the next coee. Risk of overheating!
Lungo: 110 ml
Espresso: 40 ml
Ristretto: 25 ml
Latte Macchiato Milk*: 150 ml/Coee: 40 ml
Cappuccino Milk*: 50 ml/Coee: 40 ml.
Warm milk froth*: 120 ml
Automatic power o 9 min
NOTE: we recommend you to keep factory settings for Ristretto, Espresso and Lungo to
ensure the best in cup results for each of our coee varieties.
Milk volume can be programmed from 30 to 200 ml.
Coee volume can be progammed from 25 to 200 ml.
NOTE: *the milk froth volume depends on the kind of milk that is used, its temperature and the
position of the milk regulator knob.
EN
FR
23
NOTE: *le volume de la mousse de lait dépend de la nature de lait utilisé, de sa température et de la
position du bouton de réglage de mousse à lait.
RÉGLAGES USINE
Ristretto: 25 ml
Cappuccino lait*: 50 ml/Café: 40 ml.
Lungo: 110 ml
Latte MacchiatoLait*: 150 ml/Café: 40 ml
Espresso: 40 ml
Mousse de lait chaude*: 120 ml
Arrêt complet automatique 9 min
AVERTISSEMENT: si la quantité de café programmée excède 150 ml; laissez la machine refroidir
pendant 5 minutes avant de préparer un autre café. Risque de surchaue!
NOTE: nous vous recommandons de conserver les réglages usine pour le Ristretto, Espresso et
Lungo an d'assurer le meilleur résultat dans la tasse pour toutes nos variétés de cafés.
La volume de lait peut être programmé de 30 à 200 ml.
Le volume de café peut être programmé de 25 à 200 ml.
/RÉTABLIR LES RÉGLAGES USINE
3. Appuyer successivement dans un mouvement continu
sur les touches: mousse de lait->Cappuccino ->Latte
Macchiato->Lungo -> Espresso ->Ristretto.
4. La touche Mousse de lait chaude clignote pour indiquer
que les quantités sont rétablies. Presser cette touche pour
conrmer, toutes les touches clignotent 3 fois: tous les
volumes d'origine sont rétablis.
5. La sortie du mode Menu se fait
automatiquement et la machine est
prête.
UM_LATTISSIMA_TOUCH_Z2A.indb 23 25.04.17 15:45

Descaling
1L
+
100 ml
500 ml
• 2
• 1
Descaling
Clean
EN
FR
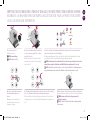
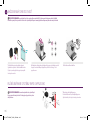
DESCALING
CAUTION: refer to safety precautions.
INFORMATION: descaling time is approximately 25 minutes.
NOTE: to ensure the proper functioning of
your machine over its lifetime and that your coee
experience is as perfect as the rst day, follow the
below process.
1. Descale the machine when
descaling alert shines orange in
ready mode.
2. Lift and close the lever to eject
any capsules in the used capsule
container.
3. Empty the drip tray and the used capsules container.
Fill the water tank with 100 ml of Nespresso descaling
agent and 500 ml water.
4. Open the descaling pipe storage door. Plug the
descaling pipe into steam connector of machine.
5. The machine enters the descaling mode. The descaling alert blinks orange
during the entire descaling process. The Warm milk froth button shines white.
6. Place a container with a minimum 1 litre capacity
under both the coee outlet and under the descaling
pipe nozzle.
EN
FR
24
/DÉTARTRAGE
2. Levez et fermez le levier an
d'éjecter la capsule dans le bac à
capsules usagées.
1. Détartrez la machine lorsque
l'alerte détartrage est allumée en
orange en mode marche.
AVERTISSEMENT: référez-vous aux consignes de sécurité.
5. La machine entre en mode détartrage. Le voyant d'alerte détartrage
clignote en orange pendant tout le processus de détartrage. La touche
lumineuse de mousse de lait chaude s'allume en blanc.
6. Positionner un récipient d'une contenance minimum
d'un litre sous la sortie café et l'embout de détartrage.
3. Videz le bac d'égouttage et le bac à capsules usagées.
Remplissez le réservoir d'eau avec 100 ml de produit
détartrant Nespresso et 500 ml d'eau.
4. Ouvrir l'espace de rangement de l'emboût de
détartrage. Connecter l'embout détartrage sur le
connecteur vapeur de la machine.
NOTE: le processus de détartrage dure environ 25 minutes.
NOTE: an d'assurer le bon fonctionnement de
votre appareil tout au long de sa vie et de maintenir
une experience café aussi parfaite qu'au premier jour
nous vous recommandons de suivre les instructions
suivantes.
UM_LATTISSIMA_TOUCH_Z2A.indb 24 25.04.17 15:45

Descaling
x5
ok
Descaling
Descaling
EN
FR
DESCALING
7. Press the Warm milk froth button. Descaling product ows
alternately through the coee outlet, descaling pipe and drip
tray.
8. When the descaling cycle is nished (water tank runs
empty), the Warm milk froth button shines.
9. Empty the used capsules container, drip tray, rinse out and ll
the water tank with fresh potable water up to level MAX.
10. Press the Warm milk froth button again. The rinsing cycle
continues through the coee outlet, descaling pipe and drip
tray until the water tank turns empty.
11. Once the rinsing process is nished, the machine switches
o. Remove and store descaling pipe. Empty drip tray and used
capsules container. Fill water tank with fresh potable water.
12. Clean the machine using a damp cloth. You have now
nished descaling the machine.
EN
FR
25
11. Lorsque le rinçage est terminé, la machine s'éteint. Retirez
et rangez l'embout détartrage dans son logement. Vider le bac
égouttoir et le bac de capsules usagées. Remplissez le réservoir
d'eau fraîche potable.
12. Nettoyez la machine à l'aide d'un chion humide. Vous avez
terminé le détartrage de la machine.
9. Videz le bac à capsules usagées, le bac d'égouttage, rincez le
réservoir et le remplir complètement d'eau fraîche potable.
10. Appuyez la touche Mousse de lait chaude à nouveau. Le
rinçage continue par la sortie café, l'embout détartrage et le bac
d'égouttage.
/DÉTARTRAGE
8. Lorsque le cycle de détartrage est terminé (le réservoir d'eau
est vide), la touche Mousse de lait chaude s'allume.
7. Presser la touche Mousse de lait chaude. Le produit
détartrant coule alternativement de la sortie café, de l'embout
détartrage et du bac d'égouttage.
UM_LATTISSIMA_TOUCH_Z2A.indb 25 25.04.17 15:45
Страница загружается ...
Страница загружается ...
Страница загружается ...
Страница загружается ...
Страница загружается ...
Страница загружается ...
Страница загружается ...
Страница загружается ...
Страница загружается ...
Страница загружается ...
Страница загружается ...
Страница загружается ...
Страница загружается ...
Страница загружается ...
Страница загружается ...
Страница загружается ...
Страница загружается ...
Страница загружается ...
Страница загружается ...
Страница загружается ...
Страница загружается ...
Страница загружается ...
Страница загружается ...
Страница загружается ...
Страница загружается ...
Страница загружается ...
Страница загружается ...
Страница загружается ...
Страница загружается ...
Страница загружается ...
Страница загружается ...
Страница загружается ...
Страница загружается ...
Страница загружается ...
Страница загружается ...
Страница загружается ...
Страница загружается ...
Страница загружается ...
Страница загружается ...
Страница загружается ...
Страница загружается ...
Страница загружается ...
Страница загружается ...
Страница загружается ...
Страница загружается ...
Страница загружается ...
Страница загружается ...
Страница загружается ...
Страница загружается ...
Страница загружается ...
Страница загружается ...
Страница загружается ...
Страница загружается ...
Страница загружается ...
Страница загружается ...
Страница загружается ...
Страница загружается ...
Страница загружается ...
Страница загружается ...
Страница загружается ...
Страница загружается ...
Страница загружается ...
Страница загружается ...
Страница загружается ...
Страница загружается ...
Страница загружается ...
Страница загружается ...
Страница загружается ...
Страница загружается ...
Страница загружается ...
Страница загружается ...
Страница загружается ...
Страница загружается ...
Страница загружается ...
Страница загружается ...
Страница загружается ...
Страница загружается ...
Страница загружается ...
Страница загружается ...
Страница загружается ...
Страница загружается ...
Страница загружается ...
Страница загружается ...
Страница загружается ...
Страница загружается ...
Страница загружается ...
Страница загружается ...
Страница загружается ...
Страница загружается ...
Страница загружается ...
Страница загружается ...
Страница загружается ...
Страница загружается ...
Страница загружается ...
Страница загружается ...
Страница загружается ...
Страница загружается ...
Страница загружается ...
Страница загружается ...
Страница загружается ...
Страница загружается ...
Страница загружается ...
Страница загружается ...
Страница загружается ...
Страница загружается ...
Страница загружается ...
Страница загружается ...
Страница загружается ...
Страница загружается ...
Страница загружается ...
Страница загружается ...
Страница загружается ...
Страница загружается ...
Страница загружается ...
Страница загружается ...
Страница загружается ...
Страница загружается ...
Страница загружается ...
Страница загружается ...
Страница загружается ...
Страница загружается ...
Страница загружается ...
Страница загружается ...
Страница загружается ...
Страница загружается ...
Страница загружается ...
Страница загружается ...
Страница загружается ...
Страница загружается ...
Страница загружается ...
Страница загружается ...
Страница загружается ...
Страница загружается ...
Страница загружается ...
Страница загружается ...
Страница загружается ...
Страница загружается ...
Страница загружается ...
Страница загружается ...
Страница загружается ...
Страница загружается ...
Страница загружается ...
Страница загружается ...
Страница загружается ...
Страница загружается ...
Страница загружается ...
Страница загружается ...
Страница загружается ...
Страница загружается ...
Страница загружается ...
Страница загружается ...
Страница загружается ...
Страница загружается ...
Страница загружается ...
Страница загружается ...
Страница загружается ...
Страница загружается ...
Страница загружается ...
Страница загружается ...
Страница загружается ...
Страница загружается ...
Страница загружается ...
Страница загружается ...
Страница загружается ...
Страница загружается ...
Страница загружается ...
Страница загружается ...
Страница загружается ...
Страница загружается ...
Страница загружается ...
Страница загружается ...
Страница загружается ...
Страница загружается ...
-
 1
1
-
 2
2
-
 3
3
-
 4
4
-
 5
5
-
 6
6
-
 7
7
-
 8
8
-
 9
9
-
 10
10
-
 11
11
-
 12
12
-
 13
13
-
 14
14
-
 15
15
-
 16
16
-
 17
17
-
 18
18
-
 19
19
-
 20
20
-
 21
21
-
 22
22
-
 23
23
-
 24
24
-
 25
25
-
 26
26
-
 27
27
-
 28
28
-
 29
29
-
 30
30
-
 31
31
-
 32
32
-
 33
33
-
 34
34
-
 35
35
-
 36
36
-
 37
37
-
 38
38
-
 39
39
-
 40
40
-
 41
41
-
 42
42
-
 43
43
-
 44
44
-
 45
45
-
 46
46
-
 47
47
-
 48
48
-
 49
49
-
 50
50
-
 51
51
-
 52
52
-
 53
53
-
 54
54
-
 55
55
-
 56
56
-
 57
57
-
 58
58
-
 59
59
-
 60
60
-
 61
61
-
 62
62
-
 63
63
-
 64
64
-
 65
65
-
 66
66
-
 67
67
-
 68
68
-
 69
69
-
 70
70
-
 71
71
-
 72
72
-
 73
73
-
 74
74
-
 75
75
-
 76
76
-
 77
77
-
 78
78
-
 79
79
-
 80
80
-
 81
81
-
 82
82
-
 83
83
-
 84
84
-
 85
85
-
 86
86
-
 87
87
-
 88
88
-
 89
89
-
 90
90
-
 91
91
-
 92
92
-
 93
93
-
 94
94
-
 95
95
-
 96
96
-
 97
97
-
 98
98
-
 99
99
-
 100
100
-
 101
101
-
 102
102
-
 103
103
-
 104
104
-
 105
105
-
 106
106
-
 107
107
-
 108
108
-
 109
109
-
 110
110
-
 111
111
-
 112
112
-
 113
113
-
 114
114
-
 115
115
-
 116
116
-
 117
117
-
 118
118
-
 119
119
-
 120
120
-
 121
121
-
 122
122
-
 123
123
-
 124
124
-
 125
125
-
 126
126
-
 127
127
-
 128
128
-
 129
129
-
 130
130
-
 131
131
-
 132
132
-
 133
133
-
 134
134
-
 135
135
-
 136
136
-
 137
137
-
 138
138
-
 139
139
-
 140
140
-
 141
141
-
 142
142
-
 143
143
-
 144
144
-
 145
145
-
 146
146
-
 147
147
-
 148
148
-
 149
149
-
 150
150
-
 151
151
-
 152
152
-
 153
153
-
 154
154
-
 155
155
-
 156
156
-
 157
157
-
 158
158
-
 159
159
-
 160
160
-
 161
161
-
 162
162
-
 163
163
-
 164
164
-
 165
165
-
 166
166
-
 167
167
-
 168
168
-
 169
169
-
 170
170
-
 171
171
-
 172
172
-
 173
173
-
 174
174
-
 175
175
-
 176
176
-
 177
177
-
 178
178
-
 179
179
-
 180
180
-
 181
181
-
 182
182
-
 183
183
-
 184
184
-
 185
185
-
 186
186
-
 187
187
-
 188
188
-
 189
189
-
 190
190
-
 191
191
-
 192
192
-
 193
193
-
 194
194
-
 195
195
-
 196
196
-
 197
197
-
 198
198


DeLonghi DINAMICA ECAM353.75B Инструкция по применению
- Категория
- Кофеварки
- Тип
- Инструкция по применению
- Это руководство также подходит для
Задайте вопрос, и я найду ответ в документе
Поиск информации в документе стал проще с помощью ИИ
на других языках
- English: DeLonghi DINAMICA ECAM353.75B Owner's manual
- français: DeLonghi DINAMICA ECAM353.75B Le manuel du propriétaire
- italiano: DeLonghi DINAMICA ECAM353.75B Manuale del proprietario
- español: DeLonghi DINAMICA ECAM353.75B El manual del propietario
- Deutsch: DeLonghi DINAMICA ECAM353.75B Bedienungsanleitung
- português: DeLonghi DINAMICA ECAM353.75B Manual do proprietário
- slovenčina: DeLonghi DINAMICA ECAM353.75B Návod na obsluhu
- polski: DeLonghi DINAMICA ECAM353.75B Instrukcja obsługi
- čeština: DeLonghi DINAMICA ECAM353.75B Návod k obsluze
Похожие модели бренда
-
DeLonghi EN550.BM Руководство пользователя
-
-
-
-
-
-
-
-
Модели других брендов
-
De’Longhi Lattissima Pro EN 750.MB Руководство пользователя
-
Dell Precision 8F764 Руководство пользователя
-
Krups my machine C50 Руководство пользователя
-
Nespresso U Pure Cream C50 Руководство пользователя
-
Krups YY1301FD Инструкция по применению
-
 my machine Nespresso Руководство пользователя
-
-
Electrolux EBC951513X Инструкция по началу работы
-
-
Lavazza Fantasia Plus Руководство пользователя
