Hotpoint Ariston 7OFK 1049L X RU/HA Руководство пользователя
- Категория
- Печи
- Тип
- Руководство пользователя
Это руководство также подходит для

English
Operating Instructions
OVEN
Contents
Operating Instructions,1
Warnings,2
Assistance,3
Description of the appliance,4
Description of the appliance,5
Installation,6
Start-up and use,8
Modes,9
Precautions and tips,16
Maintenance and care,16
Troubleshooting,18
7OFK 1049L X RU/HA
7OFK 1049LS X RU/HA
Русскии
Руководство по эксплуатации
ДУХОВОЙ ШКАФ
Содержание
Руководство по эксплуатации,1
Предупреждения,2
Сервисное обслуживание,3
Описание изделия,4
Описание изделия,5
Установка,19
Включение и эксплуатация,21
Программы,23
Предосторожности и рекомендации,29
Техническое обслуживание и уход,29
Неисправности и методы их устранения,31

2
Warnings
WARNING: The appliance and its accessible parts
become hot during use. Care should be taken to
avoid touching heating elements. Children less than 8
years of age shall be kept away unless continuously
supervised. This appliance can be used by children
aged from 8 years and above and persons with
reduced physical, sensory or mental capabilities or
lack of experience and knowledge if they have been
given supervision or instruction concerning use of the
appliance in a safe way and understand the hazards
involved. Children shall not play with the appliance.
Cleaning and user maintenance shall not be made
by children without supervision.
Do not use harsh abrasive cleaners or sharp metal
scrapers to clean the oven door glass since they can
scratch the surface, which may result in shattering of
the glass.
Never use steam cleaners or pressure cleaners on
the appliance.
WARNING: Ensure that the appliance is switched
off before replacing the lamp to avoid the possibility
of electric shock.
! When you place the rack inside, make sure that the
stop is directed upwards and in the back of the cavity.
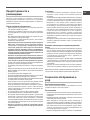
Предупреждения
ВНИМАНИЕ: Данное изделие и его доступные
комплектующие сильно нагреваются в процессе
эксплуатации.
Будьте осторожны и не касайтесь нагревательных
элементов.
Не разрешайте детям младше 8 лет приближаться
к изделию без контроля.
Данное изделие может быть использовано
детьми старше 8 лет и лицами с ограниченными
физическими, сенсорными или умственными
способностями или без опыта и знания о
правилах использования изделия при
условии надлежащего контроля или обучения
безопасному использованию изделия с учетом
соответствующих рисков. Не разрешайте
детям играть с изделием. Не разрешайте детям
осуществлять чистку и уход за изделием без
контроля взрослых.
Не используйте абразивные вещества или
режущие металлические скребки для чистки
стеклянной дверцы духового шкафа, так как
они могут поцарапать поверхность, что может
привести к разбиванию стекла.
Никогда не используйте паровые чистящие
агрегаты или агрегаты под высоким давлением
для чистки изделия.
ВНИМАНИЕ: Проверьте, чтобы изделие было
выключено, перед заменой лампочки во
избежание возможных ударов током.
! При установке решетки проверить, чтобы
фиксатор был повернут вверх с задней стороны
выемки.

3
Assistance
Warning:
The appliance is tted with an automatic diagnostic system which detects any
malfunctions. Malfunctions are signalled through messages of the following
type: “F—” followed by numbers.
Call for technical assistance in the event of a malfunction.
Before calling for Assistance:
• Check whether you can x the problem yourself.
• Restart the programme to check whether the malfunction has
disappeared.
• If it has not, contact the Authorised Technical Assistance Service.
! Never use the services of an unauthorised technician.
Please have the following information to hand:
• The type of problem encountered.
• The message shown on the TEMPERATURE display.
• The appliance model (Mod.).
• The serial number (S/N).
The latter two pieces of information can be found on the data plate located
on the appliance.
Сервисное обслуживание
Внимание:
Изделие оснащено системой автоматической диагностики, позволяющей
выявить возможные неисправности. Неисправности показываются на
дисплее посредством следующих сообщений: “F—” с последующими
цифрами.
В этом случае необходимо вызвать техника из центра сервисного
обслуживания.
Перед тем как обратиться в Центр Технического обслуживания:
• Проверьте, можно ли устранить неисправность самостоятельно;
• Вновь запустите программу для проверки исправности машины;
• В противном случае обратитесь в уполномоченный Центр
Технического обслуживания.
! Никогда не обращайтесь к неуполномоченным техникам.
При обращении в Центр Технического Обслуживания необходимо
сообщить:
• Тип неисправности;
• сообщение, показываемое на дисплее ТЕМПЕРАТУРЫ
• Модель изделия (Мод.)
• Номер тех. паспорта (серийный №)
Эти данные вы найдете на паспортной табличке, расположенной на
изделии.

4
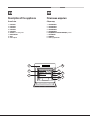
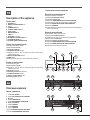
Description of the appliance
Overall view
1 POSITION 1
2 POSITION 2
3 POSITION 3
4 POSITION 4
5 POSITION 5
6 GUIDES for the sliding racks
7 DRIPPING PAN
8 GRILL
9 Control panel
Описание изделия
Общии вид
1 ПОЛОЖЕНИЕ 1
2 ПОЛОЖЕНИЕ 2
3 ПОЛОЖЕНИЕ 3
4 ПОЛОЖЕНИЕ 4
5 ПОЛОЖЕНИЕ 5
6 ВЫДВИЖНЫЕ НАПРАВЛЯЮЩИЕ уровней
7 ПРОТИВЕНЬ
8 РЕШЕТКА
9 Панель управления
7
8
9 6
1
2
3
4
5

5
Description of the appliance
Control panel
1 SETTINGS icon
2 MANUAL COOKING MODES icon
3 Display
4 TEMPERATURE icon
5 CONTROL PANEL LOCK icon
6 START / STOP
7 MINUTE MINDER icon
8 TIME icon
9 SELECTOR control dial
10 AUTOMATIC COOKING MODES icon
11 CONFIRM SETTINGS icon
12 CONTROL PANEL POWER BUTTON
Display in programming mode
13 Cooking mode number indicator
14 Selected menu indicator
15 Temperature indicator
16 COOKING DURATION indicator
17 Suggests a course of action or displays the activity currently being
performed by the oven
18 END OF COOKNG TIME indicator
19 TIME indicator
20 Selected cooking mode icon / recommended rack position icon
Display in cooking mode
21 Animated cooking icon
22 Selected menu indicator
23 Suggests a course of action or displays the activity currently being
performed by the oven
24 Temperature indicator
25 Preheating / Residual heat indicators
26 COOKING DURATION indicator
27 END OF COOKNG TIME indicator
28 Cooking progress indicator
Описание изделия
Панель управления
1 Символ НАСТРОЙКИ
2 Символ ПРОГРАММ РУЧНОГО РЕЖИМА
3 Дисплей
4 Символ ТЕМПЕРАТУРА
5 Символ БЛОКИРОВКА УПРАВЛЕНИЙ
6 ПУСК / ОСТАНОВКА
7 Символ ТАЙМЕРА
8 Символ ВРЕМЕНИ
9 Рукоятка ВЫБОРА
10 Символ АВТОМАТИЧЕСКИХ ПРОГРАММ
11 Символ ПОДТВЕРЖДЕНИЕ НАСТРОЕК
12 ВКЛЮЧЕНИЕ КОНСОЛИ УПРАВЛЕНИЯ
Дисплей программирования
13 Индикатор номера программы
14 Индикатор Выбранного режима
15 Индикатор температуры
16 Индикатор ПРОДОЛЖИТЕЛЬНОСТИ ПРИГОТОВЛЕНИЯ
17 Рекомендует, что делать или что выполняет духовой шкаф
18 Индикатор ВРЕМЯ ОКОНЧАНИЯ ПРИГОТОВЛЕНИЯ
19 Индикатор ВРЕМЕНИ
20 Символ выбранного режима приготовления / символ рекомендуемого
уровня приготовления
Дисплей приготовления
21 Движущийся символ приготовления
22 Визуализация выбранного меню
23 Рекомендует, что делать или что выполняет духовой шкаф
24 Визуализация температуры
25 Индикатор Нагрева / Остаточного тепла
26 Индикатор ПРОДОЛЖИТЕЛЬНОСТИ ПРИГОТОВЛЕНИЯ
27 Индикатор ВРЕМЯ ОКОНЧАНИЯ ПРИГОТОВЛЕНИЯ
28 Индикатор выполнения приготовления
1
2
4
3
5
6
12
7
11
10
8
9
13
14
15
16
17
18
19
20
21
22
23 24
25
26
27
28

6
GB
Installation
! Please keep this instruction booklet in a safe place for future reference. If
the appliance is sold, given away or moved, please make sure the booklet is
also passed on to the new owners so that they may benet from the advice
contained within it.
! Please read this instruction manual carefully: it contains important information
concerning the safe operation, installation and maintenance of the appliance.
Positioning
! Do not let children play with the packaging material; it should be disposed
of in accordance with local separated waste collection standards (see
Precautions and tips).
! The appliance must be installed by a qualied professional in accordance
with the instructions provided. Incorrect installation may damage property or
cause harm to people or animals.
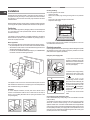
Built-in appliances
Use an appropriate cabinet to ensure that the appliance operates properly:
• the panels adjacent to the oven must be made of heat-resistant material.
• cabinets with a veneer exterior must be assembled with glues which can
withstand temperatures of up to 100°C.
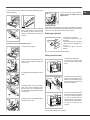
• to install the oven under the counter (see diagram) or in a kitchen unit,
the cabinet must have the following dimensions:
590 mm.
595 mm.
22,5 mm.*
20,5 mm.
550 mm.
570 mm.
20 mm.
575-585 mm.
45 mm.
560 mm.
550 mm.
min.
! The appliance must not come into contact with electrical parts once it has
been installed.The indications for consumption given on the data plate have
been calculated for this type of installation.
Ventilation
To ensure adequate ventilation, the back panel of the cabinet must be
removed. It is advisable to install the oven so that it rests on two strips of
wood, or on a completely at surface with an opening of at least 45 x 560
mm (see diagrams).
560 mm.
45 mm.
Centring and xing
Secure the appliance to the cabinet:
• Open the oven door.
• Remove the 2 rubber plugs covering the xing holes on the perimeter
frame.
• Fix the oven to the cabinet using the 2 wood screws.
• Replace the rubber plugs.
! All parts which ensure the safe operation of the appliance must not be
removable without the aid of a tool.
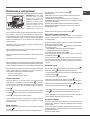
Electrical connection
Ovens equipped with a three-pole power supply cable are designed to operate
with alternating current at the voltage and frequency indicated on the data
plate located on the appliance (see below).
Fitting the power supply cable
1. Open the terminal board by
inserting a screwdriver into the side
tabs of the cover. Use the screwdriver
as a lever by pushing it down to open
the cover (see diagram).
2. Install the power supply cable by
loosening the cable clamp screw
and the three wire contact screws
L-N- .
Connect the wires to the
corresponding terminals: the Blue
wire to the terminal marked (N), the
Brown wire to the terminal marked
(L) and the Yellow/Green wire to the
terminal marked (see diagram).
3. Secure the cable by fastening the
clamp screw.
4. Close the cover of the terminal
board.
Connecting the supply cable to the mains
Install a standardised plug corresponding to the load indicated on the data
plate (see table).
The appliance must be directly connected to the mains using an omnipolar
switch with a minimum contact opening of 3 mm installed between the
appliance and the mains. The switch must be suitable for the charge indicated
and must comply with current electrical regulations (the earthing wire must not
be interrupted by the switch). The supply cable must be positioned so that it
does not come into contact with temperatures higher than 50°C at any point
(the back panel of the oven, for example).
N
L

GB
7
! The installer must ensure that the correct electrical connection has been
performed and that it is fully compliant with safety regulations.
Before connecting the appliance to the power supply, make sure that
• the appliance is earthed and the plug is compliant with the law.
• the socket can withstand the maximum power of the appliance, which is
indicated on the data plate.
• the voltage is in the range between the values indicated on the data plate.
• the socket is compatible with the plug of the appliance. If the socket is
incompatible with the plug, ask an authorised technician to replace it. Do
not use extension cords or multiple sockets.
! Once the appliance has been installed, the power supply cable and the
electrical socket must be easily accessible.
! The cable must not be bent or compressed.
! The cable must be checked regularly and replaced by authorised technicians
only (see Assistance).
! The manufacturer declines any liability should these safety measures
not be observed.
APPLIANCE SPECIFICATIONS
Dimensions*
width 43.5 cm
height 32,4 cm
depth 41.5 cm
Volume*
59 l
Dimensions**
width 45.5 cm
height 32,4 cm
depth 41.5 cm
Volume**
62 l
Electrical
connections
voltage: 220 - 240 V~ 50/60 Hz or
50 Hz (see data plate) maximum power
absorbed 2800 W
ENERGY
LABEL
Without
removable
guide rails
Directive 2002/40/EC on the label
of electric ovens. Standard EN 50304
Declared energy consumption
for Forced convection Class –
heating mode:
ECO.
* Only for models with drawn rails.
** Only for models with wire rails.
This appliance conforms to the
following European Economic
Community directives:
- 2006/95/EEC dated 12/12/06
(Low Voltage) and subsequent
amendments
- 2004/108/EEC dated 03/05/89
(Electromagnetic Compatibility)
and subsequent amendments
- 93/68/EEC dated 22/07/93 and
subsequent amendments.
- 2012/19/EEC and subsequent
amendments.
1275/2008 standby/off mode.

8
GB
Start-up and use
WARNING! The oven is provided
with a stop system to extract the
racks and prevent them from
coming out of the oven (1).
As shown in the drawing, to extract
them completely, simply lift the
racks, holding them on the front
part, and pull (2).
! The rst time you use your appliance, heat the empty oven with its door
closed at its maximum temperature for at least half an hour. Make sure that
the room is well ventilated before switching the oven off and opening the
oven door. The appliance may emit a slightly unpleasant odour caused by
protective substances used during the manufacturing process burning away.
! Turn the control dial to adjust the parameter shown on the display between
the “<” and “>” symbols.
! To make the setting process easier, keep the knob in position: this will
increase the scrolling speed of the numbers on the display.
! Each setting will automatically be stored in the appliance memory after 10
seconds.
! The touch controls cannot be activated if the user is wearing gloves.
! In order to optimise the cooking performance, when starting the selected
function, product settings will be applied that could cause a delayed start of
the fan and heating elements.
Some models are equipped with a system of hinges which allows the door to
close slowly, without the user having to follow the movement through with his/
her hand. To use the system correctly, before closing the door:
• Open the door fully.
• Do not force the closing movement manually.
Switching the oven on for the rst time
After connecting the oven to the electricity supply, the rst time it is switched
on the user should also switch on the control panel by pressing the
button. The list of languages will appear in the menu. To choose the desired
language, select it using the control dial. Conrm by pressing the icon.
Once the selection has been made, the display will show the settings menu.
Press the icon or scroll through using the control dial until you reach the
EXIT command and press the icon to begin using the oven.
! After choosing the language in the menu, if the display is not used for another
30 seconds it will automatically revert to programming mode.
Setings menu commands
To enter the settings menu, switch on the control panel and press the icon.
Use the control dial to highlight the individual menu commands.
To modify the setting, press the icon.
The following parameters are listed in the menu:
LANGUAGE: select the language shown on the display.
CLOCK: set the exact time.
TONE: activate/deactivate keypad tone.
LIGHT: activate/deactivate the internal oven light during cooking.
LOGO: activate/deactivate logo on start-up.
GUIDE: activate/deactivate operating tips.
EXIT: exit the menu.
! It is possible to exit the settings menu by pressing the icon.
Control panel/door lock
! The door and control panel can be locked while the oven is off, once cooking
has started or nished and during programming.
The door/control panel lock can be used to lock the oven door and/or controls.
To activate it, press the icon and select the desired command by
pressing the control dial:
• NO LOCK: deactivate an active lock;
• BUTTONS: lock the controls.
Conrm by pressing the icon.
A conrmation buzzer will sound and the icon will appear on the display.
The lock may be activated while the oven is in use, or while it is switched off.
It can also be deactivated in all the above situations and after the oven has
nished cooking.
Setting the clock
To set the clock, switch on the oven by pressing the icon, then press
and follow the steps described.
1. Scroll through the menu commands using the control dial, select CLOCK
and press .
2. Adjust the time using the control dial.
3. Once you have reached the correct hour value, press the icon.
4. Repeat steps 2 and 3 to set the minutes.
5. To exit adjustment mode, press the icon or use the control dial to scroll
through the menu until you reach EXIT, then press .
! The clock can also be set while the oven is off, by pressing the icon
and carrying out steps 2 to 4 as described above.
After the appliance has been connected to the mains, or after a blackout, the
clock will need to be reset.
Setting the minute minder
! The minute minder may be set regardless of whether the oven is switched
on or off. It does not switch the oven on or off.
When the set time has elapsed, the minute minder emits a buzzer that will
automatically stop after 30 seconds or when any active button on the control
panel is pressed.
To adjust the minute minder, proceed as follows:
1. Press the icon.
2. Set the desired time using the control dial.
3. Once you have reached the desired value, press the icon again.
When the oven is switched off, the countdown appears on the display. When the
oven is on, the lit symbol will remind you that the minute minder is active.
To cancel the minute minder, press the icon and use the control dial to
set the time to 00:00. Press again.
The icon will switch off to indicate that the minute minder has been
disabled.

GB
9
Starting the oven
1. Press to switch on the control panel. The appliance buzzer sounds
three times (ascending).
2. Press the icon to select the desired manual cooking mode. The cooking
temperature and duration may be set.
Press the icon to select the desired automatic cooking mode. The
cooking temperature and duration are both set to default values. Only the
duration may be adjusted in accordance with the selected mode. The text
“AUTO” appears on the display to indicate that the temperature is following
a precise cooking prole. A delayed cooking cycle may be programmed.
3. Press to start the cooking mode.
4. The oven will begin its preheating phase, the preheating indicators will light
up as the temperature rises.
5. When the preheating process has nished, a buzzer sounds and all the
preheating indicator lights show that this stage has been completed: the food
can then be placed in the oven.
6. During cooking it is always possible to:
- adjust the temperature by pressing the icon, turning the control dial and
conrming by pressing again (manual modes only );
- set the duration of a cooking mode (see Cooking Modes);
- stop cooking by pressing the icon. In this case the appliance stores
the temperature modied previously in its memory (manual modes only);
- switch off the oven by pressing the icon for 3 seconds.
7. If a blackout occurs while the oven is already in operation, an automatic
system within the appliance will reactivate the cooking mode from the point at
which it was interrupted, provided that the temperature has not dropped below
a certain level. Programmed cooking modes which have not yet started will
not be restored and must be reprogrammed (for example: a cooking mode
has been programmed to start at 20:30. At 19:30 a blackout occurs. When the
power supply is restored, the mode will have to be reprogrammed).
! There is no preheating stage for the GRILL mode.
! Never put objects directly on the bottom of the oven; this will prevent the
enamel coating from being damaged.
! Always place cookware on the rack(s) provided.
Cooling ventilation
In order to cool down the external temperature of the oven, a cooling fan
blows a stream of air between the control panel and the oven door, as well as
towards the bottom of the oven door. At the beginning of the cleaning cycle,
the cooling fan operates at low speed.
! Once cooking has been completed, the cooling fan continues to operate
until the oven has cooled down sufciently.
Oven light
The light comes on when the oven door is opened or when a cooking mode
starts (if enabled in the settings menu).
When models featuring LED INSIDE technology begin cooking, the LEDs on
the door light up for improved illumination of all cooking levels.
Residual heat indicators
The appliance is tted with a residual heat indicator. When the oven is off,
the “residual heat” bar on the display lights up to indicate high temperatures
inside the oven cavity. The individual segments of the bar switch off one by
one as the temperature inside the oven falls.
Demo mode
! The appliance will not enter DEMO mode if the language has not been
selected beforehand.
The oven can operate in DEMO mode: all heating elements are deactivated,
and the controls remain operative.
To activate DEMO mode, switch off the oven and keep the control dial turned
clockwise while pressing for 10 seconds. A buzzer sounds and the
display shows “DEMO”.
To deactivate DEMO mode, keep the control dial turned anticlockwise while
pressing for 3 seconds. A buzzer sounds to conrm deactivation.
Restoring the factory settings
The oven factory settings can be restored to reset all selections made by the
user (language, tone, customised durations, etc…). To carry out a reset, switch
off the oven, then press and hold 6 , and simultaneously
for 6 seconds. Once the restore procedure is complete, a buzzer will sound.
The rst time the icon is pressed, the oven will behave as if it is being
switched on for the rst time.
Standby
This product complies with the requirements of the latest European Directive
on the limitation of power consumption in standby mode. If no buttons are
pressed for 30 minutes and the control panel/door lock has not been activated,
the appliance automatically reverts to standby mode. The ECO Mode symbol
appears on the display to indicate standby mode. As soon as interaction with
the machine resumes, system operation is restored.
Modes
! In order to guarantee wonderfully soft and crunchy foodstuffs,
the oven releases – in the form of water vapour - the humidity
naturally withheld in the food itself. In this way, optimal cooking
results can be achieved for all types of food.
! Every time the oven is switched on, it suggests the rst manual cooking mode.
Manual cooking modes
! All cooking modes have a default cooking temperature which may be adjusted
manually to a value between 40°C and 250°C as desired (270°C for GRILL mode).
Any temperature adjustments will be stored in the appliance memory and suggested
again the next time this mode is used. If the selected temperature is lower than the
temperature inside the oven, the text “OVEN TOO HOT” appears on the display.
However, it will still be possible to start cooking.
If cooking is started without a duration being set, the display will show the
elapsed time.
MULTILEVEL mode
All heating elements and the fan are activated. Since the heat remains constant
throughout the oven, the air cooks and browns food in a uniform manner. A
maximum of 3 racks may be used at the same time.

10
GB
GRILL mode
The top heating element and the rotisserie spit (where present) are activated.
The high and direct temperature of the grill is recommended for food which
requires a high surface temperature. Always cook in this mode with the oven
door closed (see “Practical cooking advice”).
FAN GRILLING mode
The top heating element and the rotisserie spit (where present) are activated
and the fan begins to operate. During part of the cycle the circular heating
element is also activated. This combination of features increases the
effectiveness of the unidirectional thermal radiation provided by the heating
elements through the forced circulation of the air throughout the oven.
This helps prevent food from burning on the surface and allows the heat to
penetrate right into the food. Always cook in this mode with the oven door closed
(see “Practical cooking advice”).
ROAST mode
The top and circular heating elements switch on and the fan begins to operate. This
combination of features increases the effectiveness of the unidirectional thermal
radiation provided by the heating elements through the forced circulation of the
air throughout the oven. This helps prevent food from burning on the surface and
allows the heat to penetrate right into the food.
Always cook in this mode with the oven door closed.
FISH mode
The top and circular heating elements switch on and the fan begins to operate.
This combination is ideal for cooking sh dishes gently.
PIZZA mode
The top and circular heating elements switch on and the fan begins to operate.
This combination heats the oven rapidly. If you use more than one rack at a
time, switch the position of the dishes halfway through the cooking process.
PROVING mode
The circular heating element will come on and the fan will operate during the
preheating stage only. The oven temperature is ideal for activating the rising
process. Always cook in this mode with the oven door closed.
PASTRY mode
The rear heating element and the fan are switched on, thus guaranteeing the
distribution of heat in a delicate and uniform manner throughout the entire
oven. This mode is ideal for baking temperature sensitive foods (such as
cakes, which need to rise).
PASTEURISATION mode
This cooking mode is suitable for fruit, vegetables, etc...
Small containers may be positioned on 2 levels (dripping pan on the 1st shelf
and rack on the 3rd shelf). Let the containers cool inside the oven. Place the
food inside the oven while it is still cold.
SLOW COOK MEAT/FISH/VEGETABLES modes
This type of cooking mode, used for years by industry professionals, enables food
(meat, sh, fruit and vegetables) to be cooked at very low temperatures (75, 85
and 110°C), thereby guaranteeing a perfect level of cooking and enhancing the
taste as much as possible.
The value of these advantages should not be underestimated:
• as the cooking temperatures are very low (in general they are lower than the
temperature required for evaporation), the dispersion of cooking sauces due
to evaporation is substantially reduced and the food becomes softer;
• when cooking meat, the muscle bres contract less than they would during
a classic cooking cycle. The result is a more tender meat which does not
need to be rested after it is cooked. Meat should be browned before it is
placed in the oven.
Cooking foods which have been vacuum-packed at low temperatures,
a technique used for over 30 years by the most prestigious chefs, brings
many advantages:
• culinary: avours are concentrated and the taste, softness and tenderness
of the food are maintained;
• hygienic: provided that hygiene regulations are respected, this type of
cooking protects the food from the harmful effects of oxygen, thus ensuring
that the dishes may be stored for longer in the refrigerator;
• organisational: thanks to the longer storage period, dishes may be prepared
well in advance;
• diet-related: this type of cooking limits the amount of fatty substances used
and therefore means that the food is lighter and easier to digest;
• nancial: the food shrinks less so there is more of the product left after it
has been cooked.
To use this technique, you must use a vacuum-packing machine and the
appropriate bags. Follow the instructions supplied relating to vacuum-packing
food carefully.
The vacuum-packing technique may also be used for raw products (fruit,
vegetables, etc.) as well as pre-cooked products (traditional cooking).
DEFROSTNG mode
The fan at the bottom of the oven circulates room-temperature air around the food.
This mode is suitable for defrosting any type of food, especially delicate items that
should not be heated, for example: ice-cream cakes or cakes made with custard,
cream or fruit.
ECO mode
The rear heating element and the fan are switched on, thus guaranteeing the
distribution of heat in a delicate and uniform manner throughout the entire
oven.This energy saving mode is recommended for small dishes, ideal for
heating foods and nishing off cooking.
Automatic cooking modes
! The temperature and cooking duration are pre-set, guaranteeing a
perfect result every time - automatically. These values are set using the
C.O.P.® (Programmed Optimal Cooking) system. The cooking cycle stops
automatically and the oven indicates when the dish is cooked. You may start
cooking whether the oven has been preheated or not. The cooking duration can
be customised according to personal taste by modifying the relevant value - before
cooking begins - by ±5/20 minutes depending on the selected programme. The
duration can however be modied even once cooking has begun. If the value is
modied before the programme begins, it is stored in the memory and suggested
again by the appliance when the programme is next used. If the temperature
inside the oven is higher than the suggested value for the selected mode, the
text “OVEN TOO HOT” appears on the display and it will not be possible to
begin cooking; wait for the oven to cool.
The icon representing the selected mode and the icon representing the
recommended shelf position appear on the display alternately.
! When the cooking stage has been reached, the oven buzzer sounds.
! Do not open the oven door as this will disrupt the cooking time and
temperature.

GB
11
BREAD mode
Use this function to bake bread. To obtain the best results, we recommend
that you carefully observe the instructions below:
• Follow the recipe.
• Do not exceed the maximum weight of the dripping pan.
• Remember to pour 50g (0,5 dl) of cold water into the baking tray in position
5.
• The dough must be left to rise at room temperature for 1 – 1 ½ hours
(depending on the room temperature) or until the dough has doubled in size.
Recipe for BREAD:
1 dripping pan holding 1000 g max, lower level
2 dripping pans each holding 1000 g max, medium and lower levels
Recipe for 1000 g of dough: 600 g our, 360 g water, 11g salt, 25 g fresh yeast (or
2 sachets of powder yeast)
Method:
• Mix the our and salt in a large bowl.
• Dilute the yeast in lukewarm water (approximately 35 degrees).
• Make a small well in the mound of our.
• Pour in the water and yeast mixture.
• Knead the dough by stretching and folding it over itself with the palm of your
hand for 10 minutes until it has a uniform consistency and is not too sticky.
• Form the dough into a ball shape, place it in a large bowl and cover it with
transparent plastic wrap to prevent the surface of the dough from drying out.
Select the manual PROVING function on the oven. Place the bowl inside
and leave the dough to rise for approximately 1 hour (the dough should
double in volume).
• Cut the dough into equal sized loaves.
• Place them in the dripping pan, on a sheet of baking paper.
• Dust the loaves with our.
• Make incisions on the loaves.
• Place the food inside the oven while it is still cold.
• Start the BREAD cooking mode.
• Once baked, leave the loaves on one of the grill racks until they have
cooled completely.
BEEF/VEAL/LAMB mode
Use this function to cook beef, veal and lamb. Place the food inside the oven
while it is still cold. The dish may also be placed in a preheated oven. Some
of the ROAST modes offer the option of selecting the desired cooking level:
1. Press the icon.
2. Use the control dial to select “WELL DONE”, “MEDIUM” or “RARE”.
3. Press again.
PORK mode
Use this function to cook pork. Place the food inside the oven while it is still
cold. The dish may also be placed in a preheated oven.
CHICKEN mode
This function is ideal for cooking chicken (whole or in pieces). Place the
food inside the oven while it is still cold. The dish may also be placed in a
preheated oven.
FISH FILLET mode
This function is ideal for cooking small-medium llets. Place the food inside the
oven while it is still cold.
FISH EN PAPILLOTE mode
Use this function to cook whole sh with a maximum weight of 1 kg. The paper/
foil package can be placed directly on the dripping pan. Place the food inside
the oven while it is still cold.
TARTS mode
This function is ideal for all tart recipes (which normally need to be heated
well from underneath). Place the food inside the oven while it is still cold. The
dish may also be placed in a preheated oven.
SHORTCRUST TARTS mode
This function is ideal for all recipes which require shortcrust pastry (usually
made without eggs) or have a liquid or very soft lling. Place the food inside
the oven while it is still cold. The dish may also be placed in a preheated oven.
BRIOCHE mode
This function is ideal for baked desserts (made using natural yeast). Place
the food inside the oven while it is still cold; the dish may also be placed in a
preheated oven if desired.
CAKE mode
This function is ideal for all recipes made using baking powder. Place the food inside
the oven while it is still cold. The dish may also be placed in a preheated oven.
DESSERTS mode
This function is ideal for cooking desserts which are made using natural yeast,
baking powder and desserts which contain no yeast. Place the dish in the
oven while it is still cold. The dish may also be placed in a preheated oven.
PAELLA mode
This function was designed for quick and easy paella preparation; all
ingredients are placed inside the oven while it is still cold. To obtain the best
results, we recommend that you carefully observe the instructions below:
• The rice used must not be sticky: salad rice or American long-grain rice are
particularly suitable.
• The oven must not be preheated.
• Position:
- the deep dripping pan on shelf level 1 (if supplied as an accessory), or
place the rack on shelf level 1 and stand a dish measuring approximately
35x30cm (height 5 cm) on it;
- the dripping pan on shelf level 3;
- the rack on shelf level 5;.
Recipe (serves 8):
In the deep dripping pan
• 1 onion, chopped
• 500 g rice
• 500 g frozen mixed seafood (shelled prawns, mussels and clams, squid
rings, etc.)
• 2 handfuls frozen peas
• ¼ chilli, diced
• Chorizo (spiced paprika sausage), sliced
• One tbsp sh stock powder
• 1 measure powdered saffron
• 700 g water
Cover the dripping pan with aluminium foil.
In the dripping pan
• 8 cod llet portions
• 8 (or 16) king prawns (or scampi)

12
GB
• 8 whole mussels, to garnish
Cover the dripping pan with aluminium foil.
On a tray standing on the rack
• 6-8 chicken thighs, marinated using paella spices and a drizzle of olive oil
Once the cooking process is complete, nish with more olive oil.
PILAU RICE mode
Use this function to cook rice. To obtain the best results, we recommend that
you observe the instructions below:
• The rice used must not be sticky: salad rice or American long-grain rice
are particularly suitable.
• The oven must not be preheated.
• The deep dripping pan should be on shelf level 2 (if supplied as an
accessory), or the rack placed on shelf level 2 and a dish measuring
approximately 35x30cm (height 5 cm) stood on it.
Recipe (serves 4 - 6):
• 500 g rice
• 700 ml water or stock
Place the rice in the deep dripping pan without soaking and cover with liquid.
Cover the dripping pan with the aluminium foil.
YOGHURT mode
The circular heating element will come on and the fan will operate during the
preheating stage only. The temperature of 50°C is ideal for preparing yoghurt.
Basic recipe for one litre of yoghurt: one litre of whole UHT milk, one
pot of natural yoghurt
Method:
• Heat the milk in a steel pan until it reaches boiling point.
• Remove the layer of cream on the surface and leave to cool.
• Stir 3 or 4 tablespoons of milk into the yoghurt and combine well.
• Add the mixture to the remaining milk and mix thoroughly.
• Pour into airtight jars.
• Stand the jars on the dripping pan and place in the oven, on level 2.
• At the end of this process, place the jars in the refrigerator to chill for at
least 12 hours. Store the yoghurt in the refrigerator for up to one week.
• The recipe can be adjusted to taste.
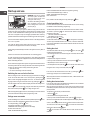
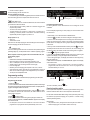
Programming cooking
! A cooking mode must be selected before programming can take place.
Programming the duration
1. Press the icon.
2. Turn the control dial to set the duration; hold the dial in this position to scroll through
the numbers more quickly and make the setting process easier. The display will show
a graphic indicating the duration in bar format.
3. Once you have reached the desired duration, press the icon again.
The duration bar will show the current time, the duration and the end of
cooking time as a graphic.
4. Press to begin cooking.
5. The display will indicate the remaining time by lling the duration bar.
6. When cooking has nished, “COOKING FINISHED” appears on the display
and a buzzer sounds.
• For example: it is 9:00 a.m. and a duration of 1 hour and 15 minutes is
programmed. The programme will stop automatically at 10:15 a.m.
Current time
indicator
End
of cooking time
Duration
bar
Cooking
duration
Programming delayed cooking
! A cooking duration must be set before the end of cooking time can be
scheduled.
! For the delayed programming to work properly, the clock should be set to
the correct time.
1. Follow steps 1 to 3 to set the duration as detailed above.
2. Press the icon twice; the end of cooking time will begin to ash.
3. Turn the control dial to adjust the end of cooking time; hold the dial in this
position to scroll through the numbers more quickly and make the setting
process easier. The display will show a graphic indicating the delayed start
in bar format.
4. Once you have reached the desired end time, press the icon again.
The delayed start bar will show the current time, the time remaining until
the start of cooking, the duration and the end of cooking time as a graphic.
5. Press to begin the pyrolysis schedule.
6. The text “POSTPONED COOKING START” and the time remaining will
appear on the display, moving the delayed start bar backwards.
7. Once cooking has begun, the display will indicate the remaining time by
lling the duration bar.
8. When the time has elapsed, “COOKING FINISHED” appears on the display
and a buzzer sounds.
• For example: it is 9:00 a.m. and a time of 1 hour and 15 minutes is
programmed, while the end time is set to 12:30. The programme will
start automatically at 11:15 a.m.
Current time
indicator
End of cooking
time
Delayed
start bar
Cooking
duration
To cancel a schedule, press the icon.
Practical cooking advice
! Do not place racks in position 1 and 5 during fan-assisted cooking. This is
because excessive direct heat can burn temperature sensitive foods.
! In the GRILL and FAN GRILLING cooking modes, particularly when using
the rotisserie spit, place the dripping pan in position 1 to collect cooking
residues (fat and/or grease).
MULTILEVEL
• Use positions 2 and 4, placing the food which requires more heat on 2.
• Place the dripping pan on the bottom and the rack on top.

GB
13
BARBECUE
• Place the rack in position 3 or 4. Position the food in the centre of the rack.
• We recommend that the temperature is set to its maximum level. The top
heating element is regulated by a thermostat and may not always operate
constantly.
PIZZA
• Use a lightweight aluminium pizza pan. Place it on the rack provided.
For a crispy crust, do not use the dripping pan as this extends the total
cooking duration and prevents the crust from forming.
• If the pizza has a lot of toppings, we recommend adding the mozzarella
cheese to the top of the pizza halfway through the cooking process.

14
GB
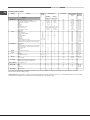
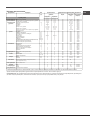
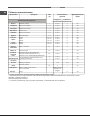
Modes Foods Weight
(in kg)
Rack position Preheating Recommended
Temperature
(°C)
Cooking
duration
(minutes)
Manual
Standard
guide rails
Sliding
guide rails
Multilevel*
Pizza on 2 racks
Pies on two racks/cakes on 2 racks
Sponge cake on 2 racks (on the dripping pan)
Roast chicken + potatoes
Lamb
Mackerel
Lasagne
Cream puffs on 3 racks
Biscuits on 3 racks
Cheese puffs on 2 racks
Savoury pies
1+1
1
1
1
2 and 4
2 and 4
2 and 4
1 and 2/3
2
1 or 2
2
1 and 3 and 5
1 and 3 and 5
2 and 4
1 and 3
1 and 3
1 and 3
1 and 3
1 and 3
1
1
1
1 and 2 and 4
1 and 2 and 4
1 and 3
1 and 3
yes
yes
yes
yes
yes
yes
yes
yes
yes
yes
yes
20-25
30-35
20-25
65-75
45-50
30-35
35-40
20-25
10-20
20-25
20-30
Grill*
Mackerel
Sole and cuttlefish
Squid and prawn kebabs
Cod fillet
Grilled vegetables
Veal steak
Sausages
Hamburgers
Toasted sandwiches (or toast)
Spit-roast chicken using rotisserie spit (where present)
Spit-roast lamb using rotisserie spit (where present)
1
0,7
0,7
0,7
0,5
0,8
0,7
n° 4 or 5
n° 4 or 6
1
1
4
4
4
4
3 or 4
4
4
4
4
-
-
3
3
3
3
2 or 3
3
3
3
3
-
-
no
no
no
no
no
no
no
no
no
no
no
300
300
300
300
300
300
300
300
300
300
300
10-20
10-15
10-15
10-15
15-20
10-20
10-20
10-12
3-5
70-80
70-80
Fan grilling*
Grilled chicken
Cuttlefish
Spit-roast chicken using rotisserie spit (where present)
Spit-roast duck using rotisserie spit (where present)
Roast veal or beef
Roast pork
Lamb
1,5
1
1,5
1,5
1
1
1
2
2
-
-
2
2
2
2
2
-
-
2
2
2
no
no
no
no
no
no
no
210
200
210
210
210
210
210
55-60
30-35
70-80
60-70
60-75
70-80
40-45
Roast*
Roasts (white or red meat)122 no 20
05
0-75
Fish*
Bream
Fish fillets
Sea bass with potatoes
0,7
1
0,5 + 0,5
2
2
2
2
2
2
yes
yes
yes
180
170
190
20-25
12-15
60
Pizza*
Pizza
Focaccia bread
0,5
0,5
2
2
1
1
yes
yes
15-20
20-25
Proving*
Rising process for dough made with yeast
(brioches, bread, sugar pie, croissants, etc.).
22 no 40
Pasteurisation*
Fruit, vegetables, etc.22yes 110
Slow cook*
Meat
Fish
Vegetables
2
2
2
1
1
1
no
no
no
75
85
110
90-180
90-180
90-180
Defrosting*
* The cooking times listed above are intended as guidelines only and may be modified according to personal tastes. Oven preheating times are set as
standard and may not be modified manually.
! ECO programme: This programme – which has longer cooking times but guarantees sensible energy saving – is recommended for dishes such as fish fillets,
small pastries and vegetables. It is also suitable for warming foodstuffs and for completing cooking.
All frozen foods
210-220
180
160-170
200-210
190-200
180
180-190
190
180
210
190-200
210-220
190-200
Cooking advice table

GB
15
Modes Foods Weight
(in kg)
Rack position Preheating
Automatic**
Standard
guide rails
Sliding
guide rails
Bread***
Bread (see recipe)
12 or 32 no
Beef
Roast beef
1-1,52 or 32 no
Veal
Roast veal
1-1,52 or 32 no
Lamb
Leg of lamb
1-1,52 or 32 no
Pork
Roast pork
1,2-1,5 2 or 32 no
Chicken
Roast chicken
1-1,52 or 32 no
Fish fillet
Cod
Perch
Trout
0,4-0,5
0,4-0,5
0,4-0,5
2 or 3
2 or 3
2 or 3
2
2
2
no
no
no
Fish en
papillote
Bream
Sea bass
0,4-0,5
0,4-0,5
2 or 3
2 or 3
2
2
no
no
Tarts
Tarts
0,52 or 32 no
Shortcrust tarts
Apple flan
0,52 or 32 no
Brioche
Desserts made with natural yeast (brioches, almond
cake, etc.)
0,72 or 32 no
Cake
Desserts made with baking powder
(marbled biscuits, pound cake, etc.)
0,72 or 32 no
Desserts
Desserts
12 or 32 no
Paella
Paella (see recipe)
1-3-51-2-4 no
Pilau rice
Pilau rice (see recipe)
0,52 1no
Pizza
with stone*
Very thin pizza (bread dough) 4 (place
pizza stone
on shelf)
* (models with pizza stone only)
** The duration of the automatic cooking functions are set by default. The values can be modified by the user, starting with
the default duration.
*** As stated in the recipe, pour 50 g (0,5 dl) water into the dripping pan in position 5.
Yoghurt
Yoghurt 22 yes
Cooking advice table

16
GB
Precautions and tips
! This appliance has been designed and manufactured in compliance with
international safety standards. The following warnings are provided for safety
reasons and must be read carefully.
General safety
• The appliance was designed for domestic use inside the home and is
not intended for commercial or industrial use.
• The appliance must not be installed outdoors, even in covered areas. It is
extremely dangerous to leave the appliance exposed to rain and storms.
• When moving or positioning the appliance, always use the handles
provided on the sides of the oven.
• Do not touch the appliance while barefoot or with wet or damp hands and
feet.
• The appliance must be used by adults only for the preparation of
food, in accordance with the instructions provided in this booklet.
Any other use of the appliance (e.g. for heating the room) constitutes
improper use and is dangerous. The manufacturer may not be held
responsible for any damage caused as a result of improper, incorrect
and unreasonable use of the appliance.
• Do not touch the heating elements or certain parts of the oven door
when the appliance is in use; these parts become extremely hot.
Keep children well away from the appliance.
• Make sure that the power supply cables of other electrical appliances do
not come into contact with the hot parts of the oven.
• The ventilation and heat dispersal openings must never be obstructed.
• Always grip the oven door handle in the centre: the ends may be hot.
• Always use oven gloves when placing cookware in the oven or when
removing it.
• Do not use aluminium foil to line the bottom of the oven.
• Do not place ammable materials in the oven: if the appliance is switched
on accidentally, the materials could catch re.
• When unplugging the appliance, always pull the plug from the mains
socket; do not pull on the cable.
• Do not perform any cleaning or maintenance work without having
disconnected the appliance from the electricity mains.
• If the event of malfunctions, under no circumstances should you attempt
to perform the repairs yourself. Contact an authorised Service Centre (see
Assistance).
• Do not rest objects on the open oven door.
• Do not let children play with the appliance.
• The appliance should not be operated by people (including children)
with reduced physical, sensory or mental capacities, by inexperienced
individuals or by anyone who is not familiar with the product. These
individuals should, at the very least, be supervised by someone who
assumes responsibility for their safety or receive preliminary instructions
relating to the operation of the appliance.
• The appliance is not intended to be operated by means of an external
timer or separate remote-control system.
Disposal
• When disposing of packaging material: observe local legislation so that
the packaging may be reused.
• The European Directive 2012/19/EC on Waste Electrical and
Electronic Equipment (WEEE), requires that old household electrical
appliances must not be disposed of in the normal unsorted municipal
waste stream. Old appliances must be collected separately in order
to optimise the recovery and recycling of the materials they contain
and reduce the impact on human health and the environment.
The crossed out “wheeled bin” symbol on the product reminds you of your
obligation, that when you dispose of the appliance it must be separately
collected.
Consumers should contact their local authority or retailer for information
concerning the correct disposal of their old appliance.
Respecting and conserving the environment
• You can help to reduce the peak load of the electricity supply network
companies by using the oven in the hours between late afternoon and the
early hours of the morning. The cooking mode programming options, the
“delayed cooking” mode (see Cooking modes) and “delayed automatic
cleaning” mode (see Care and Maintenance) in particular, enable the user
to organise their time efciently.
• Always keep the oven door closed when using the GRILL and FAN
GRILLING modes: this will achieve improved results while saving energy
(approximately 10%).
• Check the door seals regularly and wipe them clean to ensure they are
free of debris so that they adhere properly to the door, thus avoiding the
dispersal of heat.
! This product complies with the requirements of the latest European Directive
on the limitation of power consumption of the standby mode.
Maintenance and care
Switching the appliance off
Disconnect your appliance from the electricity supply before carrying out
any work on it.
Cleaning the appliance
• Slight differences in colour on the front of the oven are due to the different
materials used, i.e. glass, plastic or metal.
• Any shady areas resembling grooves on the oven door glass are caused
by reections from the oven light.
• The enamel is branded at very high temperatures. This process may cause
colour variations. This is normal and will not affect appliance operation in
any way. The thin edges of the sheet metal cannot be entirely enamelled
and may therefore appear to be unnished. This will not affect the rust
protection.
• The stainless steel or enamel-coated external parts and the rubber seals
may be cleaned using a sponge that has been soaked in lukewarm water
and neutral soap. Use specialised products for the removal of stubborn
stains. After cleaning, rinse and dry thoroughly. Do not use abrasive
powders or corrosive substances.
• The inside of the oven should ideally be cleaned after each use, while it is
still lukewarm. Use hot water and detergent, then rinse well and dry with
a soft cloth. Do not use abrasive products.
• All accessories - with the exception of the sliding racks - can be washed
like everyday crockery, and are even dishwasher safe.
• We recommend that detergents are not sprayed directly onto the control
panel, but that a sponge is used instead.
! Never use steam cleaners or pressure cleaners on the appliance.
Cleaning the oven door
! The door of LED INSIDE models cannot be removed.
Clean the glass part of the oven door using a sponge and a non-abrasive
cleaning product, then dry thoroughly with a soft cloth. Do not use rough
abrasive material or sharp metal scrapers as these could scratch the surface
and cause the glass to crack.
For more thorough cleaning purposes, the oven door may be removed:
1. Open the oven door fully (see diagram).

GB
17
2. Use a screwdriver to lift up and turn the small levers F located on the two
hinges (see diagram).
F
3. Grip the door on the two outer sides and
close it approximately half way. Pull the
door towards you, lifting it out of its slot (see
diagram). To replace the door, reverse this
sequence.
To remove oven door with soft closing hinges*:
1. Open the door completely.
2. Lift the pull-out hooks located on the two
hinges. If you cannot lift them manually, use
a tool as a lever.
3. Completely rotate downwards the pull-out
hooks.
4. Holding the door by its two outer sides,
slowly close it but not completely. Pull the
door to remove it from its seat (see gure).
To re-assemble the door follow the procedure
in reverse order.
5. Rotate the pull-out hooks upwards until they
touch the front of the oven.
6. Push the pull-out hooks downwards,
making sure they are steady and do not
rotate forward.
Inspecting the seals
Check the door seals around the oven regularly. If the seals are damaged,
please contact your nearest Service Centre (see Assistance). We recommend
that the oven is not used until the seals have been replaced.
Replacing the light bulb
To replace the oven light bulb:
1. Remove the glass cover of the
lamp-holder.
2. Remove the light bulb and replace
it with a similar one: Wattage 25 W,
cap E 14.
3. Replace the glass cover (see
diagram).
! Do not use the oven lamp as/for ambient lighting.
Sliding rack kit assembly
To assemble the sliding racks:
1. Remove the two frames, lifting
them away from the spacers A (see
gure).
2. Choose which shelf to use with the
sliding rack. Paying attention to the
direction in which the sliding rack is
to be extracted, position joint B and
then joint C on the frame.
3. Secure the two frames with the
guide rails using the holes provided
on the oven walls (see diagram).
The holes for the left frame are
situated at the top, while the holes
for the right frame are at the bottom.
4. Finally, fit the frames on the
spacers A.
! Do not place the sliding racks in position 5.
A
B
C
Left
guide rail
Right guide
rail
Direction
of extraction
D

18
GB
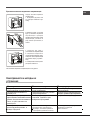
Troubleshooting
Problem Possible cause Solution
A programmed cooking mode
does not start.
There has been a blackout. Reprogram the cooking mode.
The display shows ECO Mode.
The appliance is in standby
mode.
Press any button to exit standby
mode.
An automatic mode has been
selected. “Hot” appears on the
dis
p
la
y
and cookin
g
does not start.
The temperature inside the oven
is higher than the suggested
value for the selected mode.
Wait for the oven to cool down.
Fan-assisted cooking has been
selected and the food looks
burnt.
Positions 1 and 5: the direct
heat could cause
temperature-sensitive
foods to burn.
We recommend switching
dripping pan positions halfway
through cooking.

19
RU
Установка
! Важно сохранить данное руководство для его последующих
консультации. В случае продажи, передачи изделия или при переезде
на новое место жительства необходимо проверить, чтобы руководство
оставалось вместе с изделием, для того чтобы его новыи владелец
мог ознакомиться с правилами эксплуатации и с соответствующими
предупреждениями.
! Внимательно прочитаите инструкции: в них содержатся важные
сведения об установке, эксплуатации и безопасности изделия.
Расположение
! Не разрешаите детям играть с упаковочными материалами.
Упаковочные материалы должны быть уничтожены в соответствии
с правилами раздельного сбора мусора (см. Предосторожности и
рекомендации).
! Монтаж изделия производится в соответствии с данными инструкциями
квалифицированными специалистами. Неправильныи монтаж изделия
может стать причинои повреждения имущества и причинить ущерб
людям и домашним животным.
Встроенный монтаж
Для обеспечения исправного функционирования встраиваемого изделия
кухонный элемент должен иметь соответствующие характеристики:
• панели кухонных элементов, прилегающих к духовому шкафу, должны
быть выполнены из термостойкого материала;
• клей кухонных элементов элементов, шпонированных деревом,
должен быть устойчивым к температуре 100°C.
• для встраивания духового шкафа под кухонным топом (см. схему)
или в пенал ниша кухонного элемента должна иметь следующие
размеры:
590 mm.
595 mm.
22,5 mm.*
20,5 mm.
550 mm.
570 mm.
20 mm.
575-585 mm.
45 mm.
560 mm.
550 mm.
min.
! После встраивания изделия в кухонный элемент должна быть
исключена возможность касания к электрическими частями.
Расход электроэнергии, указанный на паспортной табличке изделия,
был замерян для данного типа монтажа.
Вентиляция
Для обеспечения надлежащеи вентиляции необходимо снять заднюю
панель ниши кухонного элемента. Рекомендуется установить духовои
шкаф на два деревянных бруска или на сплошное основание с
отверстием диаметром не менее 45 х 560 мм (см чертежи).
560 mm.
45 mm.
Центровка и крепление
Для крепления изделия к кухонному элементу:
• откройте дверцу духовки;
• выньте 2 резиновых заглушки, закрывающие крепежные отверстия
в периметральной рамке;
• прикрепите духовой шкаф к нише 2 шурупами для дерева;
• установите на место резиновые заглушки.
! Все защитные элементы должны быть закреплены таким образом,
чтобы их можно было снять только при помощи специального
инструмента.
Электрическое подключение
Духовые шкафы, укомплектованные трехполюсным сетевым кабелем,
расчитаны на функционирование с переменным током с напряжением
и частотой электропитания, указанными на паспортной табличке с
данными (см. ниже).
Подсоединение сетевого кабеля
1. Откройте зажимную коробку,
нажав при помощи отвертки на
выступы с боков крышки: потяните
и откройте крышку (см. схему).
2. Порядок подсоединения
сетевого кабеля: отвинтите
винт кабельного сальника и
три винта контактов L-N- и
затем прикрепите провода под
головками винтов, соблюдая
цветовую маркировку Синий (N)
Коричневый (L) Желто-зеленый
(см. схему).
3. Закрепите сетевой кабель в
специальном кабельном сальнике.
4. Закройте крышку зажимной
коробки.
N
L

20
RU
Подсоединение сетевого шнура изделия к сети электропитания
Установите на сетевой кабель нормализованную штепсельную вилку,
расчитанную на нагрузку, указанную на паспортной табличке (см. сбоку).
В случае прямого подключения к сети электропитания между изделием
и сетью необходимо установить многополюсный выключатель с
минимальным расстоянием между контактами 3 мм, расчитанный
на данную нагрузку и соответствующий действующим нормативам
(выключатель не должен размыкать провод заземления). Сетевой кабель
должен быть расположен таким образом, чтобы ни в одной точке его
температура не превышала температуру помещения более чем на 50°C
(например, задняя панель духового шкафа).
! Электромонтер несет ответственность за правильное подключение
изделия к электрическои сети и за соблюдение правил безопасности.
Перед подключением изделия к сети электропитания проверьте
следующее:
• розетка должна быть соединена с заземлением и соответствовать
нормативам;
• сетевая розетка должна быть рассчитана на максимальную
потребляемую мощность изделия, указанную в таблице технических
характеристик;
• напряжение и частота тока сети должны соответствовать
электрическим данным изделия;
• сетевая розетка должна быть совместима со штепсельнои вилкои
изделия. В противном случае замените розетку или вилку; не
используите удлинители или троиники.
! Изделие должно быть установлено таким образом, чтобы электрическии
провод и сетевая розетка были легко доступны.
! Электрическии провод изделия не должен быть согнут или сжат.
! Регулярно проверяите состояние кабеля электропитания и в случае
необходимости поручите его замену только уполномоченным техникам
(см. Техническое обслуживание).
! Производитель не несет ответственности за последствия
несоблюдения перечисленных выше требовании.
* Только для моделей с направляющими, изготовленными методом вытяжки.
** Только для моделей с направляющими из прутка.
ПАСПОРТНАЯ ТАБЛИЧКА
Габаритные
размеры*
ширина 43,5 см.
высота 32,4 см.
глубина 41,5 см.
Объем*
59 л
Электрическое
подключение
напряжение 220-240 В ~ 50/60 Гц или
50 Гц (см. Паспортную табличку),
максимальная поглощаемая
мощность 2800 Вт
ENERGY
LABEL
Без выдвижных
направляющих
Директива 2002/40/СЕ об этикетках
электрических духовых шкафов.
Норматив EN 50304
Заявление о расходе электроэнергии
класса принудительной
конвекции - режим нагрева:
ECO.
Данное изделие соответствует
следующим Директивам
Европейского Сообщества:
2006/95/CEE от 12.12.06 (Низкое
напряжение) с последующими
изменениями – 2004/108/СЕЕ от
15.12.2004 (Электромагнитная
совместимость) с последующими
изменениями – 93/68/СЕЕ от 22/07/93
с последующими изменениями.
- 2012/19/CEE с последующими
изменениями.
- 1275/2008 режим
энергосбережения/выкл.
Габаритные
размеры**
ширина 45,5 см.
высота 32,4 см.
глубина 41,5 см.
Объем**
62 л
Страница загружается ...
Страница загружается ...
Страница загружается ...
Страница загружается ...
Страница загружается ...
Страница загружается ...
Страница загружается ...
Страница загружается ...
Страница загружается ...
Страница загружается ...
Страница загружается ...
Страница загружается ...
-
 1
1
-
 2
2
-
 3
3
-
 4
4
-
 5
5
-
 6
6
-
 7
7
-
 8
8
-
 9
9
-
 10
10
-
 11
11
-
 12
12
-
 13
13
-
 14
14
-
 15
15
-
 16
16
-
 17
17
-
 18
18
-
 19
19
-
 20
20
-
 21
21
-
 22
22
-
 23
23
-
 24
24
-
 25
25
-
 26
26
-
 27
27
-
 28
28
-
 29
29
-
 30
30
-
 31
31
-
 32
32


Hotpoint Ariston 7OFK 1049L X RU/HA Руководство пользователя
- Категория
- Печи
- Тип
- Руководство пользователя
- Это руководство также подходит для
Задайте вопрос, и я найду ответ в документе
Поиск информации в документе стал проще с помощью ИИ
на других языках
Похожие модели бренда
Модели других брендов
-
HOTPOINT/ARISTON 7OFKQ 897EC(K)RU/HA Инструкция по эксплуатации
-
-
Indesit 7OFKQ 897EC(K)RU/HA Руководство пользователя
-
-
-
-
Hotpoint FK 1039E .20 X/HA Руководство пользователя
-
-
-
Haier HOQ-K5AAN3GBHOQ-K5AAN3GB Руководство пользователя