Dell Vostro 3268-8213 Руководство пользователя
- Категория
- Ноутбуки
- Тип
- Руководство пользователя

Dell Vostro 3267/3268
Owner's Manual
Regulatory Model: D13S
Regulatory Type: D13S002

Примечания, предостережения и предупреждения
ПРИМЕЧАНИЕ: Пометка ПРИМЕЧАНИЕ указывает на важную информацию, которая поможет использовать
данное изделие более эффективно.
ПРЕДОСТЕРЕЖЕНИЕ: Пометка ПРЕДОСТЕРЕЖЕНИЕ указывает на потенциальную опасность повреждения
оборудования или потери данных и подсказывает, как этого избежать.
ПРЕДУПРЕЖДЕНИЕ: Пометка ПРЕДУПРЕЖДЕНИЕ указывает на риск повреждения оборудования, получения
травм или на угрозу для жизни.
© Корпорация Dell или ее дочерние компании, 2017. Все права защищены. Dell, EMC и другие товарные знаки являются товарными
знаками корпорации Dell Inc. или ее дочерних компаний. Другие товарные знаки могут быть товарными знаками соответствующих
владельцев.
2017 - 01
Rev. A00

Contents
1 Работа с компьютером...............................................................................................................................6
Инструкции по технике безопасности......................................................................................................6
Подготовка к работе с внутренними компонентами компьютера..........................................................6
Выключение компьютера..........................................................................................................................7
Выключение компьютера (Windows 10)..............................................................................................................7
После работы с внутренними компонентами компьютера.................................................................... 7
2 Извлечение и установка компонентов................................................................................................... 8
Рекомендуемые инструменты..................................................................................................................8
крышку;...................................................................................................................................................... 8
Removing the cover.....................................................................................................................................................8
Installing the cover....................................................................................................................................................... 8
Лицевая панель.........................................................................................................................................9
Removing the front bezel............................................................................................................................................9
Installing the front bezel.............................................................................................................................................. 9
Cooling shroud....................................................................................................................................................................9
Removing the cooling shroud..................................................................................................................................... 9
Installing the cooling shroud...................................................................................................................................... 10
Плата расширения...................................................................................................................................10
Removing the expansion card...................................................................................................................................10
Installing the expansion card...................................................................................................................................... 11
Жесткий диск............................................................................................................................................ 11
Removing the hard drive assembly........................................................................................................................... 11
Removing the hard drive from the hard drive bracket............................................................................................11
Installing the hard drive into the hard drive bracket............................................................................................... 12
Installing the hard drive assembly.............................................................................................................................12
Оптический дисковод.............................................................................................................................. 12
Removing the optical drive........................................................................................................................................12
Removing the optical drive bracket..........................................................................................................................13
Installing the optical drive bracket............................................................................................................................ 14
Installing the optical drive.......................................................................................................................................... 14
Плата WLAN....................................................................................................................................................................15
Removing the WLAN card.........................................................................................................................................15
Installing the WLAN card...........................................................................................................................................15
Радиатор...................................................................................................................................................16
Removing the heat sink assembly............................................................................................................................ 16
Installing the heat sink assembly...............................................................................................................................16
Модуль памяти.........................................................................................................................................17
Removing the memory module................................................................................................................................. 17
Installing the memory module....................................................................................................................................17
Блок питания............................................................................................................................................ 17
Removing the power supply unit (PSU).................................................................................................................. 17
Installing the power supply unit (PSU).................................................................................................................... 18
Contents
3

Вентилятор корпуса.................................................................................................................................19
Removing the system fan..........................................................................................................................................19
Installing the system fan............................................................................................................................................20
Батарейка типа "таблетка"..................................................................................................................... 20
Removing the coin cell battery.................................................................................................................................20
Installing the coin cell battery....................................................................................................................................21
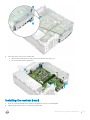
Системная плата......................................................................................................................................21
Removing the system board......................................................................................................................................21
Installing the system board....................................................................................................................................... 23
System board layout.................................................................................................................................................. 24
3 Технология и компоненты...................................................................................................................... 26
Processors........................................................................................................................................................................ 26
Идентификация процессоров в Windows 10...................................................................................................26
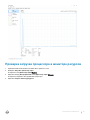
Проверка использования процессора в диспетчере задач............................................................ 26
Проверка загрузки процессора в мониторе ресурсов.....................................................................27
Наборы микросхем..................................................................................................................................28
Загрузка драйвера набора микросхем............................................................................................. 28
Идентификация набора микросхем в диспетчере устройств Windows 10............................................28
Драйверы набора микросхем Intel.................................................................................................................... 29
Видеокарта Intel HD .................................................................................................................................................... 30
Драйверы Intel HD Graphics.................................................................................................................................. 30
Параметры дисплея................................................................................................................................30
Идентификация адаптера дисплея.................................................................................................. 30
Загрузка драйверов........................................................................................................................... 30
Изменение разрешения экрана........................................................................................................ 30
Регулировка яркости в Windows 10.....................................................................................................................31
Подключение к внешним устройствам отображения.......................................................................31
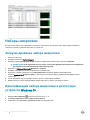
Параметры жесткого диска..................................................................................................................... 31
Определение жесткого диска в Windows 10.................................................................................................... 31
Вход в режим настройки BIOS............................................................................................................................ 32
Функции USB-интерфейса...................................................................................................................... 32
Интерфейс USB 3.0 (SuperSpeed USB)..............................................................................................................32
Быстродействие.................................................................................................................................33
Область применения......................................................................................................................... 34
Совместимость...................................................................................................................................34
HDMI 1.4............................................................................................................................................................................34
HDMI 1.4 Features......................................................................................................................................................35
Advantages of HDMI................................................................................................................................................. 35
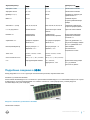
Memory features..............................................................................................................................................................35
Проверка системной памяти ............................................................................................................35
Проверка системной памяти в программе настройки.....................................................................36
DDR4........................................................................................................................................................................... 36
Тестирование памяти с помощью ePSA..........................................................................................................38
Драйверы аудиоустройств Realtek HD....................................................................................................................38
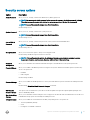
4 Поиск и устранение неполадок..............................................................................................................40
4
Contents

Диагностика............................................................................................................................................. 40
Диагностические сообщения об ошибках............................................................................................. 40
Системные сообщения об ошибке........................................................................................................ 44
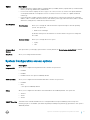
5 Краткое описание программы настройки системы........................................................................... 46
Доступ к настройке системы.................................................................................................................. 46
Параметры настройки системы............................................................................................................. 46
General screen options..............................................................................................................................................46
System Conguration screen options......................................................................................................................47
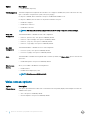
Video screen options................................................................................................................................................. 48
Security screen options.............................................................................................................................................49
Secure Boot screen options..................................................................................................................................... 50
Intel Software Guard Extensions screen options.................................................................................................... 51
Performance screen options..................................................................................................................................... 51
Power Management screen options........................................................................................................................52
POST Behavior screen options................................................................................................................................ 53
Virtualization support screen options......................................................................................................................53
Maintenance screen options.................................................................................................................................... 53
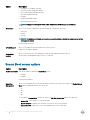
Параметры экрана журнала системы.............................................................................................. 54
SupportAssist System Resolution screen options................................................................................................. 54
6 Specications..............................................................................................................................................55
ProcessorSystem informationMemoryVideoAudioCommunicationExpansion busDrivesCardsExternal
connectorsControl Lights And Diagnostic LightsPowerPhysical Dimensions of ChassisEnvironmental
specications....................................................................................................................................................................55
7 Обращение в компанию Dell...................................................................................................................59
Contents
5

Работа с компьютером
Инструкции по технике безопасности
Соблюдайте приведенные ниже инструкции по технике безопасности во избежание повреждения компьютера и для
собственной безопасности. Если не указано иное, то каждая процедура, предусмотренная в данном документе,
подразумевает соблюдение следующих условий.
• прочитаны указания по технике безопасности, прилагаемые к компьютеру;
• для замены компонента или установки отдельно приобретенного компонента выполните процедуру снятия в обратном
порядке.
ПРЕДУПРЕЖДЕНИЕ: Отсоедините компьютер от всех источников питания перед снятием крышки компьютера
или панелей. После окончания работы с внутренними компонентами компьютера, установите все крышки,
панели и винты на место, перед тем как, подключить компьютер к источнику питания.
ПРЕДУПРЕЖДЕНИЕ: Перед началом работы с внутренними компонентами компьютера прочитайте инструкции
по технике безопасности, прилагаемые к компьютеру. Дополнительные сведения о рекомендациях по технике
безопасности содержатся на начальной странице раздела о соответствии нормативным требованиям по
адресу: www.Dell.com/regulatory_compliance.
ПРЕДОСТЕРЕЖЕНИЕ: Большинство видов ремонта может выполнять только квалифицированный специалист.
Пользователь может осуществлять поиск и устранение неисправностей и простой ремонт только в том случае,
если это рекомендуется в документации на изделие Dell, инструкциями интерактивной справки или службой
поддержки компании Dell. На ущерб, вызванный неавторизованным обслуживанием, гарантия не
распространяется. Прочтите и выполняйте инструкции по технике безопасности, поставляемые с устройством.
ПРЕДОСТЕРЕЖЕНИЕ: Заземлитесь для предотвращения возникновения электростатического разряда, надев
антистатический браслет или периодически прикасаясь к некрашеной металлической поверхности (например,
к разъему на задней панели компьютера).
ПРЕДОСТЕРЕЖЕНИЕ: Бережно обращайтесь с компонентами и платами. Не дотрагивайтесь до компонентов и
контактов платы. Держите плату за края или за металлическую монтажную скобу. Держите такие компоненты,
как процессор, за края, а не за контакты.
ПРЕДОСТЕРЕЖЕНИЕ: При отсоединении кабеля беритесь за разъем или специальную петлю на нем. Не тяните
за кабель. У некоторых кабелей имеются разъемы с фиксирующими лапками; перед отсоединением кабеля
такого типа нажмите на фиксирующие лапки. При разъединении разъемов старайтесь разносить их по прямой
линии, чтобы не погнуть контакты. А перед подсоединением кабеля убедитесь в правильной ориентации и
соосности частей разъемов.
ПРИМЕЧАНИЕ: Цвет компьютера и некоторых компонентов может отличаться от цвета, указанного в этом
документе.
Подготовка к работе с внутренними
компонентами компьютера
Во избежание повреждения компьютера выполните следующие шаги, прежде чем приступать к работе с внутренними
компонентами компьютера.
1 Соблюдение Инструкций по технике безопасности обязательно.
2 Чтобы не поцарапать крышку компьютера, работы следует выполнять на плоской и чистой поверхности.
3 Выключите компьютер (см. раздел Выключение компьютера).
1
6 Работа с компьютером

ПРЕДОСТЕРЕЖЕНИЕ: При отсоединении сетевого кабеля необходимо сначала отсоединить его от
компьютера, а затем от сетевого устройства.
4 Отсоедините от компьютера все сетевые кабели.
5 Отсоедините компьютер и все внешние устройства от электросети.
6 Нажмите и не отпускайте кнопку питания, пока компьютер не подключен к электросети, чтобы заземлить системную
плату.
7 Снимите крышку.
ПРЕДОСТЕРЕЖЕНИЕ: Прежде чем прикасаться к чему-либо внутри компьютера, снимите статическое
электричество, прикоснувшись к некрашеной металлической поверхности (например, на задней панели
компьютера). Во время работы периодически прикасайтесь к некрашеной металлической поверхности,
чтобы снять статическое электричество, которое может повредить внутренние компоненты.
Выключение компьютера
Выключение компьютера (Windows 10)
ПРЕДОСТЕРЕЖЕНИЕ: Во избежание потери данных сохраните и закройте все открытые файлы и выйдите из
всех открытых программ перед выключением компьютера.
1 Нажмите или коснитесь его.
2 Нажмите или коснитесь его, а затем нажмите кнопку Shut down (Завершение работы) или коснитесь ее.
ПРИМЕЧАНИЕ: Убедитесь, что компьютер и все подключенные к нему устройства выключены. Если
компьютер и подключенные устройства не выключились автоматически при завершении работы
операционной системы, нажмите и не отпускайте кнопку питания примерно 6 секунды, пока они не
выключатся.
После работы с внутренними компонентами
компьютера
После завершения любой процедуры замены не забудьте подключить все внешние устройства, платы и кабели, прежде
чем включать компьютер.
1 Установите на место крышку.
ПРЕДОСТЕРЕЖЕНИЕ: Чтобы подсоединить сетевой кабель, сначала подсоедините его к сетевому
устройству, а затем к компьютеру.
2 Подсоедините к компьютеру все телефонные или сетевые кабели.
3 Подключите компьютер и все внешние устройства к электросети.
4 Включите компьютер.
5 Если необходимо, проверьте исправность работы компьютера, запустив программу Dell Diagnostics.
Работа с компьютером 7

Извлечение и установка компонентов
В этом разделе приведены подробные сведения по извлечению и установке компонентов данного компьютера.
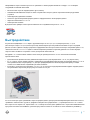
Рекомендуемые инструменты
Для выполнения процедур, описанных в этом документе, требуются следующие инструменты:
• маленькая шлицевая отвертка;
• Крестовая отвертка № 1
• небольшая пластиковая палочка
• Отвертка с шестигранной головкой
крышку;
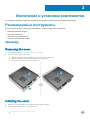
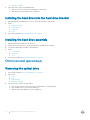
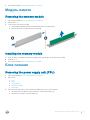
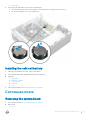
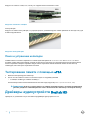
Removing the cover
1 Follow the procedure in Before working inside your computer.
2 Follow the steps to remove the cover:
a Remove the 6-32xL6.35 screws that secure the cover to the computer [1].
b Slide the computer cover towards the back of the computer [2].
c Lift and remove the cover from the computer [3].
Installing the cover
1 Slide the cover from the back of the computer, until the latches snap-in.
2 Tighten the 6-32xL6.35 screws to secure the cover.
2
8 Извлечение и установка компонентов

3 Follow the procedures in After Working Inside Your Computer
Лицевая панель
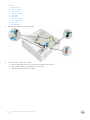
Removing the front bezel
1 Follow the procedure in Before working inside your computer.
2 Remove cover.
3 Follow the steps to remove the front bezel:
a Lift the tabs [1], and pull the front bezel [2].
b Lift the front bezel to remove it from the computer [3].
Installing the front bezel
1 Hold the bezel and ensure that the hooks on the tabs snap into the notches on the computer.
2 Rotate the front bezel toward the front of the computer.
3 Press the front bezel until the tabs snap in.
4 Install the cover.
5 Follow the procedure in After Working Inside Your Computer.
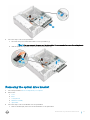
Cooling shroud
Removing the cooling shroud
NOTE
: Cooling shroud is not a mandatory removal but recommended for easier access to the cables.
1 Follow the procedure in Before working inside your computer.
2 Remove the cover
3 Follow the steps to remove the heat sink fan cover:
a Pry the plastic notches that secure the fan cover in an outward direction [1].
b Remove the fan cover from the heat sink assembly [2].
Извлечение и установка компонентов 9

Installing the cooling shroud
1 Align the tabs on the cooling shroud with the securing slots on the computer.
2 Lower the cooling shroud into the chassis until it is rmly seated.
3 Install the cover.
4 Follow the procedure in After Working Inside Your Computer.
Плата расширения
Removing the expansion card
1 Follow the procedure in Before working inside your computer.
2 Remove the cover.
3 Perform the following steps to remove the expansion card:
a Pull the metal tab to release the expansion card [1].
b Push the tab forward [2], and remove the expansion card from the slot on the computer [3].
10 Извлечение и установка компонентов

Installing the expansion card
1 Insert the expansion card on the slot.
2 Push the card- retention latch to secure the expansion card.
3 Push the metal tab until it snaps in place.
4 Install the cover
5 Follow the procedure in After Working Inside Your Computer.
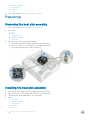
Жесткий диск
Removing the hard drive assembly
1 Follow the procedure in Before working inside your computer.
2 Remove the:
a cover
b bezel
c cooling shroud
3 Disconnect the power and the data cables from the hard drive.
NOTE: For easy access to the power and the data cables, it is recommended to remove the cooling shroud.
4 Follow the steps to remove the hard drive assembly:
a Remove the 6-32xL3.6 screws that secure the hard drive to the drive bay.
b Press the blue tab, and slide the hard drive from the hard drive bay.
Removing the hard drive from the hard drive bracket
1 Follow the procedures in Before Working Inside Your Computer.
2 Remove:
a cover
b front bezel
c cooling shroud
Извлечение и установка компонентов 11

d hard drive assembly
3 Follow the steps to remove hard drive bracket:
a Remove the screw that secures the hard drive to the bracket.
b Slide and remove the hard drive from the bracket.
Installing the hard drive into the hard drive bracket
1 Slide the hard drive and tighten the screws to secure the hard drive to the bracket.
2 Install:
a hard drive assembly
b cooling shroud
c front bezel
d cover
3 Follow the procedure in After Working Inside Your Computer.
Installing the hard drive assembly
1 Slide the hard drive assembly into the drive bay.
2 Tighten the 6-32xL3.6 screws to secure the hard-drive assembly to the computer.
3 Connect the data and power cables to the hard drive.
4 Install:
a cooling shroud
b front bezel
c cover
5 Follow the procedures in After Working Inside Your Computer.
Оптический дисковод
Removing the optical drive
1 Follow the procedure in Before working inside your computer.
2 Remove the:
a cover
b bezel
c cooling shroud
d hard drive assembly
3 Follow the steps to release the optical drive:
a Remove the 6-32xL3.6 screw that secures the optical drive to the drive bay [1].
b Press the blue tab to loosen the optical drive [2].
c Slide the optical drive bracket from the computer [3].
12 Извлечение и установка компонентов

4 Follow the steps to remove the optical drive:
a Disconnect the power and the data cables from the optical drive [1].
NOTE: For easy access to the power and the data cables, it is recommended to remove the cooling shroud.
b Slide the optical drive [2] and lift it up to remove it from the chassis [3].
Removing the optical drive bracket
1 Follow the procedure in Before working inside your computer.
2 Remove the:
a cover
b bezel
c cooling shroud
d hard drive assembly
e optical drive
3 Follow the steps to remove the bracket from the optical drive.
a Remove the M2L2(04) screws that secure the bracket to the optical drive.
Извлечение и установка компонентов 13

b Slide the optical drive from the bracket.
NOTE: Remove the optical-drive bracket only if you are replacing with a new optical drive. Otherwise, if optical drive
removal is only a pre-requisite to remove other components, then ignore Step 5 and Step 6
Installing the optical drive bracket
1 Slide the optical drive into the drive bay until it snaps.
2 Tighten the M2L2(04) screw to secure the optical drive to the bracket.
3 Install the:
a optical drive
b hard drive assembly
c cooling shroud
d front bezel
e cover
4 Follow the procedures in After Working Inside Your Computer.
Installing the optical drive
1 Insert the optical drive into the slot until it clicks into place.
2 Tighten the 6-32xL3.6 screw to secure the drive to the chassis.
3 Connect the data and power cables to the optical drive.
4 Install the:
a hard drive assembly
b cooling shroud
c front bezel
d cover
5 Follow the procedure in After Working Inside Your Computer.
14 Извлечение и установка компонентов

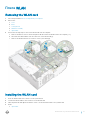
Плата WLAN
Removing the WLAN card
1 Follow the procedure in Before working inside your computer.
2 Remove the:
a cover
b bezel
c cooling shroud
d hard drive assembly
e optical drive
3 Perform the following steps to remove the WLAN card from the computer:
a Remove the M2L3.5 screw to release the plastic tab that secures the WLAN card to the computer [1, 2].
b Disconnect the WLAN cables from the connectors on the WLAN card [3].
c Remove the WLAN card from its connector on the system board [4].
Installing the WLAN card
1 Insert the WLAN card to the connector on the system board.
2 Connect the WLAN cables to the connectors on the WLAN card.
3 Place the plastic tab and tighten the M2L3.5 screw to secure the WLAN card to the system board.
4 Install:
a optical drive
Извлечение и установка компонентов 15

b hard drive assembly
c cooling shroud
d front bezel
e cover
5 Follow the procedure in After Working Inside Your Computer.
Радиатор
Removing the heat sink assembly
1 Follow the procedure in Before working inside your computer.
2 Remove the:
a cover
b bezel
c cooling shroud
d hard drive assembly
e optical drive
3 Follow the steps to remove the heat sink assembly:
a Disconnect the heat sink assembly cable from the system board [1].
b Remove the screws to loosen the processor fan and the heat sink [2].
c Lift the heat sink and remove it from the chassis [3].
Installing the heat sink assembly
1 Place the heat sink assembly in the slot by aligning with the screw holders.
2 Tighten the screws to secure the heat sink assembly to the system board.
3 Connect the heat sink assembly cable to the system board.
4 Install:
a optical drive
b hard drive assembly
c cooling shroud
d front bezel
e cover
16 Извлечение и установка компонентов

5 Follow the procedure in After Working Inside Your Computer.
Модуль памяти
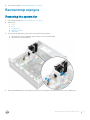
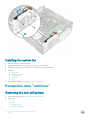
Removing the memory module
1 Follow the procedure in Before working inside your computer.
2 Remove the cover.
3 To remove the front memory module:
a Pull the clips securing the memory module until the memory module pops up.
b Remove the memory module from the system board.
Installing the memory module
1 Insert the memory module into the memory module socket until the clips secure the memory module.
2 Install the cover.
3 Follow the procedure in After working inside your computer.
Блок питания
Removing the power supply unit (PSU)
1 Follow the procedure in Before working inside your computer.
2 Remove the:
a cover
b bezel
c cooling shroud
d hard drive assembly
e optical drive
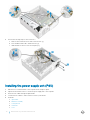
3 Perform the following steps to remove the power supply unit (PSU) from the computer:
a Disconnect the PSU cables from the connectors on the system board [1, 2].
b Unroute the PSU cables from the holder [3,4].
Извлечение и установка компонентов 17

4 Perform the following steps to remove the PSU:
a Remove the 6-32xL6.35 screws that secure the PSU [1].
b Press the blue release tab to release the PSU [2].
c Slide and remove the PSU from the computer [3].
Installing the power supply unit (PSU)
1 Slide the PSU towards the back of the computer until it snaps into place.
2 Tighten the 6-32xL6.35 screws to secure the power supply unit to the computer.
3 Route the PSU cables through the placeholder.
4 Connect the PSU cables to their connectors on the system board.
5 Install the:
a optical drive
b hard drive assembly
c cooling shroud
d front bezel
e cover
18 Извлечение и установка компонентов

6 Follow the procedure in After Working Inside Your Computer.
Вентилятор корпуса
Removing the system fan
1 Follow the procedure in Before working inside your computer.
2 Remove the:
a cover
b bezel
c cooling shroud
d hard drive assembly
e optical drive
3 Perform the following steps to remove the system fan from the computer:
a Disconnect the system fan cable from the connector on the system board [1].
b Unroute the system fan cable [2].
4 Remove the M6xL10 screws that secure the system fan to the computer chassis and remove it from the computer. [1,2]
Извлечение и установка компонентов 19

Installing the system fan
1 Place the system fan on the computer.
2 Tighten the M6xL10 screws to secure the system fan to the computer.
3 Route and connect the system fan cable to the connector on the system board.
4 Install the:
a optical drive
b hard drive assembly
c cooling shroud
d front bezel
e cover
5 Follow the procedure in After Working Inside Your Computer.
Батарейка типа "таблетка"
Removing the coin cell battery
1 Follow the procedures in Before working inside your computer.
2 Remove the:
a cover
b bezel
c cooling shroud
d hard drive assembly
20 Извлечение и установка компонентов
Страница загружается ...
Страница загружается ...
Страница загружается ...
Страница загружается ...
Страница загружается ...
Страница загружается ...
Страница загружается ...
Страница загружается ...
Страница загружается ...
Страница загружается ...
Страница загружается ...
Страница загружается ...
Страница загружается ...
Страница загружается ...
Страница загружается ...
Страница загружается ...
Страница загружается ...
Страница загружается ...
Страница загружается ...
Страница загружается ...
Страница загружается ...
Страница загружается ...
Страница загружается ...
Страница загружается ...
Страница загружается ...
Страница загружается ...
Страница загружается ...
Страница загружается ...
Страница загружается ...
Страница загружается ...
Страница загружается ...
Страница загружается ...
Страница загружается ...
Страница загружается ...
Страница загружается ...
Страница загружается ...
Страница загружается ...
Страница загружается ...
Страница загружается ...
-
 1
1
-
 2
2
-
 3
3
-
 4
4
-
 5
5
-
 6
6
-
 7
7
-
 8
8
-
 9
9
-
 10
10
-
 11
11
-
 12
12
-
 13
13
-
 14
14
-
 15
15
-
 16
16
-
 17
17
-
 18
18
-
 19
19
-
 20
20
-
 21
21
-
 22
22
-
 23
23
-
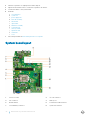 24
24
-
 25
25
-
 26
26
-
 27
27
-
 28
28
-
 29
29
-
 30
30
-
 31
31
-
 32
32
-
 33
33
-
 34
34
-
 35
35
-
 36
36
-
 37
37
-
 38
38
-
 39
39
-
 40
40
-
 41
41
-
 42
42
-
 43
43
-
 44
44
-
 45
45
-
 46
46
-
 47
47
-
 48
48
-
 49
49
-
 50
50
-
 51
51
-
 52
52
-
 53
53
-
 54
54
-
 55
55
-
 56
56
-
 57
57
-
 58
58
-
 59
59


Dell Vostro 3268-8213 Руководство пользователя
- Категория
- Ноутбуки
- Тип
- Руководство пользователя
Задайте вопрос, и я найду ответ в документе
Поиск информации в документе стал проще с помощью ИИ
на других языках
- English: Dell Vostro 3268-8213 User manual