Candy CGM 61/1W-07 Руководство пользователя
- Категория
- Вытяжки
- Тип
- Руководство пользователя
Это руководство также подходит для

CGM61/1X-07,CGM61/1N-07,
CGM61/1W-07,CGM91/1X-07,
CGM91/1N-07,CGM91/1W-07
Instructionmanual
ENGLISH(EN)--------------------------------------------------------------------------------page 001
RUSSIAN(RU) -------------------------------------------------------------------------------page 015

CGM61/1X-07,CGM61/1N-07,
CGM61/1W-07,CGM91/1X-07,
CGM91/1N-07,CGM91/1W-07
Cooker Hood
Instruction Manual

Content
1…………………………………..………………………………Safety instructions
2…………………………………..………………………………Installation
3…………………………………..………………………………Start using your cooker hood
4…………………………………..………………………………Troubleshooting
5…………………………………..………………………………Maintenance and cleaning
6…………………………………..………………………………Environment protection

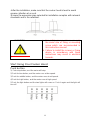
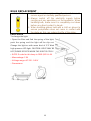
SAFETY INSTRUCTIONS
This manual explains the proper installation and use of your cooker hood,
please read it carefully before using even if you are familiar with the product.
The manual should be kept in a safe place for future reference.
Never to do:
● Do not try to use the cooker hood
without the grease filters or if the filters
are excessively greasy!
●Do not install above a cooker with a
high level grill.
●Do not leave frying pans unattended
during use because overheated fats or
oils might catch fire.
●Never leave naked flames under the
cooker hood.
●If the cooker hood is damaged, do not
attempt to use.
●Do not flambé under the cooker hood.
●CAUTION: Accessible parts may
become hot when used with cooking
appliances.
●The minimum distance between the
supporting surface for the cooking
vessels on the hob and the lowest part
of the cooker hood. (When the cooker
hood is located above a gas appliance,
this distance shall be at least 65 cm)
●The air must not be discharged into a
flue that is used for exhausting fumes
from appliances burning gas or other
fuels.
Always to do:
● Important! Always switch off the
electricity supply at the mains during
installation and maintenance such as
light bulb replacement.
●The cooker hood must be installed in
accordance with the installation
instructions and all measurements
followed.
●All installation work must be carried
out by a competent person or qualified
electrician.
●Please dispose of the packing material
carefully. Children are vulnerable to it.
● Pay attention to the sharp edges
inside the cooker hood especially
during installation and cleaning.
●When the cooker hood is located
above a gas appliance,the minimum
distance between the supporting
surface for the cooking vessels on the
hob and the lowest part of the cooker
hood that distance must be:
Gas cookers: 75 cm
Electric cookers: 65 cm
Coal or oil cookers: 75 cm
●Make sure the ducting has no bends
sharper than 90 degrees as this will
reduce the efficiency of the cooker
hood.
●Warning: Failure to install the screws
or fixing device in accordance with
these instructions may result in
electrical hazards

Always to do:
●Always put lids on pots and pans
when cooking on a gas cooker.
●When in extraction mode, air in the
room is being removed by the cooker
hood. Please make sure that proper
ventilation measures are being
observed. The cooker hood removes
odours from room but not steam.
●There shall be adequate ventilation of
the room when the cooker hood is
used at the same time as appliances
burning gas or other fuels.
●Cooker hood is for domestic use only.
●If the supply cord is damaged, it must
be replaced by the manufacturer, its
service agent or similarly qualified
persons in order to avoid a hazard.
●This appliance can be used by
children aged from 8 years and above
and persons with reduced physical,
sensory or mental capabilities or lack
of experience and knowledge if they
have been given supervision or
instruction concerning use of the
appliance in a safe way and
understand the hazards involved.
Children shall not play with the
appliance. Cleaning and user
maintenance shall not be made by
children without supervision.
●Warning: Before obtaining access to
terminals, all supply circuits must be
disconnected.
Always to do:
● Caution: The appliance and its
accessible parts can become hot
during operation. Be careful to avoid
touching the heating elements.
Children younger than 8 years old
should stay away unless they are
under permanent supervision.
● There shall be adequate ventilation of
the room when the cooker hood is
used at the same time as appliances
burning gas or other fuels.
●There is a fire risk if cleaning is not
carried out in accordance with the
instructions
●Regulations concerning the discharge
of air have to be fulfilled.
●Clean your appliance periodically by
following the method given in the
chapter MAINTENANCE.
●For safety reason, please use only the
same size of fixing or mounting screw
which are recommended in this
instruction manual.
●Regarding the details about the
method and frequency of cleaning,
please refer to maintenance and
cleaning section in the instruction
manual.
●Cleaning and user maintenance shall
not be made by children without
supervision.
●When the cooker hood and
appliances supplied with energy other
than electricity are simultaneously in
operation, the negative pressure in the
room must not exceed 4 Pa (4 x 10⁻⁵
bar).

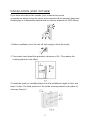
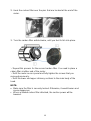
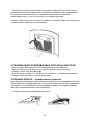
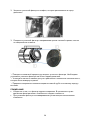
INSTALLATION (VENT OUTSIDE)
If you have an outlet to the outside, your cooker hood can be
connected as below picture by means of an extraction duct (enamel, aluminum,
flexible pipe or inflammable material with an interior diameter of 150/120mm)
1. Before installation, turn the unit off and unplug it from the outlet.
2. The cooker hood should be placed at a distance of 65~75cm above the
cooking plane for best effect.
3. Install the hook on a suitable place once the installation height is fixed, and
keep it in line. The fixed position of the inside chimney bracket is the place of
chimney. See pic 2.

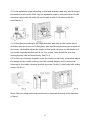
4. Fix the expansion pipe according to the lead direction and way, and then put
the cooker hood on the hook. Lay the expansion pipe to the wall outlet. Fix the
expansion pipe with the cable tie on the wall-outlet if it is aluminium foil
pipe.See pic 3.
5. Put the glass according to the lead direction and way on the cooker hood,
and then use the screws to fix the glass, also lead the expansion pipe outside of
the room, meanwhile adjust the height of the inside chimney to the position of
the inside chimney bracket and fix on it by screw , here should be sure the
inside chimney can be flexed freely. See Pic 4.
6. Put the two chimneys together onto the cooker hood body, meanwhile adjust
the height of the inside chimney into the suitable height, and fix the inside
chimney to the inside chimney bracket by screw. Finally, fix the body with safety
screw. See Pic 5.
Note: The two safety vents are positioned on the back housing, with diameter
of 6mm.

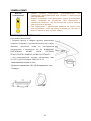
MOUNTING OF THE V-FLAP(Optional)
If the cooker hood does not have an assembled V-flap 1, you should mount the
half-parts to the its body.
To mount the V-flap 1 you should:
• Mount two half-parts 2 into the body 6
• a pin 3 should be top oriented;
• the axis 4 should be inserted in the holes 5 on body;
• repeat all the operations for the 2nd
half-part
HINTS FOR EXHAUST DUCT INSTALLATION
The following rules must be strictly followed to obtain optimal air extraction:
• Keep expansion pipe short and straight.
• Do not reduce the size or restrict expansion pipe.
• When using expansion pipe always install the pipe pulled taut to
minimize pressure loss.
• Failure to observe these basic instructions will reduce the performance
and increase noise levels of the cooker hood.
• Any installation work must be carried out by a qualified electrician or
competent person.
•Do not connect the ducting system of the hood to any existing ventilation
system which is being used for any other appliance ,such as warmer tube,
gas tube , hot wind tube.
•The angle of the bend of the expansion pipe should not be less than 120º;
you must direct the pipe horizontally, or, alternatively, the pipe should go
up from the initial point and should be led to an outer wall.

•After the installation ,make sure that the cooker hood is level to avoid
grease collection at on end.
•Ensure the expansion pipe selected for installation complies with relevant
standards and is fire retardant.
WARNING:
For safety reason, please use only
the same size of fixing or mounting
screw which are recommended in
this instruction manual.
Failure to install the screws or fixing
device in accordance with these
instructions may
result in electrical
hazards.
Start Using Your Cooker Hood
Push button
1) Push stop button, and the motor will stop.
2)Push the low button, and the motor runs at low speed.
3)Push the middle button, and the motor runs at mid speed.
4)Push the high button, and the motor runs at high speed.
5)Push the light button and the two lights will come on. Push it again and the light will
turn off.

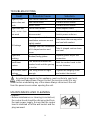
TROUBLESHOOTING
Fault Possible Cause Solution
Light on, but
motor does not
work
Fan switch turned off Select a fan switch position.
Fan switch failed Contact service center.
Motor failed Contact service center.
Light does not
work, motor does
not work
House fuses blown Reset/Replace fuses.
Power cord loose or
disconnected
Refit cord to power outlet.
Switch power outlet on.
Oil leakage
One way valve and the air
ventilation entrance are not
tightly sealed
Take down the one way valve
and seal with sealant.
Leakage from the connection
of U-shaped section and
cover
Take U-shaped section down
and seal.
Lights not
working
Broken/Faulty globes
Replace globes as per this
instruction.
Insufficient
suction
The distance between the
cooker hood and the gas top
is too far
Refit the cooker hood to the
correct distance.
The Cooker hood
inclines
The fixing screw not tight
enough
Tighten the hanging screw
and make it horizontal.
NOTE:
Any electrical repairs to this appliance must conform to your local,
state and federal laws.Please contact the service centre if in any
doubt before undertaking any of the above.Always disconnect the unit
from the power source when opening the unit.
MAINTENANCE AND CLEANING
Caution:
• Before maintenance or cleaning is carried out,
the cooker hood should be disconnected from
the main power supply. Ensure that the cooker
hood is switched off at the wall socket and the
plug removed.

• External surfaces are susceptible to scratches and abrasions, so please
follow the cleaning instructions to ensure the best possible result is
achieved without damage.
GENERAL
Cleaning and maintenance should be carried out with the appliance cold
especially when cleaning.Avoid leaving alkaline or acid substances
(lemon juice, vinegar etc.) on the surfaces.
STAINLESS STEEL
The stainless steel must be cleaned regularly (e.g.weekly) to ensure long
life expectancy.Dry with a clean soft cloth. A specialized stainless steel
cleaning fluid may be used.
NOTE:
Ensure that wiping is done along with the grain of the stainless steel to
prevent any unsightly crisscross scratching patterns from appearing.
CONTROL PANEL SURFACE
The inlay control panel can be cleaned using warm soapy water. Ensure
the cloth is clean and well wrung before cleaning. Use a dry soft cloth to
remove any excess moisture left after cleaning.
Important
Using neutral detergents and avoid using harsh cleaning chemicals,
strong household detergents or products containing abrasives,as this will
affect the appliance appearance and potentially remove any printing of
artwork on the control panel and will void manufactures warrantee.
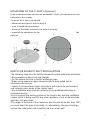
GREASE MESH FILTERS
The mesh filters can be cleaned either by hand or in the dishwasher. After
cleaning ensure that the filters are completely dry before refitting.
- By hand: Soak them for about 3 minute in water with a grease-loosening
detergent then brush it gently with a soft brush. Please do not apply too
much pressure, avoid to damage it . (Leave to dry naturally out of direct
sun light)
- In a dishwasher: Ensure that placement of the filters is made so as to not

impede the function of the spray arm. Washing the filters in a dishwasher
may cause discoloration of the aluminum inner mesh over time although it
will not affect their performance.
Filters should be washed separately to crockery and kitchen utensils. it is
advisable not to use rinse aid.
INSTALLING GREASE MESH FILTERS
• To install filters for the following four steps .
- Angle the filter into slots at the back of the hood.
- Push the button on handle of the filter.
- Release the handle once the filter fits into a resting position.
- Repeat to install all filters.
CARBON FILTER-buy separately
Activated carbon filter can be used to trap odors. Normally the activated
carbon filter should be changed at three or six months according to your
cooking habit. The installation procedure of activated carbon filter is as
below.
1. Remove the grease filter(s).

2. Hook the carbon filter over the pins that are located at the end of the
motor.
3. Turn the carbon filter anticlockwise, until you feel it click into place.
※Repeat this process for the second carbon filter. You need to place a
cabon filter at either end of the motor.
※Refit the motor access panel and fully tighten the scrwes that you
removed previously.
※Refit the lower and upper chimney sections to the main body of the
hood.
NOTE:
• Make sure the filter is securely locked. Otherwise, it would loosen and
cause dangerous.
• When activated carbon filter attached, the suction power will be
lowered.

BULB REPLACEMENT
Important :
The bulb must be replaced by the manufacturer, its
service agent or similarly qualified persons.
Always switch off the electricity supply before
carrying out any operations on the appliance. When
handling bulb, make sure it is completely cool down
before any direct contact to hands.
When handling globes hold with a cloth or gloves to
ensure perspiration does not come in contact with
the globe as this can reduce the life of the globe.
LED LIGHTS
To change the light:
• Open the filter and find the spring of the light,
push the spring and the light will be slip out.
Change the light as with same kind of 2*2 Watt
high pressure LED light. CAUTION: LIGHT MAY BE
HOT,PLEASE ROTATE WHEN THE LIGHT IS COOL!
• ILCOS D code for this lamp is: DBR-2/65-H-64.
– Max wattage: 2 W
– Voltage range: AC 220-240 V
– Dimensions:

ENVIRONMENTAL PROTECTION:
This product is marked with the symbol on the selective sorting of
waste electronic equipment. This means that this product must not
be disposed of with household waste but must be supported by a
system of selective collection in accordance with Directive
2012/19/EU. It will then be recycled or dismantled to minimize
impacts on the environment, electrical and electronic products are
potentially dangerous for the environment and human health due to
the presence of hazardous substances.For more information, please
contact your local or regional authorities.
NOTE:
The following shows how to reduce total environmental impact (e.g. energy use) of the
cooking process).
(1) Install the cooker hood in a proper place where there is efficient ventilation.
(2) Clean the cooker hood regularly so as not to block the airway.
(3) Remember to switch off the cooker hood light after cooking.
(4) Remember to switch off the cooker hood after cooking.
INFORMATION FOR DISMANTLING
Do not dismantle the appliance in a way which is not shown in the user manual. The
appliance could not be dismantled by user. At the end of life, the appliance should
not be disposed of with household waste. Check with you Local Authority or retainer
for recycling advice.

CGM61/1X-07, CGM61/1N-07,
CGM61/1W-07, CGM91/1X-07,
CGM91/1N-07, CGM91/1W-07
Кухонная вытяжка
Руководство по эксплуатации

Содержание
1…………………………………..…………………Указания по технике безопасности
2…………………………………..…………………Установка
3…………………………………..…………………Начало использования кухонной вытяжки
4…………………………………..…………………Устранение неисправностей
5…………………………………..…………………Техническое обслуживание и очистка
6…………………………………..…………………Защита окружающей среды

УКАЗАНИЯ ПО ТЕХНИКЕ БЕЗОПАСНОСТИ
Это руководство описывает надлежащую установку и использование вашей кухонной
вытяжки. Пожалуйста, предварительно внимательно прочтите его, даже если вы
знакомы с этим изделием. Руководство должно храниться в безопасном месте для
обращений к нему в будущем.
Никогда не делайте
следующее:
● Не пытайтесь использовать кухонную
вытяжку без жироулавливающих
фильтров или при чрезмерно
замасленных фильтрах!
●
Не устанавливайте вытяжку над плитой
с решеткой высокого уровня.
●
Не оставляйте без присмотра
сковороды при приготовлении пищи,
так как перегретый жир или масло
может воспламениться.
● Никогда не оставляйте открытое пламя
под кухонной вытяжкой.
●
Не пытайтесь использовать
поврежденную кухонную вытяжку.
●
Не разводите огонь под кухонной
вытяжкой..
●
ПРЕДОСТЕРЕЖЕНИЕ: Доступные
части могут нагреваться при
использовании с кухонными приборами.
●
Минимальное расстояние между
опорной поверхностью для кухонной
посуды на конфорке и нижней частью
кухонной вытяжки (если кухонная
вытяжка расположена над устройством,
работающим на газе, это расстояние
должно быть не менее 65 см).
●
Воздух из вытяжки не должен
выводиться в дымоход,
предназначенный для вытяжки паров
от приборов, использующих газ или
другое топливо.
Всегда делайте следующее:
● Важно! Всегда отключайте
электропитание при установке и
техническом обслуживании, например,
при замене лампочек.
● Кухонная вытяжка должна
устанавливаться в соответствии с
инструкциями по установке и с
применением всех мер
предосторожности.
●
Вся работа по установке должна
выполняться компетентным
специалистом или квалифицированным
электриком.
●
Пожалуйста, надлежащим образом
утилизируйте упаковочный материал.
Он опасен для детей.
●
Остерегайтесь острых краев внутри
кухонной вытяжки, особенно во время
установки и очистки.
●
Если кухонная вытяжка расположена
над устройством, работающим на газе,
минимальное расстояние между
опорной поверхностью для кухонной
посуды (решетка / держатель для
посуды) на конфорке и нижней частью
кухонной вытяжки должно быть
следующим:
Газовые плиты: 75 см
Электрические плиты: 65 см
Плиты, работающие на угле
или керосине: 75 см
●
Обеспечьте, чтобы вытяжная труба не
имела изгибов под углом менее
90 градусов, так как это снизит ее
эффективность.
● Предупреждение: Несоблюдение этих
инструкций при установке винтов или
фиксирующего устройства может

привести к поражению электрическим
током.
Всегда делайте следующее:
● Всегда накрывайте крышками
сковороды и кастрюли при
приготовлении пищи на газовой плите.
●
В режиме вытяжки воздух из
помещения удаляется кухонной
вытяжкой. Пожалуйста, обеспечьте
принятие надлежащих мер для
вентиляции. Кухонная вытяжка удаляет
запахи, но не пар.
●
При использовании кухонной вытяжки
вместе с приборами, использующими
газ или другое топливо, помещение
нужно хорошо проветривать.
● Кухонная вытяжка предназначена
только для бытового использования.
●
В случае повреждения сетевого шнура
он должен быть заменен
производителем, представителем
центра обслуживания или другим
квалифицированным специалистом,
чтобы избежать опасности поражения
электрическим током.
● Данный прибор не предназначен для
использования лицами (включая детей)
с пониженными физическими,
психическими или умственными
способностями или при отсутствии у
них опыта или знаний, если они не
находятся под контролем или не
проинструктированы об использовании
прибора лицом, отвечающим за их
безопасность. Дети должны находиться
под присмотром для недопущения
игры с прибором. Запрещается
проводить очистку и техническое
обслуживание устройства детям, если
они не находятся под присмотром
взрослых.
● Предупреждение: Перед получением
доступа к клеммам необходимо
отсоединить все цепи питания.
Всегда делайте следующее:
●
Предостережение: Устройство и его
доступные части могут нагреваться во
время эксплуатации. Старайтесь не
касаться нагревательных элементов.
Дети младше 8 лет не должны
приближаться к устройству, если они
не находятся под постоянным
наблюдением.
●
При использовании кухонной
вытяжки вместе с приборами,
использующими газ или другое топливо,
помещение нужно хорошо
проветривать.
● При несоблюдении инструкций по
очистке возникает риск пожара.
●
Необходимо соблюдать нормы,
касающиеся отвода воздуха.
●
Периодически очищайте ваше
устройство, применяя метод,
описанный в главе «ТЕХНИЧЕСКОЕ
ОБСЛУЖИВАНИЕ».
●
По соображениям безопасности
необходимо использовать только тот
размер винтов или крепежных
приспособлений, который
рекомендован в настоящем
руководстве по эксплуатации.
●
Подробное описание методов и
периодичности очистки смотрите в
разделе инструкции по эксплуатации,
посвященном техническому
обслуживанию и очистке.
●
Запрещается проводить очистку и
техническое обслуживание устройства
детям, если они не находятся под
присмотром взрослых.
● При одновременной работе кухонной
вытяжки и неэлектрических устройств

отрицательное давление в помещении
не должно превышать 4 Па (4×10
-5
бар).
УСТАНОВКА (НАРУЖНОЕ ВЕНТИЛЯЦИОННОЕ ОТВЕРСТИЕ)
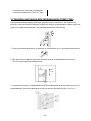
При наличии вывода наружу, кухонную вытяжку можно подключить, как показано на
рисунке, через вытяжной воздуховод (покрытую эмалью, алюминиевую гибкую трубу или
трубу из негорючего материала с внутренним диаметром 150/120 мм).
1. Перед установкой выключите устройство и отсоедините его от электрической розетки.
2. Для наилучшего эффекта кухонная вытяжка должна устанавливаться на высоте
65~75 см над варочной поверхностью.
3. Установите вытяжку в подходящем месте после фиксации установочной высоты и ее
выравнивания. Кронштейн фиксируется на внутренней вытяжной трубе. См. Рис. 2.
Рис. 2
65 см
Рис. 1
75 см
Страница загружается ...
Страница загружается ...
Страница загружается ...
Страница загружается ...
Страница загружается ...
Страница загружается ...
Страница загружается ...
Страница загружается ...
Страница загружается ...
Страница загружается ...
Страница загружается ...
-
 1
1
-
 2
2
-
 3
3
-
 4
4
-
 5
5
-
 6
6
-
 7
7
-
 8
8
-
 9
9
-
 10
10
-
 11
11
-
 12
12
-
 13
13
-
 14
14
-
 15
15
-
 16
16
-
 17
17
-
 18
18
-
 19
19
-
 20
20
-
 21
21
-
 22
22
-
 23
23
-
 24
24
-
 25
25
-
 26
26
-
 27
27
-
 28
28
-
 29
29
-
 30
30
-
 31
31


Candy CGM 61/1W-07 Руководство пользователя
- Категория
- Вытяжки
- Тип
- Руководство пользователя
- Это руководство также подходит для
Задайте вопрос, и я найду ответ в документе
Поиск информации в документе стал проще с помощью ИИ
на других языках
- English: Candy CGM 61/1W-07 User manual
Похожие модели бренда
-
Candy CBT6020/2X-07 Руководство пользователя
-
-
Candy CVM 670 LX Руководство пользователя
-
-
-
-
-
-
Модели других брендов
-
 Monsher TOP 60 C Руководство пользователя
-
 Monsher COCOS 60 B Руководство пользователя
-
Gorenje WHT68INI Руководство пользователя
-
Kuppersberg SLIMLUX S 90 GW Руководство пользователя
-
 Monsher Kvazi 60 W Руководство пользователя
-
Bosch DKE915A Инструкция по эксплуатации
-
Schaub Lorenz SLD DY6117 Инструкция по применению
-
-
 Novex DP 6520 S Руководство пользователя
-
ELICA CLASS 90/A/IX/BL Руководство пользователя


