Yamaha DTX700 Инструкция по применению
- Категория
- Музыкальные барабаны
- Тип
- Инструкция по применению

Read on your computer
(PDF file)
EN
DRUM TRIGGER MODULE
DTX700
Read first
Owner’s Manual
(Setup / Basic Operation)
:
This booklet
Reference Manual
(Detailed Operation)
Read when
necessary
Read when
necessary
Data List :
Separate booklet
Please download from this web page:
http://www.yamaha.co.jp/manual/
Read on paper
Owner’s Manual
(Setup / Basic Operation)
(see page 6 for Table of Contents)

2
DTX700 Owner’s Manual
SPECIAL MESSAGE SECTION
This product utilizes batteries or an external power supply (adapter). DO
NOT connect this product to any power supply or adapter other than one
described in the manual, on the name plate, or specifically recom-
mended by Yamaha.
This product should be used only with the components supplied or; a
cart, rack, or stand that is recommended by Yamaha. If a cart, etc., is
used, please observe all safety markings and instructions that accom-
pany the accessory product.
SPECIFICATIONS SUBJECT TO CHANGE:
The information contained in this manual is believed to be correct at the
time of printing. However, Yamaha reserves the right to change or modify
any of the specifications without notice or obligation to update existing units.
This product, either alone or in combination with an amplifier and head-
phones or speaker/s, may be capable of producing sound levels that
could cause permanent hearing loss. DO NOT operate for long periods
of time at a high volume level or at a level that is uncomfortable. If you
experience any hearing loss or ringing in the ears, you should consult an
audiologist.
IMPORTANT: The louder the sound, the shorter the time period before
damage occurs.
NOTICE:
Service charges incurred due to a lack of knowledge relating to how a
function or effect works (when the unit is operating as designed) are not
covered by the manufacturer’s warranty, and are therefore the owners
responsibility. Please study this manual carefully and consult your dealer
before requesting service.
ENVIRONMENTAL ISSUES:
Yamaha strives to produce products that are both user safe and environ-
mentally friendly. We sincerely believe that our products and the produc-
tion methods used to produce them, meet these goals. In keeping with
both the letter and the spirit of the law, we want you to be aware of the
following:
Battery Notice:
This product MAY contain a small non-rechargeable battery which (if
applicable) is soldered in place. The average life span of this type of bat-
tery is approximately five years. When replacement becomes necessary,
contact a qualified service representative to perform the replacement.
This product may also use “household” type batteries. Some of these
may be rechargeable. Make sure that the battery being charged is a
rechargeable type and that the charger is intended for the battery being
charged.
When installing batteries, never mix old batteries with new ones, and
never mix different types of bat
teries. Batteries MUST be installed cor-
rectly. Mismatches or incorrect installation may result in overheating and
battery case rupture.
Warning:
Do not attempt to disassemble, or incinerate any battery. Keep all batter-
ies away from children. Dispose of used batteries promptly and as regu-
lated by the laws in your area. Note: Check with any retailer of household
type batteries in your area for battery disposal information.
Disposal Notice:
Should this product become damaged beyond repair, or for some reason
its useful life is considered to be at an end, please observe all local,
state, and federal regulations that relate to the disposal of products that
contain lead, batteries, plastics, etc. If your dealer is unable to assist you,
please contact Yamaha directly.
NAME PLATE LOCATION:
The name plate is located on the bottom of the product. The model num-
ber, serial number, power requirements, etc., are located on this plate.
Yo u should record the model number, serial number, and the date of pur-
chase in the spaces provided below and retain this manual as a perma-
nent record of your purchase.
Model
Serial No.
Purchase Date
PLEASE KEEP THIS MANUAL
92-BP (bottom)
1. IMPORTANT NOTICE: DO NOT MODIFY THIS UNIT!
This product, when installed as indicated in the instructions contained
in this manual, meets FCC requirements. Modifications not expressly
approved by Yamaha may void your authority, granted by the FCC, to
use the product.
2. IMPORTANT: When connecting this product to accessories and/or
another product use only high quality shielded cables. Cable/s sup-
plied with this product MUST be used. Follow all installation instruc-
tions. Failure to follow instructions could void your FCC authorization
to use this product in the USA.
3. NOTE: This product has been tested and found to comply with the
requirements listed in FCC Regulations, Part 15 for Class “B” digital
devices. Compliance with these requirements provides a reasonable
level of assurance that your use of this product in a residential envi-
ronment will not result in harmful interference with other electronic
devices. This equipment generates/uses radio frequencies and, if not
installed and used according to the instructions found in the users
manual, may cause interference harmful to the operation of other
electronic devices. Compliance with FCC regulations does not guar-
antee that interference will not occur in all installations. If this product
is found to be the source of interference, which can be determined by
turning the unit “OFF” and “ON”, please try to eliminate the problem by
using one of the following measure
s:
Relocate either this product or the device that is being affected by the
interference.
Utilize power outlets that are on different branch (circuit breaker or
fuse) circuits or install AC line filter/s.
In the case of radio or TV interference, relocate/reorient the antenna.
If the antenna lead-in is 300 ohm ribbon lead, change the lead-in to
co-axial type cable.
If these corrective measures do not produce satisfactory results,
please contact the local retailer authorized to distribute this type of
product. If you can not locate the appropriate retailer, please contact
Yamaha Corporation of America, Electronic Service Division, 6600
Orangethorpe Ave, Buena Park, CA90620
The above statements apply ONLY to those products distributed by
Yamaha Corporation of America or its subsidiaries.
* This applies only to products distributed by YAMAHA CORPORATION OF AMERICA. (class B)
FCC INFORMATION (U.S.A.)
COMPLIANCE INFORMATION STATEMENT (DECLARATION OF CONFORMITY PROCEDURE)
Responsible Party : Yamaha Corporation of America
Address : 6600 Orangethorpe Ave., Buena Park, Calif. 90620
Telephone : 714-522-9011
Type of Equipment : Drum Trigger Module
Model Name : DTX700
This device complies with Part 15 of the FCC Rules.
Operation is subject to the following two conditions:
1) this device may not cause harmful interference, and
2) this device must accept any interference received including interfer-
ence that may cause undesired operation.
See user manual instructions if interference to radio reception is suspected.
* This applies only to products distributed by YAMAHA CORPORATION OF AMERICA. (FCC DoC)

DTX700 Owner’s Manual
3
PRECAUTIONS
PLEASE READ CAREFULLY BEFORE PROCEEDING
* Please keep this manual in a safe place for future reference.
WARNING
Always follow the basic precautions listed below to avoid the possibility of serious injury or even death from electrical
shock, short-circuiting, damages, fire or other hazards. These precautions include, but are not limited to, the following:
• Do not place the power cord near heat sources such as heaters or
radiators, and do not excessively bend or otherwise damage the
cord, place heavy objects on it, or place it in a position where
anyone could walk on, trip over, or roll anything over it.
• Only use the voltage specified as correct for the instrument. The
required voltage is printed on the name plate of the instrument.
• Use the specified adaptor (page 57) only. Using the wrong adaptor
can result in damage to the instrument or overheating.
• Check the electric plug periodically and remove any dirt or dust
which may have accumulated on it.
• This instrument contains no user-serviceable parts. Do not attempt
to disassemble or modify the internal components in any way. If it
should appear to be malfunctioning, discontinue use immediately
and have it inspected by qualified Yamaha service personnel.
• Do not expose the instrument to rain, use it near water or in damp or
wet conditions, place on it any containers (such as vases, bottles or
glasses) containing liquids which might spill into any openings. If
any liquid such as water seeps into the instrument, turn off the
power immediately and unplug the power cord from the AC outlet.
Then have the instrument inspected by qualified Yamaha service
personnel.
• Never insert or remove an electric plug with wet hands.
• Do not put burning items, such as candles, on the unit.
A burning item may fall over and cause a fire.
• When one of the following problems occur, immediately turn off the
power switch and disconnect the electric plug from the outlet. Then
have the device inspected by Yamaha service personnel.
• The power cord or plug becomes frayed or damaged.
• It emits unusual smells or smoke.
• Some object has been dropped into the instrument.
• There is a sudden loss of sound during use of the instrument.
CAUTION
Always follow the basic precautions listed below to avoid the possibility of physical injury to you or others, or damage
to the instrument or other property. These precautions include, but are not limited to, the following:
• Do not connect the instrument to an electrical outlet using a
multiple-connector. Doing so can result in lower sound quality, or
possibly cause overheating in the outlet.
• When removing the electric plug from the instrument or an outlet,
always hold the plug itself and not the cord. Pulling by the cord can
damage it.
• Remove the electric plug from the outlet when the instrument is not
to be used for extended periods of time, or during electrical storms.
• Do not place the instrument in an unstable position where it might
accidentally fall over.
• Before moving the instrument, remove all connected cables.
• When setting up the product, make sure that the AC outlet you are
using is easily accessible. If some trouble or malfunction occurs,
immediately turn off the power switch and disconnect the plug from
the outlet. Even when the power switch is turned off, electricity is
still flowing to the product at the minimum level. When you are not
using the product for a long time, make sure to unplug the power
cord from the wall AC outlet.
Power supply/AC power adaptor
Do not open
Water warning
Fire warning
If you notice any abnormality
Power supply/AC power adaptor
Location
DMI-3 1/2

4
DTX700 Owner’s Manual
• Use only the stand/rack specified for the instrument. When attaching
the stand or rack, use the provided screws only. Failure to do so
could cause damage to the internal components or result in the
instrument falling over.
• Before connecting the instrument to other electronic components,
turn off the power for all components. Before turning the power on
or off for all components, set all volume levels to minimum.
• Be sure to set the volumes of all components at their minimum
levels and gradually raise the volume controls while playing the
instrument to set the desired listening level.
• Do not insert a finger or hand in any gaps on the instrument.
• Never insert or drop paper, metallic, or other objects into the gaps
on the panel. This could cause physical injury to you or others,
damage to the instrument or other property, or operational failure.
• Do not rest your weight on, or place heavy objects on the
instrument, and do not use excessive force on the buttons, switches
or connectors.
• Do not use the instrument/device or headphones for a long period of
time at a high or uncomfortable volume level, since this can cause
permanent hearing loss. If you experience any hearing loss or
ringing in the ears, consult a physician.
Always turn the power off when the instrument is not in use.
Even when the power switch is in standby status, electricity is still flowing to the instrument at the minimum level. When you are not using the
instrument for a long time, make sure you unplug the power cord from the wall AC outlet.
NOTICE
To avoid the possibility of malfunction/ damage to the product, damage to data, or damage to other property, follow the notices
below.
Handling and Maintenance
• Do not use the instrument in the vicinity of a TV, radio, stereo equ ipment, mobile phone, or other electric devices. Otherwise, the
instrument, TV, or radio may generate noise.
• Do not expose the instrument to excessive dust or vibrations, or extreme cold or heat (such as in direct sunlight, near a heater,
or in a car during the day) to prevent the possibility of panel disfiguration, damage to the internal components or unstable oper-
ation. (Verified operating temperature range: 5° – 40°C, or 41° – 104°F.)
• Do not place vinyl, plastic or rubber objects on the instrument, since this might discolor the panel or keyboard.
• When cleaning the instrument, use a soft, dry/dry or slightly damp cloth. Do not use paint thinners, solvents, cleaning fluids, or
chemical-impregnated wiping cloths.
Saving data
• Saved data may be lost due to malfunction or incorrect operation. Save important data to a USB storage device/external device
such as a computer.
• To protect against data loss through media damage, we recommend that you save your important data onto two USB storage
devices/external media.
Information
About copyrights
• Copying of the commercially available musical data including but not limited to MIDI data and/or audio data is strictly prohibited except for your
personal use.
• This product incorporates and bundles computer programs and contents in which Yamaha owns copyrights or with respect to which it has
license to use others’ copyrights. Such copyrighted materials include, without limitation, all computer software, style files, MIDI files, WAVE data,
musical scores and sound recordings. Any unauthorized use of such programs and contents outside of personal use is not permitted under rel-
evant laws. Any violation of copyright has legal consequences. DON’T MAKE, DISTRIBUTE OR USE ILLEGAL COPIES.
About this manual
• The illustrations and LCD screens as shown in this manual are for instructional purposes only, and may appear somewhat different from those
on your instrument.
• The company names and product names in this manual are the trademarks or registered trademarks of their respective companies.
Connections
Handling caution
Yamaha cannot be held responsible for damage caused by improper use or modifications to the instrument, or data that is lost or destroyed.
DMI-3 2/2

DTX700 Owner’s Manual
5
Welcome
Thank you for purchasing the Yamaha DTX700 Drum Trigger Module.
To get the most out of your new instrument, be sure to read this owner’s manual carefully.
And after reading through this manual, be sure to store it in a safe place so
that you can refer back to it again as needed.
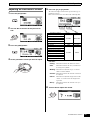
Using the Manuals
Owner’s Manual – this booklet (Setup / Basic Operation)
This paper manual describes the basic operations performed via the DTX700’s control panel.
Data List
The Data List contains the names of all of the DTX700’s sounds and kits, together with MIDI-related reference material.
Reference Manual (Detailed Operation) *Not bundled with this product.
The Reference Manual provides a description of all of the functions that can be accessed by pressing the [MENU] button on the
DTX700’s control panel. This PDF manual is not bundled with the drum trigger module. If you wish to learn more about your
DTX700 using the Reference Manual, please download it from the Yamaha Manual Library web page:
http://www.yamaha.co.jp/manual/
* Yamaha Corp. reserves the right to modify this URL at any time without prior notice.
Using PDF Manuals
The Reference Manual for your DTX700 is made available in digital format as a PDF document. As such, a computer and suitable
software will be required in order to read it. We recommend that Adobe Reader be used for this purpose as it allows you to quickly
and easily search for keywords, to print out specific sections, and to conveniently jump from page to page by clicking embedded
links. Keyword searching and link-based navigation in particular are extremely useful functions available only with digital-type
documents. The most-recent version of Adobe Reader can be downloaded from the following web page.
http://www.adobe.com/products/reader/
Bundled items
• Power adaptor • Module holder
• Owner’s Manual (this booklet) • Module-holder fixing screws x 4
• Data List
• DVD-ROM (containing DAW software)
Latest Firmware Version
From time to time, Yamaha may update product firmware without prior notice. We recommend, therefore, that you check our web
site (below) for the latest version and keep your DTX700 firmware up to date.
http://dtxdrums.yamaha.com/downloads/
The content of this Owner’s Manual applies to the newest version of the firmware as of printing. Details regarding any functions
ad
ded to later versions will also be made available via the above web site.
Optional Pads
Within this Owner’s Manual, the optional external pads that may be connected to the DTX700 are referred to by model name.
Please note that these model names were up-to-date as of printing of this manual. Details regarding any subsequently released
models will be made available via the following web site.
http://dtxdrums.yamaha.com/downloads/

6
DTX700 Owner’s Manual
Contents
Welcome ................................................................5
Using the Manuals ................................................5
Bundled items .......................................................5
Contents.................................................................6
First Steps.................................................7
Quick Start Guide .....................................8
Component Names & Functions........................10
Control Panel............................................................. 10
Side Panel ..................................................................11
Rear Panel ................................................................ 12
Setting Up for Sound ..........................................13
Connecting the Adaptor............................................. 13
Connecting Speakers or Headphones ...................... 13
Connecting a Music Player........................................ 13
Turning On................................................................. 14
Turning Off................................................................. 14
Auto Power-Off........................................................... 14
Playing Demo Songs ..........................................16
Basic DTX700 Operations ..................................17
Dial (with integrated button)....................................... 17
Changing the Cursor Value ....................................... 17
Moving the Cursor ..................................................... 17
[-/DEC] and [+/INC] Buttons ...................................... 18
[F1], [F2] & [F3] Fu nction Buttons.............................. 18
Adjusting the Volume................................................. 19
Adjusting Display Contrast ........................................ 19
Storing Settings ......................................................... 21
Connecting a USB Memory Device........................... 21
Restoring Default Settings ......................................... 22
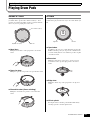
Playing Drum Pads..............................................23
Snares & Toms .......................................................... 23
Hi-Hats ...................................................................... 23
Cymbal ...................................................................... 24
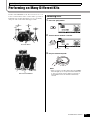
Performing on Many Different Kits ....................25
Selecting a Kit ........................................................... 25
Selecting a Sensitivity for the Entire Kit..................... 26
Adjusting Tone........................................................... 27
Turning Off Effects..................................................... 28
Initializing a Kit .......................................................... 28
Switching the Display Mode ...................................... 29
Building Your Own Kit........................................ 30
Selecting Sounds (Instruments) ................................ 30
Adjusting an Instrument’s Sound............................... 31
Playing with a Double Bass Drum ............................. 32
Importing & Assigning Audio Files............................. 32
Naming an Original Kit .............................................. 34
Adjusting the Snare Wire........................................... 35
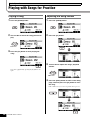
Playing with Songs for Practice........................ 36
Playing a Song .......................................................... 36
Adjusting the Song Volume ....................................... 36
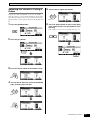
Adjusting the Volume of a Song’s Drums .................. 37
Muting the Drum Part ................................................ 38
Soloing the Bass Part................................................ 38
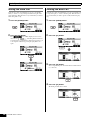
Locking a Kit.............................................................. 39
Turning On the Click-Track ................................ 41
Setting the Tempo and Starting the Click-Track......... 41
Setting the Click-Track Volume .................................. 41
Setting the Time Signature........................................ 43
Using the Timer ......................................................... 44
Tap Tempo – Setting the Tempo by Playing Pads...... 44
Using DTX700 Training Functions............................. 45
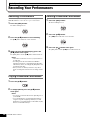
Recording Your Performances .......................... 48
Recording a Performance.......................................... 48
Playing a Recorded Performance.............................. 48
Deleting a Recorded Performance ............................ 48
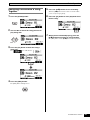
Recording Performance & Song Together................. 49
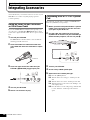
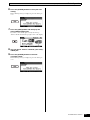
Integrating Accessories..................................... 50
Using an HH65 Hi-hat Controller
as Kick Drum Pedal ............................................... 50
Expanding with a PCY135 Cymbal Pad..................... 50
Connecting Your DTX700 to a Computer ......... 52
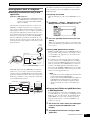
Making Connections.................................................. 52
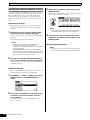
Making Music with a Computer ................................. 53
Setting up Cubase Remote Control ........................... 54
On-Screen Messages ......................................... 55
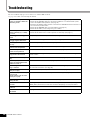
Troubleshooting ................................................. 56
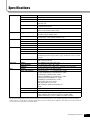
Specifications ..................................................... 57
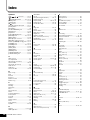
Index .................................................................... 58
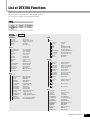
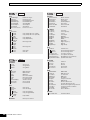
List of DTX700 Functions .................................. 59
Setup
Basic Operation
* For details regarding these functions, refer to the Reference
Manual PDF document.

DTX700 Owner’s Manual
7
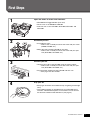
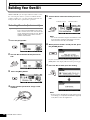
First Steps
Open the boxes to reveal their contents.
• DTX700 Drum Trigger Module (main unit)
• Racks such as the RS500 and RS700
• Pad sets such as the DTP700C, DTP700P, DTP750C, and
DTP750P
Assemble your kit.
• Assemble the racks.
m Refer to the assembly manuals that came with your racks
(RS500, RS700, etc.).
•Mount the pads and the DTX700 on the racks.
m Refer to the assembly manuals that came with your pad
sets (DTX700K, DTX750K, etc.).
Connect your kit.
• Connect your pads to the DTX700 using the correct cables.
m Refer to the assembly manuals that came with your pad
sets (DTX700K, DTX750K, etc.).
•Plug the power adaptor into the DTX700 and turn it on.
m See page 13 of this booklet.
Play your kit.
• See pages 8 and 9 of this booklet for tips on getting started right
away.
•This booklet provides an introduction to your DTX700’s basic
functions. Detailed descriptions of all functions can be found in
the Reference Manual PDF document (see page 5).
1
2
3
4

8
DTX700 Owner’s Manual
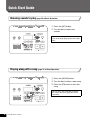
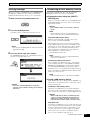
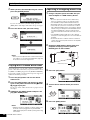
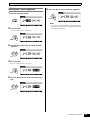
Quick Start Guide
q Press the [KIT] button.
w Turn the dial to select new
sounds.
q Press the [SONG] button.
w Turn the dial to select a new song.
e Press the [F3] button to start the
song.
Yo u can also assign sounds individually to
each of the pads (page 25 of Basic Opera-
tion).
Yo u can press the [F2] button to silence
the song’s drum part (page 38 of Basic
Operation).
Choosing sounds to play (page 25 of Basic Operation)
Playing along with a song (page 36 of Basic Operation)

DTX700 Owner’s Manual
9
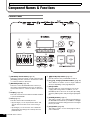
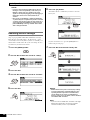
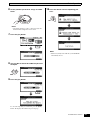
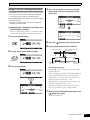
Quick Start Guide
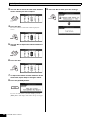
q Press the [CLICK] button.
w Turn the dial to set the tempo.
e Press the [ ] button to start the
metronome.
q Press the [REC] button.
w Press the [>/
] button to start
recording.
e When you have finished playing,
press the [>/
] button once again
to stop recording.
Yo u can also use the [>/
] button to start
and stop playback of your recorded perfor-
mance (page 48 of Basic Operation).
Practicing with a metronome (page 41 of Basic Operation)
Recording your own performance (page 48 of Basic Operation)

Setup
10
DTX700 Owner’s Manual
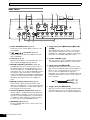
Component Names & Functions
q [PHONES] volume knob (page 13)
This knob controls the volume of audio output from the
[PHONES] jack. Turn clockwise to increase the volume
or counter-clockwise to decrease it.
w [MASTER] knob (page 19)
This knob controls the DTX700 master volume (i.e.,
the volume at the OUTPUT jacks). Turn clockwise to
increase the volume or counter-clockwise to decrease
it.
e Display (page 29)
This LCD screen shows information and data needed
to operate the DTX700.
r Dial (page 17)
This dial can be both turned and pressed.
• By pressing it, you can set parameter values and
execute various functions such as the storing of
data.
• By turning it, you can move the cursor within dis-
played pages and change the currently selected
parameter value.
t (Standby/On) button (page 14)
Use this switch to turn your DTX700 on and off.
y [F1], [F2], and [F3] function buttons (page 18)
These buttons are used to access a range of different
functions depending on the page displayed.
u [EXIT] button
Press this button to cancel operations such as the
copying and storing of data. In addition, you can
immediately silence all voices at any time by holding
down the [SHIFT] button and pressing the [EXIT] but-
ton.
i [STORE] button (page 21)
This button is used to store settings and other data in
the DTX700’s internal memory. In addition, it will light
up whenever parameter settings have been changed
but not yet stored.
o [KIT] button (page 25)
This button is used to access the Kit page in order to
select a drum kit.
Control Panel
wq
e
y
@0
!8 !9
!0
!1
o
!3
!4
!2
!6
!7
!5
ui
t
r

DTX700 Owner’s Manual
11
Setup
Component Names & Functions
!0 [SONG] button (page 36)
This button is used to access the Song page in order
to select a song.
!1 [MENU] button (page 20)
This button is used to access the Menu area. From
here, you can select various other pages in order to
configure your DTX700 in many different ways.
*This booklet introduces some of the basic functions avail-
able in the Menu area. For a complete description of all
functions, please download the DTX700 Reference Manual
from this web page:
http://www.yamaha.co.jp/manual/
!2 [INST] button (page 30)
This button is used to access the Instrument page in
order to select instruments.
[Definition] Instrument
In the context of the DTX700, the term “instru-
ment” is used to refer to each of the various
percussion instruments that make up a kit. Typ-
ical examples would be snare drums, tom-toms,
cymbals, and kick drums.
!3 [CLICK] button (page 41)
This button is used to access the Click page in order to
set your DTX700’s click-track (or metronome).
!4 [SHIFT] button
When you press this button, the functions assigned to
the [F1], [F2], and [F3] buttons will change. These
functions can be accessed by holding down the
[SHIFT] button and pressing the corresponding func-
tion button (see page 18). Meanwhile, a number of the
buttons on the DTX700’s control panel have second-
ary functions, indicated just above the buttons them-
selves. These functions can also be accessed by
holding down the [SHIFT] button and pressing the cor-
responding button.
!5 [>/
] button (page 48)
Use this button to start and stop the playback of perfor-
mances that you have recorded on the DTX700.
!6 [REC] button (page 48)
Using this button, you can activate and deactivate
recording of your performances.
!7 [ ] (Click-track) button (page 41)
The Click-track button is used to start and stop the
DTX700’s click-track (or metronome).
!8 [-/DEC] button (page 18)
This button is used to decrease the value at the cursor
position. In addition, the selected value can be
decreased in units of 10 by holding down the [SHIFT]
button and pressing the [-/DEC] button or by holding
down the [-/DEC] button and pressing the [+/INC] but-
ton.
!9 [+/INC] button (page 18)
This button is used to increase the value at the cursor
position. In addition, the selected value can be
increased in units of 10 by holding down the [SHIFT]
button and pressing the [+/INC] button or by holding
down the [+/INC] button and pressing the [-/DEC] but-
ton.
@0 Sliders (page 41)
The sliders are used to adjust the volumes of individ-
ual parts such as the snare and toms, and also the vol-
ume of the click-track.
q [USB TO HOST] port (page 52)
This port is used to connect the DTX700 to a computer
via a USB cable.
w [USB TO DEVICE] port (page 21)
This port is used to plug in a USB memory device
(such as a flash drive), either directly or via a USB
cable.
Side Panel
qw

Setup
12
DTX700 Owner’s Manual
Component Names & Functions
q [LCD CONTRAST] knob (page 19)
This knob is used to set the display contrast for opti-
mum legibility.
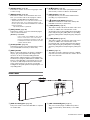
w [ ] connector (page 13)
Use this connector for the power adaptor that came
with your DTX700.
e Cord clip (page 13)
Wrap the power adaptor cord around this clip to pre-
vent accidental unplugging during operation.
r MIDI [IN] and [OUT] connectors (page 13)
The MIDI [IN] connector is used to receive control or
performance data from another MIDI device, such as
an external sequencer, via a MIDI cable. When con-
nected in this way, you can play the DTX700’s internal
tone generator and control many of its parameters
using another MIDI device. Meanwhile, the MIDI [OUT]
connector is used to send performance data from the
DTX700 to other devices in the form of MIDI mes-
sages.
t [AUX IN] (auxiliary input) jack (page 13)
External audio signals can be input via this stereo
mini-jack. Using [AUX IN], you can connect a portable
music player, a CD player, or another similar device to
play along with your favorite tunes.
y OUTPUT [L/MONO] and [R] jacks (page 13)
Use these jacks to output line-level stereo mixes from
your DTX700. For example, you can connect each of
the jacks to the left and right inputs of an external ste-
reo amplifier or mixer using mono audio-jack cables.
For mono output, use the [L/MONO] jack only.
u [PHONES] jack (page 13)
Use this standard audio jack to connect a pair of ste-
reo headphones.
i Trigger input jacks [qSNARE] to [i HI-HAT],
and [!1]
These trigger-input jacks are used to connect stereo-
type pads (two- and three-zone). They also support
standard mono-output pads. In addition, these trigger-
input jacks are compatible with pad controllers.
o [HI-HAT CONTROL] jack
This jack is used to connect an HH65 Hi-hat Controller
or an RHH135 Real Hi-hat Pad via its control output.
!0 Trigger input jack [oKICK/!0]
This trigger-input jack is used to connect mono-type
pads such as the KP65 Kick Pad. If using a KP65, fur-
thermore, you can use the input jack on its rear sur-
face to connect an additional mono-type pad.
Meanwhile, you could also use a Y-shaped cable (sold
separately) with this jack in order to connect a pair of
mono-type pads.
!1 Trigger input jack [!2HH-KICK]
This jack is used to connect an HH65 Hi-hat Controller
(sold separately) for use as an alternative kick pad or
as part of a double bass drum configuration (page 50).
Rear Panel
w ert uyq
i
!1 !0 o

DTX700 Owner’s Manual
13
Setup
Setting Up for Sound
1 Ensure that your DTX700 is turned off (i.e.,
the screen is not lit).
2 Insert the power adaptor’s DC plug into the
[ ] connector on the rear
panel.
3 Hook the power adaptor’s cord around the
cord clip to secure it in place.
4 Plug the power adaptor’s AC power cord into
an AC wall socket or another electrical outlet.
Your DTX700 does not come with built-in speakers. In order to
hear it, therefore, you will need to connect headphones or a
DTX-series monitor system, such as the MS40DR.
Connecting Speakers
Connect your speakers to the OUTPUT [L/MONO] and [R]
jacks (standard mono-audio).
Connecting Headphones
Connect your headphones to the [PHONES] jack (standard
stereo-audio). The [PHONES] knob on the control panel can
be used to adjust the volume of the headphones.
You can connect a portable music player or another similar
source of audio to your DTX700 via the [AUX IN] (auxiliary
input) stereo mini-jack. This makes it possible to play along
with your favorite songs.
NOTICE
• Whenever connecting other devices, ensure that the
cables you use have plugs that match the input or out-
put connectors on those devices.
• Before making connections, furthermore, you should
also turn the volume on the other devices fully down.
• When all connections have been made, use each
device’s volume controller to balance its output with
that of the DTX700.
Connecting the Adaptor
CAUTION
• Excessive bending can damage the power adap-
tor’s cord and create a fire hazard. Ensure, there-
fore, that the power cord is not bent at an extreme
angle when wrapped around the clip.
WARNING
• Use only the power adaptor that came with your
DTX700.
CAUTION
• The DTX700 remains charged and draws a small
amount of power even when the (Standby/On)
button is set to the Standby position. For this rea-
son, you should always unplug the power adaptor
from the wall socket if the instrument will not be
used for an extended period of time.
Cord clip
Power adaptor cord
Connecting Speakers or Headphones
CAUTION
• To prevent hearing loss, avoid using headphones at
high volumes for extended periods of time.
Connecting a Music Player
Speakers with
a built-in amplifier
External MIDI device
MIDI
OUT
Standard stereo-
audio jack (6.3-mm
dia.)
Mini stereo
audio cable
(3.5-mm dia.)
Mobile music
player, etc.
Standard mono audio
cable (6.3-mm dia.)
MIDI
cable
MIDI
IN

Setup
14
DTX700 Owner’s Manual
Setting Up for Sound
1 Turn the [MASTER] knob fully counterclock-
wise to minimize the output volume.
2 Press the (Standby/On) button.
The opening pages will be displayed, followed by the Kit
page.
3 If you have connected any amplified speakers
or other similar external devices, turn them
on now.
NOTE
• When powering down your system, be sure to turn off
external devices before the DTX700.
1 Press the (Standby/On) button.
The display will turn off.
NOTICE
• If you turn off the DTX700 without storing any
changes you have made to settings, those changes
will be lost. For details on how to store changed set-
tings, see page 21.
If no controls are operated or no data is exchanged with external
devices (such as a computer or MIDI instrument) for a predeter-
mined length of time, your DTX700 will turn off automatically.
This function is called Auto Power-Off.
NOTICE
• If you do not store changed settings before the Auto
Power-Off function activates, your changes may be per-
manently lost. Be sure, therefore, to store new settings
whenever you are happy with them.
Setting the Auto Power-Off Function
Use the following procedure to set the time until the Auto
Power-Off function activates or to disable the function.
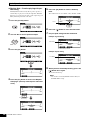
1 Press the [MENU] button.
2 Turn the dial to move the cursor to “Utility”.
3 Press the dial.
4 Turn the dial to move the cursor to “General”.
5 Press the dial.
6 Turn the dial to move the cursor to the “Auto-
PowerOff” row of the displayed list.
Turning On Turning Off
Auto Power-Off

DTX700 Owner’s Manual
15
Setup
Setting Up for Sound
7 Press the dial.
The cursor will zoom in on the value on the right.
8 Turn the dial to set the automatic power-off
time.
The value indicates the idle time until automatic power-off
in minutes. Settings can be made in units of 5 minutes
between 5 and 30. Furthermore, you can disable the Auto
Power-Off function by selecting “off”.
9 Press the dial.
The cursor will zoom out to select the entire row.
10 Press the [STORE] button.
11 Press the dial to store your new settings.
NOTE
• The Auto Power-Off function is set to 30 minutes by
default.
Disabling the Auto Power-Off Function at
Startup
To disable the Auto Power-Off function when turning on the
DTX700, hold down the [>/
] button when you press the
(Standby/On) button. (This action sets the AutoPower-
Off parameter to “Off”.)

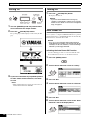
Basic Operation
16
DTX700 Owner’s Manual
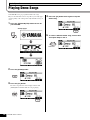
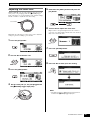
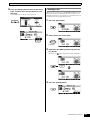
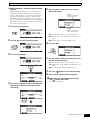
Playing Demo Songs
Your DTX700 comes pre-programmed with demo songs.
Played as described below, these songs allow you to fully appre-
ciate the quality of the sound produced by the built-in tone gen-
erator.
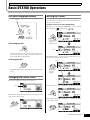
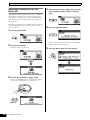
1 Press the (Standby/On) button to turn on
your DTX700.
Startup pages
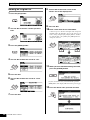
2 Press the [SONG] button.
3 Press the [F3] button.
The demo song indicated on the display will start. The
[SONG] button will flash while the song is playing.
4 Press the [F3] button once again to stop the
demo song.
5 To select a different demo song, turn the dial
and repeat Steps 3 and 4.

DTX700 Owner’s Manual
17
Basic Operation
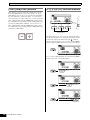
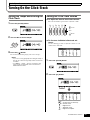
Basic DTX700 Operations
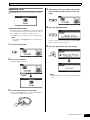
Pressing the dial
You press the dial to execute various operations and to set
new values for parameters. The cursor type (see below) can
also be toggled by pressing the dial.
Turning the dial
You turn the dial to change parameter values and to move the
cursor.
The cursor is displayed as a block of inverted text.
By turning the dial in either direction, you can change the value
at the current cursor position.
When a page contains more than one editable value, you can
press the dial to toggle between inverted text and underlined
text at the cursor position.
Example: After pressing the [SONG] button
On the page accessed with the [SONG] button, you can set both
the song number and the tempo .
By turning the dial, you can move the cursor. In this way, you
can select the value you wish to change.
Press the dial once again to switch back to the inverted-text cursor.
By turning the dial in either direction, you can change the value
at the cursor position.
Dial (with integrated button)
Changing the Cursor Value
Dial
Cursor
Moving the Cursor
Cursor
Cursor
Press the dial to
switch to the
underline cursor.
Cursor
Turn the dial to
move the
underline

Basic Operation
18
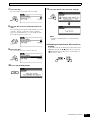
DTX700 Owner’s Manual
Basic DTX700 Operations
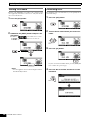
These buttons are used to change the currently selected value.
Press the [+/INC] button to increase the value by one; the [-/
DEC] button to decrease by one. If you hold down either button,
the value will change continuously. In the case of parameters
with a wide range of possible settings, you can increase them in
units of 10 by holding down the [SHIFT] button and pressing
the [+/INC] button or by holding down the [+/INC] button and
pressing the [-/DEC] button. Similarly, you can decrease in
units of 10 by holding down the [SHIFT] button and pressing
the [-/DEC] button or by holding down the [-/DEC] button and
pressing the [+/INC] button.
The functions that you can access by pressing the [F1], [F2],
and [F3] function buttons are displayed as inverted text at the
bottom of the display. In addition, when the symbol is
shown in the bottom right corner, you can press the [SHIFT]
button to display additional functions for each of the buttons.
To access these additional functions, hold down the [SHIFT]
button and press the corresponding button.
[-/DEC] and [+/INC] Buttons [F1], [F2] & [F3] Function Buttons
Function buttons
Kit Lock
Effects Switch
Display Mode

DTX700 Owner’s Manual
19
Basic Operation
Basic DTX700 Operations
You can use the [MASTER] knob to adjust the volume of sound
on the OUTPUT [L/MONO] and [R] channels. In addition, the
[PHONES] knob can be used to adjust the volume of head-
phones plugged into the [PHONES] jack on the rear panel. Turn
clockwise to increase the volume or counter-clockwise to
decrease it.
Using the [LCD CONTRAST] knob on the rear panel, you can
adjust the contrast level of the DTX700 display.
Adjusting the Volume
Adjusting Display Contrast
[LCD CONTRAST] knob

Basic Operation
20
DTX700 Owner’s Manual
Basic DTX700 Operations
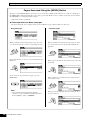
Pages Accessed Using the [MENU] Button
The pages of your DTX700’s Menu area provide access to a wide range of highly-useful settings. To access this area, simply press
the [MENU] button. This manual introduces some of the pages from the Menu area. For a complete description, please download
the DTX700 Reference Manual from this web page:
http://www.yamaha.co.jp/manual/
Cursor operations on Menu area pages
The way in which the cursor is displayed and operated on Menu area pages differs from that of other pages.
• Navigation pages
When you turn the dial on navigation-type pages, the cursor
(i.e., the inverted text) moves in the corresponding direction.
By pressing the dial, you can move one level further into the
Menu area.
To move back one step towards the top page, press the
[EXIT] button.
NOTE
• The convention used in this manual to describe
sequences of cursor operations in the Menu area takes
the form: [MENU] m [KIT] m [COMMON].
• Parameter pages
When you turn the dial on parameter-type pages, the cursor
(i.e., the inverted text) moves up and down within the dis-
played list.
When you press the dial, the cursor will zoom in on the value
on the right.
In this condition, you can turn the dial to change the value
selected by the cursor.
When you press the dial again, the cursor will zoom out to
select the entire row.
Страница загружается ...
Страница загружается ...
Страница загружается ...
Страница загружается ...
Страница загружается ...
Страница загружается ...
Страница загружается ...
Страница загружается ...
Страница загружается ...
Страница загружается ...
Страница загружается ...
Страница загружается ...
Страница загружается ...
Страница загружается ...
Страница загружается ...
Страница загружается ...
Страница загружается ...
Страница загружается ...
Страница загружается ...
Страница загружается ...
Страница загружается ...
Страница загружается ...
Страница загружается ...
Страница загружается ...
Страница загружается ...
Страница загружается ...
Страница загружается ...
Страница загружается ...
Страница загружается ...
Страница загружается ...
Страница загружается ...
Страница загружается ...
Страница загружается ...
Страница загружается ...
Страница загружается ...
Страница загружается ...
Страница загружается ...
Страница загружается ...
Страница загружается ...
Страница загружается ...
Страница загружается ...
Страница загружается ...
Страница загружается ...
Страница загружается ...
-
 1
1
-
 2
2
-
 3
3
-
 4
4
-
 5
5
-
 6
6
-
 7
7
-
 8
8
-
 9
9
-
 10
10
-
 11
11
-
 12
12
-
 13
13
-
 14
14
-
 15
15
-
 16
16
-
 17
17
-
 18
18
-
 19
19
-
 20
20
-
 21
21
-
 22
22
-
 23
23
-
 24
24
-
 25
25
-
 26
26
-
 27
27
-
 28
28
-
 29
29
-
 30
30
-
 31
31
-
 32
32
-
 33
33
-
 34
34
-
 35
35
-
 36
36
-
 37
37
-
 38
38
-
 39
39
-
 40
40
-
 41
41
-
 42
42
-
 43
43
-
 44
44
-
 45
45
-
 46
46
-
 47
47
-
 48
48
-
 49
49
-
 50
50
-
 51
51
-
 52
52
-
 53
53
-
 54
54
-
 55
55
-
 56
56
-
 57
57
-
 58
58
-
 59
59
-
 60
60
-
 61
61
-
 62
62
-
 63
63
-
 64
64


Yamaha DTX700 Инструкция по применению
- Категория
- Музыкальные барабаны
- Тип
- Инструкция по применению
Задайте вопрос, и я найду ответ в документе
Поиск информации в документе стал проще с помощью ИИ
на других языках
- English: Yamaha DTX700 Owner's manual
- français: Yamaha DTX700 Le manuel du propriétaire
- italiano: Yamaha DTX700 Manuale del proprietario
- español: Yamaha DTX700 El manual del propietario
- Deutsch: Yamaha DTX700 Bedienungsanleitung
- Nederlands: Yamaha DTX700 de handleiding
- português: Yamaha DTX700 Manual do proprietário
- dansk: Yamaha DTX700 Brugervejledning
- polski: Yamaha DTX700 Instrukcja obsługi
- čeština: Yamaha DTX700 Návod k obsluze
- svenska: Yamaha DTX700 Bruksanvisning
- 日本語: Yamaha DTX700 取扱説明書
- Türkçe: Yamaha DTX700 El kitabı
- suomi: Yamaha DTX700 Omistajan opas
- română: Yamaha DTX700 Manualul proprietarului
Похожие модели бренда
-
Yamaha DD-75 Инструкция по применению
-
-
-
-
-
Yamaha FGDP-30 Руководство пользователя
-
-
-
-