Indesit 7OF 99 C.1 IX RU/HA Руководство пользователя
- Категория
- Печи
- Тип
- Руководство пользователя

7OF 99 C.1 IX RU/HA
GB
OVEN
Contents
Installation, 2-3
Positioning
Electrical connection
Technical data
Description of the appliance, 4
Overall view
Control panel
Display
Start-up and use, 5
Setting the clock
Setting the timer
Starting the oven
Cooking modes, 6-8
Cooking modes
Programming cooking
Practical cooking advice
Cooking advice table
Precautions and tips, 9
General safety
Disposal
Respecting and conserving the environment
Care and maintenance, 10-11
Switching the appliance off
Cleaning the appliance
Cleaning the oven door
Replacing the light bulb
Assembling the sliding rack kit
Assistance, 12
English, 1
Operating Instructions
GB
Русский, 13
RS

2
GB
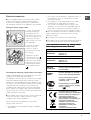
Ventilation
To ensure adequate ventilation is provided, the back
panel of the cabinet must be removed. It is
advisable to install the oven so that it rests on two
strips of wood, or on a completely flat surface with
an opening of at least 45 x 560 mm (
see diagrams
).
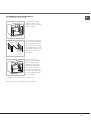
Centring and fixing
Position the 4 tabs on the side of the oven, in line
with the 4 holes on the outer frame. Adjust the tabs
according to the thickness of the cabinet side panel,
as shown below:
20 mm thick: take off the
removable part of the tab
(
see diagram
).
18 mm thick: use the first
groove, which has already
been set in the factory
(
see diagram
).
16 mm thick: use the second
groove (
see diagram
).
Secure the appliance to the cabinet by opening the
oven door and inserting 4 screws into the 4 holes on
the outer frame.
!!
!!
! All parts which ensure the safe operation of the
appliance must not be removable without the aid of
a tool.
!!
!!
! Before operating your new appliance please read
this instruction booklet carefully. It contains
important information concerning the safe operation,
installation and maintenance of the appliance.
! Please keep these operating instructions for future
reference. Pass them on to possible new owners of
the appliance.
Positioning
!!
!!
! Keep packaging material out of the reach of
children.
It can become a choking or suffocation hazard. (
see
Precautions and tips
).
!!
!!
! The appliance must be installed by a qualified
professional in accordance with the instructions
provided. Incorrect installation may cause harm to
people and animals or may damage property.
Built-in appliance
Use the appropriate cabinet to ensure that the
appliance functions properly.
• The panels adjacent to the oven must be made of
heat-resistant material.
• Cabinets with a veneer exterior must be
assembled with glues which can withstand
temperatures of up to 100°C.
• to install the oven under the counter (
see diagram
)
or in a kitchen unit, the cabinet must have the
following dimensions:
!!
!!
! The appliance must not come into contact with
electrical parts once it has been installed.
The indications for consumption given on the data
plate have been calculated for this type of
installation.
595 mm.
595 mm.
24 mm.
545 mm.
5 mm.
567 mm.
23 mm.
593 mm.
45 mm.
558 mm.
547 mm. min.
Installation
560 mm.
45 mm.

3
GB
Electrical connection
!!
!!
! Ovens equipped with a three-pole power supply
cable are designed to operate with alternating
current at the voltage and frequency indicated on
the data plate located on the appliance (
see below
).
Fitting the power supply cable
1. Open the terminal
board by inserting a
screwdriver into the
side tabs of the cover.
Use the screwdriver as
a lever by pushing it
down to open the cover
(
see diagram
).
2. Loosen the cable
clamp screw and
remove it, using a
screwdriver as a lever
(see figure).
3. Remove the wire
contact screws L-N-
, then fasten the wires
under the screw heads,
respecting the colour
code: Blue (N), Brown
(L) and Yellow-Green
(
).
Connecting the electricity supply cable to the mains
Install a standardised plug corresponding to the load
indicated on the data plate (
see table
).
The appliance must be directly connected to the mains
using an omnipolar switch with a minimum contact
opening of 3 mm installed between the appliance and
the mains. The switch must be suitable for the charge
indicated and must comply with current electrical
regulations (the earthing wire must not be interrupted
by the switch). The supply cable must be positioned
so that it does not come into contact with temperatures
higher than 50°C at any point.
!!
!!
! The installer must ensure that the correct electrical
connection has been made and that it is fully
compliant with safety regulations.
Before connecting the appliance to the power
supply, make sure that:
• The appliance is earthed and the plug is compliant
with the law.
• The socket can withstand the maximum power of
the appliance, which is indicated on the data
plate (
see below
).
• The voltage is in the range between the values
indicated on the data plate (
see below
).
• The socket is compatible with the plug of the
appliance. If the socket is incompatible with the
plug, ask an authorised technician to replace it.
Do not use extension cords or multiple sockets.
!!
!!
! Once the appliance has been installed, the power
supply cable and the electrical socket must be
easily accessible.
!!
!!
! The cable must not be bent or compressed.
!!
!!
! The cable must be checked regularly and replaced
by authorised technicians only (
see Assistance
).
!!
!!
!
The manufacturer declines any liability shouldThe manufacturer declines any liability should
The manufacturer declines any liability shouldThe manufacturer declines any liability should
The manufacturer declines any liability should
these safety measures not be observed.these safety measures not be observed.
these safety measures not be observed.these safety measures not be observed.
these safety measures not be observed.
TABLE OF CHARACTERISTICS
Dimensions
width 43.5 cm
hei gh t 32 cm
depth 40 cm
Volume
56 l
Dimensions *
width 43.5 cm
hei gh t 32 cm
depth 41.5 cm
Volume *
58 l
Electrical
connections
voltage: 220 - 240 V~ 50/60Hz
maximum power absorbed 2800 W
(see data plate)
ENERGY
LABEL
Directive 2002/ 40/EC on the label of
electric ovens. Standard EN 50304
Energy consumption for Natural
convection – heating mode:
Traditional mode
Declared energy consumption for
Forced convection Class – heat ing
mode: Baking
This appliance conf orms to t he
following European Economic
Community directives: 2006/95/EEC
dated 12/12/06 (Low Voltage) and
subsequent amendments –
2004/108/EEC dated 15/12/04
(Electromagnetic Compatibility) and
subsequent amendments -
93/68/EEC dated 22/07/93 and
subsequent amendments.
2002/96/EC and subsequent
amendments.
1275/2008 stand-by/of f mode
* With
g
lass
p
anel fitted to the insi de of the door

4
GB
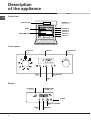
Control panel
GRILL
DRIPPING PAN
GUIDES for the
sliding racks
position 5
position 4
position 3
position 2
position 1
Description
of the appliance
Overall view
Control panel
Display
SELECTOR
Knob
THERMOSTAT
knob
DISPLAY
TIME SETTING
button
LIGHT
button
TIMER
knob
TEMPERATURE
and TIME digits
END OF COOKING
icon
CLOCK
icon
DURATION
icon
TIMER
icon
Preheating
indicator

5
GB
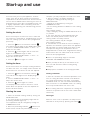
! The first time you use your appliance, heat the
empty oven with its door closed at its maximum
temperature for at least half an hour. Ensure that the
room is well ventilated before switching the oven off
and opening the oven door. The appliance may emit
a slightly unpleasant odour caused by protective
substances used during the manufacturing process
burning away.
Setting the clock
! The clock may be set when the oven is switched
off or when it is switched on, provided that a the end
time of a cooking cycle has not been programmed
previously.
1. Press the
button several times until the
icon and the first two digits on the display start to flash.
2. Turn the TIMER KNOB towards “+” and “-” to
adjust the hour value.
3. Press the
button again until the other two
digits on the DISPLAY begin to flash.
4. Turn the TIMER KNOB towards “+” and “-” to
adjust the minute value.
5. Press the
button again to confirm.
Setting the timer
! This function does not interrupt cooking and does
not affect the oven; it is simply used to activate the
buzzer when the set amount of time has elapsed.
1. Press the
button several times until the
icon and the three digits on the display begin to
flash.
2. Turn the TIMER KNOB towards “+” and “-” to
adjust the minute value.
3. Press the
button again to confirm.
The display will then show the time as it counts
down. When this period of time has elapsed the
buzzer will be activated.
Starting the oven
1. Select the desired cooking mode by turning the
SELECTOR knob.
2. The oven begins its preheating stage and the
preheating indicator lights up.
The temperature may be changed by turning the
THERMOSTAT knob
3. When the preheating indicator
switches off
and a buzzer sounds the preheating process is
complete: you may now place the food in the oven.
4. During cooking it is always possible to:
- change the cooking mode by turning the
SELECTOR knob
- change the temperature by turning the
THERMOSTAT knob
- set the cooking duration in addition to the cooking
end time
(
see Cooking modes
)
- stop cooking by turning the SELECTOR knob to the
“0” position.
5. The oven switches off automatically after two
hours: this default period of time is set for all
cooking modes for safety reasons.
The cooking duration may be changed
(
see Cooking modes
).
6. If a blackout occurs while the oven is already in
operation, an automatic system within the appliance
will reactivate the cooking mode from where it was
interrupted as long as the temperature has not
dropped below a certain level. Programmed cooking
modes which have not started will not be restored
and must be reprogrammed.
!!
!!
! There is no preheating stage for the FAST
COOKING and BARBECUE modes.
!!
!!
! Never put objects directly on the bottom of the
oven; this will avoid the enamel coating being
damaged.
!!
!!
! Always place cookware on the rack(s) provided.
Cooling ventilation
In order to cool down the external temperature of the
oven, a cooling fan blows a stream of air between
the control panel and the oven door. In the FAST
COOKING mode, the fan is activated automatically
after ten minutes. In the BAKING mode, the cooling
fan is only activated when the oven is hot.
!!
!!
! Once cooking has been completed, the cooling fan
continues to operate until the oven has cooled down
sufficiently.
Oven light
When the oven is not in operation, the lamp can be
switched on at any time by pressing the button
.
Start-up and use

6
GB
Cooking modes
! All cooking modes have a default cooking
temperature which may be adjusted manually
between 40°C and 250°C as desired.
In the BARBECUE mode, the default power level
value is indicated as a percentage (%) and may also
be adjusted manually.
TRADITIONAL OVEN mode
When using this traditional cooking mode, it is best
to use one cooking rack only. if more than one rack
is used, the heat will be distributed unevenly.
MULTI-COOKING mode
Since the heat remains constant throughout the
oven, the air cooks and browns food in a uniform
manner. A maximum of two racks may be used at
the same time.
BARBECUE mode
By turning the THERMOSTAT knob, the different
power levels which may be set will appear on the
display; these range between 50% and 100%. The
high and direct temperature of the grill is
recommended for food which requires a high surface
temperature. Always cook in this mode with the oven
door closed.
GRATIN mode
This combination of features increases the
effectiveness of the unidirectional thermal radiation
provided by the heating elements through forced
circulation of the air throughout the oven.
This helps prevent food from burning on the surface
and allows the heat to penetrate right into the food.
Always cook in this mode with the oven door closed.
PIZZA OVEN mode
This combination heats the oven rapidly by producing
a considerable amount of heat, particularly from the
element at the bottom. If you use more than one rack
at a time, switch the position of the dishes halfway
through the cooking process.
BAKING mode
This mode is ideal for baking temperature sensitive
foods (such as cakes, which need to rise) and for
the preparation of “bitesize pastries” on 3 shelves
simultaneously.
FAST COOKING mode
Preheating is not necessary for this cooking mode.
This mode is particularly suitable for cooking pre-
packed food quickly (frozen or pre-cooked). The
best results are achieved using one cooking rack
only.
PROVING mode
The oven reaches and maintains a temperature of
40°C irrespective of the position of the
THERMOSTAT knob. This mode is ideal for
leavening dough made with yeast.
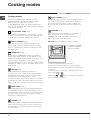
Spit roast (only available in certain models)
To operate the spit roast
function (
see diagram
)
proceed as follows:
1. Place the dripping pan in position 1.
2. Place the rotisserie support in position 3 and
insert the spit in the hole provided on the back panel
of the oven.
3. Start the rotisserie using the SELECTOR knob to
select mode
or .
! When the
or mode is activated, the spit will
stop if the door is opened.
Cooking modes

7
GB
Programming cooking
! A cooking mode must be selected before
programming can take place.
Programming the cooking duration
1. Press the
button several times until the
icon and the three digits on the DISPLAY begin to
flash.
2. Turn the TIMER KNOB towards “+” and “-” to
adjust the duration.
3. Press the
button again to confirm.
4. When the set time has elapsed, the text END
appears on the DISPLAY, the oven will stop cooking
and a buzzer sounds.
• For example: it is 9:00 a.m. and a time of 1 hour
and 15 minutes is programmed. The programme
will stop automatically at 10:15 a.m.
Setting the end time for a cooking mode
! A cooking duration must be set before the end
cooking time can be scheduled.
1. Follow steps 1 to 3 to set the duration as detailed
above.
2. Next, press the
button until the icon and
the two digits on the DISPLAY begin to flash.
3. Turn the TIMER KNOB towards “+” and “-” to
adjust the hour value.
4. Press the
button again until the other two
digits on the DISPLAY begin to flash.
5. Turn the TIMER KNOB towards “+” and “-” to
adjust the minute value.
6. Press the
button again to confirm.
7. When the set time has elapsed, the text END
appears on the DISPLAY, the oven will stop cooking
and a buzzer sounds.
Programming has been set when the
and
buttons are illuminated. The DISPLAY shows the
cooking end time and the cooking duration
alternately.
To cancel programming, turn the SELECTOR knob to
the “0” position.
Practical cooking advice
! Do not place racks in position 1 and 5 during fan-
assisted cooking. This is because excessive direct
heat can burn temperature sensitive foods.
! In the BARBECUE and GRATIN cooking modes,
particularly when using the rotisserie spit, place the
dripping pan in position 1 to collect cooking
residues (fat and/or grease).
MULTI-COOKING
• Use positions 2 and 4, placing the food which
requires more heat on 2.
• Place the dripping pan on the bottom and the rack
on top.
BARBECUE
• Place the rack in position 3 or 4. Position the food
in the centre of the rack.
• We recommend that the power level is set to
maximum. The top heating element is regulated
by a thermostat and may not always operate
constantly.
PIZZA OVEN
• Use a light aluminium pizza pan. Place it on the
rack provided.
For a crispy crust, do not use the dripping pan as
it prevents the crust from forming by extending
the total cooking time.
• If the pizza has a lot of toppings, we recommend
adding the mozzarella cheese on top of the pizza
halfway through the cooking process.

8
GB
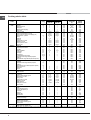
Cooking advice table
Cooking
modes
Foo ds Weight
(in kg)
Rack position Preheating Recommended
Temperature
(°C)
Cooking
duration
(minutes)
St an dard
guide rails
Sliding
guide rails
Co nvection
Oven
Duck
Chic ken
R oast veal or be e f
Roast pork
Biscuits (shortcrust pastry)
Pies / Tarts
1.5
1.5
1
1
-
1
2
2
2
2
2
2
1
1
1
1
1
1
Yes
Yes
Yes
Yes
Yes
Yes
200- 2 10
200- 2 10
200
200- 2 10
180
180
70-80
60-70
70-75
70-80
15-20
30-35
Multi-cooking
Pizza on 2 racks
Pies on two racks/c akes on 2 racks
Sp onge ca ke on 2 rac ks ( o n t he dr ippi n g pan)
R oast chicken + pot atoes
Lamb
Mackerel
Lasagne
Cream puffs on 2 rac ks
Biscuits on 2 racks
Ch e es e pu ffs on 2 r acks
Savoury pies
1+1
1
1
1
2 and 4
2 and 4
2 and 4
1 and 2/3
2
1 or 2
2
2 and 4
2 and 4
2 and 4
1 and 3
1 and 3
1 and 3
1 and 3
1 and 3
1
1
1
1 and 3
1 and 3
1 and 3
1 and 3
Yes
Yes
Yes
Yes
Yes
Yes
Yes
Yes
Yes
Yes
Yes
220- 2 30
180
170
200- 2 10
190- 2 00
180
190- 2 00
190
190
210
200
20-25
30-35
20-25
65-75
45-50
30-35
35-40
20-25
10-20
20-25
20-30
Barbecue Mackerel
Sol e an d cutt lefish
Squid and prawn kebabs
Cod fillet
G ri lle d vege tabl es
Ve al st eak
Sausages
Hamburgers
Toasted sandwic h es (or toast)
Spit-roast chicken using rotisserie spit (where
present)
Sp it- roast lam b usi ng rotisseri e spit (w here pr esen t)
1
0.7
0.7
0.7
0.5
0.8
0.7
4 or 5
4 or 6
1
1
4
4
4
4
3 or 4
4
4
4
4
-
-
3
3
3
3
2 or 3
3
3
3
3
-
-
No
No
No
No
No
No
No
No
No
No
No
100%
100%
100%
100%
100%
100%
100%
100%
100%
100%
100%
15-20
10-15
8- 10
10-15
15-20
15-20
15-20
10-12
3-5
70-80
70-80
Gra tin
Grilled chicken
Cuttlefish
Spit-roast chicken using rotisserie spit (where
present)
Spit-roast duck using rotisserie spit (where present)
R oast veal or be e f
Roast pork
Lamb
1,5
1
1,5
1,5
1
1
1
2
2
-
-
2
2
2
2
2
-
-
2
2
2
N
o
No
No
No
No
No
No
210
200
210
210
210
210
210
5
5
-60
30-35
70-80
60-70
60-75
70-80
40-45
Pizza Oven
Pizza
Focaccia bread
0.5
0.5
2
2
1
1
Yes
Yes
220
200
1
5
-20
20-25
Baking mode
Pies / Tarts
Fruit cakes
Sponge cake m ade with yoghurt
Small cakes on 2 racks
Sponge cake
Cream puffs on 3 rac ks
Biscuits on 3 racks
Filled pancakes
Meringues on 3 racks
Cheese puffs
0.5
1
0.7
0.7
0.6
0.7
0.7
0.8
0.5
0.5
2 or 3
2 or 3
2 or 3
2 and 4
2 or 3
1, 3 and 5
1, 3 and 5
2
1, 3 and 5
2
1 or
2
1 or 2
1 or 2
1 and 3
1 or 2
1, 2 an d 4
1, 2 an d 4
1
1, 2 an d 4
1
Yes
Yes
Yes
Yes
Yes
Yes
Yes
Yes
Yes
Yes
180
180
170- 1 80
180- 1 90
160- 1 70
180- 1 90
180
200
90
210
2
5
-35
40-50
45-55
20-25
30-40
20-25
20-25
30-35
18 0
20-25
Fast cooki ng Frozen food
Pizza
C ourg ett e a nd pr aw n pie
C ountry style spinach pie
Turnovers
Lasagne
Golden Rolls
Chic ken bites
0.3
0.4
0.5
0.3
0.5
0.4
0.4
2
2
2
2
2
2
2
1
1
1
1
1
1
1
-
-
-
-
-
-
-
250
200
220
200
200
180
220
12
20
30-35
25
35
25-30
15-20
Pre-cooked food
G o ld en chick en w in gs
0.4
2
1
-
200
20-25
Fresh Food
Biscuits (shortcrust pastry)
Sponge cake m ade with yoghurt
Cheese puffs
0.3
0.6
0.2
2
2
2
1
1
1
-
-
-
200
180
210
15-18
45
10-12
Proving Rising pr oc ess fo r dough mad e wit h ye ast ( brio ches,
br ead , su g ar pie, c roissants, etc.)
2 1 40 30-60
! Th e cooki ng times list ed a bo ve ar e i nt end e d as gui d eli n es onl y a nd ma y b e mo di fied acc ordin g to perso n al tast es. Oven pre heat ing time s ar e set as standar d and m ay n ot b e
modified manually.

9
GB
Precautions and tips
! This appliance has been designed and manufactured in
compliance with international safety standards. The following
warnings are provided for safety reasons and must be read
carefully.
General safety
• The appliance was designed for domestic use inside the home
and is not intended for commercial or industrial use.
• The appliance must not be installed outdoors, even in covered
areas. It is extremely dangerous to leave the appliance exposed
to rain and storms.
• When moving or positioning the appliance, always use the
handles provided on the sides of the oven.
• Do not touch the appliance with bare feet or with wet or damp
hands and feet.
• The appliance must be used by adults only for the preparation
of food, in accordance with the instructions provided in this
booklet.
• Do not touch the heating elements or certain
parts of the oven door when the appliance is in
use; these parts become extremely hot. Keep
children well away from the appliance.
• Ensure that the power supply cables of other electrical
appliances do not come into contact with the hot parts of the
oven.
• The openings used for the ventilation and dispersion of heat
must never be covered.
• Always grip the oven door handle in the centre: the ends may
be hot.
• Always use oven gloves when placing cookware in the oven or
when removing it.
• Do not use aluminium foil to line the bottom of the oven.
• Do not place flammable materials in the oven: If the appliance
is switched on accidentally, the materials could catch fire.
• Always make sure the knobs are in the “z”/“{”
position when the appliance is not in use.
• When unplugging the appliance, always pull the
plug from the mains socket; do not pull on the
cable.
• Never perform any cleaning or maintenance work without
having disconnected the appliance from the electricity mains.
• If the appliance breaks down, under no circumstances should
you attempt to perform the repairs yourself. Repairs carried out
by inexperienced persons may cause injury or further
malfunctioning of the appliance. Contact a Service Centre
(
see Assistance
).
• Do not rest heavy objects on the open oven door.
•
The appliance should not be operated by people
(including children) with reduced physical,
sensory or mental capacities, by inexperienced
individuals or by anyone who is not familiar with
the product. These individuals should, at the very
least, be supervised by someone who assumes
responsibility for their safety or receive
preliminary instructions relating to the operation of
the appliance.
• Do not let children play with the appliance.
Disposal
• When disposing of packaging material: observe local legislation so
that the packaging may be reused.
• The European Directive 2002/96/EC relating to Waste Electrical
and Electronic Equipment (WEEE) states that household
appliances should not be disposed of using the normal solid
urban waste cycle. Exhausted appliances should be collected
separately in order to optimise the cost of re-using and recycling
the materials inside the machine, while preventing potential
damage to the atmosphere and to public health. The crossed-out
dustbin is marked on all products to remind the owner of their
obligations regarding separated waste collection. For further
information relating to the correct disposal of exhausted
household appliances, owners may contact the public service
provided or their local dealer.
Respecting and conserving the
environment
• You can help to reduce the peak load of the
electricity supply network companies by using the
oven in the hours between late afternoon and the
early hours of the morning. The cooking mode
programming options, the “delayed cooking”
mode (
see Cooking modes
) and “delayed
automatic cleaning” mode (
see Care and
Maintenance
) in particular, enable the user to
organise their time efficiently.
• Always keep the oven door closed when using the
BARBECUE and GRATIN modes: This will achieve
improved results while saving energy
(approximately 10%).
• Check the door seals regularly and wipe them
clean to ensure they are free of debris so that
they adhere properly to the door, thus avoiding
heat dispersion.
! This product complies with the requirements of the
latest European Directive on the limitation of power
consumption of the standby mode.
If no operations are carried out for a period of 2
minutes, the appliance automatically switches to the
standby mode.
The standby mode is visualised by the high
luminosity "Watch Icon".
As soon as interaction with the machine resumes,
the system's operating mode is restored.

10
GB
Care and maintenance
Switching the appliance off
Disconnect your appliance from the electricity
supply before carrying out any work on it.
Cleaning the appliance
• The stainless-steel or enamel-coated external
parts and the rubber seals may be cleaned using
a sponge that has been soaked in lukewarm water
and neutral soap. Use specialised products for
the removal of stubborn stains. After cleaning,
rinse and dry thoroughly. Do not use abrasive
powders or corrosive substances.
• The inside of the oven should ideally be cleaned
after each use, while it is still lukewarm. Use hot
water and detergent, then rinse well and dry with
a soft cloth. Do not use abrasive products.
• All accessories - with the exception of the sliding
racks - can be washed like everyday crockery,
and are even dishwasher safe.
! Never use steam cleaners or pressure cleaners on
the appliance.
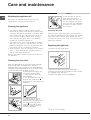
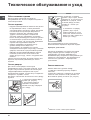
Cleaning the oven door
Clean the glass part of the oven door using a sponge
and a non-abrasive cleaning product, then dry
thoroughly with a soft cloth. Do not use rough abrasive
material or sharp metal scrapers as these could scratch
the surface and cause the glass to crack.
To clean more thoroughly, you
can remove the oven door.
1. Open the oven door fully
(
see diagram
).
2. Use a screwdriver to lift up
and turn the small levers
FF
FF
F
located on the two hinges (
see
diagram
).
3. Grip the door on the two
external sides and close it
approximately half way. Unlock
the door by pressing on the
clamps
FF
FF
F, then pull the door
towards you lifting it out of its
seat (
see diagram
).*
3. Grip the door on the two
outer sides and close it
approximately half way. Pull
the door towards you lifting it
out of its seat (
see diagram
).*
To replace the door, reverse
this sequence.
Inspecting the seals
Check the door seals around the oven regularly. If
the seals are damaged, please contact your nearest
After-sales Service Centre (
see Assistance
). We
recommend that the oven is not used until the seals
have been replaced.
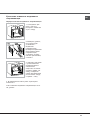
Replacing the light bulb
To replace the oven light bulb:
1. Remove the glass cover of the lamp-holder.
2. Remove the light bulb and replace it with a similar
one: Wattage 25 W, cap E 14.
3. Replace the glass cover (
see diagram
).
F
F
F
*
Only on certain models

11
GB
Assembling the sliding rack kit
To assemble the sliding racks:
1. Remove the two
frames, lifting them
away from the spacers
A (
see figure
).
2. Choose which shelf
to use with the sliding
rack. Paying attention
to the direction in which
the sliding rack is to be
extracted, position joint
B and then joint C on
the frame.
3. Secure the two
frames with the guide
rails using the holes
provided on the oven
walls (
see diagram
).
The holes for the left
frame are situated at
the top, while the holes
for the right frame are
at the bottom.
4. Finally, fit the frames on the spacers A.
! Do not place the sliding racks in position 5.
D
A
B
C
Left
guide rail
Right guide
rail
Direction
of extraction

12
GB
Warning:
The appliance is fitted with an automatic diagnostic system which detects any malfunctions. Malfunctions are
displayed by messages of the following type: ”F” followed by numbers.
Call for technical assistance should a malfunction occur.
! Never use the services of an unauthorised technician.
Please have the following information to hand:
• The type of problem encountered.
• The appliance model (Mod.).
• The serial number (S/N).
The latter two pieces of information can be found on the data plate located on the appliance.
Assistance

Содержание
Установка, 14-15
Расположение
Электрическое подключение
Технические данные
Описание изделия, 16
Общий вид
Консоль управления
Дисплей
Включение и эксплуатация, 17
Настройка часов
Настройка таймера
Включение духового шкафа
Программы, 18-20
Программы приготовления
Программирование приготовления
Практические советы по приготовлению
Таблица приготовления
Предосторожности и рекомендации,
21
Общие требования по безопасности
Утилизация
Экономия электроэнергии и охрана окружающей
среды
Техническое обслуживание и уход,
22-23
Обесточивание изделия
Чистка изделия
Чистка дверцы
Замена лампочки
Крепление комплекта выдвижных направляющих
Сервисное обслуживание, 24
Инструкции по
эксплуатации
ДУХОВОЙ ШКАФ
RS
7OF 99 C.1 IX RU/HA
English,1
GB
RS
Русский, 13

14
RS
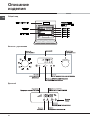
Вентиляция
Для обеспечения надлежащей вентиляции
необходимо снять заднюю панель ниши кухонного
элемента. Рекомендуется установить духовой
шкаф на два деревянных бруска или на сплошное
основание с отверстием диаметром не менее 45 х
560 мм (см. схемы).
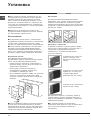
Центровка и крепление
4 крепежных элемента с боков духового шкафа
должны быть отрегулированы в соответствии с 4
отверстиями в периметральной раме в
зависимости от толщины боковой панели
кухонного элемента:
толщина 20 мм: полностью
удалите съемную часть
крепежного элемента (см.
схему);
толщина 18 мм: используйте
первый паз, согласно уже
готовой конфигурации
производителя (см. схему);
толщина 16 мм: используйте
второй паз (см. схему).
Для крепления изделия к кухонному элементу:
откройте дверцу духового шкафа и завинтите 4
шурупа для деревянных панелей в 4 отверстия в
периметральной раме.
!!
!!
! Все защитные элементы должны быть
закреплены таким образом, чтобы их можно было
снять только при помощи специального
инструмента.
!!
!!
! Важно сохранить данное руководство для его
последующих консультаций. В случае продажи,
передачи изделия или при переезде на новое
место жительства необходимо проверить, чтобы
руководство оставалось вместе с изделием, для
того чтобы его новый владелец мог ознакомиться
с правилами эксплуатации и с соответствующими
предупреждениями.
!!
!!
! Внимательно прочитайте инструкции: в них
содержатся важные сведения о монтаже изделия,
его эксплуатации и безопасности.
Расположение
!!
!!
! Не разрешайте детям играть с упаковочными
материалами. Упаковка должна быть уничтожена в
соответствии с правилами раздельного сбора
мусора (см. Предосторожности и рекомендации).
!!
!!
! Монтаж изделия производится в соответствии с
данными инструкциями квалифицированными
специалистами. Неправильный монтаж изделия
может стать причиной повреждения имущества и
причинить ущерб людям и домашним животным.
Встроенный монтаж
Для обеспечения исправной работы
встраиваемого изделия кухонный модуль должен
иметь соответствующие характеристики:
• панели кухонных элементов, прилегающих к
духовому шкафу, должны быть выполнены из
термостойкого материала;
• клей кухонных элементов элементов,
шпонированных деревом, должен быть
устойчивым к температуре 100°C.
• для встраивания духового шкафа под кухонным
топом (см. схему) или в шкаф-пенал ниша
кухонного элемента должна иметь следующие
размеры:
!!
!!
! После встраивания изделия в кухонный элемент
должна быть исключена возможность касания к
электрическими частями. Расход электроэнергии,
указанный на паспортной табличке изделия, был
замерян для данного типа монтажа.
595 mm.
595 mm.
24 mm.
545 mm.
5 mm.
567 mm.
23 mm.
593 mm.
45 mm.
558 mm.
547 mm. min.
Установка
560 mm.
45 mm.

15
RS
Электрическое подключение
!!
!!
! Духовые шкафы, укомплектованные
трехполюсным сетевым кабелем, расчитаны на
функционирование с переменным током с
напряжением и частотой электропитания,
указанными на паспортной табличке с данными
(см. ниже).
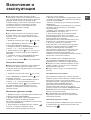
Подсоединение сетевого кабеля
1. Откройте зажимную
коробку, нажав при
помощи отвертки на
выступы с боков
крышки: потяните и
откройте крышку (см.
схему).
2. Отвинтите винт
кабельного сальника и
выньте его, поддев
отверткой (см. схему).
3. Отвинтите винты
контактов L-N-
и
затем прикрепите
провода под
головками винтов,
соблюдая цветовую
маркировку Синий (N)
Коричневый (L) Желто-
зеленый ( ).
Подсоединение сетевого кабеля изделия к
сети электропитания
Установите на сетевой кабель нормализованную
штепсельную вилку, расчитанную на нагрузку,
указанную на паспортной табличке (см. сбоку).
В случае прямого подключения к сети
электропитания между изделием и сетью
необходимо установить многополюсный
выключатель с минимальным расстоянием между
контактами 3 мм, расчитанный на данную нагрузку
и соответствующий действующим нормативам
(выключатель не должен размыкать провод
заземления). Сетевой кабель должен быть
расположен таким образом, чтобы ни в одной
точке его температура не превышала температуру
помещения более чем на 50°C.
!!
!!
! Электромонтер несет ответственность за
правильное подключение изделия к электрической
сети и за соблюдение правил безопасности.
Перед осуществлением электрического
подсоединения необходимо проверить следующее:
• сетевая розетка должна быть соединена с
заземлением и соответствовать нормативам;
• сетевая розетка должна быть расчитана на
максимальную потребляемую мощность
изделия, указанную на паспортной табличке
(см. ниже);
• напряжение сети электропитания должно
находиться в пределах значений, указанных на
паспортной табличке (см. ниже);
• сетевая розетка должна быть совместима со
штепсельной вилкой изделия. В противном
случае замените розетку или вилку; не
используйте удлинители или тройники.
!!
!!
! Изделие должно быть установлено таким
образом, чтобы сетевой кабель и сетевая розетка
были легко доступны.
!!
!!
! Сетевой кабель изделия не должен быть согнут
или сжат.
!!
!!
! Регулярно проверяйте состояние сетевого
кабеля и в случае необходимости поручите его
замену только уполномоченным техникам (см.
Сервисное обслуживание).
!!
!!
! Производитель не несет ответственности за
последствия несоблюдения перечисленных
выше требований.
ПАСПОРТНАЯ ТАБЛИЧКА
Габаритные
размеры
ширина 43,5 см.
высота 32 см.
гл
у
бин
а
40 см
Объем* л 56
Габаритные
размеры*
ширина 43,5 см.
высота 32 см.
гл
у
бин а 41,5 см
Объем л 58
Элек тро питан ие
напряжение 220 В/ 2430 В ~ 50/60 Гц,
макс. поглощаемая мощность 28 0 0 Вт
(
см. паспортн
у
ю табличк
у)
МАРКИРОВКА
ПОТРЕБЛЕНИЯ
ЭЛЕКТРОЭНЕРГИИ
Директива 2002/40/СЕ об этикетках
электрических духовых шкафов.
Н орм ати в EN 50304
Расход э лектр оэ нергии при
натуральной конвекц ии
функция на грева н ия:
Традициональная
Заявл ение о расходе электроэнергии
класса принудительной конвекции
функция на грева н ия:
Кондитерская выпечка
Данное изделие соответствует
следующим Директивам Европейского
Сообщества: 2006/95/CEE от 1 2/ 12/06
(Низкое напряжение) с последующими
изменениями – 2004/ 108/СЕЕ от
15/12/04 (Электромагнитная
совместимость) с последующими
изменениями – 93/68/СЕЕ от 22/07/93 с
последующими изменениями. -
2002/96/СЕ с пос ледующими
изменениями.
1275/2008 stand
-
b
y
/off mode
*с дв ойной стеклянной дв ерцей

16
RS
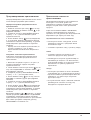
Описание
изделия
Общий вид
Консоль управления
Дисплей

17
RS
!!
!!
! При первом включении духового шкафа
рекомендуем прокалить его примерно в течение
часа при максимальной температуре с закрытой
дверцей. Затем выключите духовой шкаф,
откройте дверцу и проветрите помещение. Запах,
который вы можете почувствовать, вызван
испарением веществ, использованных для
предохранения духового шкафа.
Настройка часов
!!
!!
! Часы можно настроить как при выключенном
духовом шкафу, так и при включенном, при
условии, что не было задано время окончания
приготовления.
1. Нажмите несколько раз кнопку
до тех пор,
пока на ДИСПЛЕЕ не замигает символ
и
первые два цифровые значения;
2. поверните регулятор НАСТРОЙКА ЧАСОВ в
сторону “+” и “-” для настройки часов;
3. вновь нажмите кнопку
до тех пор, пока на
ДИСПЛЕЕ не замигают другие два цифровые
значения;
4. поверните регулятор НАСТРОЙКА ЧАСОВ в
сторону “+” и “-” для выставления минут;
5. вновь нажмите кнопку
для подтверждения.
Настройка таймера
!!
!!
! Данная функция не прерывает приготовление и
не зависит от работы духового шкафа. Она
позволяет включить звуковой сигнал по истечении
заданного времени.
1. Нажмите несколько раз кнопку
до тех пор,
пока на ДИСПЛЕЕ не замигает символ
и три
цифровые значения;
2. поверните регулятор НАСТРОЙКА ЧАСОВ в
сторону “+” и “-” для выставления минут;
3. вновь нажмите кнопку
для подтверждения.
На дисплее будет показан обратный отсчет
времени, по завершении которого включится
звуковой сигнал.
Включение духового шкафа
1. Выберите нужную программу приготовления при
помощи рукоятки ПРОГРАММЫ.
2. Духовой шкаф начнет фазу предварительного
нагрева, и загорится индикатор нагрева.
Настройка температуры производится при помощи
регулятора ТЕРМОСТАТ.
3. Когда индикатор предварительного нагрева
погаснет, и раздастся звуковой сигнал
завершения нагрева духовки: Вы можете
поместить в него продукт.
4. В процессе приготовления в любой момент можно:
- изменить программу приготовления при помощи
рукоятки ПРОГРАММЫ;
- изменить температуру при помощи регулятора
ТЕРМОСТАТ;
- запрограммировать продолжительность и время
окончания приготовления (см. программы
приготовления);
- прервать приготовление, повернув рукоятку
ПРОГРАММЫ в положение «0».
5. По истечении двух часов духовой шкаф
автоматически выключается: это время
запрограммировано в целях безопасности для
всех программ приготовления.
Продолжительность приготовления может быть
изменена (см. программы приготовления).
6. В случае внезапного отключения
электропитания, если температура в духовом
шкафу не слишком понизилась, срабатывает
система, возобновляющая программу
приготовления с момента, в который она была
прервана. Программирование, сделанное в
ожидании продолжения программы, не
сохраняется после возвращения электропитания и
должно быть выполнено повторно.
!!
!!
! В программах FAST COOKING (Быстрое
приготовление) и BARBECUE (Гриль) фаза
предварительного нагрева не предусмотрена.
!!
!!
! Никогда не ставьте никакие предметы на дно
духового шкафа, так как они могут повредить
эмалированное покрытие.
!!
!!
! Всегда ставьте посуду на прилагающуюся
решетку.
Охладительная вентиляция
Для понижения температуры снаружи духового
шкафа в процессе приготовления, охладительный
вентилятор создает поток воздуха между
передней панелью и дверцей духового шкафа. В
программе FAST COOKING (Быстрое
приготовление) вентилятор включается
автоматически через десять минут работы
духового шкафа. В программе КОНДИТЕРСКАЯ
ВЫПЕЧКА вентилятор включается только при
разогретом духовом шкафу.
!!
!!
! По завершении приготовления вентилятор
продолжает работать вплоть до надлежащего
охлаждения духовки.
Освещение духового шкафа
Освещение духового шкафа может быть включено
в любой момент при выключенной духовке при
помощи кнопки
.
Включение и
эксплуатация

18
RS
Программы приготовления
! Каждая программа имеет заданную температуру
приготовления. Температура может быть
настроена вручную, от 40°C до 250°C.
В программе ГРИЛЬ заданное значение является
уровнем мощности, выраженной в %. Этот
уровень может быть также настроен вручную.
Программа ТРАДИЦИОНАЛЬНАЯ
ДУХОВКА
В режиме традиционального приготовления
рекомендуется использовать только один уровень:
при использовании нескольких уровней
распределение температуры будет
неоптимальным.
Программа ОДНОВРЕМЕННОЕ
ПРИГОТОВЛЕНИЕ
Так как жар является постоянным во всем
духовом шкафу, воздух обеспечивает однородное
приготовление и подрумянивание продукта.
Одновременно можно использовать не более двух
уровней духового шкафа.
Программа ГРИЛЬ
Поворачивая регулятор ТЕРМОСТАТ, на дисплее
показываются все возможные уровни мощности от
50% до 100%. Высокая температура и жар
прямого действия гриля рекомендуется для
приготовления продуктов, нуждающихся в
высокой поверхностной температуре. Готовьте
блюда с закрытой дверцей духового шкафа.
Программа ЗАПЕКАНКА
Сочетает однонаправленное выделение жара с
принудительной циркуляцией воздуха внутри
духового шкафа.
Это препятствует обгоранию поверхности
продуктов, повышая проникающую способность
жара. Готовьте блюда с закрытой дверцей
духового шкафа.
Программа ПИЦЦА
Данная программа позволяет быстро разогреть
духовку с основным жаром, сосредоточенным в
ее нижней части. Если используются несколько
уровней одновременно, необходимо менять
местами блюда в середине их приготовления.
Программа КОНДИТЕРСКАЯ ВЫПЕЧКА
Данная функция рекомендуется для
приготовления деликатных блюд (например,
кондитерских изделий, требующих подъема теста)
и мелкой выпечки одновременно на трех уровнях.
Программа FAST COOKING (Быстрое
приготовление)
Программа не нуждается в предварительном
нагреве духовки. Данная программа в
особенности рекомендуется для быстрого
приготовления полуфабрикатов (мороженых или
готовых блюд). Оптимальные результаты
получаются при использовании только одного
уровня.
Программа РАССТОЙКА
Духовка нагревается и поддерживает температуру
40°C, независимо от положения регулятора
ТЕРМОСТАТ. Данная программа идеально
подходит для расстойки дрожжевого теста.
Вертел (имеется
только в некоторых
моделях)
Для включения
вертела (см. схему)
выполните следующие
операции:
1. установите противень на 1-ый уровень;
2. установите держатель вертела на 3-ий уровень
и вставьте вертел в специальное отверстие в
задней стенке духового шкафа;
3. включите вертел при помощи рукоятки
ПРОГРАММЫ
или ;
! После начала выполнения программы
или
при открывании дверцы духовки вертел
останавливается.
Программы

19
RS
Программирование приготовления
! Запрограммировать приготовление можно только
после выбора программы приготовления.
Порядок настройки продолжительности
приготовления
1. Нажмите несколько раз кнопку
до тех пор,
пока на ДИСПЛЕЕ не замигает символ
и три
цифровые значения;
2. поверните регулятор НАСТРОЙКА ЧАСОВ в
сторону “+” и “-” для выставления нужной
продолжительности;
3. вновь нажмите кнопку
для подтверждения;
4. по истечении заданного времени на дисплее
показывается надпись END (КОНЕЦ), и духовой
шкаф завершает приготовление со звуковым
сигналом.
• Пример: в 9:00 вы задаете приготовление, на
которое потребуется 1 час 15 минут.
Приготовление автоматически завершится в
10:15.
Настройка окончания приготовления
! Настроить окончания приготовления можно
только после настройки продолжительности
приготовления.
1. Выполните операции с пункта 1 по пункт 3, в
которых описывается порядок настройки
продолжительности;
2. затем нажмите несколько раз кнопку
до тех
пор, пока на ДИСПЛЕЕ не замигает символ
и
два цифровых значения;
3. поверните регулятор НАСТРОЙКА ЧАСОВ в
сторону “+” и “-” для настройки часов;
4. вновь нажмите кнопку
до тех пор, пока на
ДИСПЛЕЕ не замигают другие два цифровые
значения;
5. поверните регулятор НАСТРОЙКА ЧАСОВ в
сторону “+” и “-” для выставления минут;
6. вновь нажмите кнопку
для подтверждения;
7. по истечении заданного времени на дисплее
показывается надпись END (КОНЕЦ), и духовой
шкаф завершает приготовление со звуковым
сигналом.
Включенные символы
и означают, что была
задана программа приготовления. На ДИСПЛЕЕ
попеременно показывается время окончания
приготовления и продолжительность риготовления.
Для отмены программы поверните рукоятку
ПРОГРАММЫ в положение «0».
Практические советы по
приготовлению
! В режиме вентилируемого приготовления не
используйте 1-ый и 5-ый уровни: они
подвергаются прямому воздействию горячего
воздуха, который может сжечь деликатные
продукты.
! При использовании ГРИЛЬ и ЗАПЕКАНКА,
особенно с функцией вертела, поместите
противень на 1-ый уровень для сбора жидкостей,
выделяемого при жарке (сок и/или жир).
ОДНОВРЕМЕННОЕ ПРИГОТОВЛЕНИЕ
• Используются 2-ой и 4-ый уровни, на 2-ой
помещаются продукты, требующие более
интенсивного жара.
• Установите проитвень снизу, а решетку сверху.
ГРИЛЬ
• Установите решетку на уровень 3 или 4,
поместите продукты в центр решетки.
• Рекомендуется настроить духовой шкаф на
максимальную мощность. Не беспокойтесь,
если верхний элемент не остается постоянно
включенным: его работа управляется
термостатом.
ПИЦЦА
• Используйте противень из легкого алюминия,
устанавливая его на прилагающуюся решетку.
При использовании противеня время выпечки
удлиняется, что препятствует получению
хрустящей пиццы.
• В случае выпечки пиццы с обильной начинкой
рекомендуется положить на пиццу сыр
моццарелла в середине выпечки.

20
RS
Таблица приготовления
Программы Продукты Вес
(кг)
Уровен
ь
Предварительный
нагрев
Рекоменд
уемая
темп ерату
ра (°C)
Продолж
ит-ть
приготов
ления
(ми нуты)
стандартные
направляющ
ие
выдвижные
направляющ
ие
Традициона
ль ная
духовка
Утка
Курица
Жаркое из теляти ны или говядины
Жаркое из свинины
Печенье (пес о чное )
Песочный торт с начинкой
1, 5
1, 5
1
1
-
1
2
2
2
2
2
2
1
1
1
1
1
1
Да
Да
Да
Да
Да
Да
200-210
200-210
200
200-210
180 180
70-80
60-70
70-75
70-80
15-20
30-35
Од но вр еме
нное
приготовле
ние на
нескольких
уровнях *
Пицца (на 2-х уровнях)
Песочный торт на 2- х уровнях/торты на 2-х
уровнях
Бисквит (на 2-ух уровнях)
Жареная курица с картошкой
Баранина
Скумбрия
Лазанья
Эклеры на 2-х уровнях
Печенье на 2-х уровнях
Печенья из слоеного теста с сыром на 2- ух
уровнях
Несладкие торты
1+1
1
1
1
2 и 4
2 и 4
2 и 4
1 и 2/ 3
2
1 или 2
2
2 и 4
2 и 4
2 и 4
1 и 3
1 и 3
1 и 3
1 и 3
1 и 3
1
1
1
1 и 3
1 и 3
1 и 3
1 и 3
Да
Да
Да
Да
Да
Да
Да
Да
Да
Да
Да
220-230
180
170
200-210
190-200
180
190-200
190
190
210
200
20-25
30-35
20-25
65-75
45-50
30-35
35-40
20-25
10-20
20-25
20-30
ГРИЛЬ* Скумбрия
Камбала и каракатицы
Кальмары и креветки на шампурах
Филе трески
Овощи-гриль
Телячий бифштекс
Колбаски-шпикачки
Гамбург ер
Фаршированый горячий бутерброт (или
обжаренный хл еб )
Курица на вертеле (если имеется)
Ягненок на ве ртеле (ес ли имеется)
1
0, 7
0, 7
0, 7
0, 5
0, 8
0, 7
4 или 5
4 или 6
1
1
4
4
4
4
3 или 4
4
4
4
4
-
-
3
3
3
3
2 или 3
3
3
3
3
-
-
Нет
Нет
Нет
Нет
Нет
Нет
Нет
Нет
Нет
Нет
Нет
100%
100%
100%
100%
100%
100%
100%
100%
100%
100%
100%
15-20
10-15
8-10
10-15
15-20
15-20
15-20
10-12
3-5
70-80
70-80
Gratin
(Подрумяни
вание)
Куриц
а
-гриль
Каракатицы
Курица на вертеле (если имеется)
Утка на вертеле (если имеется)
Жаркое из теляти ны или говядины
Жаркое из свинины
Баранина
1, 5
1
1, 5
1, 5
1
1
1
2
2
-
-
2
2
2
2
2
-
-
2
2
2
Нет
Нет
Нет
Нет
Нет
Нет
Нет
210
200
210
210
210
210
210
55-60
30-35
70-80
60-70
60-75
70-80
40-45
Пицца Пицца
Булка
0, 5
0, 5
2
2
1
1
Да
Да
220
200
15-20
20-25
Кондитерск
ая выпечка
Песочный торт с начинкой
Фруктовый торт
Кекс
Мелкие кексы на 2-х уровнях
Бисквит
Эклеры на 3-х уровнях
Печенье на 3-х уровнях
Блины с начинкой
Безе на 3- х уровнях
Печенье из слоеного теста с сы
р
ом
0, 5
1
0, 7
0, 7
0, 6
0, 7
0, 7
0, 8
0, 5
0
,
5
2 или 3
2 или 3
2 или 3
2 и 4
2 или 3
1 и 3 и 5
1 и 3 и 5
2
1 и 3 и 5
2
1 или 2
1 или 2
1 или 2
1 и 3
1 или 2
1 и 2 и 4
1 и 2 и 4
1
1 и 2 и 4
1
Да
Да
Да
Да
Да
Да
Да
Да
Да
Д
а
180
180
170-180
180-190
160-170
180-190
180
200
90
210
25-35
40-50
45-55
20-25
30-40
20-25
20-25
30-35
180
20-25
Быст рое
приготовле
ние
Мороженные продук т
ы
Пицца
Смесь цуккини с креветками в кляре
Несладкий торт со шпинатом
Пирожки
Лазанья
Рыбные котлеты в панировке
Кусочки курицы
0. 3
0. 4
0. 5
0. 3
0. 5
0. 4
0. 4
2
2
2
2
2
2
2
1
1
1
1
1
1
1
-
-
-
-
-
-
-
250
200
220
200
200
180
220
12
20
30-35
25
35
25-30
15-20
Полуфабрикаты
Жареные куриные крылышки
0. 4
2
1
-
200
20-25
Сырые продукт
ы
Печенье (пес о чное )
Кекс
Печенье из слоеного теста с сыром
0. 3
0. 6
0. 2
2
2
2
1
1
1
-
-
-
200
180
210
15-18
45
10-12
Расстойка Расстойк
а
дрожжевого теста (булочки, хлеб,
торты, круассаны и т.д.)
2 1 40 30-60
! Указанная продолжительность приготовления служит тол ько
в
ка ч ест в е пр и мер а и может быть изменена в соответствии с личными вкусами. Время
разогревания духовки яв ля ет ся фиксированным и не может быть изменено вручную.
Страница загружается ...
Страница загружается ...
Страница загружается ...
Страница загружается ...
-
 1
1
-
 2
2
-
 3
3
-
 4
4
-
 5
5
-
 6
6
-
 7
7
-
 8
8
-
 9
9
-
 10
10
-
 11
11
-
 12
12
-
 13
13
-
 14
14
-
 15
15
-
 16
16
-
 17
17
-
 18
18
-
 19
19
-
 20
20
-
 21
21
-
 22
22
-
 23
23
-
 24
24


Indesit 7OF 99 C.1 IX RU/HA Руководство пользователя
- Категория
- Печи
- Тип
- Руководство пользователя
Задайте вопрос, и я найду ответ в документе
Поиск информации в документе стал проще с помощью ИИ
на других языках
Похожие модели бренда
-
Indesit ON 837 I RFH Руководство пользователя
-
-
-
-
Hotpoint FQ 99 C.1 (BK) /HA Инструкция по применению
-
-
-
-
-
Модели других брендов
-
Hotpoint-Ariston 7OF99C.1 IX RU/HA Руководство пользователя
-
HOTPOINT/ARISTON 7OFKQ 897EC(K)RU/HA Инструкция по эксплуатации
-
-
-
Hotpoint 7OFTR 850 (AN) RU/HA Руководство пользователя
-